The Emergency Cash Stash, never leave home without it

NEWS – With most purchases being made using a debit or credit card these days, most people don’t carry cash with them anymore. But if you forget, or worse, lose your wallet having cash on hand can be a lifesaver. The Emergency Cash Stash is a mini canister that holds one rolled up bill for situations when you need money most. 

The Emergency Cash Stash is machined in the USA from solid brass and is small enough that it will take up hardly any room on your key-ring.

The canister is waterproof and has a clever threadless design that won’t allow the container to open unless it’s off your keyring. Making sure that your emergency cash is always safe.

So if you want a little peace of mind the next time you leave the house, pick up The Emergency Cash Stash.

The Emergency Cash Stash sells for $27 and is available on Cool Material.

Filed in categories: News

Tagged: ,

The Emergency Cash Stash, never leave home without it originally appeared on The Gadgeteer on October 6, 2018 at 5:02 pm.

Note: If you are subscribed to this feed through FeedBurner, please switch to our native feed URL http://the-gadgeteer.com/feed/ in order to ensure continuous delivery.

Bowers & Wilkins 607 speaker review

REVIEW – When I’m sticking to a budget and needing to buy something, I sometimes look at the least expensive model from a high-end company rather than the top model from a more middle-range company. That way, I figure I’m getting a better made product at a similar price. That’s the theory I would apply to the new 600 Series speakers from Bowers & Wilkins. While the B&W 607 speakers are the least expensive speakers in Bowers & Wilkins’ line, they are still B&Ws. But does the 607 speaker live up to B&Ws reputation?

What is it?

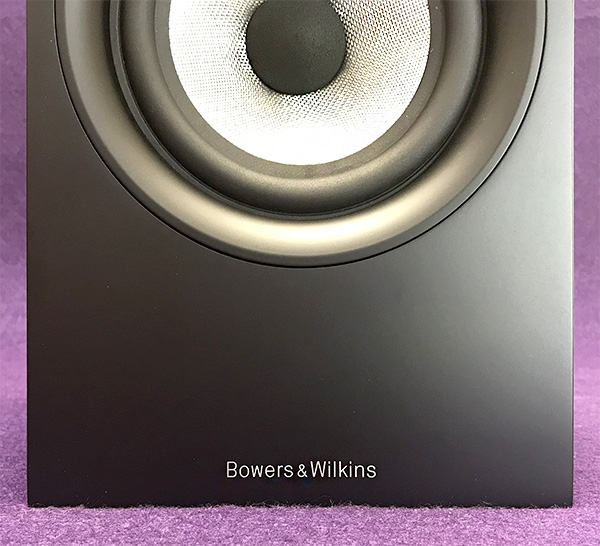
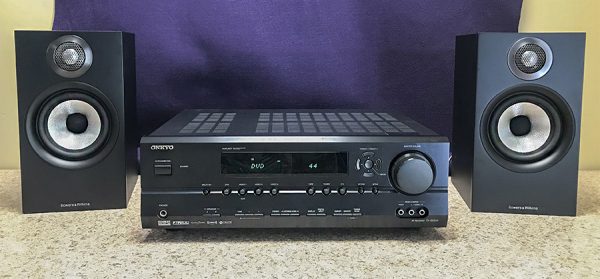
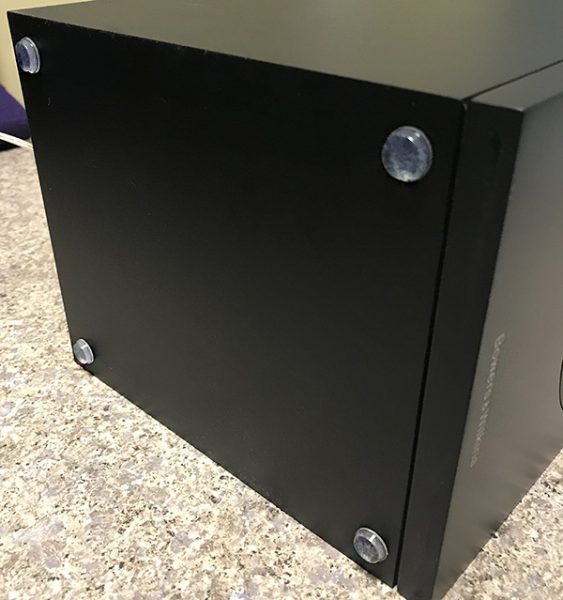
The Bowers & Wilkins 607 is a 2-way vented, passive bookshelf speaker. It is sold and priced in pairs.

Specs

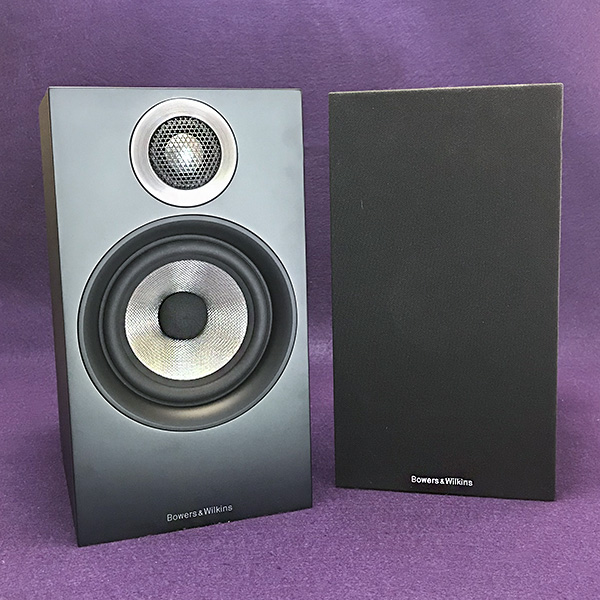
  • 1 in. aluminum dome high-frequency tweeter
  • 5 in. Continuum cone bass/midrange
  • Nominal impedance: 8 ohms 
  • Recommended amplifier power: 30-100 W
  • Dimensions 11.8 in. (H); 6.5 in. (W); 9.1 in. (D)
  • Net Weight: 10.25 lb.
  • Finishes: Black/black; White/gray

Design and features

Let me start with an admission: I am unfamiliar with Bowers & Wilkins’ speaker line. However, I am familiar with B&W’s headphones and Bluetooth speakers, from the P5 wireless and P7 headphones to the iconic Zeppelin wireless speaker. It’s from these reviews that I came to recognize what some call the “B&W sound.”

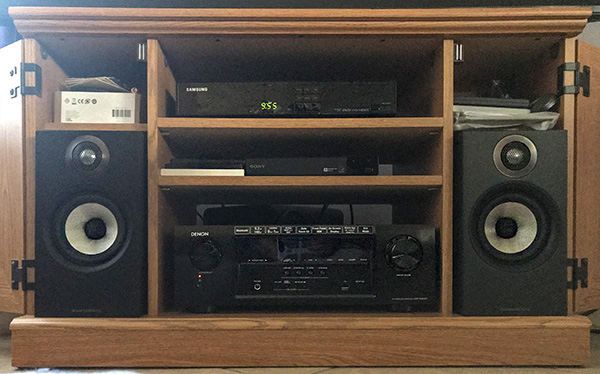
My first introduction to the 600 series was at B&W’s east coast headquarters in Boston last June. I reported on the visit here. The 600 series speakers consist of the 607, as well as the more expensive (and larger) 606, 603 speakers as well as the HTM6 center channel speaker and a choice of 3 subwoofers. The 600 series are passive speakers, so a power source (receiver or amplifier) is necessary. The 607 is both small and light in weight—a true bookshelf design. 

I chose to review the least expensive 607 speaker for a couple of reasons. They are the most affordable home speakers that B&W makes and I could easily connect them to existing equipment without any issues (there were none). Let other audiophiles write about how the 607 speakers sound with top-rated amps, receivers and turntables. There are plenty of detailed reviews that say it better and in more detail than I can. I wanted to see if the 607 speakers can live in an “everyday” environment with equipment that any normal person might already own—like me.

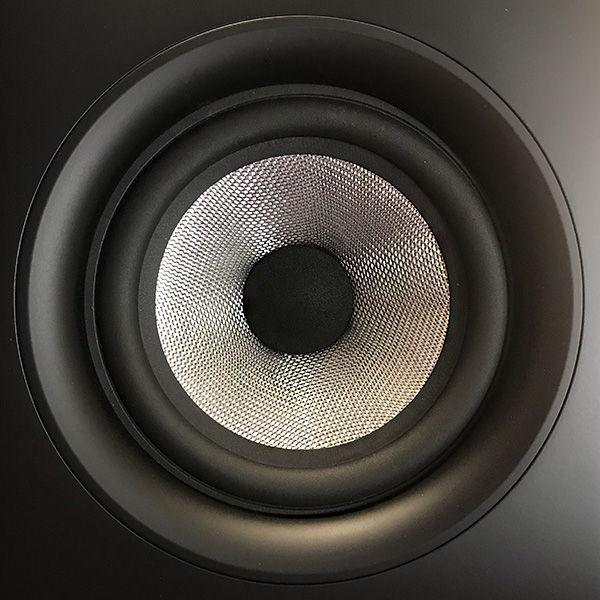
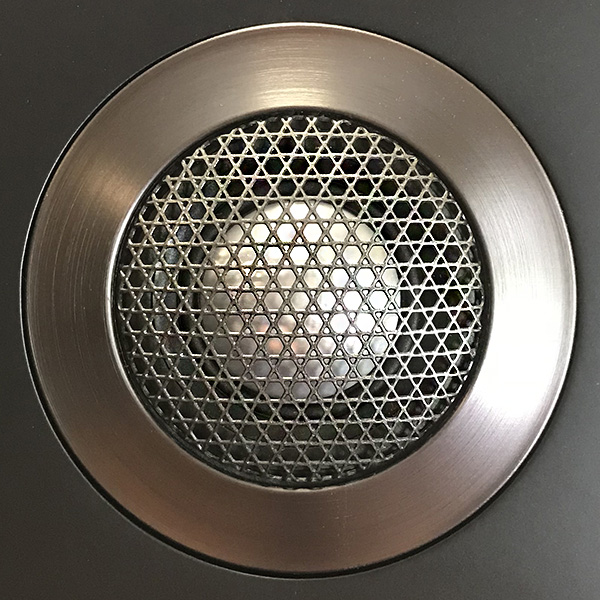
The 600 series benefits from a “trickle down” approach. Speakers  that were made of Kevlar have been replaced with a Continuum Cone base driver—a more rigid and accurate driver borrowed from the more expensive B&W speakers. They also upgraded the delicate dome tweeter as well as its protective metal mesh cover. While in Boston, I was able to hear a direct comparison between the older and new 600 speakers. As I said in my report, the improvement was subtle at best. If you already own an older 600 series speaker, there is no need to upgrade.

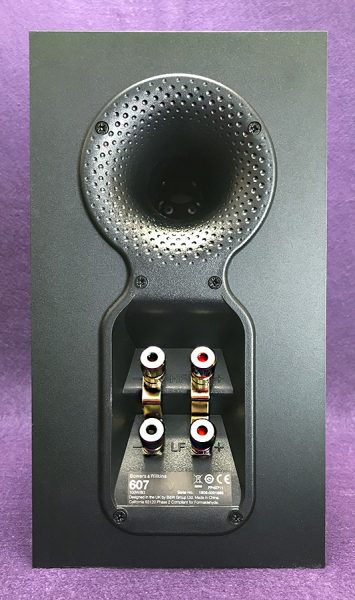
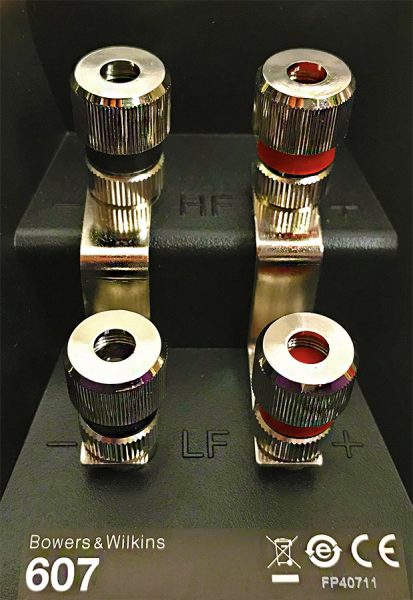
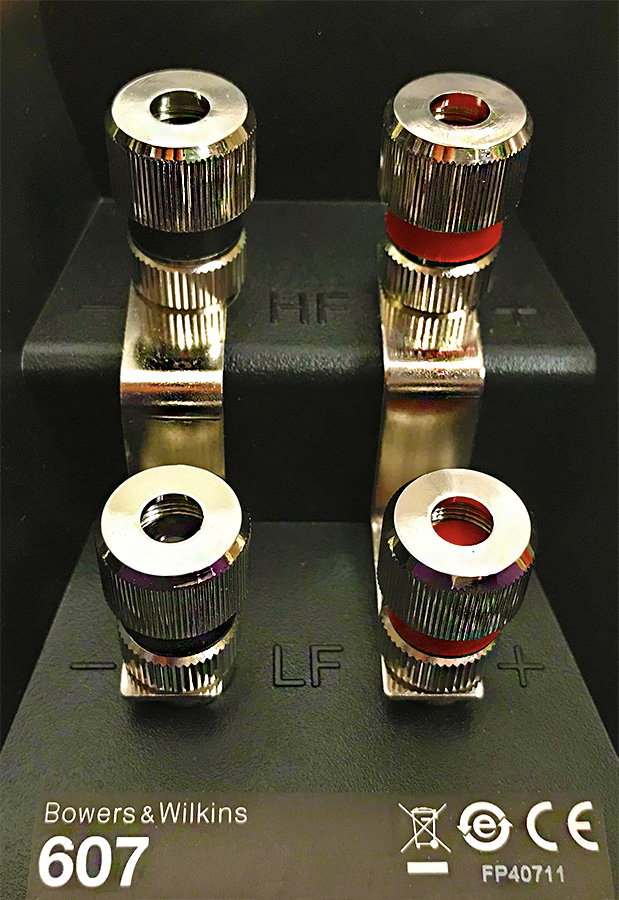
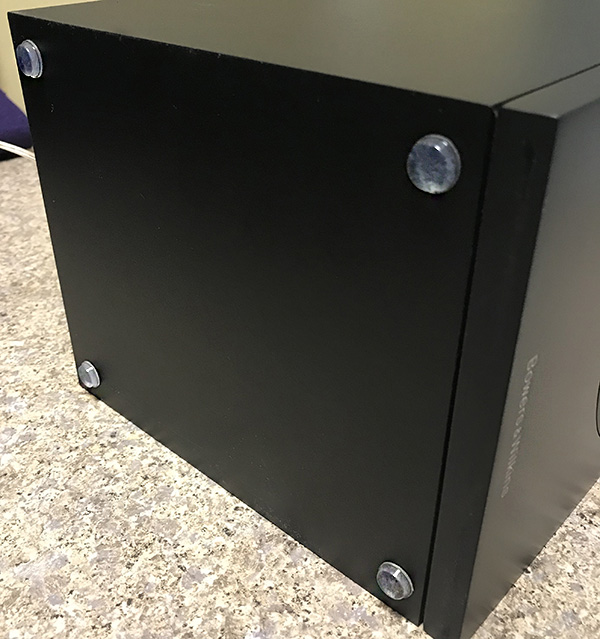
Connecting the speakers can be achieved in two ways, conventional or bi-amplification (or bi-wiring). Bi-amplification is more complicated, but can result in more resolution in low-level detail. But since this is an “everyday” review, connecting to single L and R posts will be fine. B&W includes small, self-sticking rubber pads for the bottom of the speakers. These help the speakers stay in place and can help eliminate unwanted vibrations.

The 600 series is exactly that—a series. Even though I’m reviewing the 607 speakers by themselves, they can be seamlessly paired with a matching center channel, subwoofer and two additional 607 rear channel speakers for a complete home theater experience. It’s something you can build as budget allows.

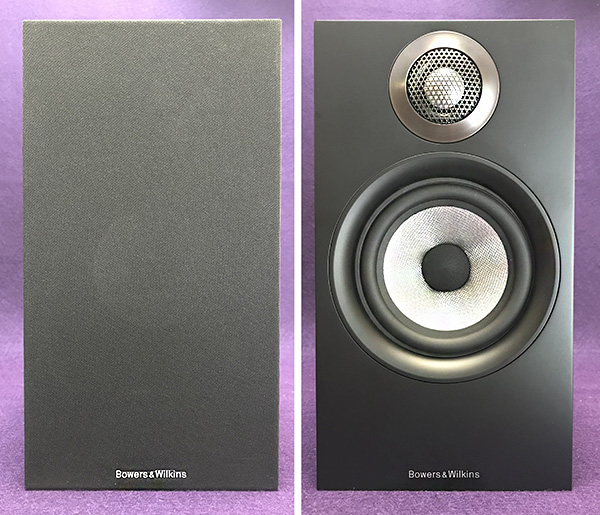
The 607 speaker cabinet comes in either black or white. There are included removable grills for those who want a cleaner design. I prefer the “naked” speaker look and left the grills in the box.

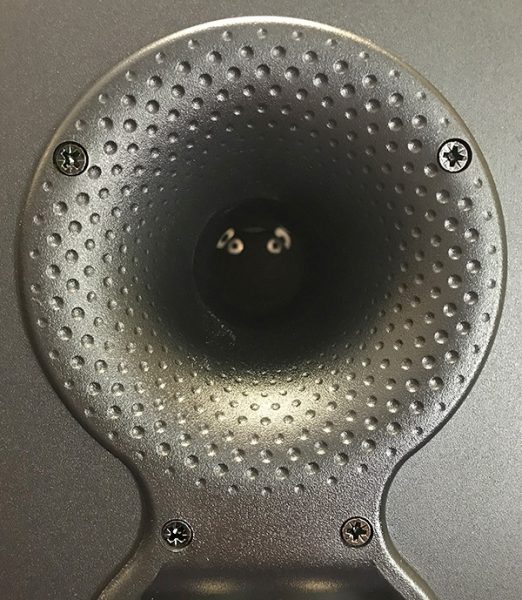
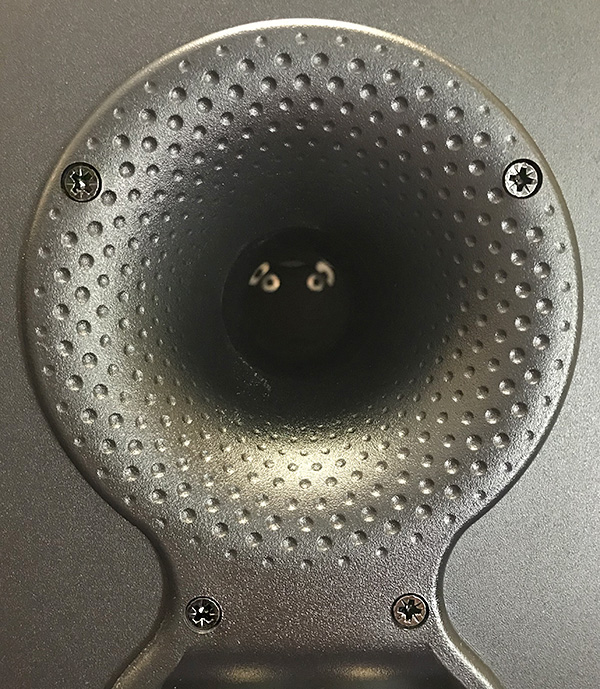
The 607 dimpled bass port has been redesigned and moved to the rear of the speaker. It’s larger then the previous front port which helps deepen the sound, especially if the speakers are moved closer to a wall. The port design is similar to the rear ports on the Zeppelin speaker. 

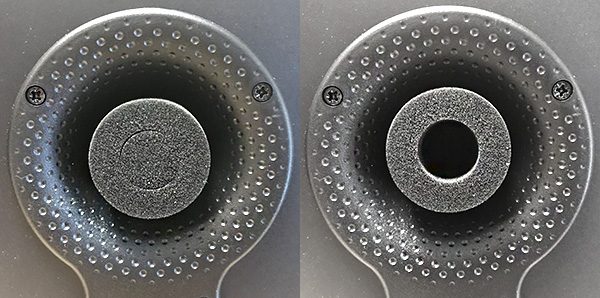
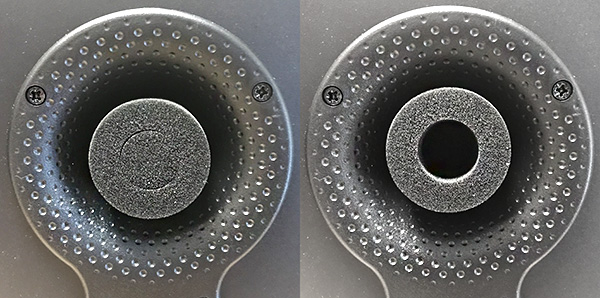
Bass can also be controlled by some included foam plugs that fit into the ports—an interesting low-tech solution to lessen bass. I’m not sure why anyone would want to lower the bass impact coming from the 607 speakers. Sure, bass is present and perfectly tuned for these speakers but I wouldn’t call it powerful. These are small speakers and physics is physics—you’re going to get much more bass from larger speakers or a subwoofer. If the room is small, the 607’s bass output is plenty. But if your room is larger and budget allows it, I would recommend getting a subwoofer, even if it does almost cost as much as a pair of 607 speakers.

There’s also plenty of treble from the 607 speakers. A few songs bordered on harsh, but I blame the recording and not the speakers. Generally, I leave any EQ settings on flat, but slightly toning down the treble EQ smoothed things out on problematic songs. 

One thing I appreciate about the 607 speakers is how intimate sounding they can be. For instance, Van Morrison’s “Into the Mystic” sounds incredible. There’s a lot going on in this song, such as subtle percussive things and strings coming in and then disappearing. But it’s Morrison’s voice that’s magical. You can hear every intonation he makes and his emotions come through with a fine clarity. It’s close to a live sound on these speakers. There’s an airiness to the song that’s missing on headphones or lesser speakers. And I’m not even a fan of Van Morrison!

That intimate sound also comes through on Brian Eno’s “Some Words” from his “My Squelchy Life” album. Eno’s singing sounds almost reluctant as if he would rather someone else do the vocals. But then heart-wrenching strings and beautiful synth keyboards come in and add an emotional context to the song’s second half. The 607 speakers exhibit the necessary detail within the song by allowing each instrument its space, yet letting them blend beautifully. 

It’s this sense of space that make the 607 speakers fun to listen to.

What I like

 The 607 speakers are great as stand-alone stereo speakers, but can also be part of a more complete home theater system later on as budget allows.

Expressive detail and sheer musical enjoyment are built into this speaker. It’s a cliche, but the 607’s sound quality matches or beats many other speakers in this price range and above.

What needs to be improved

Nothing of note.

Final Thoughts

Sure, the more expensive B&W speakers will sound better and also have more of this or that, but the Bowers & Wilkins 607 speakers do an admirable job of living up to the B&W name. At $600/pair, they are not cheap, but they are not expensive either when you consider how long people normally keep speakers. The one caveat to owning the 607 speakers is that you may find that you will eventually want something better and that something will probably be better and more expensive B&W speakers. 

Price: $599/pair US
Where to buy:
Source: The sample for this product was provided by Bowers & Wilkins.

Filed in categories: Reviews

Tagged:

Bowers & Wilkins 607 speaker review originally appeared on The Gadgeteer on October 6, 2018 at 9:00 am.

Note: If you are subscribed to this feed through FeedBurner, please switch to our native feed URL http://the-gadgeteer.com/feed/ in order to ensure continuous delivery.

The Nima Peanut Sensor allows you to test food for allergens right at the table

NEWS – My daughter has allergies and asthma, and she has a lot of food allergies, including peanut allergy.  Over the years, we’ve had to be very careful with what she ate.  Peanuts can cause anaphylaxis, meaning an exposure can be fatal.  Even when she was tiny, she knew to ask first if food had peanuts in it before she could accept food from even her grandparents.  To make things a little easier for those with peanut allergies now, Nima has developed the world’s first portable peanut sensor, so you can test a new food or a restaurant’s offerings before you take a bite.  I would have lived my life with one of these Nima Peanut Sensors in my hand when my daughter was growing up, if only they had been available then.

To use, you place a small amount of the food in the peanut test capsule, put the capsule in the sensor, and wait a few minutes for the result.

Nima’s antibody-based chemistry was developed by MIT scientists to be faster, cheaper, and usable right at the dinner table. Nima is optimized to detect 10 parts per million of peanut protein and above. 10 ppm is the lowest adverse reaction level observed in patients during clinical research studies.

Nima is recognized as a leader in allergen research and has been awarded a grant from the National Institute of Health to develop the peanut sensor. Nima is advised by some of the top allergen researchers in the world.

Using the Nima app, you can also search their database of over 20,000 results to discover peanut-free restaurants and packaged foods tested by Nima sensor owners.  You can help build the database by uploading information about your testing results.

Nima’s Peanut Sensor has a rechargeable battery that usually needs to be charged about once a month.  It comes with a carrying case and twelve test capsules for $289.00.  You can purchase more test capsules for $72.00 for 12 tests; with automatic refills, the price drops to $59.00 per 12-pack.  To help with the cost, financing for 3, 6, 0r 12 months is available, if you qualify.  And the Peanut Sensor and test capsules are FSA/HSA reimbursable.

Learn more and purchase the Nima Peanut Sensor at the Nima website.

Filed in categories: News

Tagged: ,

The Nima Peanut Sensor allows you to test food for allergens right at the table originally appeared on The Gadgeteer on October 6, 2018 at 8:16 am.

Note: If you are subscribed to this feed through FeedBurner, please switch to our native feed URL http://the-gadgeteer.com/feed/ in order to ensure continuous delivery.

The Gadgeteer is moving to a new server

web

NEWS – This is a quick announcement to let everyone know that we’ll be moving to a new web server early Saturday morning. There may be a service disruption for a day or so while all the name servers are being updated. If you are not seeing content updates for more than a couple of days, you’re still accessing the old site; please be careful when leaving comments because anything posted on the old site after 1 AM Central time tomorrow (Saturday) will be lost. You will know that you’ve arrived on the new site when you see posts newer than this one. 🙂

Filed in categories: News

Tagged:

The Gadgeteer is moving to a new server originally appeared on The Gadgeteer on October 5, 2018 at 10:00 pm.

Note: If you are subscribed to this feed through FeedBurner, please switch to our native feed URL http://the-gadgeteer.com/feed/ in order to ensure continuous delivery.

ABOX Raspberry Pi 3B+ Starter kit review

REVIEW – I love to tinker.  I love gadgets.  And I love when those two worlds collide, resulting in something I made and is useful.  The Raspberry Pi is one of those computing devices that – if you can define a use for it – is practical, easy to use, and brings satisfaction to even the most curmudgeonly tinkerer (aka me).  ABOX produces a few different Raspberry Pi kits and today we are going to look at the Starter version.  Does it have what you need to get started?  Read on to find out…

What is it?

The ABOX Raspberry Pi 3B+ Starter kit is a bundle of everything you will need to get started with the world of Raspberry Pi – except a keyboard, mouse, and monitor.

What’s in the box?

  • A Raspberry Pi 3B+ motherboard with 4 USB 2.0 ports, a gigabit Ethernet port, an HDMI port, audio out, power and micro-SD card reader.  This is the latest model of Raspberry Pi, with a processor that is 19% faster than the previous version, dual band 802.11ac wireless networking and Bluetooth 4.2.
  • A 32 gig micro-SD card pre-loaded with NOOBS, a great utility that will help first-time RPi’ers to load an operating system like the Linux distro Raspbian.
  • A USB 2.0 micro-SD card reader for your other computer that will allow you to load a different operating system like Retro-Pi for gaming.
  • Heatsinks for the motherboard – most Raspberry Pi cases do not have fans, so this helps dissipate heat.
  • A 5v power supply to provide electrons to your Raspberry Pi.
  • An HDMI cable to connect to a monitor.
  • A “Getting Started” booklet that will walk you through installing the Raspbian operating system.
  • A standard case to house the whole affair (minus the “Getting Started” booklet).

Setup

Setup doesn’t get much simpler.  Peel the tape off the back of the heat sinks and attach them to the two chips (in the picture, the upper left chip and the one immediately to the right and lower – it is pretty easy to figure out which goes where).  Open the case and put the board in place.  Close the case, and you are ready to get started.

This is the power, HDMI and audio out ports in the case.

The Ethernet and USB 2.0 ports on one side…

…and the micro-SD slot with the card installed on the other side.  Plug in your keyboard and mouse, connect a monitor and then plug in the power cable.

Load your operating system and you are ready to explore the world of Raspberry Pi.  It is that simple.

Is it worth it?

Depends.

These kits are a great, hands-on way to teach kids about STEM.  They are also great for home automation projects like creating your own Amazon Alexa device.  Into retro-gaming?  Again, another great use.  And this is the point – if you can find a use for this, a kit like the ABOX is the right way to get started.  If you are uncertain about what a Raspberry Pi is or what it can do, you might want to read more before spending the money.  So it really comes down to whether this particular kit is the right one.

And the short answer is yes, it is.  The motherboard and case are standard issue, so no difference between these and the components you will find in other kits.  The differentiation comes in the other components included in the Starter set.  The power cord is a solid, UL-listed version with a convenient on-off switch installed.  The HDMI cable is molded and shielded.  A name-brand micro-SD card that is fast enough to support the Pi.  And the instruction booklet will get you started – as far as getting an operating system loaded and functioning.  After that, you are free to explore as you like. ABOX has packaged great components that will help launch you into the Raspberry Pi world.

What I like

  • (Almost) everything you will need to get started (bring your own mouse, keyboard and monitor)
  • Good quality components that make it easier for the beginner to get started
  • An instruction book that gets you to the launch of the operating system

What should be improved

  • A fairly minor point, but a couple of pictures on how to assemble the case and motherboard would probably help the extreme beginner or kids getting started on their own

Final thoughts

Getting everything you need in one box is the difference between success and frustration when you are beginning.  There are plenty of tutorials on the Internet that will help you take an assembled unit and make it into something, but few will tell you what you actually need to get started.  ABOX is bridging that gap with kits like this.  From unboxing to install, the process took me a little over an hour – and a fair portion of that was spent finding a wired mouse that I could start with (once up and running I switched to a Bluetooth mouse – it’s just that brief getting started time where that – or a Logitech unifying device – is needed).

So what am I going to do with this?  I think I am going to make a retro gaming setup.  A couple of USB game controllers and installation of the Retro-Pie operating system, digging up some games on the Internet, and soon the sweet sounds of Donkey Kong will once again reverberate through my living room.  Or maybe I will buy a LCD screen component and some sensors to use as a weather station.  Or add the camera module and build a facial recognition device that will show either my wife or I a custom-built news and information feed.

Or maybe I will do all 3…where is my credit card again?

Price: $78.99 with the 32 gig memory card, $68.99 with the 16 gig version
Where to buy: Amazon
Source: The sample for this review was provided by ABOX.

Filed in categories: Reviews

Tagged:

ABOX Raspberry Pi 3B+ Starter kit review originally appeared on The Gadgeteer on October 5, 2018 at 12:00 pm.

Note: If you are subscribed to this feed through FeedBurner, please switch to our native feed URL http://the-gadgeteer.com/feed/ in order to ensure continuous delivery.