Potensic AW30 (Navigator III) Drone with Camera review

REVIEW – I have been casually shopping for an entry-level camera-equipped quad-copter drone for a year or so. The opportunity to test drive the Potensic AW30 (Navigator III) came at a good time as my sons have recently expressed interest in camera-carrying drones as well. Let’s hope the AW30 fills our needs for a trainer / gateway drone.

What is it?

The Potensic AW30 (a.k.a. Navigator III) is an entry-level drone for kids and beginning enthusiasts. The AW30 packs an onboard WiFi hotspot for relaying images back to a iPhone /iPad or Android device using the company’s proprietary app. It supports video and photo capture and VR display on these devices.

What’s in the box?

The Navigator III arrived in a full color box.

On the inside flap, the charging options are listed (more on this later). No charger is included.

The full kit includes

  • AW30 / Navigator III drone
  • Spare set of propellers
  • Remote control with instructional overlay
  • Phone mount for remote
  • Rechargeable lithium ion battery
  • USB A to micro USB charging cable
  • Multi-language instruction booklet
  • Quick start strip
  • Thank you card

Design and features

The AW30 is similar to other starter drones on the market with fixed position propeller / motor arms, fixed propeller guards, a fixed front-mounted camera, and a removable lithium battery. It includes a remote control which may be used to control the drone or the drone may be flown using the downloadable iOS / Android app. The app supports photo / video capture and live views from the drone’s camera.  The app also supports limited VR capabilities using the appropriate phone mount.

Setup

Setting up the AW30 involved installing the phone holder into the specified slot in the body of the remote and installing 6 AA batteries into the back of the remote.


Before flight, the drone’s flight battery must be charged. I used the included cable plugged into a Bestek Vertical Power Cube, which will supply up to 2.4A per USB port based on the demands of the device being charged, to charge the flight battery. Right off the bat, I had trouble getting the cable to seat properly in the battery. When charging the battery has a red LED that lights up. A green LED lights up when the battery is fully charged.

Once charged, the battery is inserted into the bottom rear of the drone (photo shows battery partially inserted).

For the full experience, including video recording and photography requires the downloading of a iOS/Android app to an appropriate device and connecting to the WiFi hotspot in the drone. You must connect to the WiFi hot spot from your device to see live video. The app also includes flight controls that are independent of the remote operating over WiFi.

Before each flight, the drone and remote must be paired and the drone calibrated.

Controls

The controls on the included remote includes two self-centering joysticks and two self-centering toggle switches mounted in the top of the remote in addition to the power button.  The left toggle switch starts/stops video recording if pressed to the left and takes still photos if pressed to the right. The right switch toggles the smart controls, which will allow you to navigate the drone without worrying about what direction it is pointed, when pressed to the left and activates the auto takeoff / landing feature when pressed to the right.

The left joystick controls the altitude and rotation of the drone. The right joystick controls pitch and roll (nose up/down and left/right tilt). The remote will alert the pilot when the drone is flying out of range.

Performance

The piloting experience with the AW30 is much smoother than my last quadcopter. I had previously flown a DraganFlyer III. For those readers not familiar with the older DraganFlyer models, most do not have automatic gyroscopic stabilization or any other flight assistance–you are in complete control, and there is a steep learning curve coming from fixed wing flight.

Flight prep includes

  1. Turning on the remote and then the drone
  2. Pairing the remote and drone
  3. Calibrating the drone
  4. Connecting your phone to the onboard WiFi hotspot (optional)
  5. A quick press of the automatic takeoff button and the drone is airborne

Once in the air, the control trim may need to be adjusted. This is a non-intuitive process that requires using one joystick to go into trim mode and then moving the appropriate joystick to adjust the control trim. This process is much easier using the app controls.

The AW30 is quite nimble and is easy to get moving in any given direction. Like other aircraft and air-cushioned vehicles it doesn’t stop or turn on an dime. I was prepared for this, but the small size of the AW30’s rotors means that it does not respond quickly as vehicles with larger rotors.

My limited time with the AW30 was enjoyable. I was able to successfully fly the AW30 both inside and outdoors without damaging any of the propellers despite quite a few crashes while initially exploring the flight controls and then exploring the flight envelope.

Meltdown

My testing of the AW30 hampered by a battery / cable combination that would disconnect and stop the charging. This seemed to be a problem with the microUSB port in the battery itself. This meant that I would often come back to my workbench to find that the battery had not been charging for the past 2 hours so I had to wait longer to fly again. I was able to temporarily fix this problem by resting the cable and battery at a specific angle while charging.  I also changed to a known-good cable. This worked for several charging sessions. After a test flight one evening, I plugged in the battery into the 2A charger that I had been using and went to have dinner. When I came back the battery was deforming (bubbled) and a strong hot plastic smell, so I quickly disconnected the cable.

We reported this issue to the manufacturer who promised an investigation and sent out a replacement battery. I was in the process of performing a standard out-of-the-box battery top off using a 2A USB charging port and the known-good USB cable. I left the battery sitting on my workbench and walked away to grab a cup of tea. When I returned about 6 minutes later I noticed the hot plastic smell again. When I got over to the battery, the end of the battery had deformed and melted the microUSB plug into the battery charging port. I quickly unplugged the cable from the power supply. After the battery had cooled enough to handle, I examined the battery and cable. After a bit of wiggling, I was able to get the plug loose from the battery, at the cost of the port coming with it. After I separated the port and plug, I was dismayed to discover that the inside of the port was melted.

What I like

Before I had my problems, I was impressed with the

  • Price
  • Ruggedness
  • Support for VR
  • Can operate just from device without need of the remote

What needs to be improved

  • Better quality assurance for the charging cable
  • Much better current / thermal management in the battery
  • Improved trim performance when using the included remote control.

Final thoughts

Initial conclusions

The Potensic Navigator III drone is a fine toy despite the shortcomings in the flight time-to-charging time ratio. However, it shares this same problem with most other small battery-powered quadcopter aircraft. The Navigator III never lived up to the promises of it being a stable video / photo platform, as I could never get the trim dialed in to provide a stable hover, even indoors when our ventilation system wasn’t running. On the plus side, the Navigator III survived many rough “landing” and “encounters” with indoor and outdoor obstacles. The rotor guards protected the rotors from damage, and I’m still using the original rotors after 30 days. The Potensic Navigator III is a good first drone for both kids and enthusiasts to get their feet wet before upgrading to a more expensive and feature-packed aircraft. If you can master stable hovering and control with the Nagivator III, you will have saved yourself lots of trouble and money on replacement parts for your later drones.

Revised conclusions

I cannot recommend the Potensic Navigator III drone due to the persistent issues with safely charging the drone’s batteries. I have had two different batteries self destruct, with the second one taking a USB cable with it.

If Potensic can address the battery charging problem, I will reconsider this statement.

For now, save your money and your safety and steer away from the Potensic Navigator III.

Price: $69.99
Where to buy: Amazon
Source: The sample of this product was provided by Potensic.

Filed in categories: Reviews

Tagged:

Potensic AW30 (Navigator III) Drone with Camera review originally appeared on The Gadgeteer on May 13, 2019 at 11:00 am.

Note: If you are subscribed to this feed through FeedBurner, please switch to our native feed URL http://the-gadgeteer.com/feed/ in order to ensure continuous delivery.

Musk aiming to provide global internet with Starlink

NEWS – A while back, I wrote about Amazon’s Project Kuiper – a plan to launch over 3,000 satellites into low Earth orbit to provide broadband access to underserved areas. SpaceX, Elon Musk’s space venture is preparing to launch the first 60 of nearly 12,000 Starlink satellites.

The photo above shows the 60 satellites strategically packed into the faring of a SpaceX Falcon 9 rocket. These are what Muck called “production design”, differing from a couple of test satellites that SpaceX tested last year. They are more of a demonstration of the concept than the first step in the ultimate constellation, but it is an important step in getting the ball rolling.

SpaceX will be facing competition from LeoSat, OneWeb, Telesat, and Amazon for this market. But so far, SpaceX looks like it will be first to market with space-bound broadband internet with this launch planned for May 15, 2019, from Cape Canaveral.  They have plans for two to six more launches this year.

Internet everywhere has long been a dream.  This week’s planned launch might signal that it will be coming more quickly than anyone anticipated.  Here’s hoping that costs are reasonable and there are no data caps!

Filed in categories: News

Tagged:

Musk aiming to provide global internet with Starlink originally appeared on The Gadgeteer on May 13, 2019 at 10:00 am.

Note: If you are subscribed to this feed through FeedBurner, please switch to our native feed URL http://the-gadgeteer.com/feed/ in order to ensure continuous delivery.

AISportage Smart Shoes review

REVIEW – What exactly is a smart shoe? This one is not from Get Smart and does not hide a phone under the heel. It does however have a pocket under the arch for squirreling away some secret tech that could seriously help your running game. Let’s take a closer look.

What is it?

This is a fitness system that includes a smart tracking module, running shoes and smart phone app that work in concert with each other to provide data tracking, analysis and advice.

What’s in the box?

We can’t even discuss what’s inside until we look at this “box”!
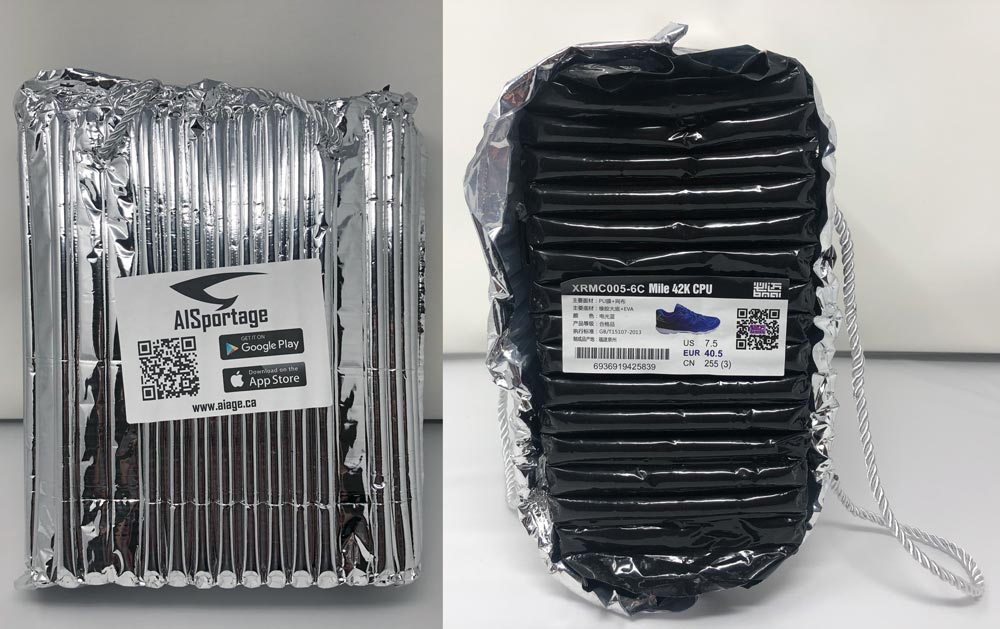
Instead of a traditional shoe box, AISportage opted for a tote bag made of two air-filled packaging material sides nested into each other in opposing directions.
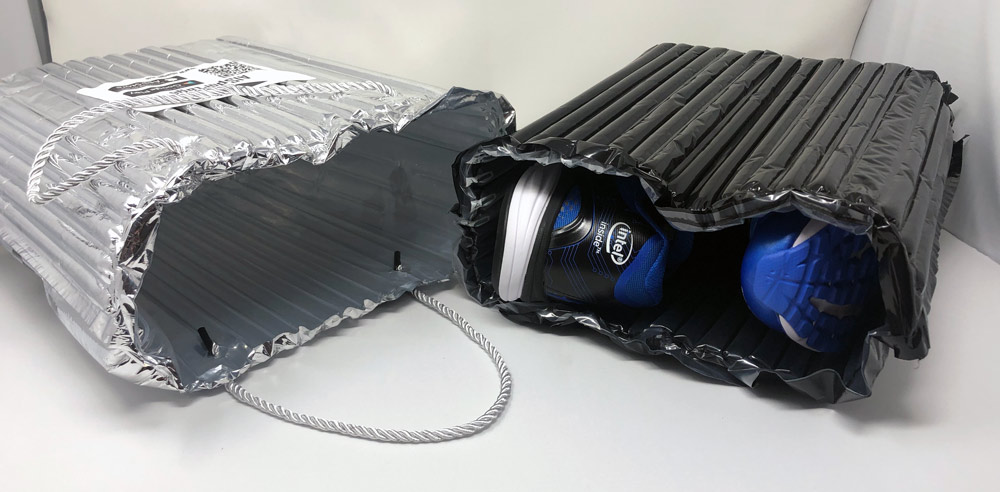
It results in a very different and unexpected take on packaging. It’s pretty cool to receive something like this in the mail, but I can imagine this would not work very well at retail. I also question if it is potentially worse than standard box and paper packaging when it comes to recycling.
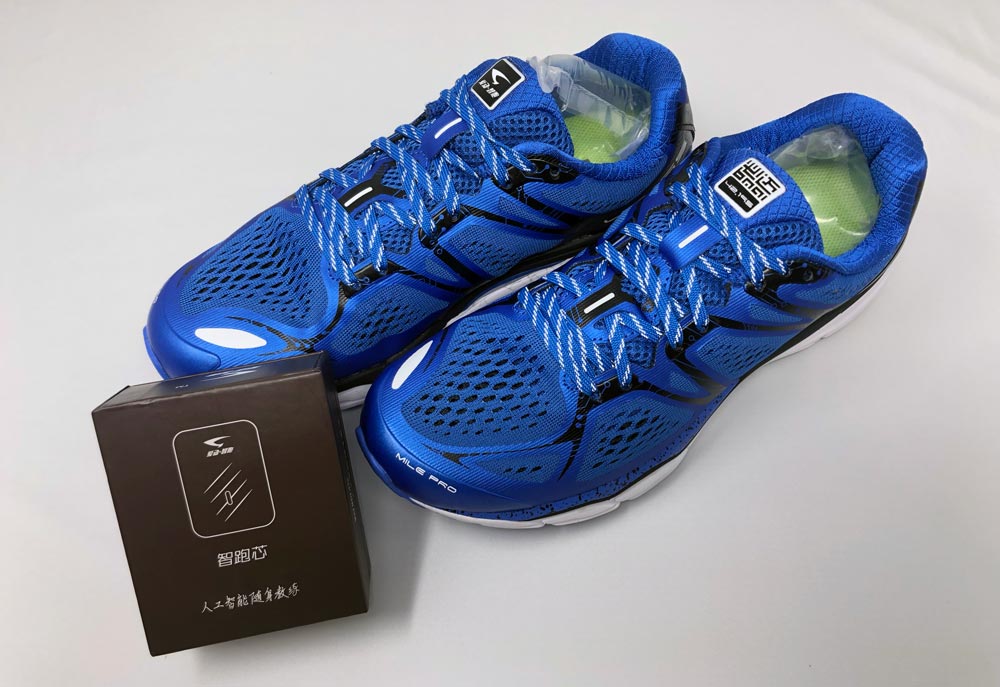
Inside the packaging  is the pair of running shoes and the accessory box.
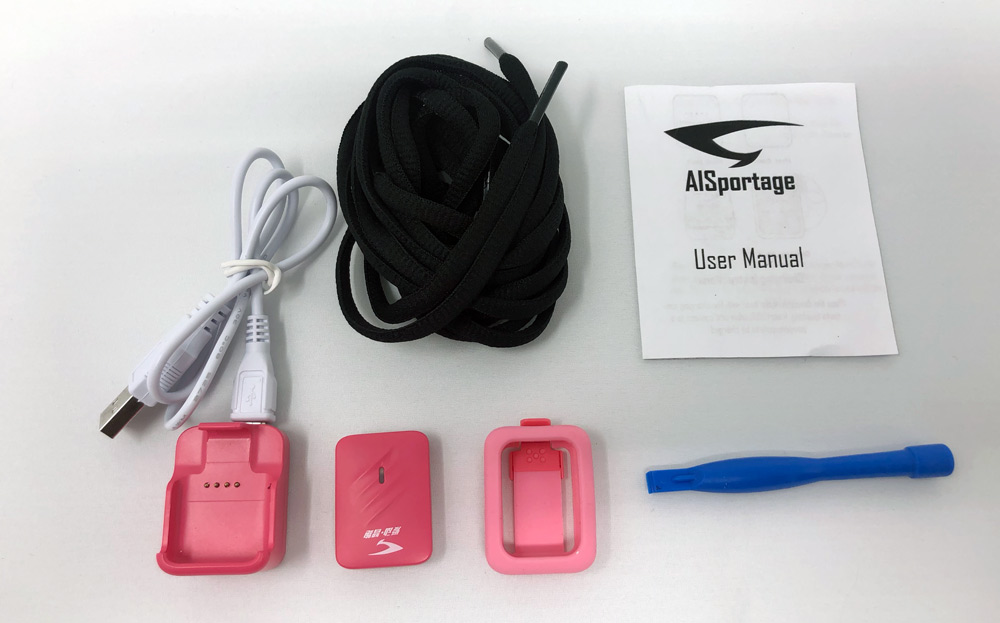
Here’s all of what’s in the box

  • AISportage Smart Running Shoes
  • Smart module
  • Charging unit
  • USB-A to USB-Micro charging cable
  • Shoelace module mount
  • Module removal tool
  • Spare laces
  • Instruction manual

Setup

Let’s get this set up…

  1. Insert the smart module into the charger, connect the USB cable to the charger and a wall adapter or computer and let charge until the light turns green.
  2. Install AISportage app by scanning the QR code or searching AISportage in the app store for your device.
  3. Remove smart module from the charger to pair with your phone.
  4. In the bluetooth settings of your device, pair with the smart module that should show up as AIDong ####.
  5. Install the smart module into the right shoe, or into the shoelace module mount.

Here’s how to install into the AIS running shoe.
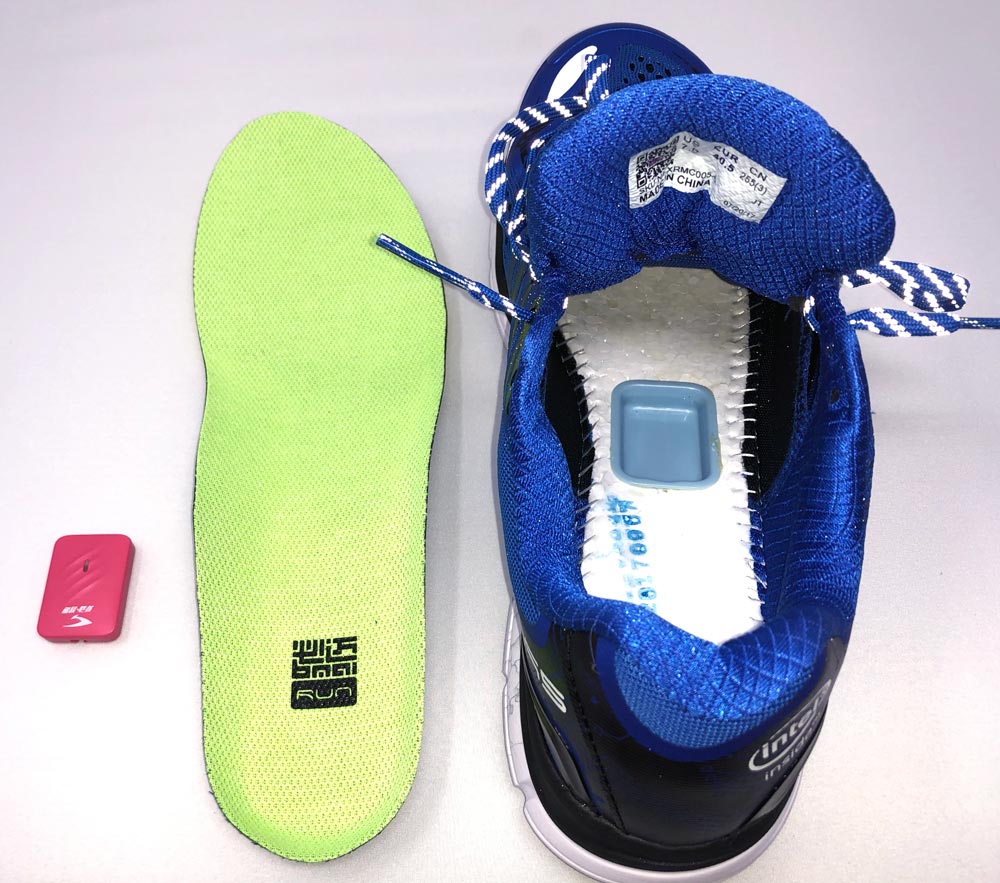
Under the insole in the right shoe is a small cavity for the smart module. Install the module as shown with LED forward and logo towards the heel. The instructions only show a logo without an LED which doesn’t really help clarify. It kinda fits the other way, but doesn’t fully seat properly.
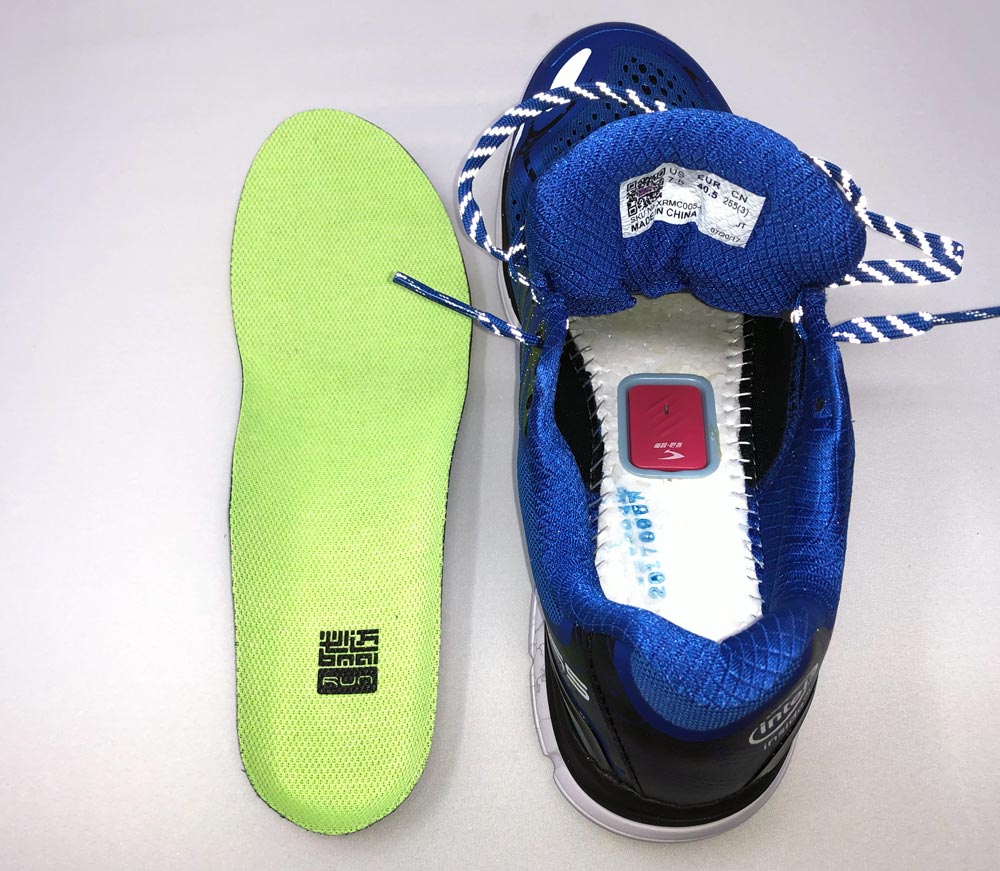
With the smart module installed go ahead and put the insole back into the shoe and you’re ready to run. You’ll need to remove it periodically for charging and to make that simpler, they included a small prybar tool to pick it out. I was also able to knock it out with a couple of swift thwacks against my other hand.

If you’d prefer to use the module with your own running shoes, you can use the lace attachment that’s included in the accessory box. It’s a silicone type material that stretches into place around the module and has a strap for running securely behind the laces.
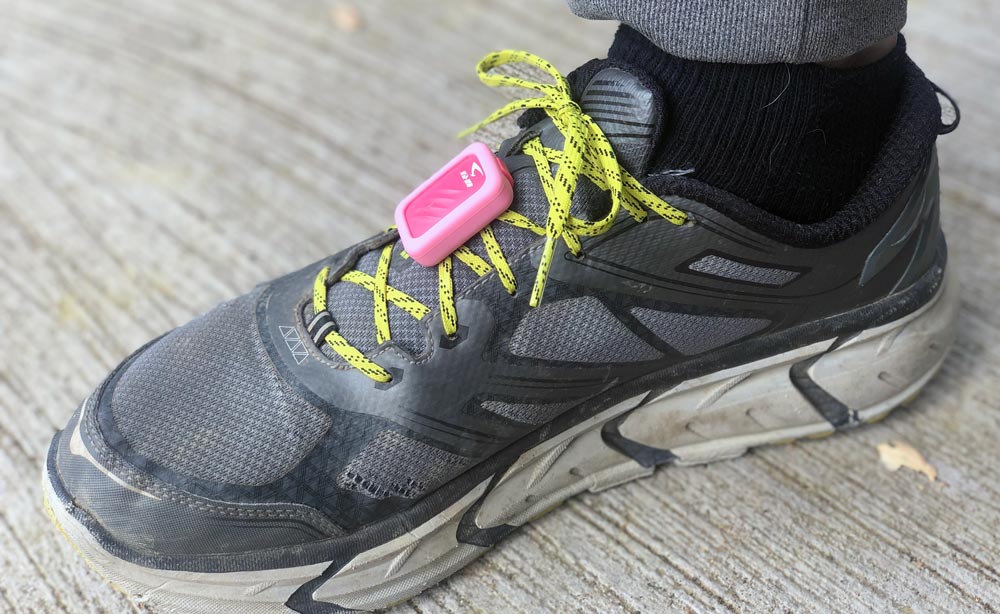
Design, features and performance

Just to start things on an honest foot, I’m not a runner. My wife is though and she helped quite a bit in this review. We also both worked at adidas on footwear over 20 years ago and are pretty comfortable with shoe construction and materials.

PART I: Let’s look at the shoe first.
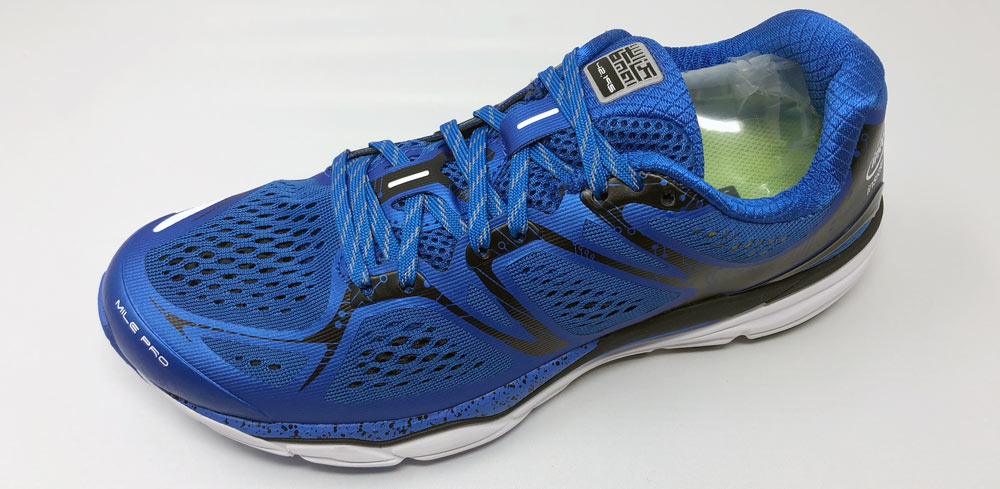
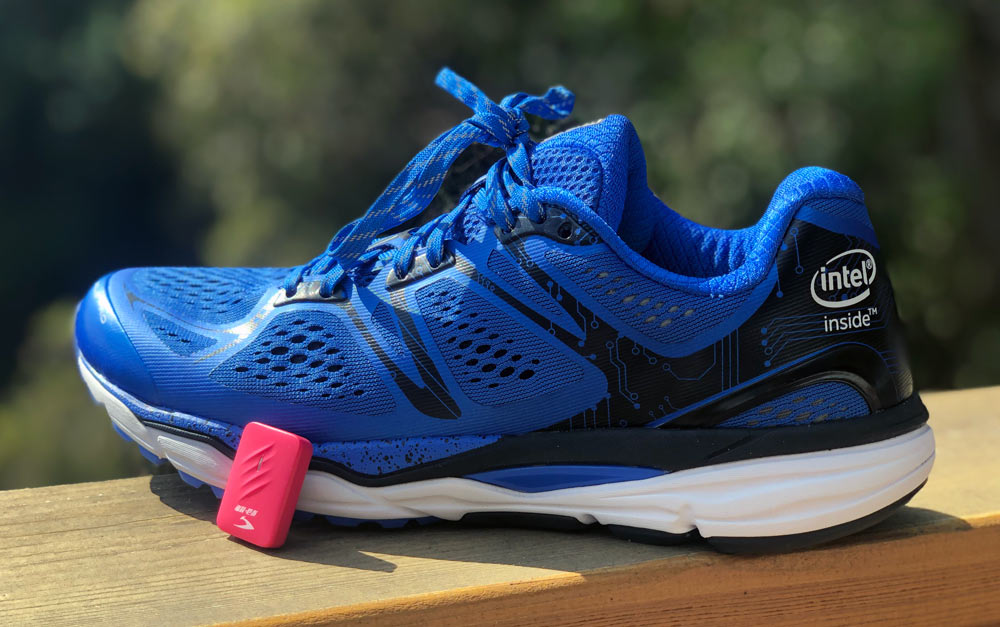
The shoe is built on a standard width last with good quality construction and high quality materials. The upper uses an Air Mesh with non-stretch film heat-pressed or welded to the upper to create a secure cradle around your foot.
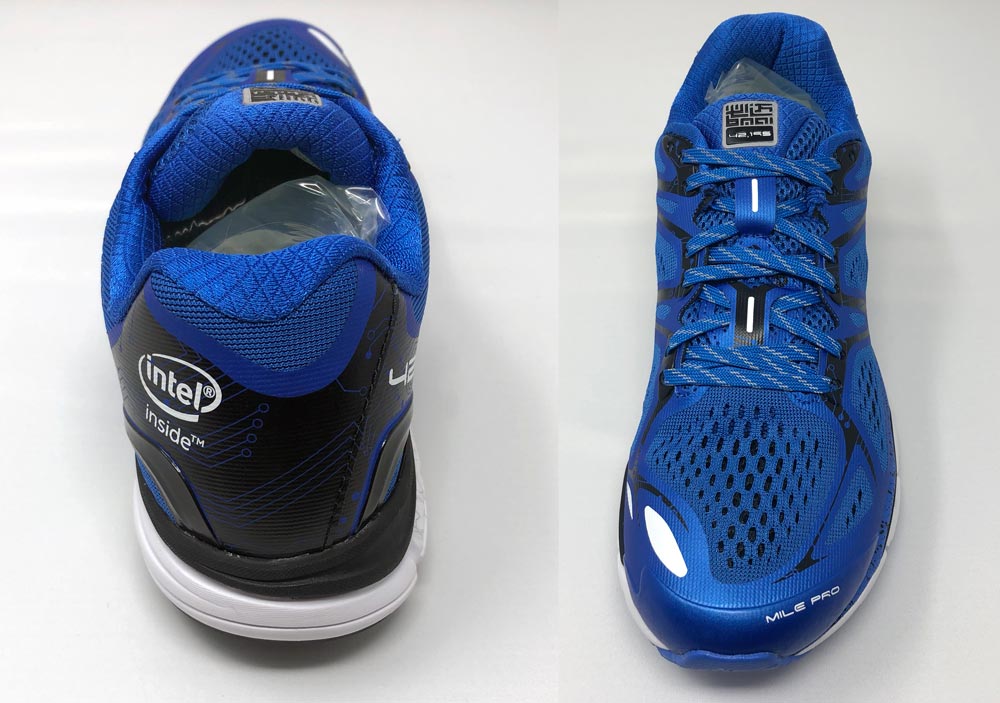
On the heel, it’s hard to see past the intel inside™ branding, but there’s a molded heel counter on each side to minimize side-to-side roll as you run. The ankle and achilles area has additional padding as does the upper tongue to create a comfortable fit. Two lace-through guides help to keep the tongue centered.
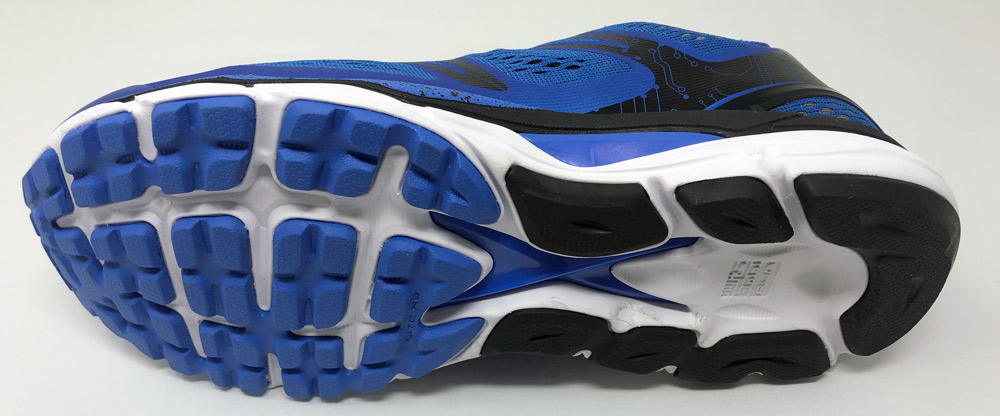
The bottom has good tread pattern with the blue and black rubbers being different hardnesses for compression and rebound. The blue arch-plate’s X-design allows the shoe’s forefoot and heel to move independently without sacrificing torsional support.
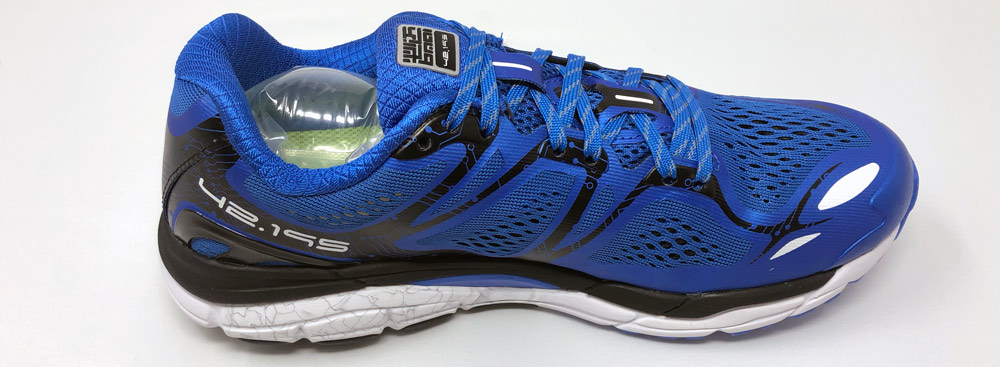
The medial side of the shoe shows the arch support structure of the torsion plate along with the upper’s non-stretch reinforcement.
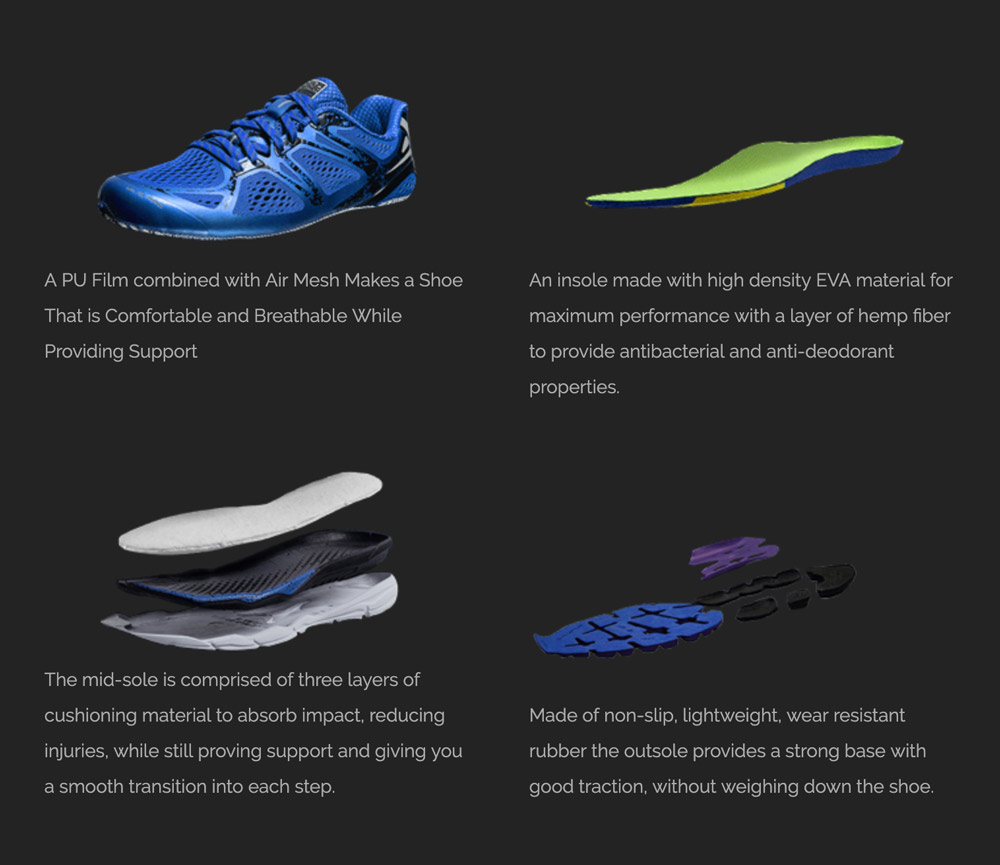
This image from the company’s website shows a bit more of all the shoe components. AISportage sells the shoe for $70 without the technology. This is a pretty good shoe for that price. More on this in a bit.

PART II: Now let’s look at the smart module part of the system…

The device (on the right) is a simple rectangular module with an LED on the top and 4 contacts on the bottom for interfacing with the charger (on the left).
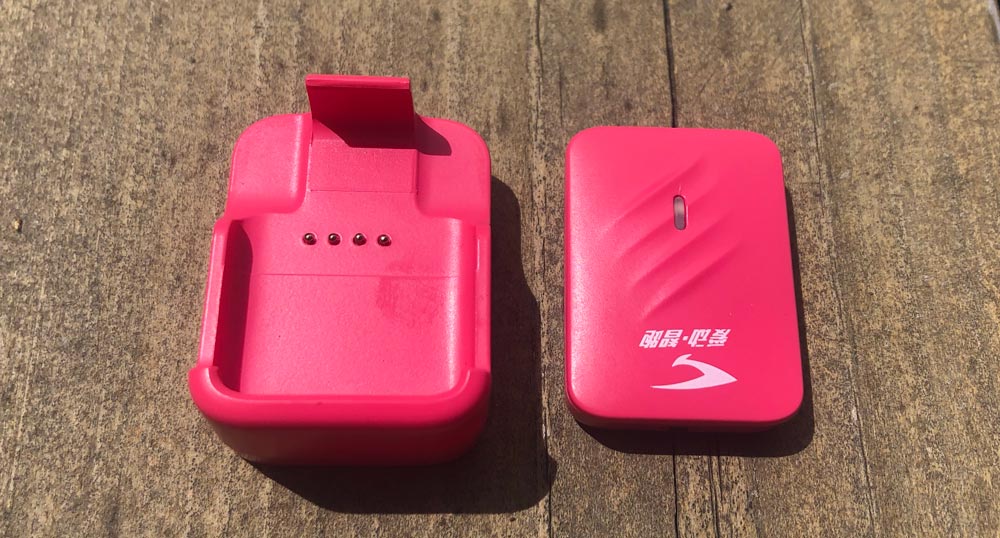
The charger has 4 pins that mate to the module in a single orientation. There is nothing however to keep you from putting it in backward.
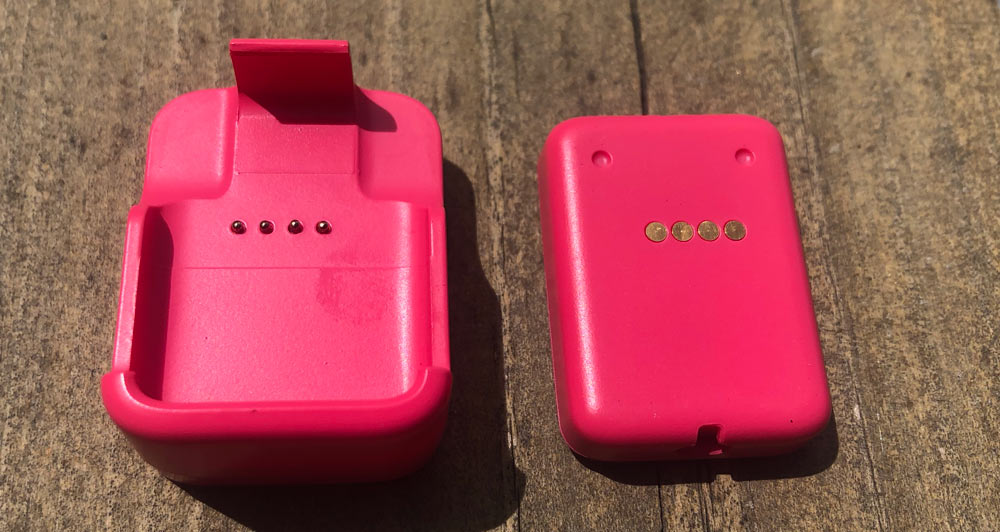
The retention mechanism (lever) does not have a pivot or hinge and instead relies on the material flexibility to deform out of the way during install and removal.
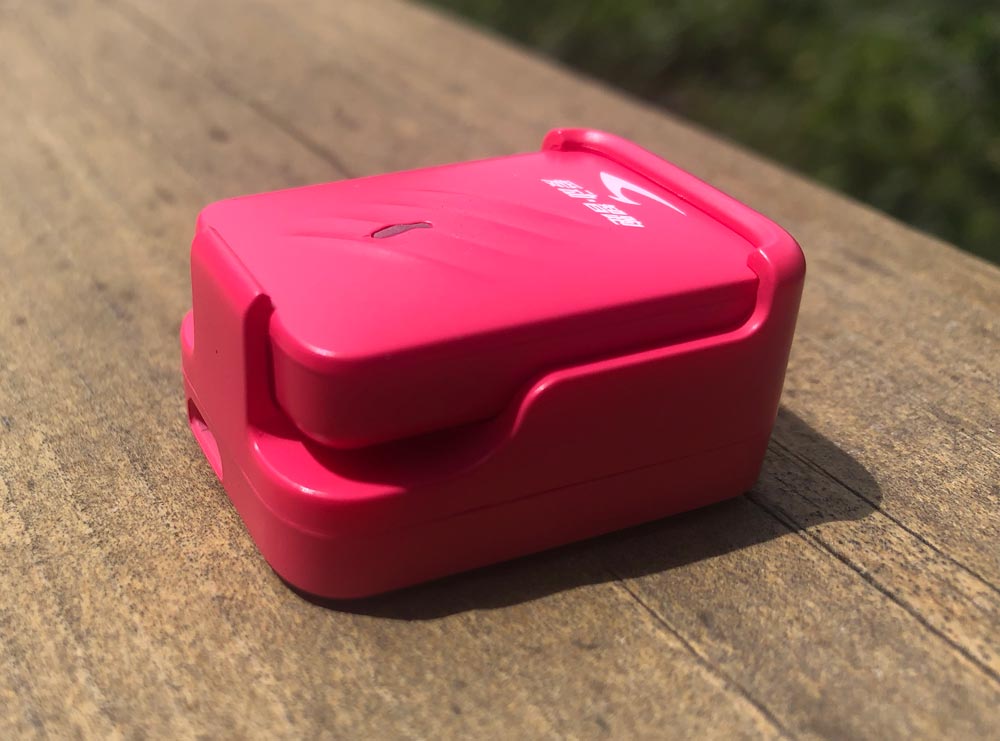
Placing the module in for charging is relatively easy with a positive snap at the end. Retrieving the module however is really difficult. Like break-a-nail difficult as you need to leverage that front edge open to slide the module past.

PART III: App time
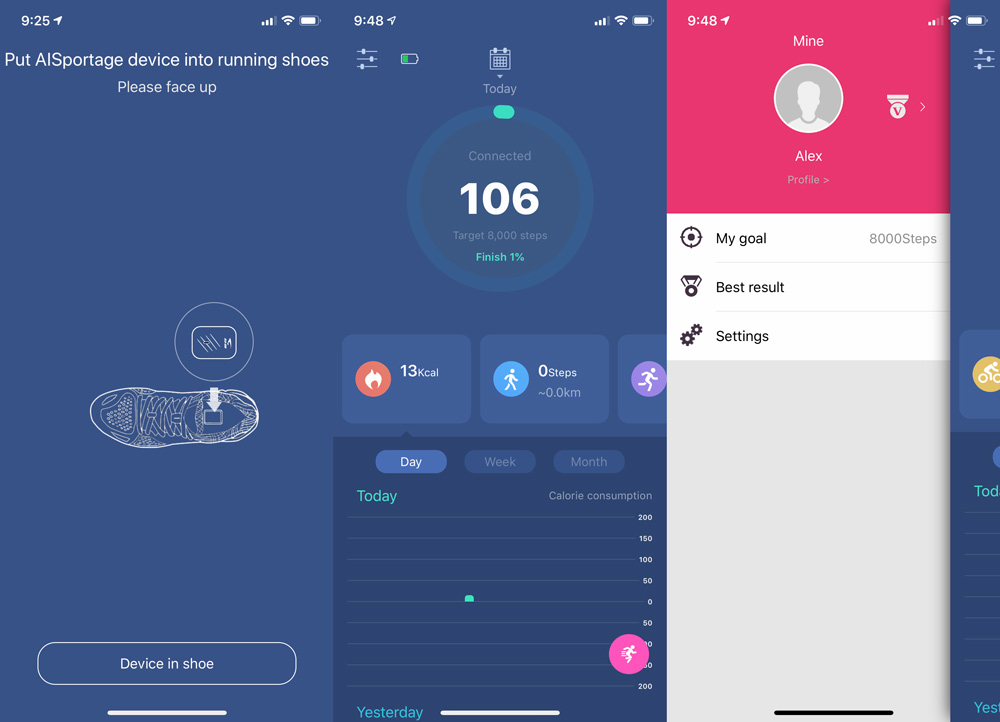
After pairing the module to your phone, launch the app and confirm that it has been placed in (or on) the shoe. The center screen above is the home screen and shows your current step count with selections for day, week or month, along with a side scroll sections of calorie, steps, running, cycling and stair metrics that you can click into for more detail. Tapping the upper left sliders icon takes you to the third screen above where you can edit your goal and access settings for firmware updates, device pairing and clear the cache. The app actively counts your steps, but to log a run, you will want to click the pink run circle at the bottom right and choose indoor or outdoor run.
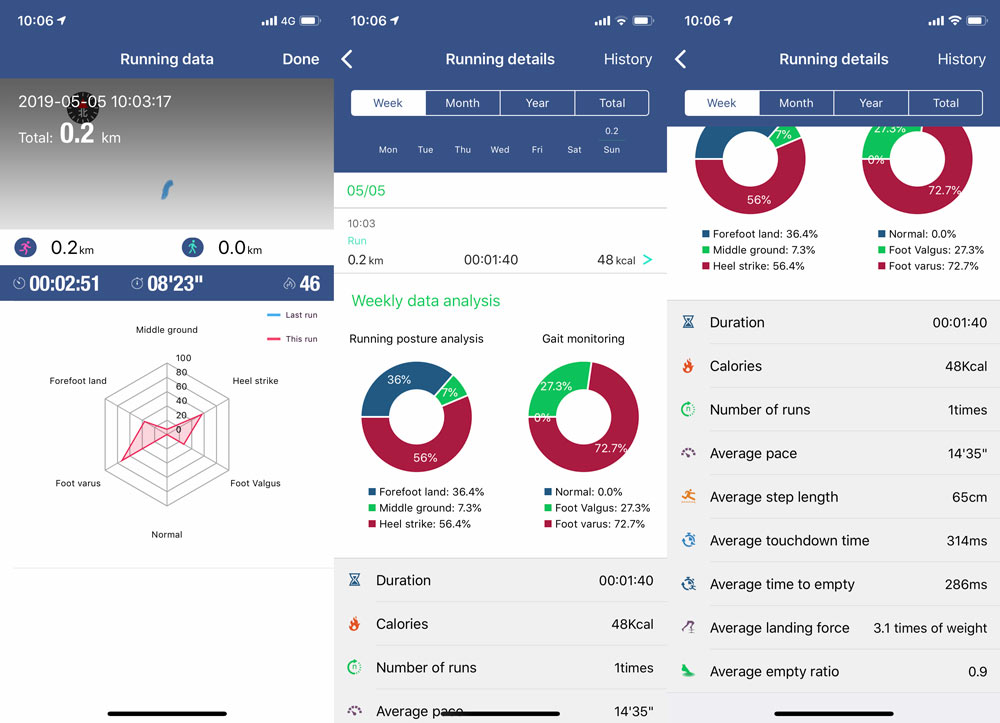
Upon finishing a run and clicking stop in the app, you’re immediately presented with the first screen above. At the top it shows the duration, estimated time for a minute and calories burned. Just below is a very cool spiderweb graph showing balance of forefoot to heel landing and angulation of knee/ankle. It’s then summarized on the next screen (two screenshots above to catch all of the scrolling), but interestingly enough there is no way to find the spider graph again after dismissing it. This was just a quick run, but you can see that I’m a heel striker, with inward angulation that lands with 3 times my weight. In discussing this with my wife, she assured me I would injure myself quickly without learning to transition to more of a forefoot strike.
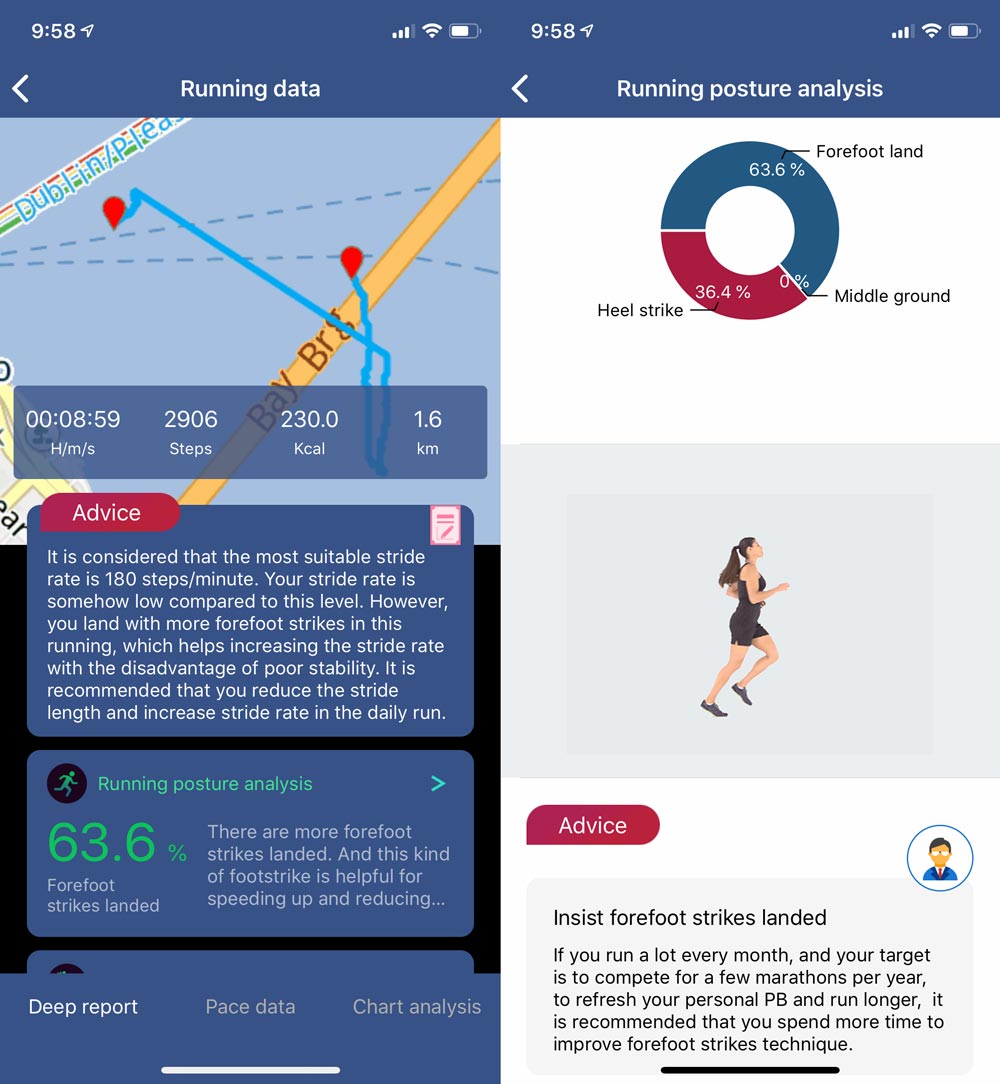
The screens above are from one of my wife’s runs. As you can see, she lands with more forefoot strikes and the app has advice in multiple areas related to that.
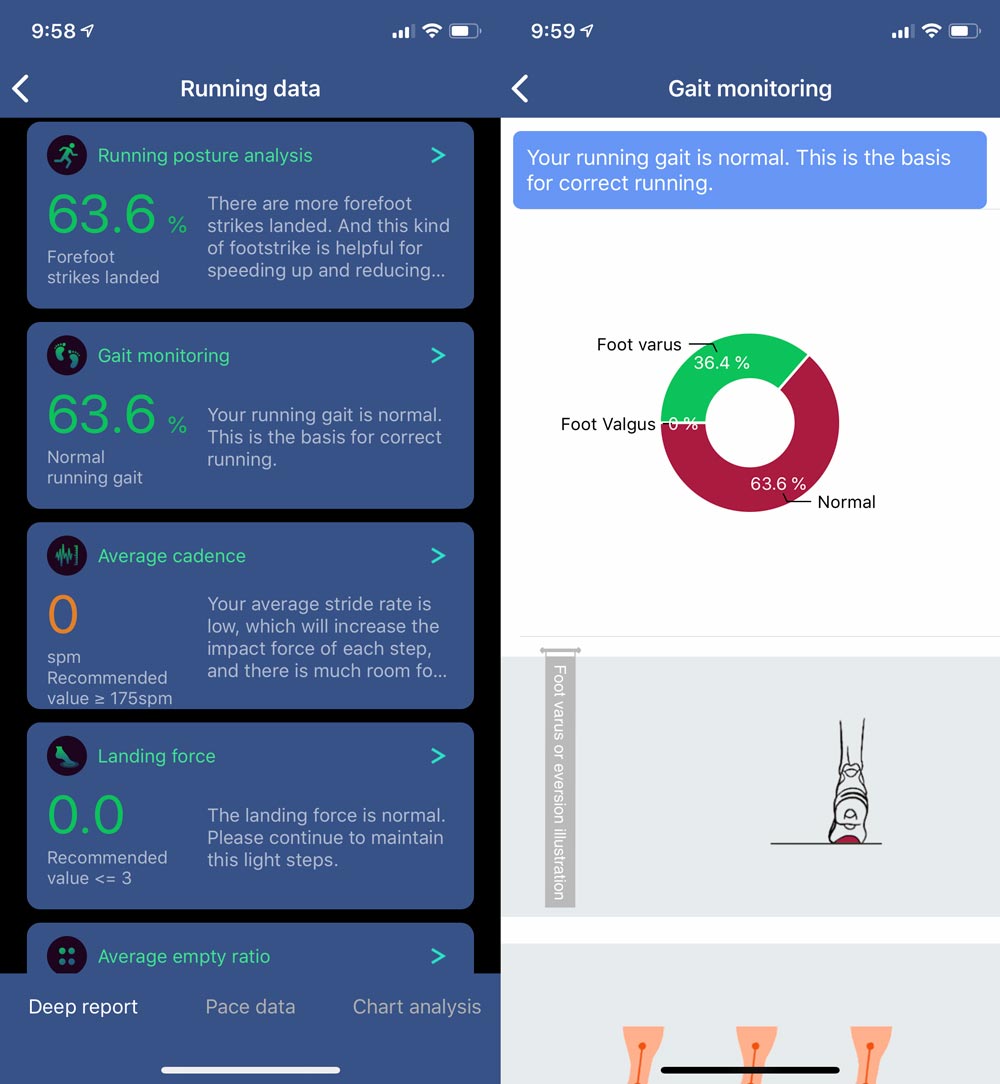
Similarly, the app has details for her on gait as well. The Landing force tidbit above suggests a value ≤ 3 which means I’m in trouble again.
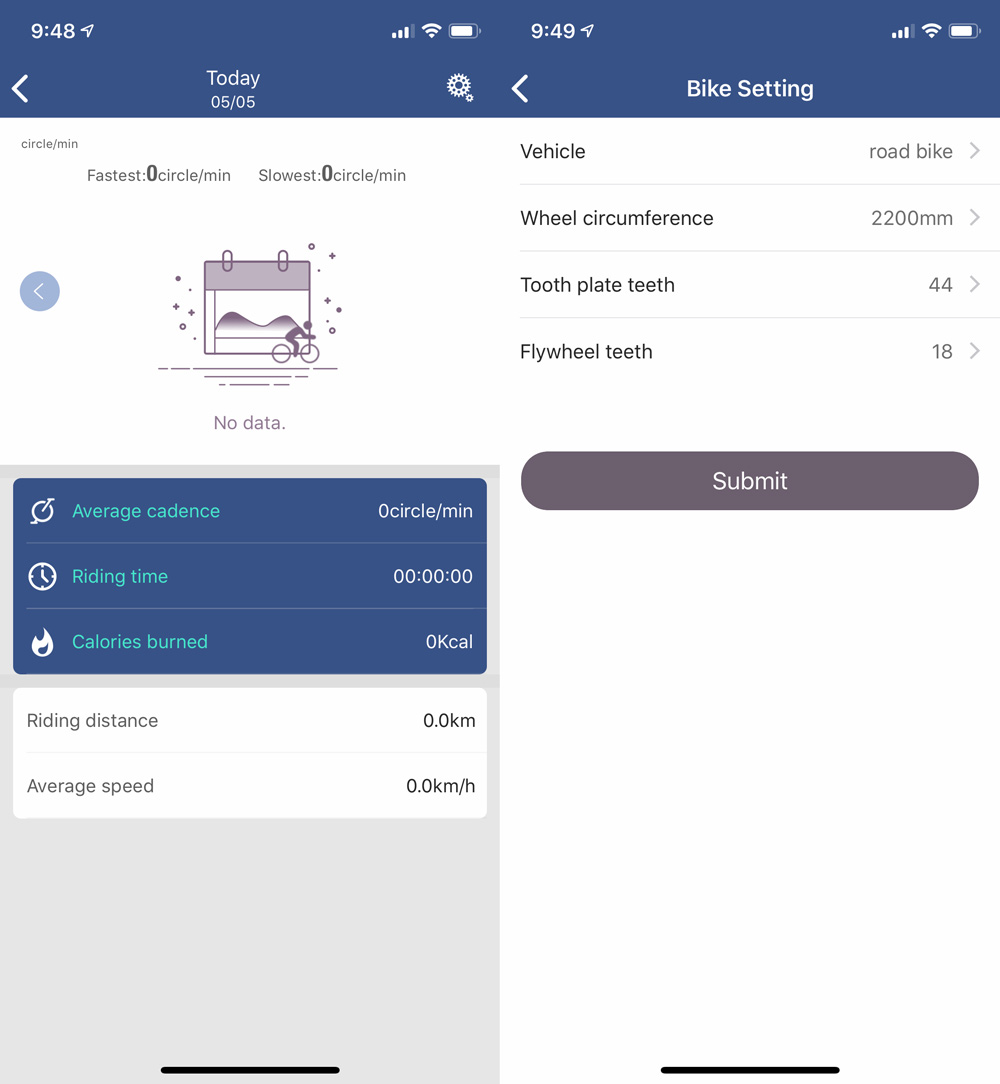
I was excited to find a cycling setting where I could specify bike type. I assumed that it would auto detect a cycling event, but it did not. I’m now guessing that you would also need to click the pink “start run” button and then it would auto-detect that one is cycling due to a lack of any foot strikes.

What’s the takeaway here… I’m struggling a bit with the mix of these products. Data science feels like the main product here in being able to learn about how you run and what you can change to increase performance and reduce strain and injury. There’s a huge benefit to all of that as a stand alone service. The app has a lot of great information and advice, but struggles a bit with navigation and where to find what you’re looking for.

While the shoe is really well made, there are some caveats. One shoe does not fit all runners, although this one should work for anyone in the center of the bell curve. Moreover, left and right feet may have very different strikes and only the right shoe has a cavity for the module. It feels a bit like they needed to make their own shoe to be able to show the value of their module and app. It wouldn’t be surprising as it’s something that many companies have to do; launch hardware in order to ultimately end up as a component or technology vendor within the space they want to be.

It also feels like this would be a product you might use early in your quest to discover and improve your running technique as you’re pretty much guaranteed to have a Fitbit, dedicated running watch, Apple Watch and/or use Strava or Nike Run Club. It’s a tough area to compete in, so maybe they’re looking to break in and end up as a module provider for shoe manufacturers or one of the established wearables. It could explain why there’s no AISportage branding on the shoe, instead choosing to run with a very large ‘intel inside’ logo.

What I like

  • Data collection, analysis and advice of more than steps, distance and route
  • Well made shoe at an affordable price
  • Good value as a package if you’re not duplicating a device or shoe

What needs to be improved

  • Smart module is difficult to install and remove from charger
  • A neutral running shoes may not be the shoe you need
  • Smart module not for sale by itself

Final thoughts

If you’re a runner, you have likely found your way to shoes that work well for your anatomy and running style. From publications like Runner’s World to local running stores that can help you with your gait, strike and other foot positioning, there are multiple ways to get information and help. AISportage has created what may be a great solution for doing that on your time in your own terms. I would hope that they begin offering the technology for sale without the shoe to lower the entry price and help runners hit their stride.

Price: $129 (Currently on sale at $109)
Where to buy: AISportage
Source: The sample of this product was provided by AISportage.

Filed in categories: Reviews

Tagged: ,

AISportage Smart Shoes review originally appeared on The Gadgeteer on May 13, 2019 at 9:00 am.

Note: If you are subscribed to this feed through FeedBurner, please switch to our native feed URL http://the-gadgeteer.com/feed/ in order to ensure continuous delivery.

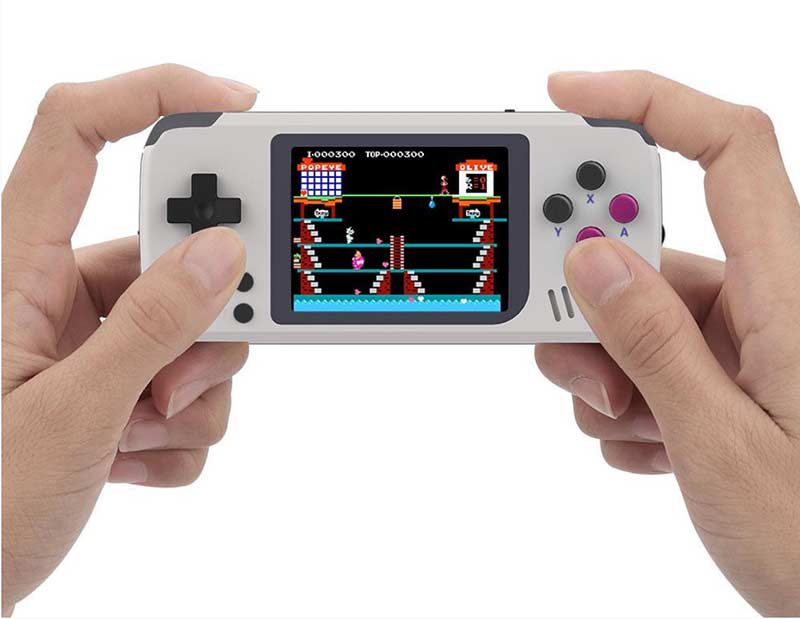
PocketGo puts your favorite classic games in your pocket

NEWS – If you read my Bittboy Game Boy and NES handheld game console review a few months ago, you’ll know that I gave it two thumbs up. Now there’s an even smaller device. It’s the retromimi PocketGo Retro and with it, you can put all your favorite games from the golden age of handheld gaming consoles in your pocket.

The PocketGo Retro supports the following game types: NES/GB/GBC/GBA/SNES/SMD/SMS/PCE/NEOGEO and features a 2.4″ tempered glass IPS display screen, and the ability to save game states so you can play a few minutes or a few hours without losing your place.

The retromimi PocketGo Retro is currently available for pre-order for $39.95 and will ship on June 15th 2019. If you order during this pre-order phase, you’ll save $10 and receive an 8GB micro SD card to hold all your favorite classic games. Head over to retromini.com for all the details.

Filed in categories: News

Tagged:

PocketGo puts your favorite classic games in your pocket originally appeared on The Gadgeteer on May 13, 2019 at 8:00 am.

Note: If you are subscribed to this feed through FeedBurner, please switch to our native feed URL http://the-gadgeteer.com/feed/ in order to ensure continuous delivery.

“Android Replacement” Fuchsia Will Cover Other “Form Factors” as Well

There’s been a buzz for quite some time about the “Android replacement,” what it would be like, when it will be released, etc. There have been leaks about it, and it’s known that Google has plans for it to not only be a mobile software but that it will also replace Chrome OS. Google is now admitting that this project, known as “Fuchsia,” is not only being developed to replace those software but to also be incorporated into other “form factors.” Fuchsia to Run on Phones, Chromebooks and Other “Form Factors It’s great that Google is finally talking about Fuchsia. Not that they’re saying a… Read more

Posted by / May 13, 2019 / Posted in News