Akaso V50 Pro Action Camera – Review and Giveaway

We’ve all seen the GoPRO cameras that allow you to take photos and videos on the go with all sorts of action shots. But you don’t need to get the name brand, as you can get all those options with the Akaso V50 Pro Action Camera. I had the chance to use the Akaso camera, and I have to say I couldn’t be more pleased with all the options. There are so many, that if I covered all of them, this review would be far too long and wouldn’t be delivered in time. But it definitely does the job of capturing… Read more

Debian vs. Ubuntu: The Similarities, Differences and Which One You Should Use

Ubuntu received a lot of love in its earlier releases. It made many seemingly complicated operations, easier for beginners just coming into the world of Linux-based distributions. But around the time the Unity interface was launched, it started to get some hate, too. Objectively speaking, the interface was not good or bad, it did its job well. But it did it differently than what most people were used to. Then, some other changes, like inserting ads in the launch menu and changing the interface once again to Gnome, made some users dislike the distro even more and people began to look… Read more

Solo Parker Parker Hybrid Backpack tote bag review

REVIEW – Tote bags can be great for tossing a bunch of stuff into and walking from point A to point B. But what if those two points get really far apart, or if you’re needing your hands to, say, walk a child or a dog or even sip your coffee? Having the ability to strap the bag on your back may make a simple tote more versatile. This is exactly the philosophy behind Solo’s Parker Hybrid Backpack tote bag. The idea is this: an upscale tote bag you’re not embarrassed to carry into work, but also can use as a backpack or even a sling bag, should the occasion demand. I enlisted the help of my younger daughter, who carries a tote to work and back every day, for testing.

What is it?

The Solo Parker Parker Hybrid Backpack tote bag is a stylish bag with internal organization that can be carried as a tote, a backpack, a sling, or on a roll-aboard extension handle.

Design and features

The Parker tote is a nylon/polyester/faux-leather bag 16″ tall x 11″ wide x 4″ deep. The first thing you notice is that there are few little hits of branding (a single gold logo and an embossed “SOLO New York” brand on the rear pocket.


On the reverse side, there are two sewn-in padded backpack straps that terminate in buckles. Lengths of 1″ webbing attach to sewn-in D-rings at each lower corner. The straps can be unclipped and placed in a purpose-built full-length pocket behind the zippered pocket. You can also attach the left strap to the lower right hand (or vice-versa) and wear the bag as a sling over either shoulder. While the inward curve of the straps makes this a bit awkward, it’s still not a bad way to carry things if you’re needing to swing the bag around front to access the contents.


Cross-stitched and fully sewn into both side of the bag is a one-inch thick double tote-type handle. The center few inches of each handle have been doubled over and stitched to form a comfortable grip and there’s a leatherette snap-on strap to hold them together. (This was one of our only complaints – there’s no way to hide or stow the tote straps when you’re carrying the bag with the backpack straps.)

The lining in all pockets is a grey and white mattress-ticking pattern striped vertically. The light color makes it easy to see things in the depths of the pockets. The webbing is a fine-grain nylon seatbelt material that feels like butter. All the hardware is a gold metallic that isn’t too gaudy, but it is not subtle. The zippers are very free-working, but not weather-proof.


The top of the main compartment is closed with a single-pull zipper 16.25″ long. Within this main area is a separated sleeve that will hold laptops or tablets up to 16″ wide by 11″ tall and maybe 2″ thick. (We couldn’t find anything to overfill it! Her 12.9″ iPad rattles around in it.) The other pocket matches it, but has a series of organizational pouches down one side. There are two medium-diameter pen loops, two card slots that could hold maybe 5 cards each, and a center patch pocket that could fit a Moleskine chair, but not a full-sized pocket notebook. They are pretty tight. Earbuds can fit into one of the card-sized pockets. (See picture) Above these is a zippered pocket that can hold quick-access items. My daughter uses this for her keys/ID for work.


On the outside, there is a zippered pocket on both front and back. These measure about 6″ across by 12″ deep. Perfect for a Plus-Sized iPhone and car keys with the requisite wad of loyalty cards, hair ties, and gym access tabs. Below the pocket opposite the metal logo is a 3″ wide band made from the same material as the main body of the bag. When placing the tote over your roll-aboard handle, the zippered pouch on this side is very handy for boarding documents, foreign currency, or other travel needs.


Final verdict? “I like it in general. I wish the main pocket was a little bigger (there’s only room for my wallet really). I don’t really use the backpack straps but they tuck away nicely. The smaller pockets on the inside are nice to separate headphones, chapstick, etc.”

What We Like

  • Multiple carry options
  • Stylish look with quality materials
  • Inner pockets keep everything from going to the bottom

What We’d Change

  • Wish the central pocket had a bit more room
  • Wish the tote handles could be somehow tucked away while wearing as a backpack.

Final thoughts

As usual with Solo bags, the fit and finish of the Parker Parker Hybrid Backpack tote bag are first-rate. While the backpack straps are rarely needed in my daughter’s case, the tote straps not being easily hidden made it odd looking on the few times using them. She’s happily using it as her daily carry currently. I’m interested in her update after her next trip!

Price: $69.99
Where to buy: Company website and Amazon
Source: The sample of this product was provided by Solo.

Filed in categories: Reviews

Tagged: ,

Solo Parker Parker Hybrid Backpack tote bag review originally appeared on The Gadgeteer on July 9, 2019 at 11:00 am.

Note: If you are subscribed to this feed through FeedBurner, please switch to our native feed URL http://the-gadgeteer.com/feed/ in order to ensure continuous delivery.

Pitaka Air Trio triple device wireless charger review

CROWDFUNDING REVIEW – How many of you need to charge more than one device every night? I’m guilty for sure. I’ve been an Apple addict since playing games on my Apple II as a teenager. These days I’m not without my Apple Watch (series 4) and my iPhone X. Both of those end up needing a charge every night and my iPad Pro (11″) frequently does as well. Well as it turns out Pitaka has a new product that solves that exact issue. It’s called Air Trio and I’ve got a pre-production unit from Pitaka that I’ve put through the paces to tell you all about. Here we go.

What is it?

Air Trio is a triple charger that can charge an Apple Watch, a device with wireless charging and a larger device with USB-C. It’s also available with a Lightning connector instead of the USB-C if that suits your quiver of devices better. There’s a lot of unique features, so let’s push on.

What’s in the box?

A reminder that this is a preproduction unit so some details could change before the Air Trio ships.
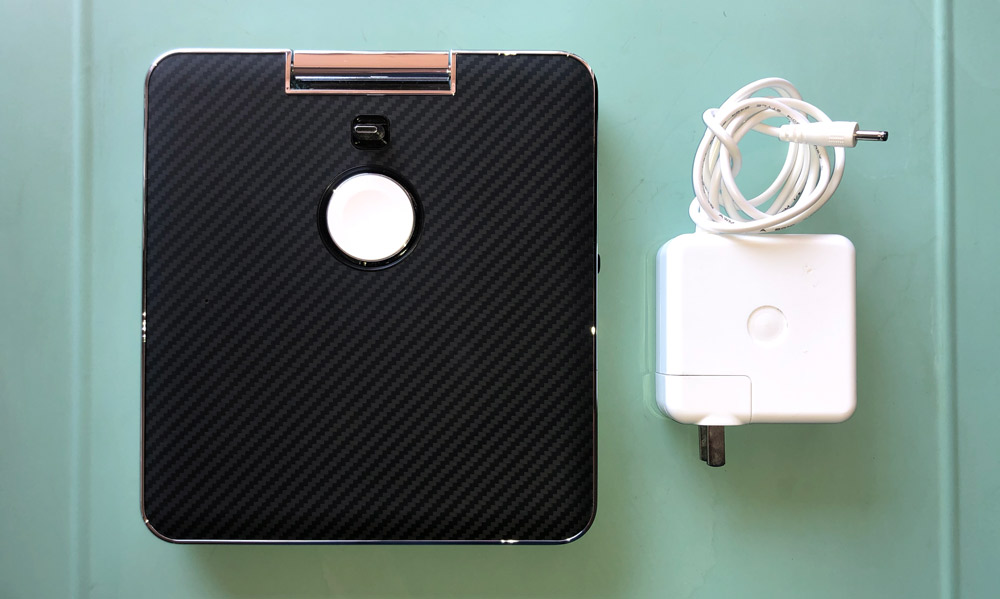
  • Air Trio
  • Wall adapter (supplies all necessary power)

Hardware specs

Device Support: 3 devices; Apple Watch, Wireless Phone, and USB-C tablet. (Lightning optional instead of USB-C)
Power:
– Input: DC15v/3.5A
– USB-C Output: 5V/3A, 9V/2A, 12v/1.5A
– Apple Watch Output: 5V/1A
– Wireless Output: 3 coils supporting 7.5W and 10W fast charging

Design and features

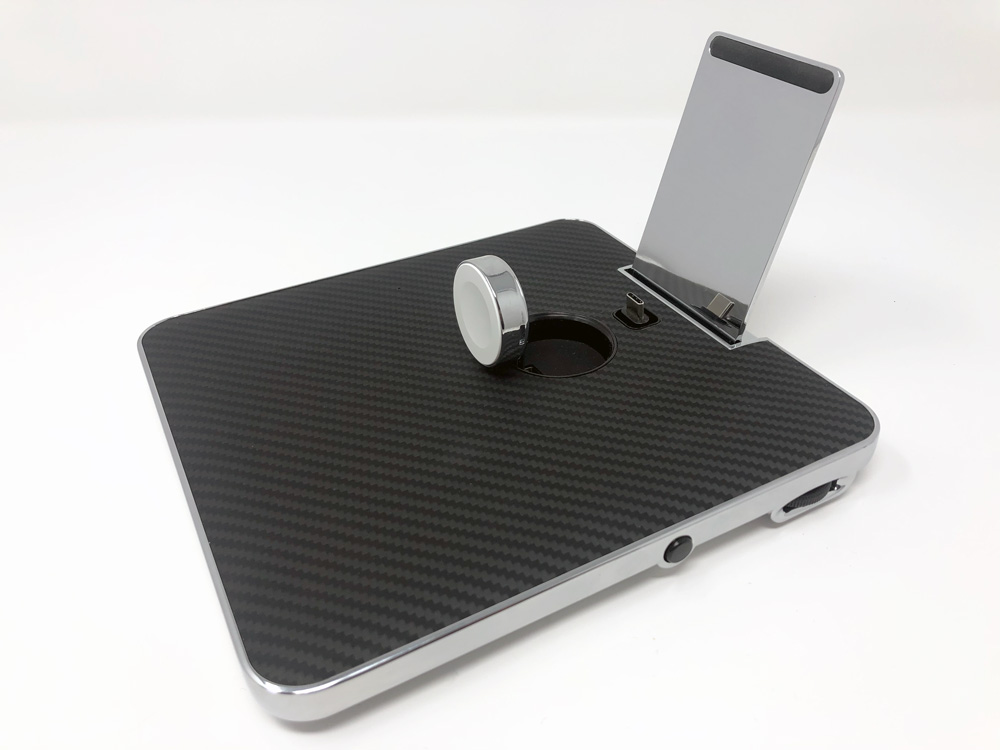
Pitaka has followed its brand ethos with the main surface of the Air Trio. The entire top is their aramid fiber with the silky smooth soft-touch finish. The Apple Watch charger sits in the back half just in front of the USB-C connector and adjustable tablet rest, and there’s a small punch-hole to the left of the watch charger with a recessed LED.

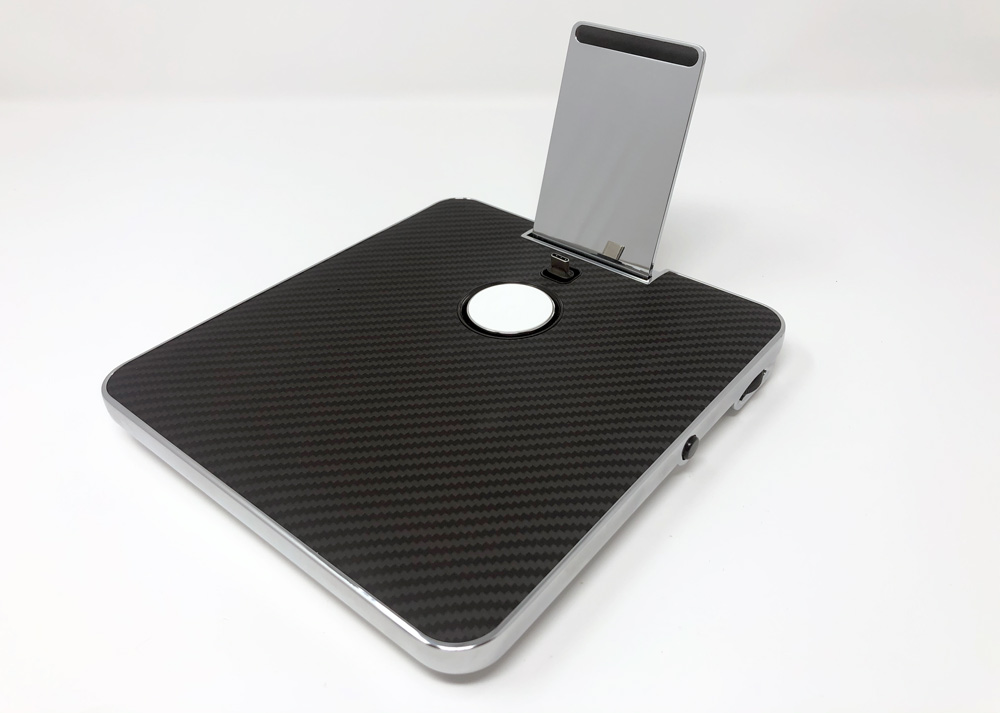
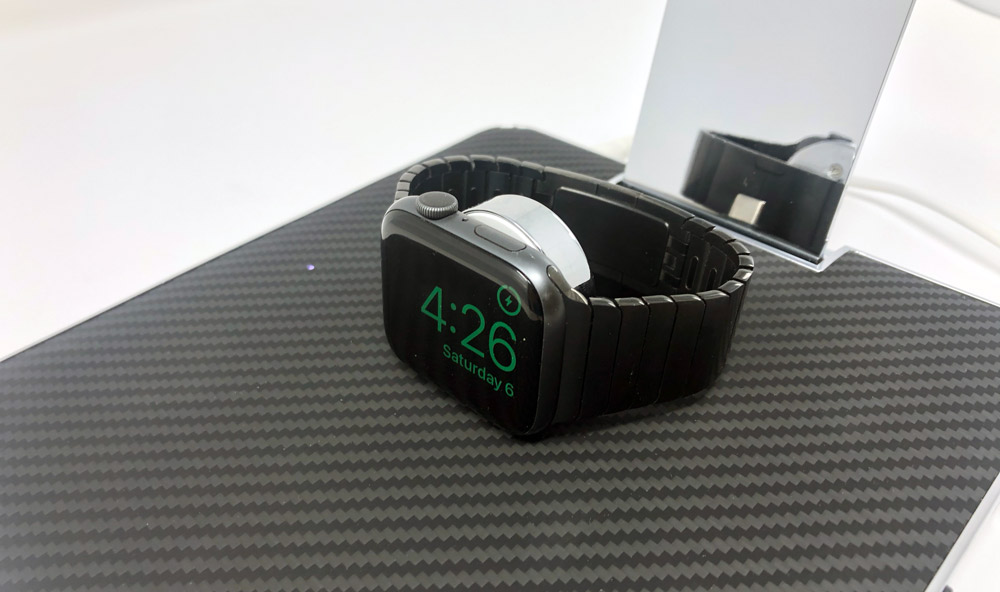
Both of these connectors/chargers have additional functionality. On the right side of the device is a button which releases the Apple Watch charger allowing it to slowly rise to a vertical position. Here’s a closer look.

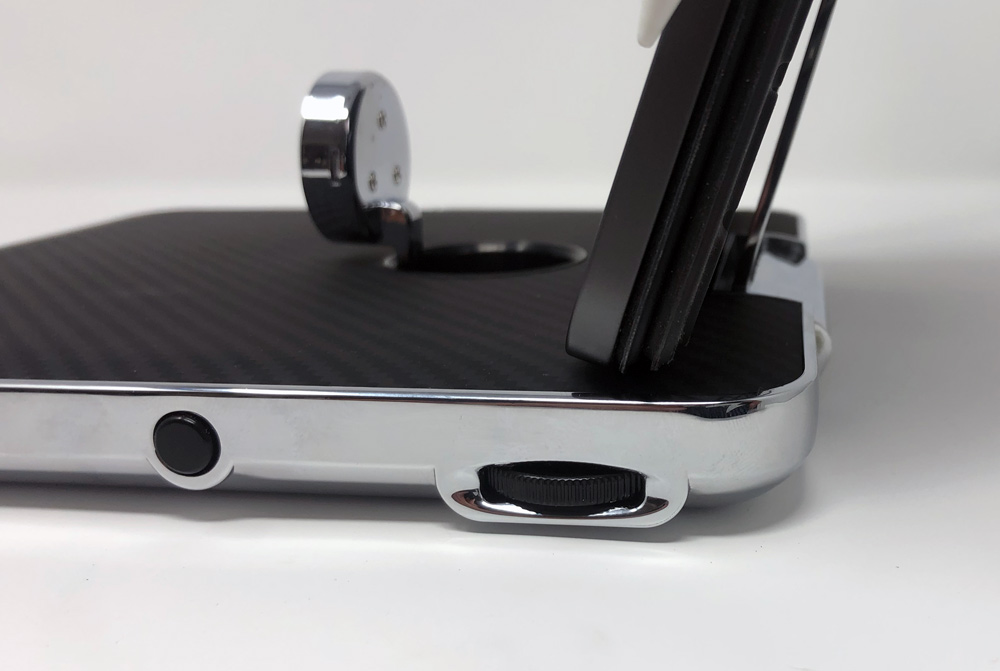
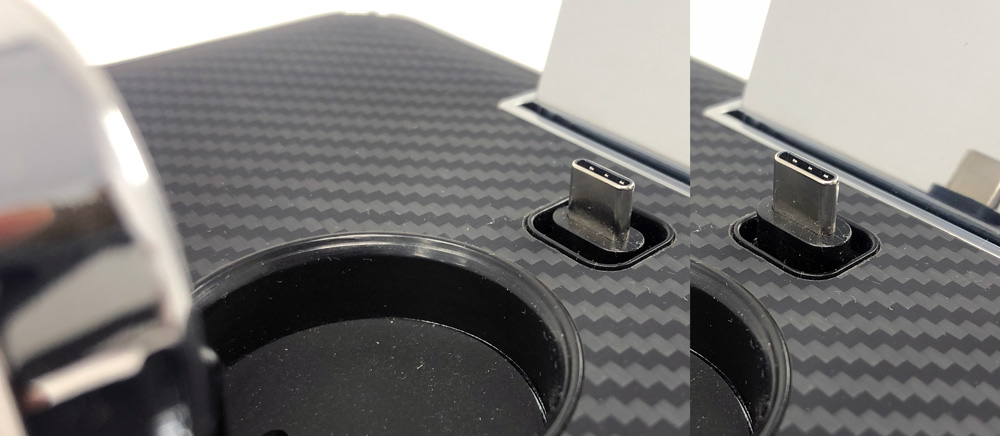
The USB-C has about 15º of range either side of the vertical position which allows for flexibility while connecting and disconnecting devices or adjusting the lean of your tablet. The dial on the right side raises and lowers that connector so you can match the depth of any case you might have on your device. Here’s a look at the high and low limits of that adjustment.

At the back of the device is the pivoting tablet rest which you can adjust between vertical and any amount of recline all the way to folded under for stowing. Without taking it apart I can’t really tell, but it’s either a friction pivot or opposing springs and holds its position without being difficult to move.

Also on the back is the power-in port (left) and an additional port which houses the LDR (Light Dependent Resistor) which enables a sleep mode of reduced brightness.

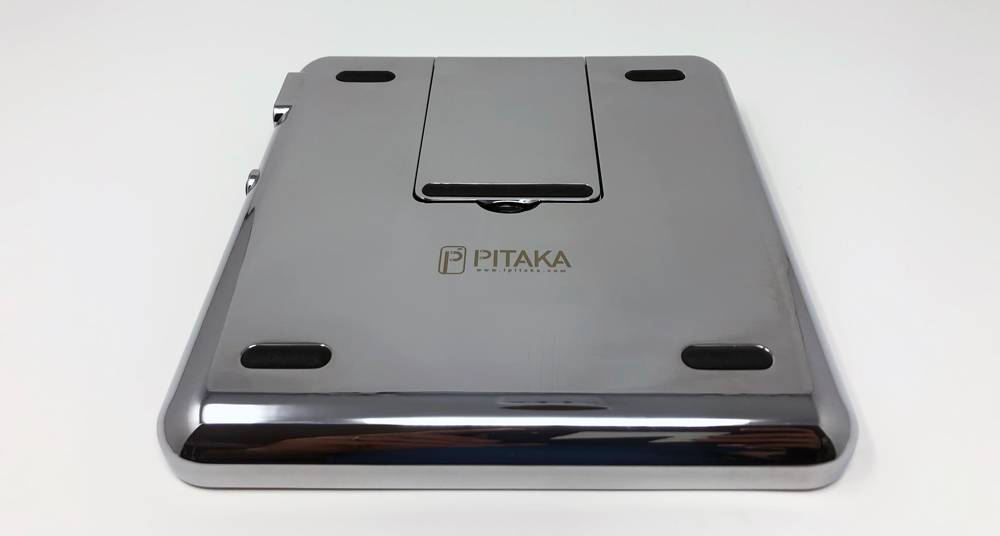
On the bottom are four rubber feet for a stable stance and it’s here that you realize just how much of the device is a polished zinc alloy. The entire bottom, sides and complete tablet rest have this finish.

The wall adapter resembles a MacBook charger with a fixed cable that could stand to be a bit longer and barrel jack at the end.

Setup

The sample I received did not have any kind of instructions but I’m pretty confident the retail units will. Regardless, setup is pretty easy. Figure out where you’re going to place the unit, connect the wall adapter’s barrel jack to the back of the Air Trio and then plug the adapter into the wall. Any additional setup is specific to your devices so let’s move on to how it works.

Performance

First off, the Air Trio has some significant heft in all the right ways. It weighs in at a little over 2lbs, 3oz. For reference, my 11″ iPad Pro with keyboard and pencil is about 1lb, 110z, so the stand has plenty ballast to keep from tipping over even before you add a phone and a watch.

For my purposes, I’ve been using the Air Trio on my nightstand. It’s super handy for being that last stop as I go to sleep. I can plop my watch and phone down and then dock my iPad after I finish getting just enough blue light to let me have trouble sleeping.

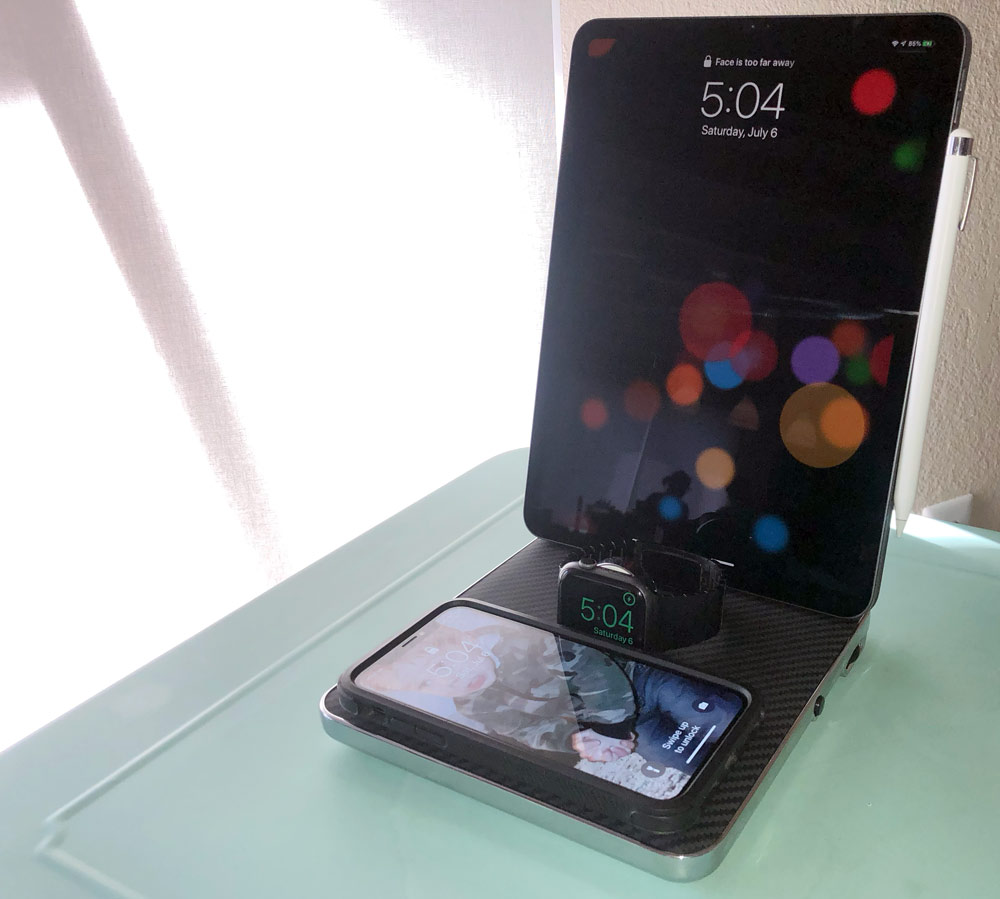
The iPad rest is set a little shy of vertical. I have the Apple Smart Keyboard Folio on my 11″ iPad Pro and between the lean angle and the amount of space between the connector and the rest, there’s no issue docking it with the cover closed or folded behind.

I mentioned the adjustable height USB-C before which lets it adjusts for both case depth and/or your lean angle up until the point you go beyond the connectors angle limitation. Only things to know here is that if you’re running a case with a charge port really tight to the Apple USB-C cable, it could be tight. It’s also really tricky to dock your iPad with a single hand because the connector moves forward and back. This gets even tricker if you’ve got the Apple Watch charger flipped up as I do.

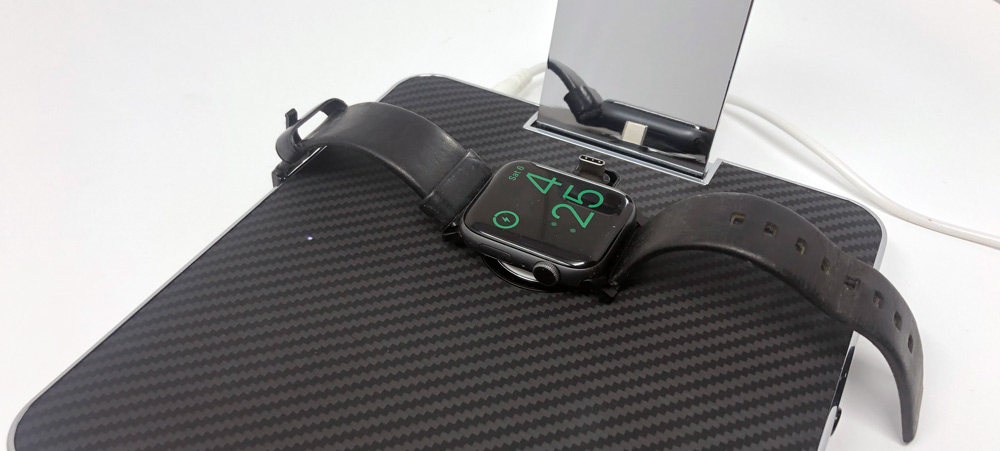
So, why does the charger flip up? One, it enables nightstand mode on your watch. Super useful for me as I like my bedroom dark and the watch display will time out until I knock on my nightstand for it to display again. Two, some of the bands available for Apple Watch do not fully disconnect which makes charging them on a flat surface very hard, if not impossible. Here’s Apple’s Link Bracelet to demonstrate that point and one of a flat charging position.

All the real estate to the front is for wireless charging your phone or other accessory. My iPhone X fits there really well, perhaps feeling a bit cramped when the watch charger is flipped up and occupied. Those of you with larger phones may find your phone overhanging the front a bit. There are three charging coils up there to help deal with the different coil placements in phones.

Overall, the Air Trio is a solid accessory if you’re charging a trio of Apple accessories. Here’s some things to be aware of…

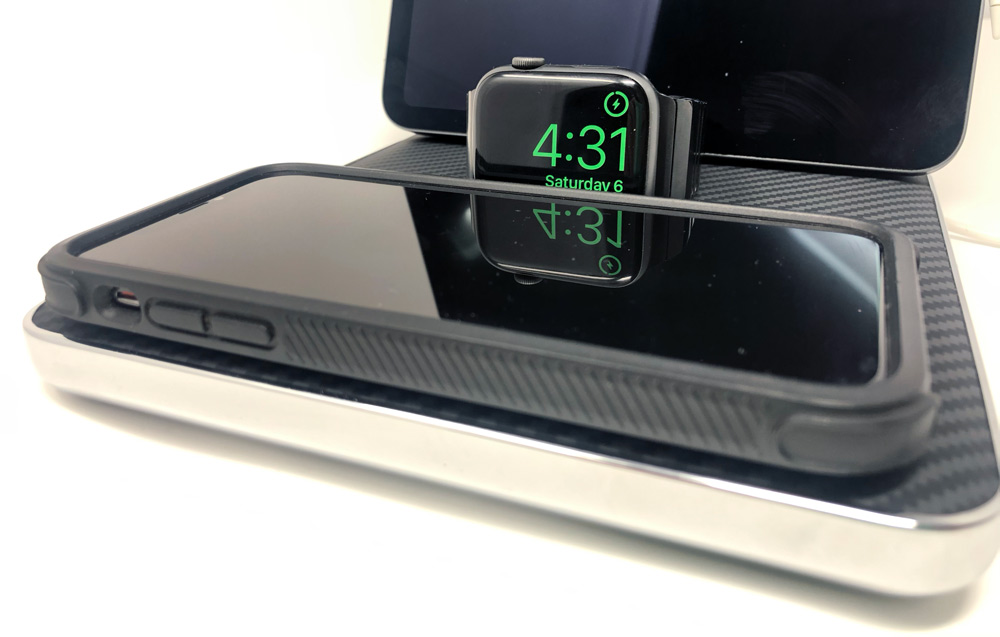
As you can see, some of the screen of my 44mm watch is obscured when I also charge my phone. Definitely not a deal breaker by any means, but if your case is much thicker it could be frustrating.

The charging coil is relatively tolerant to position, just experiment with your particular phone and adjust to make sure you’re actively charging.

With as heavy as the Air Trio is, I was expecting to be able to grab my iPad with one hand for removal. Alas, the USB-C connection is a good one and I’d rather not wiggle the whole thing until it releases. One hand on the front of the base lightly while the other lifts and you’re good to go.

That little LED to the left of the watch charger is really bright, and for some reason, it blinks while your devices are charging. If you put a piece of tape over the light sensor at the back, the LED power cuts in half. I’m relying on my devices to tell me they’re charging so my piece of tape is going over the LED itself.

Finally, you can order any color you like as long as it’s Aramid/Polished Zinc (carbon fiber look with chrome). This is sitting on my nightstand, so not a huge deal, but otherwise could be polarizing for potential customers.

What I like

  • Fast charging for 3 devices with 1 charger (remember to choose USB-C or Lightning for the tablet at purchase)
  • Heavy and stays put
  • Works with cased devices and any watch band combo

What I’d change

  • Remove the LED since your devices show charging status
  • Power cable could be a bit longer for getting behind furniture
  • More color options, less or no chrome

Final thoughts

Pitaka has a great charging product here and it’s less Apple centric as it might initially sound. The Apple Watch charger is actually the only Apple specific thing as the USB-C rear and wireless front chargers can work with many devices. I really appreciate fewer cords and the Air Trio is a sweet spot for the accessories I use daily. It replaced 3 separate chargers on my nightstand with a single unit that works very well for me.

Price: $129 and up
Where to buy: Kickstarter (campaign launches in 2-3 weeks)
Source: The sample of this product was provided by Pitaka.

Filed in categories: Reviews

Tagged: ,

Pitaka Air Trio triple device wireless charger review originally appeared on The Gadgeteer on July 9, 2019 at 10:00 am.

Note: If you are subscribed to this feed through FeedBurner, please switch to our native feed URL http://the-gadgeteer.com/feed/ in order to ensure continuous delivery.

Etekcity Smart WiFi Light Switch review

REVIEW – We are smart home fanatics at our house.  We have almost every light in our house, including ceiling fans controlled by Amazon Alexa.  The few lights we don’t have under Alexa control are either lights we rarely use, or they are three-pole lights.  Three pole lights are lights that are controlled by two different light switches.  That means each switch has extra wires coming into it compared to a single pole switch.  Up until recently, there were no smart light switches available that handled three pole switches.  So when I was given the opportunity to review the Etekcity Smart Wifi Light Switch that can handle three poles, I jumped at it.  Let’s see how it works.

What is it?

Etekcity makes several smart products.  Two of which are smart switches.  One is for a standard single pole (ESWLO1) and the other for three pole switches (ESWLO3).  I received the ESWLO3.  Like I stated above, a three pole switch is a switch that can control a single light or lights along with another switch.

What’s in the box?

  • 1 x Safety Card – states that the device should only be used to control incandescent, LED, Halogen, and compact fluorescent lightbulbs.  You should only use the device indoors, and turn the power off while installing.  It also mentions contacting an electrician if you are in any way uncomfortable with installing the device.
  • 1 x Facebook group foldout card – asks you to join their Facebook group
  • 1 x Etekcitizen foldout card – will give you an extra year of warranty, free products, and exclusive deals if you join their Etekcitizen group.
  • 2 x packages of hardware to install two light switches
  • 2 x smart light switches including backplates.  I have one facing up and one facing down so you can see the wires coming into the back of the unit.
  • 1 x user manual

Hardware specs

The big thing to note about these switches is that they are specifically designed for three pole switches.  You have to have a neutral wire, ground wire, two traveler wires, and a hot wire in your box for this device to work.  Also note that even though they give you two switches, you only need to replace one of the two switches on a three-pole system for it to work.  So technically, you can replace two different three pole setups with a single box.

Setup

The first thing the instructions tell you to do is to separate the face plate from the main switch.  This was easily done in the picture above by just popping the switch out by pressing on it.

The picture above shows you the light switch I am replacing.  Its partner switch is part of another two switch bank that I did not feel like messing with.

I did not take pictures of the actual wiring.  There is a great video put out by Etekcity showing you how to install the switch.  I ran into two ‘issues’ when installing this switch.   My original switch had four wires coming out of it.  The two traveler wires, a ground wire, and the hot wire.   I had to dig into the back of the box to find the neutral wire already tied off to another neutral in the box.   So I ended up adding the new switch neutral wire to an already existing neutral wire pair to have a total of three neutral wires tied together.   The other issue was just the amount of wire I had to try and stuff back into the box.  I have large metal boxes for my switches, but I guess I have a bunch of extra wire coming into them.  I really had to stuff those wires back in order to get the large switch to fit flush into the box.   The video of the install you can find on YouTube here: Etekcity Three Pole Light Switch Install Video

The picture above shows the light switch installed. You just simply touch the power button area and the light will turn on or off.  You don’t feel any kind of switch movement.  It is a touch sensitive plate.  The WiFi indicator below helps you connect the switch to your WiFi and shows you if the switch is currently connected.

After installing the switch, the next thing I did was to install the Vesync app.  This is available for both Android and iOS.  In the screenshots above you can see the app first asked for an account or you can create an account.  I created one with my email address.  An email was sent to my account to verify it before I could continue further.   Once signed in, I was asked to add my first device.

As you can see from the screenshots above there are many products from Etekcity.  I chose switches and was then presented with two choices.  I chose the three-way switch.

The app then asks to make sure the switch is installed properly.  I tested this by being able to turn my lights off and on with the switch manually.  My next step was to press and hold down on the power button for five seconds.  After that period of time, the WiFi logo below started to blink on and off.

The app then instructed me to connect my phone’s WiFi to the switches WiFi.  You can see the Etekcity WiFi name in the screen shot above.  I connected my phone to that and went back to the app.

The next step which I won’t show, was me having to place my WiFi password into the app.  I was then presented with the screen above that did a count up to 100% as it connected to my WiFi.  Once connected I was able to rename the switch to whatever I wanted to.  I chose the word Breakfast since it controlled the lights in my breakfast area.

The first screenshot above shows the main control screen in the app for my breakfast switch.  The app has several nice features where you can set a schedule to turn the light off an on (great for when you are on a vacation) and a basic timer.  The other screenshot shows the device in my Amazon Alexa app.  I simply added Vesync as a skill and logged into my account.  I then searched for devices and it found it.   In Alexa, I could add the light to my group ‘all lights’ or any group I wished.

Performance

The switch has been performing flawlessly for how we use it.  I have not tried any of the scheduling features.  I did notice there is a firmware update, so I will be sure to update the switch when I get next to it again with my phone.

What I like

  • The app is really easy to use.
  • Setup of the app and getting it to recognize the switch was a breeze.
  • I like how the switch is just a touch panel and not a toggle switch.

What I’d change

  • Please try and not make the switch box so deep.  I realize it may have a lot of technology, but it makes it difficult to install with all the extra wires.

Final thoughts

I can highly recommend this switch for anyone looking to convert a three pole switch to a smart switch.  I have installed several other smart switches and it was very easy to set up app wise.  Like I stated earlier, I just wish the switch box were not so big.  People with small plastic switch boxes in their walls will not be able to use this switch because it will be too big with all the extra wires involved.

Price: $49.98
Where to buyAmazon
Source: The sample of this product was provided by Etekcity.

Filed in categories: Reviews

Tagged: ,

Etekcity Smart WiFi Light Switch review originally appeared on The Gadgeteer on July 9, 2019 at 9:00 am.

Note: If you are subscribed to this feed through FeedBurner, please switch to our native feed URL http://the-gadgeteer.com/feed/ in order to ensure continuous delivery.