Normally, picking up a laser measure for the first time is accompanied by the thought or statement, “how far away is that [object]?” Then after a quick press of a button and flash of red light, a result is displayed that is usually accompanied by the thought or statement, “Cool!” The novelty and simplicity of these devices is underscored by two very cool operating principles: the speed of light and laser frequency is measured in order to calculate the measured distance, and accurate measurements require the optics and circuitry to function at MHz frequencies. The Gadgeteer was presented a Tacklife HD-60 to review. Beyond providing an accurate distance, the Tacklife has some neat features to simplify taking measurements without tape or an assistant. Read on to see what I think!

The Tacklife HD-60 comes in an easy to open, environmentally friendly and lightweight cardboard box. Inside is the laser distance measure, two AAA batteries, a nylon belt case, a lanyard an instruction booklet and a 24 month warranty.
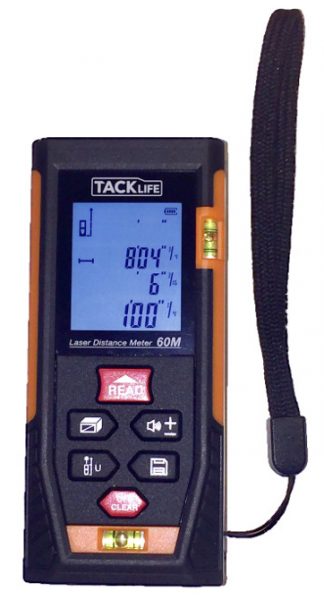
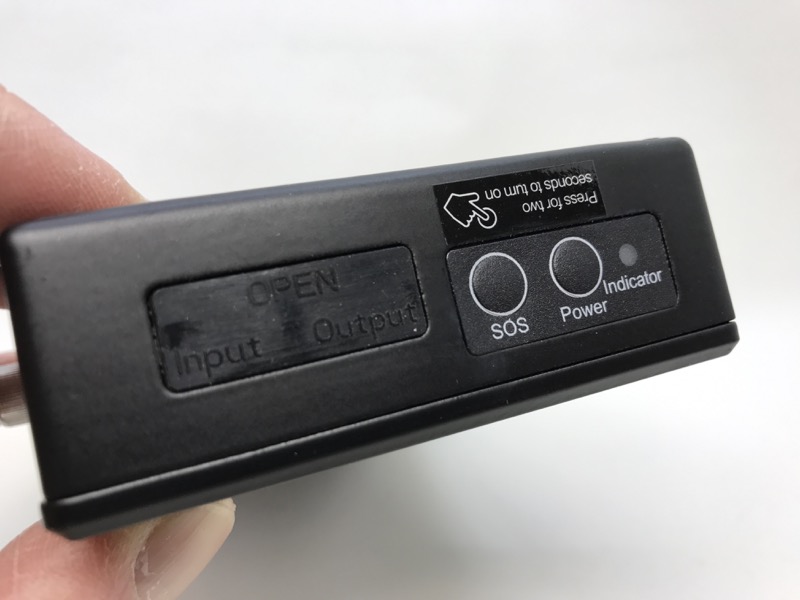
The unit is about 2.4” wide, 1” tall, and 4.3” long and weighs 4 oz with batteries installed. The exterior of the unit is a composite bi-injection rubber and plastic. The rubber will absorb hits more than a completely plastic case and provides a better gripping surface to prevent drops in the first place. The fact that this is bi-injection molded should provide enhanced durability over a plastic case with a rubber boot. One thing that would potentially make this more usable is a tripod mount. The buttons are soft silicone and laid out in a hexagon on the bottom half of the topside. In fact, the entire bottom half of the unit is uniform rubber membrane which will prevent dirt and liquid from getting inside to the circuit board better than individually seated buttons. Most of the buttons are multi-functional, but after a short amount of practice using the unit, pressing the correct button for each feature is easy to remember or easily determined by a quick glance at the icons on the button face. The topside of the unit also includes a horizontal and vertical spirit bubble to help ensure that the measurements between the measurer and the target are not at an angle. (A deviation of little more than 5° will change the measured distance by a foot at 196 ft.)
The unit is powered by 2 AAA batteries which were easy to install and, when the time comes, should be easy to replace because they are readily available. If the unit is not operated for more than 150 seconds it shuts off automatically to conserve the battery power. A fresh set of batteries can take 8000 single measurements.

The unit is powered on by a quick press of the read button. The display is back-lit in a cool white hue that makes the LCD numbers and icons on the screen easy to read in low light conditions. All of the LCD display segments are displayed on startup to enable the user to verify the display is fully functional. At its most basic level the display shows an icon depicting if the point of reference for the measurement is the front or rear face of the unit, battery strength, 3 memory registers of the previous three readings, the current reading, units for each of the readings, and an icon to show if the mode of operation is linear distance, area, volume, or distance determined by one of three Pythagorean constructions. The keypad is not back-lit, but it makes sense that the keys will be easy enough to see in the conditions that allow you to see where you are measuring from and to.
The manual is well written and is available here. But just to summarize on the mail features, I’ll describe how to take a measurement. To take a reading the read button is pressed. The laser is lit to allow the user to target the measurement. Once the measurement is aligned the read button is pressed again. The laser flashes twice and then the result is displayed. A long press of the read button will cause the laser to remain illuminated and the measured result to be updated 80 times a second until the read button is pressed again, locking the result onto the screen. In the constant read mode, the maximum and minimum results obtained are also updated, and these are also saved once the constant read mode is exited. Depending on the situation, the operation of the measurer may be improved by using the audio function. Holding the button marked with a speaker will toggle the beeps associated with a keypress and with the conclusion of a measurement. Results may be saved by holding the save button until a number is displayed at the top of the screen. Saving has a 30 result memory, which may be accessed by hitting the save button and scrolling through with the Pythagorean button (forward) and the audio/+- button (backward).
The Pythagorean constructions can be quite useful, especially for measuring halfway up a tall wall, or a segment of a long corridor, where a laser target would be required to demarcate the extents of the desired measurement. Before getting to the Pythagorean modes there are two other calculators built into the unit: area and volume. Pressing the calculator button once brings you to the area calculator. to perform a calculation ensure that you read the measure of the length that is blinking on the picture on the display. Pressing the calculator button again allows you to calculate volume. Note that for area the shape must be a parallelogram, rectangle or square and for volume, the floor and ceiling must be parallel. Pressing the calculator button a third time brings you this calculation:

Enter the distance a and then b by pushing the read button (the user manual says to push off/clear, but this is incorrect). Make sure that the base of the measurer doesn’t move so that the measurements are all taken from the same location. I measured my wall and later confirmed the length by measuring from the floor the ceiling and the measurements were within an 1/8 inch. This won’t work if x is not perpendicular to b, but will work even if the measurement is not vertical. Pressing the calculator button a fourth time brings you this calculation:

Enter the distance a and then b by pushing the read button (the user manual says to push off/clear, but this is incorrect). Make sure that the base of the measurer doesn’t move so that the measurements are all taken from the same location and that the measurement a and b are perpendicular to each other. Pressing the calculator button a fifth time brings you this calculation:

This mode is great if want to measure a section of wall but don’t have access to an area perpendicular to the area you want to measure. For instance, this is useful to measure the height of a flag at the top of a flagpole. In order for this calculation to produce correct results, the measurement of C must be perpendicular to the length measured. Again, the manual states to use the off/clear button to take measurements but the read button is the correct one to press. The final press of the calculator mode will calculate this construction:

In this construction, b should be perpendicular to x, and the length measured will be most accurate if the targets of a, b, and c are linear.
I had the opportunity to compare the results of the Tacklife with the results obtained by a Jetery laser distance measurer and a Bosch Laser Distance measurer. Both comparisons yielded excellent agreement of the measured distances.


I also verified the result of the distance meter with a tape measure and found that the laser distance results agree with the distance indicated by the tape over 24 feet. On short lengths of a foot or shorter there is some disagreement, so measuring with these distances are best accomplished with a ruler.
In conclusion, the laser distance measure should be one of the basic tools that every gadget lover has in their arsenal. The price of these units has absolutely crashed from a few years ago and is now low enough that most people can afford to have it around the house for those jobs where a tape measure is too short or unwieldy. Yet, the construction of the HD60 is top-notch and is very similar to the Bosch unit that I tested it against. I recommend you pick one up today.
Source: The sample for this review was provided by Tacklife. Please visit their site for more info and Amazon to order.
Product Information
| Price: |
$75.99 (on sale for $36.97) |
| Manufacturer: |
Tacklife |
| Retailer: |
Amazon |
| Requirements: |
|
| Pros: |
- easy to use
- accurate
- inexpensive
|
| Cons: |
|
Filed in categories: Reviews
Tagged: Tools
Tacklife HD60 laser distance measurer review originally appeared on on May 7, 2017 at 10:00 am.
Note: If you are subscribed to this feed through FeedBurner, please switch to our native feed URL http://the-gadgeteer.com/feed/ in order to ensure continuous delivery.


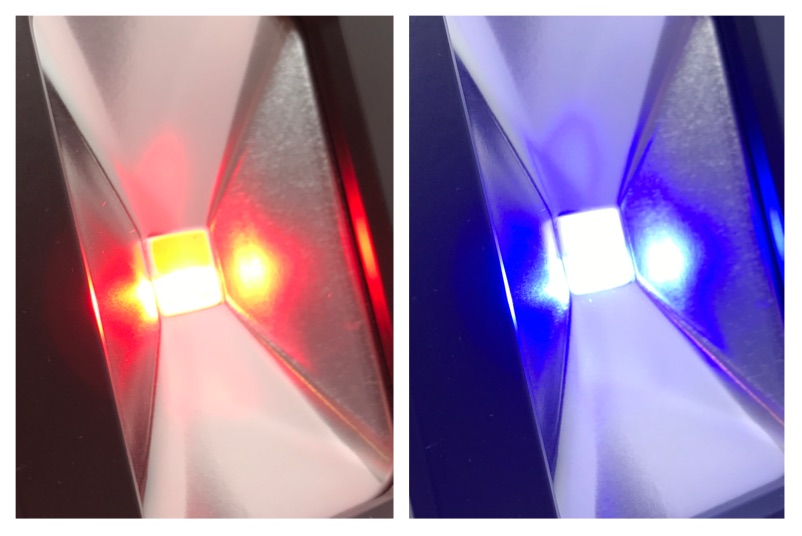 Speaking of SOS, the light alternates between red and blue. While it would get your attention, the color pattern is somewhat similar to what emergency vehicles might use. I also noticed in the specifications that the colored lights are rated at 2W each, and the white light at 11W, totaling 15W. I was led to believe that the main white light was rated at 15W, but I’m not so sure.