Skylum AirMagic drone image editing software review

REVIEW – Drones.  Love them or hate them, they’re everywhere.  If you have one, you probably like taking photos, but they don’t always look awesome, since you are at the mercy of Mother Nature and her available lighting at the time of your flight.  If you’re gifted at Photoshop, or some other image editing software, you can usually tweak your images into something that matches your vision.  For many hobbyists, photo editing remains a mystery.  Skylum is here to save the day with AirMagic drone photography software.

I was given a chance to play with a pre-production version of AirMagic, so some of the features, or specific commentary may or may not match the production version, but it should be pretty close as I encountered no issues with this version.  With that said, let’s take a look.

What is it?

AirMagic is software designed specifically to modify images taken by drones.  Silly, you say?  What’s special about drones?  Like any other camera, drone cameras have their own unique personality. The specifics of the sensor, lens distortion and other parameters all contribute to little things in images that can be corrected.  Drones, with their overhead perspective, bring another variable into play, especially when photographing architecture.  AirMagic can read the metadata that is automatically attached to your drone images and apply corrections specific to your drone model.  AirMagic was able to detect that my images came from a DJI Mavic Pro and Mavic 2 Pro.  I was not provided a list of supported drones, but I expect most popular consumer drones will be supported.  Even if your drone isn’t directly supported, you will still benefit from the general image enhancements.

AirMagic’s big differentiator is that it is AI-powered, meaning that the software will make enhancement decisions based on each individual image, applying different corrections to each image to deliver the best possible images.

What’s in the box?

The software was made available as a download.  AirMagic will be available for Windows and Mac platforms.

Setup and installation

For Windows, AirMagic requires:

  • Win 7,8,10  64-bit
  • Open GL.3 or later compatible graphics card
  • Intel Core i3 or AMD Athlon 64 processor, 2 GHz or faster
  • 4GB RAM, 8 GB recommended
  • 1024 x 768 display, 1280 x 800 recommended
  • 4GB hard drive space, SSD recommended
  • DirectX 10 compatible video adapter
  • Internet access for registration and access to online updates

Setup on my Surface Book was simple and pretty standard.

Design and features

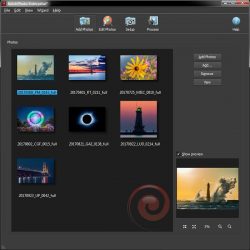
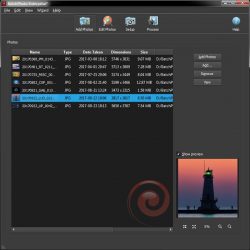
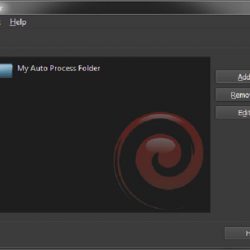
Once you open the software, you can either drag photos or a whole folder, directly onto the welcome screen or click the Open button to browse and select images.

AirMagic supports RAW, TIFF, JPG and PNG file formats and images of 800 x 600 or larger.  Once you open your selected images, AirMagic presents you with a thumbnail view of all open images. At this point, you can just click the “EXPORT <x> PHOTOS” button on the bottom right and let the software work its magic with default settings. It will process all open images in one shot.  Basically, it’s one-touch image enhancement.  Tell it to go, and come back in a few minute to improved images.

If you double-click on an image, it starts an open process where AirMagic analyzes the image.

The AI process provides multiple statuses along the way like “Lens correction”, “Looking for skies”, “Looking for haze”, “Detecting scene objects”, “Doing some magic”, and “Final touches to make it awesome”.  It is processing multiple parts of the image individually using its AI engine:

  • Color recovery
  • JPEG artifact fix
  • Foliage enhancement
  • Auto color temperature
  • Auto lens correction
  • Smart dehaze
  • EAW processing
  • Sky enhancement
  • Exposure compensation
  • Natural light correction
  • Noise reduction
  • Tint perfection

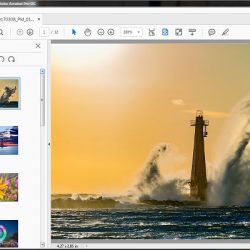
Once done, the image comes up with a slider that allows you to see the before and after images, side-by-side.

The above screen capture shows how the software enhanced the sunset image with me providing exactly zero input.  It made its own decisions on everything.  You can see how the sunset is only slightly enhanced, but the ground detail and colors were significantly updated.  To my eye, it essentially was able to apply a high dynamic range (HDR) effect without me having to supply three or more images, all with different exposures.  Pretty cool.

If you click on the paintbrush button, you get a slider that allows you to decrease or increase the effect. By default, it is set to 60% boost.

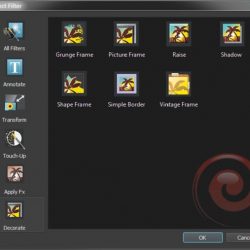
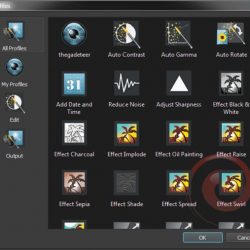
The button on the bottom left opens a palette of styles.

The different styles, left to right, are: no style, Chinook, Cinematic, Emotional, Sandstorm, and Zephyr.  There is no description of what each one does, and there is no online help yet, since this is pre-production software. According to the documentation, these five styles performed better than any others in testing, so they are included.  Essentially, the AI chose the best styles.  I didn’t see a whole lot of difference in the default style and Chinook. Cinematic boosted blue levels. Emotional seemed to increase color saturation.  Sandstorm lowered color saturation and flattened the image. Zephyr was similar to Chinook, with slightly muted colors.  The plus sign on the right allows you to purchase additional styles from Skylum’s online marketplace.

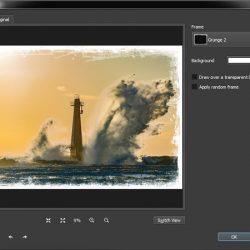
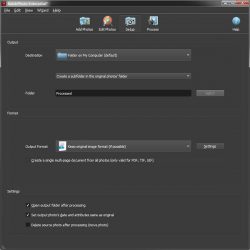
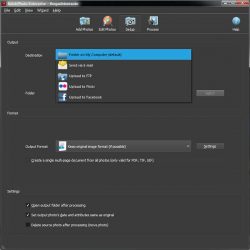
When you go to save your images, the software gives you a menu with a single option to save to disk.  The fact that there is a menu suggests that there may be other options in the future.  Choosing to export to disk brings up a standard save window with location, filename, multiple format choices and a quality slider, if your output format supports it.

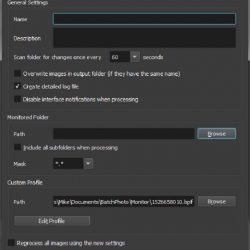
Advanced Settings gets you a treasure trove of options.

First, you can choose your output file folder and select to warn before overwriting an existing file.

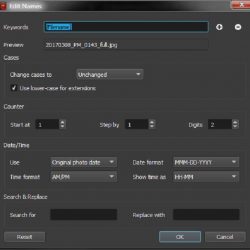
Next, you can do file renaming, changing the prefix of the name, the base filename, or suffix.  I added a suffix of “airmagic” and when I exported, all my images were named <original filename>_airmagic.jpg.  The LETTERS options allow you to change the case to all upper or lower case.

Like in the basic export window, all file formats are available here as well.

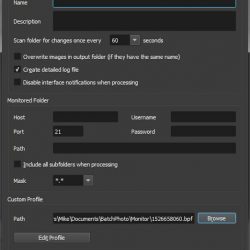
Beyond file formats, AirMagic allows you to change the color profile.  Basically, a color profile defines how colors are managed in the image, and therefore, in image editing software, displays and printers. For most users, sRGB, the most widely used color space, especially on the web, should be your go-to choice.

There is a really nice sizing section. You can ensure that you save in the same size as the original image, or, resize by providing a long-edge or short-edge measurement in pixels.  The software will scale the image to keep its original proportions.  You can also prevent the software from enlarging your image, if you provide a long-edge or short-edge measurement that would force enlargement. You can also resize to specific dimensions, but it will skew your image if your dimensions are different than the original image.  You can’t make a 600 x 300 image scale to 800 x 600 without distortion.

Finally, there are a couple of presets provided on the left side, Web JPG and email.  These presets have all the settings, other than file location and filename, to optimize the image for the web or for email.  You can create your own presets as well, which can really streamline your workflow.

OK, enough about how to use it.  Does it work?  In a word, yes.  But, your mileage may vary.  Photography, and image enhancement is an intensely personal thing. What looks good you one may drive another to distraction.

Here are a variety of examples with several different types of lighting. All image pairs have the original on the left and the automatically enhanced image on the right. All images were processed with the default, no style setting.  I didn’t change anything, other than the output filename.

Water – a lot of it.  I liked this outcome.  The software did a great job making the colors richer and improving contrast.

The homestead.  Again, colors boosted, contrast improved.  I like the sky – it really looks like that here.  The golf course looks perhaps a little too boosted to my eye, but that can be adjusted easily. It’s really more of a preference than a criticism.

A sunset. I like the sky. It looks more like what I saw with my eyes.  I like the fact that the ground is also visible, where it was a mottled mess in the original.

A scenic hill. This one was a bit more subtle. I like the deepened color in the river and improved detail in the sky and trees.  I was impressed with this, given the challenging direct lighting on the left side.

A view down the river. The glare on the water is gone, revealing the nice blue water.  The sky, which was cloudy and blown out in the original now appears flat and featureless, which is what it looked like that day.

The alma mater.  Again, this one is subtle, since the original looked pretty darned good.  Slight tweaks to improve color saturation and contrast make the enhanced image pop more than the original.

The old neighborhood.  Again, subtle.  There is more saturation in the grass and better contract, making the houses pop.

Another lake image.  Again, nicely improved color saturation, although it did add a touch of blue tint to some of the white buildings.

Finally, another lake image. This one really jumped out for two reasons.  First, what it did to the lake was awesome.  Look at the improved detail under the water in the bottom left.  Second, look at the blue tint added to the white building in the upper left.

What I like

  • Easy, one-click image enhancement for single images or batches of images
  • High-quality output
  • Tons of options for saving images
  • Ability to tweak the final image with a side-by-side view
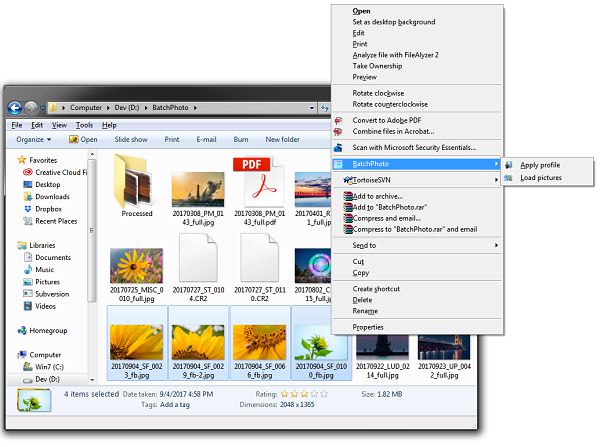
  • Can be used as a plug-in in Photoshop CS5 or higher and Lightroom Classic CC

What needs to be improved

  • Several images exhibited a blue tint, especially visible on white structures
  • Sometimes, the colors can seem overblown and tweaking means having to process images individually
  • An explanation of the output styles would be nice

Final thoughts

Skylum’s AirMagic is an intriguing addition to their existing AI-driven software portfolio that includes Luminar photo browsing and editing software and Aurora HDR photo software. For drone enthusiasts, and those that use drones professionally, like real estate agents, being able to whip through enhancing a batch of images with a couple of clicks makes AirMagic a compelling choice.

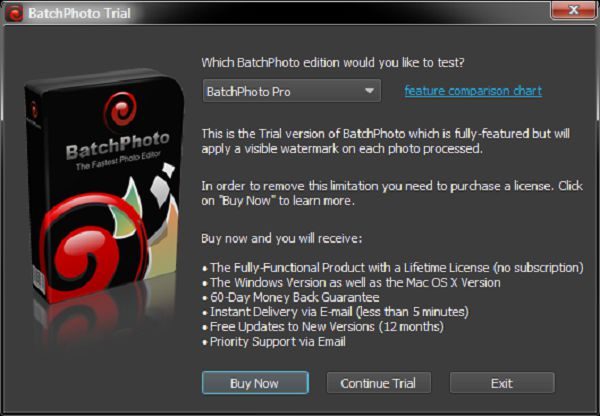
There will be a free version available with no batch processing, output file size limitations, no plug-ins and watermarks applied in addition to the full-featured paid version.

Price: $39 for activation on two devices
Where to buy: skylum.com – pre-orders begin March 7, 2019
Source: AirMagic was provided by Skylum

Filed in categories: Reviews

Tagged: , ,

Skylum AirMagic drone image editing software review originally appeared on The Gadgeteer on March 7, 2019 at 9:00 am.

Note: If you are subscribed to this feed through FeedBurner, please switch to our native feed URL http://the-gadgeteer.com/feed/ in order to ensure continuous delivery.

5 Windows PC problems that you can fix yourself

ARTICLE – Although some PC problems require a technician to repair them, there are many issues that you can fix at home all by yourself.

Regardless of whether you’re dealing with an older computer or a cutting-edge gaming PC, many solutions to common problems are similar. Consider the following five.

1. Computer Is Slow

Is your computer taking too long to boot up? Or perhaps you find yourself waiting too long for a program to open? When resolving a slow computer problem, it’s important to identify precisely what is slow.

If a specific website is slow to load, your computer may not be the culprit. Some sites are slow to load due to their own server issues or page configuration. If a specific site is slow though most others work fine, it’s likely the website’s issue.

However, if your computer takes too long to boot up, the issue lies in your system. The first thing to check is if you have enough space on your hard drive. On the bottom left corner, in the Windows search box, search for ‘This PC’ and click on it. Here, you will see how much space you have left. If the disk space bar is almost full and red instead of blue, you should clear space. More space will help your PC run faster.

Free up space by removing unnecessary files or programs you don’t use. You can also use a cloud-based platform like Google Drive to store data digitally instead of on your hard drive. An external hard drive can also help you store files, giving your internal hard drive (where your operating system resides) more room to breathe.

Another potential culprit of slow boot time is that too many programs are running when you start up your computer.

You can change this function by searching for ‘msconfig’ and opening System Configuration and then ‘Startup.’ From here, ensure that only programs you need are starting upon boot. Programs that load slowly may have issues because of other programs hogging resources in the background.

2. Pop-Ups Are on My Desktop

If pop-ups and advertisements are appearing on your PC even when you’re not surfing the web, it’s likely that you installed adware, probably by accident.

Although getting rid of spyware isn’t easy, you can do so by using the trusted Malwarebytes Anti-Malware Free. Malwarebytes will likely eliminate the spyware after a scan and restart.

If that step fails, you can either Google a removal process for the specific adware or reinstall Windows completely, both solutions are entirely possible at home.

3. A Program Looks or Acts Strange

Whether a particular program is going haywire or you accidentally changed its settings, sometimes a program can look weird, ranging from issues like a blurry text or a dead pixel that appears as a spot to the program randomly closing.

The first step to take is right-clicking on the program in which you’re encountering issues and clicking on ‘Properties.’ From here, click on ‘Compatibility’ and then ‘Run compatibility troubleshooter.’

The troubleshooter should promptly fix any issues. You can also use the ‘Compatibility’ settings to change the screen resolution and color settings for the program, which can help resolve visual issues.

4. The PC Is Overheating

Computers will generate some heat, though it should never be to the point of getting extremely hot to the touch. If you feel that your computer is overheating, usually accompanied by a fan sounding like it’s working on overload, there are several solutions you can try.

Dust accumulation is one of the most common culprits of overheating. While your PC is off and unplugged, use a compressed air duster can to get dust out. Also, ensure that your PC has adequate ventilation and that there are no blocked vents.

It’s also possible that your fans are dysfunctional or a temperature rise is resulting in a chemical reaction to the battery. These cases require technical support, though in most cases of overheating, you can remedy the issue by using an air compressor can and ensuring proper ventilation for your PC.

5. Random Shutdowns and Restarts

It’s very frustrating to have your work interrupted by a computer that shuts down or restarts without prompting. In many cases, the restarts are a consequence of automatic Windows updates.

Search for ‘Windows Update settings‘ to change settings so that updates are less frequent or, at the very least, give you some time in advance to prepare. It’s a bad idea to turn off updates entirely, though you can set the updates to be less insistent.

These five issues are common among PC users, though fortunately, they can often be resolved with some time and focus at home rather than you spending money for a technician and waiting several days.

Image by Laurent Peignault

Filed in categories: Articles

Tagged:

5 Windows PC problems that you can fix yourself originally appeared on The Gadgeteer on August 17, 2018 at 11:00 am.

Note: If you are subscribed to this feed through FeedBurner, please switch to our native feed URL http://the-gadgeteer.com/feed/ in order to ensure continuous delivery.

Updated type experience coming to Adobe InDesign CC and Illustrator CC

NEWS – Anyone who has used the latest Adobe Creative Cloud versions of InDesign or Illustrator has probably noticed that font selection is a little unwieldy. I use InDesign every day and whenever I’m looking for a specific sort of typeface to use, like a nice handwritten font, I find myself squinting at the tiny font sample next to the name. But fear not, Adobe has heard your cries!

In the upcoming version of InDesign and Illustrator, a vastly improved type menu will allow for customized sample display text and integrated access to the 9,000 TypeKit fonts that are included with a Creative Cloud subscription. You will be able to browse this font library in the app and quickly preview your chosen text in any font of your choice.

Check out the video on Adobe’s blog for a closer look. I’m very much looking forward to this small but potent improvement!

Filed in categories: News

Tagged: ,

Updated type experience coming to Adobe InDesign CC and Illustrator CC originally appeared on The Gadgeteer on August 10, 2018 at 2:19 pm.

Note: If you are subscribed to this feed through FeedBurner, please switch to our native feed URL http://the-gadgeteer.com/feed/ in order to ensure continuous delivery.

BatchPhoto software review

If you work much with digital photos, sooner or later you’ll probably come across the need to edit a batch of photos, applying some form of edit to all of them. Regardless of whether or not you use something like Photoshop, Lightroom, or another image editor, sometimes the right tool for this job is one specifically designed for batch operations – like BatchPhoto from Bits&Coffee.

What is it?

BatchPhoto is a batch photo editing software program for Windows and Mac that can process multiple photos in an automated or semi-automated manner, applying specified actions to each one. There are 50 edit actions that can be applied. BatchPhoto calls them filters, but they’re more than just an Instagram-like filter. These filters include things like applying text, watermarks, resizing, rotating, image touch-up, and many more. Each filter has settings so that you can customize each filter to do exactly what you want it to.

What’s in the box?

The download for BatchPhoto is 34.5MB for Windows and 56.2MB for Mac. The download includes all available versions and has the ability to unlock the full (paid) version with a product key so there’s no re-downloading and installing the paid version if you decide to buy a license.

The installation was pretty much a standard installation, nothing unusual to mention.

When you first start the program you’re presented with a dialog where you can choose which version to evaluate. There are three versions to choose from, Home, Pro, and EEnterprise.This review covers the enterprise version. For a comparison of features included in each version, see the comparison chart.

BatchPhoto is available in the following languages: English, German, French, Spanish, Italian, and Japanese.

Design and features

The program uses a simple wizard-like three-step approach:

  • Step 1: Add photos.
  • Step 2: Edit Photos.
  • Step 3: Setup.

Clicking the “Process” button starts the real action of the program, processing each image with the settings you have specified.

Although the program is wizard-like, you can jump between steps at will. You can even skip step one if you’re going to be using a profile to automate the processing of images at a later time (more on profiles later).

Step 1 – Add Photos

BatchPhoto handles just about every image format there is. It can process over 170 image formats, including quite a few RAW formats (including Canon, Sony, Nikon, Olympus, Fuji, Kodak, Pentax) that photographers use. It can also output to almost all of these formats as well. Some formats can’t be output to, like RAW files that are specific to digital cameras.

You can add photos via drag and drop or browsing for specific files, or adding files from a folder or multiple folders. The photos list also includes multiple view modes such as detail list, small icons, medium icons, and large icons (icon meaning thumbnails). A Preview window is also in this step and supports zooming.


Step 2: Edit Photos

In this step, you specify filters and file renaming options. This is the heart of the program. There are 50 filters, each with its own customizable settings. You can do just about anything that you would want to automate.

There are far too many filters here to cover each one individually, but I’ll include screenshots of the filters here, along with a couple of their edit dialogs as well.


Step 3: Setup

This is where you setup the output options. You can specify the output folder, output format, and other miscellaneous options.

The output options are:

  • Folder on your computer
  • Send via E-mail
  • Upload to FTP
  • Upload to Flickr
  • Upload to Facebook

PDF, TIF, and GIF output formats can create multi-page files where all of the images are included in a single file.

There are also settings for setting the output photo’s date and attributes to match the original file, as well as an option to delete the source file after processing.


Processing

One of the key features of BatchPhoto is its ability to process multiple photos at the same time, greatly reducing the time it takes to process photos. For those who are into technical stuff, this means it will use multiple threads to process the photos. There’s also an option to turn this off if you want.

One of the things I really like is that you can save your settings as a profile for easily loading those settings later, and applying them to batch operations using the “watch folder” feature of the included monitor program. For example, you might have one profile for processing “proof” images, and another profile to process “final” images or one for outputting small images and one for outputting large images.

One thing I did note is that you save the profile via the file menu, but you load them via the wizard menu. BatchPhoto includes many pre-defined profiles for your convenience including a “Convert to PDF Album” that will output your photos to a PDF file and a “Send via E-mail” profile.


Automated processing

BatchPhoto includes a utility program called Monitor. It can be launched and will run separately from the main program. It can be configured to watch a local or FTP folder for new files. When the new files are detected, it will process them automatically based on a specified profile.

This is a very powerful feature for users that want to automate the processing of files. An example use would be to automatically process and upload files simply by copying or moving them to a watched folder. As soon as that folder is checked (at an interval that you specify), the new files are automatically processed.


Semi-Automated processing

BatchPhoto also includes the option to integrate into the Windows Explorer shell. You can simply select your images, then right click and choose BatchPhoto then Apply Profile and the program will prompt you to select a profile and the selected images will be processed with that profile.

What I like

  • Very versatile in input and output formats
  • Video tutorials on the BatchPhoto website.
  • Profiles for quickly specifying options
  • Output option for processing the files to a subfolder of the original folder.
  • Configurable file renaming options.
  • Multiple thread output. 7 threads on an 8 CPU (4 Core) system.

What needs to be improved

  • I would like to see a ZIP output format where all the files would be created and then moved into a zip file.
  • I saw errors outputting files using the grunge frame with multiple files while using multi-processing. The error did not occur when the setting was turned off.

Final thoughts

BatchPhoto is an excellent batch photo processing solution. It provides powerful editing features, superb configuration options, as well as great output formats and destinations. Whether you’re an amateur or a professional, you’ll probably find that this program will meet most, if not all, of your needs.

Price: $29.95 – $129.95
Where to buy: BatchPhoto
Source: The sample of this product was provided by Bits&Coffee

The post BatchPhoto software review appeared first on The Gadgeteer.

Filed in categories: Reviews

Tagged: , ,

BatchPhoto software review originally appeared on The Gadgeteer on May 29, 2018 at 10:00 am.

Note: If you are subscribed to this feed through FeedBurner, please switch to our native feed URL http://the-gadgeteer.com/feed/ in order to ensure continuous delivery.

Adobe Photoshop Elements 2018 review

I’m not entirely sure how it happened, but over the years I have become the curator of the family media archive.  I routinely receive old movie reels, slide and photos to digitize and archive.  Many of these items arrive in somewhat less than pristine shape, and it just doesn’t make sense to store damaged images.  This is the space where a tool like Adobe’s Photoshop Elements 2018 plays best.  The question is will this application make things easier for me and improve the quality of our digital memories, or will I spend a lot of time with little to show for it?  Read on to find out.

In order to decide whether Photoshop Elements would help or hinder, I wanted to take a real-life example.  When my father passed away I helped to clean out storage at the house I grew up in, and along the way, I found a treasure trove of old photos from when my Dad was far younger than I ever was.  Most were in pretty good shape, but some were scratched and dusty from years of storage.  The following photo is my Dad when he was 4 years old and growing up in New Jersey.

What you can see immediately are the scratches and discoloration that happens when a picture sits in a shoe box for 65+ years.

Photoshop Elements offers a “guided mode” which allows you to choose a path to enhancing your images.  After loading the photo in the application, I switched to the guided mode.  There are dozens of options, but since this is a black and white image, I limited the choices to that type of guide only.  From the 10 or so guides that came up, I selected the scratch and dust removal guide.

Once the path was chosen, a step-by-step guide came up on the right side of the screen.  I selected each step that seemed appropriate to the picture I was working on.  First I cropped the image to highlight my Dad and not necessarily the table.  Tools like spot healing to remove lines, blur to smooth out imperfections and dust removal to get rid of spots, each tool making the image just that much better than it was.  At the end, I removed the extraneous colors that scanning a less than perfect photo introduces, adjusted the brightness and contrast, and finally sharpened the image.

And here is the result.

Arguably better than the original in my opinion.  The whole process for this picture took me less than 5 minutes – I could have spent more time on this and improved it even more if I wanted.  And the original image is untouched as the guide allows you to either overwrite or save to a new image.  If this were something I had taken with my phone, I could also have used the guide to share the picture on Facebook or Instagram.

Not just for the record anymore!

So I know that Photoshop Elements can handle the hard work of preserving my family’s precious memories.  But how will it stack up against tasks like inserting myself into places I have never been?  You know, the important stuff.  I started this part of the journey with a picture of a close friend.

That, of course, is Groot from Marvel’s Guardians of the Galaxy.  If you haven’t seen the movie(s) go watch them now.  I’ll wait.

There.  Now you see why I love Groot.  Problem is, there is very little opportunity to spend time with him outside of those movies.  My head may be in space, but the rest of me is firmly rooted here.

How can I get us together?  Photoshop Elements to the rescue!  Using Expert mode and a tutorial I found online (and there are a ton of these kinds of tutorials out there to help you with anything you want to do), I was able to get my favorite tree person to photobomb me.  Start to finish, even with my fumbling around and reading the tutorial over and over, the whole thing took less than 10 minutes.  Oh, and after the fact I learned there is a guide to do this as well, but…experience.  Here is the result.

Maybe not up to the standard of some Photoshop work, but more than enough to show my friends I know trees in high places.

What else do you get?

Photoshop Elements also provides an excellent way to organize your images through the Organizer tool.  The tool allows you to view, rename and manage your library.  In the 2018 edition, Adobe has added an AI tool called Auto Curate which will examine the images in your library to point out possible flaws like composition, exposure and focus problems.  It can also help identify faces plus tag images with any kind of data – including EXIF data coming from your camera, and all delivered via smart tools.

There is even a smart tool which will take a photo where the subject’s eyes are closed and will open them.  Here’s the before (from our wedding 8 years ago).

And after running the Open Closed Eyes tool.

So now that Auto Curate has pointed out some image flaws, do you have to edit each image individually to fix those problems?  Good question!  And the answer is “of course not” – Photoshop Elements also offers a batch processing mode that will allow you to select a group of photos, apply transformations (resizing, corrections and other adjustments) and output the results to another location to let you choose whether they keep the old or new.  It will even change image formats, like taking all of your PNG files and converting them to JPG.

Now that you have a nice, clean library of photos, the Slide Show tool will allow you to arrange the images into a presentation.  You can apply artistic effects like watercolor rendering, transition effects like dissolves, and add your own soundtrack to the results.  When you are done, you can share your creation in the usual places.

So what are the quirks?

As great as Photoshop Elements is, the application is not without any shortcomings.  First, there is a weird problem if you use multiple monitors.  Elements always opens on the primary monitor, but you can drag the window to your secondary monitor (or any other you might have connected).  What’s weird is that once the window is on the non-primary monitor, any attempt to resize the window causes the application to snap the window back to the primary monitor and the window is maximized.  This happens on both the Mac and Windows versions of the application.

And if you own an iPhone or iPad that you use to take pictures, you might not be able to edit the images in Elements on either platform.  iOS 11 introduced the HEIF format (High Efficiency Image Format), a container that gives greater compression to your images so you don’t run out of space on your device.  At the moment Elements does not support the HEIF format although a patch has been promised.  If you use an Apple device, you will have to go into Settings for the Camera app and choose Most Compatible rather than High Efficiency.

Final thoughts

If you take pictures, Adobe’s Photoshop Elements is one of the friendliest and least expensive way to manipulate, catalog and preserve your media.  When paired with the sister application (Adobe Premiere Elements 2018, review coming soon), these two applications will make your digital life the envy of your friends.  And at $99.99 list price (cheaper on sale at Amazon for digital downloads), the application won’t break the bank.

Available in versions for both macOS and Windows and a generous license which will allow you non-simultaneous use on 2 machines – and cross-platform licensing so you can use the application on either OS – makes this a must-have tool if you want to curate your digital life.

Price: $99.99 (bundled with Premiere Elements 2018 for $149 – but often on sale for much less)
Where to buy:  Amazon
Source: The sample for this review was provided by Adobe.