Dodocool DA189 True Wireless Earbuds review

REVIEW – Truly wireless Earbuds have been out in the world for a while now, but I have yet to pick up a pair for myself. They seemed nifty, but I always felt they’d just fall out. After testing out my friend’s EarPods, I decided the next time I had an opportunity, I’d try some out. The Dodocool DA189 Earbuds were in my price range, so I thought I’d give them a try.

What is it?

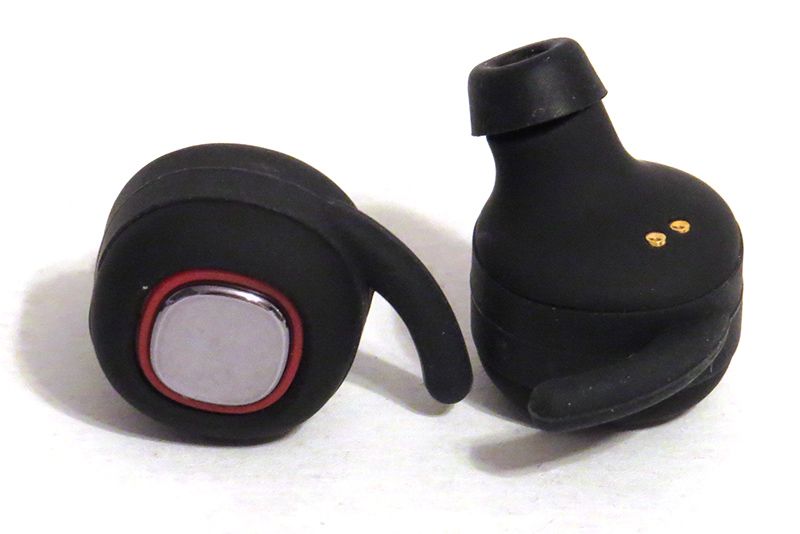
Dodocool DA189’s are truly wireless earbuds that also boast being sweat and water resistant.

Hardware specs

  • 42 mAh battery (headphones)
  • 450 mAh battery (charging case)
  • Working time: Up to 5 hours
  • Standby time: 500 hours
  • 10 m Wireless range

What’s in the box?

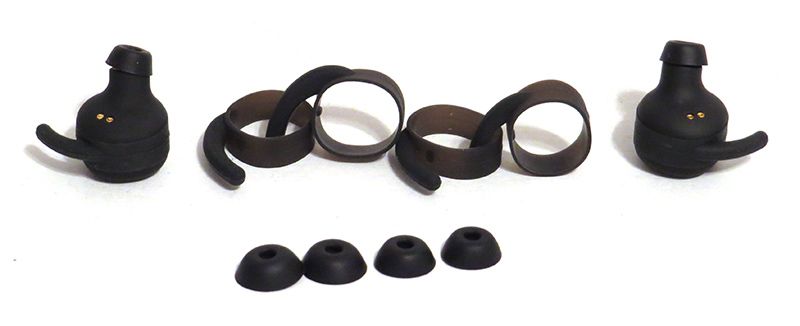
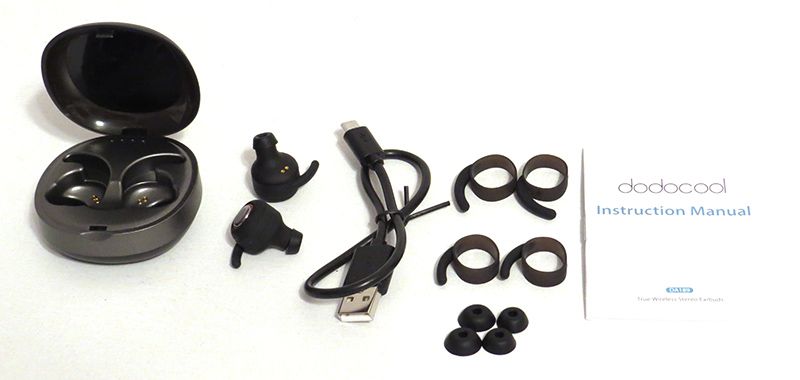
  • Dodocool Earbuds
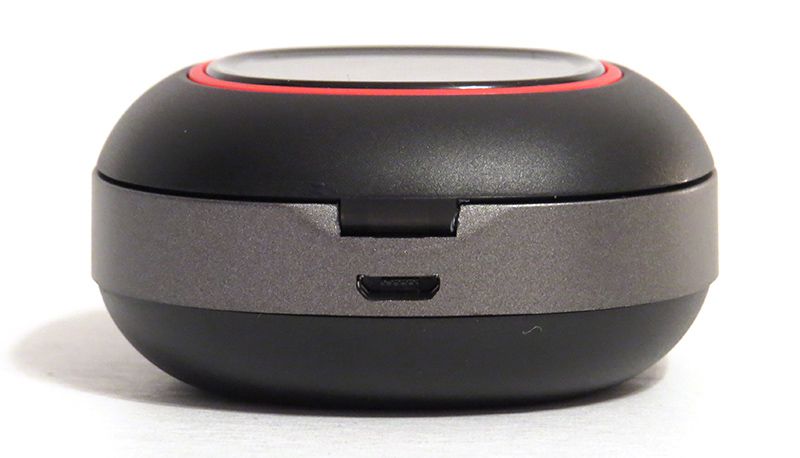
  • Charging case
  • Micro-USB cable
  • 3 Eartips
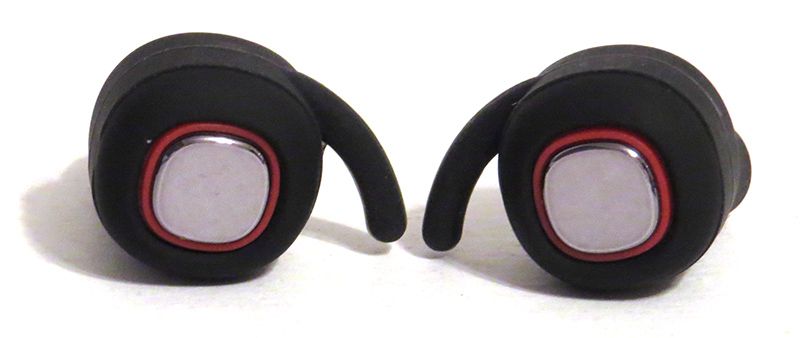
  • 3 Wings
  • Instruction Manual

Design and features

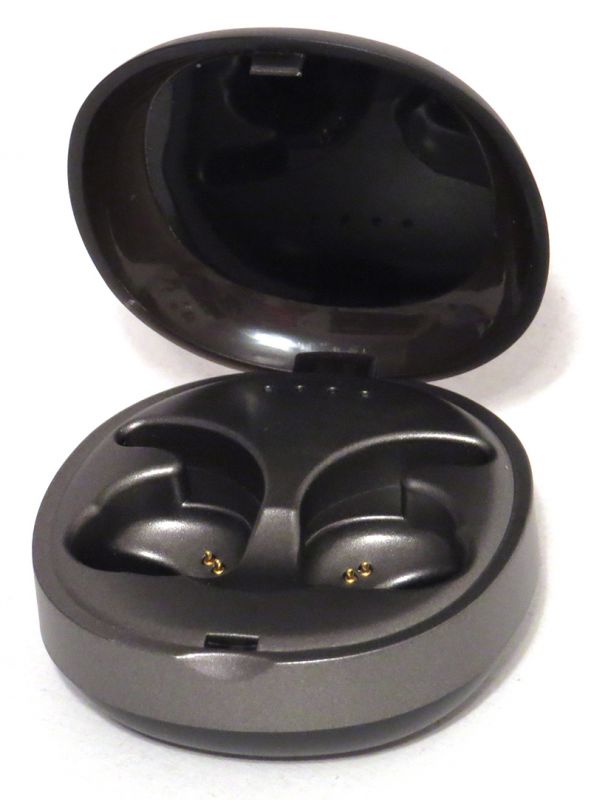
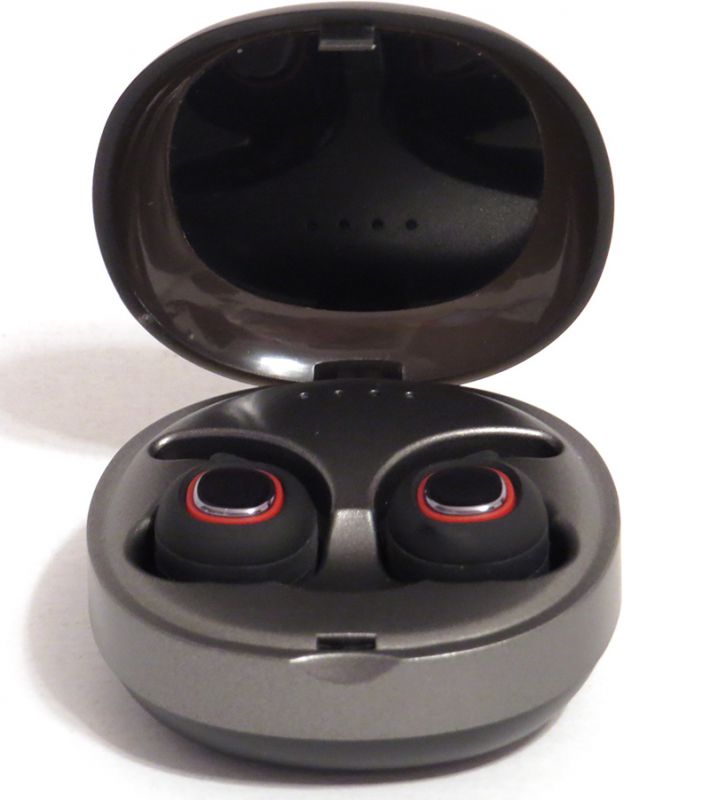
The case/earbuds took a little over a few hours to charge up, but the case charges the earbuds in less than an hour. I really liked how compact the case was, and that it was solid and could easily be tossed around.. Or batted to the floor in the case of my cats. It was also really easy to remove and replace the earbuds in the case. There was a magnetic pull that locked them into place. I did notice, however, that a bump would loosen the connections enough to turn on the earbuds. Enough of these bumps drained the battery down. It seemed random though, as major bumps like floor drops didn’t seem to bump the connection.

Each time I used the earbuds, I would drop them into the case to charge, with the longest use time at around 2.5 hours. They would also turn themselves off when they were not in use. This allowed me to use them for a good amount of time before needing a recharge.

Setup

When I initially paired these to my phone, I could only get one headphone to work at a time. They wouldn’t talk to each-other! Despite the instructions, they would continue to work in mono mode. I am not sure what I did, but eventually, after several tries, I got them to work together. Since then, they’ve worked flawlessly together without going back to mono mode.

Performance

I used these headphones for a solid week thinking they had terrible sound quality. They would fit fine in my ears, but there was no bass at all. I took them for a run, and when stopping to adjust them on my way back, I managed to push one into a better fitting position. The sound quality was night and day! After that, I made sure to push inward more than standard Earbuds, and if I got it ‘suctioned’ in, the sound quality was good. The mids and highs on these were just average, but the bass/lows were above average for the price range once they were suctioned into my ear.

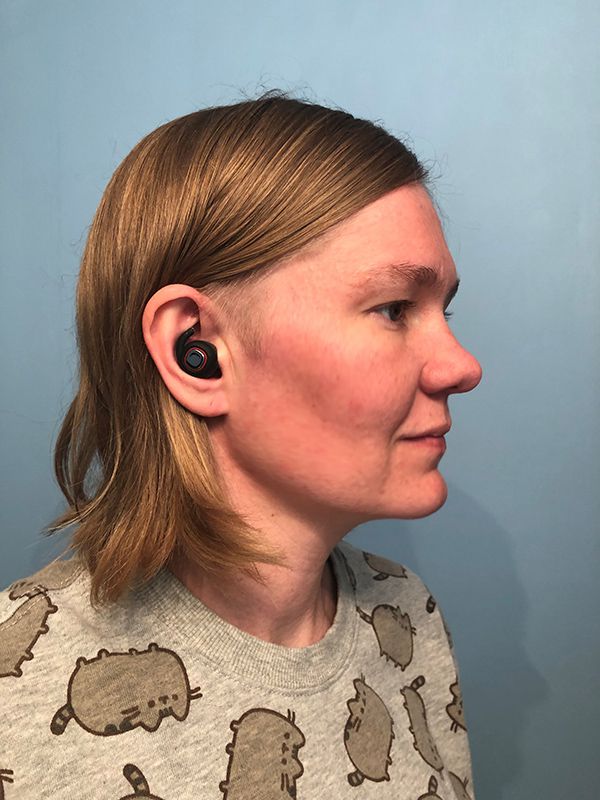
During my run, they stayed in place for the most part. I had to adjust them once before heading back, but since my ears are terrible for earbuds, I was impressed. The wings help a lot, and I am really glad those come in three different sizes so that I could find the one that fit just right. Not only did they fit correctly, but they were comfortable to wear for a few hours as well.

What I like

  • Automatically connects to the phone when taken out of the case.
  • Compact
  • Customization for different ear sizes

What needs to be improved

  • Earbuds are loose in the case causing them to turn on by bumping the case
  • Pairing was a challenge

Final thoughts

Overall, the Dodocool DA189 Earbuds were ok for the price. They did stay in my ears during a run, and once I got the fit figured out, they had decent sound quality. I was disappointed when I went to use them when washing my car and they had no battery life due to being bumped every morning and evening on my nightstand. For less than $40 though, they weren’t too bad.

Price: $49.99
Where to buy: Amazon
Source: The sample of this product was provided by Dodocool.

Filed in categories: Reviews

Tagged:

Dodocool DA189 True Wireless Earbuds review originally appeared on The Gadgeteer on April 29, 2019 at 10:00 am.

Note: If you are subscribed to this feed through FeedBurner, please switch to our native feed URL http://the-gadgeteer.com/feed/ in order to ensure continuous delivery.

PlayShifu Plugo STEM kit review


REVIEW – Earlier this year, my son was diagnosed with ADHD, and since then I have been in pursuit of STEM (Science, Technology, Engineering, and Math) type kits and devices to aid in his growth, learning, and expression. It was very obvious that his creativity was one of his strong skills. He has the ability to put together or to fix just about any assortment of parts that seem unrelated to many but in fact do belong together. I have purchased a few different STEM kits and after seeing him actually become attentive for very long periods of time, I have been seeking as many kits of this type as I can possibly acquire. I am elated that I have the opportunity to test and review the PlayShifu Plugo STEM kit. Here is a summary of my experience with it.

What is it?

The PlayShifu Plugo is described by the manufacturer as “An AR gaming system to stimulate STEM skills”. The entire suite offers the power of AR and education combined in 5 gaming kits: Quest, Count, Link, Steer, and Piano.
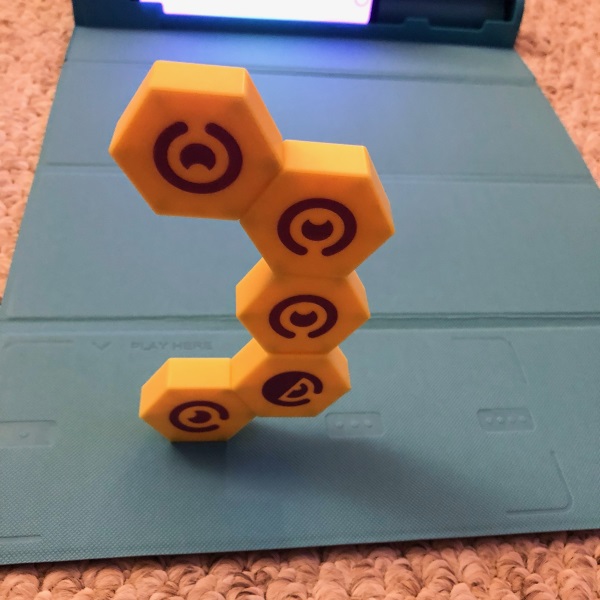
This kit contains the Plugo Count which stimulates your child’s interest to solve mathematical questions and the Plugo Link which uses magnetic hexagon building blocks in the form of games to stimulate your child’s mental abilities with puzzles and constructional challenges. It is recommended for ages 5+.

What’s in the box


1 x Plugo Count Set
Includes:
1 Count Spike
2 sets of 0-9 numerals
4 Operators
4 games on Plugo app

1 x Plugo Link Set
Includes:
15 Hexagon blocks
4 games on Plugo app

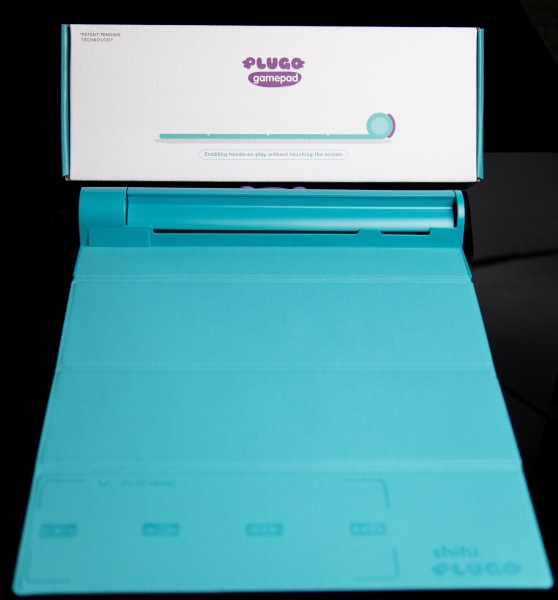
1 x Plugo Gamepad

Design and features


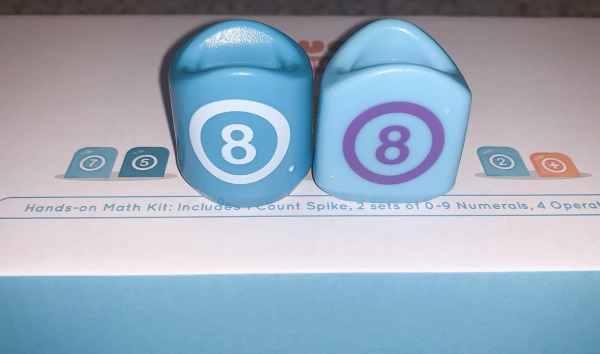
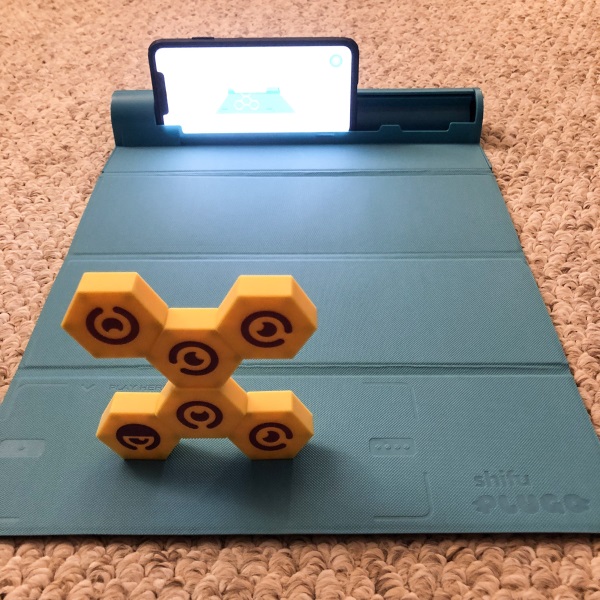
The PlayShifu Plugo kit parts are made of plastic. The Count kit comes with 2 sets of 10 blue numbered game pieces with numbers on each side. One side in white and one is brown.

It also comes with two additional yellow pieces with a plus, minus, divide and subtract symbols, one symbol per side are included with each set of number pieces.


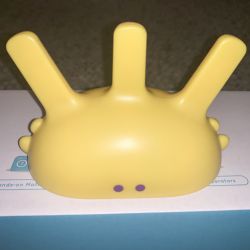
The Count central base piece is yellow and connects magnetically to the gamepad. One side has brown dots to direct how the piece should be used based on the game requirements and the side of the game pieces that should be used.


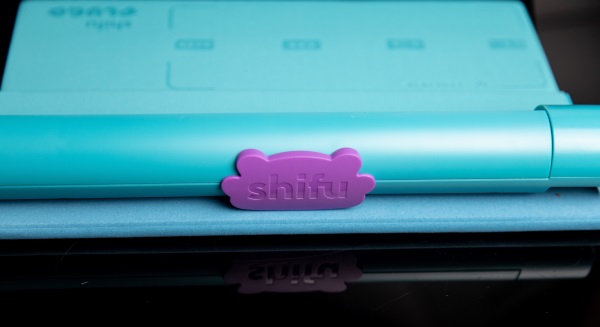
The gamepad is blue and folds out flat. On one end there is the spring-loaded mobile device holder that accepts the tablet or the phone. On the back, there is a purple PlayShifu logo.

Performance

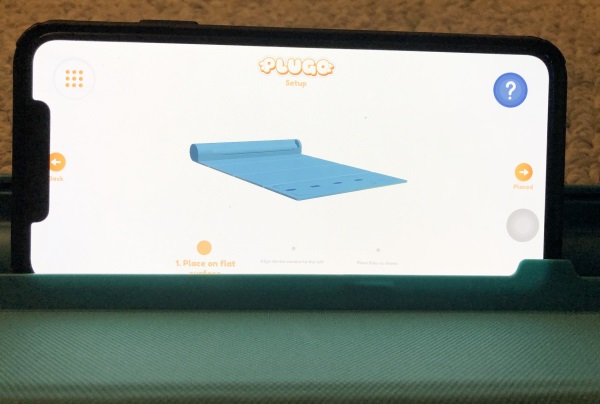
Setting up the Plugo is very easy. Once you lay the gamepad flat and insert the tablet/phone into the spring loaded device holder slot the gamepad is ready to go. You then download the PlayShifu Plugo app and follow the setup instructions. Despite the compatibility instructions, I decided to try my 2nd generation iPad first because it is the only 9″ iPad in the home. The others that I have are 12.9″. I also knew that the IOS version was older but I gave it a shot and it initially worked all the way through the setup. It is only when I tried to play the games that the app crashed every time and I eventually had to reluctantly switch to my iPhone. This also explains why some of the pictures below are with an iPad and some with my iPhone.

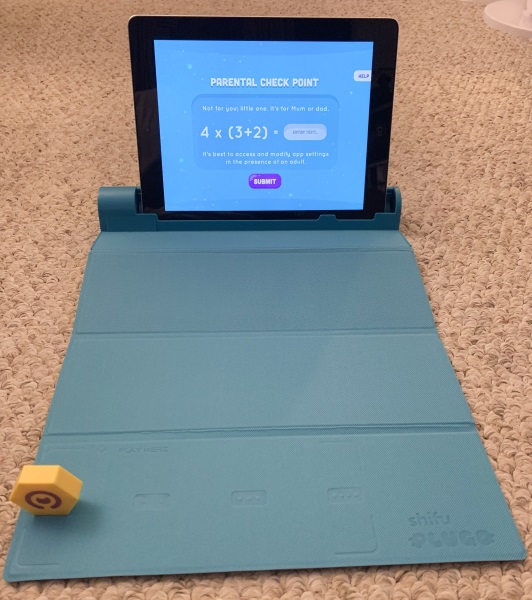
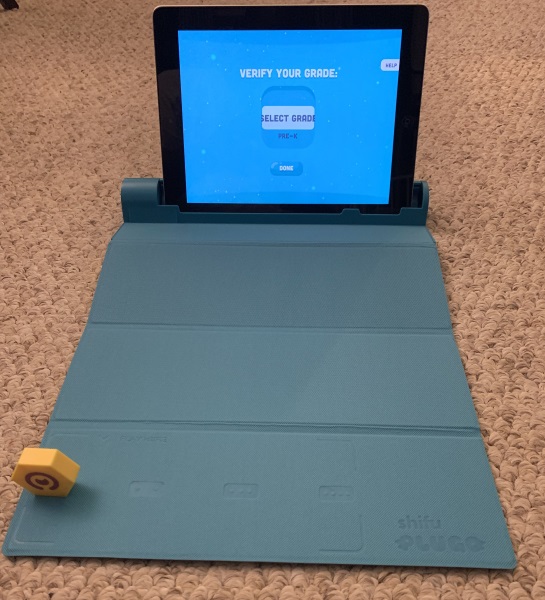
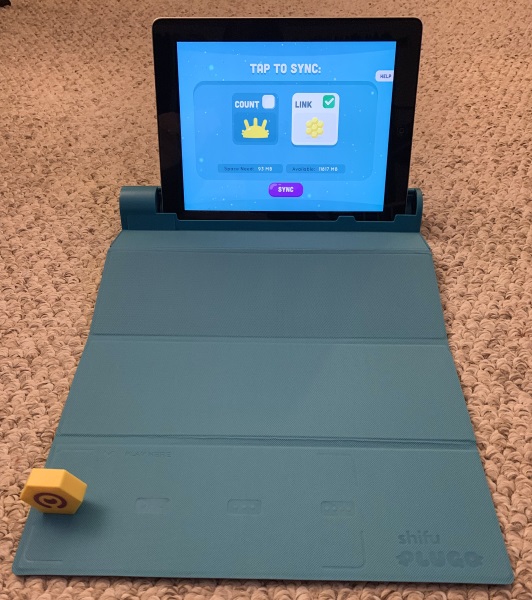
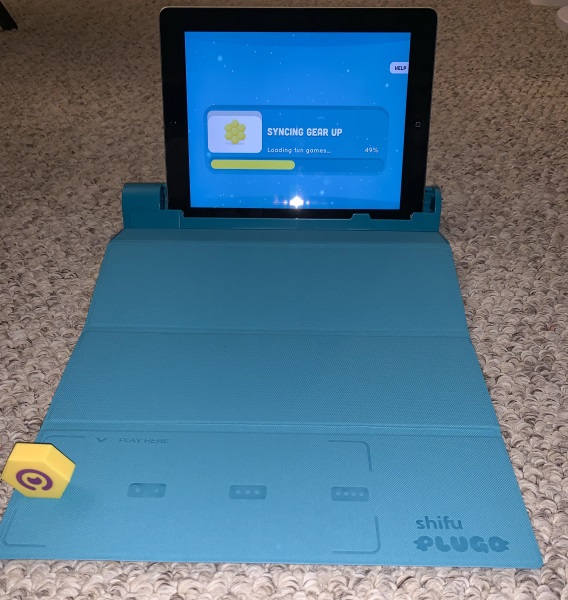
Once you load the app it asks a math question which is the same every time you start the setup process. After that, you are prompted to select the grade level of your child. Then you are prompted to give the app access to the device camera and after that, there is a sync process to sync the modules. Once the syncing process is completed for each module, in this case, the Count and the Link are the modules that I have, you are ready to play.


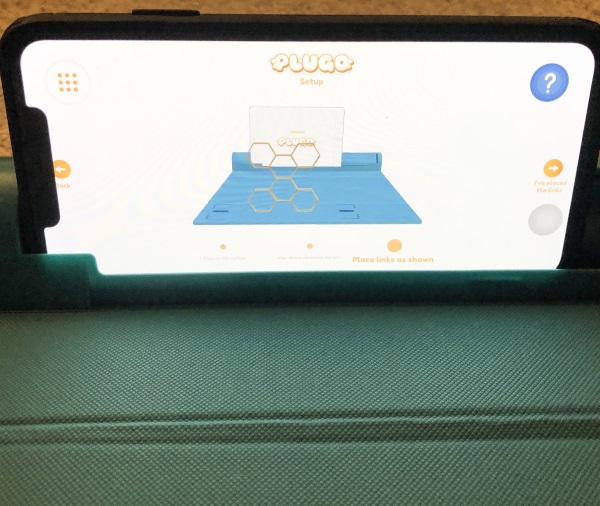
In order to start using the plastic game pieces for the Link and the main control piece for the Count, they have to be paired with the gamepad. The following screens are the instruction screens for placing the required pieces on the gamepad so the pairing process can be completed.


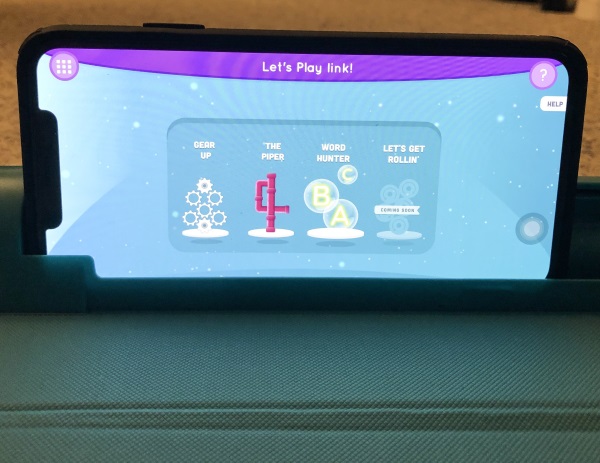
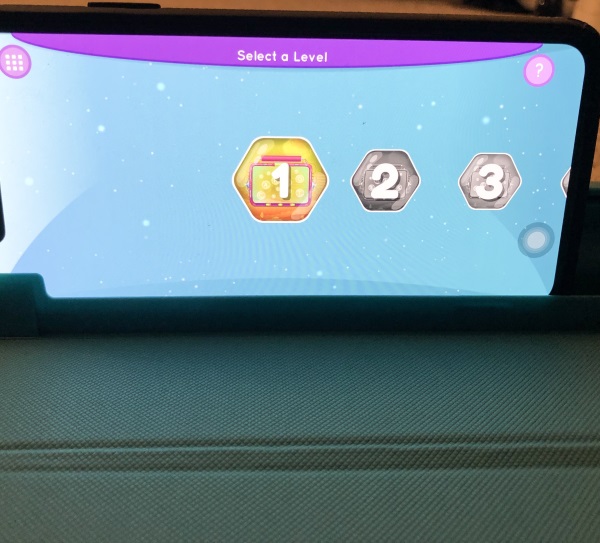
Once the game pieces are paired to interact with the gamepad, you can select a game and a level. To select the module and the game you can either touch the screen and in the case of the Count module, you can place the game piece over the center spike of the base control piece. For example, if you place the game piece marked “3” over the center spike, it will select game 3. How it works is better explained in the following

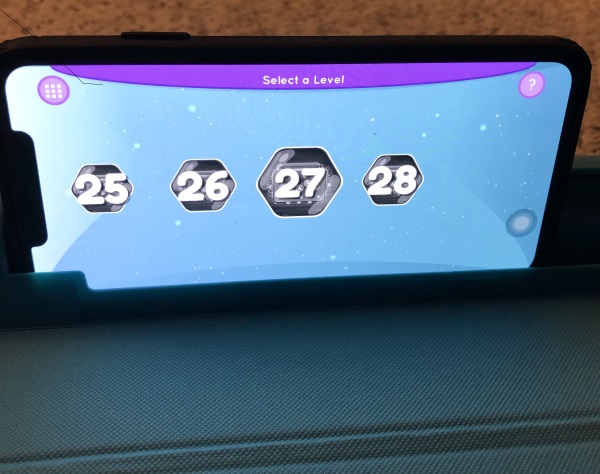
As shown below, the game that I selected has 28 levels.


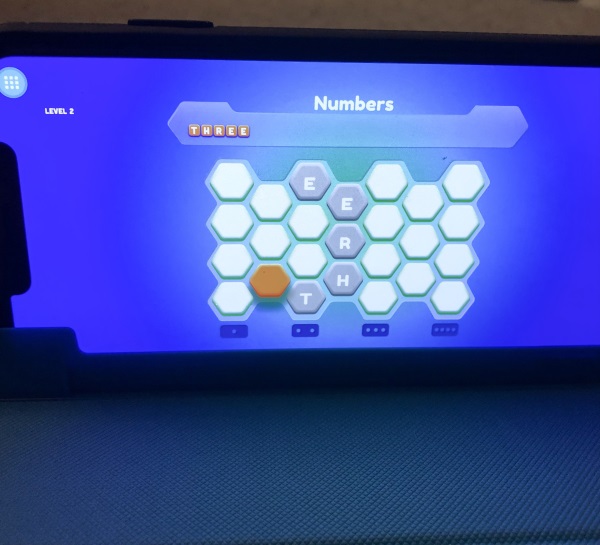
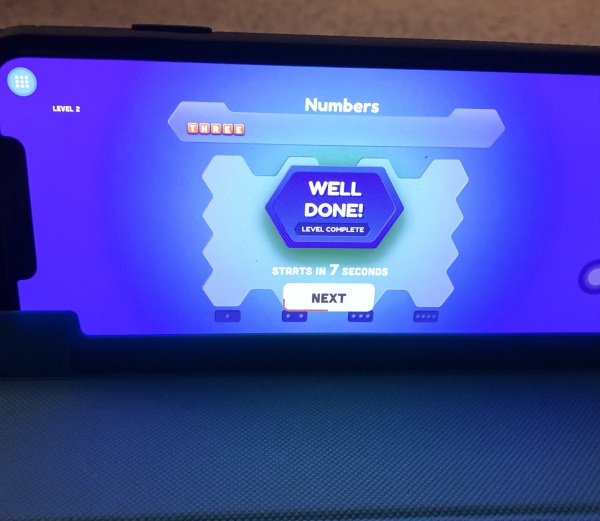
The pictures below show a link game that displays a word and requires you/child to connect the game pieces to match what is shown on the screen and spell the word.


The screens below show a game my child played using the Count module. and also below there is a video showing how the screen displays the confirmation for choosing the correct answer.

There are several games and levels that your child can play and interact with for hours of fun and learning. I am looking into buying additional modules like Quest and Steer that I know my children will love.

What I like

  • The learning options that it provides
  • The ease of use
  • The smartphone/tablet compatibility
  • The design that appears attractive to children

What can be improved

  • A gamepad that can accommodate more of the popular and regularly used tablet sizes including the 12.9″ iPad

Final thoughts

Over the past few months, as I have become more familiar with STEM learning tools, I have also become a fan. Using various STEM kits, I have watched in amazement as my son explores and showcases his creative abilities. The PlayShifu Plugo has added to his world and his ability to learn and grow via a mechanism that he understands and identifies with. Just like my other STEM kits, I give this one two thumbs up!!

Price: Plugo Link – $49.99; Plugo Count – $49.99
Where to buy: PlayShifu and Amazon
Sample: The sample for this review was provided by PlayShifu

Filed in categories: Reviews

Tagged: ,

PlayShifu Plugo STEM kit review originally appeared on The Gadgeteer on April 28, 2019 at 12:00 pm.

Note: If you are subscribed to this feed through FeedBurner, please switch to our native feed URL http://the-gadgeteer.com/feed/ in order to ensure continuous delivery.

Edifier W860NB Bluetooth Active Noise Canceling headphone review

REVIEW – As wireless headphones and earphones are becoming the norm rather than a luxury, it only makes sense that customers will keep asking headphone makers “How can you top that?” with each new headphone. Now that wireless is common, the next step is making ANC or Active Noise Canceling standard. Currently, it seems Bose and Sony have ANC locked down, but more headphone companies are incorporating ANC into their product line with varying degrees of success. One of those companies is Edifier—a maker of first-rate (and expensive) home speakers, downright inexpensive computer desktop speakers and everything in-between. They also make good sounding headphones that provide a lot of bang for the buck.

What is it?

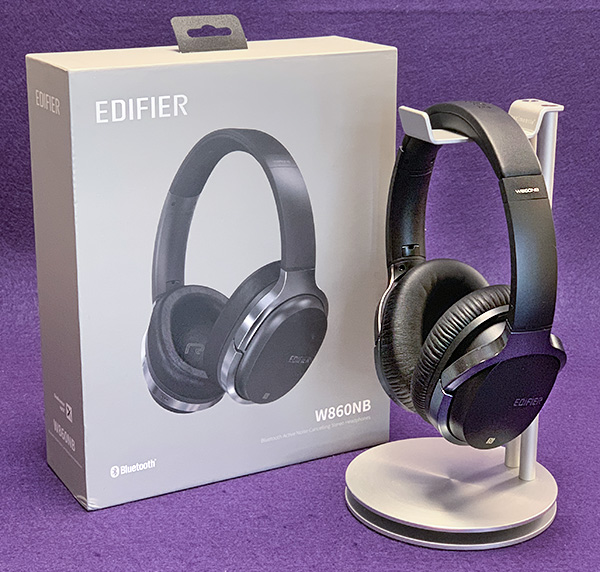
The Edifier W860NB headphone combines a warm sound signature, ear pad tracking and ANC into a successful mix of good sounding tech. It’s an affordable headphone that sounds better than its price might indicate.

Specs

  • Frequency response: 20Hz~20kHz 
  • Impedance: 32 Ohms (easy to use with smartphones)
  • Input sensitivity: 100dB
  • Bluetooth: 4.1 
  • Bluetooth profiles: HSP HFP A2DP AVRCP 
  • Connection distance: 33 feet 
  • Battery capacity: 1400mAh rechargeable battery
  • Battery standby time: About 800 hours 
  • Charging time: About 3 hours 

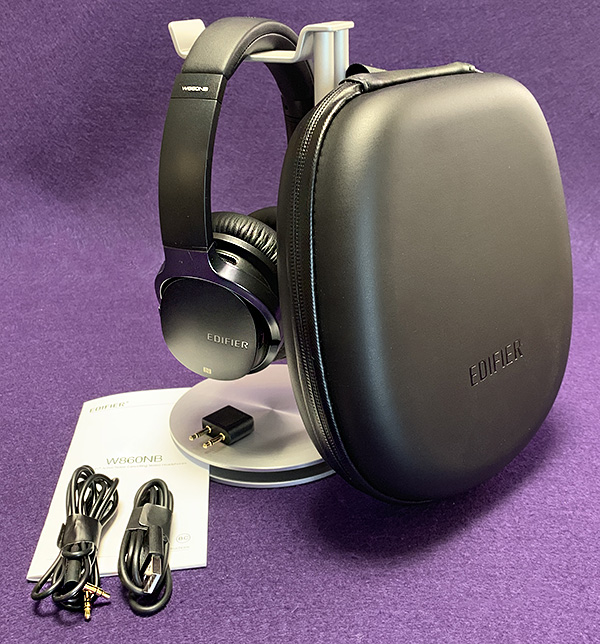
In the box

  • W860NB headphone
  • Hard case
  • Micro USB charging cord
  • Mini plug cord
  • Airplane adapter

Design and features

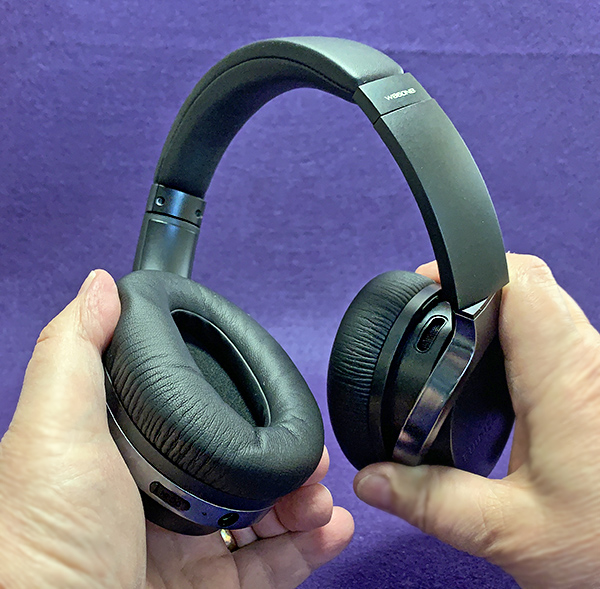
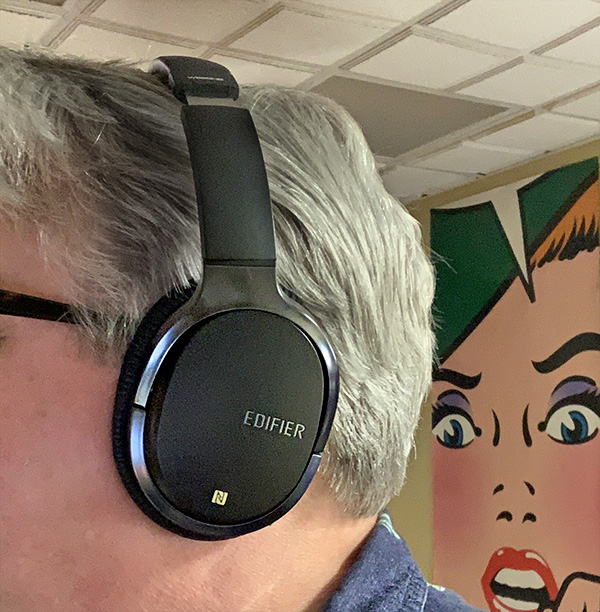
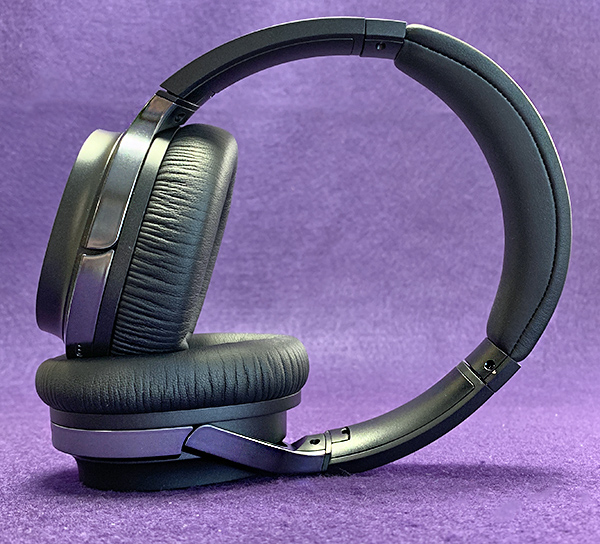
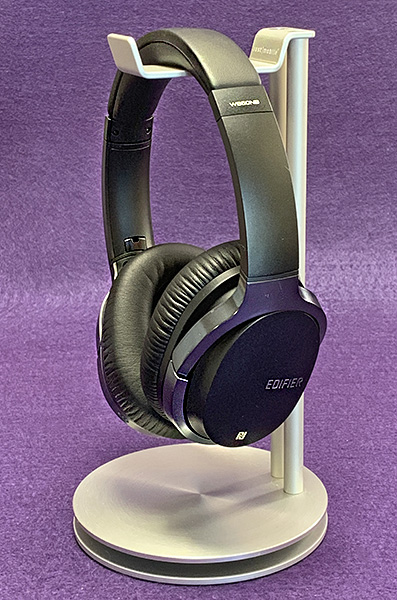
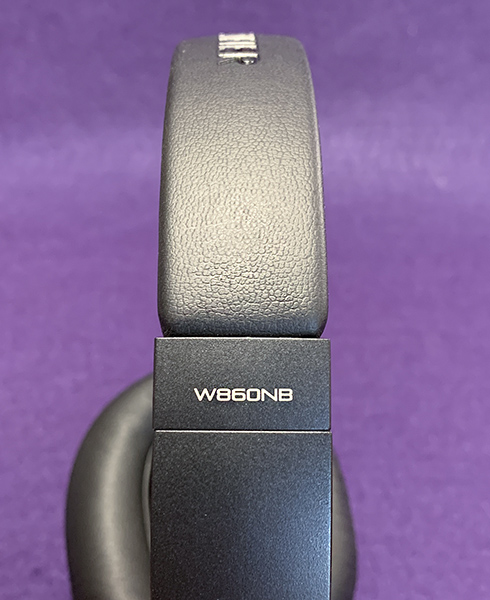
The Edifier W860NB headphone loosely reminds me of Bose ANC headphones. They don’t look like them, but there are similarities. The W860NB is mostly plastic but feels solid and not cheap—like Bose. The ear pads are quite soft and comfortable with head clamping that holds securely without being too tight—also, like Bose. It’s a mama bear approach—just right. These are the kind of headphones that can be worn for hours with no issues—with or without glasses. The ear pads are tilted at the same angle as human ears, so the fit is more “eargonomic” than many other headphones. Because of this, the W860NB headphone looks and feels perfectly natural when wearing—so why is this a rarity?

Black is the go-to color for headphones that aren’t trying to make a designer statement and the W860NB headphones are no exception. The look is all business with black plastic mated with black protein leather ear pads and a subtle silvery-black trim. It’s a classy look, if a bit forgettable. However, they don’t sound forgettable. More on that later.

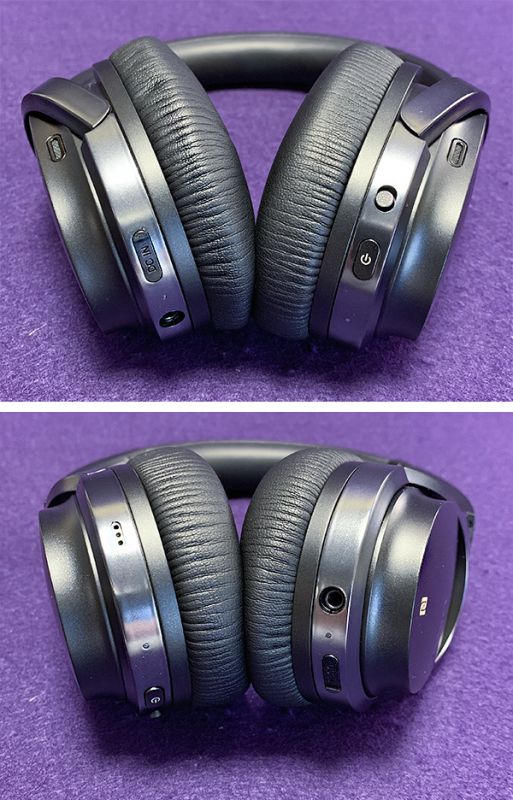
All controls are on the right ear cup. Edifier calls the On/off button a Multi-function button. It will power the W860NB headphone on or off, but pressing it longer begins the Bluetooth pairing process. Anyone who hasn’t read the manual may get quickly frustrated trying to pair for the first time. NFC is available for most smartphone users—except Apple, of course.

Next to the Multi-function button is the active noise canceling switch. This slider button is easy to find with fingers without looking while wearing the headphones.

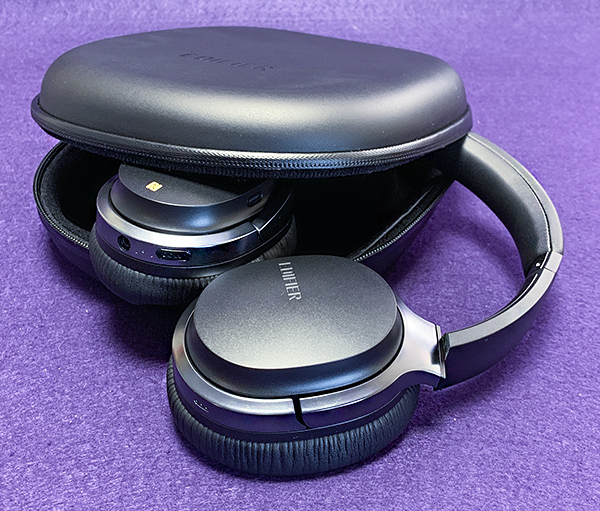
The left ear cup houses both the micro USB charging port and mini-plug port for wired listening. I listened to music both wired and wirelessly. Usually, I can tell the difference between the two sources, but not with the W860NB headphone. That’s rare.

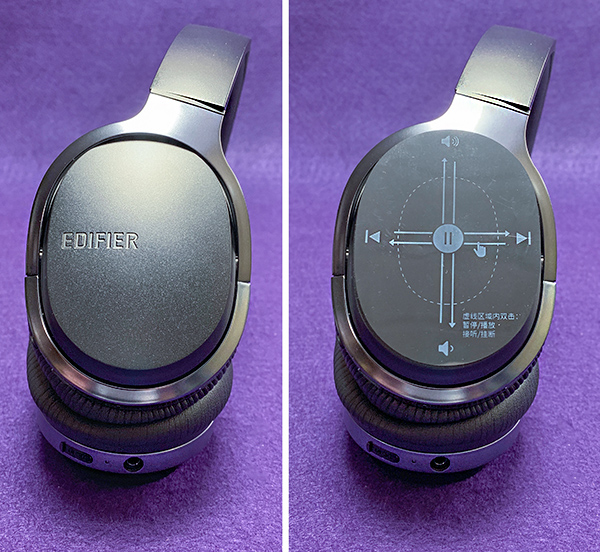
The right ear pad has a touch screen (track pad) built into its slightly rounded surface. Dragging your finger up and down adjusts the volume up and down. Dragging forward will skip to the next track and dragging back go will either go to the previous track or return to the beginning of a track. Double-tapping the center of the ear pad pauses and un-pauses music or accepts/rejects a phone call. 

This is all a nifty feature with a couple of caveats. Sliding a finger up and down changes volume alright, but there’s no finesse. I was either adjusting the volume too loud or soft. I realized that short-flicking my finger on the ear cup rather than dragging changed the volume in more accurate, shorter increments. The other issue I had is that anytime I touched the ear cup to adjust it on my head, I  would perform one of the trackpad functions when I didn’t mean to. I needed to be aware of where I touched the ear cup. I’m sure I’ll get used to it, but its a learning curve.

Call quality using the built-in mics is okay—not great. People I talked to could hear me just fine, but when (unfairly) compared to Apple’s AirPods, there is no comparison. I sounded a bit muffled and far away. To be fair to Edifier, I haven’t had any headphones yet that can rival the AirPods in call quality—regardless of price.

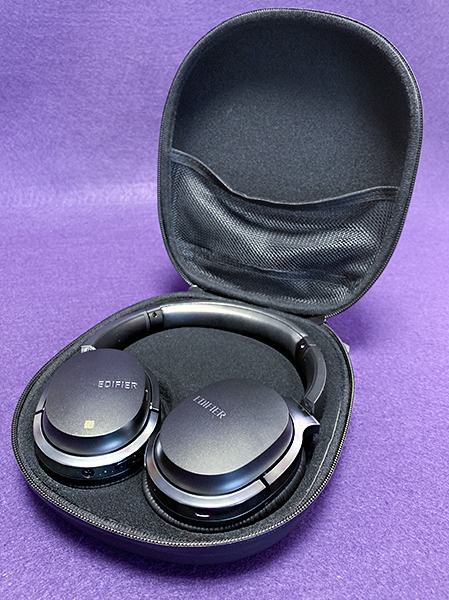
The W860NB headphone comes with a hard, protective case. The W860NB does not fold, so the case is a bit large. An additional soft, commuting bag would have been welcome, but at the price of this headphone, I can’t argue that point too much. Also included are a mini plug to mini plug cord and a USB to micro USB charging cord. There’s even an airline adapter, though those are becoming more unnecessary as time goes on.

It takes about 4 hours to fully charge the W860NB headphone. Play time is rated at 25+ hours with ANC on or 45+ hours with ANC off. Note that volume can also affect battery time.

ANC is one of the main features of the W860NB headphone. It’s not quite as effective as either Bose’s or Sony’s ANC but hey—the W860NB headphone is a bargain compared to those two brands and it’s almost as good! When on an airplane or in a daily commute, the W860NB headphone’s ANC will eliminate any drone-like background and adequately muffle vocals so you can either rest or have better concentration. ANC on the W860NB headphone does what it’s designed to do and that’s a good thing.

The W860NB headphone’s ANC does affect the quality of music when on. ANC tends to “flatten” the sound a bit. This has the effect of distancing emotional connection to what music I’m listening to. However, with ANC off, music takes on a more engaging, fuller sound. There’s just the right amount of bass for easy listening with no hint of harshness in the high frequencies. Technically, the W860NB headphone may not be as accurate as it could be, but who cares? They’re fun to use, comfortable and can wirelessly make music sound good. That counts for a lot.

Even if music sounds better with ANC off, I would not hesitate to use ANC if I thought it was necessary.

What I like

The main attraction of the Edifier W860NB headphone is not its comfort, ANC or relaxing sound signature. All that works just fine. The attraction is that Edifier manages to provide all this at the price they do.

  • Well made
  • Comfortable
  • Long battery life
  • Good ANC

What needs to be improved

  • Too bad they don’t fold
  • Case is protective, but big for travel
  • ANC flattens the music a bit

Final Thoughts

Edifier has a winner with the W860NB headphone, It’s not too expensive—especially with all the extras factored in. The headphone can easily compete with Bose and Sony at a much better price—and still look good doing it.

Price: $169.99 US
Where to buy: Amazon
Source: The sample for this product was provided by Edifier.

Filed in categories: Reviews

Tagged:

Edifier W860NB Bluetooth Active Noise Canceling headphone review originally appeared on The Gadgeteer on April 28, 2019 at 9:09 am.

Note: If you are subscribed to this feed through FeedBurner, please switch to our native feed URL http://the-gadgeteer.com/feed/ in order to ensure continuous delivery.

Ninja Foodi, MX10 Android TV Box, robot vacuums, and more – Weekly roundup

NEWS – Wow, is it just me, or did the last seven days flew by in a flash? If the week was a blur for you too, then take a few minutes to check out this comprehensive list of all the reviews and news that we posted this week.

REVIEWS

NEWS

Filed in categories: Reviews

Tagged:

Ninja Foodi, MX10 Android TV Box, robot vacuums, and more – Weekly roundup originally appeared on The Gadgeteer on April 27, 2019 at 4:05 pm.

Note: If you are subscribed to this feed through FeedBurner, please switch to our native feed URL http://the-gadgeteer.com/feed/ in order to ensure continuous delivery.

WeBoost Drive Sleek cellular signal booster review

REVIEW – Remember phone calls? With so much email, text and work messaging, many of us make far fewer calls than we used to. If you’re a car commuter however, you likely take a few conference calls while driving or even just rely on one of the hands-free assistants who all require connectivity for responding to your every whim. I’m in that camp and also have a couple of major reception trouble spots that routinely cause me consternation. Enter Drive Sleek from WeBoost with a solution that claims to work with all carriers and solve that exact problem with a complete system universally designed to fit most vehicles. Needless to say, something I was keen to check out.

What is it?

Drive Sleek is a complete signal booster kit for vehicles designed to increase reception to and from your mobile phones.

What’s in the box?
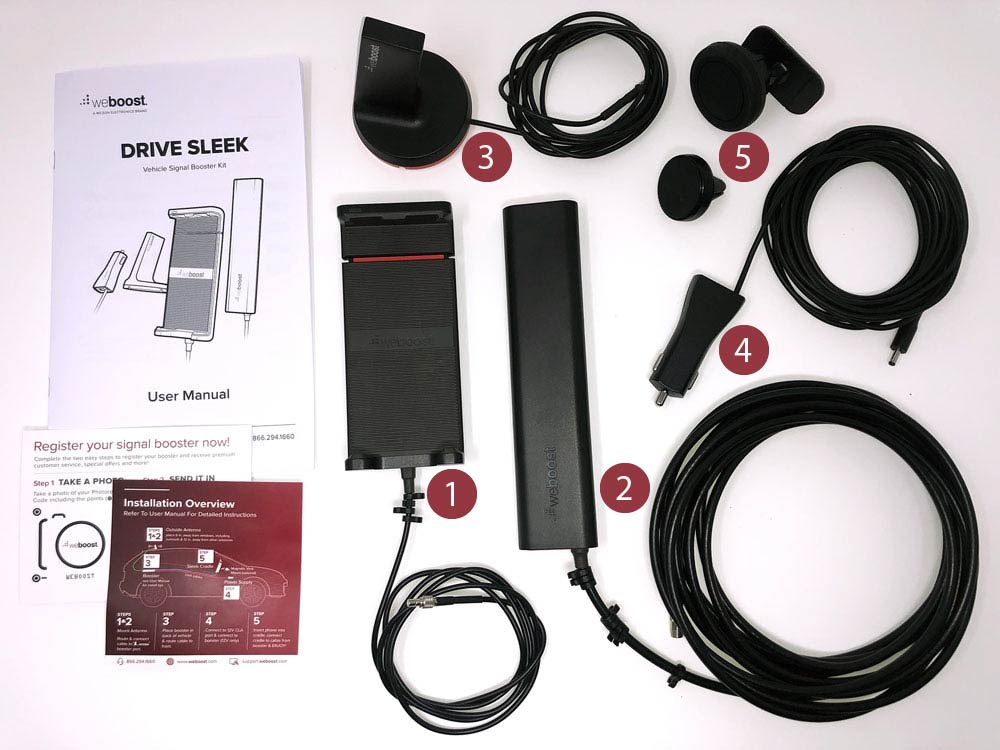
  • (1) Sleek cradle
  • (2) Signal booster
  • (3) Sleek outside antenna
  • (4) Power supply
  • (5) Cradle mount adapters
  • Instruction manual, Overview and registration cards
  • Adhesive mount disc for external antenna, velcro mount for signal booster (these not shown)

Hardware specs

  • Supported frequencies: 700 MHz (bands 12/17 or 13), 850 MHz (band 5), 1700/2100 MHZ (band 4), 1900MHz (band 2)
  • Impedance: 50 Ohm
  • Max gain: 23dB
  • Connectors: SMB
  • Cradle fit: Mobile phones 5.1 – 7.5″ tall

Design and features

As mentioned above, the Drive Sleek is a complete signal booster kit designed to fit as many vehicles and mobile phones as possible. Not the easiest task, but WeBoost has done a commendable good job of covering the bases.

The antenna is magnetic and gently but securely holds fast to most car bodies. They’ve included an adhesive disc should you need to mount to glass or something more exotic that’s not metal.
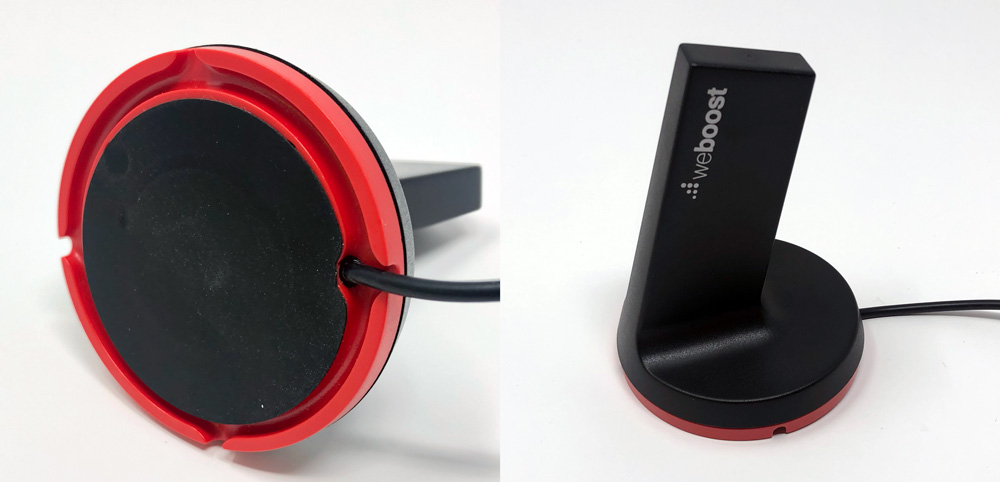
The antenna has a circular perimeter recess on the underside with exits at the compass points allowing you to orient the cable for as little cable showing as possible. Just choose your direction before you place it on the roof.

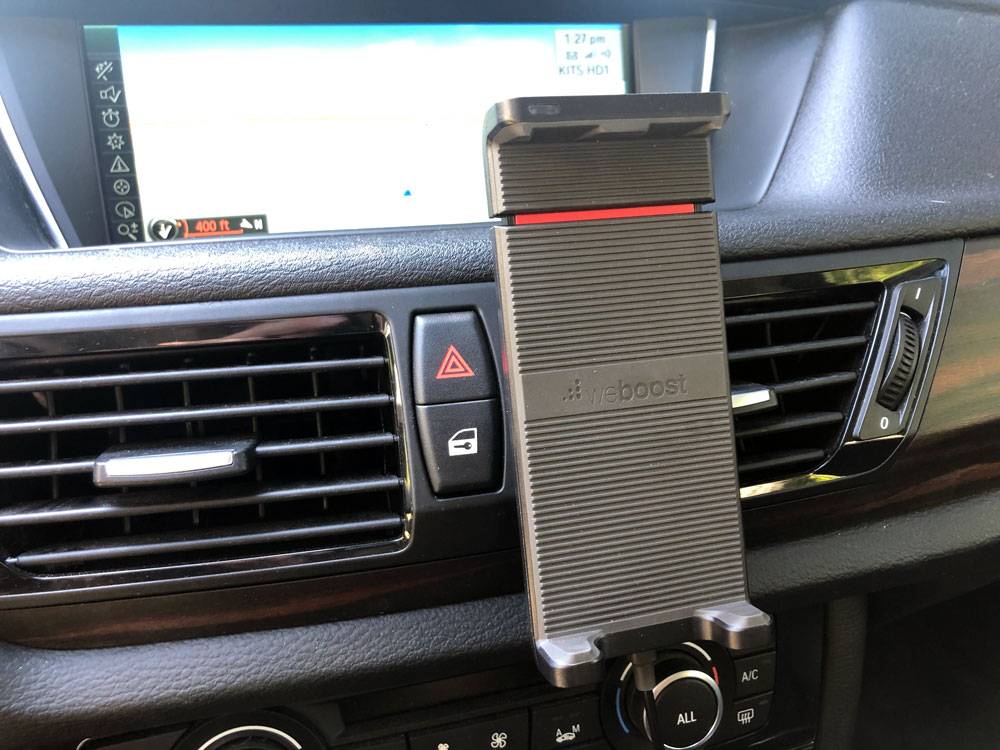
The cradle also mounts magnetically to a vent or adhesive mount to solve for most dash scenarios.
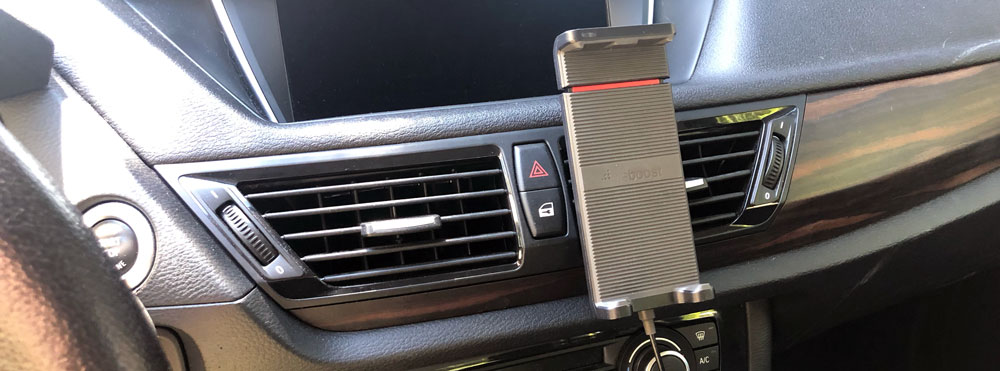
The ability to quickly disconnect the cradle from the mount and stash it when parking is pretty cool. Love the red hit showing you where the expansion section is before you start to slide it.

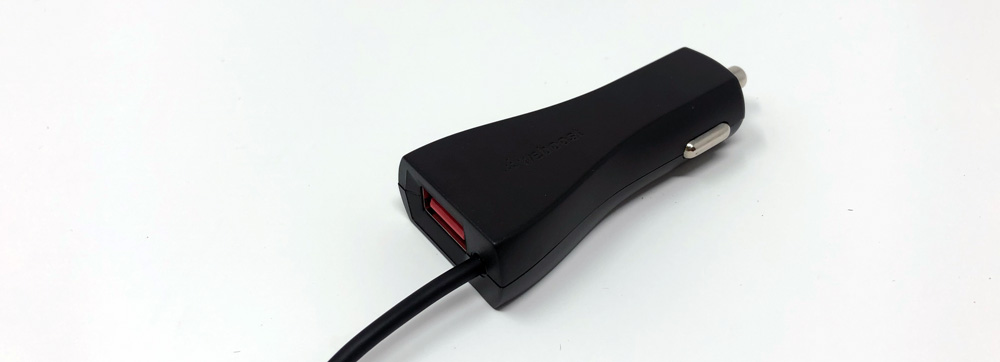
The power supply is a typical CLA (Cigarette Lighter Adapter), but with a flattened design and a really long cable in case you need to make a run from a 12V outlet at the front of your car. The built-in USB port may come in quite handy if that’s the setup you need.
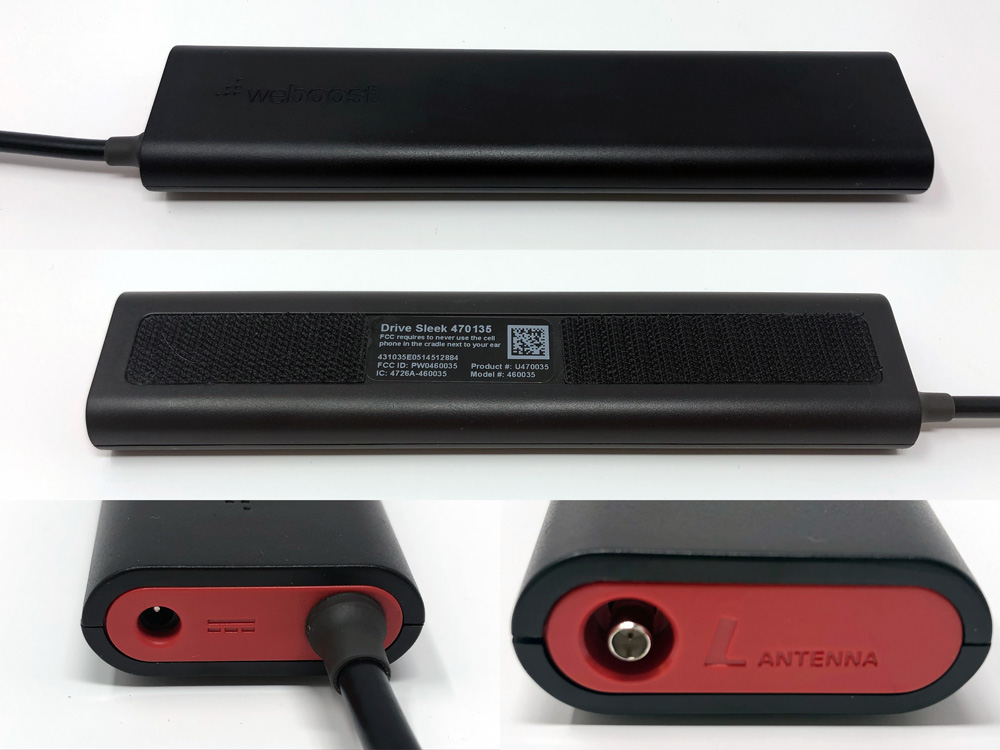
The signal booster module has a long tethered cord with a port to connect the power supply on one end and the roof antenna on the other. All the cables are designed to be tucked away and out of sight.
Possibly the best feature is one that I can’t show visually. It’s that once everything is plugged in, it’s just on and working whenever your car is running.

Setup

Installing Drive Sleek can be very easy and quick if you’re installing the system temporarily or take a good deal longer if you’re trying to install it more permanently and want to be meticulous.

Here are the basics… Mount the antenna on the roof and route the cord inside through a trunk or door to the signal booster. Connect the power supply to a 12V CLA and the other end to the signal booster. Finally, run the long signal booster cable up to the cradle for your dash. If you’ve done this quickly for a road trip in a rental car (my first couple days of use), you likely have cables draped everywhere and will need to tuck a few of them out of the way.

As for installing more permanently, the order doesn’t change a whole lot other than taking stock of what makes the most sense for your particular car. Here’s how that worked for installing on my mine.

I placed the antenna on the right rear of the roof for a couple of reasons.
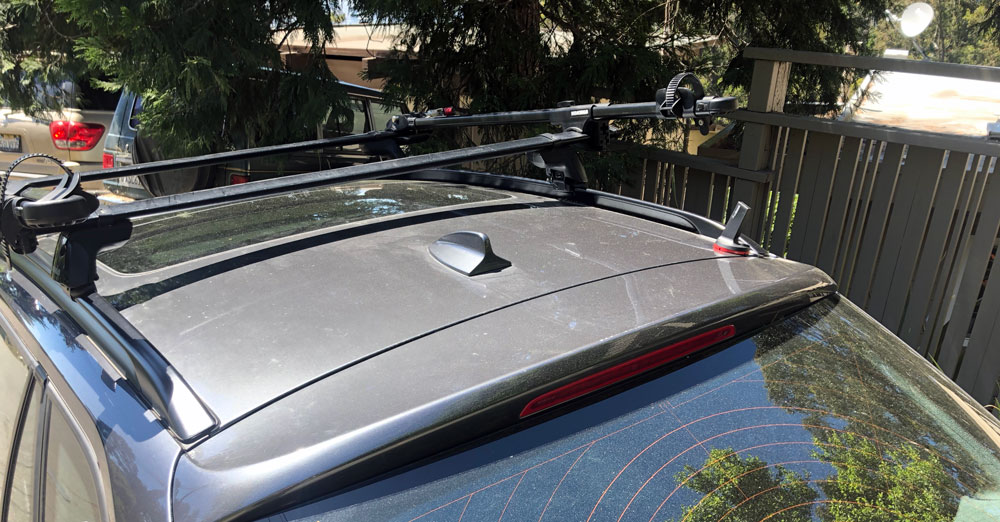
The antenna has a 6′ cable needs to be at least 12 inches away from any other antennas. My car already has the antenna in the center rear where I probably would have put the Sleek antenna, so I needed to find a different location. Putting it in the right rear allowed almost no visible cable and also helped add some visual camouflage the antenna near the end of the built-in luggage rack.
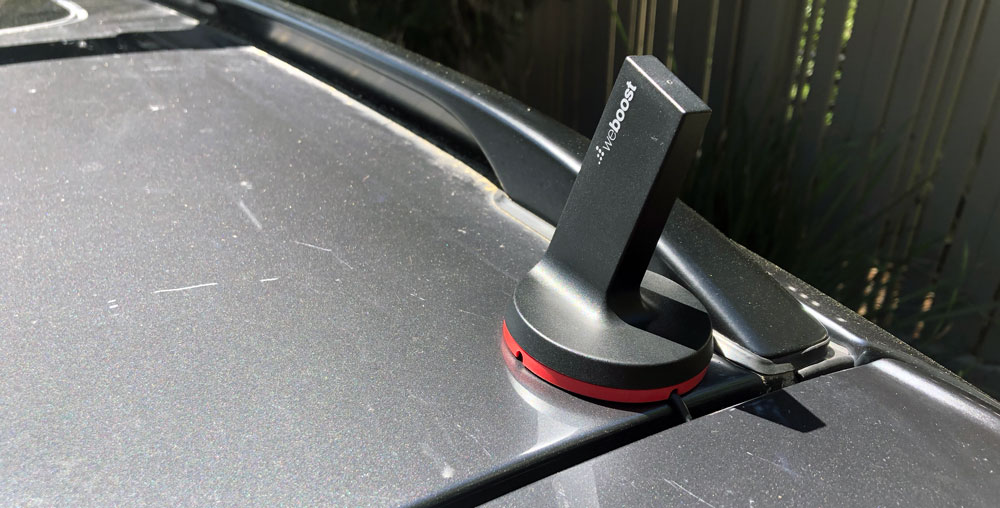
It would have also fit on the left, but there’s an accessory 12V outlet in the right rear. Easy peasy.

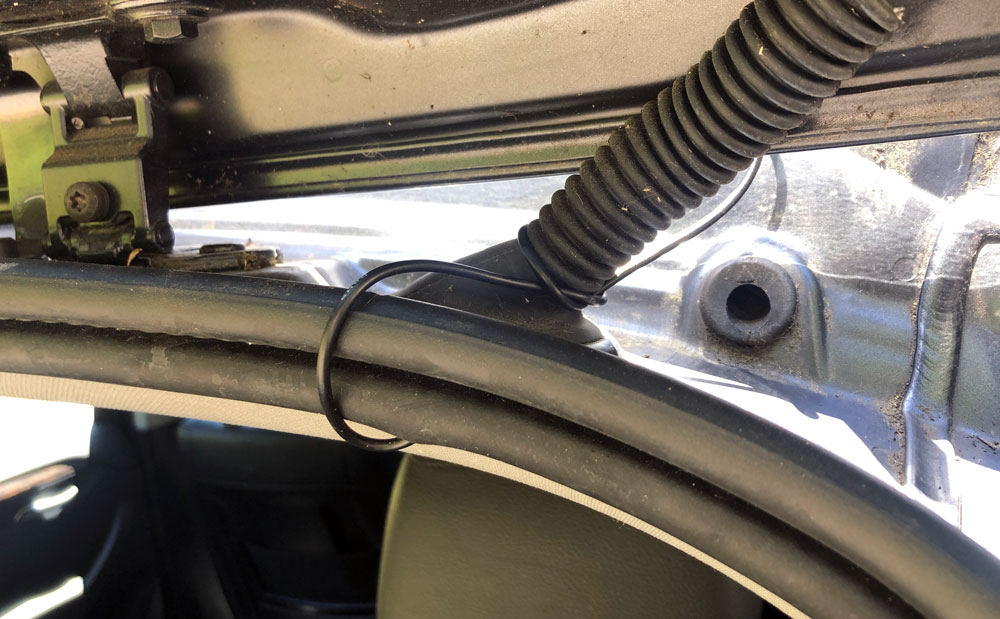
I looped the cord around the electrical for the rear window so that opening and closing the hatch wouldn’t tug on the antenna cord and then tucked it inside the roof lining before running over to the right side.
The signal booster is pretty slender, lightweight and already has hook velcro adhered to the back. The mating velcro with adhesive is included in the box if you need it. I found that the hook side actually gripped to the lining material of the trunk as is, so just found a spot up and under to keep this one out of sight for the nefarious types that like to peer into parked cars.
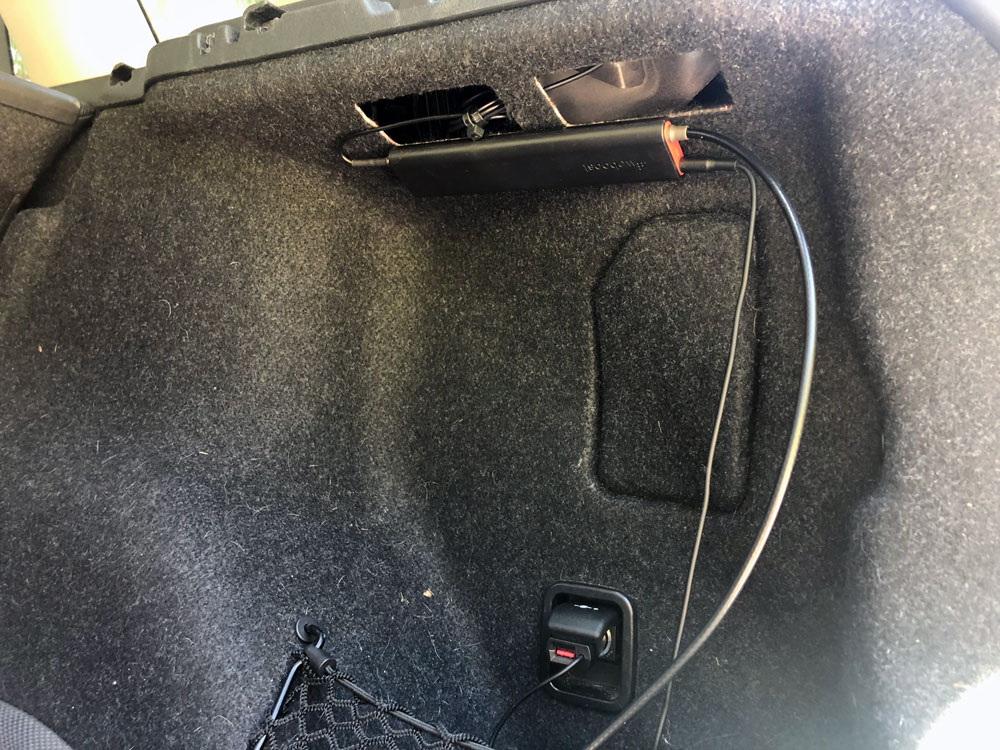
I used some zip-ties to secure extra cable lengths and then connected the antenna cord to the front of the signal booster. I only needed about a foot of cable to make the jump from the outlet to the signal booster. All good.

Next, you’ll want to figure out where you’re placing your cradle.  They include two magnetic adapters for finding a good location in your car. One is a vent mount which has the now-typical 4 finger claw that pushes into place.
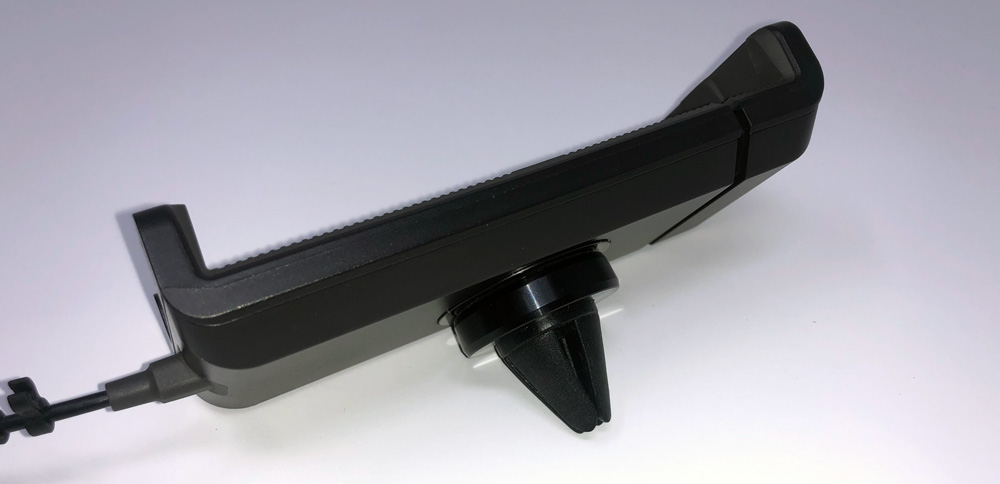
The second is a ball-joint mount with peel-and-stick adhesive you can secure to a clean, smooth surface on your dash.
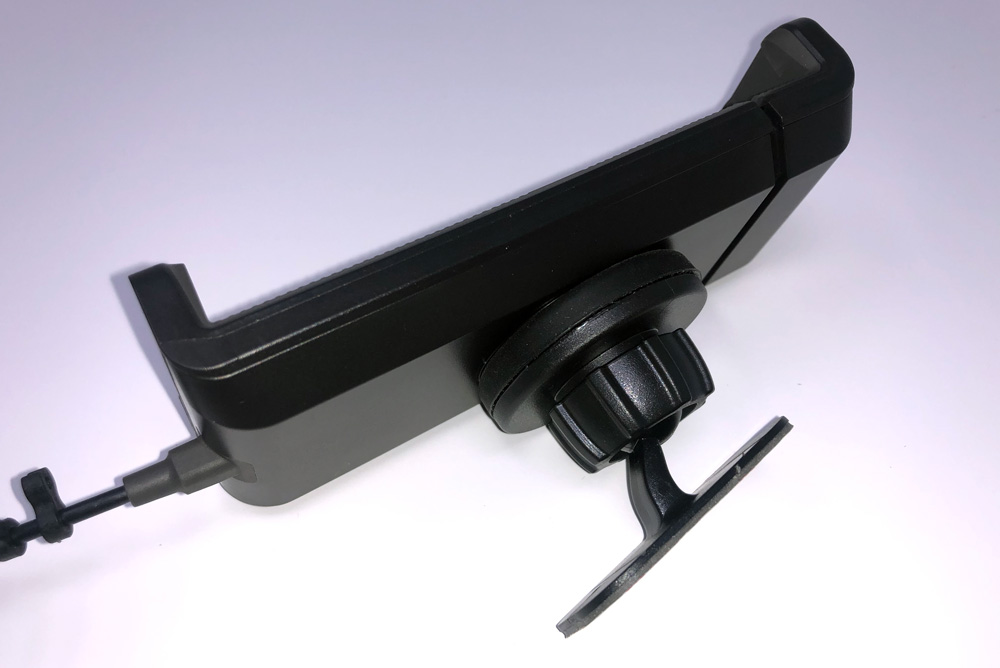
I opted for the dash mount. (Tip: Try to find a location that helps lock the vent into a position that prevents vertical motion and then allows the cradle to rest against the bottom).

The cradle’s cable is only about 4′ long which is long enough to get the connector end down between your seat and console, so you’ll need to run the signal booster’s long cable up to meet it with a connection that looks like this.

I was able to run mine underneath the rear trunk cover, under the back rest of the right rear seat and then down under the door step covers. I didn’t need to actually pry anything up, just kinda wedge the cables under and tuck them out of sight. I then connected the two cables under the front passenger seat.

Performance

A couple of weeks ago my son and I flew up for an Oregon/Washington college visit weekend that was going to have us clocking in some pretty significant miles and some good stretches of what was likely to be spotty cellular coverage. I brought Drive Sleek along to use in the rental car as I knew we’d be on the phone multiple times to relay new college info and answer lots of questions. The rental car was a Ford Explorer and I had Drive Sleek installed in about 5 minutes as we headed out far too early in the morning.

The phone goes into the cradle easily by placing the top edge of your phone under the top lip and sliding up until the bottom clears and enters the lower edge of the cradle. (This is an iPhone 6+ in the photo to show capability for larger phones and it easily had another 1.5″ of motion available.)
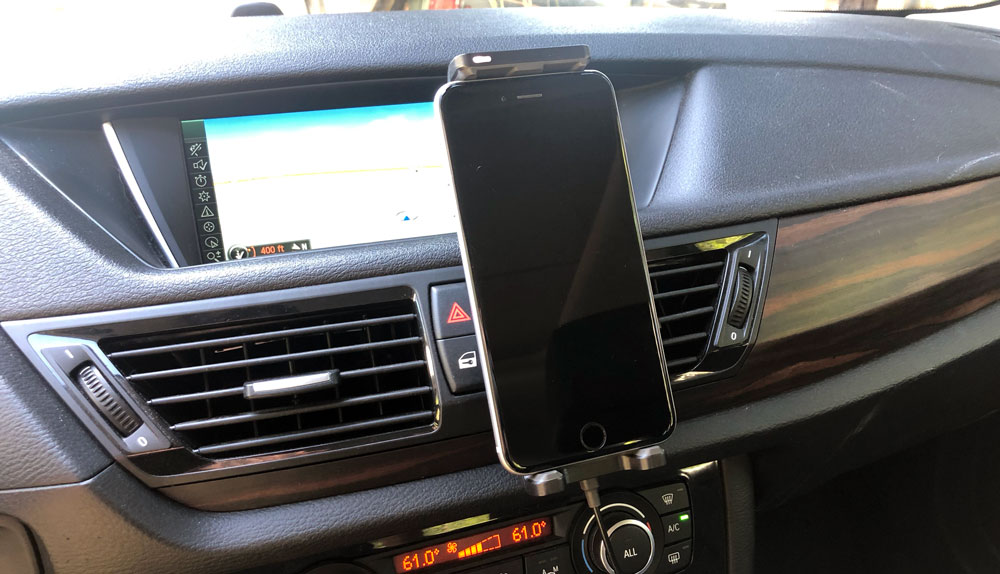
Adjustment is automatic with a super smooth slide and as long as your vent isn’t pivoting on you, it’s a one-handed operation. There are two recessed areas under the top cradle edge if your phone has a power button up top (nice touch). A little (but very bright) white light resides in the top left corner of the cradle to let you know the system is functioning properly and is at maximum gain.

So, how did it work for me? I use an iPhone X and my son has an iPhone 8. The reception indicators are shown as 4 bars where zero is no reception and 4 is all good. That said, these indicators are much more FYI and not great at actually showing what is really happening. In our case (having different model phones) I didn’t want to add any additional variables to the mix so the real test came down to making calls.

Throughout the trip, I was able to make and receive calls without trouble as well as ask Siri whatever it was I needed to ask. I did all the driving so my phone stayed in the cradle and I’d ask my son to look for restaurants and gas stops on his phone. We definitely hit a few areas where I would have 2-3 bars when he had 1. Again this isn’t conclusive, just anecdotal. We had a good 60+ minute phone call through a long, less populated stretch where my phone was showing a single bar a few times. This phone call never dropped, got fuzzy or hard to hear and I do feel that Drive Sleek was part of why.

We also drove through some pretty nasty rain conditions, as is common in the northwest from time to time. We did not see any issues with the external antenna or reception of my cloud-based music library. Nor was there any leakage past the trunk seal where the cable was routed. We finished the trip up with the feeling that Drive Sleek may actually live up to WeBoost’s claims.
Back home, there are two specific spots which have repeatable coverage issues and would help to prove that out. One is on the bay bridge on the way to SF, just before Yerba Buena Island. The second is at my kid’s high school in Oakland which somehow is an AT&T black hole.

For the bay bridge issue, I was able to make and finish phone calls through the trouble zone without dropouts. This is pretty impressive as phone calls typically just abruptly end where even the built-in streaming of our car’s entertainment system blacks out for this one 500 ft section. Similarly, at the high school, I was able to drive within the troubled area and have an uninterrupted phone call without any signs of audio trouble.

Overall, very positive results, but there are a few things to nitpick as I tend to do.

  • The white light on the cradle is fine during the day, but for night time driving it is very bright. There’s no control to knock it down or toggle a “night mode” so I’ll probably end up fashioning a little gaffer’s tape hood, or use some tinted transparent tape to knock it down a bit.
  • Would love to see wireless charging on the cradle. Phone calls and GPS apps kill batteries. Wireless charging here would just be the icing on the cake for the new crop of phones.
  • I’d also like to see the cable on the cradle be detachable. I would prefer to fully wedge the cable behind some panels on my dash and have it pop out just below to connect. This would also allow for someone to purchase a longer or shorter cable if needed.

What I like

  • Improved reception
  • Simplicity of the system
  • Design and function of the cradle
  • Magnetic attachment style of antenna and cradle

What needs to be improved

  • White cradle light is very bright at night
  • Wireless charging please (feature request, not a con)
  • Detachable cable on the cradle would be useful

Final thoughts

Drive Sleek is aimed at personal vehicles where one’s phone is mounted while driving. It’s well built, looks good and solves for most common mounting scenarios. The cradle itself is great and outperforms a lot of vent mounts I’ve used. As a system, it’s not inexpensive, but if you rely on your phone while driving for directions or work calls it may pay for itself quickly. It’s definitely worth a shot as WeBoost offers a 30-day money-back guarantee. Good luck!
Price: $199
Where to buy: WeBoost and Amazon
Source: The sample of this product was provided by WeBoost.

Filed in categories: Reviews

Tagged:

WeBoost Drive Sleek cellular signal booster review originally appeared on The Gadgeteer on April 27, 2019 at 11:00 am.

Note: If you are subscribed to this feed through FeedBurner, please switch to our native feed URL http://the-gadgeteer.com/feed/ in order to ensure continuous delivery.