Kami home security system review

REVIEW – Home security is all the rage today. Yi, maker of the Yi Home Camera 3 standalone security camera is jumping into the full system fray with their Kami product.

What is it?

Kami is a modular do-it-yourself home security system.  I was sent the base system that includes the base station, three entry sensors and a motion sensor as well as their wireless HD camera.

What’s in the box?
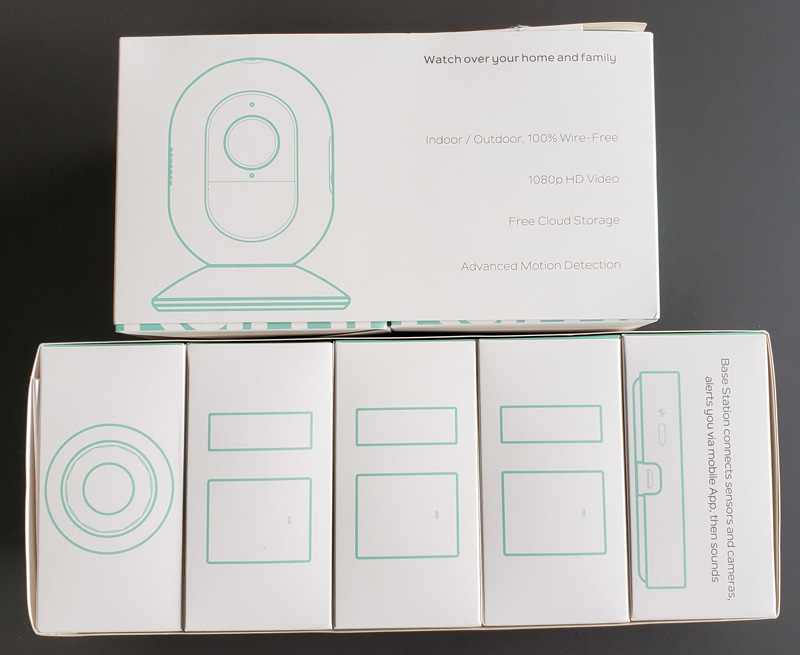
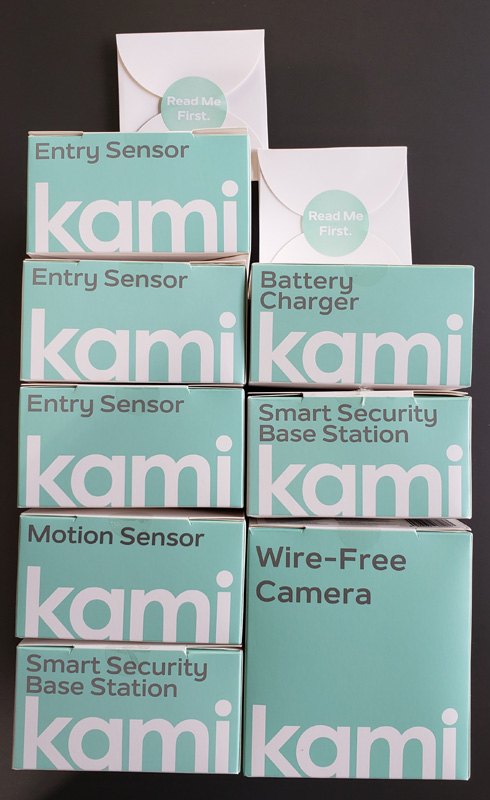
More correctly, what’s in the boxes – there were seven in total.

Box 1 – base station
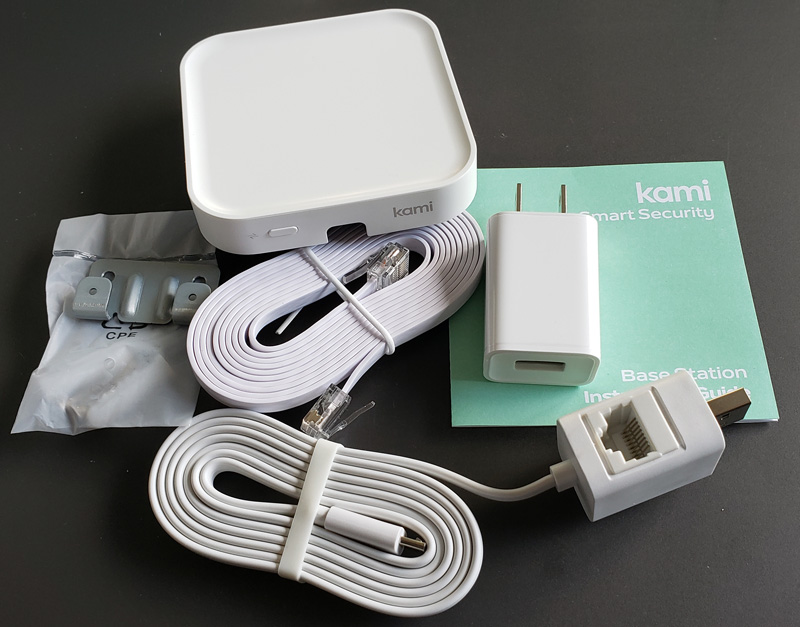
  • Base station
  • USB power adapter
  • USB power cord with Ethernet adapter
  • Ethernet cable
  • Wall mounting kit
  • Instruction guide

Boxes 2,3,4 – entry sensors
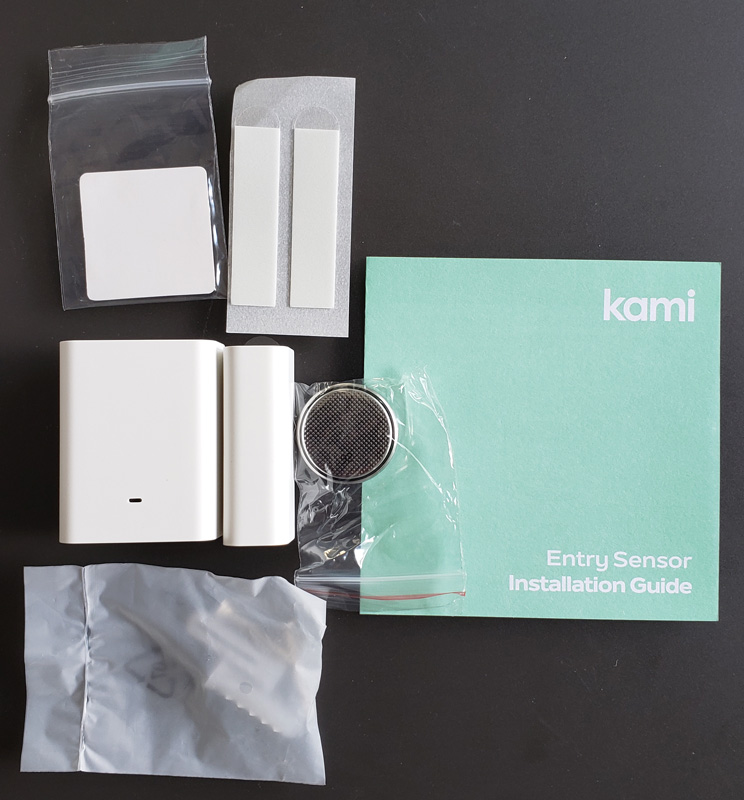
  • Three identical boxes that contain:
    • Entry sensor base (larger)
    • Entry sensor remote (smaller) with adhesive pad attached
    • Adhesive strips for base
    • Base mounting screws
    • Reset pin (not pictured because it’s under that square cardboard piece – doh!)
    • Installation guide

Box 5 – motion sensor
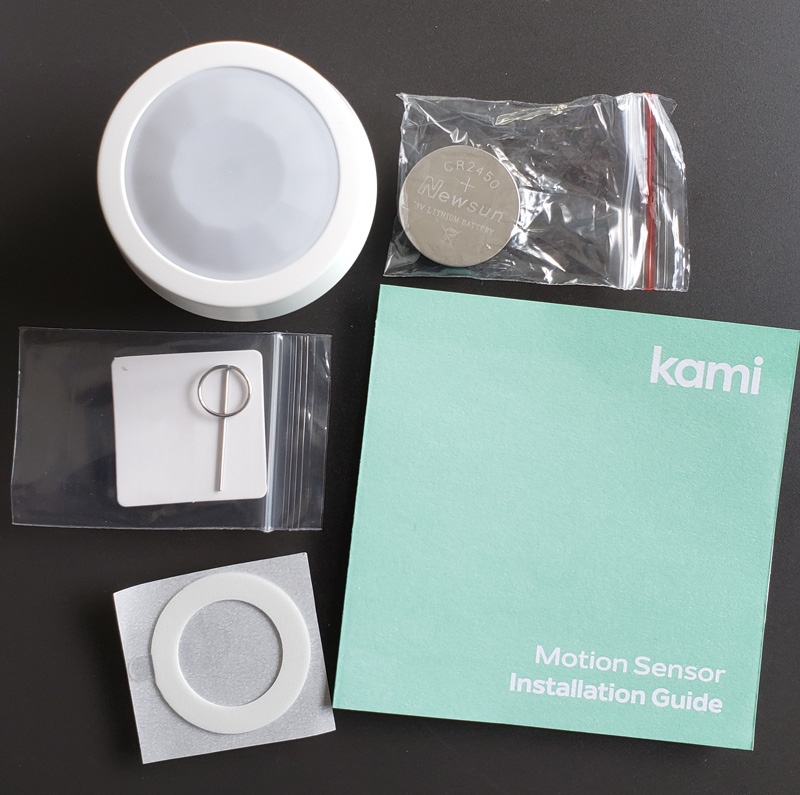
  • Motion sensor
  • Adhesive circle
  • Battery
  • Reset pin (pictured this time!)
  • Installation guide

Box 6 – another base station

  • Exactly like box 1
  • Can be used to set up different zones with different home/away or schedule profiles

Box 7 – wire-free camera
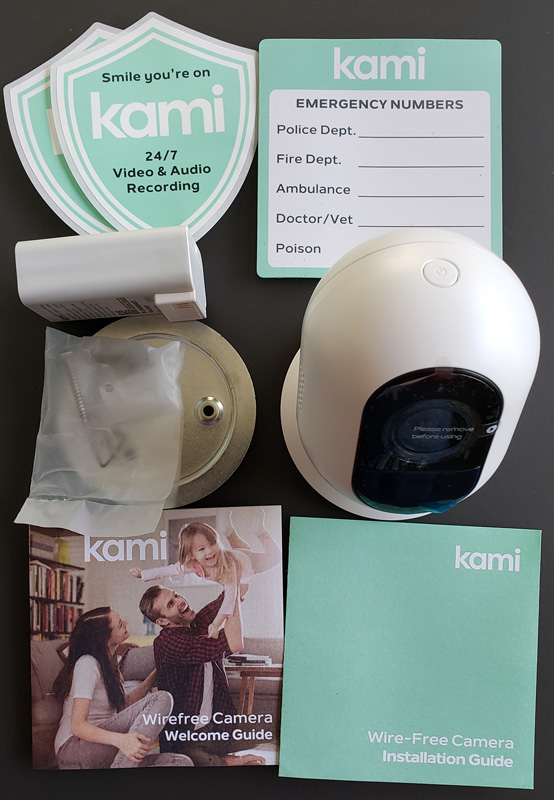
  • Wire-free camera
  • Magnet base
  • Rechargeable battery
  • Mounting plate
  • Mounting screws
  • Emergency number magnet
  • 2 x Kami video surveillance warning stickers
  • Welcome guide
  • Installation guide

Box 8 – wire-free camera battery charger plus a spare battery
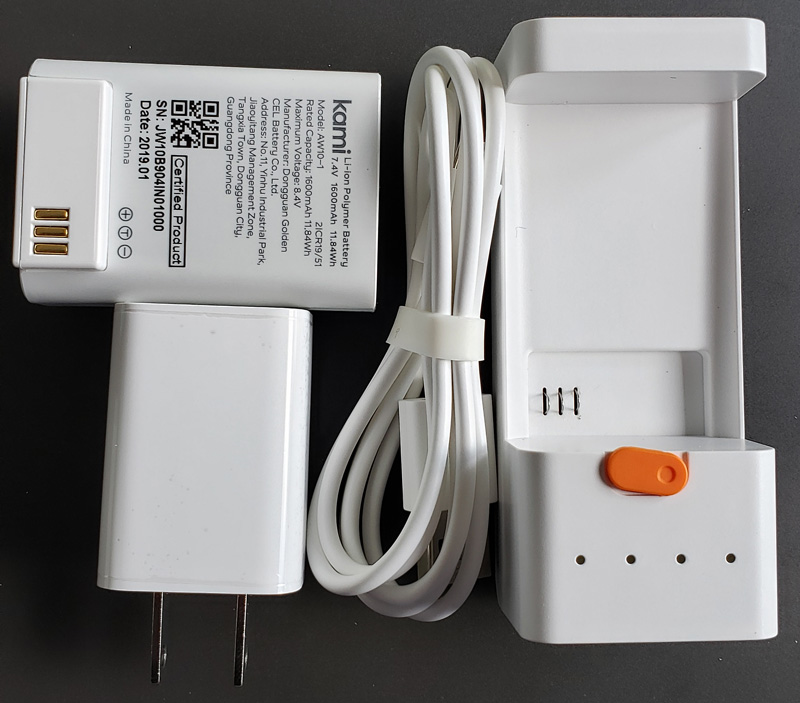
  • Battery
  • Charger
  • USB power adapter
  • USB cord

Hardware specs

Base system

1x Kami Smart Security Base Station:
Wired Network: RJ45
Wireless Connection: 2.4GHZ Wi-Fi
Operating Temperature: 0-45° Degree Celsius / 40°-115° Fahrenheit
Power input: DC 5V/1A

3 x Kami Entry Sensor:
Battery Type: CR2450
Operating Temperature: 0-45° Degrees Celsius / 40°-115° Fahrenheit

1x Kami Motion Sensor:
Battery Type: CR2450
Operating Temperature: 0-45° Degrees Celsius / 40°-115° Fahrenheit

Wire-free camera system

1 x Kami Wire-Free Camera:
Infrared night vision: 18 feet
Camera viewing angle: 113° degrees (H), 59° degrees (V), 140° degrees (D)
Video specification: 1080P / 20fps
Operating temperature: 14-122 Degrees Fahrenheit

1x Kami Smart Security Base Station:
Wireless connection: 2.4GHZ Wi-Fi
Operating temperature: 32-113 Fahrenheit

2 x Battery:
Rated capacity: 1600mAh/11.84Wh

1 x Battery charger:
Rated power: 9W

Design and features

The Kami system is designed to be modular – you add what you need for your specific installation.  Let’s take a  look into the setup.

Setup

Base station

The first thing to do is to download the IOS or Android Kami Home app from the appropriate store.  Once installed, set up a Kami Home account.  This is where I ran into an issue.  As a Yi Home camera user, it turns out that the Yi Home and Kami Home accounts are the same things.  So, I simply logged into Kami Home with my Yi Home credentials.

Now, to get a base station installed. The base station must be plugged into a router.  Luckily, I had a couple of ports available on one of my eero remotes.

Design flaw here:
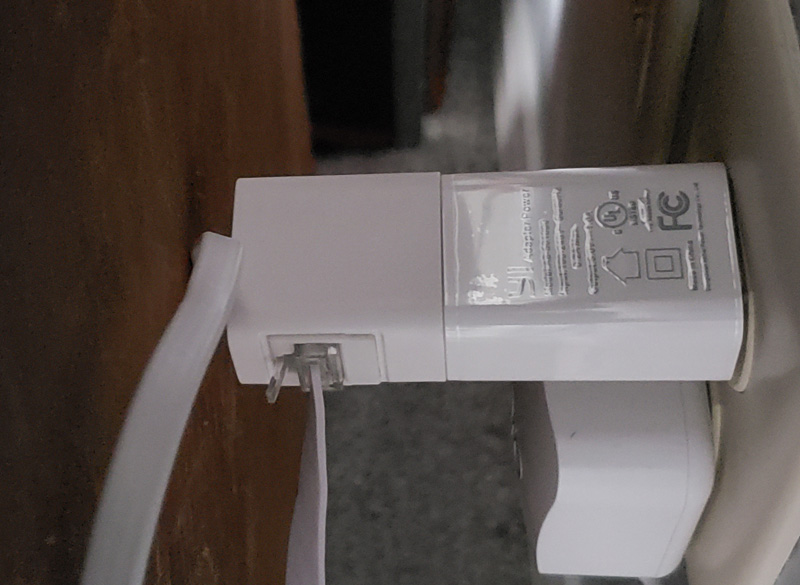
The Ethernet adapter/power cord combo plugs into the end of the USB power puck, creating a two-inch-long monster that is impossible to hide behind furniture without moving said piece quite a distance from the wall.

To start the setup, choose what it is you are installing.
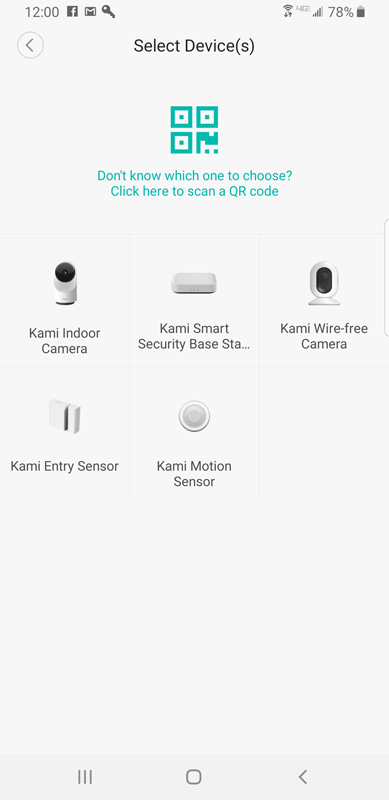
After getting everything plugged in, Yi’s usual, excellent, voice prompts from the device lead you through pairing.  In the app, I chose to add a base station.  The app found the base station immediately and paired as expected.

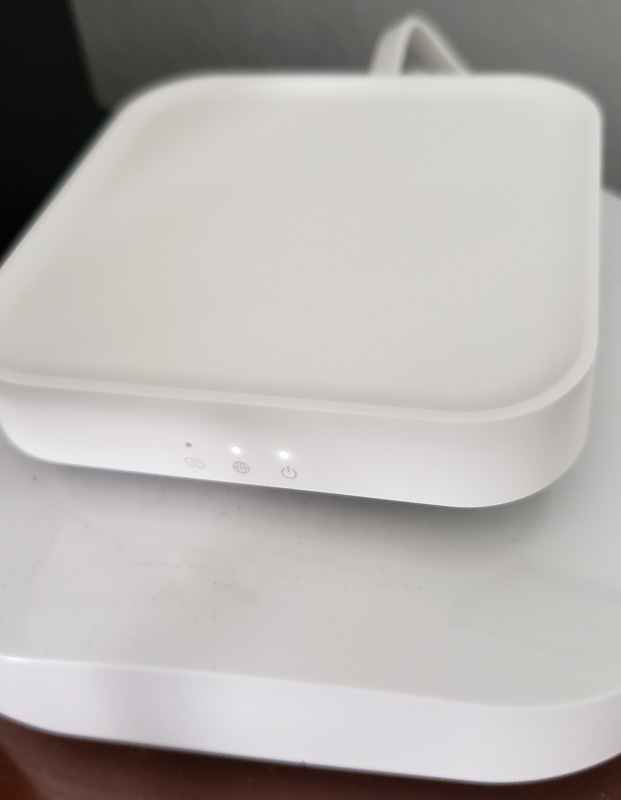
The base station is very small.  Here it is sitting on top on my eero router.
Entry sensor

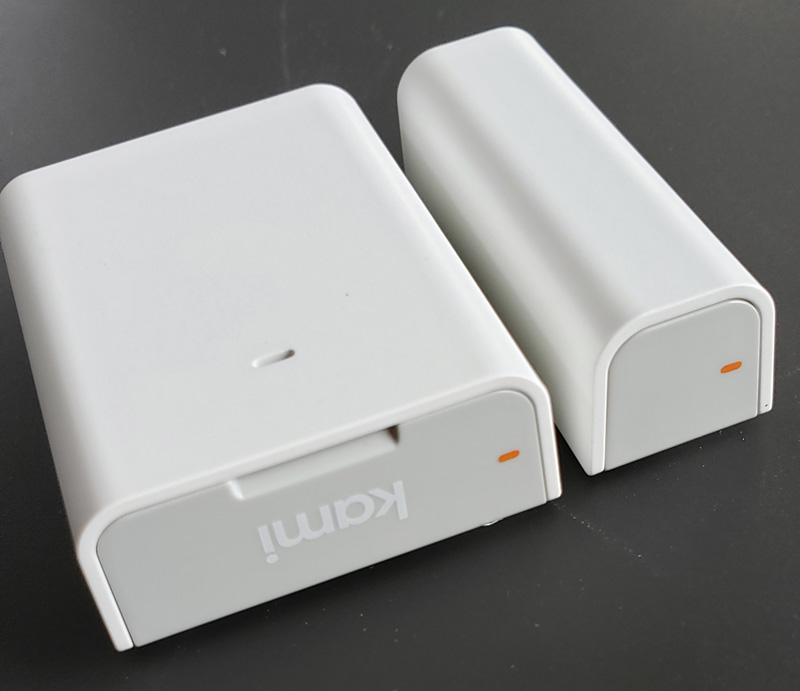
Again, set up is pretty simple.  Choose to add an entry sensor in the app, and the app leads you. Open it up, install the battery – battery orientation is pictured in the app, place it near the base station and scan the QR code inside the cover.  Then the app prompts you to push the reset button with the included reset pin. There is a little green light to the left of the reset hole.  Once flashing, confirm that in the app and the base station reports verbally that the sensor is paired.

The app shows devices as they are added.
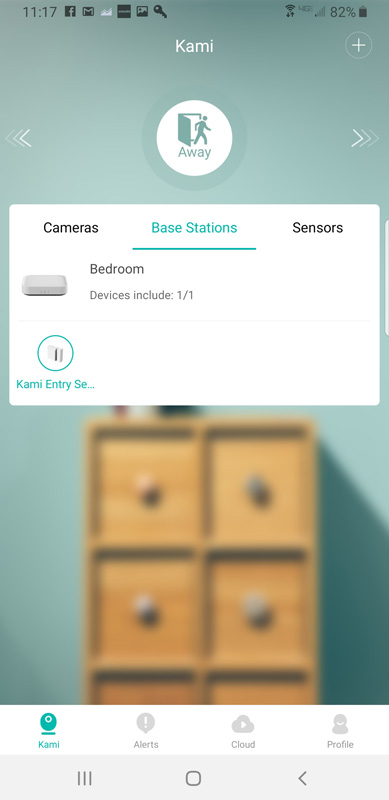
And, the app provides mounting instructions:
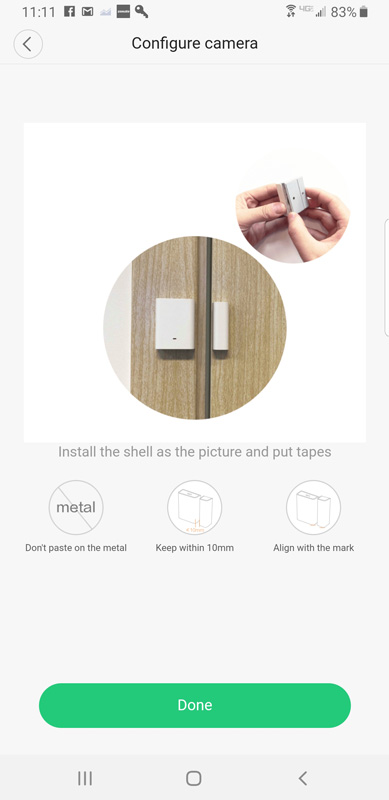
That last item – align with the mark – refers to marks on the two parts of the sensor that need to be matched up.
Motion sensor

Setup for the motion sensor followed the same steps as the entry sensor.

Start by twisting the back off.  I couldn’t do it.  Then, I saw the lock indicator.
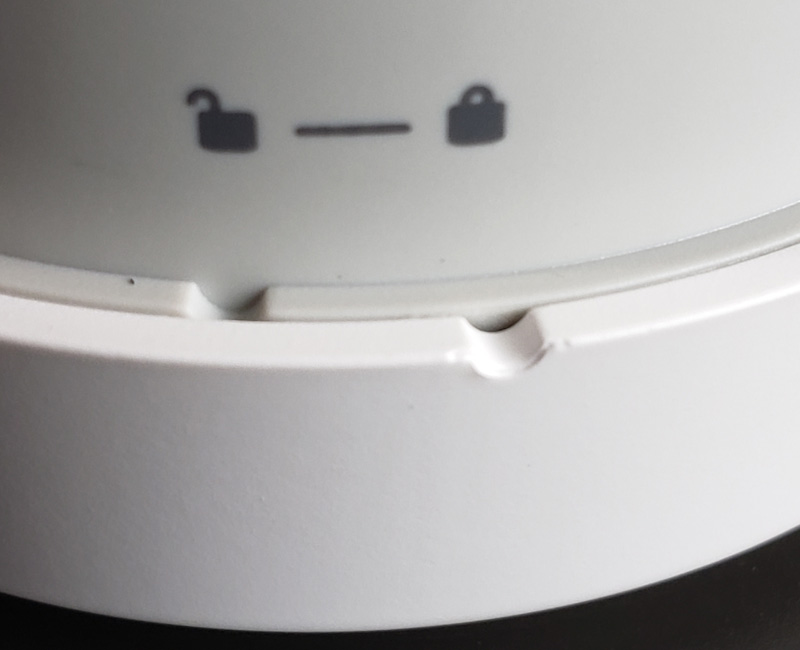
After I twisted it to the unlock position, the back came off easily.

Here is a view of the green LED I mentioned above that flashes after hitting the reset button, indicating it is ready for pairing.
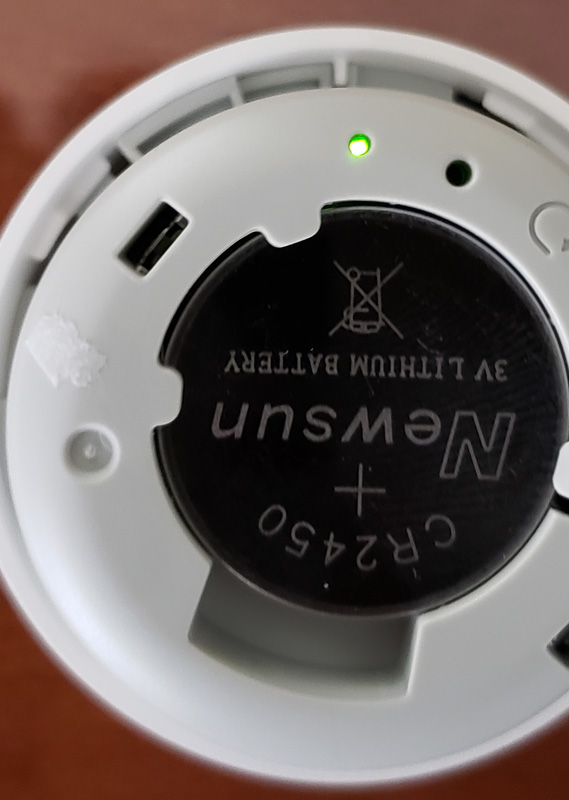
Each device confirms when it pairs.

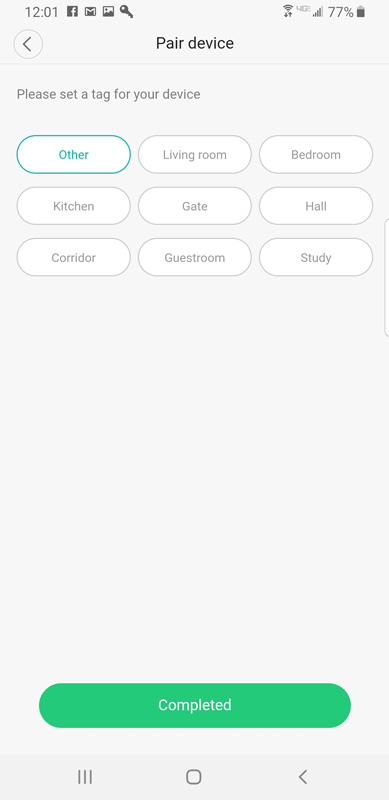
You can set a location tag for each device.
Camera

Camera set up is essentially the same as the other devices. Pop off the back to access the door lock for the battery compartment.
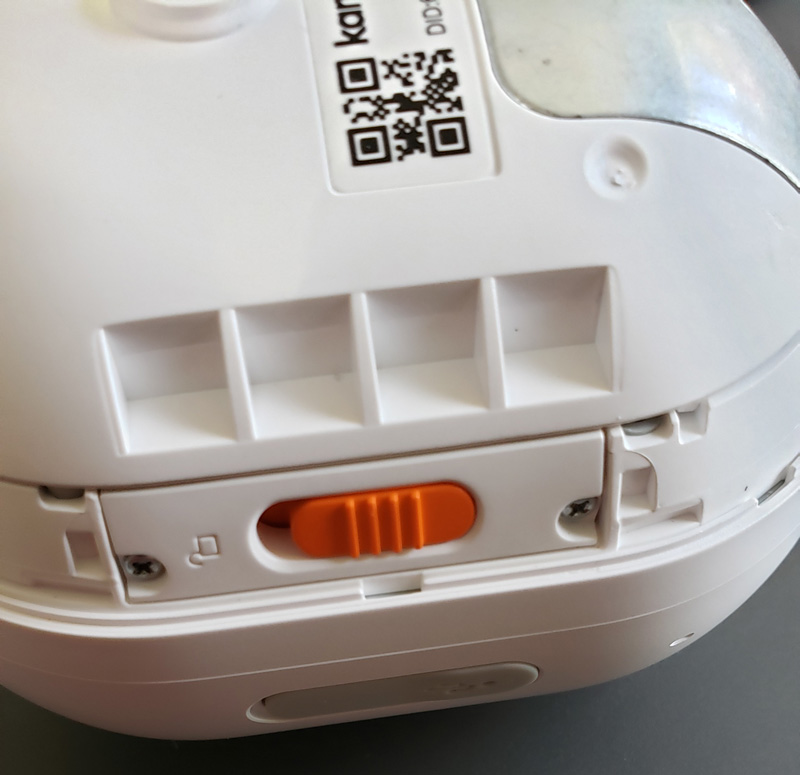
Swinging open the door, we find the battery compartment.
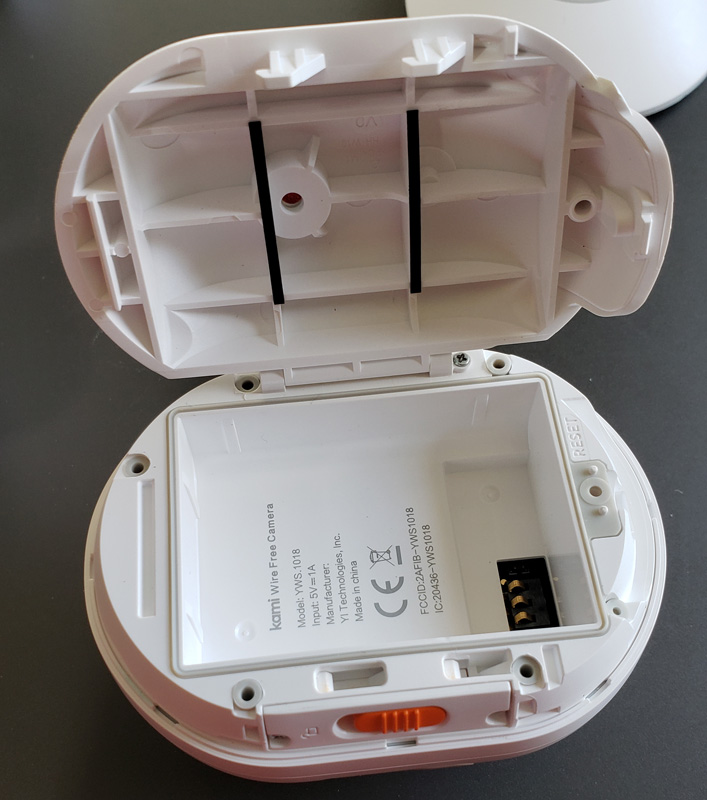
The battery drops in and immediately powers up the camera.  Its voice prompt tells you it is powered up.
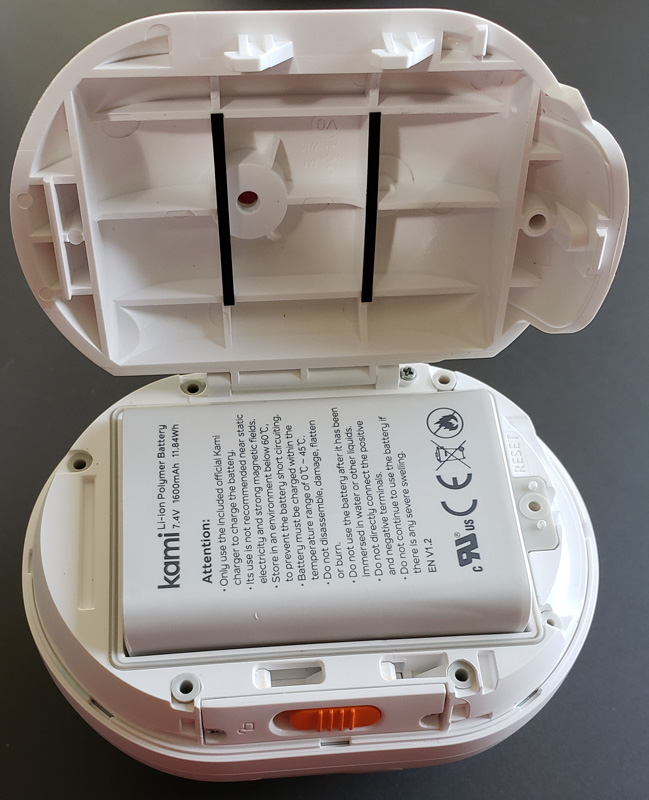
After closing the unit and placing it on the base for stability, place it by the base station, press the main button on top and the app leads you through automatic pairing.  Both the camera and base station’s voice prompts report that the pairing is complete.

One note – the camera is an indoor/outdoor camera, so you can use this to monitor your outdoor spaces.

Battery charger

There is no setup for the battery charger – just plug it in and pop in a battery to charge.  Four LEDs report charging progress.

Performance

After installing an entry sensor, I moved the entry sensor parts apart and back together to test operation.
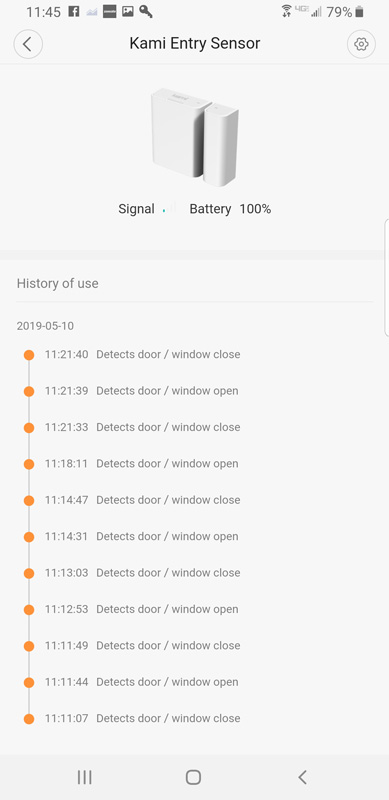
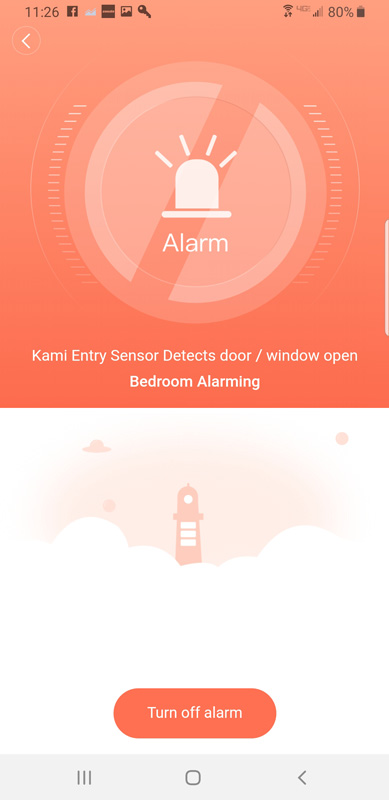
The app recorded each event.  When the system was in away mode, the base station started audibly alarming minutes before I received an alert in the app.  Eventually, I got an alert and was able to see the alert and silence the alarm.
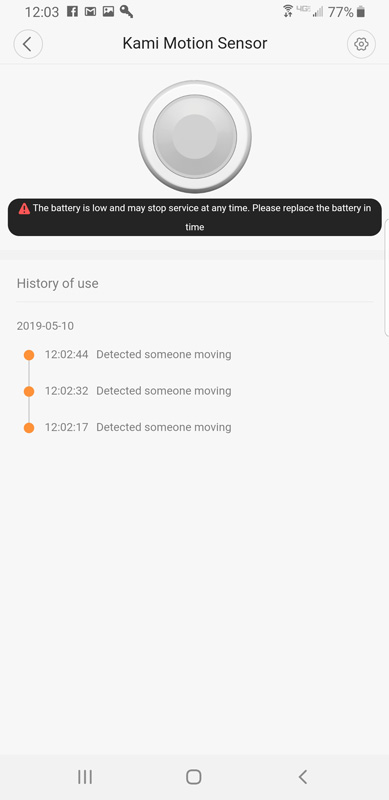
I also tested the motion sensor.  It picked up motion successfully, but looks like they sent an old battery!
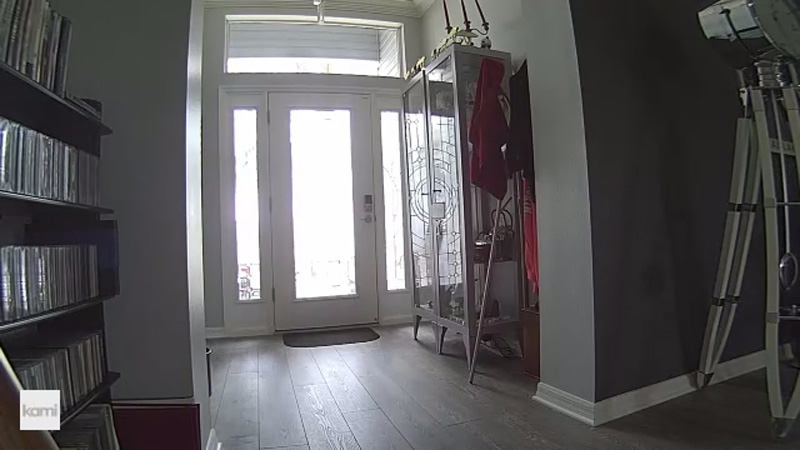
After adding the camera, it produced good quality video and images.
The camera does not have an SD card slot, meaning that you cannot save any video without subscribing to the Kami Cloud recording service.  Pricing runs from $66 to $199 annually depending on how long the videos are saved and whether it records full-time or only motion activated recording.

There are two modes, home, where alarms are silenced and away, where alerts trigger the base station alarm and app notifications, To change to/from home and away mode,  you slide the icon to the right to activate away mode and to the left to activate home mode.

After just a few days, the battery in the camera died.  I was surprised how quickly it died, but it probably really wasn’t fully charged.  Still, there was no notification from the app.  If there was from the camera, it happened at night or when I wasn’t home, so there was no way to know.  I only discovered it when I looked in the app and saw the camera was offline. Speaking of notifications, the app seemed to regularly sleep and notifications from motion would only come in sporadically, and then, in groups.

Finally, after the battery died in the camera, I expected to drop in the other battery and be back in business. Nope. I put in the battery and got the verbal welcome message. I checked the app, expecting to see the camera back online. Nope. The camera didn’t come back online after I put in the battery.  I tried it multiple times with the camera right next to the hub.  Nothing.  I finally deleted the camera from the Kami hub and went through the pairing process again.  Still nothing.  I followed the procedures in the app exactly as I did for the initial pairing and I could never get the camera to pair again.

What I like

  • Simple set up
  • A comprehensive set of sensors for a reasonable price
  • Good quality camera

What needs to be improved

  • The alarm is somewhat quiet
  • Phone alerts are slow and inconsistent
  • The entire system is in home or away mode – no mode for home, but still armed, like a night sleep mode
  • No SD card in the wire-free camera, so no recording without paying to subscribe
  • Wire-free camera wouldn’t come back online after the battery died
  • No options for central monitoring – alerts are audible from the base station and in the app

Final thoughts

Overall, I am not impressed with this DIY security system.  The setup and installation are simple and the sensors and camera all work well until the battery dies.  The alerts take some time to reach your device and the only other alarm is a somewhat muted alarm at the base station.  With no options for central monitoring, it is limited to audibly alerting inside your home and on your phone. Plus, you are required to pay for cloud recording, since there is no SD card option on the camera. It is not documented in the app, but it does include six months of cloud recording.

With spotty alerts and problems when battery-powered devices lose power, I can’t really recommend this system.

Price: Base system: $99.99; Wire-free camera system: $109.99
Where to buy: Amazon – base system and wire-free camera system
Source: The sample of this product was provided by Yi Technology.

Filed in categories: Reviews

Tagged:

Kami home security system review originally appeared on The Gadgeteer on May 27, 2019 at 11:00 am.

Note: If you are subscribed to this feed through FeedBurner, please switch to our native feed URL http://the-gadgeteer.com/feed/ in order to ensure continuous delivery.

Airdog FitAir Personal Air Purifer review


REVIEW – If you have kept up on reading my past reviews on Air Purifiers, you may recall a Personal Air Purifier that I reviewed that as far as I am concerned was a total gimmick and completely useless. I now have the chance to review another similar device called the Airdog FitAir Personal Air Purifier. Is this yet another gimmick device that will end up in some landfill? Let’s see!!

What is it?

Airdog FitAir is a personal air purifier system that works to remove viruses, smoke, bacteria, allergens, and other harmful microbes from within 25 square feet of the space around you at a rate of 3 times per hour. It can be used in multiple ways to function indoors and outdoors.

What’s in the box


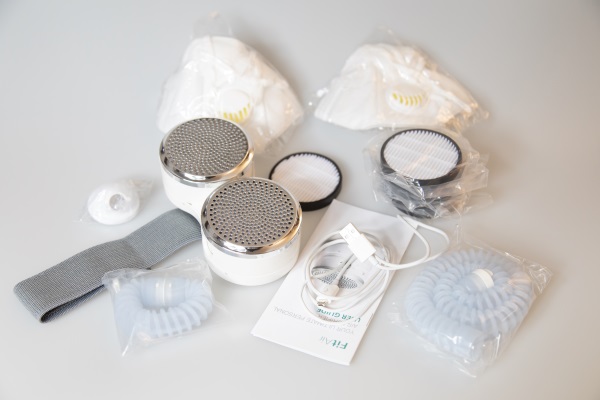
1 x FitAir Portable Air Purifier
2 x H13 HEPA Filter
1 x Micro USB Charging Cable
1 x User Guide

The following optional items included in the Accessory Pack were provided by Airdog for this review:
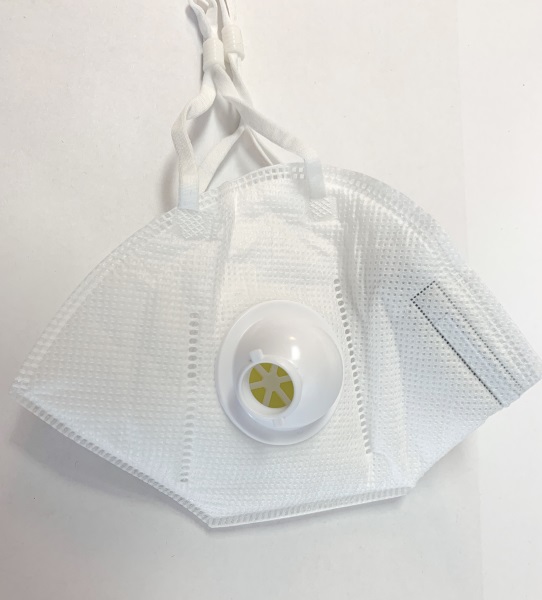
2 x Face Mask
1 x Air Inlet
1 x Long Silicon Tube
1 x Short Silicon Tube
1 x Box of Replacement Filters

Design and features

Specifications
Battery Life: 2 to 6 hours
Power: 3W 1600 mAh
Size: 7.2” x 3.5” x 3.1”
Item Weight: 7.8 oz

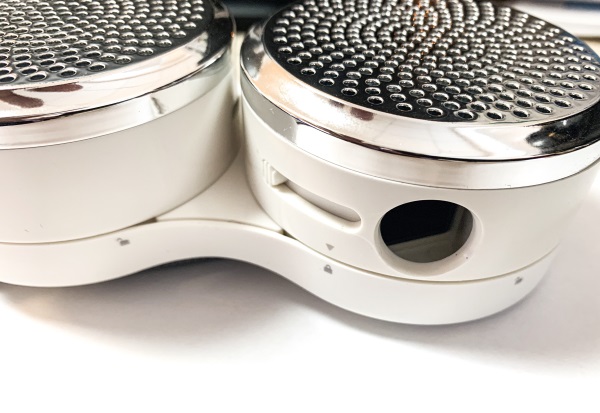
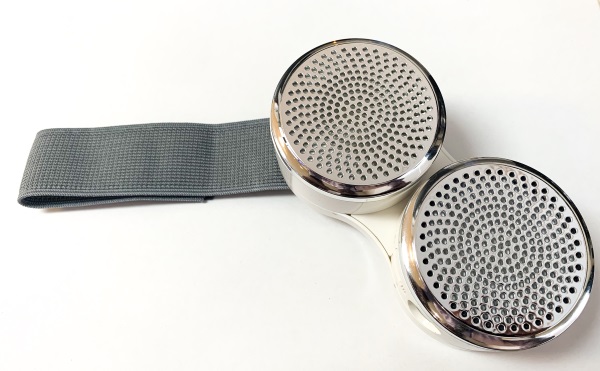
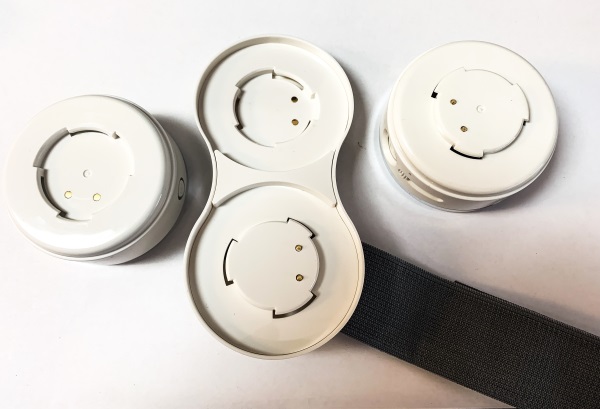
The FitAir Air Purifier has a base that the 2 individual modules can be connected to. The base has an elastic band with velcro that allows you to attach the unit to your arm or even to a stroller if you are heading outdoors. There are contact points on each surface that allow them to be powered by the Control Module that has the built-in battery.

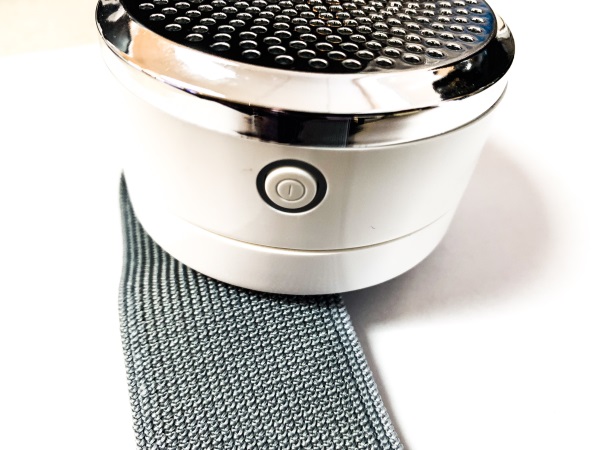
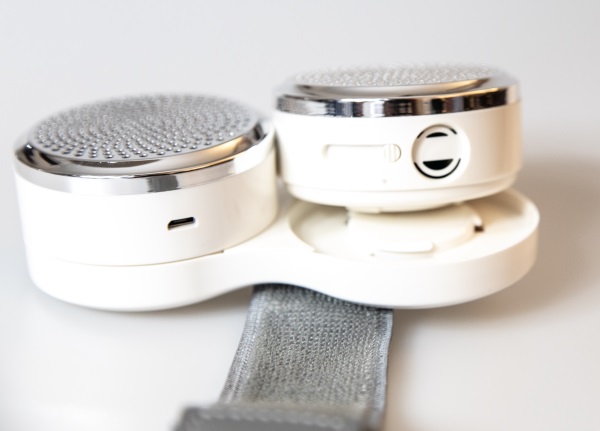
The Control Module has a built-in battery and the power/control button. The Cleaning Module has the Air Gate control and the Air Outlet.


The picture below shows the power button that is on the Control Module. It has a multi-colored LED around it that lights green when the battery has 3 to 6 hours of charge, yellow when there is 1 to 3 hours of charge left and red when there is 1 hour or less left of charge. It is also the manual control for the 3 levels of intensity.


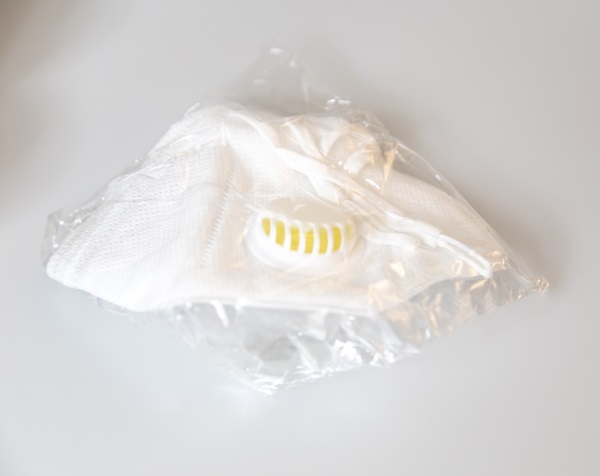
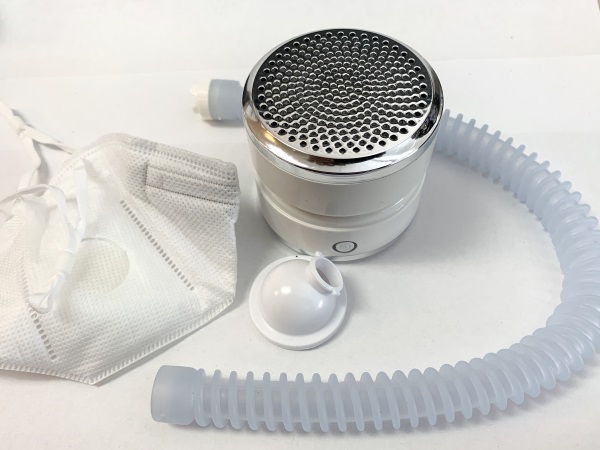
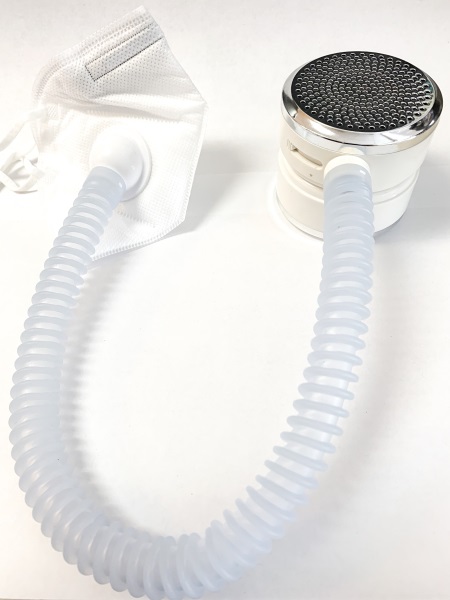
Below you can see pictures of the face mask and the long and short hoses. Either hose can be used to connect the face mask to the Cleaning Module.

Performance

The Airdog FitAir Air Purifier is very easy to assemble and operate right out of the box. The Control Module can be charged separately or on the base. I like to charge it connected to the Cleaning Module since this is how I use them together most often. Once fully charged the device provides me with a bit over 5 hours of function before the red LED lights and then it is time to start charging it soon. The device does operate while being charged. However, I would really like a battery that lasts a bit longer so that I can charge it at home overnight and have it with me during the day without having to charge it before my work day is over. The video below shows it being charged.

When the device is on, there is some associated sound. There are 3 power levels. The video below shows the device on at the highest level. It does not sound any louder than a small desk fan.

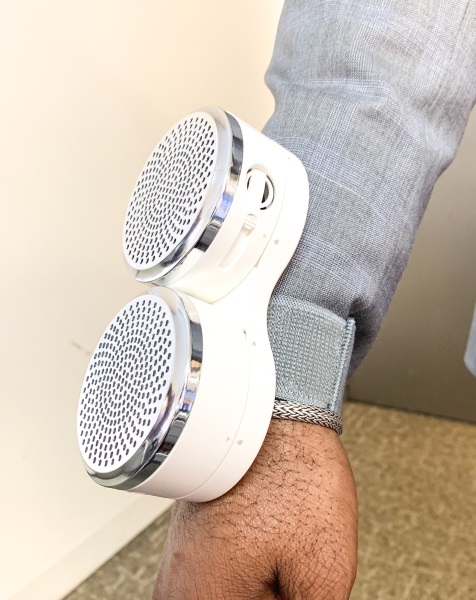
FitAir includes an elastic band that allows you to wear the device on your hand, arm or to strap it in a compatible manner.

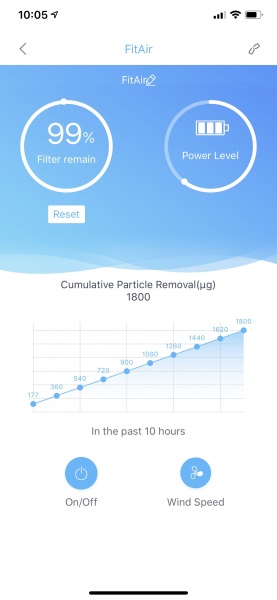
The main screen from the app is shown below. The information it provides includes the battery charge level, the remaining life of the filter, the air particle removal rate, and 2 control icons for power on/off and the level intensity control.

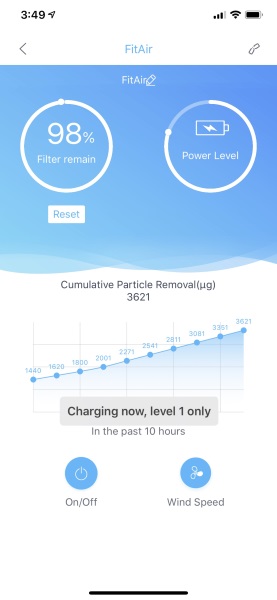
The screenshot below from the app shows the message that displays while charging the device, that indicates that only one level of intensity is available.

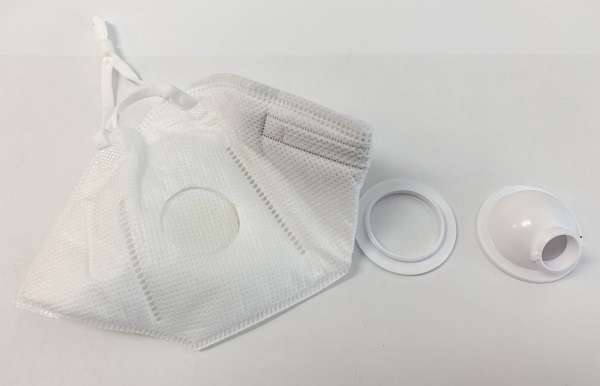
The photos below show the assembly process to be able to use the device with the face mask.


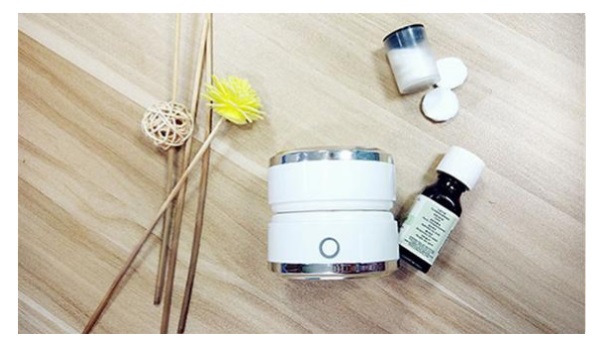
The FitAir can also be used as an Aromatherapy device.

What I like

  • Its compact size
  • Its versatile design
  • It is simple to use

What can be improved

  • The battery life

Final thoughts

I always find it a bit hard to measure the true performance of personal air purifiers because of the inherent and always changing factors like location, level of allergens at any given time, etc. However, I have been using the FitAir at my desk at work each day, and I seem to have much less of the usual allergy effects that I would normally experience at this location. Based on these results and the ability of the device to be used over my nose to protect me in what could be a variety of other environmental conditions, I will give it a tentative two thumbs up, with the promise to update should its effectiveness change.

Price: $99.00
Where to buy: Airdog USA website and Amazon
Sample: The sample for this review was provided by Airdog.

Filed in categories: Reviews

Tagged: ,

Airdog FitAir Personal Air Purifer review originally appeared on The Gadgeteer on May 27, 2019 at 9:00 am.

Note: If you are subscribed to this feed through FeedBurner, please switch to our native feed URL http://the-gadgeteer.com/feed/ in order to ensure continuous delivery.
J-Pillow Travel Pillow review

REVIEW – Zzzzzzzz… huh? Oh! Sorry, friends! I must have dozed off while writing my review! And that’s a good thing in this case. I’m checking out the J-Pillow, a different (and award-winning) take on the travel pillow design. Not only is it comfy, but it’s got some neat tricks up hidden under it’s wings. To the review!

What is it?

It’s a travel pillow designed for resting while sitting up, but it’s also great for around-the-home use.

What’s in the box?

You get the pillow and a drawstring travel bag.


Hardware specs

  • 9″ by 9″ by 5″
  • 8 ounces
  • Machine washable
  • 100% polyester fabric cover
  • 100% polyester & flame retardant filling

Design and features

So there are a ton of travel pillows that are based on some variation on a u-shaped, yoke-style design. What’s so different about the J-Pillow? It employs a pair of bat-like wings, and adds a third J-shaped pad from which the pillow gets it’s name. Designed by a former flight attendant, this extra pad provides additional stability when you’re trying to use it to rest while sitting up during travel. Check it out:

The pillow is made from a super-soft padding and cover material, so it feels good to use right off the bat. But here’s the neat bit: the design allows you to configure it in a way that maximizes your comfort based on your preferences and body type.

Here’s the “standard” configuration. In this setup, the “J” pad slings under your chin, and the wings cradle your head. You can set this up for left- or right-side use. See how there’s no gap between my neck and the pillow?

If that setup doesn’t work for you, you can flip it. Here the “J” pad is wrapped around the back of my neck, and the wings run vertically. This is the way I’d set it up if I had a window seat:

You can also use it like a traditional U-shaped pillow. Pinch the wings on one side, and off you go. Notice the restful expression on your reviewer’s face. It’s comfy, folks!

In the interest of full disclosure, I haven’t traveled with the J-Pillow yet. But I am also finding a lot of uses for it around the house. J-Pillow promotes it’s use as a lumbar support pillow, and this really works for me. Its wonderful for reducing back strain at my old creaky desk chair. I’m also using it on the couch, as seen here:

And here’s another use that they promote that REALLY works for me. My 50 year old knees can get downright surly sometimes, and I need to rest/sleep with a pillow to reduce soreness. The J-pillow works great as a leg pillow, as demonstrated by your pasty-white reviewer/model below:

I’m also using it as a pillow when lounging about, and it’s great for watching TV or reading. Or napping with the dog. You get the idea.

For traveling, the J-pillow includes a vinyl travel bag with a drawstring closure. It compresses nicely in the bag and has a button-snap loop that you can use to attach it to your luggage (with or without the bag). It’s a convenient feature that saves space in your luggage.

What I like

  • Very comfortable, no matter how you choose to use it
  • Great for both travel and in-home use
  • Attaches to your luggage, saving space in your bag
  • Convenient storage/travel bag to keep it clean when not in use

What needs to be improved

  • None so far

Final thoughts

Sometimes the simple innovations make all the difference. I can see why the J-Pillow has won awards for it’s design and is so highly rated by users. I’m loving this pillow for use around the house, and can’t wait to take it on my next trip. In the meanwhile, you’ll find me snoozing on the couch. Sweet dreams!

Price: $49.95 direct from the manufacturer, but I’m seeing prices under $30.00 on Amazon. Multiple colors are also available.
Where to buy: Get it at the J-Pillow web site, or on Amazon.
Source: The sample of this product was provided by J-Pillow.

Filed in categories: Reviews

Tagged: , ,

J-Pillow Travel Pillow review originally appeared on The Gadgeteer on May 26, 2019 at 9:00 am.

Note: If you are subscribed to this feed through FeedBurner, please switch to our native feed URL http://the-gadgeteer.com/feed/ in order to ensure continuous delivery.
Ultimate Ears MegaBlast Portable WiFi/Bluetooth speaker review

REVIEW – It’s been a while since I reviewed a wireless speaker. I’ve heard good things about Ultimate Ears speakers, and I wanted a speaker that was portable, waterproof and could replace the Echo Dot that I currently use in my living room. The UE MegaBlast meets all these criteria so I decided to give it a listen.

What is it?

Ultimate Ears MegaBlast is a portable WiFi/Bluetooth speaker with 360º sound and built-in Amazon Alexa. 

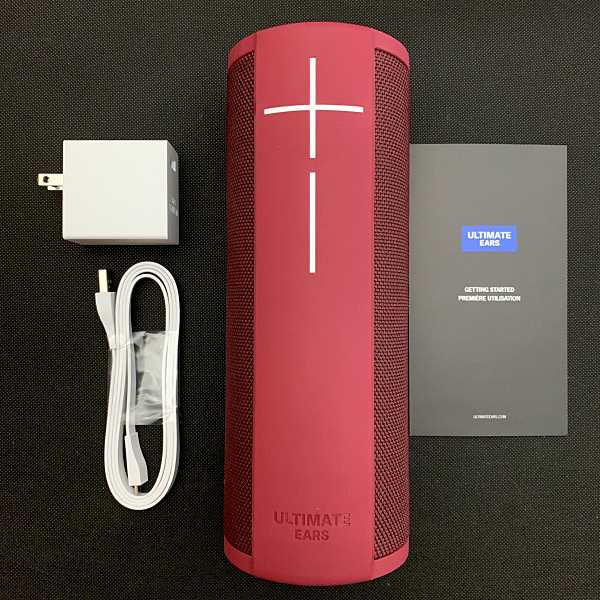
What’s in the box?

  • MegaBlast speaker
  • Micro-USB charging cable
  • Power adaptor
  • Removable D-ring
  • Quick start guide

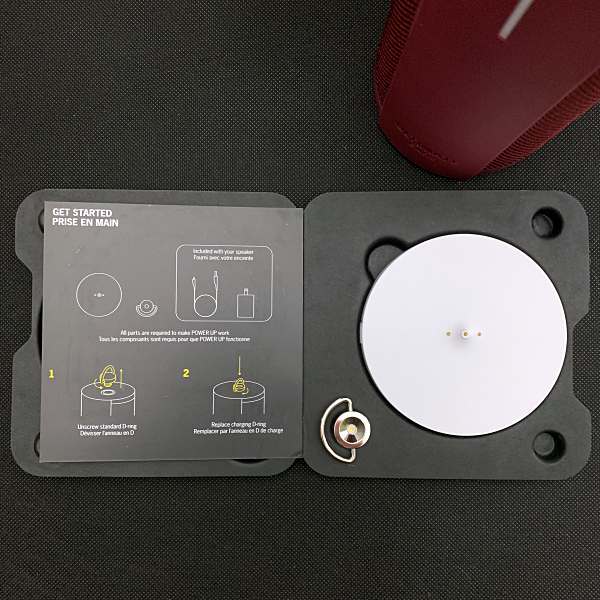
Power Up

  • Power Up base
  • Charging D-ring
  • Quick start guide

Hardware specs

  • Maximum Sound Level: 93 dBC
  • Frequency Range: 60Hz – 20kHz
  • Drivers: Two 25mm tweeters, two 55mm active drivers and two 85mm x 50mm passive radiators
  • Wi-Fi range: 100m / 330ft
  • Bluetooth range: 45m / 150ft

Design and features

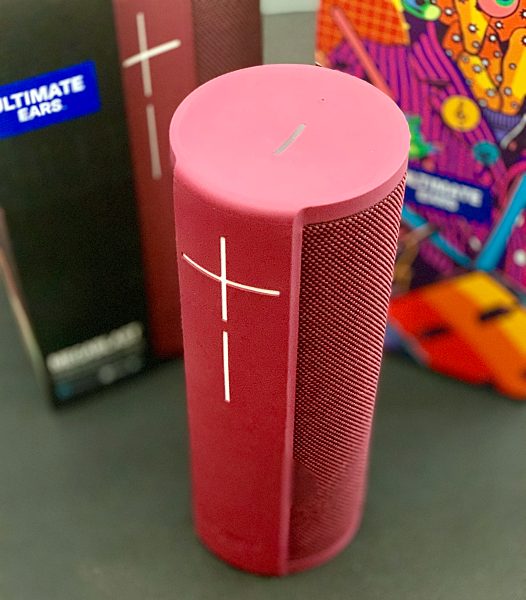
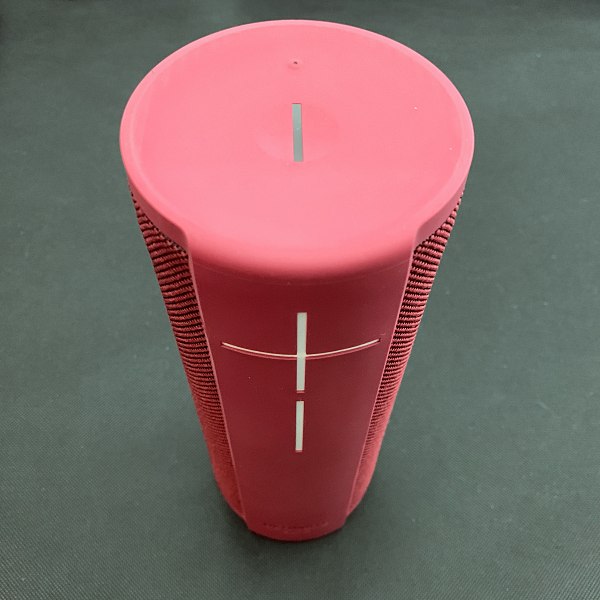
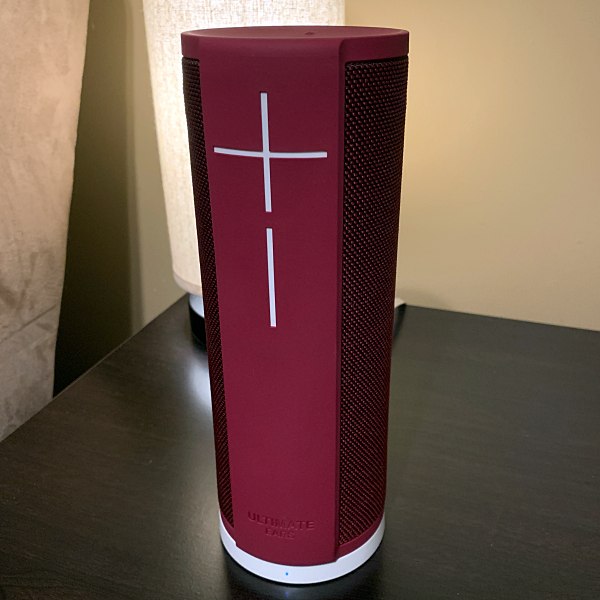
The MegaBlast’s design is similar to other offerings from UE. Cylindrical with rubberized surfaces wrapped in acoustic fabric with those signature oversized volume control buttons on the front. It stands vertically, so it takes up less space.  It’s aesthetically pleasing without being obnoxious, and it comes in cool colors. I choose to review the Merlot Red, it’s also available in Graphite, Bluesteel, and Blizzard.

MegaBlast is UE’s biggest speaker to date coming in at just under 91/2-inches tall. It has a little heft to it but is still extremely portable.

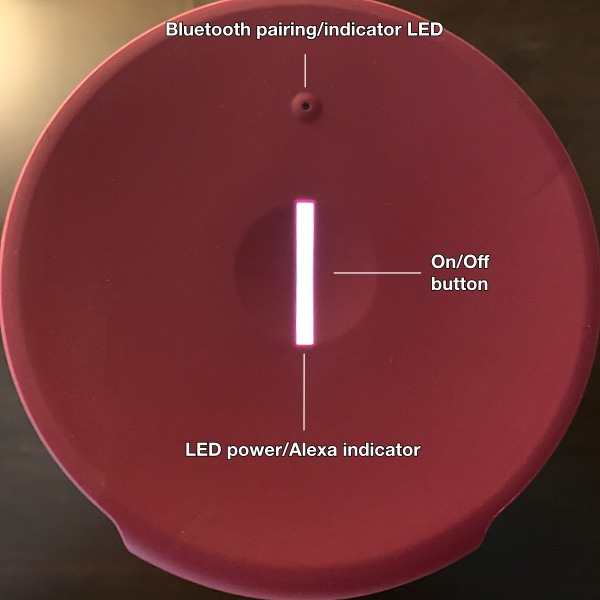
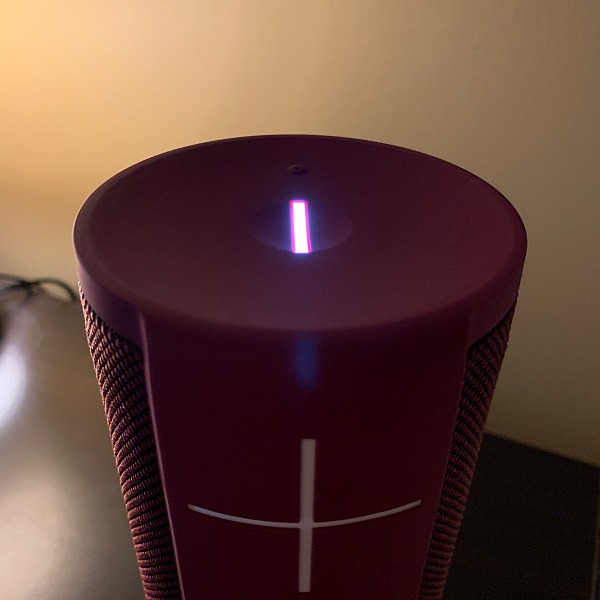
The on/off button, Bluetooth indicator LED, and LED power/Alexa indicator are located on the top of the speaker.

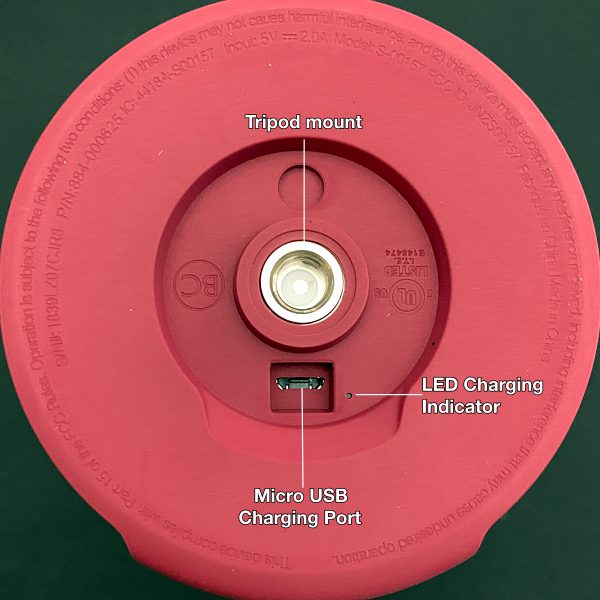
On the bottom, there’s a D-ring that when removed reveals a standard tripod mount insert. The Micro-USB charging port is located under the rubber weather door. There’s also a charge LED.

Connection

MegaBlast can be connected using both Wi-Fi and Bluetooth. Using WiFi, you can control your music with your voice. Or control Wi-Fi quality streams directly from music services such as Spotify and Amazon Music. When you’re away from Wi-Fi, you can use your smartphone or other Bluetooth devices, minus the voice control of course.

MegaBlast can be paired with other MegaBlast or Blast speakers for louder, more immersive sound. Using the app, you can instantly connect up to eight speakers in total.

Durability

The speaker has an impressive IP67 waterproof and dust-proof rating, which means it can be totally submerged in water for up to 30 minutes.

It’s also drop-proof, something I put to the test within my first hour of use. I accidentally knocked the speaker off of a countertop, it fell about six feet to the ground and came away with only a small scuff mark. Whew!

I also like the fact that if it gets dirty, you can just rinse it off and let it air dry.

Battery life

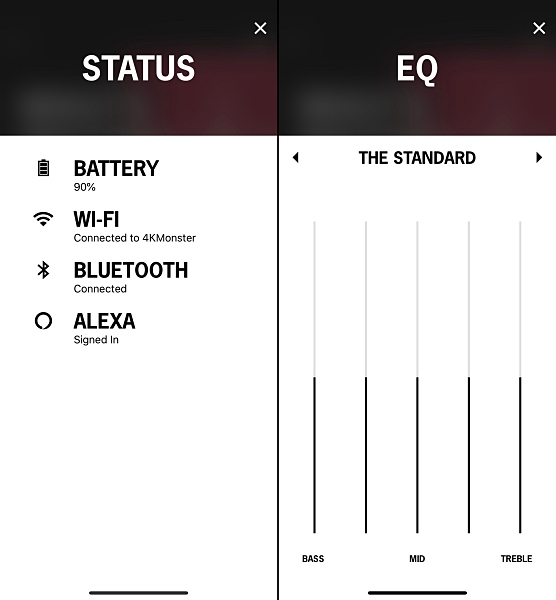
MegaBlast also boasts an equally impressive 16-hour battery life. I can’t speak on the 16 hours, but listening to music using Wi-Fi for over 2 hours at a medium volume it went from 100% to 90%. Not bad. However, when using Bluetooth, the battery went from 100% to 50% over the same time span. That’s not so good.

To check the battery percentage of the speaker, you can use the app or simultaneously press the + – buttons.

Power Up wireless charger

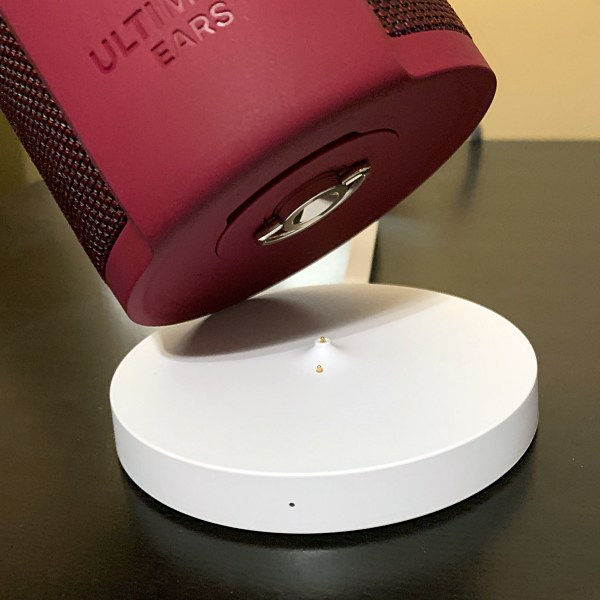
Speaking of battery life, UE also sent me one of their Power Up wireless chargers. The small white disk is the same size as MegaBlast’s base and it can be used anywhere it can be plugged in.

It comes with a charging D-ring that replaces the MegaBlast’s standard D-ring. To charge simply place the speaker onto the Power Up.

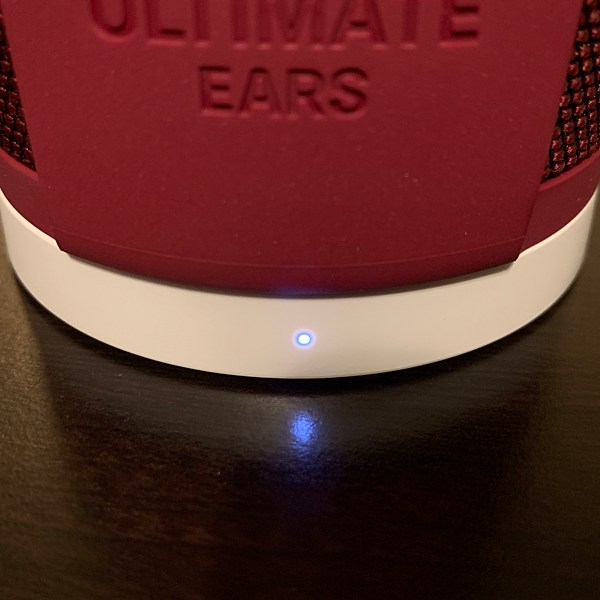
A small LED indicator on the front will blink to let you know that the speaker is charging. When the battery is charged, the light will remain solid. You can also use the speaker while it’s charging.

The Power Up allows me to keep the speaker on 24/7 so I have access to Alexa without having to worry about running down the battery. And when I grab the MegaBlast to take it into another room or outside I know that it’s fully charged.

It also means no more remembering to plug or unplug the speaker.

IMO if you plan on getting a MegaBlast, the Power Up is a must-have accessory and worth the $39 price tag.

Setup and Blast app

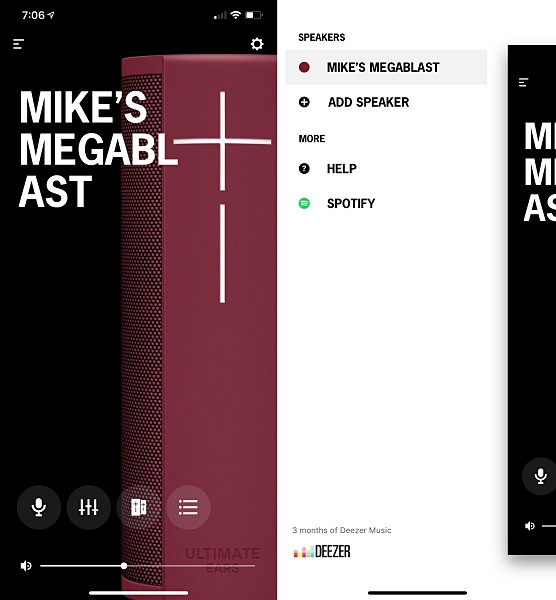
To set up the speaker, download and launch the Blast app then follow the instructions. With the Blast app, you can control volume, EQ settings, add and create speaker groups, and check the speaker’s battery and connection status. The app has a nice interface and is easy to navigate.

Say hello to Alexa

One of the MegaBlasts biggest features is that it comes with Amazon Alexa built-in. To enable Alexa, all you have to do is sign into your Amazon account using the Blast app during setup.

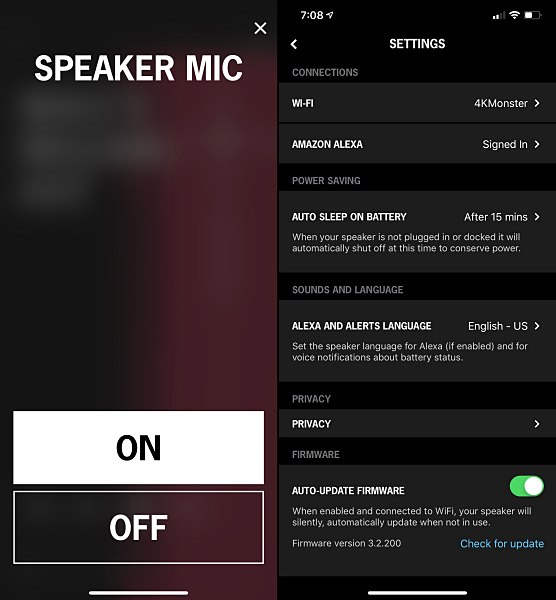
When you say the wake word “Alexa”, the indicator light on top of the speaker glows brightly indicating that she’s listening.

The only problem with that is if the speaker is across the room, it’s hard to know if Alexa is hearing you, might be nice if there was an audible tone indicating Alexa is listening.

Otherwise, it works pretty much like my Echo Dot. I can use Alexa to control my lights and smart lock, set a timer,  control my music or access one of Alexa’s growing range of skills.

The best thing is being able to do all these things wirelessly as long as your connected to WiFi or a mobile hotspot (Alexa does not work using Bluetooth).

I like being able to take Alexa with me from room to room. And being able to control my music without having to fumble with my phone is a definite plus.

Here’s a link to all the music services you can control using Alexa.

I did run into one issue. When playing music at a high volume, Alexa had trouble hearing me even at close range. Hopefully, this is something that can be addressed with a firmware update.

If you don’t want Alexa listening to you, you can enable Alexa Privacy Mode either through the Blast app or by simultaneously pressing the volume down and Bluetooth buttons.

Sound performance

With a name like MegaBlast, you would expect this speaker to get plenty loud, and it does. But it does so without losing any of the music’s clarity. What you get is a rich, vibrant sound that is well balanced.

MegaBlast also delivers that bass but in a way that’s not over manufactured or fake sounding.

The design of the speaker allows it to radiate music 360º, and it fills the room with sound. You feel like the music is surrounding you instead of coming directly at you.

You can use the Blast app to choose from 5 different preset EQ settings. The Standard, Custom, Voices, Cramped Spaces, and Bass Jump. I recommend using either The Standard or Custom to get the best sound.

I’ll be the first to say I’m not a music snob or audio aficionado. But to me, the overall listening experience with the MegaBlast is excellent.

What I like

  • Cool design
  • Portable
  • IP67 waterproof
  • Durable
  • Built-in Alexa
  • Works with both Wi-Fi and Bluetooth
  • Very good room filling sound
  • Power Up wireless charger (sold separately)

What needs to be improved

  • It’s hard to tell if Alexa is activated
  • Alexa has trouble hearing you over loud music

Final thoughts

The UE MegaBlast is the best sounding wireless speaker I’ve ever used. The built-in Alexa feature, while not perfect, is still very good and it sure beats my Echo dot for sound and of course portability. The only major issue I have is Alexa not being able to hear me when I listen to music at a high volume.

Price: $199 w/o Power Up – $239.98 w/Power Up
Where to buy: Amazon
Source: The sample for this review was provided by Ultimate Ears.

Filed in categories: Reviews

Tagged:

Ultimate Ears MegaBlast Portable WiFi/Bluetooth speaker review originally appeared on The Gadgeteer on May 25, 2019 at 9:00 am.

Note: If you are subscribed to this feed through FeedBurner, please switch to our native feed URL http://the-gadgeteer.com/feed/ in order to ensure continuous delivery.
Colonel Littleton Possibles Bags review

REVIEW – In our hectic lives, our world can get pretty crazy at times with work, school, home improvement projects, travel, etc. We have several spots in the house we call the Danger Zones, where if you’re crazy enough to leave something important in those spaces, you do so at your own risk.  I’m pretty AR about some things and have several sanctuary spaces I keep my gear so 1) I know it’s safe and 2) I have it when I need it and don’t have to go searching around the house to find my stuff when I’m late getting on the road. All that said, I also like keeping my gear organized/protected in these spaces and use various boxes, bags and bins to make that happen. Colonel Littleton has created three general purpose leather pouches to help do just that, called the Possibles Bags. He’s sent me one of each size to checkout for this review.

What is it?

The Possibles Bags are handmade drawstring leather pouches created to hold nearly any small to medium item(s). The Possibles Bags come in three sizes: small/No. 1, medium/No. 2, and large/No. 3.

In times gone by, people used bags like these for trips into the wild and stuffed them with medicines and survival items. It’s still a jungle out there – only the essentials have changed. Today, you might stash your bag with jewelry and accessories, coins, mobile phone, etc. Use them to hold your valuables in your golf bag, or to hold your cat’s eye or aggies. The possibilities are endless.

Hardware specs — Sizing & Weight

  • Large No. 3 – 9.5″ H x 7.5″ W / 1.4oz
  • Medium No. 2 – 7.25″ H x 6.5″ W / 2.1oz
  • Small No. 1 – 5.13″ H x 3.75″ W / 2.9oz

Design and features

The Possibles Bags are handmade in the Colonel’s workshop from soft, dry-milled leathers. They have a simple, practical design meant to carry anything from some of your EDC bits/cables to your golf balls. The drawstring closure ensures that what you put in them stays safely and securely within. The design and engineering on these bags are very old school but are meant to be nearly foolproof.

These bags are constructed from two pieces of leather stitched together with thin nylon thread. The leathers are soft, supple and has a wonderful smell. The bags feel great to hold and will last many years of use, growing softer with time.

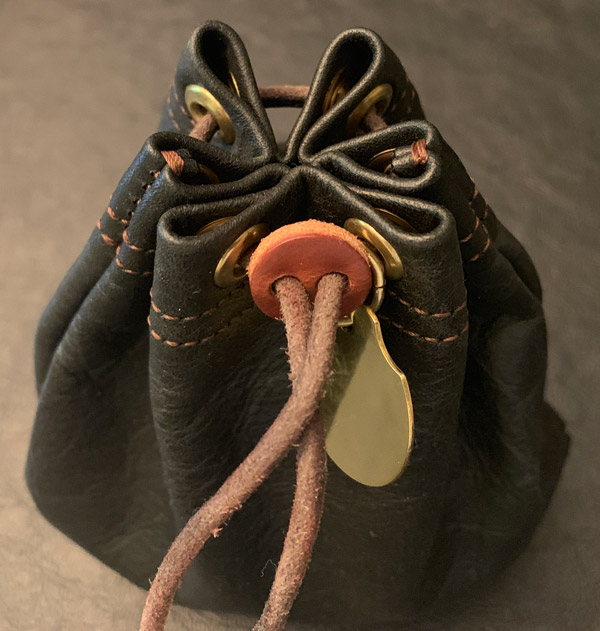
The top opening is held closed by a round leather lace drawstring threaded through brass eyelets. These eyelets not only serve in the closure system but adds strength along the top of the bag similar to rivets.

There is a small circular piece of leather that the drawstring ends go thru that enables you to synch the bags closed. There is a small copper tab on the drawstring ends to keep the leather cord from coming undone.

The back of the bag has the Colonel Littleton logo, product name, warranty, and Lynnville, TN embossed into the leather.

Our family and friends have a semi-regular card game we play (Tripoly) and keeping your stash of dimes in a safe and known location is key. I’ve decided the black No. 2 bag is the perfect size to do this. Plus when I belly up to the card table with this bag, it reminds me of an old western movie as the cowboy sits down to play poker and plunks their bag of loot on the table. I’ve also been using the largest of the pouches in my 1943 Navigator Bag to hold all my EDC gear that rattles around the bottom of several of its pockets.
What I like

  • Excellent handmade craftsmanship
  • Soft, supple dry-milled leather
  • Simple/practical design

What needs to be improved

  • None

All three sizes of Possibles bags are available in black, vintage brown or saddle tan leather. There is a brass tag for your initials.

I have easily found uses for the No.2 & No. 3 bags but am still searching for a purpose for the smallest of the trio in my world. It’ll most likely end up holding some jewelry that is currently bouncing around our safety deposit box.

Final thoughts

Like all of the Colonel Littleton gear I have used over the years, the Possibles Bags are made with the same old world craftsmanship and attention to detail I have come to know and appreciate. These bags are relatively basic, yet not only get the job done but give off a vibe of times gone by. The Possibles Bags are made of high quality leather and materials and will certainly last the test of time.

Price: Large (#3) – $75 / Medium (#2) – $65 / Small (#1) – $55
Where to buy: available directly from the Colonel Littleton website.
Source: The sample of this product was provided by Colonel Littleton.

Filed in categories: Reviews

Tagged: ,

Colonel Littleton Possibles Bags review originally appeared on The Gadgeteer on May 24, 2019 at 11:00 am.

Note: If you are subscribed to this feed through FeedBurner, please switch to our native feed URL http://the-gadgeteer.com/feed/ in order to ensure continuous delivery.