GameSir G6 Mobile Gaming iPhone Touchroller review

REVIEW – Love mobile gaming but hate the virtual controls? GameSir might have just the solution for you with their G6 iPhone Touchroller (an amalgam of Touchscreen and Controller). Does it score a victory royale or an epic fail? Read on!

What is it?

The GameSir G6 Touchroller is a hybrid game controller developed specifically for mobile games. It combines the advantages of an actual analog controller and touch screen control, so you can use the left controller to move or jump while focusing on the precise aiming on the right touch screen. It is only compatible with iPhone.

Maybe nabbing that victory royale on iOS will be a bit easier.

What’s in the box?

  • GameSir G6 Mobile Gaming Touchroller
  • Micro-USB Cable
  • User Manual

Hardware specs

  • Wireless Technology: Bluetooth 5.0
  • Working Platforms: iOS 9.0 or later only
  • Compatible Mobile Phone Size: length less than 6.57 in.
  • Battery Capacity: built-in 240mAh rechargeable Lithium battery
  • Working Time: 7080 hours
  • Charging Time: 23 hours
  • Charging Voltage: 3.7V5V
  • Connectivity: Micro-USB (for charging)
  • Up to 3 million keystroke trigger lifespan
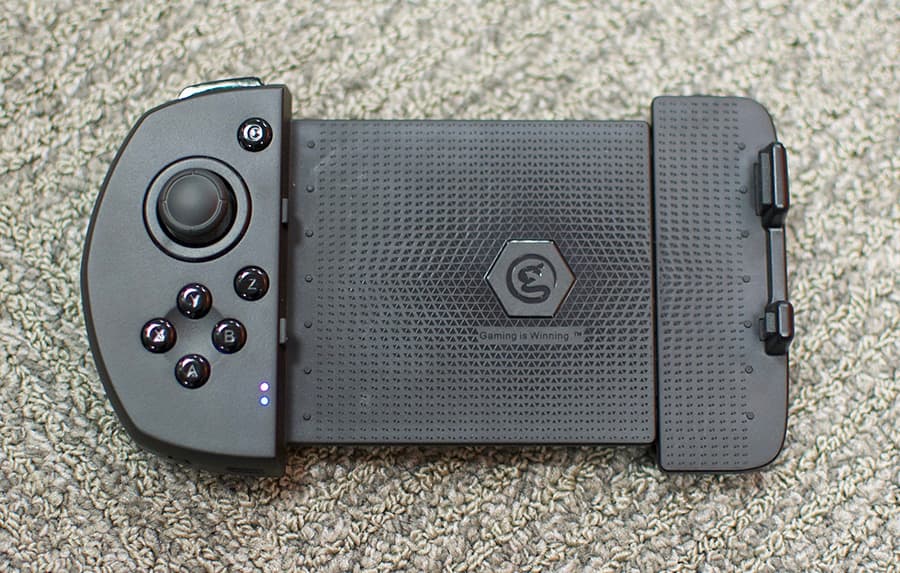
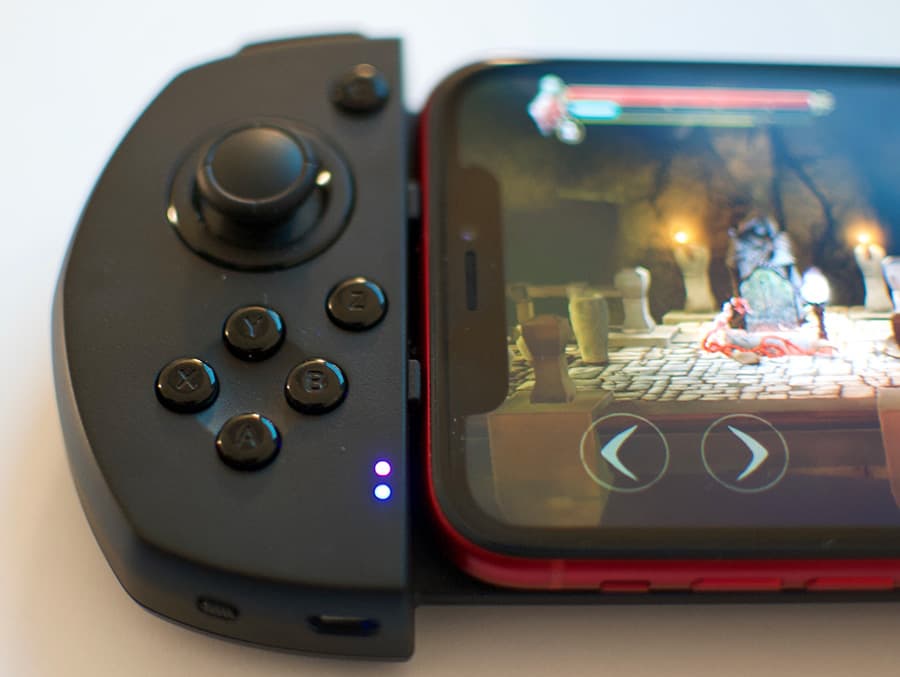
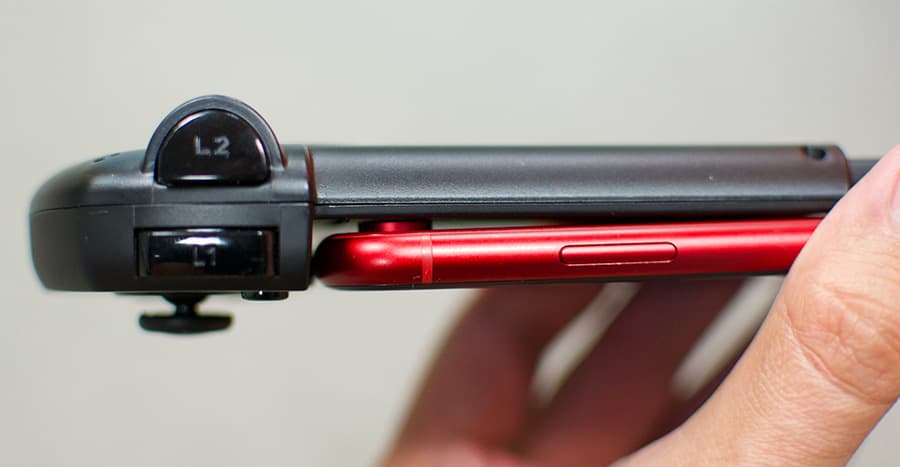
The left side has two shoulder buttons, a joystick, 4 buttons configured in a d-pad shape, and two additional buttons.

Design and features

The GameSir G6 Touchroller is a bit of an odd cookie.

Mobile game controllers aren’t a new concept and have been around for a few years in many iterations and sizes. I have a SteelSeries Nimbus that I break out to use with my iPhone every once in a while, offering a wireless control solution very similar to a PlayStation controller. GameSir’s G6 Touchroller tries to make the best of both worlds: external controllers and smart on-screen control schemes.

I’ll elaborate. If you’ve played Fortnite or PUBG or any good modern mobile game, chances are you’ve used the default touchscreen control interface. You know. All those little semi-transparent virtual buttons on the top, bottom and sides of the screen.

A lot of the major iOS game releases that rely on virtual controls are smartly positioned so your thumbs, while also holding on to your phone, can easily reach all the buttons necessary to play the game. It’s not a perfect setup, but it works in a pinch because it’s a mobile device, and the developer is doing the best they can.

Now, most games are controlled in the same way, with the left thumb moving your character and the right thumb performing actions like aiming, jumping and firing. So for most virtual controls, the on-screen movement is handled with a virtual joystick. This remains one of the most obnoxious methods of controlling your character… it’s just plain hard to get it right, since there are no physical borders for your thumb sliding around on the screen. It’s easy to move your thumb right off the edge of that virtual space, bringing your character to a halt.

The right thumb doesn’t have much of a problem, though, once it gains the muscle memory of knowing where to tap on the screen to perform an action. In most cases, it’s quite good.

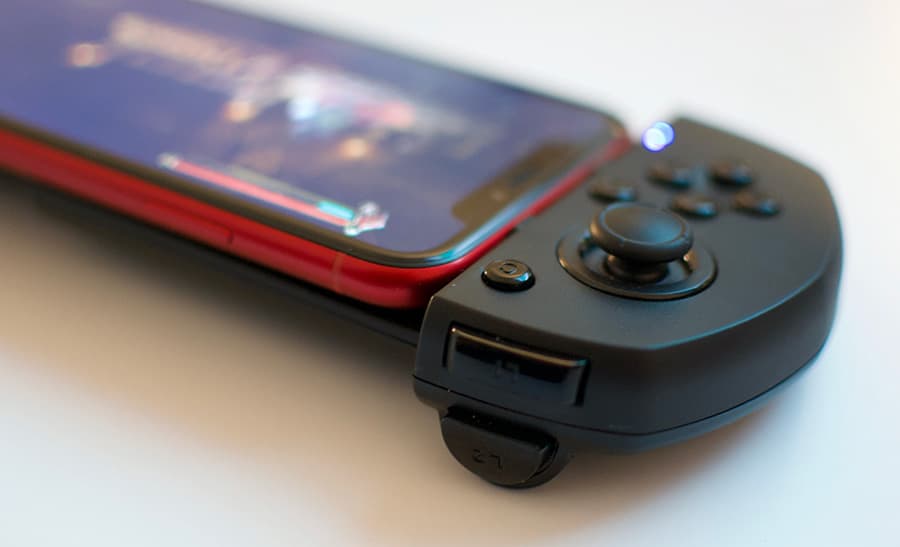
The right side has only one shoulder button.

This is exactly the problem the Touchroller attempts to fix. It gives your left thumb the more traditional control setup of a console gaming system, while keeping your right thumb free to use the touch controls that are inherently good in many iOS games.

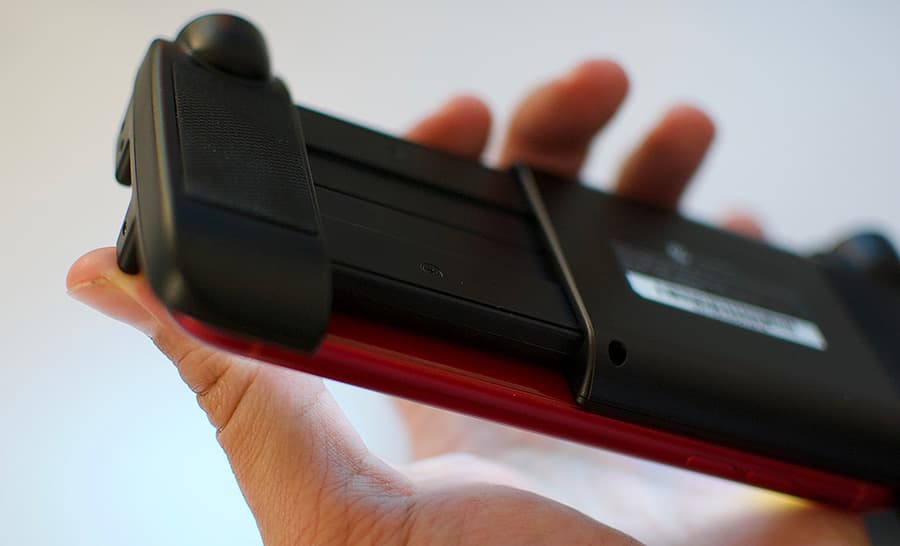
Getting the phone mounted in place is simple. The right side of the Touchroller extends to accommodate even the largest iPhone, the Max model. Just extend the side and slide your phone. There is a strong spring and grippy pads that keep the phone firmly in place.

This bit extends out and automatically springs back to hold the phone tightly in place.

I tested several games with the Touchroller… Fortnite (which I probably don’t have to explain), Grimvalor, a side-scrolling platformer, and Death Road to Canada, which controls sort of like an old-school isometric beat-em-up. All of these games feature virtual joysticks and buttons.

Each of these games recognized the controller immediately upon launch, although it took a lot of trial and error to see what buttons on the controller did what, but once I got used to the layout, I was up and running with much tighter control.

The joystick, probably the best feature, is smooth, and comparable to a gaming console. The buttons have a nice clickiness to them, especially the shoulder buttons, which feel more triggery, having a bit more travel than the face buttons. And there are plenty, provided you can figure out what they all do. They are programmable, as well, but that’s something I’ll address in the Weird Issue section.

Overall, the Touchroller feels good in my hands. I like that my hands don’t cover up as much of the screen, too. It’s more comfortable to hold for long stretches, and the phone never felt like it was going to pop out.

Let’s get to the oddities…

Some Weird Issues

One problem I ran into was with the initial setup. Pairing the Touchroller via Bluetooth was easy, but there’s an extra step detailed in the tiny instruction booklet that states “Press Y+power buttons simultaneously, the LED mode indicator light will flash pink and then remain lit.” You need to do this after pairing, so it’s almost like it needs to pair twice. Fortunately, you only have to do this once, but it’s a strange very important extra step.

This isn’t quite GameSir’s fault, but since the surface that the phone rests on is flat, the obnoxious camera bump on my XR made it sit a little off. Since the grips on the right side have such a low profile, using the Touchroller works better without a case on your phone.

Another oddity with this Touchroller is in the proprietary software. Using the G-Crux app, you are able to download control settings for specific games, or, if one does not exist, you can upload a screenshot into the app and map the controller buttons on top of the virtual controls, programming the physical buttons to correspond with the game’s controls. It’s pretty in-depth, and I imagine that once you get through mapping those buttons, it’ll work fine from that point, but I did not have the patience to try that.

Fortunately, you can search for what I’m assuming are user-made game controls and download them in the app. It’s a lot of setup. The games that I tested just sort of “worked.” I say sort of because even though they controlled well, there were buttons that went unused that could have been mapped to other virtual buttons. I didn’t feel the need to try to mess with that.

One last big caveat. With the launch iOS 13 literally a little over a month away, which promises compatibility with Xbox and PS4 controllers (I know right?!), it’s tough to recommend picking up an iPhone-specific controller if you’ve got a spare game system controller laying around. I’d wait to see how that pans out. Personally, I can’t wait to give that a try, because to me the PS4 controller is bonkers good.

What I like

  • makes controlling most games much easier
  • easier to hold the phone for long stretches

What I’d change

  • Initial setup and customization for specific games can be confusing
  • I found myself missing the right joystick in some FPS games
  • PS4 and Xbox controllers will soon be supported (sorry MFi manufacturers)

Final thoughts

Overall, I do like the G6 Touchroller, mostly because the games that I tested it with seem well-suited for it. Most modern games that use touch controls have the buttons smartly mapped onto the screen, and the addition of a physical stick and shoulder buttons to these touch controls enhances the controls a lot more than I would have thought.

Price: $42.99
Where to buy: GameSir’s website and Amazon
Source: The sample of this product was provided by GameSir.

Filed in categories: Reviews

Tagged: ,

GameSir G6 Mobile Gaming iPhone Touchroller review originally appeared on The Gadgeteer on August 17, 2019 at 11:00 am.

Note: If you are subscribed to this feed through FeedBurner, please switch to our native feed URL http://the-gadgeteer.com/feed/ in order to ensure continuous delivery.

The Dairy Custom Phone Case review

REVIEW – Looking for something unique in your next phone case? The Dairy may have you covered. They offer a whole range of unique case designs from artists around the world. And if you want to bring your own design like I did here, they’ll print it for you with a proprietary 3D printing process that embeds the design in the shell. It’s pretty neat. To the review!

What is it?

It’s a snap-on phone case that can be purchased with different unique designs, or you can bring your own.

Hardware specs

The Dairy has two styles of case, called Snap and Armored. The Snap case is a simple polycarbonate shell. Mine is the Armored case, which adds a TPU sleeve beneath the shell for extra protection.

Whether you choose a design from the site or bring your own, The Dairy uses a patented 3D printing technology to embed the design in the layers of polycarbonate for high resolution image quality and long-lasting endurance.

Design and features

I’m an artist and designer, so the products from The Dairy intrigued me right off the bat. They contract with artists and graphic designers around the world to create all kinds of interesting designs that you just don’t see on the street. Browse their web site and you’ll find everything from unique floral prints to graphic patterns and statement pieces.

Now if you prefer to create your own design, they offer a customization option that allows you to do your own thing. A set of pre-designed colors and backgrounds are available, to which you can add customized text. A preview mode and easy-to-use interface allows you to quickly tweak the design to your specifications.

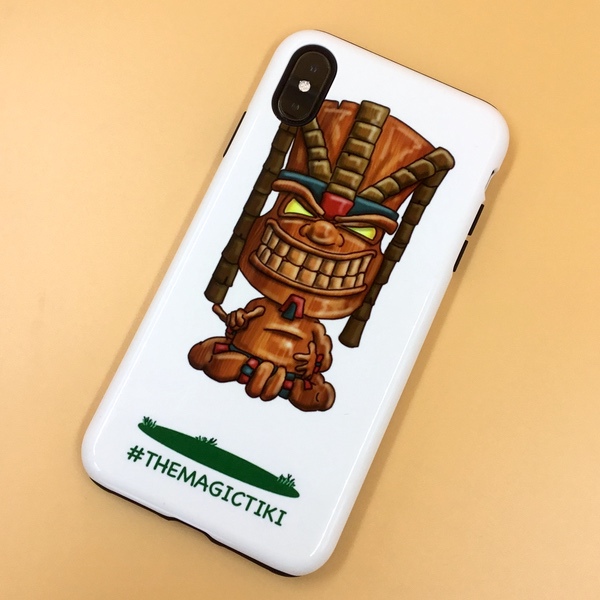
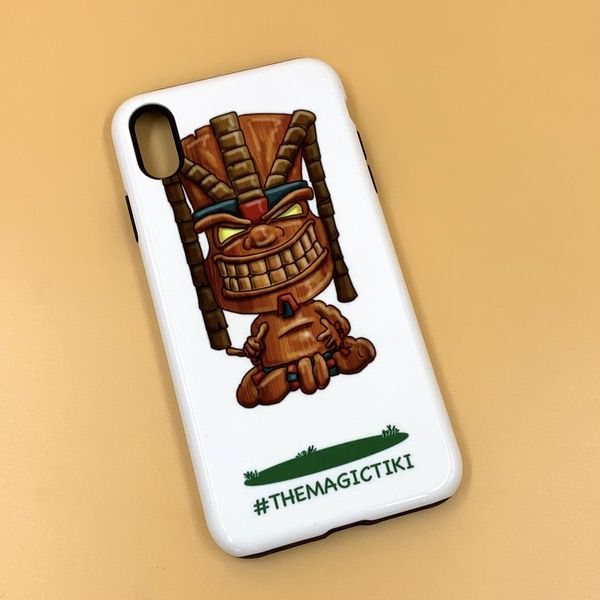
But the thing that really intrigued me here was I could take one of my own designs and have it printed. So I uploaded one of my illustrations for testing using that “upload image” option to make it the background on the phone. I could have added text if I wanted, but I did the design to stand on it’s own. Check it out:

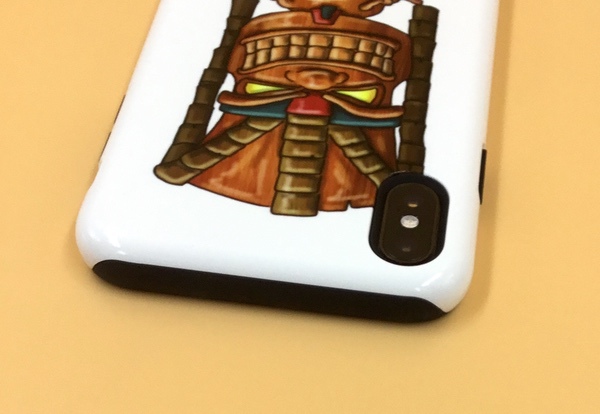
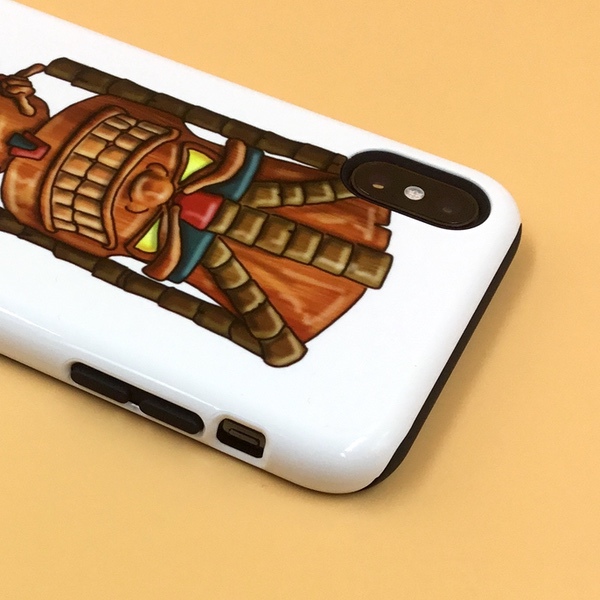
Here’s the really interesting thing about their printing process: this isn’t a sticker, or some sort of laser-printed top layer. It’s printed with a proprietary photo-quality 3D technology that embeds the artwork in the polycarbonate case. That means it won’t fade or scratch away over time. The result was truly stunning. You’ll see in the pictures below how the process captured every nuance and detail of my original illustration.

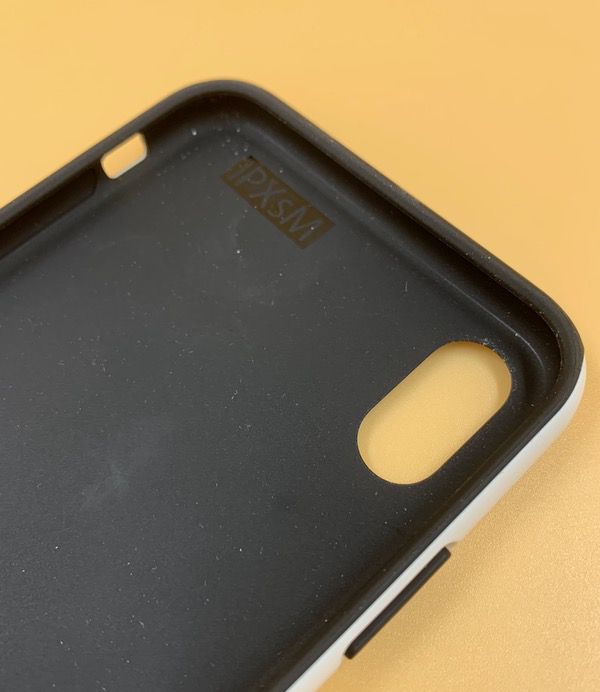
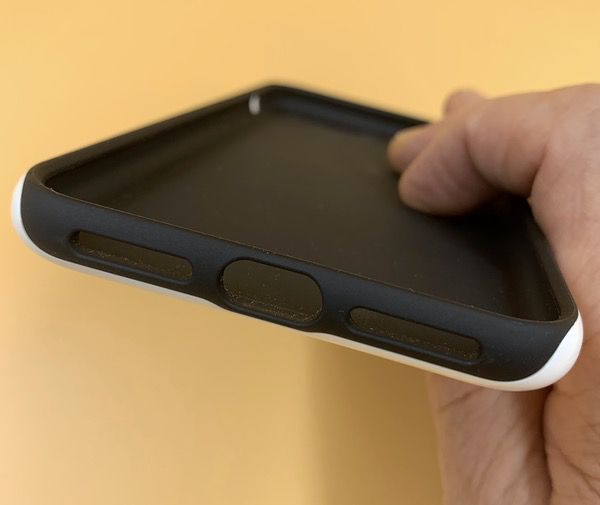
Now, all of this artsy goodness wouldn’t do without a phone case that actually works well, and The Dairy delivers here. Mine is the Armored case, which incorporates a TPU jacket with the polycarbonate sleeve for extra impact protection. Here’s a shot of that internal jacket:

The finished case is machined precisely for my iPhone XS Max. Here’s a shot showing the bottom ports:

The phone itself snaps snugly into place with a bit of an edge to protect the phone’s perimeter.

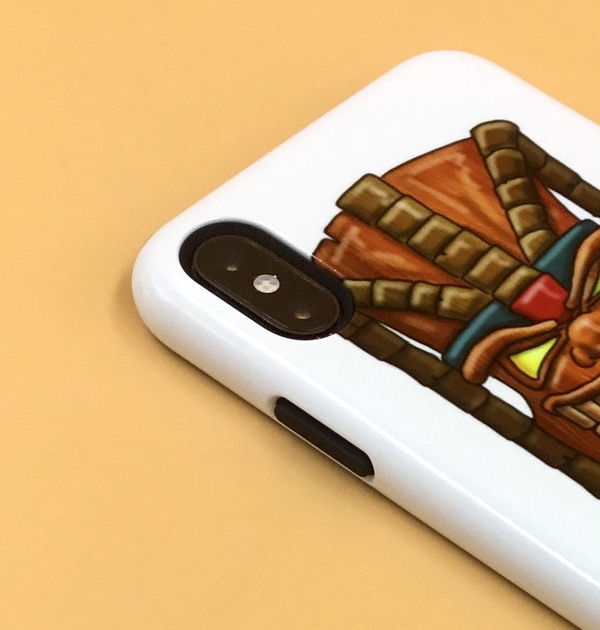
You’ll see that every port has that extra TPU jacketing too. Here’s the camera port:

The volume buttons are accommodated with TPU overlays that are integrated into the case, while the sound on/off switch is exposed. Functionality is crisp and precise right out of the box.

Here’s a super close-up of the printed work. I do my stuff in Procreate with a lot of digital painting & airbrushing effects. Check out how every shade and brush stroke is captured! You’ll get the same quality from the pre made designs or custom pieces. It’s really well finished.

Here’s the other cool bit: my finished custom phone case came in at a final price of $55. That’s pretty crazy given the quality of the finished piece!

What I like

  • Excellent quality and finishing.
  • Great selection of designs by artists worldwide.
  • Ability to customize with a simple online interface, including your own images or artwork.

What I’d change

  • Nothing that I see so far.

Final thoughts

I’ve been beating this case mercilessly for a month now, and I’m not seeing any obvious mars or scars. There are some scratches here and there (I did take it to the beach for a week), but nothing has negatively impacted the glossy finish. It’s really impressive for a simple iPhone case, especially one that you can rock with a unique design that represents your personal style. Highly recommended.

Price: Prices start at about $30 USD depending on phone style. My iPhone XS Max Armored case retails for about $55 USD.
Where to buy: Visit The Dairy Web Site.
Source: The sample of this product was provided by The Dairy.

Filed in categories: Reviews

Tagged:

The Dairy Custom Phone Case review originally appeared on The Gadgeteer on August 17, 2019 at 10:00 am.

Note: If you are subscribed to this feed through FeedBurner, please switch to our native feed URL http://the-gadgeteer.com/feed/ in order to ensure continuous delivery.

Kanex Docking Station for iPad Pro review


REVIEW – Over the years as the iPad has evolved, it has become a competent tool for many professionals in various industries. As a photographer and videographer, I now use my iPad for much of my editing. I also use it for daily routine tasks. The ability to add ports and thus additional functionality is very necessary. Recently, several companies have introduced docking stations for the iPad. the Kanex Docking Station for the iPad Pro is one of the newest additions. Let’s see how it works!!

What is it?

The Kanex Docking Station for the iPad Pro is a USB-C plug and play docking station that adds external ports to the iPad Pro for additional functionality and connectivity.

What’s in the box


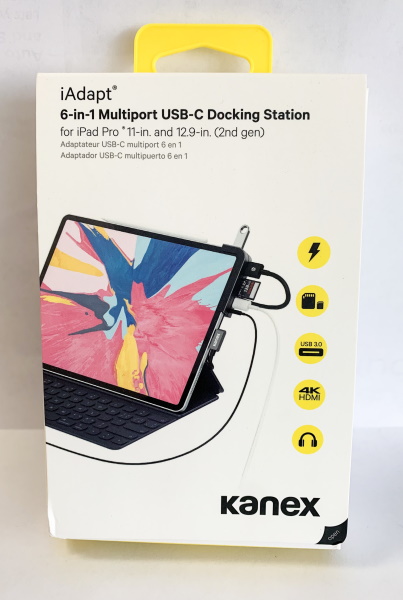
1 x Kanex Docking Station 6-in-1 Multiport USB-C Docking Station for iPad Pro® 11-in. and 12.9-in. (3rd gen)

Design and features

Specifications
Ports:
USB-C Female: USB-C 3.1 (Gen 1) – 3.0 data and PD 3.0 charging (60W)
USB 3.0: Type-A port delivers up to 5Gbps transfer speeds
SD/MicroSD: Supports up to 2TB SD and MicroSD cards
HDMI: 2K/60Hz on iPad Pro; 4K/30Hz on MacBooks
Supported Systems: Windows 10, Google Chrome OS, macOS Mohave, and above, IOS

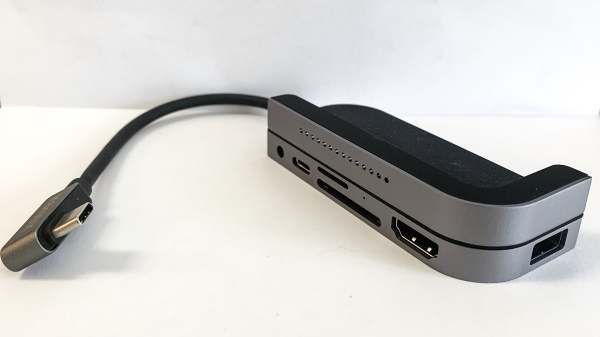
As shown in the photo below, the device has several ports. From left to right they are the headphone jack, the USB-C charging port, the micro SD and SD slots, the HDMI port and above the ports, there is a speaker grille.

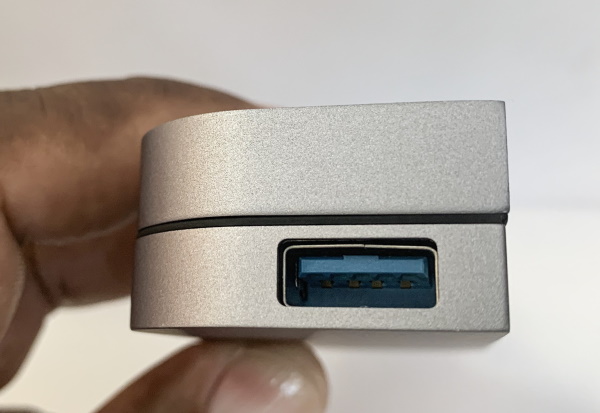
On the side of the device, there is a USB 3.0 port.

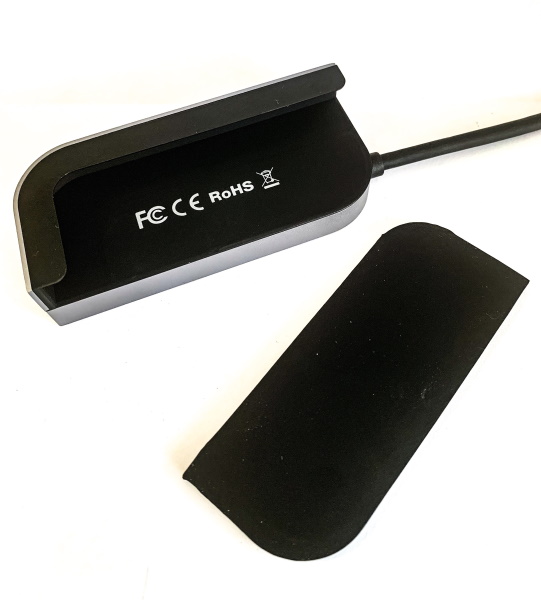
The Docking Station also comes with a magnetic insert that can be removed to fit some of the thicker cases.

Performance

Using the dock is very simple. It is plug and play. Since it is primarily designed for the iPad Pro, I spent most of my time testing it on my 3rd Gen iPad Pro 12.9″ (2018). I first tested it with my iPad without any case on it. In terms of function, the photo app sees the media as expected and the HDMI option to an external monitor works as expected. The USB-C Power Delivery port also allows you to connect your power supply to keep charging the iPad.
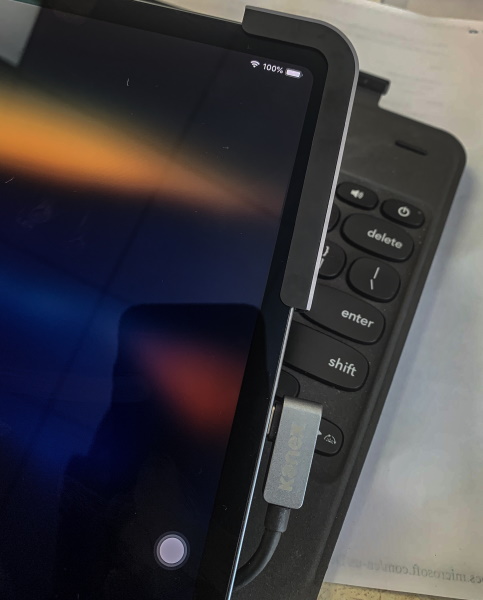
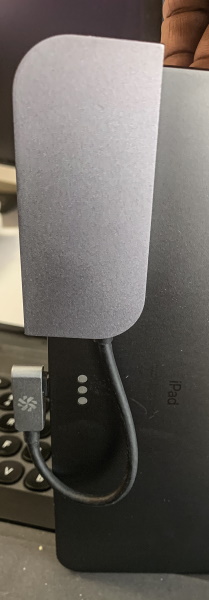
Here are some pictures of the dock on my bare iPad:


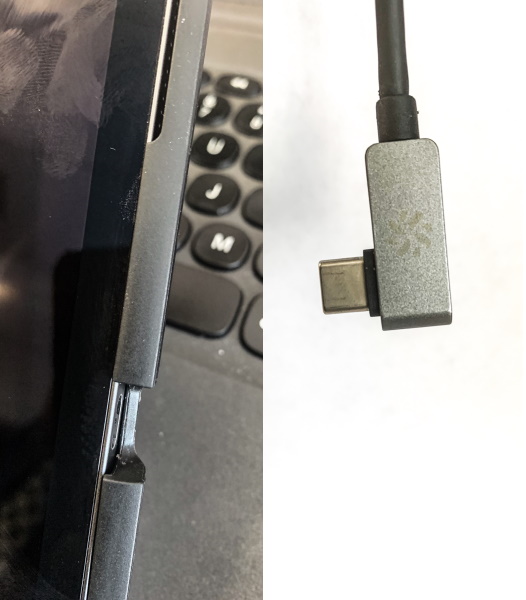
The major issue for me was that once my iPad was installed into my Zagg Slim Book Keyboard Case, the Kanex Dock did not fit even with the insert removed. And, because of the right angle USB-C connector on the dock, it was also unable to be plugged in with my case installed.

Windows 10:
This dock works very well with my Windows 10 Asus Zendesk Laptop. It is immediately recognized and all 0f the ports work including the HDMI port for a second display. Note: The USB-C port works for connectivity but not for power delivery since the USB-C port on my laptop is not a PD port.

MAC OS:
This dock also works very well with my MacBook Pro. It is immediately recognized and all 0f the ports work including the HDMI port for a second display and the USB-C PD port.

What I like

  • The build quality
  • The included ports
  • The USB-C Power Delivery port
  • It also works with Windows 10 and MAC

What I’d change

  • The clip-on capability so that it can expand to accommodate a larger variety of iPad cases
  • Better design of the USB-C connector to accommodate larger cases. (Maybe include an extension?)

Final thoughts

The Kanex Docking Station for the iPad Pro is a small and compact device that fits the Ipad pro perfectly if it is being used without a case, and I do suspect that it will also fit some of the thinner cases. It works well as a dock for multiple Operating Systems much like many of the USB-C standard docks that I have tested. I say standard because some docks are built with 2 USB-C ports side by side and are specifically designed for the MacBook Pro. This dock is light and easy to travel with as a part of your daily gear, but its inability to clamp on to a larger variety of cases and the right-angle USB-C plug limit how it can be used. This is another device that I think is going to require some additional thought prior to purchasing it and the decision should include considerations of versatility versus cost.

Price: $99.95
Where to buy: The Kanex website
Source: The sample for this review was provided by Kanex.

Filed in categories: Reviews

Tagged: ,

Kanex Docking Station for iPad Pro review originally appeared on The Gadgeteer on August 17, 2019 at 9:06 am.

Note: If you are subscribed to this feed through FeedBurner, please switch to our native feed URL http://the-gadgeteer.com/feed/ in order to ensure continuous delivery.

Solyent meal replacement shakes review

REVIEW – I love food almost as much as I love gadgets. So in addition to a variety of kitchen gadgets, I like to review food items too. Lately, I’ve been searching for meal replacement shakes and bars to test and ingest. I’ve tried Queal, Huel, and Ambronite shake mixes and have been asked why I haven’t tried one of the first meal replacement shakes – Soylent. You spoke, I listened, and the last time I shopped for groceries at my local Walmart, I noticed that they carried RTD bottles of Soylent, so I bought some. Good? Bad? Made of people? Let’s find out?

What is it?

Soylent (the meal replacement shake) has been around since 2014 and has always been a little controversial due to its name – Soylent. If you’re a child of the 70’s you might remember the cult sci-fi flick called Soylent Green which started Charleston Heston. In this movie, which takes place in the year 2022, the world is polluted and food is scarce so a company creates a new food called Soylent Green which turns out, is made from people. Yum!

Ingredients


The Soylent drink I’m going to tell you about today isn’t made of people (shock!), but is made of soy protein isolate. Yum! Ok, not really, but we’ll get to that.

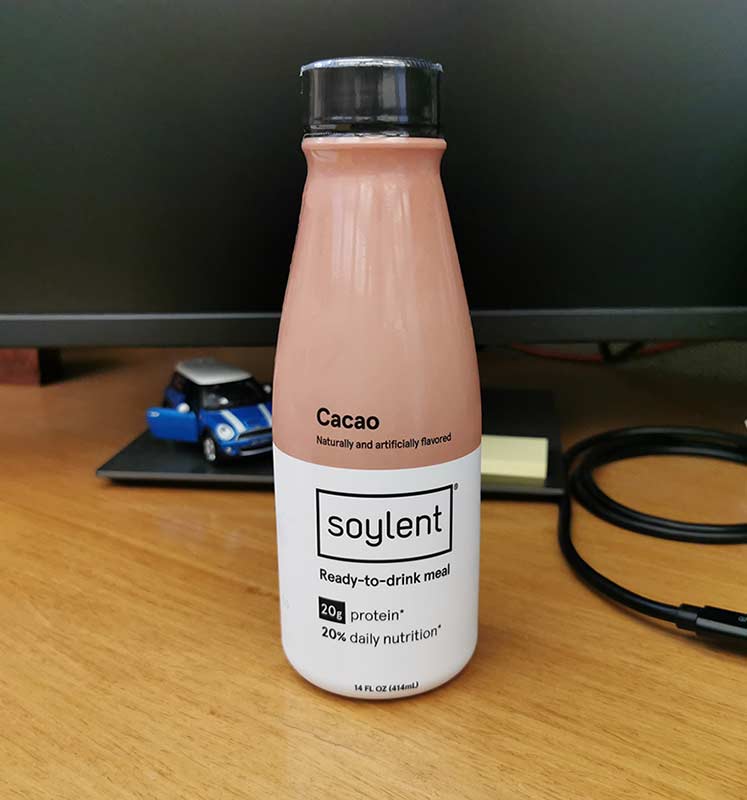
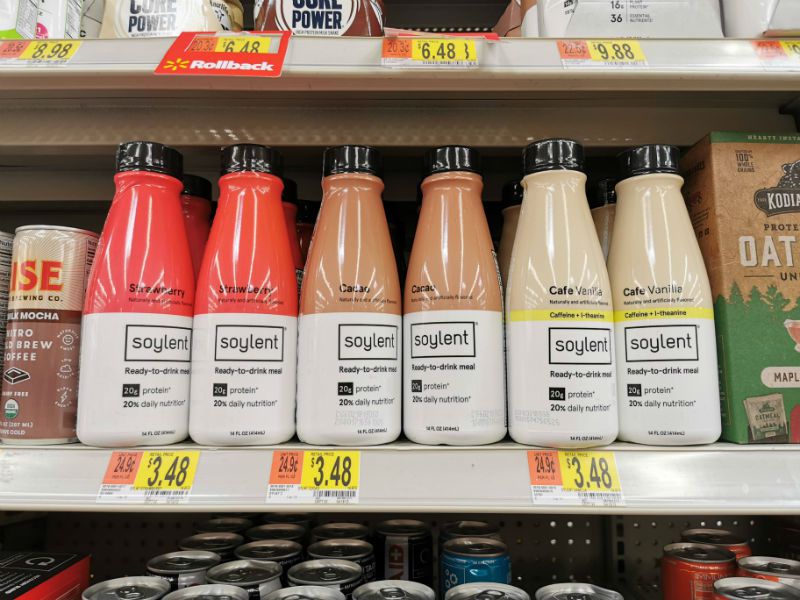
Soylent is available in powder and in RTD (ready-to-drink) bottles in 6 flavors that include Original, Strawberry, and Cacoa. That’s only 4 flavors you say. That’s because there is a version of Soylent with caffeine. The Cafe flavors include Vanilla, Chai, and Mocha. I can’t do caffeine, so I bought one of each of the regular flavors for $X from my local Walmart.

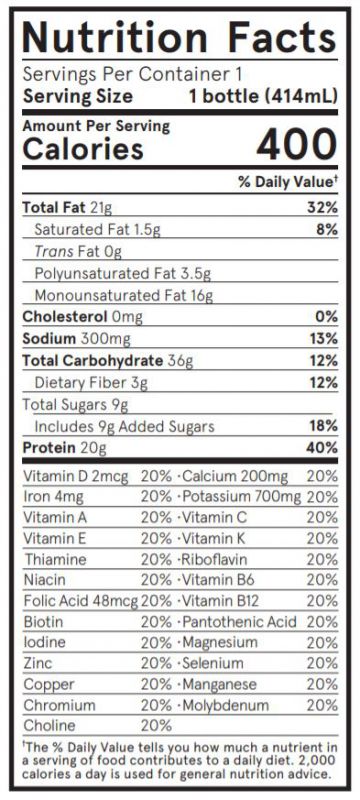
Each 14oz (414mL) bottle contains 20% of your daily nutrition requirements and 400 calories. The ingredients (original flavor) are: FILTERED WATER, SOY PROTEIN ISOLATE, MALTODEXTRIN, HIGH OLEIC SUNFLOWER OIL, ISOMALTULOSE, CANOLA OIL, MODIFIED FOOD STARCH, OAT FIBER, VITAMIN AND MINERAL PREMIX, ISOMALTOOLIGOSACCHARIDE, SOY LECITHIN, NATURAL AND ARTIFICIAL FLAVORS, SALT, GELLAN GUM, SUCRALOSE

FYI, the strawberry flavor contains CELLULOSE. Seriously?

The vitamin and mineral premix includes: VITAMIN & MINERAL PREMIX: POTASSIUM CHLORIDE, MAGNESIUM PHOSPHATE, TRICALCIUM PHOSPHATE, DIPOTASSIUM PHOSPHATE, CHOLINE CHLORIDE, SODIUM ASCORBATE, DL-ALPHA-TOCOPHERYL ACETATE, FERROUS GLUCONATE, ZINC SULFATE, NIACINAMIDE, D-CALCIUM PANTOTHENATE, VITAMIN A PALMITATE, THIAMINE HYDROCHLORIDE, COPPER GLUCONATE, MANGANESE SULFATE, PYRIDOXINE HYDROCHLORIDE, IBOFLAVIN, CHROMIUM CHLORIDE, BIOTIN, FOLIC ACID, SODIUM MOLYBDATE, SODIUM SELENITE, VITAMIN K1, POTASSIUM IODIDE, CYANOCOBALAMIN, ERGOCALCIFEROL.

Taste and texture

The other meal replacement products I’ve tested or have purchased but haven’t reviewed like Ka’Chava, use pea or oats as their main source of protein. So, I was a little skeptical of Soylent from the onset. I normally try to stay away from consuming a lot of soy products due to my breast cancer adventure 8 years ago, but I figured as long as I wasn’t replacing EVERY meal with Soylent for an extended period of time, it would be perfectly fine to test a few bottles.

The first flavor I tried was the original (vanilla) flavor. I chilled it in the fridge for a day or so and took it to work and drank it for lunch. I found the texture to be thin and watery and the flavor to be an offputting fake shake taste with a chemical after taste. Let’s just say that I was not a fan of it but I soldiered through and drank the whole bottle.

45 minutes later I found myself in the restroom with severe stomach cramps and cold sweats. Let me preface this by saying that I’ve tried other meal replacement shakes and haven’t had this issue. I’m also not allergic to soy and drank soy milk over the years with no issues and have eaten protein bars that have soy isolate in them without issues. I will also say that I will have episodes like this one on very rare occasions, like once a year or once every two years. I never know what brings them on but my first thought this time was that the Soylent caused it.

In an effort to make sure it wasn’t Soylent, I drank the cacao flavor the next day. I didn’t think it tasted at all like chocolate and thought it tasted even worse than the original flavor. But I drank the whole thing and this time I didn’t get sick. So it must have been one of my weird episodes and not Soylent.

The last flavor I tried weeks later was the strawberry flavor and again – ick. To my tastebuds (your experience may differ), Soylent Strawberry and Soylent, in general, tastes the worst out of all the shakes I’ve tried so far by a long shot. Maybe it would taste better if it was actually made of people!

What I like

  • Available at your local Walmart

What I’d change

  • Improve the taste
  • Improve the ingredients

Final thoughts

I personally didn’t like Soylent based mainly on the flavor and then on the protein source and other ingredients. Cellulose? Why do we need wood pulp in a meal replacement shake? Canola oil? Again, why?

I’ve been using meal replacement shakes as an alternative to eating a cheeseburger and fries, or a bag of chips for lunch. But in this case, I would skip the Soylent in favor of the burger. I know that many people swear by Soylent, but for me, all I can say is no thanks, I’d much rather drink Huel and Queal shakes (also contains soy).

Price: < $4.00 for one bottle. Price varies depending on quantity
Where to buy: Soylent, Amazon, and Walmart
Source: The samples for this review was purchased with my own funds.

Filed in categories: Reviews

Tagged: ,

Solyent meal replacement shakes review originally appeared on The Gadgeteer on August 16, 2019 at 11:00 am.

Note: If you are subscribed to this feed through FeedBurner, please switch to our native feed URL http://the-gadgeteer.com/feed/ in order to ensure continuous delivery.

The MeatStick Wireless Meat Thermometer review

REVIEW – Around here, we’re big fans of the Butcher Box.  It’s a monthly meat delivery service that sends boxes of meat straight to our house. Their beef is 100% grass-feed, and their chicken is free range organic, things that are important to us.  When it comes to cooking meat, especially thick cuts like briskets and pork tenderloins, it’s critical to cook it until it reaches just the right temperature.  Maybe professional chefs can just look at the meat and know if it’s done, but the rest of us use a meat thermometer.  Traditional thermometers require you to open the oven or the grill every so often in order to check the meat, thereby wasting a lot of the heat that has built up. Wouldn’t it be nice if you could just put the thermometer in the meat one time and then have it tell you when the meat’s done, no matter where you are in the house?  That’s exactly what the MeatStick Wireless Meat Thermometer does!

What is it?

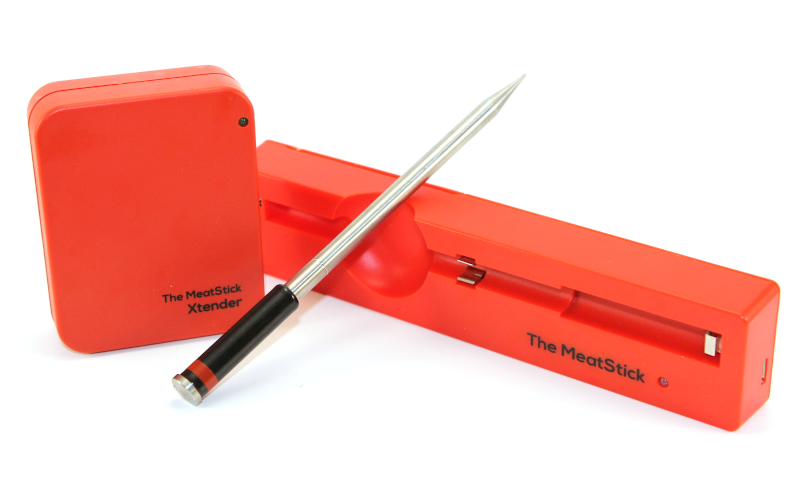
I have the MeatStick Xtender Set, which includes one MeatStick and one Xtender.  The MeatStick is a wireless thermometer that you put into your meat and leave until it’s done.  It communicates via Bluetooth through the Xtender to an app on your mobile phone to let you know the current temperature of the meat and its environment and how much longer until it’s done.  Its goal is to take “the guesswork out of cooking.”

What’s in the box?
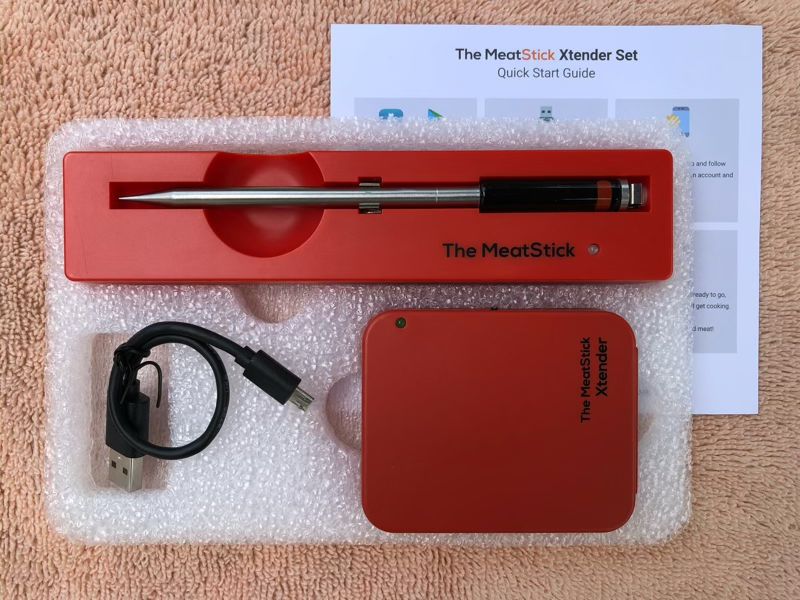
  • 1 MeatStick True Wireless Meat Thermometer
  • 1 Xtender
  • 1 Charger with USB cable
  • 1 Quick start guide with 2 pages of English instruction

Hardware specs

The MeatStick has been rated as food grade by FDA-approved labs; it is waterproof (rated IPX8), so it can be used in sous vide.  The entire MeatStick is 6 inches long, and the steel part is nearly 4 inches.

There are two sensors in the MeatStick, one in the stainless-steel tube that measures the temperature of the meat and another in the ceramic handle that measures the ambient temperature. The former can withstand temperatures up to 212°F and the later up to 482°F (though it can go higher for short periods of time).

The MeatStick is charged via USB and lasts for 24 hours of use; the USB cable that comes with the charger is only 8 inches long.  The Xtender requires a pair of AA batteries that are not included.

The MeatStick and the Xtender communicate with your phone via Bluetooth.  The MeatStick has a range up to 6 feet when inserted into a cut of meat; the Xtender extends that range up to 100 feet when indoors.  One Xtender can support up to eight MeatSticks simultaneously.

Design and features

Installation and setup

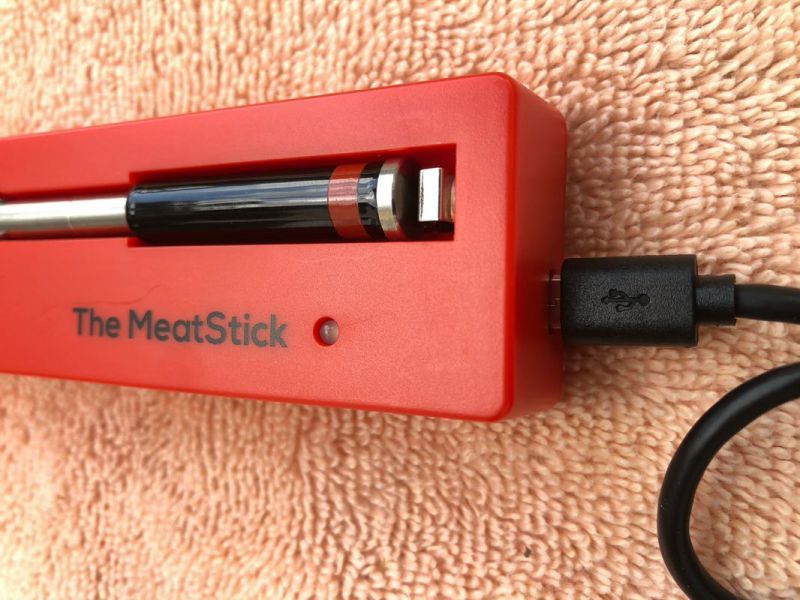
The quick start guide does a great job explaining how to get everything set up.  First, I downloaded the free mobile app; there are links to Apple’s App Store and Android’s Google Play on their website.  Second, I charged the MeatStick by putting it into its charger, connecting the USB cable, and plugging it into our Anker USB charging station. The quick start guide recommends letting it charge for at least 1 hour before first use and another 1 to 3 hours between each use; the MeatStick Support team, however, recommends 4 hours.
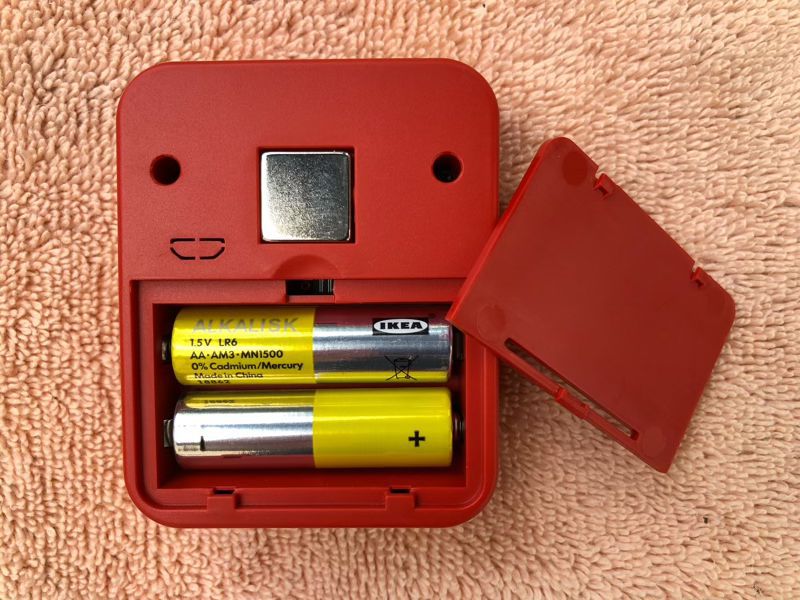
Third, I popped in a pair of AA batteries into the Xtender.  There’s a strong magnet on its back, which allows me to securely attach it to my stove or grill, if I want.  It just so happened that these yellow IKEA batteries that I put in were nearly dead. While cooking, the mobile app reported Bluetooth connection errors.  When I inserted fresh batteries, everything resynced and started working again.
Fourth, I began to explore the mobile app.  The MeatStick doesn’t come with a manual, and it doesn’t really need one.  The mobile app does a great job explaining how to use everything.  There’s an initial tutorial that walked me through how to use everything, and every time I accessed a feature for the first time, it gave me another tutorial. If I ever forget something, I can access any of the 15 tutorials from the Help menu.  Someone has done a great job thinking about human factors on this app.
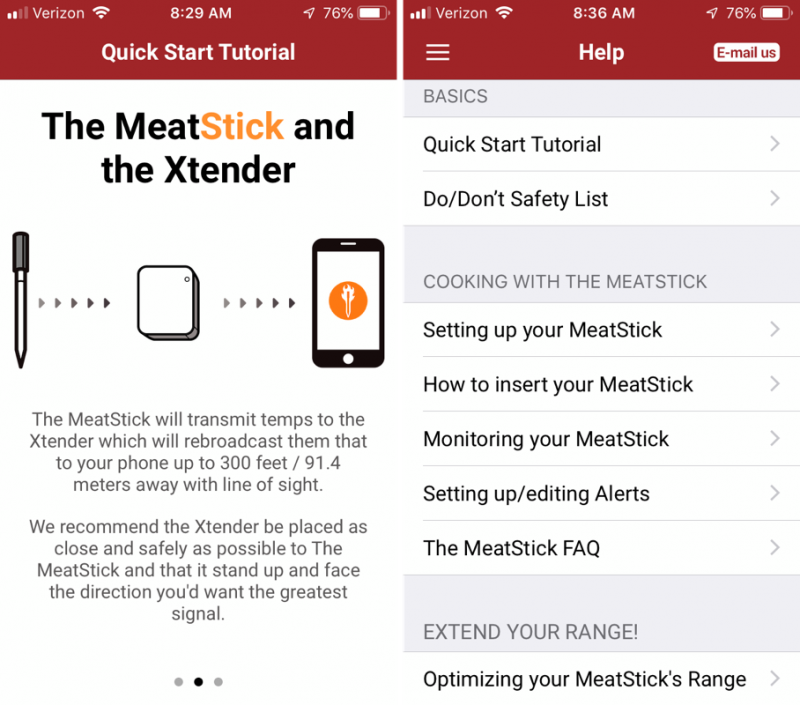
The one thing that concerned me about the setup process is that the mobile app requires me to turn on Location Services all the time, whether I am using the app or not; it refuses to work unless I give these permissions.  Why does a thermometer need to know my location at all times?  I’m unhappy with this, as it allows the MeatStick company to track my location, information that they have no need whatsoever to know. I recommend enabling Location Services while you’re cooking and then disabling it when you’re done.  The app also has the option to create an account and store your cooks in the cloud, but I choose to skip this.

Attempt #1 – Brisket

For our first attempt to use the MeatStick, my wife and I decided to cook a nice piece of brisket in the oven.  In the morning she marinated it, and right before cooking, she wrapped it in aluminum foil. With the thermometer still in the charger, and the charger still plugged in—this detail is surprisingly important—we started the app.  As it walked through the introductory tutorials, I learned my first lesson about the MeatStick:  It’s designed to be completely inserted (not including the handle) into large cuts of meat. If it cannot be completely inserted, say I’m grilling quarter-pound hamburgers or baking some chicken thighs or searing filet mignon on a skillet, then this is not the right thermometer for the job, as the stainless-steel tube can only withstand temperatures up to 212°F. Fortunately, our brisket was plenty large, so we began.

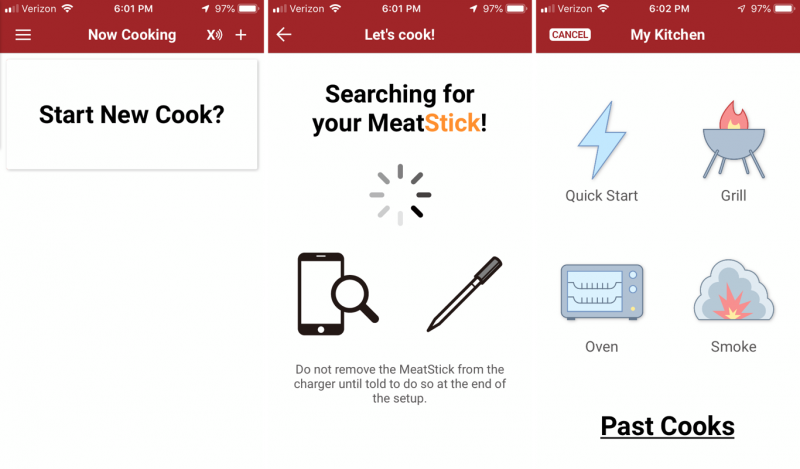
We selected “Start New Cook,” and then we waited until the app connected via Bluetooth to the MeatStick. Then we selected “Oven” from the “My Kitchen” screen.
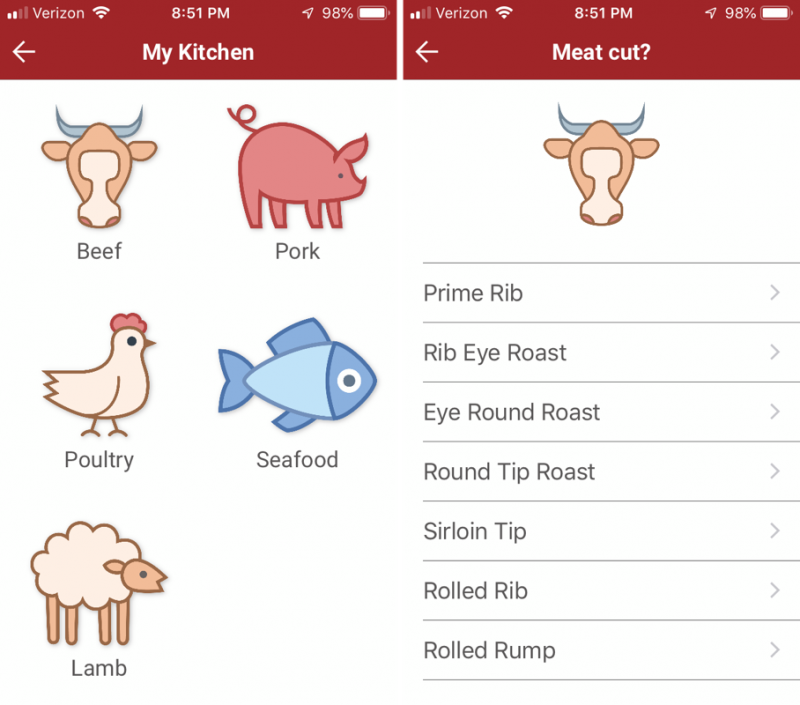
We selected “Beef,” and then I learned my second lesson about the MeatStick:  The list of meat cuts in the mobile app does not contain every cut of meat; in fact, it has surprisingly few.  There are at least 40 cuts of beef, but only 7 in the app; it can only provide recommendations for those cuts that are in the data.  For everything else, I have to know this info myself.
The good news is that the MeatStick is still useful for other cuts of meat.  We hit the back arrow until we came to “My Kitchen,” and then we selected “Quick Start.”  We selected how well we wanted the meat cooked and our temperatures.  On the “Settings” page we specified when we wanted alerts, and then we gave it a name.
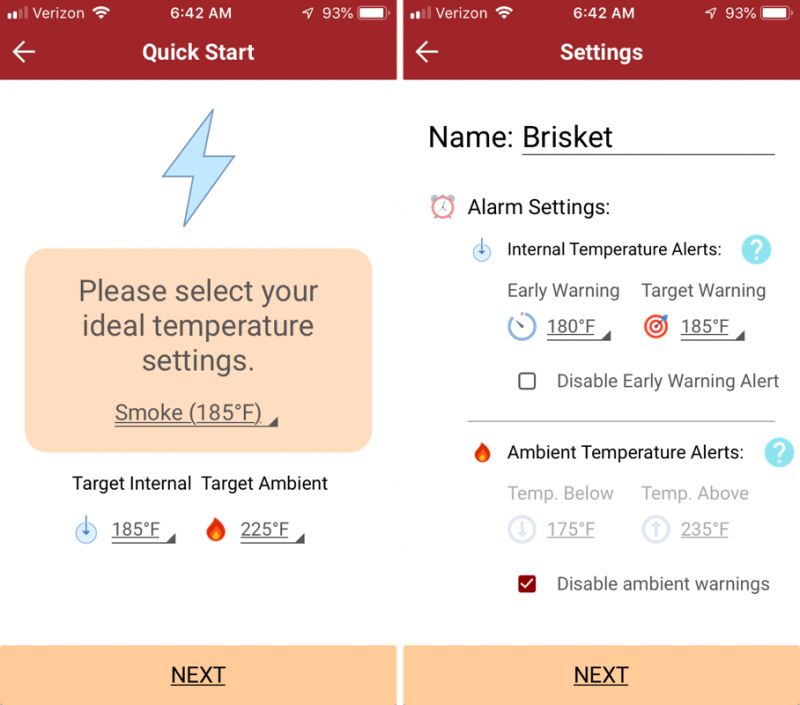
After hitting “Next” one final time, the app instructed us to insert the thermometer and put our brisket into the oven.
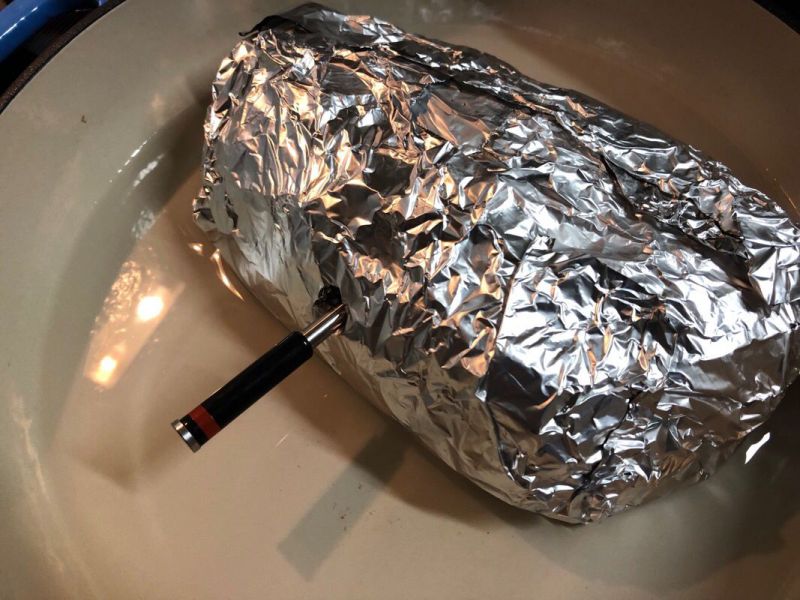
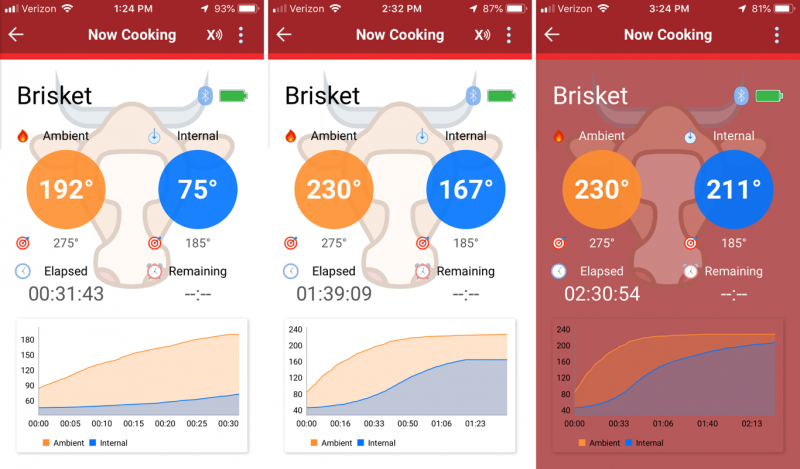
We turned on the Xtender and put it on the counter next to the oven, and then we watched as the MeatStick began feeding us data.  Even when I took my phone to the opposite side of our house, the Xtender worked perfectly to forward data to the app.  After a couple hours, the app sounded an alarm, letting me know that our ideal temperature had been reached.  After taking it out of the oven and letting it rest for a bit, we unwrapped it and sliced it into strips.  The brisket was cooked to perfection and tasted oh so yummy!
Attempt #2 – Top Sirloin Cap

For our second attempt we selected a top sirloin cap, as we thought this was one of the cuts in the mobile app.  (It’s a bit of a pain that you don’t know what cuts are in the app until after you start the syncing process.)  We browned the cap, sync’d the app with the thermometer, and then walked through the selection process, same as before.  When we got to the “Meat cut” menu, however, we realized that it wasn’t an exact match. The app has a “sirloin tip,” but we had a “sirloin cap.”  Are these the same?  Are they at least close?  This is where I learned my third lesson with the MeatStick:  I really need to understand my meat cuts way better than I do. There are many different cuts of meat, and many times they are best cooked in different ways.  The names can be misleading; the sirloin tip, for example, actually comes from the round primal, not from the sirloin.  To make things worse, there are marketing names for various cuts of meat.  The NY strip is also called the Kansas City strip, top loin steak, shell steak, and Delmonica steak.  To most effectively use the mobile app, I need to know what I’m cooking and what cuts are in the app.

In the moment, however, we didn’t have time to go research all the cuts of beef, so we selected “sirloin tip” from the menu, hoping that good enough was good enough and finished the setup process.  One minor annoyance that we encountered was the selection list for temperatures, which are available in 1-degree increments.  It’s a hassle to scroll through a hundred degrees by ones; I think it would be better to have this list available in 5-degree increments.
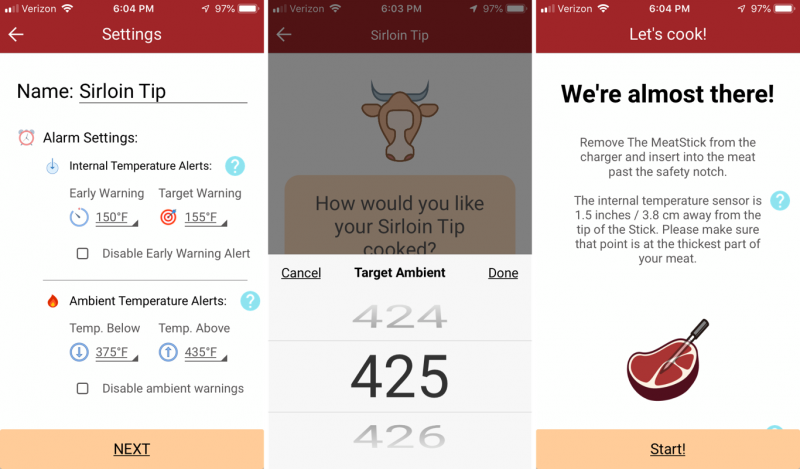
We inserted the thermometer into our top sirloin cap and put it in the oven to cook.
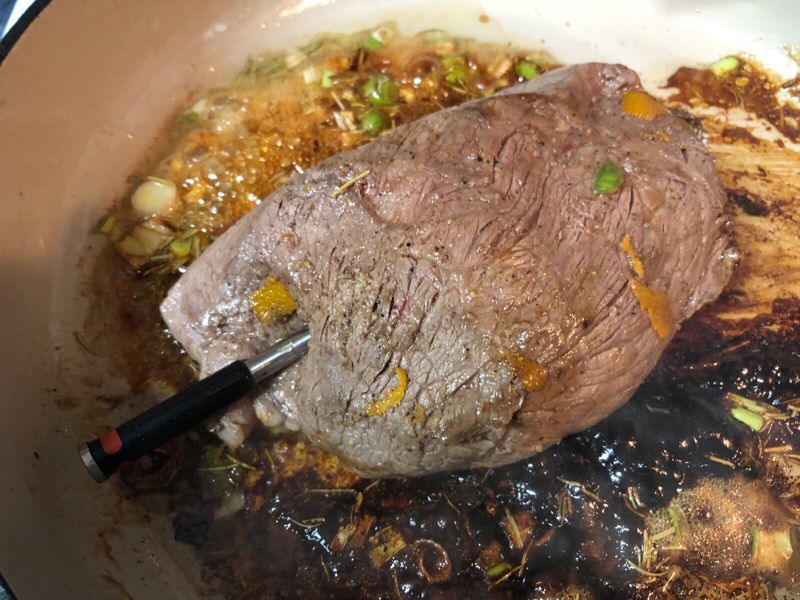
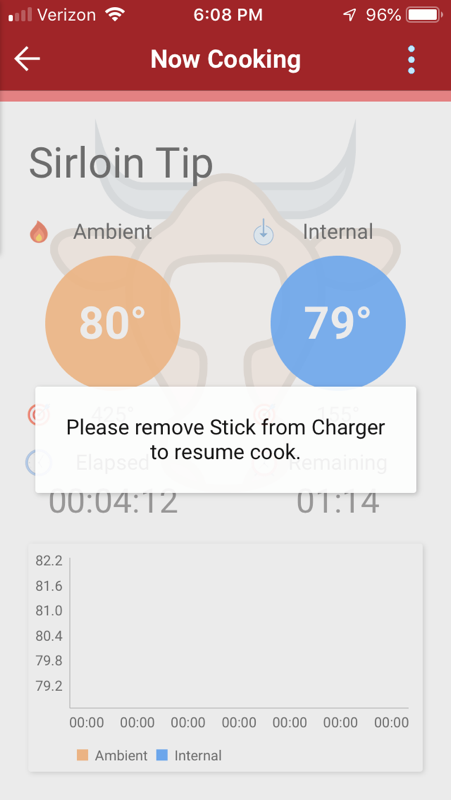
About 5 minutes later, the mobile app gave me an error message:  “Please remove Stick from Charger to resume cook.”  It seemed like there was a connection error.  I brought the app closer.  I turned the Xtender on and off.  I took the meat out of the oven and put the phone and Xtender right next to it. Nothing I tried fixed this problem. This is where I learned my fourth lesson with the MeatStick:  When the hi-tech solution doesn’t work, it’s good to have an old-fashion solution nearby. I put the meat back in the oven and used a regular meat thermometer to finish cooking.  Our top sirloin cap was tender and delicious.  I still don’t understand what this error means; my best guess was that the thermometer wasn’t sufficiently charged after cooking the brisket.
Attempt #3 – Whole Chicken

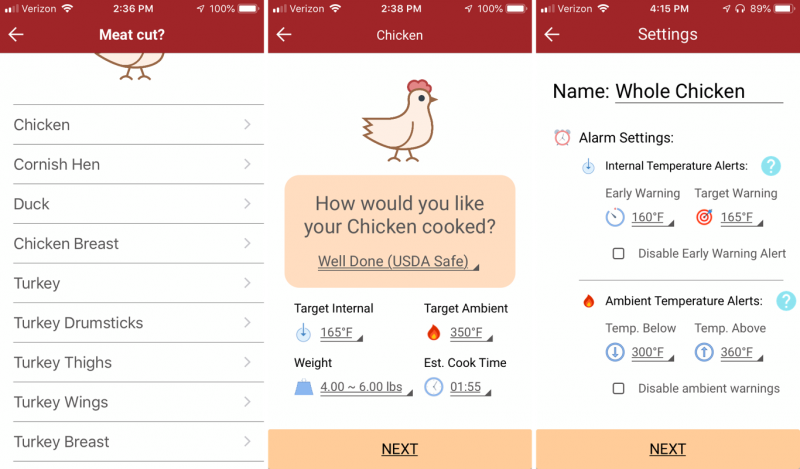
For our third attempt, my wife found a recipe for a whole roasted chicken.  She prepared everything, and we walked through the setup process in the mobile app once again.  We selected “Poultry,” “Chicken,” “Well Done,” and the weight, then we allowed the app to select the temperatures for us.  It suggested 165°F—this seemed a bit low to us but we rolled with it—for about 2 hours.
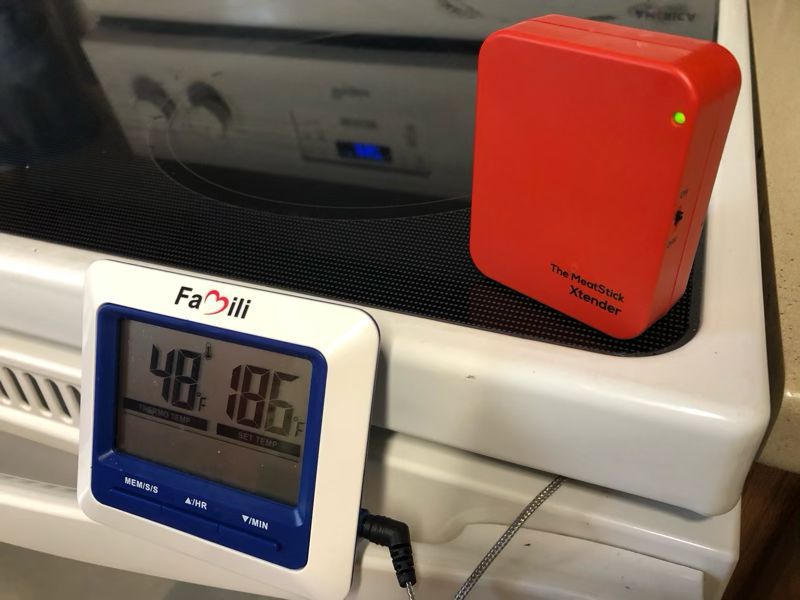
We put the MeatStick in, and just to be safe we put in a wired thermometer as well, and then put the whole thing in the oven.

We put the Xtender and the temperature gauge on top, and then made sure the app was still working. Everything looked good.
But 5 minutes later, we got the same error as with the top sirloin cap.  We took everything out of the oven, cleaned the MeatStick, started everything all over again, and put it back in the oven.  5 minutes later we got the error yet again.  At this point it seems pretty clear that there’s something wrong with my MeatStick, though I didn’t know what.

To get help with this problem, I sent an email to the MeatStick Support team, and I am happy to report that this is where I learned my fifth lesson with the MeatStick:  They provided the best support I have received from any gadget company.  They responded within minutes and politely walked me through a series of tests to verify that I was using the MeatStick properly and that it was charging and syncing correctly.  (This is where I learned that they recommend charging for 4 hours between uses.)  Once it became apparent to them that the MeatStick was not functioning as desired, they offered to send me a replacement MeatStick free of charge; I only needed to send them my Order ID, the serial number on the MeatStick, and a shipping address.  How cool is that!  On the one hand, I’m a little bit nervous about a gadget that stops working after one use. Was there a manufacturing defect? Maybe.  Did I do something wrong that broke it?  Possibly.  I don’t know. On the other hand, MeatStick is clearly a company that stands by their products and are willing to do whatever it takes to help their customers out; that’s impressive.  (By the way, when I first contacted Support, I did so incognito; they offered the replacement without knowing that I was a reviewer for The Gadgeteer.)

Attempt #4 – Pork Tenderloin

Once the new MeatStick arrived, I charged it for 4 hours for our fourth attempt, a pork tenderloin.  We walked through all the steps for syncing, put everything in the oven and waited.  Five minutes later, I got the exact same error as before.  This was getting pretty frustrating.  I communicated some more with the Support team, but we couldn’t figure out what was wrong.  Then in the middle of the night—am I the only one who gets good ideas in the middle of the night?—it occurred to me that the MeatStick worked the first time that I used it, so I need to get back to the original state.  The next morning I uninstalled the app and rebooted my phone, then I reinstalled the app and began testing.  The MeatStick worked again!  Both the original one and the replacement worked!  So what was the problem?  The Support team theorized that there was a problem with my phone’s Bluetooth that was fixed by the reboot; that might be, but my other Bluetooth devices were working just fine.  I think that the app somehow got into an inconsistent state where it couldn’t sync properly, and so the reinstall fixed the problem.  Whatever it was, we’re ready to get back to testing.

Attempt #5 – Eye Round Roast

My wife wanted to make some BBQ from an eye round roast, so she prepared it and wrapped it in aluminum foil.  I went through the syncing process once again, and that’s when I found another problem with the mobile app:  It can’t change the weight of an eye round roast.  I went back and tried several other cuts of beef, and they allowed me to specify the weight of my cut.  For some reason, the eye round roast is stuck on the default setting of 2 to 3 pounds. As ours is 4 pounds, the app was unable to correctly estimate how long it will take to be done.  At this point, I’m having trust issues with the MeatStick, so we put the wired thermometer back in it again.  The two thermometers stayed within 4 degrees of each other the entire time, so I’m confident that the MeatStick is correctly measuring the temperature.

After less than 2 hours cooking, a klaxon alarm sounded to warn me that I should probably take the roast out of the oven in order to let it rest.  It’s only 140°, so this seems a bit too soon.  I wonder if this is a side-effect of having the wrong weight of the roast.  We decided to leave it in for a while longer and then take it out.
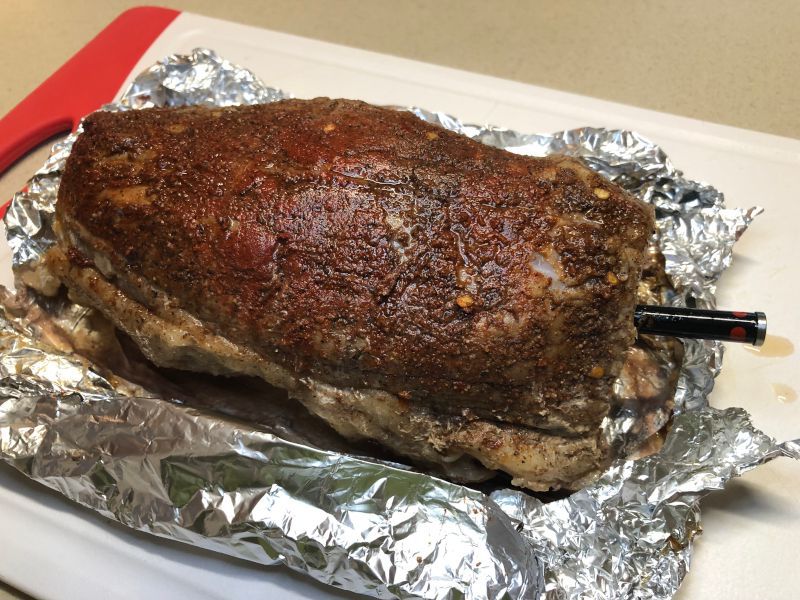
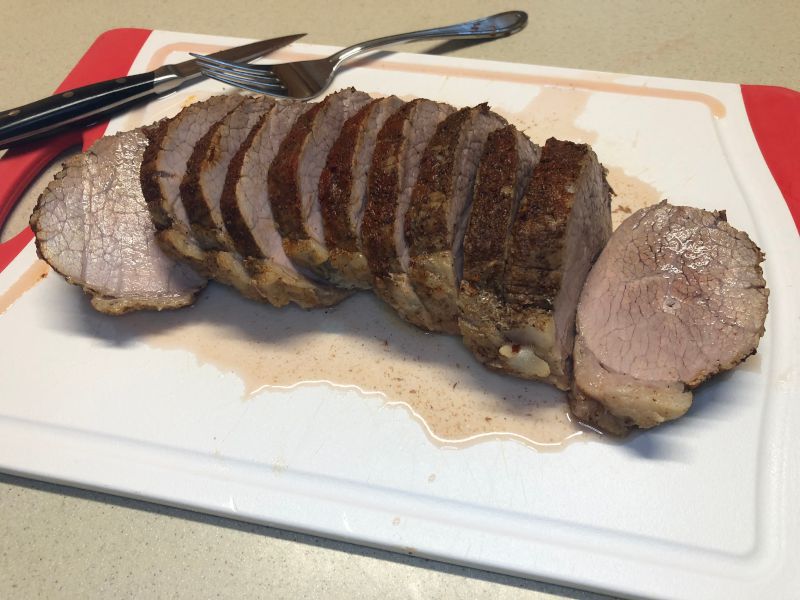
The result was perfect.  Eye round roast has a tendency to dry out, as it’s rather lean, but ours was tender and still very juicy; it made for some delicious BBQ.
Attempt #6 – Whole Chicken

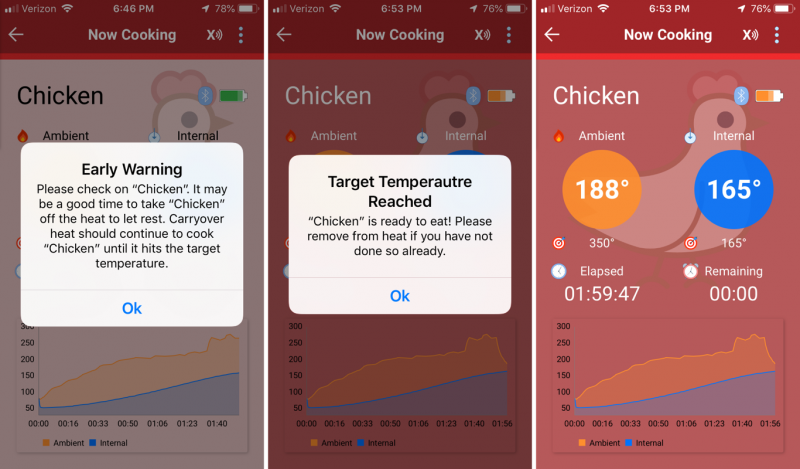
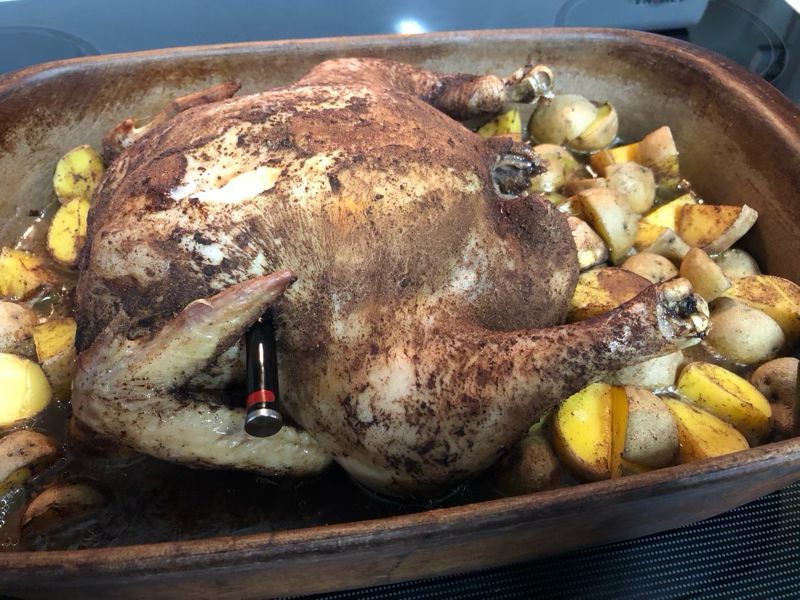
For our final attempt at cooking with the MeatStick, we decided to give whole chicken another try. My wife seasoned it, wrapped it in aluminum foil, and added some potatoes.  We synced the MeatStick, inserted it into the chicken, turned on the Xtender, and put the bird into the oven.  I’m happy to report that everything worked perfectly.  Shortly before it was done, the app warned me that it was time to take it out of the oven.  Once it had rested for it a bit, it warned me again that the ideal temperature had been reached.
The chicken turned out perfectly.  It was tender and juicy, just how we like it.  It was a perfect meal and the perfect end to weeks of testing the MeatStick.
What I like

  • No wires, long range
  • Helpful tutorials in the app
  • Solid construction
  • Great support team

What I’d change

  • Stop requiring my location
  • Add additional cuts of beef to the app
  • Change the temperature selection to increment by 5 instead of 1
  • Address the “Please remove Stick from Charger to resume cook” problem

Final thoughts

I have mixed feelings about the MeatStick.  On the one hand, it’s great to know when my meat is done cooking, no matter where I am in the house or yard; on the other hand, it only works with large cuts of meat. It’s a well-written app with great tutorials, but it always wants to track my location.  The app works great when it works, but it still has a few kinks to work out and lacks many cuts of meat.  The Support team was super helpful and dedicated, but even so I had to solve the problem myself.

In the end, the MeatStick wasn’t a hit with our family.  I am not a fan of giving a thermometer company the ability to track me, and my wife feels like it’s only half a solution, because she still needs another thermometer for smaller cuts.  But if these aren’t issues for you, the MeatStick might be just the gadget you need to help you perfectly cook your next cut of meat.

Price: $85.99
Where to buyThe MeatStick and Amazon
Source: The sample for this review was provided by The MeatStick.

Filed in categories: Reviews

Tagged:

The MeatStick Wireless Meat Thermometer review originally appeared on The Gadgeteer on August 16, 2019 at 9:00 am.

Note: If you are subscribed to this feed through FeedBurner, please switch to our native feed URL http://the-gadgeteer.com/feed/ in order to ensure continuous delivery.