5 of the Best Panorama Apps for Android that Take Stunning Photos

Believe it or not, there was a time when you had to wait to see how your pictures came out. You had to choose wisely as to what you were going to take a picture of. When the pictures were ready, you practically ran to pick them up to see how they came out. Today you can easily take as many pictures as you want without having to worry about the space. But even regular digital pictures are getting a little boring, and users are looking for new thrills such as panoramic pictures. Thanks to these kinds of pictures you can see more of everything…. Read more

Yolobox portable live stream studio review


REVIEW – As a videographer/photographer, I am always looking for ways to promote my business and for ways to offer more to my clients. The ability to live stream events like wedding ceremonies, business events, etc is one that I know many of my clients would find appealing because they have previously asked about it or mentioned it. For my needs, I have been looking for a small all-in-one device that would allow me to manage as many functions as I could including features like, encoding, recording, switching, and streaming. About a year ago, while web surfing, I stumbled across a product on IndieGoGo called Yolobox from a company called Yololiv. After much waiting, I finally got my hands on one to test and review. After all of my impatient anticipation, let’s get it going!!

What is it?

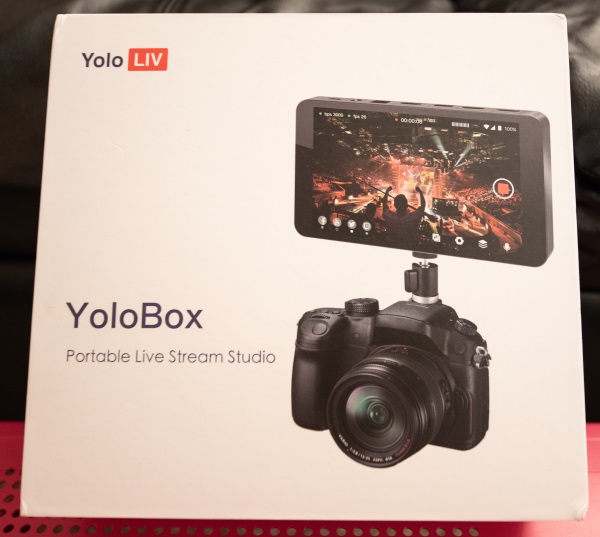
YoloBox is a hardware live stream solution that allows you to stream live video across Facebook, YouTube, Twitch and other platforms using many kinds of cameras, such as DSLR, professional cams, action cameras, and Drones.

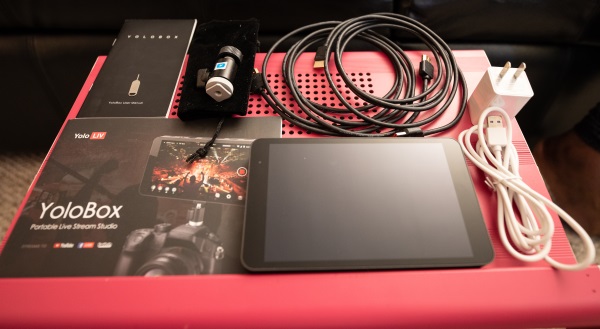
What’s in the box


1 x Yolobox
2 x HDMI Cable
1 x AC Adapter with USB-C Cable
1 x ¼-20” Tripod Mount
1 x Carrying Sleeve
1 x User Guide
1 x Holder with Sim Slot release tool

Design and features

Specifications

Encoded Format: Video Encoded Format:H.264
Audio Encoded Format:AAC (48k)
Video Recorded format:MP4
Audio Input Format:32kHz, 44.1kHz, 48kHz, 16-bit
Video Input Format:1080i/ 720p/ 1080p
Video Recorded Resolution:Up to 1080p:60fps
Live Broadcast Resolution:540P/720P/1080P
Video Storage: Storage Card Type:SD Card, Storage Card Capacity:Expanded to 128G
Network Connection: WiFi:2.4G/5G, Support 802.11a/b/g/n/ac, 4G Network:LTE-FDD B2/4/5/7/12/13/17/25/26,LTE-TDD B41
SIM Card Size:Standard SIM Card
Power Interface:Type C, Quick Charge 3.0
Battery Capacity:3.7V/5700mAh
Transmission Network Protocol:RTMP
Dimensions: 185mm(L) x 107mm(W) x 19.5mm(H)
Weight:480g

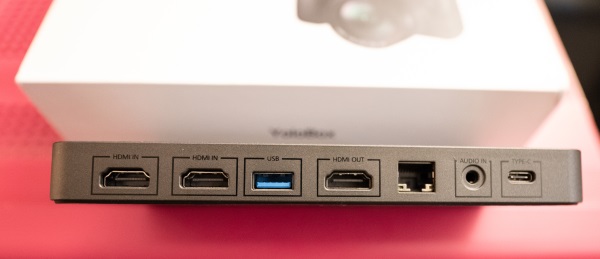
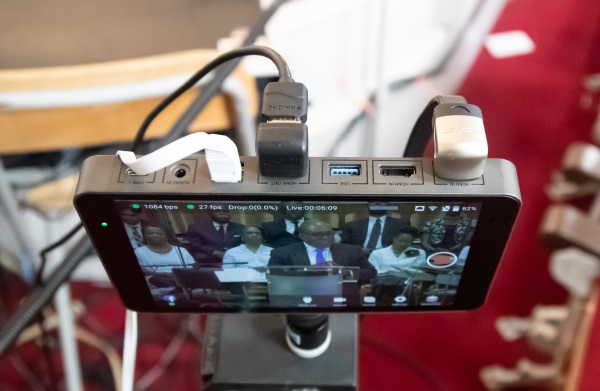
On the top edge of the Yolobox as shown in the photo below, from left to right there are 2 x HDMI input ports, 1 x USB input port, 1 x HDMI output port, 1 x Ethernet port, 1 x audio input port and 1 x  USB-C charging/powering port.

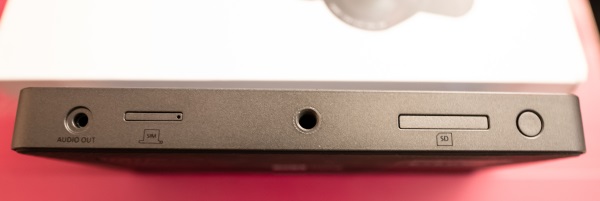
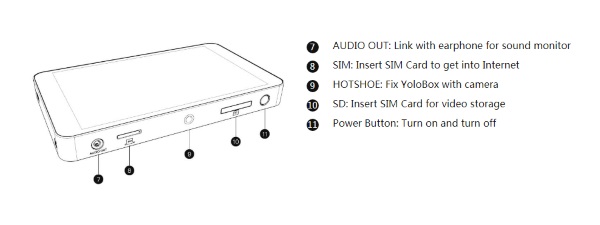
On the bottom of the Yolobox from left to right, as shown below, there is an audio out port, a Sim card slot, a 1/4-20″ mount, an SD card slot and the power button.

Performance

When I first took the Yolobox out of the box, I was very impressed by the build quality, the design and the sleek look. The front of the Yolobox is smooth with no protruding buttons.

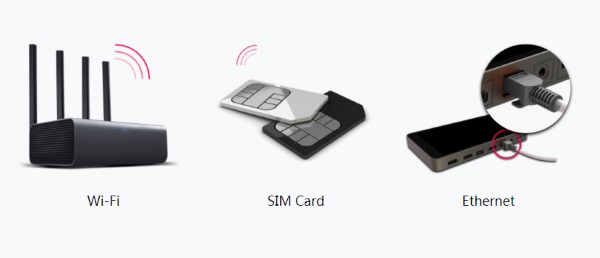
Once I charged it up and powered it on, I was greeted by a Yolobox splash screen and then it took me straight to the network screen that offered 3 choices for connectivity. The following are your choices:
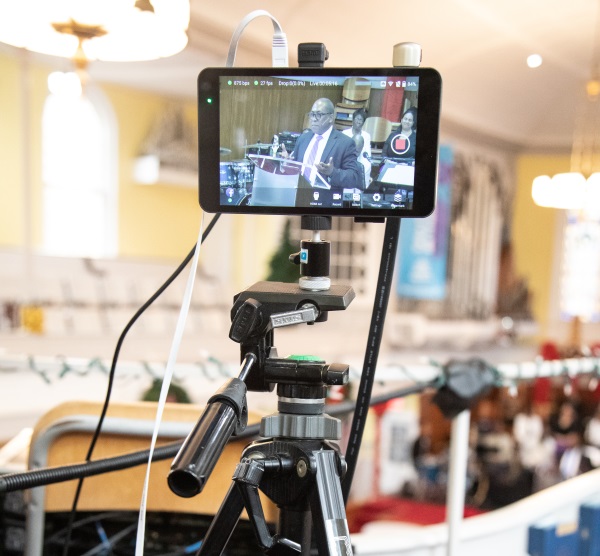
I have been using the hard wired ethernet cable choice since I have been live streaming the sermons from my church and I prefer not to risk any signal issues that may occur when using a wireless connection. As you can see in the picture below, I mounted the Yolobox with the 1/4-20″ head to a tripod so that I could operate it at eye-level. The touchscreen response is great, but the screen does attract fingerprints that are actually only visible once the device is powered off.

At the top of the device, as shown below, I have an HDMI cable plugged into the input. The other end of this cable is plugged into an 8-port Blackmagicdesign Switcher that has 6 cameras connected. So for this particular live stream, the camera switching is done on the BM Switcher. I also have an HDMI cable plugged into the HDMI output port. That cable goes to a large monitor approximately 10 feet away and is used by other members of the media team that keep an eye on everything. The white cable that you see is a flat Ethernet cable that is connected to one of the network switches for internet connectivity.


The picture below shows the Yolobox as it is actually live streaming a sermon. As you can see on the screen, the device provides the live streaming data including data rates, dropped packages metrics, the platform or platforms that you are streaming to (Note the Facebook Icon ion the bottom left corner. You can stream to multiple platforms simultaneously), as well as utilize the functional options on the toolbar across the bottom of the screen.

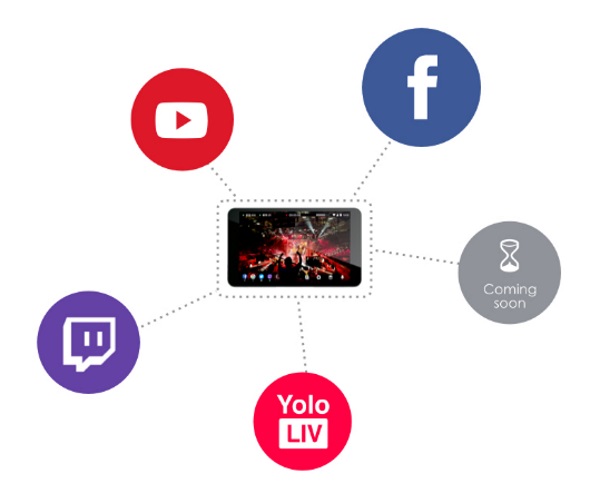
The features also include the ability to add custom graphics layers like a logo or watermark to your stream and you can also live switch between 5 video inputs((2 HDMI, 1 USB,1 SD card,1 from web source). You can stream video with picture-in-picture and audio from a separate external audio source if you choose to. Here is an illustration of the platforms that you can stream to:

There are a large number of settings that utilize the features and capabilities of the Yolobox, and too many to mention in this review. During the time that I have been testing this device, the Yolobox record feature was enabled so that you can record your stream onto an SD card and have it ready for other purposes. However, I have noticed an extreme audio/video sync problem with the recordings. The audio and video start off in sync, but over time, they become extremely out of sync and unusable without major editing. There is no sync problem with the live stream.

Another negative that I have been experiencing is that connectivity to Facebook has been a bit inconsistent. Out of every 4 attempts, there will be one occasion when it will not connect. I have identified this as an issue because I have a lower-end streaming box that connects every time. They are both on a 1GB/1GB FIOS connection, I did reach out to Yolobox support, and while they responded within a couple of days, they never offered any clear or practical solution.

You can click here to see one of the sermons that I live streamed to Facebook using the Yolobox.

What I like

  • Its size and sleek look
  • Build quality
  • Numerous included functions and features
  • The all-in-one concept/design
  • Battery life
  • Expansion capabilities

What can be improved

  • A redesign to include a user replaceable battery.
  • The ability to stream 4K
  • A storage capacity beyond 128GB
  • Fix the audio/video sync issue

Final thoughts

Yolobox is poised to make all of my live streaming needs and goals a reality. Right out of the box, its functions and features make it a winner in my book. It also seems that the architecture is already built-in to expand on its capabilities to make parts of it future-proof. Otherwise, the only test left is to see if it stands up to extensive use. This is where the weakness may exist partially because of the built-in battery that does not seem to offer a replacement option. In addition, I do think that a software fix is needed to ensure that the connectivity to all of the compatible platforms always works. Regardless, I am giving the Yolobox a well done!! And, two thumbs up!!

Price: $999
Where to buy: Amazon
Source: The sample for this review was provided by Yololiv.

Filed in categories: Reviews

Tagged: ,

Yolobox portable live stream studio review originally appeared on The Gadgeteer on May 5, 2019 at 8:23 am.

Note: If you are subscribed to this feed through FeedBurner, please switch to our native feed URL http://the-gadgeteer.com/feed/ in order to ensure continuous delivery.

Skylum AirMagic drone image editing software review

REVIEW – Drones.  Love them or hate them, they’re everywhere.  If you have one, you probably like taking photos, but they don’t always look awesome, since you are at the mercy of Mother Nature and her available lighting at the time of your flight.  If you’re gifted at Photoshop, or some other image editing software, you can usually tweak your images into something that matches your vision.  For many hobbyists, photo editing remains a mystery.  Skylum is here to save the day with AirMagic drone photography software.

I was given a chance to play with a pre-production version of AirMagic, so some of the features, or specific commentary may or may not match the production version, but it should be pretty close as I encountered no issues with this version.  With that said, let’s take a look.

What is it?

AirMagic is software designed specifically to modify images taken by drones.  Silly, you say?  What’s special about drones?  Like any other camera, drone cameras have their own unique personality. The specifics of the sensor, lens distortion and other parameters all contribute to little things in images that can be corrected.  Drones, with their overhead perspective, bring another variable into play, especially when photographing architecture.  AirMagic can read the metadata that is automatically attached to your drone images and apply corrections specific to your drone model.  AirMagic was able to detect that my images came from a DJI Mavic Pro and Mavic 2 Pro.  I was not provided a list of supported drones, but I expect most popular consumer drones will be supported.  Even if your drone isn’t directly supported, you will still benefit from the general image enhancements.

AirMagic’s big differentiator is that it is AI-powered, meaning that the software will make enhancement decisions based on each individual image, applying different corrections to each image to deliver the best possible images.

What’s in the box?

The software was made available as a download.  AirMagic will be available for Windows and Mac platforms.

Setup and installation

For Windows, AirMagic requires:

  • Win 7,8,10  64-bit
  • Open GL.3 or later compatible graphics card
  • Intel Core i3 or AMD Athlon 64 processor, 2 GHz or faster
  • 4GB RAM, 8 GB recommended
  • 1024 x 768 display, 1280 x 800 recommended
  • 4GB hard drive space, SSD recommended
  • DirectX 10 compatible video adapter
  • Internet access for registration and access to online updates

Setup on my Surface Book was simple and pretty standard.

Design and features

Once you open the software, you can either drag photos or a whole folder, directly onto the welcome screen or click the Open button to browse and select images.

AirMagic supports RAW, TIFF, JPG and PNG file formats and images of 800 x 600 or larger.  Once you open your selected images, AirMagic presents you with a thumbnail view of all open images. At this point, you can just click the “EXPORT <x> PHOTOS” button on the bottom right and let the software work its magic with default settings. It will process all open images in one shot.  Basically, it’s one-touch image enhancement.  Tell it to go, and come back in a few minute to improved images.

If you double-click on an image, it starts an open process where AirMagic analyzes the image.

The AI process provides multiple statuses along the way like “Lens correction”, “Looking for skies”, “Looking for haze”, “Detecting scene objects”, “Doing some magic”, and “Final touches to make it awesome”.  It is processing multiple parts of the image individually using its AI engine:

  • Color recovery
  • JPEG artifact fix
  • Foliage enhancement
  • Auto color temperature
  • Auto lens correction
  • Smart dehaze
  • EAW processing
  • Sky enhancement
  • Exposure compensation
  • Natural light correction
  • Noise reduction
  • Tint perfection

Once done, the image comes up with a slider that allows you to see the before and after images, side-by-side.

The above screen capture shows how the software enhanced the sunset image with me providing exactly zero input.  It made its own decisions on everything.  You can see how the sunset is only slightly enhanced, but the ground detail and colors were significantly updated.  To my eye, it essentially was able to apply a high dynamic range (HDR) effect without me having to supply three or more images, all with different exposures.  Pretty cool.

If you click on the paintbrush button, you get a slider that allows you to decrease or increase the effect. By default, it is set to 60% boost.

The button on the bottom left opens a palette of styles.

The different styles, left to right, are: no style, Chinook, Cinematic, Emotional, Sandstorm, and Zephyr.  There is no description of what each one does, and there is no online help yet, since this is pre-production software. According to the documentation, these five styles performed better than any others in testing, so they are included.  Essentially, the AI chose the best styles.  I didn’t see a whole lot of difference in the default style and Chinook. Cinematic boosted blue levels. Emotional seemed to increase color saturation.  Sandstorm lowered color saturation and flattened the image. Zephyr was similar to Chinook, with slightly muted colors.  The plus sign on the right allows you to purchase additional styles from Skylum’s online marketplace.

When you go to save your images, the software gives you a menu with a single option to save to disk.  The fact that there is a menu suggests that there may be other options in the future.  Choosing to export to disk brings up a standard save window with location, filename, multiple format choices and a quality slider, if your output format supports it.

Advanced Settings gets you a treasure trove of options.

First, you can choose your output file folder and select to warn before overwriting an existing file.

Next, you can do file renaming, changing the prefix of the name, the base filename, or suffix.  I added a suffix of “airmagic” and when I exported, all my images were named <original filename>_airmagic.jpg.  The LETTERS options allow you to change the case to all upper or lower case.

Like in the basic export window, all file formats are available here as well.

Beyond file formats, AirMagic allows you to change the color profile.  Basically, a color profile defines how colors are managed in the image, and therefore, in image editing software, displays and printers. For most users, sRGB, the most widely used color space, especially on the web, should be your go-to choice.

There is a really nice sizing section. You can ensure that you save in the same size as the original image, or, resize by providing a long-edge or short-edge measurement in pixels.  The software will scale the image to keep its original proportions.  You can also prevent the software from enlarging your image, if you provide a long-edge or short-edge measurement that would force enlargement. You can also resize to specific dimensions, but it will skew your image if your dimensions are different than the original image.  You can’t make a 600 x 300 image scale to 800 x 600 without distortion.

Finally, there are a couple of presets provided on the left side, Web JPG and email.  These presets have all the settings, other than file location and filename, to optimize the image for the web or for email.  You can create your own presets as well, which can really streamline your workflow.

OK, enough about how to use it.  Does it work?  In a word, yes.  But, your mileage may vary.  Photography, and image enhancement is an intensely personal thing. What looks good you one may drive another to distraction.

Here are a variety of examples with several different types of lighting. All image pairs have the original on the left and the automatically enhanced image on the right. All images were processed with the default, no style setting.  I didn’t change anything, other than the output filename.

Water – a lot of it.  I liked this outcome.  The software did a great job making the colors richer and improving contrast.

The homestead.  Again, colors boosted, contrast improved.  I like the sky – it really looks like that here.  The golf course looks perhaps a little too boosted to my eye, but that can be adjusted easily. It’s really more of a preference than a criticism.

A sunset. I like the sky. It looks more like what I saw with my eyes.  I like the fact that the ground is also visible, where it was a mottled mess in the original.

A scenic hill. This one was a bit more subtle. I like the deepened color in the river and improved detail in the sky and trees.  I was impressed with this, given the challenging direct lighting on the left side.

A view down the river. The glare on the water is gone, revealing the nice blue water.  The sky, which was cloudy and blown out in the original now appears flat and featureless, which is what it looked like that day.

The alma mater.  Again, this one is subtle, since the original looked pretty darned good.  Slight tweaks to improve color saturation and contrast make the enhanced image pop more than the original.

The old neighborhood.  Again, subtle.  There is more saturation in the grass and better contract, making the houses pop.

Another lake image.  Again, nicely improved color saturation, although it did add a touch of blue tint to some of the white buildings.

Finally, another lake image. This one really jumped out for two reasons.  First, what it did to the lake was awesome.  Look at the improved detail under the water in the bottom left.  Second, look at the blue tint added to the white building in the upper left.

What I like

  • Easy, one-click image enhancement for single images or batches of images
  • High-quality output
  • Tons of options for saving images
  • Ability to tweak the final image with a side-by-side view
  • Can be used as a plug-in in Photoshop CS5 or higher and Lightroom Classic CC

What needs to be improved

  • Several images exhibited a blue tint, especially visible on white structures
  • Sometimes, the colors can seem overblown and tweaking means having to process images individually
  • An explanation of the output styles would be nice

Final thoughts

Skylum’s AirMagic is an intriguing addition to their existing AI-driven software portfolio that includes Luminar photo browsing and editing software and Aurora HDR photo software. For drone enthusiasts, and those that use drones professionally, like real estate agents, being able to whip through enhancing a batch of images with a couple of clicks makes AirMagic a compelling choice.

There will be a free version available with no batch processing, output file size limitations, no plug-ins and watermarks applied in addition to the full-featured paid version.

Price: $39 for activation on two devices
Where to buy: skylum.com – pre-orders begin March 7, 2019
Source: AirMagic was provided by Skylum

Filed in categories: Reviews

Tagged: , ,

Skylum AirMagic drone image editing software review originally appeared on The Gadgeteer on March 7, 2019 at 9:00 am.

Note: If you are subscribed to this feed through FeedBurner, please switch to our native feed URL http://the-gadgeteer.com/feed/ in order to ensure continuous delivery.

Get your colors right with Datacolor SpyderX

NEWS – Monitor calibration has long been a staple activity of professional photographers.  Monitors inherently have variations that affect how colors are displayed.  Couple that with changes in ambient light in the room, due to sun angle, cloud cover or electric light type and the colors you see on the monitor can really change.  Without calibrating your monitor, those amazing colors you see when editing your photos could look completely different when your photos are printed.

Calibration tools have typically been cumbersome, slow to use and require some advanced knowledge to get good results.  Datacolor has been a player in the calibration tool market for many years and has offered Spyder calibration tools that help photographers ease that burden.  Their new SpyderX Pro and Elite are the latest versions of that popular tool.

SpyderX offers a one-click wizard and can calibrate your monitor in less than two minutes. For users that require more monitors for their workflow, the software can calibrate multiple monitors, .  Having all your monitors look exactly the same is a huge benefit when dragging windows from monitor to monitor.

SpyderX is available in two versions.  The Pro version is targeted at serious photographers who want to ensure that their image colors match their original vision.  The Elite version has more advanced settings for professional photographers. With its ease of use and speed, SpyderX removes any excuses for not calibrating your monitor and getting images with colors you expect. The Pro version is $169.99 and available from Datacolor or Amazon. The Elite version is $269.99 and available from Datacolor or Amazon.


Filed in categories: News

Tagged: ,

Get your colors right with Datacolor SpyderX originally appeared on The Gadgeteer on February 15, 2019 at 10:00 am.

Note: If you are subscribed to this feed through FeedBurner, please switch to our native feed URL http://the-gadgeteer.com/feed/ in order to ensure continuous delivery.
The most popular kinds of drones we’ll see in 2019

ARTICLE – Consumers arguably became most familiar with drones by getting introduced to the ones that took photos from the sky. Those kinds are still popular, and many drone enthusiasts own them.

But, like any other segment, the drone industry evolves to meet needs. Here are five kinds of drones most likely to gain prominence in 2019.

1. Pocket-Sized/Microdrones

Although there are drones of modest builds that make them maximally accessible to hobbyists, there’s a recent push toward drones that could fit in backpacks or even smaller compartments.

AirSelfie unveiled several new pocket-sized drones at CES 2019, opening up the possibilities for people who want drones they can hold in their hands. The AIR 100 is the least expensive option, retailing for under $100. It boasts a 12-megapixel camera and a six-minute flight time.

The U.S. Army is also getting into the microdrone market with plans to equip its soldiers with personal reconnaissance drones that can survey battlefields for their operators and send back footage to them. The drones weigh only 1.16 ounces and are less than seven inches long.

People could see many more uses for microdrones in 2019, especially depending on the reception of these early efforts. It’s easy to see how these gadgets could be big hits during backyard parties.

2. Home Security Drones

Households are accustomed to intelligent security cameras that move in response to changes in the environment and even use artificial intelligence to recognize people versus animals, for example. It appears the next level of home security advancements involves drones. Many of the companies offering them suggest that drones get used as part of a more extensive home security system.

If a person noticed something on a camera that caused concern, they could direct the drone to check it out in detail. Sunflower Labs has a drone called a Bee that flies autonomously, guided by sensors called Sunflowers. Users can also make the Bee fly to designated places on their properties.

Companies use most of the security drones now, but Sunflower Labs is among numerous companies trying to make drones staples of home security systems. They could be especially advantageous for people who live on expansive properties, such as farms. The moveable nature of drones could mean an owner could send only one drone to look around the whole property, instead of installing several cameras.

3. Underwater Drones

Thanks to new technologies, people can admire drones in the air as well as underwater. Companies sell models for hobbyists and professionals, with one called the Deep Trekker DTG2 Pro outfitted with 4K camera and video capabilities at a depth of up to 150 meters. Those features make the drone excellent for scuba divers who want footage of their adventures.

And, there’s the Geneinno Titan, with its three speed levels and power from six thrusters. This model has an automatic hover mode and can take shots from both high and low angles.

In today’s society, people love collecting videos and snapshots and sharing them with others. The nice thing about these water-ready drones is that they give undersea perspectives to individuals on land.

4. Disaster Recovery/Relief Drones

Engineering experts in laboratory settings have suggested drones could be excellent for helping relief workers examine rubble after earthquakes and engage in similar tasks that are dangerous for humans to undertake. In 2019, people interested in drones can expect more real-life applications of those drones.

A recent collaborative project in Japan involved TerraDrone, KDDI, and Secom, and the companies unveiled a drone used for stadium security that detects suspicious people. Representatives believe the drone could be a good fit for disaster relief missions, too.

Also, the underwater drones mentioned above help people acquire footage of surroundings beneath the ocean. But, some could do double duty and assist after disasters, too. In one case, officials in India used a drone to find the body of a miner trapped due to flooding.

That story didn’t have an uplifting outcome, but an initiative in Alaska that relies on drones could be different. Drone experts at the University of Alaska Fairbanks are working on a way to use unmanned aerial vehicles to deliver supplies during medical emergencies. The researchers assert mushers on dog sleds handled the job in earlier eras, and now the task seems suitable for drones.

Many Drones to Interest Gadget Lovers in 2019

Some of these drone projects are in the early stages, but they give previews of larger trends likely to happen in the world of drones this year.

People should keep an eye on the headlines to stay abreast with how these possibilities develop, and which other companies follow suit with other ideas that fit into these categories.

Filed in categories: Articles

Tagged: ,

The most popular kinds of drones we’ll see in 2019 originally appeared on The Gadgeteer on February 8, 2019 at 9:00 am.

Note: If you are subscribed to this feed through FeedBurner, please switch to our native feed URL http://the-gadgeteer.com/feed/ in order to ensure continuous delivery.