TRENDnet Powerline 200 AV PoE+ Adapter review

REVIEW – The TRENDnet Powerline 200 AV PoE+ Adapter extends a computer network almost to 1000 ft by transmitting an encrypted signal over existing electrical wiring. The adapter can also power PoE+ devices. Best of all it is ready to use out of the box. Read on to see what I think!

What is it?

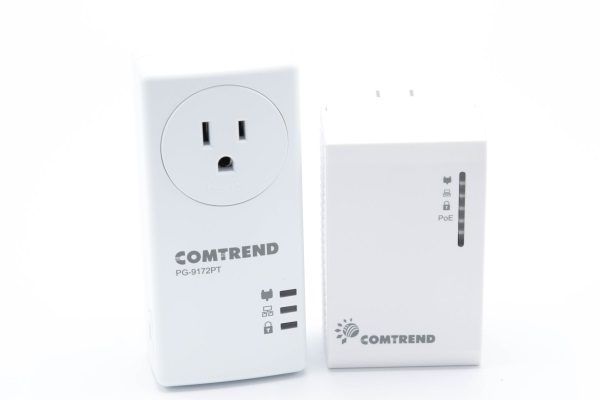
The TRENDnet Powerline 200 AV PoE+ Adapter creates a high-speed computer network on top of  your home’s existing electrical wiring. It does this by creating an encrypted radio signal within home wiring for transmitting and receiving network traffic. This is useful for using network components that require wired network connections in rooms where no such connection is available. The TRENDnet Powerline 200 AV PoE+ Adapter also has PoE+ capability, which means that it can supply up to 30W of power over the ethernet connection for powering devices. Some devices which may benefit from this include IP cameras, wireless access points and VoIP handsets. 

What’s in the box?

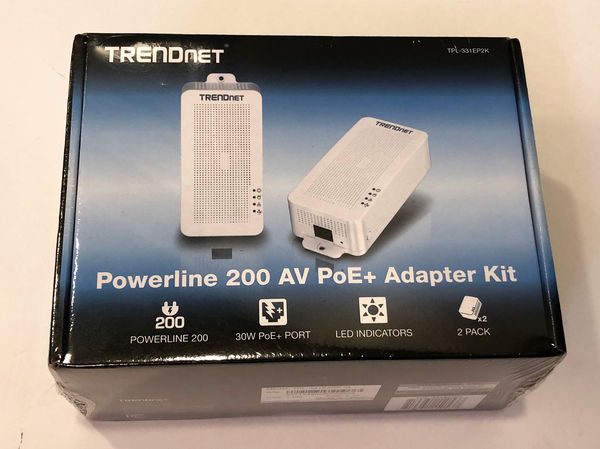
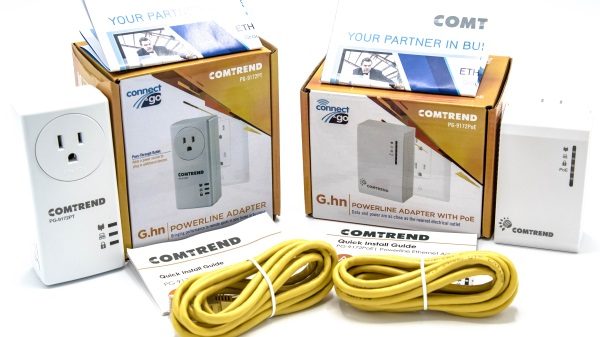
The product review is for the TPL-331EP2K which contains two units for starting a network.

  • 2 x TPL-331EP
  • Quick Installation Guide
  • Safety note (about the dangers of using damaged electrical equipment and exposing the unit to extreme heat)
  • 2 x Network cable (1.2m/4 ft.)
  • 2 x mounting hardware

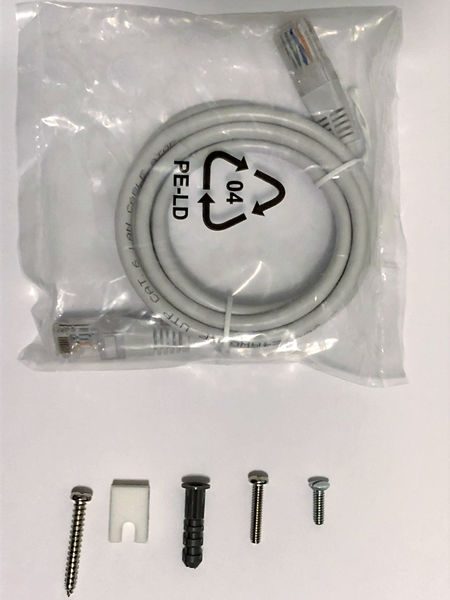
Mounting hardware includes a plastic drywall anchor, screw and foam spacer so that the base of the unit can be fastened to the drywall below the wall receptacle. You can see from the picture below that the spacer, on the left, is about the same thickness as the wall plate (on the right).

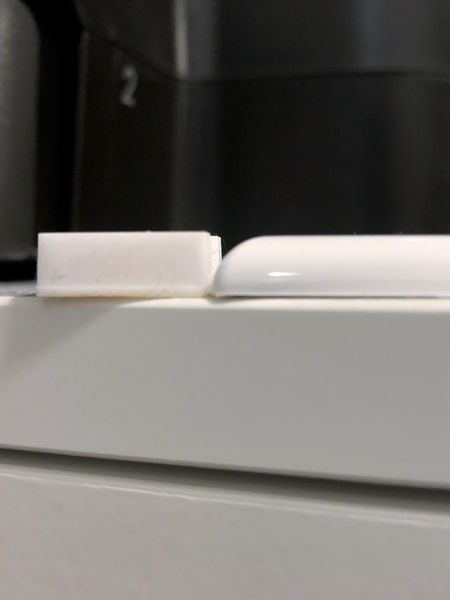
The mounting hardware also comes with an extended wall plate screw that can support the weight of the adapter in a standard duplex receptacle design. The unit weighs 7 1/4 ounces so it will generally stay installed without the screw – the hardware provides assurance that it will not be removed accidently. The picture below shows the unit fastened by the wall plate screw only. 

Design and features

Specifications

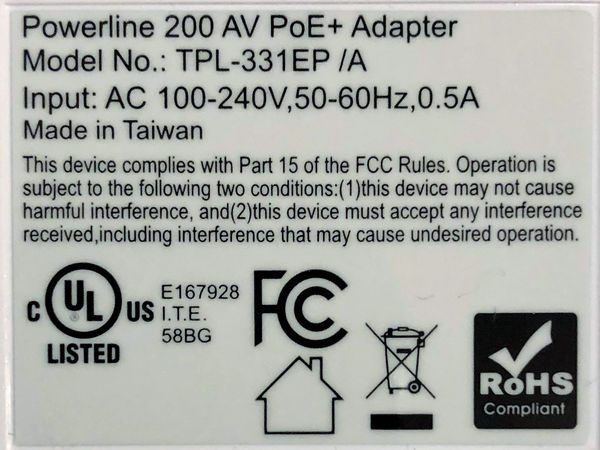
Standards  • IEEE 802.3, IEEE 802.3u,  IEEE 802.3x,  IEEE 802.3af,  IEEE 802.3at,  IEEE 1901
Frequency Band • 2 – 28MHz
Modulation/Protocol • OFDM, 1024/256/64/16/8-QAM, QPSK, BPSK, ROBO; CSMA/CA, CSMA
Data PHY Rate • Up to 200Mbps
Networking Distance • Powerline: Up to 300m (980ft.) linear distance over electrical power lines***
Encryption • 128-Bit AES (Advanced Encryption Standard)
Powerline Nodes • Up to 8 (max.)
Overlapping Powerline Networks • Up to 4 (per electrical system)
Special Features • Auto-connects to other TRENDnet Powerline adapters;  IPv6 support;  IGMP / MLDv2 Streams
Power • Input: 100 – 240V AC, 50-60Hz; Consumption: Active mode: 2.3W (max.); Standby mode: 1.7W (max.); PoE Budget: 30 Watts (max.)
PoE Delivery • Pin 1, 2 for power+ and pin 3, 6 for power- (mode A)
Operating Temperature • 0 – 55°C (32 – 131°F)
Operating Humidity • Max. 93 % non-condensing
Certifications • FCC;  IC
Dimensions • 156 x 67 x 43 mm (6.14 x 2.6 x 1.7 in.)
Weight • 205g (7.2 oz.)
Warranty: • 3 year

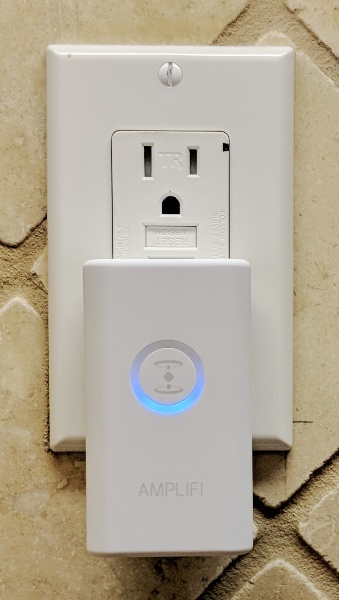
TRENDnet Powerline 200 AV PoE+ Adapter Design

The power adapter will look at home in any fairly technical setting, such as an AV area or near a computer workstation area. However, it’s technical design and lines will be somewhat of an eyesore anywhere else. For instance, if you are using this to discreetly power an IP camera then the large TRENDnet box will certainly provide a hint that there may be surveillance in the area.  The front of the unit is well ventilated but it seems excessive for a device that only consumes 2.3 W.

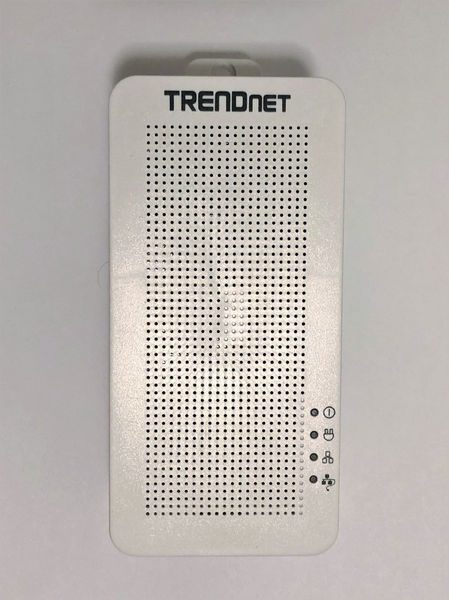
The four LEDs on the front indicate the operating state of the unit. The top LED is always lit whenever the device is powered. The second from top LED is lit when the powerline network is connected and blinks when data is transmitted over the powerline network. The second from bottom is lit when the Ethernet port is connected and blinks when data is transmitting over Ethernet. Therefore, the middle two LEDs always blink together, but the second from the top may blink on its own (indicating the powerline network overhead). The bottom LED is lit when a PoE/PoE+ device is connected.

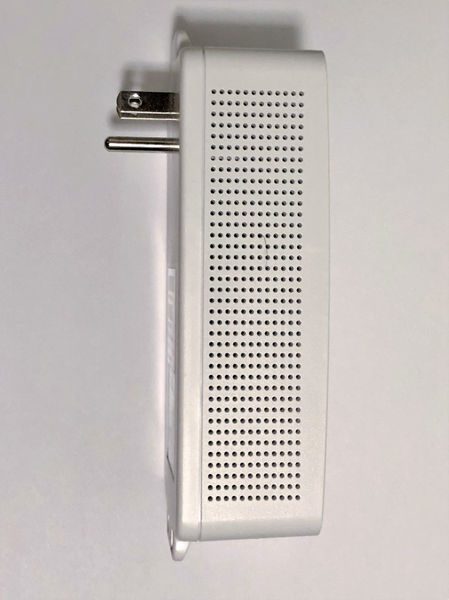
The left side of the unit has more ubiquitous venting but no other interface or indicators.

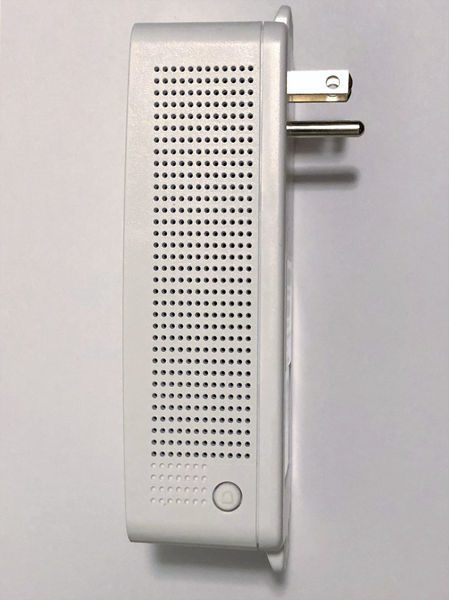
The right side of the unit looks similar to the left side but there is a sync button at the base. Pressing the sync button for 3 seconds initiates a synchronization session. The powerLED will begin to blink for 2 minutes. Pressing the Sync button on additional adapters within the time frame will synchronize encryption keys between these adapters and create a private network. Without performing this step any additional TRENDnet adapters introduced into the electrical circuit will also be allowed to join the network. Performing this step on a subset of adapters (if four or more adapters are connected) will create an isolated network of adapters.

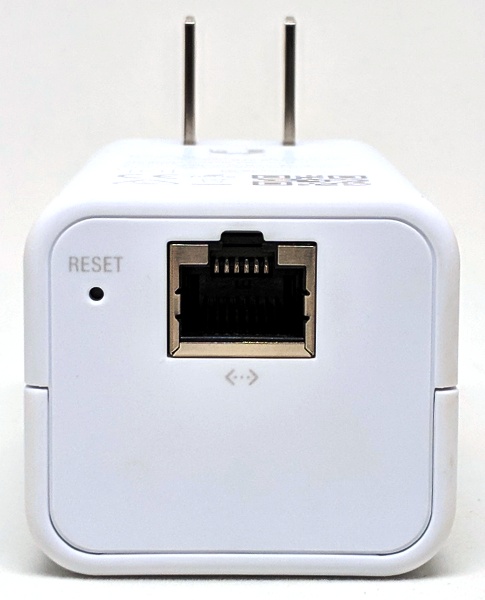
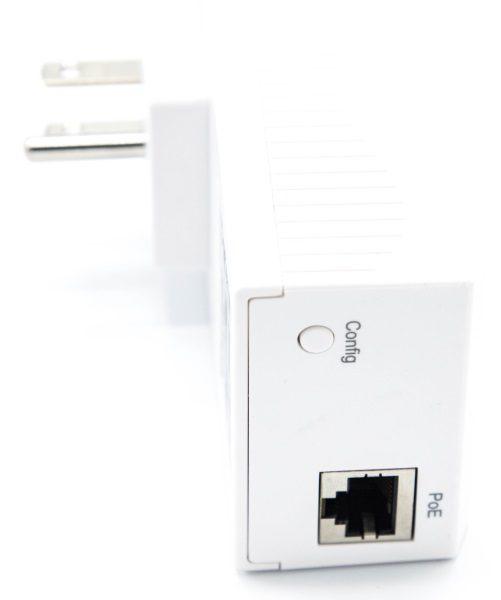
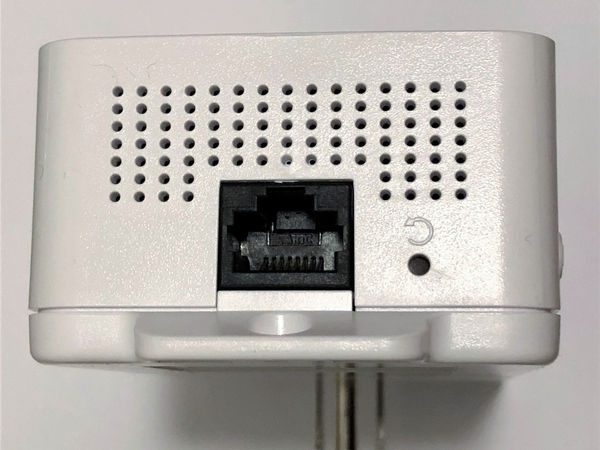
The bottom of the device is shown in the picture below. The Ethernet port is a standard design. The reset button to the right restores factory defaults settings if it is pressed for more than 10 seconds. When resetting  all LEDs will turn off and on again. After reset the powerline network name will return to the default “HomePlug AV”.

Operation

Operation is the definition of simplicity. The adapters automatically establish a network out of the box. The adapters are also cross-compatible with Powerline 1200, 600, and 500 adapters.

The powerline communication works on a single electrical system. (Usually controlled by a single distribution panel). Power strip, GFCI outlets, and AFCI circuit breakers may degrade Powerline network signals. My first choice for outlets in my home was on two different end-runs powered by different breakers. One breaker is the standard design from 1973. The other breaker is a GFCI type installed last year. The Powerline signal did not transmit across the GFCI. However, it was easy to debug this situation by observing the LEDs on the front.

I tested the operation of the PoE with a VOIP phone from work and it successfully powered up. You can see the PoE LED illuminated in the picture below, and the Powerline LED in the middle of a blink. I didn’t have any PoE+ devices at my disposal.

Performance

Aside from the PoE capability, the most important aspect of the system is how quickly it can provide communications over the electrical system and how reliable it is. Every electrical system is a little different so these tests only indicate one set of results and can’t guarantee the maximum or minimum performance achievable in another application.

One thing I did notice is that I cannot use touch-sensitive lamps on the same line as the adapters. The adapters must introduce signal noise that triggers the circuitry to turn the touch light on and off.

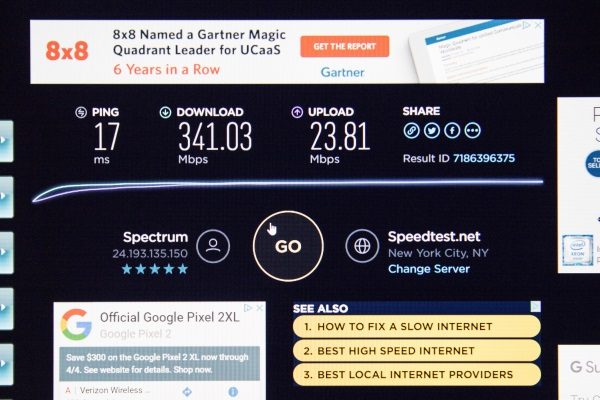
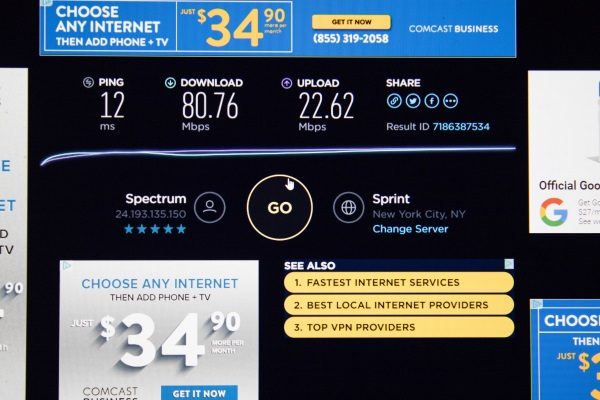
To test performance, first I plugged my laptop directly into my router and then the router to the TRENDnet and the TRENDnet to another computer. I tested the speed between the systems using LAN SpeedTest Portable Ver. 4.1.0 Lite by Totusoft. The OS parameters the computer used for the test:

Operating System: Windows 10 Build 14393
Window ScaleFactor: 1
Network Cards: 1
HP Timers: 0 = 0.01 1 = 0.09 10 = 9.38 100 = 99.02
Packet Size: 1 MB to 1 MB
Packet Size Avg: 1,000,000 Bytes
Packets: 1
Write Cache: Enabled
Read Cache: Disabled

The results vary considerably from test to test. However, in general, the results using the Wi-Fi in my house (with the Ethernet ports disconnected):

Write Speed: 149.08 Mbps
Read Speed: 199.52 Mbps

The typical results using the TRENDnet without Wi-Fi:

Write Speed: 16.51 Mbps
Read Speed: 24.60 Mbps

And for comparison, the results at work (using a different source and destination):

Write Speed: 231.96 Mbps
Read Speed: 273.98 Mbps

The results above indicate that the Powerline is not operating at 200 Mbps. Unless the Powerline network is very clean there may not be sufficient bandwidth for 4k video, for instance. However, 25 Mbps is adequate for  general web surfing, email, social media, Online gaming, Video conferencing, and HD video streaming. It would be great if the TRENDnet could provide an indication of  signal quality. Maybe an LED that indicated the electrical system signal-to-noise ratio could be included in future designs.

The TRENDnet has been connected to my SmartThings hub for the past month. I have not had any reports from my hub that the internet signal has dropped. Therefore I can say that the connectivity remains very high.

What I like

  • Easy Set-up
  • PoE/PoE+ for devices that can use it

What needs to be improved

  • electrical system quality check

Final thoughts

The TRENDnet Powerline 200 AV PoE+ Adapter provides network access through electrical wires when network cabling or Wi-Fi isn’t available. Setup is easy since the adapters auto-connect to an encrypted network out of the box. Even if the signal isn’t the fastest, it seems to be very reliable.

Price: $59.99
Where to buyAmazon
Source: The sample for this review was provided by TRENDnet.

Filed in categories: Reviews

Tagged:

TRENDnet Powerline 200 AV PoE+ Adapter review originally appeared on The Gadgeteer on July 25, 2018 at 9:00 am.

Note: If you are subscribed to this feed through FeedBurner, please switch to our native feed URL http://the-gadgeteer.com/feed/ in order to ensure continuous delivery.

Zyxel Multy Pro Tri-Band modular WiFi review

With more and more connected gadgets arriving in our homes, WiFi bandwidth can become a huge bottleneck. Zyxel’s expandable Multi Pro tri-band modular WiFi helps to keep your signal strong, even in the furthest reaches of your home.

What is it?

Zyxel’s Multy WiFi system is comprised of one or more AC3000 wireless routers. The first unit connects to an internet connection and broadcasts a strong, stable signal. Adding one or more Multy units allows continuous daisy-chaining to enable home WiFi to reach the furthest areas of your home.

Hardware Specs

  • Fast, comprehensive WiFi coverage
  • Room-to-room roaming
  • Easy set-up within minutes
  • Guest network
  • Compatible with Alexa
  • Speed Rating (per unit)
  • Number of Bands: Tri-band
  • Coverage: Up to 7500 sq. ft./696 m2
  • Wireless Standard: IEEE 802.11 b/g/n 2.4 GHz – 256QAM support, IEEE 802.11 a/n/ac 5 GHz (Wave 2) – 256QAM support
  • Wireless Transfer Rate: (Transmit & Receive): 1733Mbps* for 5 GHz (dedicated backhaul),866Mbps* for 5 GHz,400Mbps* for 2.4 GHz
  • WiFi Features: Daisy Chain, Bridge Mode, MU-MIMO, Beamforming, Auto path selection, Single WiFi NameAP Steering, Band Steering, Optional to separate 2.4G and 5G WiFi network
  • Plastic housings
  • Dimensions: 7 x 2 x 9.3 inches
  • Weight: 1.96 pounds.

What’s In The Box?

  • Two Multy WiFi routers
  • Two power supplies
  • Two Ethernet cables
  • Two Instruction manuals

Design and features

Zyxel’s Multy Pro system arrives in handsome packaging. The two Multy routers are identical. I elected to locate the primary router in a centrally-located location on the first floor of my home. Connections were simple – Internet connection from my ISP modem and power. I downloaded the iOS app and followed the simple instructions and was up and running in minutes.

Next, I located the second Multy WiFi in a room with sporadic WiFi and continued with the set-up in the app. The second unit needs power only. The second unit daisy-chains WiFi, using the same SSID and password. Additional Multy units can be added to bring that elusive WiFi signal to all the deep, dark corners of your castle. Communications between the two Multy units is deliciously fast at 1733Mbps. Since the bases have 3 Gigabit Ethernet ports, using the full bandwidth is as easy as plugging in the cables.

After getting the system up and running, I ran several speed tests in different locations in my home with impressive results. Signal strengths even at the furthest reaches of my home were at worst, a very respectable -51dB. My daughter was the first to comment that she had experienced many fewer dropouts and faster speeds on her bedroom computer and iPhone.

Looking to tweak the settings I tried to find a way to change the default IP address of 192.168.212.1 to find there isn’t an easy way to do this. I contacted Zyxel Technical Support and was provided with a way to make the changes using Putty, but elected to just leave it at the default. Next, I looked for a way to plug in an 8TB USB hard drive into the “Master” Multy to use as a backup for all of the computers on my network but was unable to locate anything in the app to enable this capability. Zyxel’s technical support informed me that this is not currently a feature, but may be implemented in the future.

I’ve used Zyxel’s Multy Pro system over the past three weeks. I’ve experienced excellent performance, few dropouts and a very strong and stable signal everywhere. The system is even powerful enough to blast WiFi all through my property so I can listen to internet radio while mowing my entire lawn.

What I like

  • Attractive design
  • Easy configuration
  • Strong, stable WiFi
  • Crazy fast backhaul
  • 3 Gigabit Ethernet ports per hub
  • Capable app

What needs to be improved?

  • Configuration options are very limited. An advanced user configuration option would be welcomed.
  • The inclusion of  USB port functionality for storage

Final thoughts

Zyxel’s Multi WiFi system is ideally suited for large homes where configuration tweaking isn’t necessary. Its sleek design, intuitive setup, and solid performance have earned it a position as the ranking WiFi router in my home.

Price: $299.99 two-pack
Where to buy: Amazon
Source: The sample for this review was provided by Zyxel.

Filed in categories: Reviews

Tagged: ,

Zyxel Multy Pro Tri-Band modular WiFi review originally appeared on The Gadgeteer on June 20, 2018 at 9:00 am.

Note: If you are subscribed to this feed through FeedBurner, please switch to our native feed URL http://the-gadgeteer.com/feed/ in order to ensure continuous delivery.

AmpliFi Teleport (AFi-RT) review

In 2016, Julie reviewed the AmpliFi WiFi router with mesh system. AmpliFi recently came out with a Teleport device that works with the AmpliFi router allowing you to securely connect to your home WiFi from anywhere in the world. I was sent the AmpliFi Teleport Kit for review. While testing it, I found that setting up the Teleport device is not easy. In addition, once I got it set up, it didn’t work every time. When it did work, I could successfully access my home network and devices.

What is it?

AmpliFi Teleport provides a secure and convenient way to access resources at home, even when you are not. Utilizing any Wi-Fi hotspot or wired Ethernet connection, Teleport is able to create an encrypted connection to your home network, expanding it wherever you go.

AmpliFi Teleport Kit works in two parts – an AmpliFi HD Router runs your home network and Wi-Fi while AmpliFi Teleport, which is a portable hardware extension to the router, makes the home network and its internet connection available from a different location. (AmpliFi website)

Hardware specs

AFi-T Specifcations (Teleport)

Dimensions: 43.00 x 75.85 x 38.85 mm (1.69 x 2.95 x 1.53″)
Weight: 80 g (2.82 oz)
Max. TX Power: 19 dBm
Speed: 2.4 GHz – 300 Mbps, 5 GHz – 300 Mbps
ESD/EMP Protection: ± 24kV Air/Contact
Buttons: Reset
Antennas: (2) Dual-Band Antennas
Wi-Fi Standard: 802.11b/g/a/n
Power Save: Supported
Wireless Security WPA2-PSK AES/TKIP
Operating Temperature: 14 to 131° F (-10 to 55° C)
Operating Humidity: 5 to 95% Noncondensing
Certifcations: FCC / CE / IC
Supported Data Rates
802.11n: 6.5 Mbps to 300 Mbps (MCS0 – MCS15, HT 20/40)
802.11a: 6, 9, 12, 18, 24, 36, 48, 54 Mbps
802.11b: 1, 2, 5.5, 11 Mbps
802.11g: 6, 9, 12, 18, 24, 36, 48, 54 Mbps

AFi-R Specifcations (Router)

Dimensions: 99.5 x 97.8 x 99.6 mm (3.91 x 3.85 x 3.92″)
Weight: 410 g (14.46 oz)
Max. TX Power: 26 dBm
Radios: 2
MIMO Chains: 6
Speed: 1750 Mbps
ESD/EMP Protection: ± 24kV Air/Contact
Buttons: Reset
Antennas: (1) Dual-Band Antenna, Tri-Polarity
Display: 1.6″ (40.6 mm) Diagonal, 240 x 240, 212 ppi, G+F Touch, Full Color
Wi-Fi Standard: 802.11ac
Power Save: Supported
Wireless Security: WPA2-PSK AES/TKIP
Operating Temperature: 14 to 131° F (-10 to 55° C)
Operating Humidity: 5 to 95% Noncondensing
Certifcations: FCC / CE / IC
Supported Data Rates
802.11ac: 13 Mbps to 1300 Mbps (MCS0 – MCS9, VHT 20/40/80)
802.11n: 6.5 Mbps to 450 Mbps (MCS0 – MCS23, HT 20/40)
802.11a: 6, 9, 12, 18, 24, 36, 48, 54 Mbps
802.11b: 1, 2, 5.5, 11 Mbps
802.11g: 6, 9, 12, 18, 24, 36, 48, 54 Mbps

What’s in the box?

AmpliFi Teleport
AmpliFi HD Router
Power adapter for the router
Two Ethernet cables
Quick start guide
The AmpliFi Story

Design and features

The AmpliFi Teleport (AFi-RT) kit came with their beautifully designed AmpliFi HD Router. It is a cube-shaped router, has a full-color LDC touchscreen display, and measures 3.91″ x 3.85″ x 3.92″.The back of the router has the following ports:

  • Four Gigabit Ethernet ports to connect 10/100/1000 Mbps wired network devices to the internet
  • Ethernet port (with a blue box around it) that connects to the broadband modem provided by your ISP (Internet Service Provider)
  • USB port that is reserved for future use
  • USB-C port for the power adapter

The bottom of the router has an LED ring around the bottom perimeter of the device and a rubber ring around the perimeter of the center plastic panel containing the product details. There is also a Reset button located here.  The AmpliFi Teleport kit also came with the Teleport device. The Teleport has an LED ring on the face of it and the device measures 1.69″ x 2.95″ x 1.53″.The back of the Teleport has outlet prongs.The bottom of the Teleport has a Reset button and an Ethernet port to connect it to an outside wired network (if desired).

Setup

AmpliFi HD Router setup

The Teleport device only works with the AmpliFi router, so I needed to set up the router first. There are a couple of ways to set up the router. You can set it up using the AmpliFi app (iOS or Android) or a web browser. I chose to set it up using the Android app. (Please see the AmpliFi Teleport guide to set up the router up using a web browser.)


To set up the AmpliFi router, I installed the AmpliFi app on my Pixel 2 XL phone. NOTE: If you are using an iOS device, you need to make sure that Bluetooth is turned on, or if you are using an Android device, you must make sure that WiFi is turned on.

After launching the app, I tapped on the “Continue” button (left screenshot above) then on the “Setup AmpliFi Mesh System” button (center screenshot above). Next, I powered off my internet service provider’s (ISP) broadband modem.


Using one of the provided Ethernet cables, I connected my AT&T modem to the Ethernet port (the one with a blue box around it) on my AmpliFi router as shown in the left screenshot above. Next, I connected the power adapter to the router’s USB-C port and plugged the other end into an outlet (as shown in the middle screenshot above). Then, I powered up my ISP’s modem.


To finish setting up the router, I needed to tap on the generic name of my router within the app (left screenshot above). Then I needed to name the router (its SSID) and create its password. And finally, I clicked on “Continue” as shown in the center screenshot above.

Now you can configure the router by tapping on the router icon in the center of the app home screen. Some of the router configurations include LCD and LED brightness, AmpliFi screen night mode settings, port forwarding, setting up a guest network, band steering which allows you to connect to the optimal band (2.4 or 5 GHz), router steering which would connect you to the main router, selecting 2.4 and 5 GHz channels and width of channels, as well as enabling hardware NAT, UPnP, clone MAC address, VLAN ID, IPv6, Bridge mode, etc.

AmpliFi Teleport setup

Preparations for Teleport setup

Step 1. Enabling AmpliFi Router Remote Access: The Teleport device needed to be paired with my router and to do so, I first needed to make sure that “Remote Access” was enabled on my router.


To enable “Remote Access” I needed to tap on the Menu icon in the upper left corner of the AmpliFi app (shown in the left screenshot above) and connect to either my Google or Facebook account. I chose to connect to my Google account. And that’s all I needed to do to set up “Remote Access”.


Step 2. Test Teleport connectivity: The second step in preparation for setting up the Teleport required me to test its connectivity. In the AmpliFi app, I tapped on the Teleport icon located in the center of the app home screen. I then tapped on “Test Connectivity” as shown in the right screenshot above. After doing so, it reported that the test failed and that I needed to enable UPnP on my ISP’s modem. However, AT&T (my ISP) does not allow UPnP for security reasons. I contacted Ubiquiti about this and they informed me that I could use port forwarding instead.

Step 3. Specify the port number in the AmpliFi router settings that the Teleport will use: Before setting up port forwarding on my AT&T modem, I needed to specify a port number in the AmpliFi router settings that the Teleport was going to use. To do this, I needed to log into my router using a web browser (http://amplifi.lan). Once I was logged in, under the setting “External port for Teleport Connection”, I entered the port number that I intended on using as shown in the screenshot above. You may click on the image to view a larger size.

Step 4. Set up port forwarding on AT&T modem: Now I was ready to set up port forwarding on my AT&T modem. I followed the steps outlined here.

NOTE: The port forwarding steps appear to be identical across AT&T modems. And, once you’ve created a new “user-defined application”, don’t forget to select it in the “Applications List” and add it to the “Hosted Applications” list in the setup.

Teleport setup

Now it’s time to setup the Teleport. First, you’ll need to plug the Teleport into an outlet and wait for the LED ring to start flashing indicating it is ready to be configured.

LED status: The LED ring on the face of the Teleport reveals its status:

  • Flashing blue full circle – it is ready to be configured
  • Circulating blue circle – it is connecting to the router
  • Steady blue full circle – it is configured and connected to the router

Next, I needed to find the Teleport listed in my phone’s WiFi settings as shown above. I then tapped on it.


Then I needed to tap on the Teleport again to sign into it (left screenshot above). On the next screen, I tapped on the “Sign In” button. I then gave my Teleport a network name (SSID) and password to log into in the future (right screenshot above).


Afterward, I needed to log into a hotspot to test the Teleport at home. NOTE: you’ll need to log in to a different WiFi other than your home WiFi when testing the Teleport at home which is why I used a hotspot device as shown in the left screenshot above.

After logging into my hotspot, the Teleport rebooted as shown in the middle screenshot above. Once it was up and running again, I had to find it in the list of available WiFi devices on my phone and tap on it (as shown in the right screenshot above – the Amp TLPT).


I then tapped on it again and tapped on the “Sign In” button to sign in. When the next screen popped up as shown in the right screenshot above,  I needed to switch over to my AmpliFi app to pair it with my AmpliFi router.


Within the AmpliFi app, a screen popped up asking if I wanted to pair the Teleport to the AmpliFi router. I tapped on “Yes, Pair this Teleport”.

I then went back to the WiFi settings on my phone and saw the center screenshot above. The center screenshot shows that my phone was connected to the Teleport device which was connected to the internet through an outside WiFi network (my hotspot). It also showed that the Teleport was paired with my AmpliFi router and thus connected to my home WiFi network.

After running the “Test Connectivity” again, I found no problems.


Now I could configure the Teleport within the AmpliFi app. To do so, I tapped on the Teleport icon located in the center of the app home screen. I could then change the Teleport settings listed (as shown in the right screenshot above) which include turning on/off the LED, pausing the Teleport, or rebooting it.

Wow, the setup process was surprisingly laborious!

Use


Using the Teleport to log into an outside network for the first time:

  • Plug the Teleport into an outlet and let it boot up
  • Connect your phone to the Teleport by selecting it from your phone’s list of available WiFi networks (left screenshot above)
  • Tap on the “Sign in” button to sign the Teleport into the available outside network (right screenshot above)


  • Select the available outside WiFi (or wired) network you wish Teleport to log into (left screenshot above), enter its password (middle screenshot above), and tap on “Continue”
  • The Teleport will reboot (right screenshot above)
  • After rebooting, you’ll connect your phone to the Teleport again by selecting it from your phone’s list of available WiFi networks
  • Now you have a secure connection to your home WiFi network

Using the Teleport to log into the same outside network that was logged into the last time you used it:

  • Plug the Teleport into an outlet and let it boot up
  • Connect your phone to the Teleport by selecting it from your phone’s list of available WiFi networks
  • Now you have a secure connection to your home WiFi network

Performance

The AmpliFi WiFi router was easy to set up and worked well for me. However, it was already reviewed by Julie. So, if you want to find out more about it, please read her review here. The purpose of this review was to test the AmpliFi Teleport device (which requires the AmpliFi router to work and is the reason why I received both items).

While I was out around town trying out the Teleport device, I found that I was hampered by the limited number of available outlets. Once I found an outlet to plug the Teleport into, I then had trouble with the Teleport logging into an available outside WiFi network. It sometimes reported that the password was incorrect. This was a false error. I know this because I was able to successfully log into the WiFi network directly (without the Teleport) using the same password. Furthermore, the same problem occurred a couple of times when trying to log into different WiFi hotspots at home while testing the Teleport device.

Some of the benefits of having secure access to your home network are that you have access to your network files, local streaming content, and access to your network devices. When I did finally get the Teleport to log into an outside WiFi network, it allowed me to successfully access my home network and devices. I was able to do things like use my Fing app to do some home network maintenance and stream Netflix and Amazon videos without issues. One of the things that I wanted to do was stream TV content from my WatchAir Smart WiFi antenna which was connected to my home WiFi network. However, the streaming was very choppy and unwatchable.

What I like

  • You can access your home network and devices

What needs to be improved

  • The setup process was tedious
  • Teleport sometimes had problems logging into an available outside WiFi network (it reported that the password was incorrect when it was not)

Final thoughts

The AmpliFi Teleport is a device that creates a secure network connection to your home network from anywhere around the world thus giving you access to your home network and devices. It works only with the AmpliFi router. While the AmpliFi router is easy to setup and works well, the setup of the Teleport was tedious.

After I was able to finally complete the setup, I found that I was limited by the number of available outlets. Also, when trying to log into an outside WiFi network using the Teleport, it sometimes reported that the password was incorrect even though I know it was not.

When the Teleport did work, I was able to do things on my home network like watch Netflix and Amazon videos without issues. However, the streaming quality of TV content through my WatchAir Wifi antenna at home was horrible. Thus, I have mixed emotions about using the Teleport. Sometimes it was just too frustrating to use, but other times it worked well and I could see its usefulness especially when you are traveling far from home.

Price: $208.05
Where to buy: Amazon
Source: The product used in this review was provided by AmpliFi.

The post AmpliFi Teleport (AFi-RT) review appeared first on The Gadgeteer.

Filed in categories: Reviews

Tagged:

AmpliFi Teleport (AFi-RT) review originally appeared on The Gadgeteer on May 11, 2018 at 2:16 pm.

Note: If you are subscribed to this feed through FeedBurner, please switch to our native feed URL http://the-gadgeteer.com/feed/ in order to ensure continuous delivery.

The goTenna Mesh Devices – communicate when it counts the most!


When life decides to “throw too many lemons” our way, if you are like me, you like to go “off the grid” maybe hiking or sightseeing, and get away from the stress and the chaos of the day. It is even nicer when you can do so and just spend some time with folks within your core group of confidants. Going “off the grid”, being away from all technology, and going back to basics can be very appealing, but in the “wilderness”, with rough terrain and many other unknown dangers, communication is a must. The problem here is that in many remote areas, cell phone service is just not available, which in the case of an emergency, can make situations even more complicated and life-threatening. In addition, there are times when adventurous groups decide to split up to explore different terrain, and usually without any way for them to communicate with each other.

The goTenna Mesh devices allow anyone to create an “off the grid” mobile mesh network that offers long-range communication, and a 24-hour battery life to ensure a longer time to communicate. They are able to create a one-on-one network, or a group network, or publicly broadcast to all nearby users. With the free goTenna app that is available for IOS and Android, you can view detailed maps offline for almost any region in the world. Once you pair the goTenna mesh to your cell phone, you can automatically send text messages and GPS locations between devices without the need for any additional equipment or service.

If you are planning your next “off the grid” trip or you want to take a better look at the goTenna mesh device, head over to Amazon and check it out. You can also purchase it there for $178.99 for a pair.

The post The goTenna Mesh Devices – communicate when it counts the most! appeared first on The Gadgeteer.

Filed in categories: News

Tagged:

The goTenna Mesh Devices – communicate when it counts the most! originally appeared on The Gadgeteer on May 11, 2018 at 9:00 am.

Note: If you are subscribed to this feed through FeedBurner, please switch to our native feed URL http://the-gadgeteer.com/feed/ in order to ensure continuous delivery.

Comtrend PG-9172PoE/PG-9172PT Powerline Adapters with G.hn Technology review

What is it?

The Comtrend PG-9172PoE/PG-9172PT Powerline Adapters with G.hn technology provides network access in areas where it may be difficult to run network cables, to add data jacks, or access points. It utilizes existing electrical lines to extend the network, and it supports PoE- Power over Ethernet-enabled devices. It can also support devices that have their own power but need a network connection. Using the Comtrend also cuts installation costs and time, since the cable runs are not needed. Its G.hn technology manages any interference from the electrical wiring that can be caused by other appliances and equipment that are being used within the same or surrounding environment.

What’s in the box

Each adapter is sold separately and comes with:
1 x PG-9172PT or 1 x PG-9172PoE
2 x CAT5e Network cables
2 x Instruction booklets

Design and features

The Comtrend Powerline PG-9172PT module connects to your router or switch and it functions as the transmitter. Once you connect it with the included network cable to your router or switch and plug it into an electrical wall outlet, it powers up and immediately begins the process of connecting to your network. There are 3 LED indicators on the module for connection, network and security. It is recommended that the security option be used, and I installed and tested both secured and unsecured and both modes worked. There is also a pass thru electrical outlet on the module.


The second module the PG-9172PoE is the receiver module that you plug into the wall outlet in the room/area where you want to add the network connection. Depressing the “config” button for 3 to 5 seconds initiates the setup and connection to the transmitter.

On the first attempt, I plugged the receiver module into an extension cord despite the warning in the instructions not to do so. And just as should be expected, I had a bit of a difficult time getting the modules to connect. Once they did connect, I plugged in a Roku streaming box and it took some time for the Roku to recognize the network connection. The picture produced on the TV was just horrible reception. I then plugged the PG-9172PoE receiver module out of the extension cord and plugged it directly into the wall outlet. It immediately connected with the PG-9172PT transmitter, and the picture the Roku then produced was perfect. I also tried plugging in my Lorex PoE security camera, and that worked immediately as well.

For my last test, I was curious about the network speed at the receiver and how it compared to the WIFI signal in the house. My data plan is 20Mbps upstream and 300Mbps downstream. However, because of my location in relation to a core ISP site, I usually get even better numbers.
First, I connected my laptop wirelessly to my router and using the speedtest.net website, I ran a speed test. Here is the result:

Next, I disconnected the laptop from the wireless network and plugged in the network cable from the PG-9172PoE receiver and ran another speed test. Here is the result:

As you can see, the downstream speed of the modules is less than a quarter of the speed of the wireless connection, and slightly less than the upstream. However, both the upstream and downstream speeds were more than enough for any network, and any streaming of security cameras or media boxes.

What I like

I love the convenience of the Comtrend kit. The connection speed is more than enough for most uses, and the ability to add a network connection this easily to an area that would otherwise present much difficulty to do so, is just a great plus. No matter how many times I plugged out from the receiver and then plugged back in, the connection was always “up” and consistent. Both modules are lightweight and attractive enough that they blend right into any décor and as far as technology goes, in my opinion they are aesthetically attractive.

What can be improved

The only thing I would like to see improved is the ability for the Comtrend to provide even faster network downstream speeds, but this may differ by location and structural characteristics within the environment, and may not actually be a factor that needs improvement.

Final thoughts

I really like the Comtrend G.hn Powerline adapters and they have already become a permanent addition to my network. The stability of its network connection and the versatility that it adds to a network make it a winner all around. I can see myself buying at least another PG-9172PoE receiver module for an additional PoE camera that I want to add to my security network in another area of my house where adding network cabling is just a headache. Simply put, the Comtrend Kit just works.

Price: $49.99 for each module
Where to buy: Comtrend Powerline PG-9172PT on Amazon, Comtrend Powerline PG-9172PoE on Amazon
Source: The sample for this review was provided by Comtrend

The post Comtrend PG-9172PoE/PG-9172PT Powerline Adapters with G.hn Technology review appeared first on The Gadgeteer.

Filed in categories: Reviews

Tagged: ,

Comtrend PG-9172PoE/PG-9172PT Powerline Adapters with G.hn Technology review originally appeared on The Gadgeteer on April 13, 2018 at 9:00 am.

Note: If you are subscribed to this feed through FeedBurner, please switch to our native feed URL http://the-gadgeteer.com/feed/ in order to ensure continuous delivery.