Ooni 12″ Perforated Pizza Peel review

REVIEW – In the last year, I’ve been fortunate enough to review two great outdoor pizza ovens from Ooni, the Ooni 3 and Koda. Recently, they introduced a new pizza peel, and they were kind enough to send me one. So let’s take a look at the new Ooni 12” perforated pizza peel.

What is it?

The Ooni 12” perforated pizza peel is a lightweight aluminum peel for sliding, turning and retrieving pizzas from your Ooni pizza oven.

What’s in the box?

  • 1 – Ooni 12″ Perforated Pizza Peel

Design and features

The pizza peel is made of lightweight aluminum and has a 12” long glass-reinforced nylon handle. Despite being lightweight, the peel has a very sturdy construction. So you won’t have to worry about dropping your pizza on your way out to the oven, even if you get a little generous with the toppings.

The peels anodized aluminum blade is 12-inches wide, making it perfect to use with the Ooni 3 and Koda ovens.

The peels tapered edge makes it easy to slide right under the base of the pizza without damaging it.

The hard smooth surface keeps your pizza from sticking to the peel, making it easier to launch and retrieve pizza from your oven. It also makes it easier to turn the pizza during the cooking process. The pizza literally slides right off.

The peel’s perforations allow for excess flour and semolina to fall away from the bottom of your pizza before sliding it into the oven. The perforations also keep steam from building up on the base of your pizza. Assuring the bottom of your pizza will turn out perfect every time.

The 12” handle gives you more control when launching, turning, and retrieving your pizza. And it keeps you from getting to close to the 800° oven. 

Just for a little comparison, I had been using Ooni’s Classic pizza peel ($25) prior to receiving this one. Although it did the job, it’s nowhere near as functional as the 12” perforated peel. IMO this peel is a huge upgrade. And it really adds to the overall enjoyment of using your Ooni pizza oven.

What I like

  • Lightweight
  • Sturdy construction
  • 12” handle
  • Perforated blade
  • Smooth slick surface

What I’d change

  • Nothing

Final thoughts

I feel in love with this pizza peel the first time I used it. It makes every aspect of preparing your pizza easier. If you use your Ooni pizza oven as much as I do then the Ooni 12” perforated pizza peel is definitely worth the upgrade.

Price: $60.00
Where to buy: Ooni
Source: The sample for this review was provided by Ooni.

Filed in categories: Reviews

Tagged: ,

Ooni 12″ Perforated Pizza Peel review originally appeared on The Gadgeteer on July 24, 2019 at 9:00 am.

Note: If you are subscribed to this feed through FeedBurner, please switch to our native feed URL http://the-gadgeteer.com/feed/ in order to ensure continuous delivery.

Cosori Premium 5.8-Quart Air Fryer review

REVIEW – Fried okra?  Yes, please!  Chicken-fried steak?  Of course!  Fried chicken?  You betcha!  When it comes to home cooking, it seems that I’m a bit of Southern boy.  But while I love fried foods, I don’t like cleaning up the mess that frying makes, and I really shouldn’t be consuming all that oil.  What I need is a way to fry foods without frying them in oil, and so I’m hoping that Cosori’s air fryer is just the gadget to make this happen.

What is it?

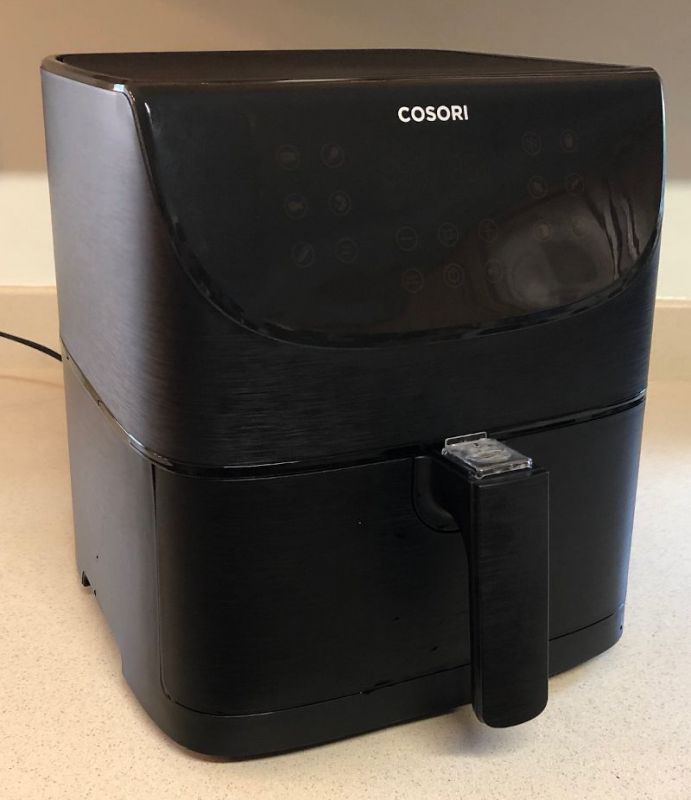
Cosori’s Air Fryer (model number CP158-AF) is a kitchen appliance that “fries” by rapidly circulating hot air around food.  This air fryer is not actually a fryer, at least not in the traditional sense of the word; rather, it’s a smaller version of a convection oven.  Convection technology is what allows it to cook food faster than a conventional oven while using a lot less heat, and though it sometimes uses oil, it uses far less than a deep-fryer.  According to Cosori’s manual, their air fryer “uses rapid 360° air circulation technology to cook with little to no oil for quick, crispy, delicious food with 75% few calories than deep fryers.”

What’s in the box?

  • The air fryer
  • A user manual with 18 pages of instructions in English
  • A recipe book with over 100 recipes for the air fryer, including breakfast, entrees, appetizers, sides, and desserts
  • A reference guide with handy shortcuts
  • A thank you card that includes contact information for Cosori’s Support Team

Hardware specs

  • Temp Range: 170-400°F (77-205°C)
  • Time Range: 1–60 minutes
  • Power: 1700W
  • Capacity: 5.8 qt
  • Dimensions:  13 in tall, 11 in wide, 11 in deep (+3 in for the handle)

Design and features

The Cosori Air Fryer is a fairly typical size for a kitchen appliance; it’s about the same as our Instant Pot and our Gourmia ice cream maker.  It’s made of black plastic—white and red colors are also available—except for the baskets, which are metal.  It’s surprisingly light weight, yet it doesn’t seem cheap or flimsy.

Installation and setup

To set up the fryer, I removed the warning stickers from the outside and the various packing materials from the inside.  As I skimmed through the manual, I noted even more warnings, so I decided to read the entire manual slowly and carefully.  It is very well written, and the instructions are quite clear.  One thing that stood out to me is the plethora of warnings about getting burned or starting fires.  Here are a few examples:

  • Do not touch hot surfaces.
  • Do not block any ventilation openings.  Hot steam is released through air outlets.
  • Do not place your air fryer near gas burners.
  • Never fill the baskets with oil or fat.
  • Do not place cardboard into your air fryer.
  • Keep your air fryer away from flammable materials.

While some of these are mildly humorous, they are a good reminder that this gadget gets very hot, and if I’m not careful, I could get burned or cause a fire.  If you have little kids at home, you’re going to want to spend extra time training them to leave this appliance alone and put it a location where they can’t touch it or pull on the power cord.  We put ours on a counter facing away from the wall and placed a large, ceramic hot pad in front of it.

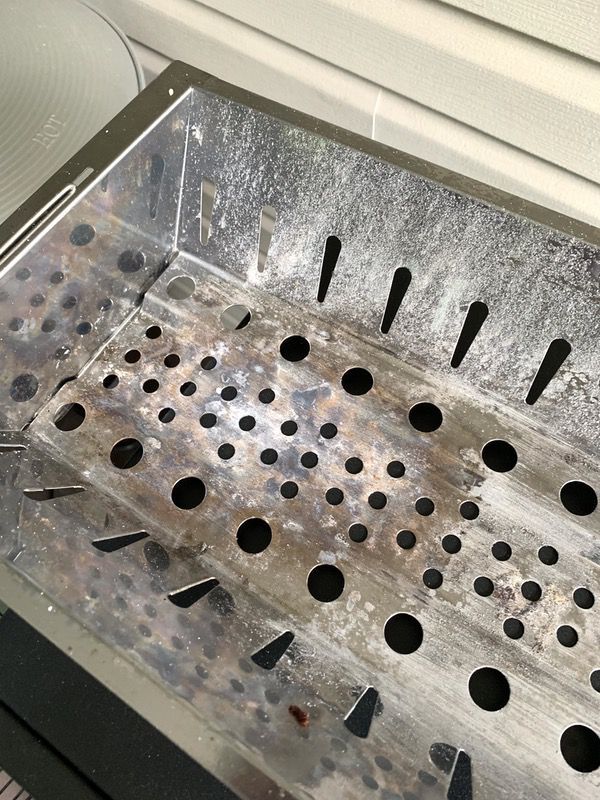
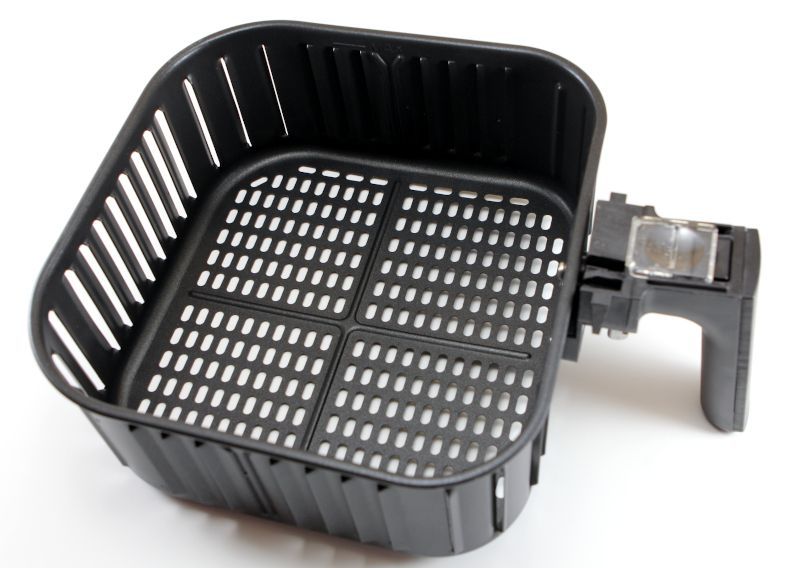
Many of the instructions were about the unique basket-in-a-basket system that is used to hold the foods while frying.  The inner basket is where the food goes, and it has a lot of holes, like a colander.  It sits in and just above the outer basket, which is used to catch any oil or grease that drops from the food.  This is nice, as it prevents the food from cooking in and soaking up extra oil or grease.

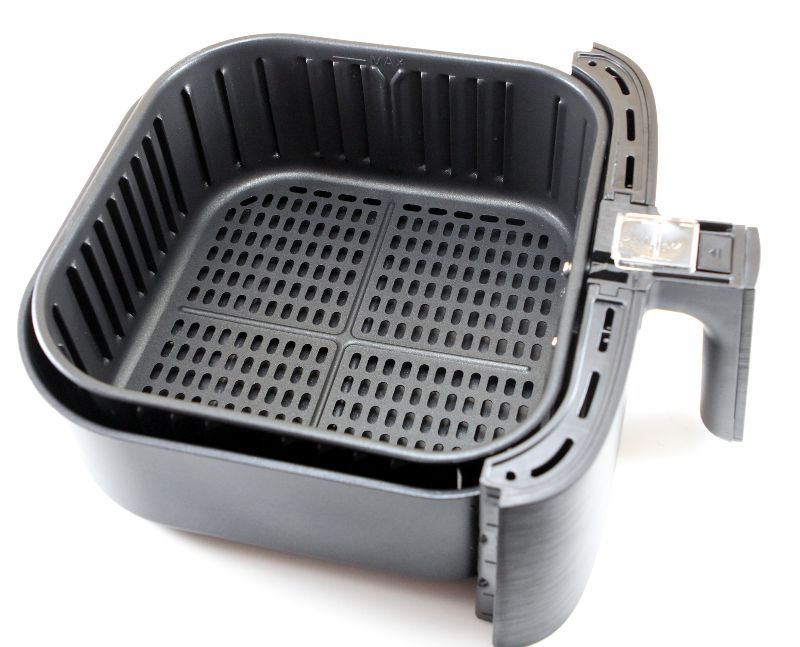
These baskets are connected, and when you pull the handle, they both come out of the fryer together.  When you slide the button guard, you can then press a button that detaches the inner basket from the outer.

When you do this, you need to make sure the outer basket is resting safely upon a heat-resistant surface, hence our ceramic hot pad, else you risk dropping it and splattering hot oil, which could be dangerous.  Once inner basket pops free from the outer basket, you can dump the food into a serving bowl or use a spatula to serve it onto a plate.

Once the basket was removed, I looked inside to see how the food was heated.  There was a heating coil, reminiscent of the coils on old stoves, and a fan, pretty much what is expected of a convection oven.

Chicken Nuggets

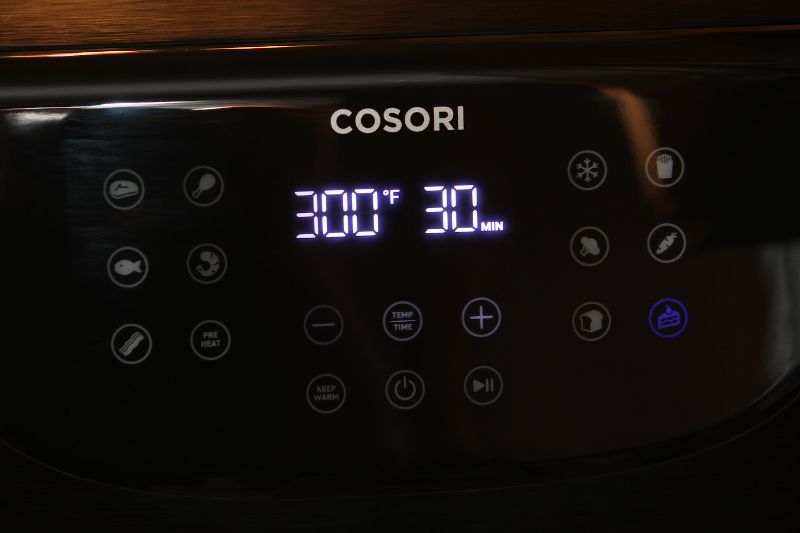
In order to test the fryer, we decided to start simple, so my wife bought a package of frozen chicken nuggets, Kirkwood’s “Fully Cooked Waffle Flavored Chicken Bites.”  First, we used the default Preheat setting to preheat the fryer.  The default value is 400°F for 5 minutes, but both the time and temperature are adjustable if desired.  Second, we put the nuggets, still frozen, into the basket and inserted it into the fryer.  Third, we selected the Frozen preset.  This setting is 350°F for 10 minutes, and half way through it gave a reminder to remove the basket and shake the contents up, which allows the food to heat more evenly.  Many if not most of the foods that we fried needed to be shaken at the half way point to ensure even cooking. The result was a wonderful bowl of chicken nuggets.  They were crispy and lightly-browned on the outside and heated all the way through on the inside.  After seeing how convenient this is, I’m thinking that anyone with a toddler at home should probably be putting this air fryer on their Christmas list.

Tater Tots

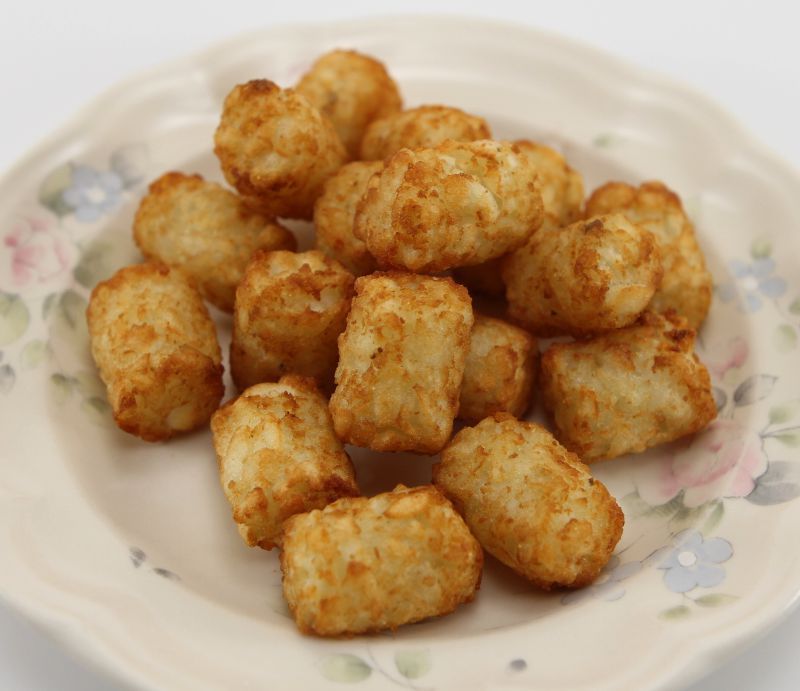
Our second test was also a simple test.  For breakfast, we decided to test the fryer on some Season’s Choice Potato Puffs, more commonly known as tater tots.  We preheated the fryer and chose the Frozen preset, but as these values are also adjustable, my wife lowered the time to cook from 10 minutes to 8 minutes, just to see what would happen.  The results were much the same as the nuggets, although we agreed that they probably should have been fried the entire 10 minutes, as some were still a wee bit undercooked.

Grilled-Cheese Sandwiches

For our third test, we slightly increased the difficulty.  Looking through the recipe book, we found a recipe for grilled-cheese sandwiches.  It was simply bread buttered on both sides with cheese in the middle.  We used the Bread preset, which is 320°F for 8 minutes.  The results were mixed.  On the one hand, the bread was toasted and the cheese was melted, making for a delicious sandwich; on the other hand, the bread was a bit too toasted for our preferences, and one side was quite a bit crispier than the other.  I think we can fix these issues by reducing the cook time to 6 minutes and by rotating the bread half way through.  My wife observed that rotating the bread was a bit harder in the fryer basket than in the omelet pan we normally use for this recipe, simply because the sides of the basket are much taller.  We agreed that while the fryer did a good job, this is a recipe that would probably be easier to do in an omelet pan or a cast iron skillet.

Quick Doughnuts

For our fourth test, my wife found an online recipe for quick air-fried doughnuts.  We started with a roll of Grand’s refrigerated biscuits, cut them into doughnut shapes, and then basted them with butter.  We dipped them in a cinnamon-and-sugar mixture and put them in the air fryer.  We tried the recommended settings from the recipe (350°F for 5 minutes), but the first batch of doughnuts were overdone.  Next, we tried it with the Bread preset (320°F for 5 minutes), and they turned out perfectly.  We also made a sugar glaze and drizzled it on top after frying.  The doughnuts were a crispy brown on the outside and light and flakey on the inside; they were so good!
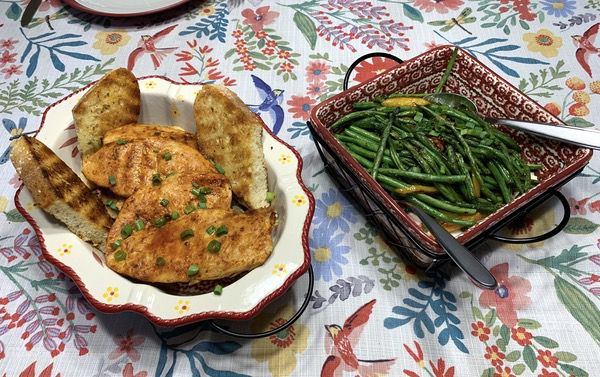
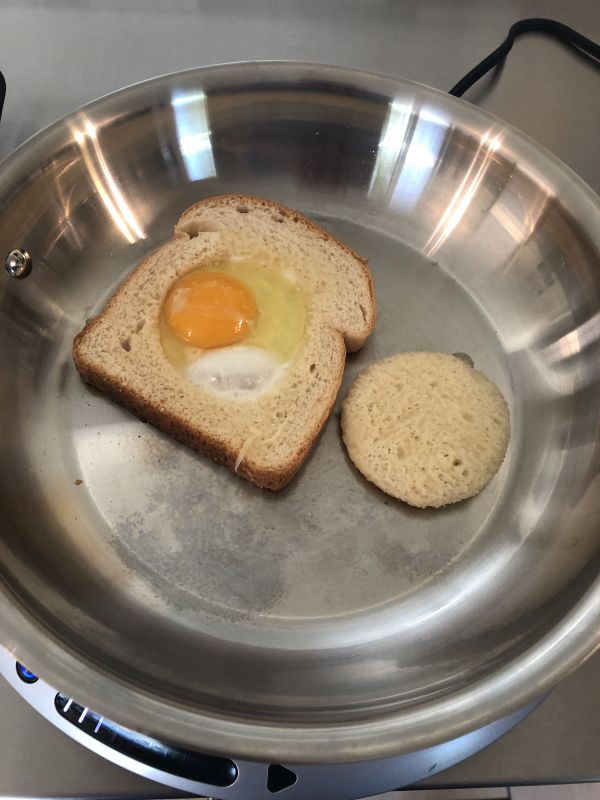
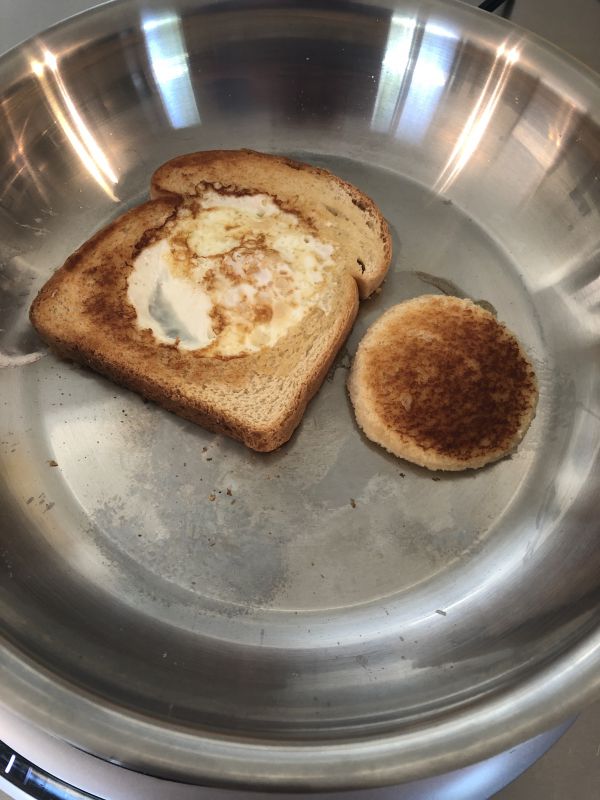
Fried Chicken

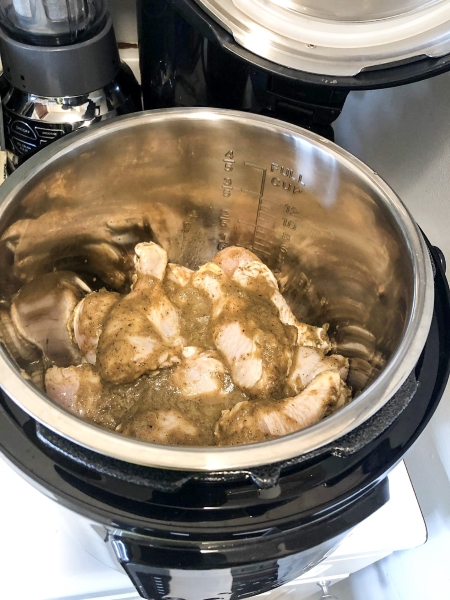
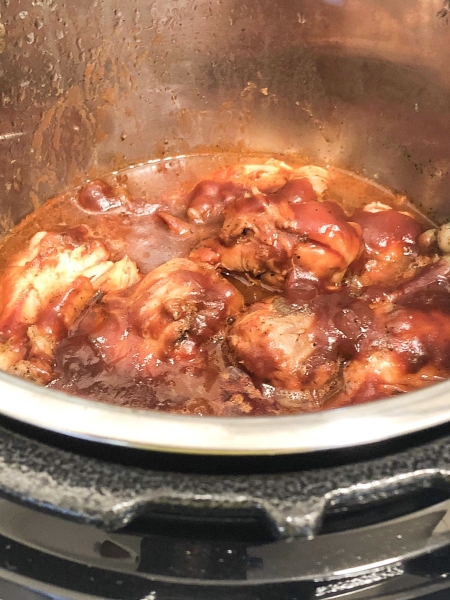
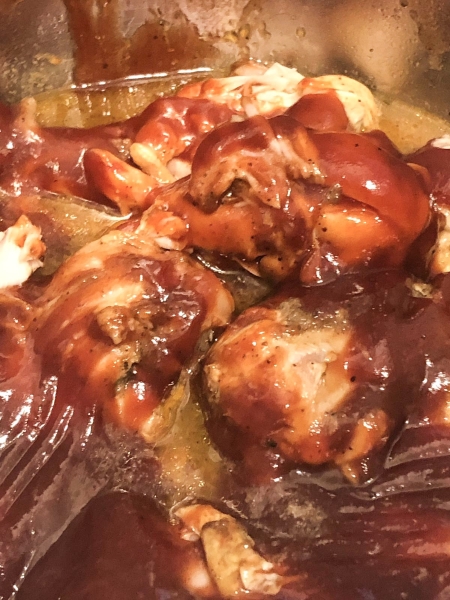
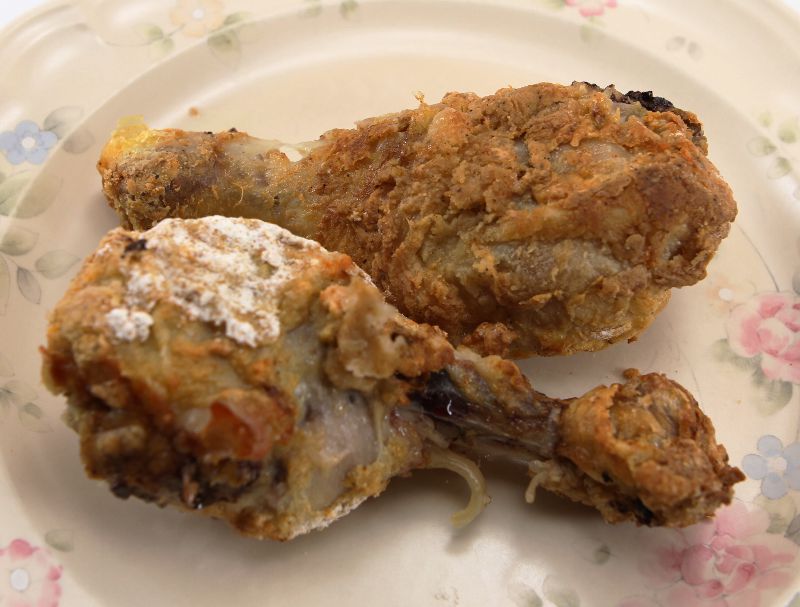
For the next test, we used another online recipe, this time for fried chicken.  My wife made breading from flour, salt, and Old Bay and then dipped chicken legs and breasts in the breading, in eggs, and then in the breading again.  She put the legs in the basket and used the Chicken preset (380°F for 25 minutes).  After 10 minutes, she turned the legs over and added the breasts.  The result was crispy, golden brown chicken on the outside that was tender and juicy on the inside.  It tasted delicious.  If you look in the picture below, you can see that some of the flour from the breading wasn’t cooked all the way, something that doesn’t normally happen with traditional frying.  We’re not sure if we added too much flour and failed to shake the excess off, or if there’s something about the air fryer that didn’t quite fry everything evenly.  In any case, it certainly didn’t stop us from enjoying some very yummy fried chicken.

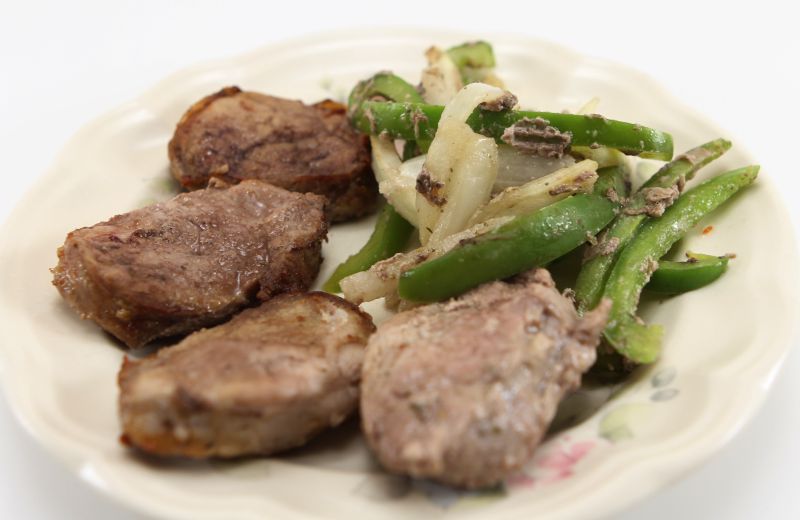
Pork Tenderloin with Peppers and Onions

For our final test, my wife found a recipe for an entrée.  I thinly sliced peppers and onions, seasoned them, and put them in the middle of a small, round baker.  I cut a pork tenderloin into slices, rubbed them with powdered mustard, salt, and pepper, and then put them over the vegetables.  I put the baker into the basket, and cooked the whole thing for 15 minutes on 350°F, pausing halfway through to mix them up.  The result was super yummy, though very different from the other tests.  The meat was tender and juicy, and the peppers and onions were soft yet slightly crunchy.  The big difference between this and the other tests was the baker, which trapped the juices and reduced the crispiness of the tenderloin slices.  This recipe really shows the flexibility of the air fryer:  It can cook foods that are typically fried, like chicken and French fries, yet it can also cook like a traditional oven (in half the time).  If you were concerned that an air fryer can only fry less-than-healthy foods, then rest assured that you can cook a whole variety of meats, vegetables, and other foods and eat as healthy as you want.

We also made a variety of other dishes that I haven’t cataloged here, including smores, bacon and eggs, cinnamon rolls, and potato chips.

Cleanup

Cleanup is pretty simple.  The two baskets have to be washed, either by putting them in the dishwater—they do take up a lot of space—or by washing them by hand.  If you do the later, don’t use anything abrasive, like steel wool, as this could damage the non-stick surface of the baskets.  Using a washcloth that is damp with hot water, wipe down the inside of the fryer, just in case any oil splashed around.  That’s it.

Safety Features

The air fryer has several safety features that are designed to make sure accidents don’t happen.  I appreciate Cosori’s attention to detail when it comes to safety.

  • There’s a button guard over the button that releases the inner basket.
  • When the baskets are withdrawn from the fryer, it automatically stops frying.
  • If the fryer is inactive for 3 minutes, it will automatically shut down.
  • If the fryer overheats, it will automatically shut down.

Other Features

The baskets on this fryer are 5.8 quarts in size, which is pretty big.  It’s easily big enough to serve a dish for 2 people, and for most things it’s probably big enough to serve 4.  If you don’t need such a large fryer, Cosori also makes one that is only 3.7 quarts.  For our family, we are super happy with the larger size.

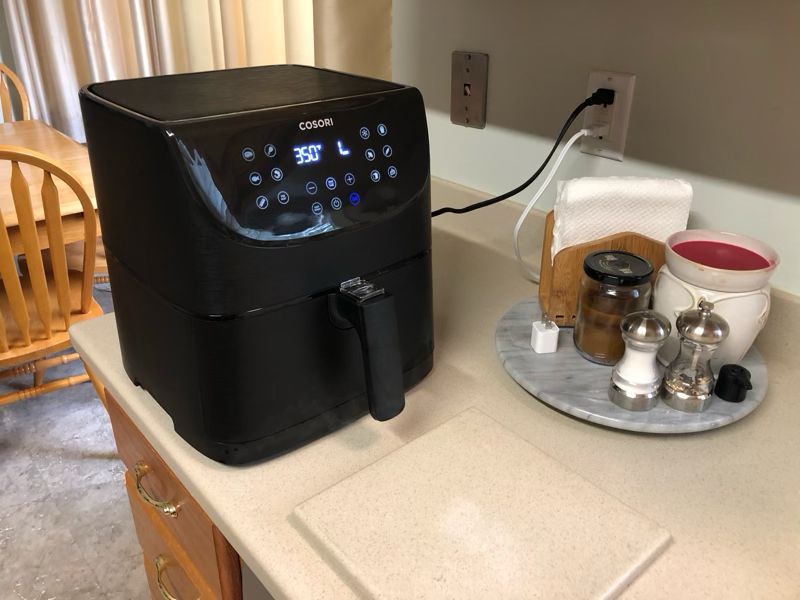
The interface is a digital display along with a set of touch controls.  The display is primarily used to show the temperature and the time remaining.  Most of the controls are the presets, and each has an icon that makes it easy to remember what it’s for.  The remaining controls turn the fryer on, change the temperature and the time, pause it, and so on.  Cosori has done a nice job with this interface, as it’s really easy to use.

As mentioned previously, the air fryer works by blowing air.  There’s a sizable fan inside, and I can definitely tell when it’s on.  It’s nowhere near as loud as a handheld vacuum cleaner, though louder than our ice cream maker.  Probably it’s just softer than our microwave oven.

What I like

  • It cooks fast and uses less heat than the stove or oven, which is especially nice during summer.
  • It fries food without using lots of oil.
  • It’s easy to use, easy to cleanup, and machine washable.
  • Lots of recipes to try that use an air fryer, both in the included cookbook and online.
  • Everything we tried was delicious!

What I’d change

  • I can’t think of anything.

Final thoughts

Our family is very glad that we got this chance to test out Cosori’s Air Fryer.  It’s quick to cook, easy to use, and easy to clean.  If you enjoy fried foods as much as we do, or you’re looking for a simple way to cook without heating up your kitchen with the stove, you should consider purchasing Cosori’s fryer.  Our family plans on enjoying this one for years to come!

Price: $119.99
Where to buy:  Cosori’s Online Store and Amazon
Source: The sample for this review was provided by Cosori.

Filed in categories: Reviews

Tagged: , ,

Cosori Premium 5.8-Quart Air Fryer review originally appeared on The Gadgeteer on July 21, 2019 at 11:00 am.

Note: If you are subscribed to this feed through FeedBurner, please switch to our native feed URL http://the-gadgeteer.com/feed/ in order to ensure continuous delivery.

Deenkee 10 in 1 Pressure Instant Pot review

REVIEW – I can remember a time not too long ago when I would spend hours in the kitchen preparing that special meal for my wife, or for guests on occasion when I was in the mood to do the cooking. Some of the Caribbean dishes I would cook involve processes of preparing several individual ingredients prior to creating the main dish. On many occasions, just the thought of the long process and work would make me suggest eating out and saving myself the experience. These days, appliances have been invented that do the work of many processes in a simple and easy way. The Deenkee 10 in 1 Pressure Instant Pot is a good example of such an appliance.

What is it?

This DEENKEE 6Qt. Pressure Cooker is a programmable kitchen appliance that incorporates features like a large LED display and an easy to use interface to easily adjust cooking settings and pressure levels or to stop/cancel the cooking process at any time. It replaces 10 common kitchen appliances and cooks food up to 70% faster than traditional cooking methods. It also features a one-button pressure release, a detachable carrying handle and a glass lid for the inner pot. It is ETL, FCC, & FDA certified.

What’s in the box


1 x Deenkee 10 in 1 Pressure Instant Pot
1 x Spoon
1 x Ladle
1 x Measuring Cup
1 x Glass lid
1 x Sealing Ring
1 x User Manual
1 x Steam Rack
1 x Recipe Book

Design and features

Specifications:
Voltage: AC 220V / 50Hz
Rated Power: 1000W
Capacity: 6 qt (6 Liters)

Features:

  • 10-1 Muti-Function: Deenkee gives you the flexibility to manually input cooking times when required and you also have the pre-programmed smart programs already set for many dishes such as Oatmeal, Broth/Soup, Poultry, Yogurt, Egg, Beans/Chilli, Rice, Pressure Cook (Manual Setting), Meat/Stew, Cake. Slow Cook, Steam, Saute, Canning & Multi-Grain so all of your favorite dishes are as easy as pressing a button
  • Healthy and Built to last: Ceramic non-stick interior coating, plastic PTFE and PFOA free for even heat distribution, fully sealed environment seals in the flavors, nutrients and aromas within the food to Healthy, stainless steel (18/10) inner cooking pot made from food grade 304 ss, no chemical coating, 3-ply bottom for even heat distribution, fully sealed environment traps the flavors, nutrients and aromas within the food
  • Safety: Safety locking lid, Automatic pressure control, Electrical Current & Temperature fuse, Pressure regulation system, Smart locking sensors, Anti-Block shield, Automatic temperature control, Pressure protection system, Heat resistant cooking mitts, Temperature monitor.
  • Accessory Kit: Included is a tempered glass lid (perfect for slow cooking and sautéing) 2 egg racks/steaming trivets, ladle, rice paddle, cooking mitts, extra silicone sealing ring, stainless steel steaming basket, stainless steel inner cooking pot, and a measuring cup
    On the top of the Instant Pot, there is the lid handle with the red pressure release button partially underneath it, and the pressure release valve off to the side.

    On the back of the lid, there is the hinge.

Performance

This Instant Pot is well built with stainless steel around the middle and a heavy-duty plastic lid and base. The control panel on the front is easy to read and navigate.

Since it comes fully assembled, I will not get into describing some of the smaller parts under the lid, but that information is available in the manual.

The Instant Pot has a stainless steel removable inner pot where you place the ingredients to be cooked. The control panel has preset buttons that provide preset cooking times for specific dishes and ingredients. I am initially from the Caribbean, and most of the dishes we cook in my home have their own Caribbean twist and flair. So, when we first tried the Instant Pot we used the preset settings and once we determined how the dish turned out, we adjusted the cooking time to suit what we wanted.

Below are some before and after photos of one of our dishes. It is a version of baked chicken with BBQ sauce.


Below are the ingredients for a traditional Caribbean dish called Cook-Up.

Below you see the served dish of the meal prepared above.

What I like

  • The build quality
  • The versatility/cooking options
  • The end results

What I’d change

    • It does what it is designed to do

Final thoughts

The Deenkee 10 in 1 Pressure Instant Pot is a really great appliance that incorporates so much functionality that with practice you can prepare a large variety of meals. The reason I say practice, is that once you get the process down, you have to figure out the cooking times and which setting works best for the dish you are preparing. In my opinion, the preset times serve as a general reference time. This can only be perfected with frequent use and trial and error. The build quality is great and I am sure that barring any unforeseen issue, that this appliance will be in my kitchen for years. I give it a well done and two thumbs up!!

Price: $95.99
Where to buy: Amazon
Sample: The sample for this review was provided by Deenkee.

Filed in categories: Reviews

Tagged: , ,

Deenkee 10 in 1 Pressure Instant Pot review originally appeared on The Gadgeteer on July 19, 2019 at 10:00 am.

Note: If you are subscribed to this feed through FeedBurner, please switch to our native feed URL http://the-gadgeteer.com/feed/ in order to ensure continuous delivery.

Uten Barbecue Charcoal Grill review

REVIEW – Take your charcoal grill on the road! This week we’re checking out the Uten Barbecue Charcoal Grill, It’s a lightweight & portable design made for transporting to the campsite, the beach, or the park. How does it hold up to the testing? To the review!

What is it?

It’s an open-styule portable charcoal grill.

What’s in the box?

You’ll get the grill with a full-length charcoal basket, 2 grill grates, 1 griddle plate, 2 removable side baskets, and 4 detachable legs.

Hardware specs

  • Dual vent design
  • 14.65 pounds
  • 31.6” by 12.6” by 27” tall fully assembled

Design and features

The Uten Barbecue Charcoal Grill is a lightweight portable cooker. Weighing in at just under 15 pounds with detachable legs, the 31.6″ by 12.6″ by 6″ footprint (with the legs removed) is very packing friendly. You con’t find any assembly instructions, but you won’t need them. There are 10 total parts to the unit. You have 4 legs that use spring-tabs to pop into the leg brackets on each corner of the fire box:

A pair of wire side baskets hook into each side of the grill: 

Drop the aluminum charcoal tray into the fire box, and add your grill grates and/or griddle tray, and you’re in business. With about 2 minutes of work you’ll have almost 400 square inches of cooking area to work with. I’m estimating that to handle 8-10 burger patties, 8 decent sized boneless chicken breasts, or a whole heap of hot dogs.

There are some quality issues that come with grills on the cheaper end of the scale, and you’ll find them here. The shot below is from the underside of the firebox, which has a two-part floor. See how the two floor components don’t line up? It doesn’t impact performance, but it’s a bad bit of quality control.

Here’s another weird bit. The charcoal tray was covered with a blue film to protect it during shipping. It looks like that film was put on before finishing the seams of the tray, so you can’t completely peel it off. I got most of it with a knife, but had to burn the rest off before the first cook.

Despite those issues, it looks like a fairly solid camp grill. Let’s fire it up and see what happens!

Performance

So we moved the grill down to the patio to get cooking. Even though it’s a lightweight build, it’s surprisingly stable when set up. Those legs brackets with the spring post locking mechanisms are tight, and the legs are splayed slightly to add a bit of extra stability. Rubber feet on the bottom of the legs provide a bit of extra grip, too. I wouldn’t want the kiddos or pets running around it, but it’s stable enough for safe use on unstable surfaces like grass, sand & dirt.

The side baskets are useful for holding your assorted accessories, and the inclusion of two baskets is a nice touch. I really like that there are 6 hooks (3 on each side) for hanging tools and gloves.

We fired up a chimney of lump charcoal for purposes of our test. For those that don’t know, lump charcoal burns hotter and faster than composite briquettes. Our chimney gave us a thin layer of charcoal across the length of the fire basket.

For this cook we’re using the griddle to saute up some green beans & peppers marinated in olive oil, melted butter, and garlic. The griddle is firmly nestled in the firebox, so it’s not prone to slipping around during use. It’s also got a nice thickness to it, so it distributes the heat evenly. Note that the griddle does have ridges, so it’s not ideal for frying eggs or pancakes.

We grilled some chicken breasts dry-rubbed with a blackening spice on direct heat using the grill grates. The grill grates are aluminum, and typical of what you see in lower cost grills with respect to thickness. I think they’ll hold up just fine with proper care. They don’t lock in tightly like the griddle does, however, so you’ll want to be careful moving your food around, or the grill grate could slide on you a bit. I’d probably want to figure out a modification to fix this for long-term safety.

We finished things off with some toasted garlic bread over the coals, switching out the griddle for the other grill grate.

Here’s the finished product. While I only used one chimney of charcoal, the grill has nice venting on the sides to help maintain heat. The griddle side was plenty hot enough to provide a steady saute for 15-20 minutes to let the beans cook through without burning. We got good grill marks on the chicken on a relatively slow cook as well.

Once cooking was done, we took a look at how the grill held up. Cleaning is a problem because that two-piece bottom creates a big seam down the middle. I was able to get to a lot of it with my brush, but there’s no port to catch ashes. You’ll need to turn it over to get all the corners cleaned. The lack of a trap for collected grease (like what you’ll find when you do burgers) is also an issue. If the coals don’t catch it, it will be difficult to clean.

The charcoal insert is showing some discoloration after one grill session, but held up pretty good to one chimney of coals.

And the griddle held up surprisingly well. Not a burn mark or discoloration to be found.

Overall I am pretty happy with the Uten Barbecue Charcoal Grill as a light duty, occasional use grill. If you’re looking for something you can toss in the car for a weekend adventure I think you’ll find this be a great solution. But we do need to talk about the fact that it’s not designed for heavy use.

All of the materials in the build are relatively thin, and there’s no buffer between the charcoal chamber and the sidewalls. I’ve seen some reviews pointing to the paint on the firebox flaking off, as well as corrosion and warping. One particular review reported an incident where the leg brackets actually melted. Given their positioning next to the side vents, I could absolutely see this happening if you completely loaded the firebox end-to-end with charcoal. That would also make the side baskets unusable as well due to the intense heat.

It’s a light-duty cooker, and won’t take the intense heat. If you fill the thing with coals soaked with lighter fluid, you’ll kill it pretty quickly (you’re not using lighter fluid to light your grill anyway, right?). But if you’re putting a chimney or two in there and loading your coals with space for the vents, I think it will last a couple of seasons with care.

What I like

  • Easy to assemble
  • Stable
  • Nice baskets & hooks for accessories
  • Good for light duty use

What I’d change

  • Construction quality has some flaws
  • Grill grates can slide around a bit
  • Difficult to clean ashes & grease out of the firebox without a trap
  • Lightweight design will not hold up to heavy heat or extended use

Final thoughts

For an occasional use outdoor grill, the Uten Barbecue Charcoal Grill is a fine solution. It’s got decent cooking area, and some nice features with side baskets and hooks that benefit you when you’re at a location where table space is at a premium. The legs are well planted and stable for use on rough surfaces, too. Just keep in mind that the construction is lightweight and not designed for high heat or regular use like a backyard grill.

Price: $65.99
Where to buy: But it on Amazon.
Source: The sample of this product was provided by Uten.

Filed in categories: Reviews

Tagged: , ,

Uten Barbecue Charcoal Grill review originally appeared on The Gadgeteer on July 11, 2019 at 1:28 pm.

Note: If you are subscribed to this feed through FeedBurner, please switch to our native feed URL http://the-gadgeteer.com/feed/ in order to ensure continuous delivery.

Hestan Cue Smart Induction Cooking System review

REVIEW – I’ve been curious about induction cooking ever since I saw a segment on a cooking show that lauded its benefits. I hadn’t really paid much attention to it but knew that it used magnets and electrical current to heat rather than using a traditional gas or electric burner as a heat source. The Hestan Cue Induction Cooking System has given me a great introduction to the process.

What is it?

The Hestan Cue is an induction “burner” with corresponding pots and pans with a wi-fi enabled cooking system that allows pre-loaded recipes to be made via step-by-step directions and video support on your connected smartphone.

What’s in the box?

  • Induction Burner
  • Instruction & Safety Manual
  • Induction Skillet
  • Instruction & Safety Manual

Design and features

The skillet and burner have a sleek modern design that fits perfectly into today’s kitchen, and especially ours with our stainless steel countertops. The skillet is stainless steel, while the burner has the plate surrounded by molded plastic. The skillet has a removable battery at the end of the handle, which also contains the wi-fi hub for communicating with the app on your smartphone. The burner connects via your standard electrical outlet and also communicates independently with the smart app.

Setup

Simply plug in the burner, download the Hestan Cue app and follow the instructions for connecting each piece to the app. Then select a recipe and start cooking.

Our first attempt was grilled chicken breasts. The app has you gather all ingredients first, then gives you step by step instructions for prepping the pan. Next, it preheats the pan to the required temperature and this doesn’t take more than 30 seconds to a minute.

As you hit “next step” it then starts cooking the dish at the required time and temperature.

It will tell you exactly when to flip the food, add more oil/seasoning/ingredients and then continue cooking.

Once complete, you remove the food and it gives you the option to make another batch and start the process all over. The chicken above came out moist and with a nice crust as well. Definitely an improvement on my grilled chicken attempts where I tend to dry it out, and without the strange texture I tend to get with my sous vide attempts. I definitely think this will be my new preferred chicken breast preparation method.

Performance

I was very happy with the overall performance of the Cue system on most everything we cooked outside of steak, where I just don’t think there’s much competition to how tender a sous vide system will get a steak. It came out overcooked and with too much of a crust for my taste. Another dish I tried and loved was their recipe for “Toad in the Hole”. Again it was a simple process of following the recipe and cooking instructions in the app, flipping once the app said to do so and then pulling from heat once done.

The eggs came out just a bit runny like we had selected and preferred and the crust on the bread was very tasty.

The only other thing I think needs to be mentioned in terms of performance is the clean-up phase of the meal. The skillet isn’t the easiest thing to get clean, as with any item where you leave food on it to cook for a fixed duration, you tend to get a lot of build-up on the pan during the cooking process even when you use oil and butter as indicated in the recipe. The manual says that it is dishwasher safe but recommends hand washing. it may be my paranoia about putting electronics in the dishwasher but I felt better about hand washing it with a soft bristle brush, so I have yet to put it in the dishwasher.

Finally, you are able to use the burner with other induction pans however you won’t be able to use the guided recipes and will need to manually adjust the temperature throughout the process to ensure proper cooking of your meal.

What I like

  • Guided cooking with great recipes
  • Fast heating, cooling, and precise temperature control
  • Ability to multi-task and not have to “watch” the pan as the app provides prompts
  • Speeds up cooking time, allowing for more family time.

What I’d change

  • More recipes in the app, it’s growing and has gotten better even in the month we’ve had it – but really want to explore more possibilities.
  • Clean-up of the skillet can be tough, but that may just come with the territory.

Final thoughts

The Hestan Cue system has opened up a new avenue for cooking quality and tasty meals in a quick time frame. Whether it’s chicken breasts, french toast, hashbrowns or bananas foster the pan was versatile and created near restaurant quality food safely and conveniently. It’s a great addition to the kitchen for anyone who wants to improve their culinary skills and make great food for their family. The price point for the skillet and burner combo is $399.99 and you can add an additional “Chef’s Pot” for $299.99 as well. It does fall on the higher end of kitchen products, but I feel the tradeoff is worth it considering the great food you’ll be able to make and the time it saves you in the kitchen overall.

Price: $399.99 for the Induction Burner and Skillet combo.
Where to buy: Hestan Cue’s Website or Amazon
Source: The sample of this product was provided by Hestan Cue.

Filed in categories: Reviews

Tagged: , ,

Hestan Cue Smart Induction Cooking System review originally appeared on The Gadgeteer on July 6, 2019 at 8:27 am.

Note: If you are subscribed to this feed through FeedBurner, please switch to our native feed URL http://the-gadgeteer.com/feed/ in order to ensure continuous delivery.