When it comes to home network security, I have a great desire to learn about the ways I can protect our home network devices and implement those protections. I recently downloaded an app called Fing to detect and keep an inventory of all the devices on my network. While doing so, I noticed that Fing had developed a network monitoring device that would allow me to not only detect all of my devices but also detect any unknown devices and block them as well. It would allow me to monitor the bandwidth used by each home device and pause internet access to bandwidth hogs. I was given the opportunity to review this device and am truly delighted with the tools it provides which help me to protect my home network.
What is it?
If you have ever used the Fing app, you know that it discovers an unlimited number of devices on the network you are connected to and provides you with network service tools like ping, traceroute, and wake-on-LAN services, but you can only use its features when you are connected to the network you wish to scan.
The Fingbox is a piece of hardware that connects to your router (thus one Fingbox works on one network) and is used with the Fing app thus allowing you to monitor your network 24/7 and unlock more features. It detects new devices on your network and alerts you to them in real time and then allows you to block them if you wish.
It also provides you with WiFi performance analyses in your home, an internet speed test, a bandwidth analysis, a digital fence (detects WiFi devices near your network), internet security scans (scans for weaknesses like open ports in your network), and allows you to schedule pauses (set a schedule to pause internet access for your kids, etc.).
NOTE: Fingbox is not a firewall. A firewall (software or hardware) scans packets of information that flow from the internet into your network to determine if the information is safe or not (e.g. malware, spyware, viruses, etc.). Identified threats are blocked from entering.
Fingbox does not do this. Fingbox “… is instead a home network security toolkit that centers around network scanning and device blocking… [it protects against] physical network hacking and Wi-Fi eavesdropping.” Physical network hacking involves someone getting within range of your WiFi network and exploiting a weakness (e.g. poor router password, an open port or an unsecured device) to connect to it. This is all accomplished from outside of the internet and thus a firewall or anti-virus software will not protect you from this type of attack (from Fing’s Network Security Tools: Firewalls vs Device Blocking).
Both lines of defense against physical attacks and attacks through the internet are important and encouraged by Fing.
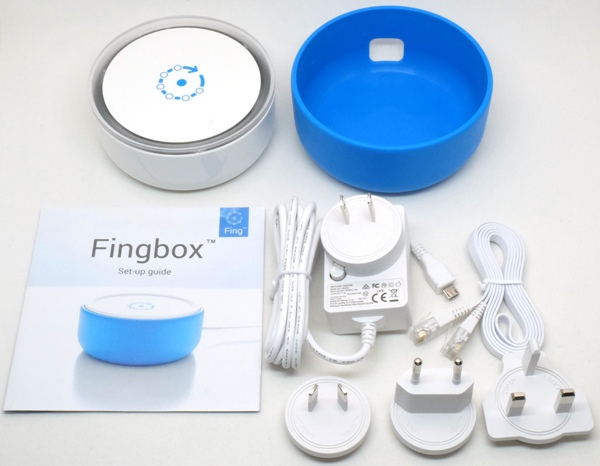
What’s in the box?
-
 Fingbox
 - Fingbox cover
- Network cable
- Power cable
- Power adapters (US, UK, EU, AU included in all Fingboxes)
- Set-up guide
Technical Specifications
- Linux Ubuntu Core OS
- ARM 7 processor
- 1 GB/s Ethernet port
- 4GB home board storage
- 512 MB RAM
- Monitoring of all wired and wireless devices on a network.
- The DigitalFence operates on the 2.4Ghz spectrum but can detect all devices because they probe all spectrums when roaming.
- 2-year warranty
- No subscription fees!
- Although Fingbox is designed to work with any existing network with a router or access point, some features (device blocking, internet pause, and bandwidth analysis) may not work with some routers, access points, or extenders. To check Fingbox compatibility with your network, please visit the Fing website (Fing’s Network Set-up Compatibility: Will Fingbox work with my existing network set-up?). NOTE: there are several links along the left side of the webpage to look through.
Design and features


The Fingbox is a simple looking short white plastic cylinder and measures about 10 cm diameter x 4 cm high (about as big as an Amazon Echo Dot). It comes with a blue silicone cover.

The bottom of the Fingbox is simple and contains general information about the device.

The back of the Fingbox contains the following ports from left to right: a reset button, a micro-USB port for power, an Ethernet port, and USB port.

The power adapter allows you to switch to the correct adapter for your country.
Setup
According to the Fing website, “Fingbox is designed to work with any existing network set-up which includes a router or access point. The box can be plugged into any router or access point on your network.” (From Network Set-up Compatibility: Will Fingbox work with my existing network set-up?). We have a modem and a separate router in our home network and the Fingbox needed to be connected to the router.
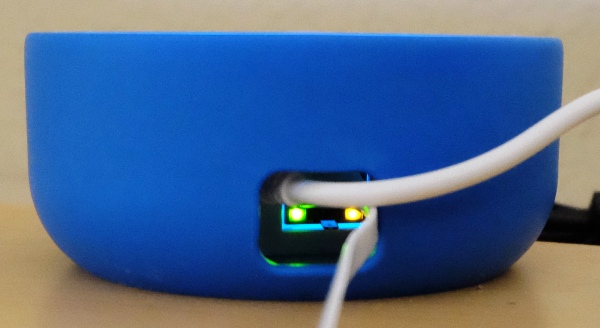
I threaded the power and Ethernet cables through the cut opening of the blue silicone cover, connected the power cord and Ethernet cable to the Fingbox and then placed the Fingbox inside its cover.
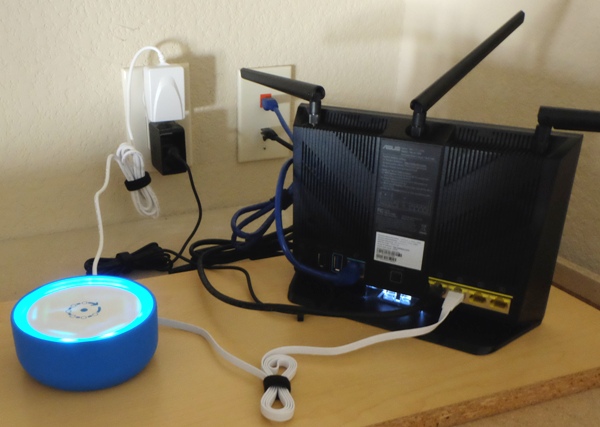
I plugged the other end of the Ethernet cable into an available spot on my router. The blue Ethernet cable is the line that comes from our modem and connects to the back of our router and provides our house with internet access.

The Fingbox has a variety of LED status lights. A steady/continuous blue ring means that the Fingbox is operating normally. The following table explains what all the LED status lights mean (CW = clockwise, CCW = counterclockwise). See Fing’s LED Light Guide for more information.
| Color | Motion | Meaning |
|---|---|---|
| White | Single light | Powering up |
| Green | Pulsing | Ready for activation |
| Blue | Steady/Continious | Normal Operation. This is the new LED quiet mode which is enabled by default during onboarding. |
| Blue | Half-circles alternating | New devices detected: open Fing app (4th tab) to recognize or block them! |
| Blue Green | Spinning CW | Bandwidth Analysis running |
| Blue | Spinning CCW | Internet Speed Test (uploading) |
| Blue | Opposite lights spinning CW | WiFi Speed Test |
| Blue | Sides pulsing | DigitalFence sensing |
| Blue | Sides pulsing | Change received (e.g. when blocking a device) |
| Pink | Steady, dark pulse every 3s | Security Alert! Please open the app (4th tab) and check |
| Orange/Red | Pulsing | Internet unreachable for more than 5 minutes. Please check Fingbox cable and ISP modem/router |
| Yellow | Spinning CW | Upgrade in progress |
Fing app and Fingbox features
I downloaded the Fing app several weeks before I received the Fingbox (it will provide you with a device inventory and basic tools without the Fingbox), set up an account (by doing this you will be able to backup, sync, and identify device models on your network), and labeled all of my known devices.
NOTE: The following screenshots may be clicked on to view a larger size.
Then after having set up the Fingbox near my router, I went into the app…
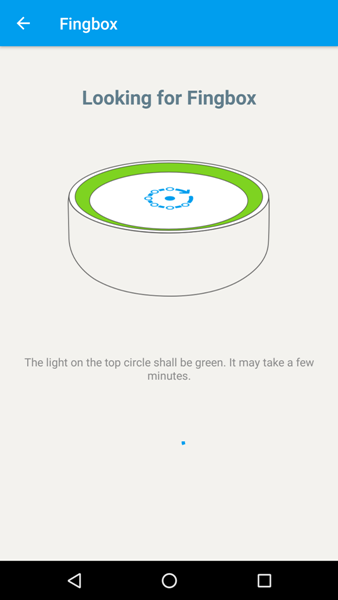
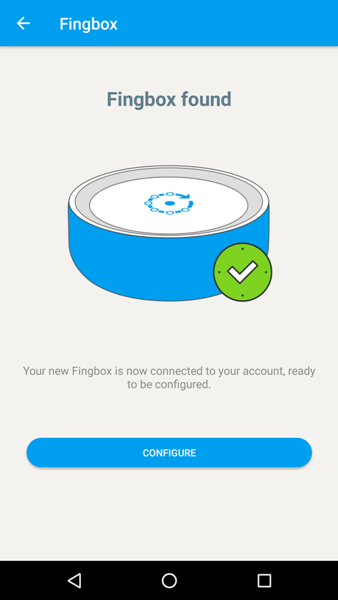
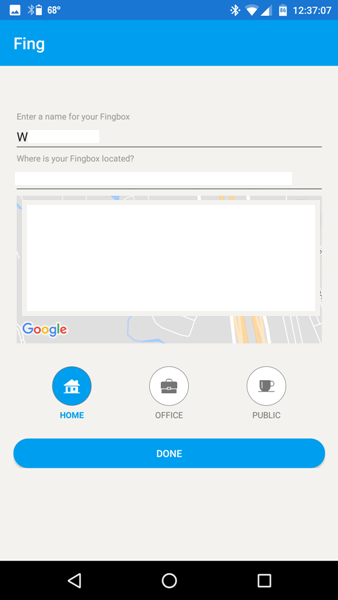
… tapped on the Fingbox tab located on the lower right of my app screen, tapped on the Fingbox “+” icon in the upper right corner of the app, after which it searched and found my Fingbox. I then named it and set its location.
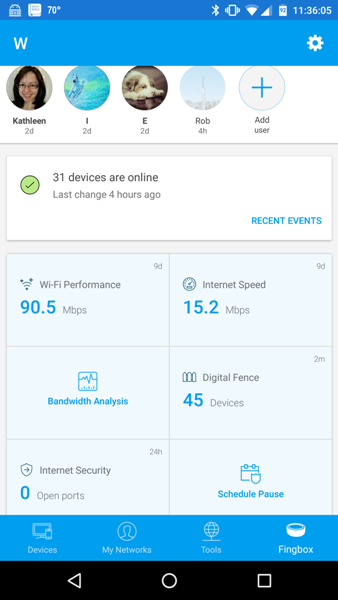
The Fing app and Fingbox provide a lot of tools and features to monitor your network and keep it safe. There are four tabs located at the bottom of the Fing app: “Devices”, “My Network”, “Tools”, and “Fingbox”. I will start by describing the Fingbox tab and all the features there and then move on to the other tabs.
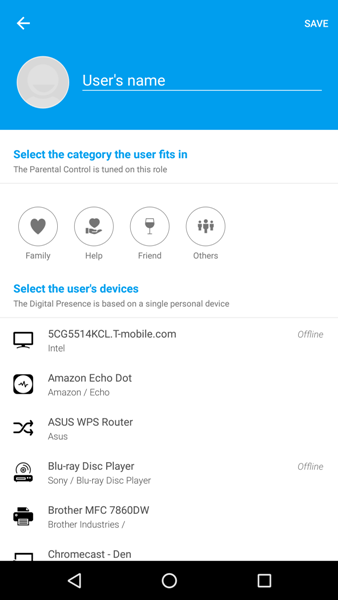
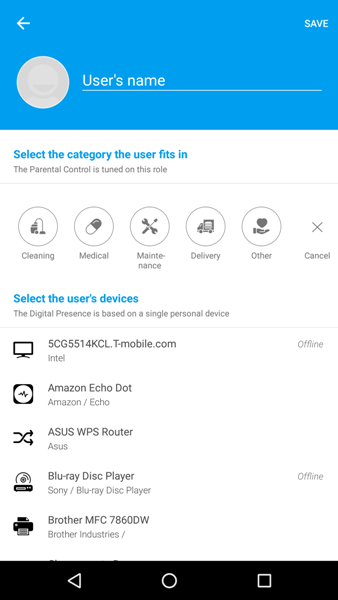
Fingbox tab – setting up users: In the Fing app, I tapped on the “Fingbox” tab, to set up the users on our network. I did that by tapping on “Add user” located near the top of the screen which brought me to my contacts list where I could select the person. If you want to add a different user, you would tap on “Create custom user” which would allow you to type in their name.
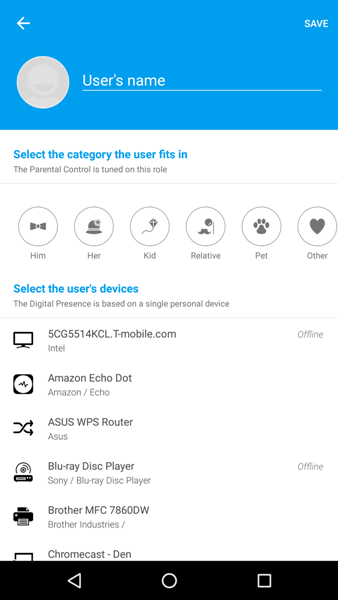
After naming each user, I then needed to select whether he/she was a family member, help, friend, or other. After tapping on “Family” as shown in the second screenshot above, I was provided with a list to further specify information about the user: Him, Her, Kid, Relative, Pet, Other, or Cancel as shown in the third screenshot above. If you select “Pet” you’ll have to choose from Cat, Dog, Other, or Cancel. If I had originally tapped on “Help” instead of “Family”, I would have been given another list: Cleaning, Medical, Maintenance, Delivery, Other, or Cancel as shown in the fourth screenshot above. The other selections do not have further lists. It is important to note that parental controls are turned on for every type of user – more about parental controls a little later.
I then tapped on all of the devices associated with that user then finally tapped on “Save” located in the upper right corner of the screen.
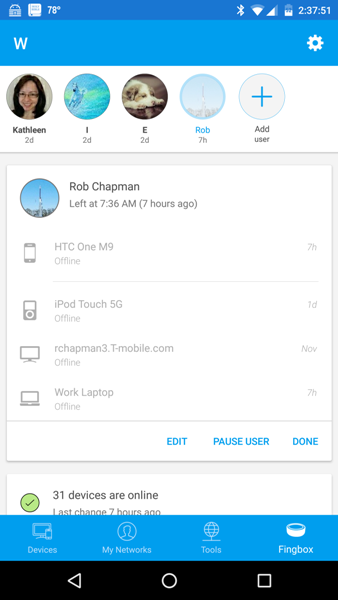
Fingbox tab – User/Parental Control features – pause user, block user’s device, set up alerts on user’s devices: After creating all of the users, I could tap on any user listed at the top of the app screen, at which point I could edit, pause the user, or select “Done”. And by tapping on any of the devices associated with that user, I could tell the Fingbox to block the device (blocks all internal LAN and internet traffic) if it was using too much bandwidth.
For you real IT experts out there wondering how this blocking feature works; Fingbox leverages low level (data-link layer) network programming and packet injections to make sure the device is unable to reach not only the Internet but also other local network devices. (from Network Security Tools: Firewalls vs Device Blocking)
I could also pause the internet (which would, for instance, allow a computer to still send documents to a printer). In addition, the Fing app allows you to schedule internet pause times for your children, etc., but I will go into that a little later.
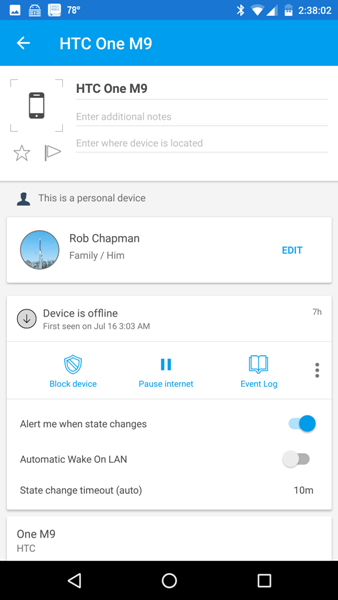
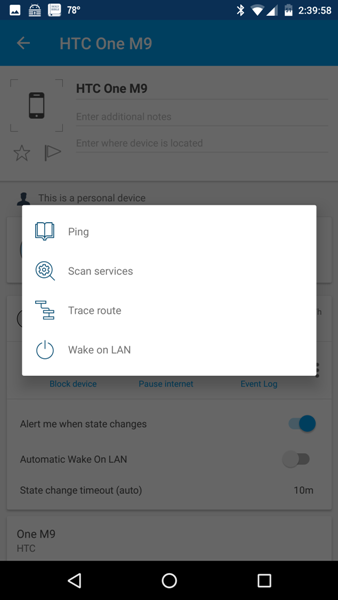
I could also set up the Fing app to alert me when the state of the user’s device changes, like when it is offline or online to indicate when someone has left home or come home. By tapping on the “Event log”, I could see all the times when the device was online or offline. And by tapping on the vertical dots (overflow menu) next to the “Event log”, the Fing app gave me access to tools I could use on that device (e.g. ping, traceroute, etc.).
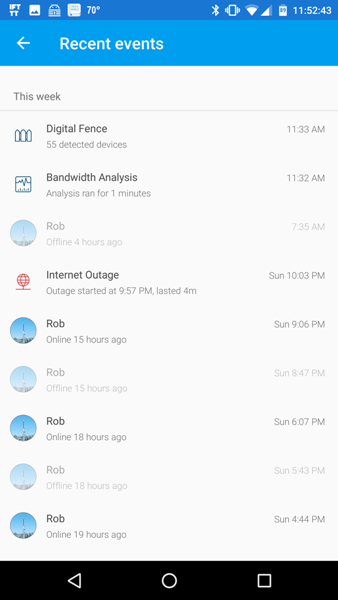
Fingbox tab – Recent Events on the network: Also under the Fingbox tab are the “Recent Events” link, “WiFi Performance” button, Internet Speed button, “Bandwidth Analysis” button, “Digital Fence” button, “Internet Security” button, and “Schedule Pause” button. I will describe each one.
After selecting that I was “Done” with the user while under the Fingbox tab of the app, I could tap on the “Recent events” link (under the list of users) to see the events going on in my network. I love this feature. I can see a list of events that have happened over time like unknown devices being detected and when I last tested my WiFi performance, internet speed, bandwidth use, and when the devices I selected to watch came online or went offline. It was cool to see how Fingbox detected an “Internet outage” on 12/10/17 at 10:03 pm which lasted four minutes while we rebooted our router to reestablish our internet connection.
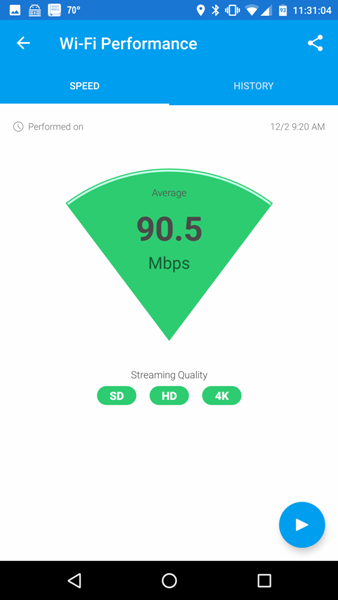
Fingbox tab – WiFi Performance feature: With a Fingbox, I was able to determine the WiFi performance around my home by tapping on the “WiFi Performance” button, then tapping on the “Play” button (the lower right corner of the Android app and upper right corner of the iOS app), and then while walking around, I could determine the strength of my WiFi signal in each room. The WiFi performance analysis runs for about a minute after tapping on the “Play” button so you can run it in each room to find out where the signal is strongest. The app keeps a history of the WiFi performance each time you run the analysis in the “History” tab located at the top of the screen.
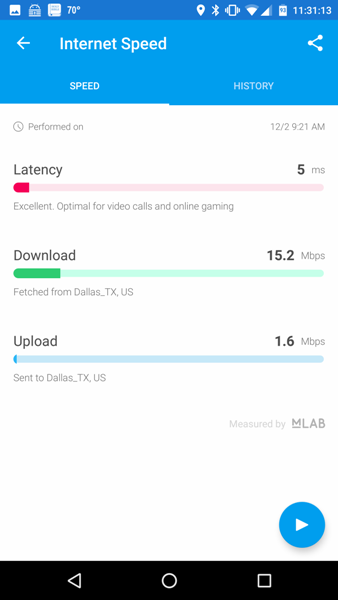
Fingbox tab – Internet Speed feature: By tapping on the “Internet Speed” button then tapping on the “Play” button, you can see your latency (the delay before the transfer of data begins), download speed (how fast my network downloads information from the internet), and upload speed (how quickly my network uploads information to the internet). The Internet Speed analysis runs for about 30 seconds after tapping on the “Play” button. The app keeps a history of the information each time you run the test in the “History” tab located at the top of the screen.
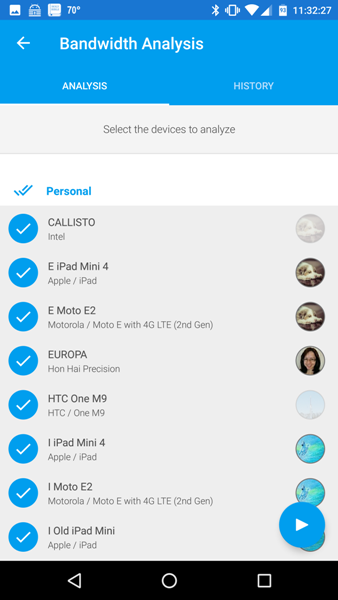
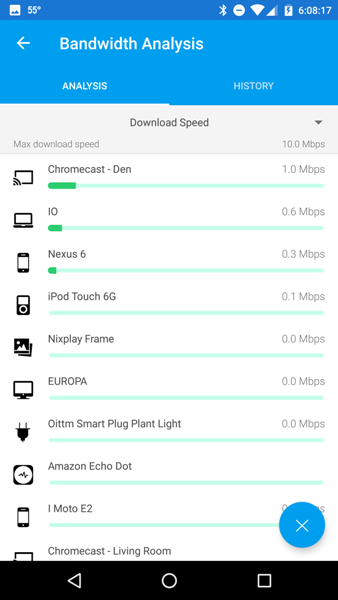
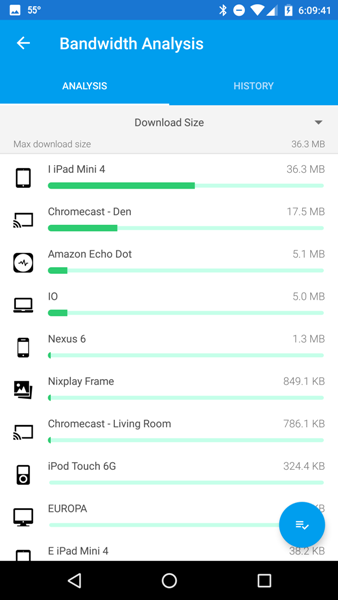
Fingbox tab – Bandwidth Analysis feature: By tapping on the “Bandwidth analysis” button, I could then select which devices to monitor then tap on the Play button (shown in the left screenshot above) to start monitoring how much bandwidth each device is using (shown in the center screenshot above). I could choose from the drop-down menu located at the top of the bandwidth monitoring screen to monitor download speed, upload speed, download size, or upload size (shown in the third screenshot above). To stop the Bandwidth Analysis, you must tap on the “X” button located in the lower right corner of the screen.
Bandwidth analysis is launched on demand by you. The reason that Fingbox does not continuously monitor the bandwidth consumption of your devices is that doing so requires re-routing all traffic on your network through Fingbox. Re-routing traffic through Fingbox all the time could potentially slow down your network. This is how cheaper firewalls behave, and in the end, they often slow down the network so much that people end up turning them off. (from Bandwidth Analysis)
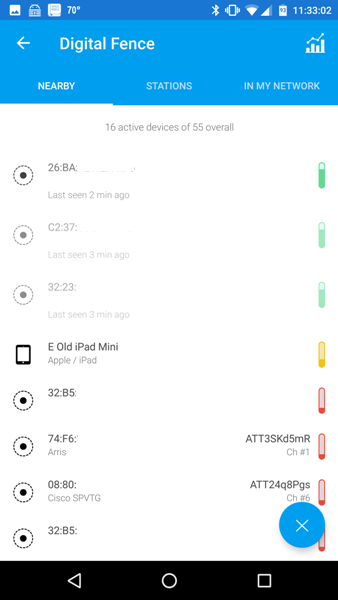
Fingbox tab – Digital Fence feature: By tapping on the “Digital Fence” box, I could view all the WiFi enabled devices and WiFi access points (stations) near me that were not on my network. It shows a list of the devices found and their MAC addresses along the left side of the list (if Fingbox can identify it) and then tells you which network and channel they’re connected to (if any) along the right side of the list. If I wanted to “watch” one of those devices, I could just tap on the device and give it a name after which it would show up in my list of devices which are continuously monitored and the Fing app would then alert me to any changes in its state.
As a standard behavior, every WiFi device sends “probing” radio messages to explore its own surroundings and see if any “interesting” devices or access points are in range; specifically to trigger the auto-connect to Wi-Fi feature. The DigitalFence screen gives you a real-time list of all the devices that are currently broadcasting those public messages around your Fingbox. (from DigitalFence)
The sensor for the Digital Fence is located on the Fingbox device and thus detects nearby WiFi devices that are within about a 50ft/15m range of the antenna.
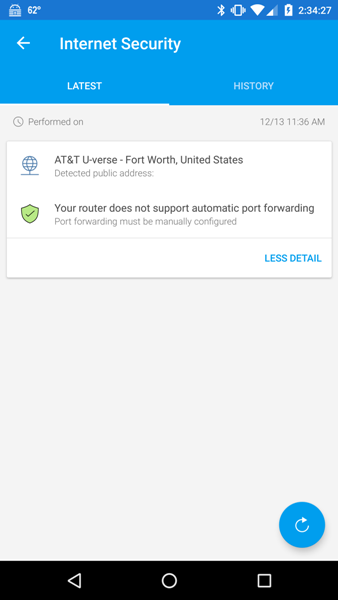
Fingbox tab – Internet Security feature: Tapping on the “Internet Security” button will show you the list of the weaknesses (e.g. if you have any open ports that might be available to attack) in your network as discovered by the last scan. Networking experts know how to expose and close off these weaknesses, but for a person like myself, having Fingbox scan for those weaknesses is invaluable. The Internet Security feature “… is a combination of a router audit and a remote scan test”. The explanation is as follows from the Fing website (from Internet Connection Security Check):
Firstly, it is best to understand how your router works.
For data to pass between the Internet and your home network the information must travel through virtual ‘holes’ in the router’s software, called ports. Ports not only allow the information to pass in and out of your network, but they also direct the information to the correct devices.
Think of your router as being like your house – a port is like your front door. The door sits shut unless you want someone to access your house. Like with a front door, a port is only opened if it is being used. But also like a door, if a port is weak or left open then you are leaving yourself vulnerable to intruders.
There are 65535 ports on your router but don’t worry, they are not all permanently open.
For homeowners, secure ports are either opened manually by the owner of the network or, like with a lot of consumer-grade routers, by inbuilt protocols, such as UPnP and NAT-PMP.
These protocols are designed to save homeowners the effort of having to manually open ports – they give permission for the devices within the network to open ports on their own.
The Internet Security feature works by running a Remote Scan Test which scans your network’s public IP address and then tells you which ports are open. It also performs an Internal Router Audit check. The website describes this as follows:
The Internal Router Audit checks the router addresses, the NAT configuration and whether or not UPnP or NAT-PMP is activated. In the house metaphor, this would be the equivalent of checking the security measures placed inside the building in case an intruder did make it through the door.
The Internet Security check results include your Internet Service Provider’s (ISP) information and your public IP address, firewall presence on the router, whether or not your router includes automatic port forwarding, and a list of open ports found.
If the check finds open ports on your network, the Fing app gives you the opportunity to close them. However, I never had such issues but here is how to close them according to the Fing website:
Closing Opened Ports via UPnP
You can now close ports via UPnP directly from the Fingbox Internet Security Check Feature
- Navigate to the Internet Security section from the Fingbox Dashboard
- Click on the section “New open ports found.” A list of opened ports will be displayed.
- Click the LOCK AND SELECT icon at the top of the screen. Alternatively, you also have a direct selection of the ports at the end of each section (“new open ports” and “known open ports”) by clicking on SELECT PORTS TO LOCK.
- A new screen will open where you can select the ports you’d like to close.
- Click the LOCK icon to close all or the ports that you have selected.
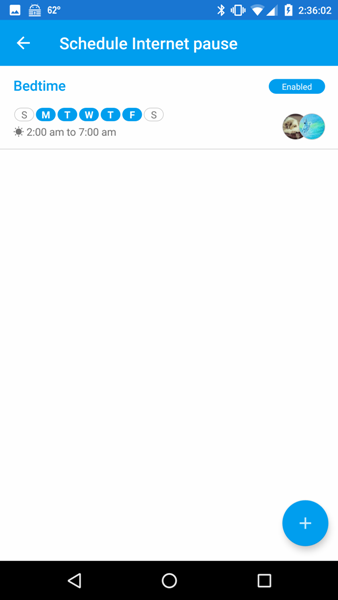
Fingbox tab – Schedule Pause feature: Tapping on the “Schedule pause” button allows me to set up a time schedule to pause internet access for certain users on the network. When adding a schedule for a user (you get to select the user, days of the week, and the hours during the selected days that you want to pause the internet for that user), it is important to note that you are scheduling the time when the user will NOT be able to access the internet.
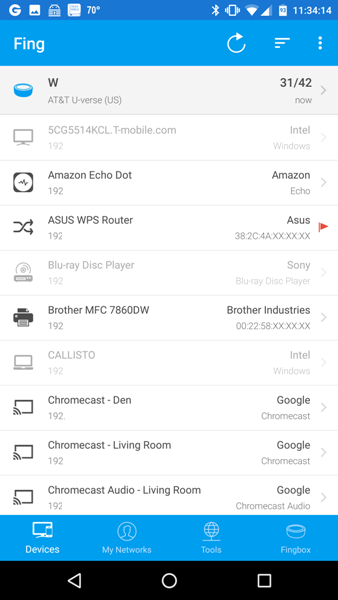
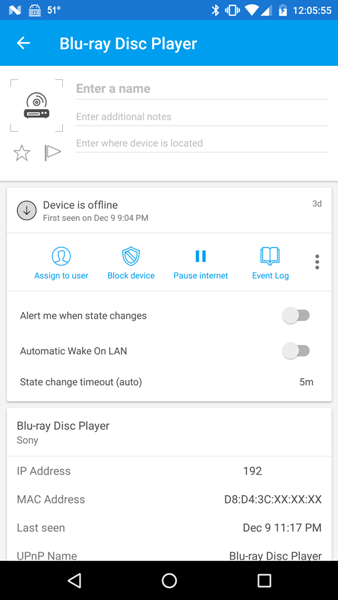
Devices tab: The “Devices” tab in the Fing app shows all the devices detected on my network (left screenshot above), thus allowing me to keep an inventory of them all. When on the “Devices” tab, I was able to tap on each device and give it a custom name and change its icon so that I could more easily see what kind of device it is at a glance. Additionally, I was able to alter the amount of time that passes before I was alerted to a state change for a device by tapping on “State change timeout”. I was also able to see other details about the device like IP address, MAC address, MAC vendor, hostname, etc. (second screenshot above).
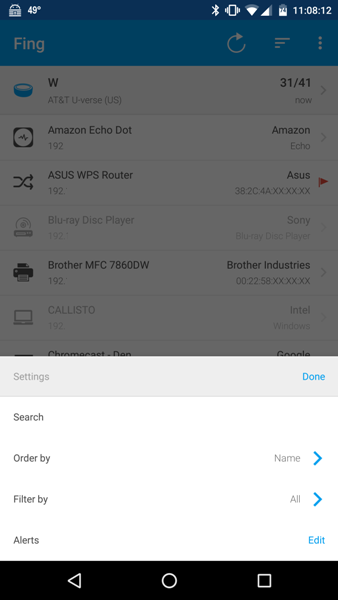
While on the “Devices” tab, by tapping on the three horizontal bar icon (menu icon) located at the top right of the Fing Android app screen (top left on iOS app screen) I could search for a particular device, reorder my list of devices (by IP address, state, name, vendor, MAC address, last change, or priority etc.), filter them (by online, offline, unrecognized, alerted, important, favorite, blocked or watched), or change the alert settings of my devices.
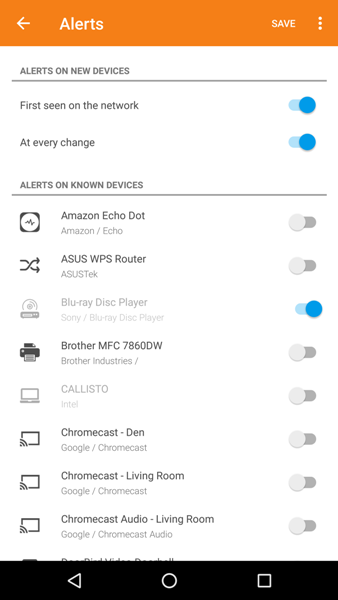
Alerts/Notifications: Notifications are set by default to email you “A summary email with multiple events” and to send push notifications,”A message for each event”. To makes changes to the default settings, you must go to app.fing.io on a web browser, log in, click on your user icon located in the upper right corner of the screen, select “Settings”, then select your desired settings for notifications.
At this point, I went back into the Fing app, tapped on the “Devices” tab > horizontal bar icon (menu icon) > “Alerts” and then under the “Alerts on New Devices” heading, I made sure that I would be alerted to any new devices on my network to detect possible intruders. And by selecting “At every change”, I would be alerted when those new devices would join or leave the network from that point forward.
Under “Alerts on Known Devices” heading, I selected the devices that I wish to be notified about when a change in the device state occurred (e.g. when it goes offline or online).
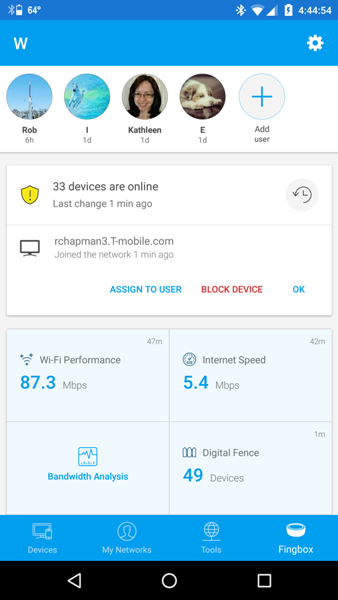
As soon as a new device was discovered by Fingbox, I was alerted to it right away. Tapping on the notification launched the Fing app (make sure you tap on the “Fingbox” tab) which allowed me to assign the device to a user, block the device, or select “Ok”.
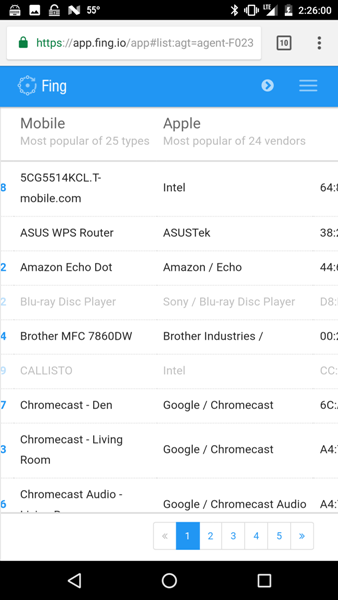
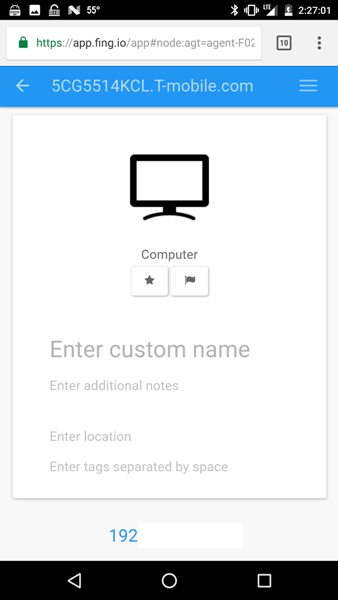
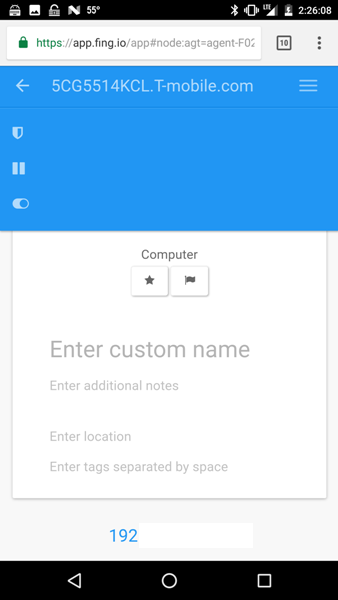
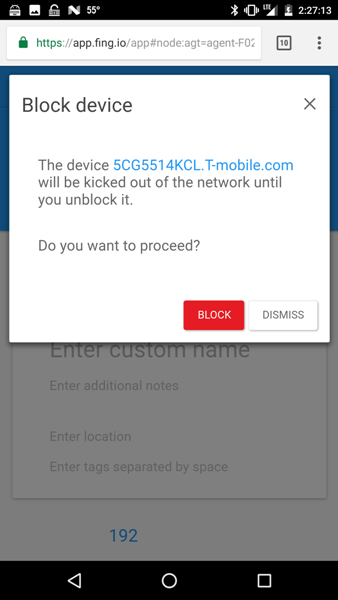
Remote blocking of a device: If you are away from your WiFi network and you get a notification, you may block the device only if you log into the web interface (app.fing.io) using a browser on your phone or another device. The screenshots above come from the Fing web interface after having logged in on my Chrome browser using my Nexus 6 phone. The device listed first in the left screenshot above was the new device. After tapping on it, I was brought to a screen that allowed me to enter a custom name and location. To block the device, I needed to tap on the menu icon (three horizontal bars) in the upper right corner of the screen and tap on the shield icon as shown in the third screenshot above.
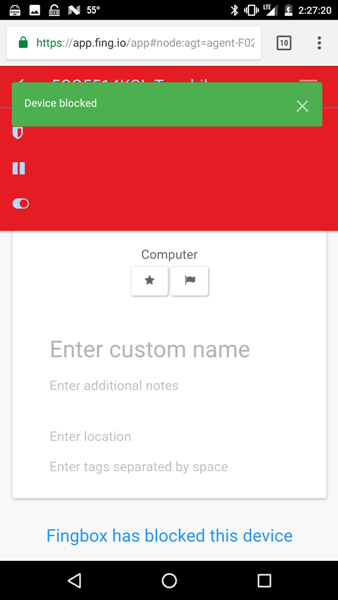

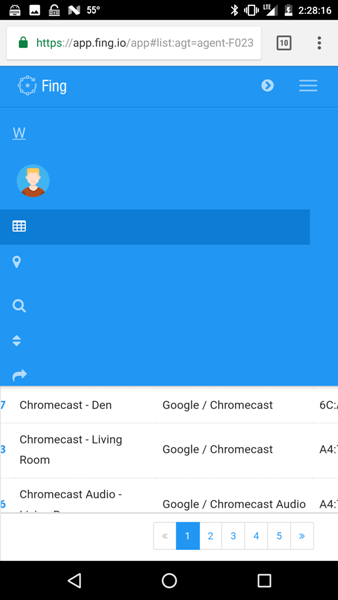
Once the device was blocked, it was easy to tell its blocked status because it shows up in red text in the list of devices (shown in the center screenshot above). The one thing I really don’t like about the web interface is that the icons are not labeled. So after experimenting, I found that they are the following from top to bottom in the right screenshot above: the top item is the network, the avatar is the account information, the grid icon is the “Devices” list, then there’s the location icon, the search icon, the sorting icon, and the last one is the export icon (yes, from the web interface you can export the network data as a CSV, XML, or HTML file).
Even though this remote blocking process is inconvenient, at least it’s possible. It would be wonderful if they could incorporate that into the Android and iOS apps.
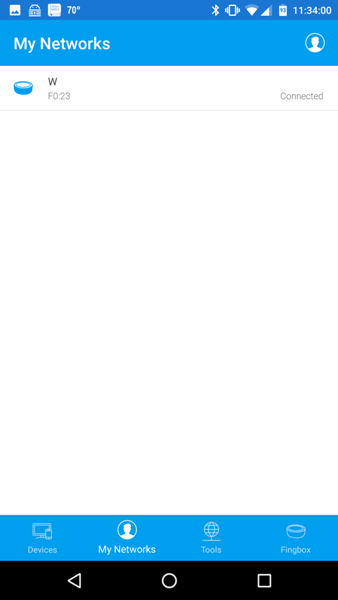
My Networks tab: The “My Networks” tab shows all the networks that I scanned in the past using the Fing app or all the networks that I connected a Fingbox to (left screenshot above).
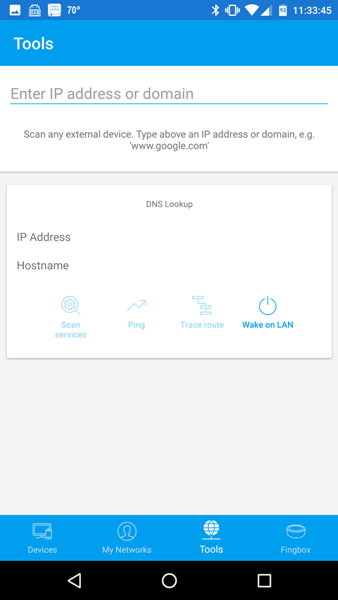
Tools tab: The “Tools” tab (shown in the right screenshot above) provides me with networking tools such as Scan Services (device port scanning to detect any available services), Ping (ping a device and check the device’s response time), Traceroute (traces a packet from your computer to an Internet host, showing how many hops the packet requires and how long each hop takes), and sending a Wake on LAN command (wake up devices remotely using the Fing application).
Positives
- Keeps an inventory of all my network devices
- Notifies me about new devices and gives me the option to block them
- Provides WiFi performance analysis (WiFi Performance feature)
- Provides internet speed test (Internet Speed feature)
- Provide Bandwidth analysis data to determine bandwidth hogs and allows me to pause those devices (Bandwidth Analysis feature)
- Provides me with a list of nearby WiFi devices that may need to be monitored (Digital Fence feature)
- Provides me with a list of my network vulnerabilities (Internet Security feature)
- Allows me to schedule internet pauses for selected users (Schedule Pause feature)
- Allows me to use network tools such as scan services, ping, traceroute, or wake-on-LAN
Negatives
- Remote blocking of a device may only be accomplished through the Fing web interface (app.fing.io)
- Web interface icons are not labeled
Final Thoughts
I love the Fingbox. Network security is a daunting task for me, but the Fingbox makes it much easier. It is a wonderful hardware addition to our network and works with the Fing app to provide me with some wonderful tools to monitor and keep my network safe. I’m able to see a list of all of our devices and label them with recognizable names and I love being able to spot bandwidth hogs within our network and pausing or blocking their access to the internet. It’s wonderful being able to determine WiFi sweet spots around my home and being able to see the recent events that have occurred on our network. But I truly love having the ability to spot a new device on my network and the ability to block that person if I do not recognize the device as well as having Fingbox monitor my network for vulnerabilities so that I may address them. I highly recommend this wonderful networking security tool!!
Price: $129.00
Where to buy: Fing or Amazon
Source: The sample used in this review was provided by Fing. Please visit their website for more information.

 But even I have to come down to earth sometimes, and it would be nice to have a way to keep mosquitoes away when I’m enjoying the outdoors without having to coat myself in insect repellent sprays.