Tend Secure – Lynx Pro Camera Review

We currently have a security camera on our front doorbell, our driveway, and our back deck.   All three are what I call ‘dumb’ type cameras where they just record and can send notifications when they sense movement. What we do not have is a security camera inside our home.  When I was offered the chance to review the new Tend Secure Lynx Pro security camera I jumped at the chance to put it in my home and see how it worked.

What is it?

The Tend Lynx Pro is a ‘smart’ camera that has the ability to recognize faces and only send notifications when it does not recognize the person.  You can even train the camera when it fails to recognize the person you have set up by pointing out the face in the video and indicating the person whose profile you have set up.  It works in both daylight and dark and can be set up outdoors and indoors.

Hardware Specs

This camera is really impressive and gives you a lot for your money.

  • 801.11 b/g/n wireless connectivity
  • Network security – WEP (40-bit, 128-bit)/WPA (TKIP,AES)/WPA2 (TKIP,AES)
  • 1/3.2 inch security grade CMOS sensor
  • 100° diagonal viewing angle
  • Infrared Night vision – 850 nm LED: up to 25 feet
  • Camera resolution – 1080p (1920×1080) HD at 30 frames/sec
  • Built in microphone
  • Built in speaker
  • Can handle temps from -4 to 115 degrees Farenheight
  • Built in battery to handle up to 1 hour of recording for up to 3 days.  It also has the internal storage to hold the data.  This is perfect for power outages.
  • You get a full 7 days of cloud storage for no charge.
  • App works with IOS 9 or higher and Android 5 or higher.
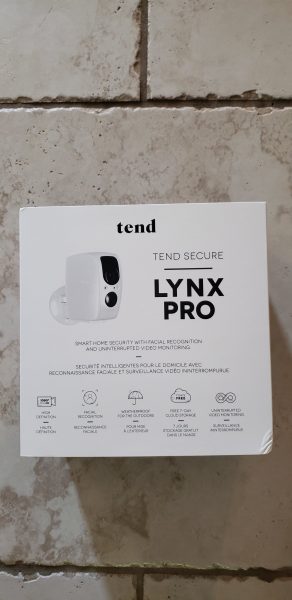
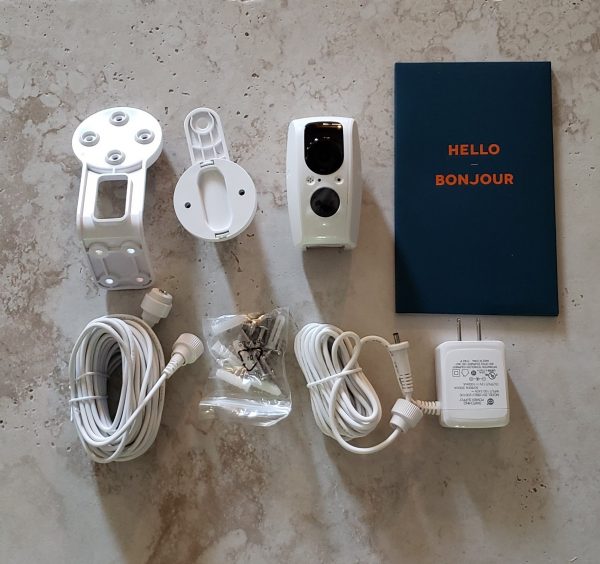
What’s in the box?

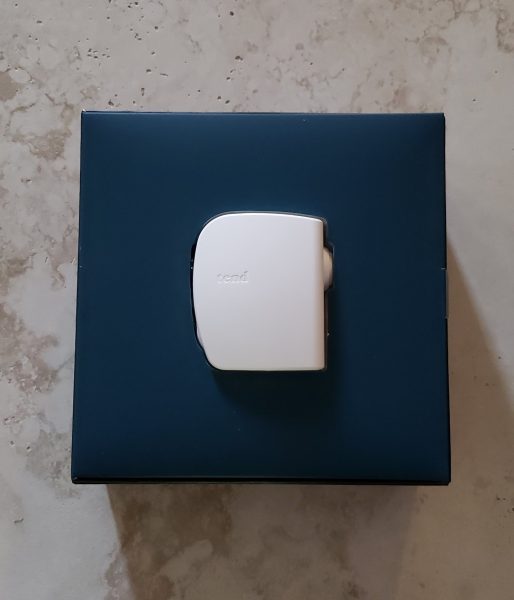
The packaging for this camera is excellent.  The picture above shows the outer slipcover for the box.  Once you pull that off and open the top cover you are presented with the actual camera as you see below.

You then lift that whole blue box top section off and you see the mounting stands on the left and the paperwork and accessories on the right.  The power adapter and extra long cord are all in a separate box stored below the Hello paperwork.

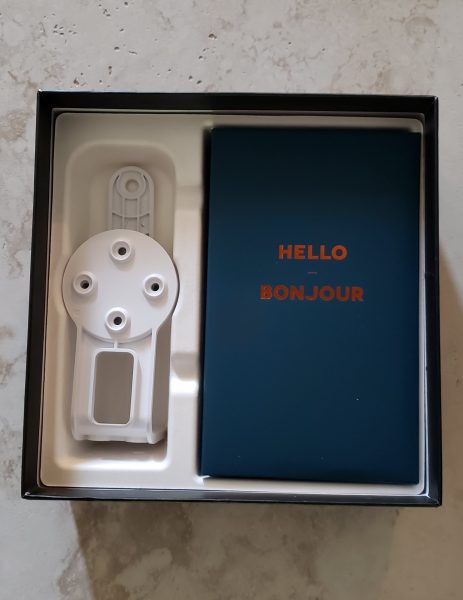
The image below shows exactly what is inside the box.

  • Mounting stands for the wall
  • Camera
  • User Manual
  • Extra power extension cord.  It does not have to be used if you do not need it.
  • Hardware to mount the camera
  • Power adapter and long power cord.

Design and Features

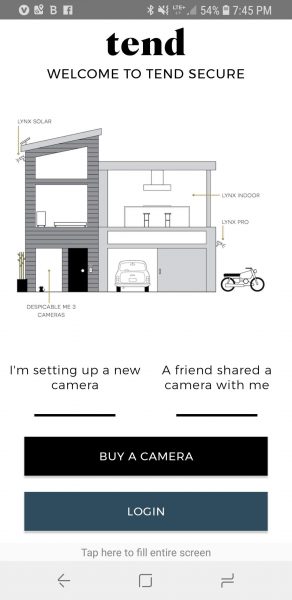
After unpacking the box, the next thing I did was to place the camera where I wanted it and install the app.  Let me state right up front that manual recommends that you mount the camera 6 to 7 feet above ground shooting towards the ground.  They state that will help with the facial recognition.  For my testing purposes, I ended up placing the camera on top of several boxes that were sitting on top of a bar in our home entryway.  So the camera was shooting across horizontally instead of having a nice downward view.  The camera still did a pretty good job on the facial recognition.  The app will work on IOS and Android.  I loaded it onto my Galaxy S9.  The screenshot below is the opening screen of the app.  I clicked on the ‘I’m setting up a new camera’.

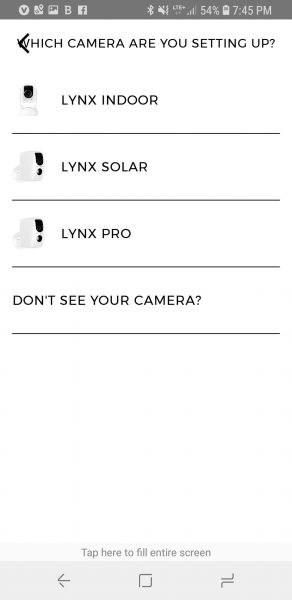
The next screen asked me which type of camera I was setting up.  Tend makes several cameras so I chose the Lynx Pro.

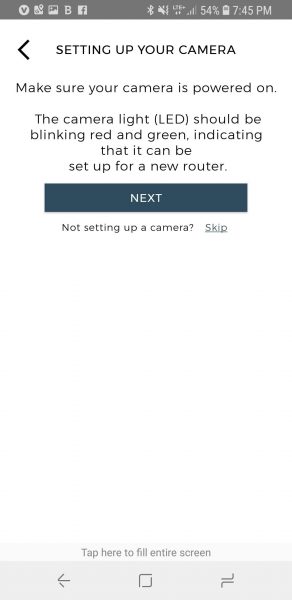
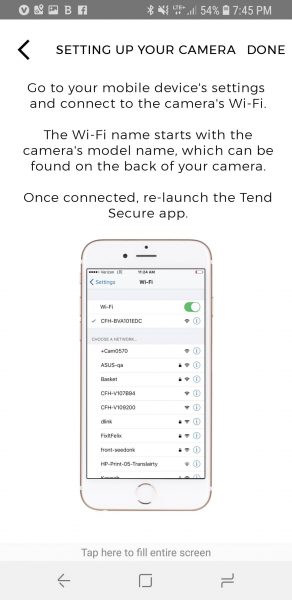
The next few screens wanted me to be sure the camera was powered on and the LED was blinking red and green.  I then went to my phone settings and connected via WIFI directly to the camera.

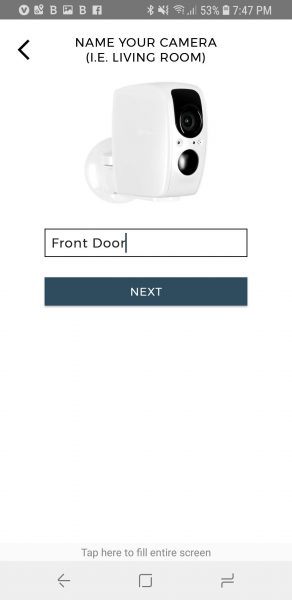
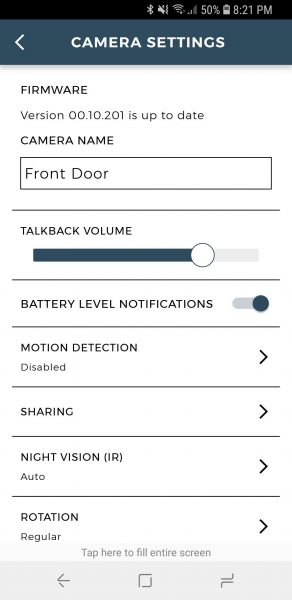
Once connected to WIFI, I went back into the app.  The app recognized I was connected and asked me to name the camera.  As you can see below, I named it ‘Front Door’.

I then got the option to pick the wireless network I wished to connect to.  As you can see, there are some networks with some interesting names in our neighborhood!

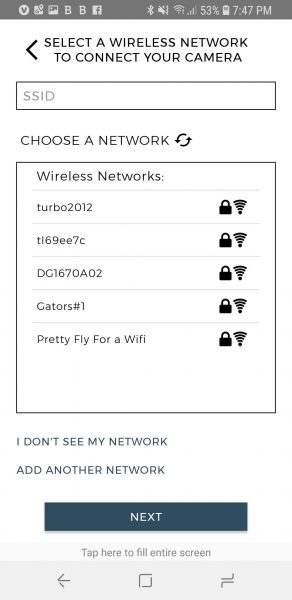
The last setup screen tells you how to mount the camera for best facial recognition.  I will note that originally I had the camera facing my front door, however that was causing way too much back lighting and the camera was having a hard time with facial recognition.  Once I moved the camera away from facing direct light it worked much better.

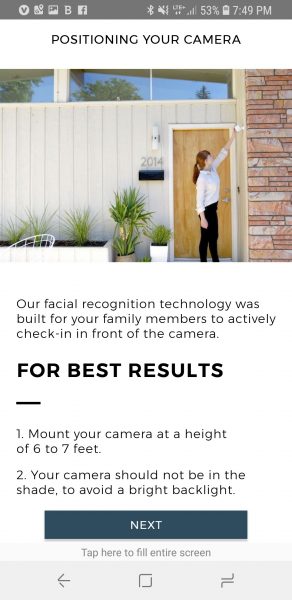
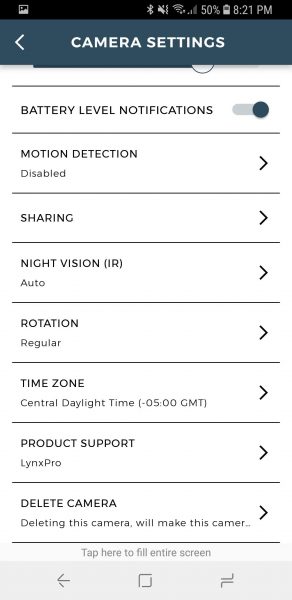
The next few screenshots will show you how the settings screens look in the app.  This first screen gives you a lot of great info and options.  I want to note that the level you are seeing for talkback volume is rather loud.  The speaker on the camera is quite impressive.

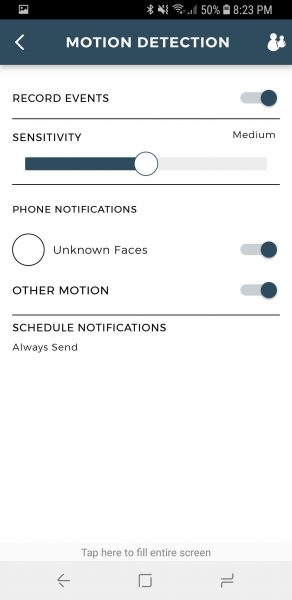
This next screen below shows you the secondary screen you get when you turn on motion detection.  You can adjust sensitivity and have the camera send notifications for unknown faces.   You can even set schedules as to when you want to be notified.  Once you start adding folks to profiles for facial recognition, you can turn off notifications profile by profile if the camera recognizes the face.

The screenshot below is the entry screen to set up profiles.  You simply take a picture of the person with your phone and they are set in the app.

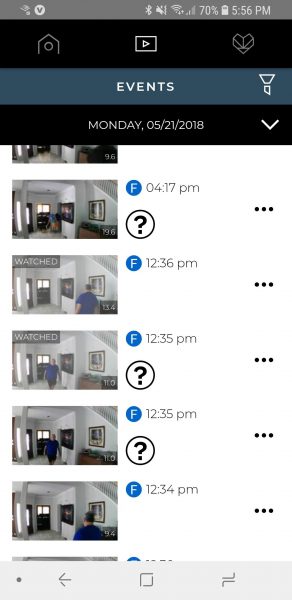
The screenshot below shows the recordings it made for part of a day in my home.  When you see a big question mark it means the app did not recognize the person in the video.  I found when lighting was good, the camera did a great job of recognizing both myself and my husband.  Of course, when we entered the scene walking away from the camera it almost never recognized us.  I believe if I ‘taught’ the camera that it was me by clicking on the head in the video and pointing to my profile it might have learned to recognize us better.  You can also see the screen will show you a ‘watched’ indicator if you have already viewed the video.  As stated earlier, the app will store up to 7 days of video in the cloud for free.

Below are some sample recordings it made during the day and one from nighttime.  There was little to no light in the room when the nighttime recording was made.

What I like

I love the video quality.  I think it does a pretty good job of facial recognition.  I also love that you get a full week of free cloud storage.  The microphone and speaker on the camera are also both excellent.  The fact that it also has a backup battery and internal storage in case of power failure is a winner.  I used to own a Nest camera at one time and I believe this camera gives you way more bang for the buck.

What needs to be improved

This camera is pretty awesome.  If any suggestion could be made it would be to see if they could somehow get this camera to work without wires.

Final thoughts

I really loved this camera.  When compared to the outside cameras that I have the video quality is excellent.   I feel the video quality is certainly comparable to the Nest home camera I used to have.  You can’t beat the free 7-day cloud storage.  This camera just offers a ton of options for the price.

Price: $149.00
Where to buy: Tend and Amazon
Source:  The sample for this review was provided by Tend

The post Tend Secure – Lynx Pro Camera Review appeared first on The Gadgeteer.

Filed in categories: Reviews

Tagged:

Tend Secure – Lynx Pro Camera Review originally appeared on The Gadgeteer on June 4, 2018 at 10:00 am.

Note: If you are subscribed to this feed through FeedBurner, please switch to our native feed URL http://the-gadgeteer.com/feed/ in order to ensure continuous delivery.

The new EGO Power+ 15” POWERLOAD String Trimmer comes with strings attached

Are you a fan of cordless yard tools? I hadn’t thought much about it until I reviewed the EGO Power+ 530 CFM Blower. After that, I was a convert. Granted, the battery life is limited and extra batteries can be expensive, but my driveway and walkways are cleaned more often simply because I can just grab the blower and … blow. No cord or startup hassles. That blower has spoiled me. Well, EGO makes other yard tools as well, such as hedge trimmers, string trimmers, chainsaws and even lawn mowers and snow blowers—all based on the same interchangeable EGO ARC lithium batteries. EGO’s newest tool is a re-designed string trimmer, the EGO Power+ 15” POWERLOAD String Trimmer with carbon fiber shaft. 

I constantly struggle with string replacement on my Stihl gas-powered string trimmer—not to mention the fumes and vibrations from its 2-stroke engine. It takes at least 10 minutes to disassemble the head, hand wind the string and then re-assemble the head. Not easy when you’re already sweating in the summer sun. What’s so special about the POWERLOAD String Trimmer is the way string is replaced. All you have to do is run the string through the head and press a button until the string is automatically wound. That’s it. Watching the video of this on EGO’s website makes it look not only easy but fun as well. 

The POWERLOAD String Trimmer also has a carbon fiber shaft that’s stronger than any other string trimmer shaft available. The shaft is equipped with a lifetime warranty—guaranteed to last forever. The trimmer comes with a hi-efficiency brushless motor with variable speed control, bump feed line advance and uses .095” professional cutting line.

Anything that saves time and makes hot Florida summer yard work easier is okay in my book. The EGO Power+ 15” POWERLOAD String Trimmer comes with a 5.0Ah Battery and Charger and sells for $329.

Visit EGO for more information.

The post The new EGO Power+ 15” POWERLOAD String Trimmer comes with strings attached appeared first on The Gadgeteer.

Filed in categories: News

Tagged:

The new EGO Power+ 15” POWERLOAD String Trimmer comes with strings attached originally appeared on The Gadgeteer on June 4, 2018 at 9:00 am.

Note: If you are subscribed to this feed through FeedBurner, please switch to our native feed URL http://the-gadgeteer.com/feed/ in order to ensure continuous delivery.

The Smarterware product line means no more wasted food – finally there is an app for that!


I am sure that all of the Gadgeteer readers that have been following my news stories and reviews regularly know by now that I am a serious gadget nerd. So I am figuring that you may be initially surprised when I start chatting about food containers. After all, I don’t ever recall putting batteries in my Tupperware bowls, or somehow making food appear in the bowl with a fancy remote control, so why would I even bother to mention bottles or bowls.

Well, I just recently learned about a company call Ovie that has created a product line call Smarterware. Smarterware is being touted as the world’s first connected food storage system, and by connected, I really do mean that there is an app for it!! The concept involves smart tags that you put on all of your containers in the fridge, and the app will remind you when you are getting to the point that the food in each container will spoil. I am forever frustrated about the amount of food that gets thrown away in my house that I am so happy that there is finally an app for that.

“The Smarterware product line consists of Smart Tags, 6-cup containers, clips, and universal connectors that can attach to any container or bottle in a fridge”. Each tag has a built-in light ring that gives off a visual light to immediately let you know the status of the food in each container. Green is good, yellow is for hurry up or you will be hungry, and red is for “sorry!!” you are too late and you need to buy or cook more food because time has run out for that dish. Ovie even went one step further by integrating with Alexa and other smart home hubs, recipe apps, and grocery apps.

Ovie plans to begin shipping Smarterware in early 2019, and retail sets will start at $59.99 and will be available at the Ovie website.

The post The Smarterware product line means no more wasted food – finally there is an app for that! appeared first on The Gadgeteer.

Filed in categories: News

Tagged: ,

The Smarterware product line means no more wasted food – finally there is an app for that! originally appeared on The Gadgeteer on June 4, 2018 at 8:00 am.

Note: If you are subscribed to this feed through FeedBurner, please switch to our native feed URL http://the-gadgeteer.com/feed/ in order to ensure continuous delivery.

Happy Birthday, Julie!

Today is Julie’s birthday.  She brings us great gadget news and reviews daily, so let’s take today to show her how much we appreciate her efforts.  Join me in wishing Julie the Happiest of Birthdays!

The post Happy Birthday, Julie! appeared first on The Gadgeteer.

Filed in categories: News

Tagged:

Happy Birthday, Julie! originally appeared on The Gadgeteer on June 4, 2018 at 6:30 am.

Note: If you are subscribed to this feed through FeedBurner, please switch to our native feed URL http://the-gadgeteer.com/feed/ in order to ensure continuous delivery.

Posted by / June 4, 2018 / Tagged with / Posted in News

Bedgear M1X pillow review

I’m incredibly picky when it comes to pillows. That’s why I’ve been using the same one for more years that I want to admit because apparently, it’s gross to sleep on the same pillow for over a decade (maybe two). I’ve tried several types of pillows over the years but I keep going back to my “old faithful”. I even told the folks at BedGear that I’m a pillow snob, but they were still willing to let me try their M1X Pillows, so let’s take one for a… nap.

What is it?

The Bedgear M1X is a 20 x 26 inch pillow that comes in four sizes: 0.0, 1.0 2.0 and 3.0. Each pillow is identical, except for their profile or size/thickness. I told the folks at Bedgear that I am a side sleeper 99% of the time, so they sent me their M1X 2.0 and 3.0 sizes.

Design and features

The M1X pillow comes packaged in a zippered bag and when I removed it, I immediately realized this was not going to be another $30 Kohl’s special. The Bedgear M1X pillow looks and feels superior to any pillow I’ve ever tried.

First of all, it has a curved area for your shoulder which is perfect for side sleepers like me.

The covering of the pillow features Dri-Tec and Air-X technology with a 3D mesh cover that is made of 98% polyester and 2% spandex and is supposed to help prevent allergens and dander from entering the pillow core. Speaking of the core, the M1X has a soft hypoallergenic shredded latex foam fill that provides great support and won’t bottom out. That’s pillow speak which means the pillow keeps its shape while you’re laying on it and bounces back, unlike some down filled pillows which get flat or lumpy during a sleep session.

The Bedgear is a comfortable pillow and I wanted to love it, but the thickness of the 2.0 and 3.0 pillows was a bit too high for me to comfortably sleep on through the whole night. I think I would be better off with either their 1.0 or even their 0.0 size.

That said, I do like the pillow quite a bit and the Dri-Tec and Air-X tech kept the pillow cool and dry even during the weird in-between weather we were having a few weeks ago when it was hard to regulate temps in the house at night with heat and AC. Even when the bedroom was slightly too warm, I didn’t feel sweaty sleeping on the Bedgear pillow.

There is one thing that’s important to mention about the Bedgear M1X pillow. It’s not machine washable. It’s only spot washable and with a price tag of $119, I think it should be fully washable for people who have problems with allergies.

What I like

  • Comfortable
  • Does get lumpy or flat
  • Stays cool
  • Comes in 4 sizes to match your sleep style and body size

What needs to be improved

  • Needs to be washable

Final thoughts

I just returned from a vacation in California where we stayed in 4 different locations, which meant 4 different beds with 4 different pillows. The first night we stayed at a Holiday Inn Express near the Indianapolis airport. It was a very nice hotel that was so new that you could actually smell the newness. The bed was comfortable, but their pillows were like sleeping on a boulder. I don’t think I slept at all that night because like I mentioned in the opening paragraph of this review, I’m a pillow snob and am very picky about the cushion I put under my head at night. The other 3 places where we stayed in California had better pillows, but I would have loved to have had one of the BedGear M1X pillows with me on the trip. Even though the 2.0 and 3.0 sizes are too thick for me, I have little doubt that their thinner versions would make me want to burn my antique pillow once and for all.

Price: $119.00
Where to buy: Bedgear
Source: The sample for this review was provided by Bedgear.

The post Bedgear M1X pillow review appeared first on The Gadgeteer.

Filed in categories: Reviews

Tagged: ,

Bedgear M1X pillow review originally appeared on The Gadgeteer on June 3, 2018 at 3:14 pm.

Note: If you are subscribed to this feed through FeedBurner, please switch to our native feed URL http://the-gadgeteer.com/feed/ in order to ensure continuous delivery.