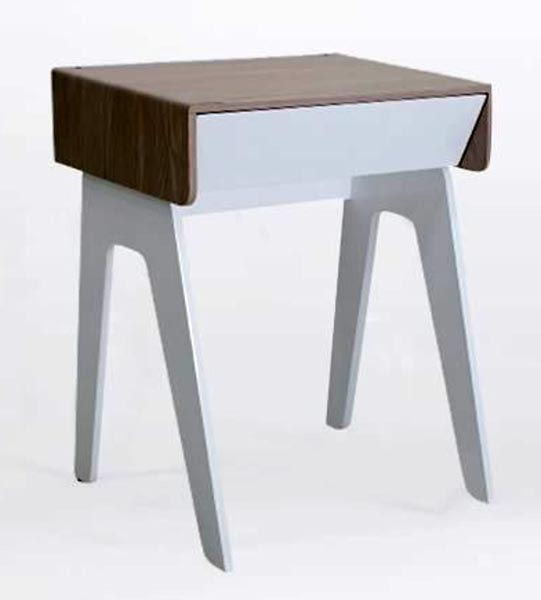
A couple months ago, we told you about the Indiegogo project for the Sobro Smart Side Tables, complete with nightlight, Bluetooth speakers, built-in wireless charger and USB, USB-C, and AC outlets, locking drawer, and refrigerator drawer – and all controlled with an app. The biggest drawback is the wait time for the project to be funded then completed. The Smart Nightstand from West Elm has almost as many features, minus the refrigerator drawer, and it’s available right now from West Elm.
The nightstand stands 16″ wide x 11″ deep x 20″ tall, and it’s available with a white or black lacquer finish over engineered wood. Other features include:
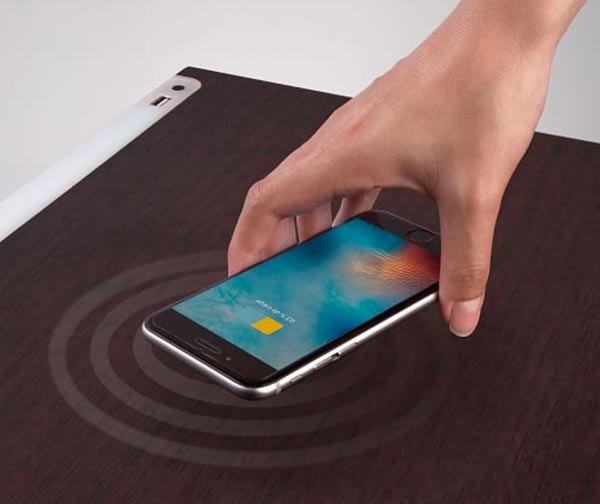
Wireless charging capability on the table top plus 2 USB ports.
Motion activated LED light to guide you to the bathroom without turning on a room light.
Hi-Fi stereo audio system plus microphone.
Bluetooth + NFC pairing.
iOS + Android OS app integration.
1 electric lock drawer.
It’s perfect to stand by your bed, or you can remove the legs and attach it to the wall. The Smart Nightstand is available to order now; it will be shipped from the vendor to your home and will arrive in 1-3 weeks. It’s $450.00 at West Elm.
Note: If you are subscribed to this feed through FeedBurner, please switch to our native feed URL http://the-gadgeteer.com/feed/ in order to ensure continuous delivery.
These days, our phones are an extension of our daily lives, and we take them with us everywhere we go. I am no exception, and when in my car, I usually lay mine on my center console/armrest and just have the charging cable draped wherever and plugged into my USB power jack. Whenever I need to glance at my phone, it has been an issue since I would either quickly glance down at my center console while driving, or grab the phone as soon as I am at a traffic light or stop sign. While many dash mount phone holders are available, my issue has been that I have always hated fiddling with the buttons that need to be depressed to remove the phone, or fiddling to depress the phone correctly in the holder to engage the manual mechanism to lock it in securely. The VAVA-Touch Phone holder aims to resolve these issues, so, let’s see how it did.
What is it?
VAVA E-Touch Phone Holder for Car, Electric Auto Lock iPhone Mount, is a dash mountable cell phone holder that electronically manages to secure and release your phone.
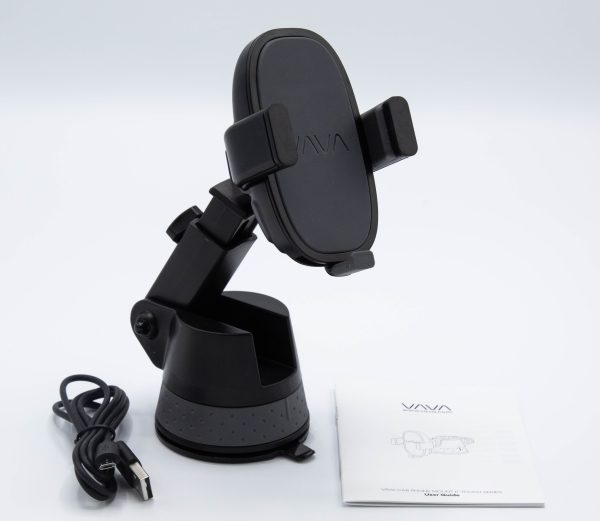
What’s in the box
1 x Phone Holder
1 x Micro USB Cable
1 x Instruction Booklet
Design and features
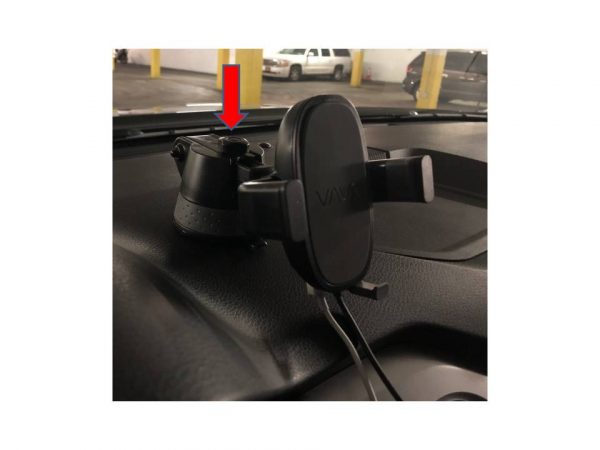
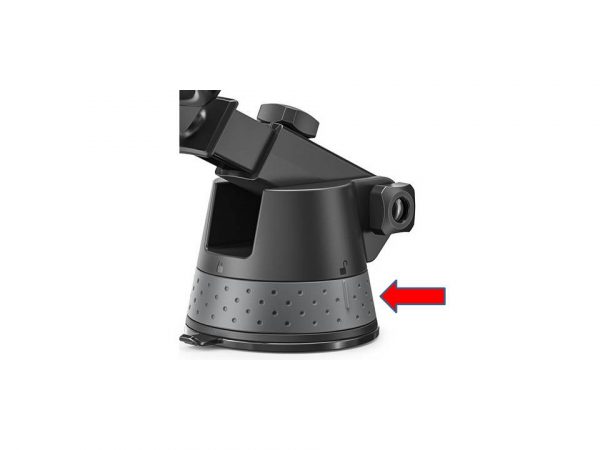
This is a typical vehicle cell phone holder, with a suction cup at the bottom, that in this design is secured by pressing the base onto the dash and turning the gray colored part of the base clockwise to secure and counter-clockwise to release. At the bottom part of the holder mechanism, there are two ports, one USB, and one micro USB. The micro USB port is used to power/charge the battery that is built into the holder, and the regular USB port can be used to power/charge your cell phone or any other USB accessory. The built-in battery means that once charged, the holder can operate and charge your device without being plugged into a power source.
Just below the phone holder, there is the arm that holds the phone holder mechanism, that can be extended to move the phone and holder closer to you or further away from you.
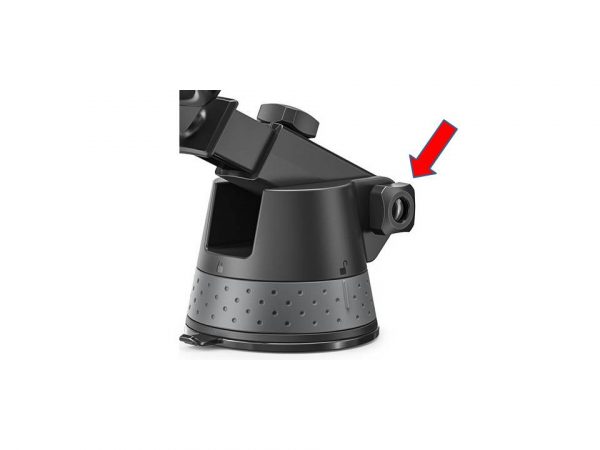
To the right and left of the ports, you will notice a “bulge” on the surface of each side. These “bulges”, are actually the touch-sensitive areas that disengage the arms of the holder to release the phone. When the phone is placed in the holder, the arms automatically and electronically close. This is accomplished by the pressure that is placed on the back of the holder when the phone is inserted. The picture below shows the accessory charging cable plugged into the bottom of the holder. This cable can be used to charge any accessory that can be charged via USB, or to power any such device.
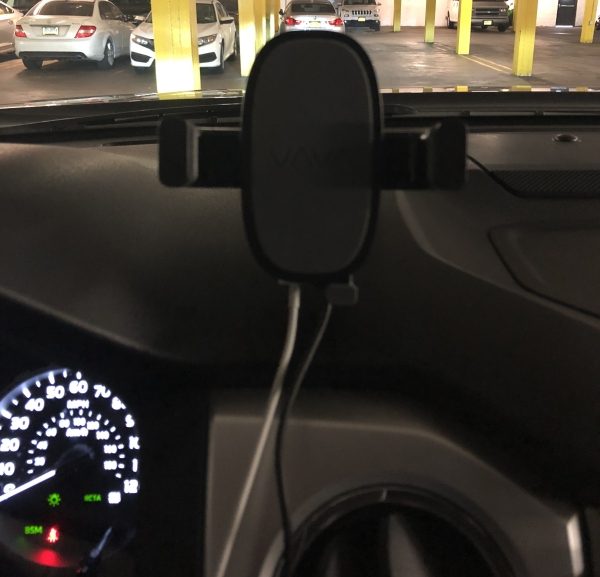
VAVA E-Touch Phone Holder mounts to the dash or windshield if so desired. The following picture shows the side view of the holder, mounted to my dash with both the power cable and my iPhone lightning cable attached. On the top of the arm behind the holder is the knob that secures or releases the extension arm.
To the right of the top knob is another knob that releases and secures the arm so that you can raise or lower it to the desired position.
This next picture is just a front facing view, with the cables attached. This is what you see from the Driver’s perspective before you attach the phone. Notice the gray pad at the surface of the back of the holder. That surface is the pressure pad that is engaged when you place your phone into the holder. The pressure on the pad activates the arms to securely close onto the sides of your phone
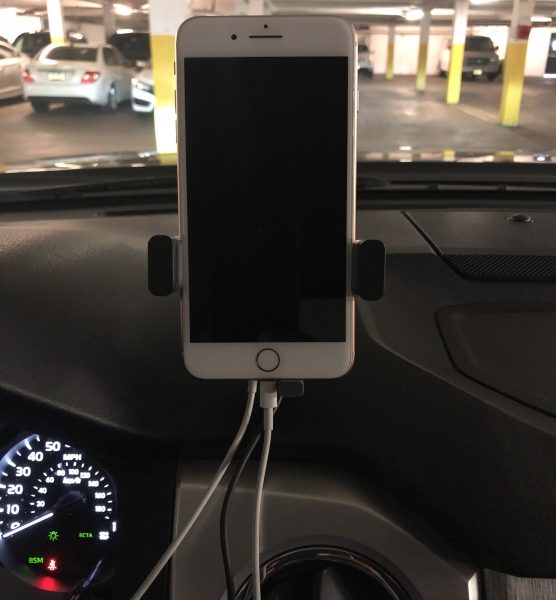
Once the phone is seated in the holder, the securing arms automatically close. In the following picture, I have my iPhone in the holder, with the lightning cable attached to charge the phone.
What I like
I like that the holder mounts in a very sturdy way to the dashboard, and when I tested it while driving on very rough NYC roads, the vibration was minimal. It is well built, and the electronic mechanism for opening and closing the securing arms works well.
What can be improved
What can be improved and what is my biggest disappointment with this holder, is that QI wireless charging is not built-in. The ability to place my phone in the holder, and have it charge wirelessly would make this a 5-star review.
Final thoughts
The VAVA E-Touch Phone Holder for Car, Electric Auto Lock iPhone Mount is a well-made mount, and it adds ease and convenience to secure your cell phone to the dash or windshield while maintaining it within proximity for easy viewing and access. The fact that it stays well secured to my dashboard and is not very affected by vibration makes it easy and practical for me to use. I currently have it installed in my car, and I use the charging port to power/charge my iPhone. I do believe that I will continue to use it at least until one with QI wireless charging is available. However, I am not convinced that the convenience of the powered security arms makes it a great value at its current price point when compared to other available holders that while not powered, are much cheaper.
Price: $29.99 Where to buy: Amazon Source: The sample for this review was provided by VAVA.
Note: If you are subscribed to this feed through FeedBurner, please switch to our native feed URL http://the-gadgeteer.com/feed/ in order to ensure continuous delivery.
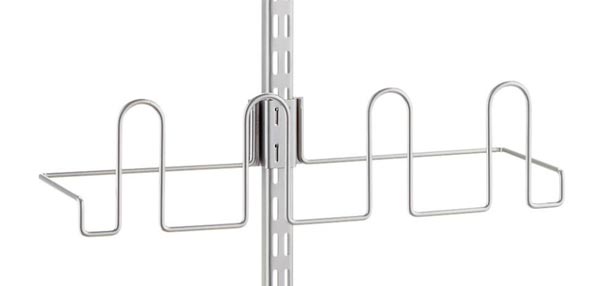
Over the last few years, I’ve shown you how we use various elfa systems in our home. We have three elfa desks, a huge shelving unit that serves as both a bookcase and a desk for our 88-key Yamaha keyboard. Plus, we have two over-the-door racks that we use for storing and organizing cleaning supplies and bathroom toiletries.
The elfa Door and Wall racks can be accessorized with a variety of shelves and baskets to serve as DVD and CD storage to a gift-wrap organizer. Their newest accessories are shoe racks. Each rack measures 17.13″ x 5.13″ x 4.5″ tall and can hold 2 pairs of shoes; each vertical bar can hold 6 racks for up to 12 pairs of shoes.
Each rack is made with epoxy-bonded steel construction for strength that lasts. They are available in white or platinum, as are the vertical bars. You can custom design a behind-the-door or wall-mounted system using the component parts from the elfa utility line, or you can select a complete system with vertical bar and over-the-door hooks, 4 shoe racks, and 2 large mesh baskets for bags or other accessories for $119.92. Learn more at The Container Store.
Note: If you are subscribed to this feed through FeedBurner, please switch to our native feed URL http://the-gadgeteer.com/feed/ in order to ensure continuous delivery.
This week we are bringing you seven crowdfunding campaigns that are currently running on Kickstarter and Indiegogo. This week’s campaigns are for people who like camera and video gear, EDC tools, puzzles, and more. Check out our picks for this week’s notable crowdfunding campaigns.
MUWI: The Ultra Compact Dolly for Smartphones & Cameras
What is it?
MUWI is a small pocketed sized dolly for your smartphone and small cameras to let you take smooth motion shots.
Why do I like it?
Motion adds emotion to a video and the MUWI looks like a cool way to add curved or linear motion when you use your smartphone to capture video for all sorts of shots.
Where can I find more info?
The MUWI campaign ends on 7/3/18 and they have already passed their funding goal of $35,000. You can pre-order a MUWI starting at $39. After the MUWI campaign ends, rewards are estimated to start shipping in September 2018. Visit their Kickstarter page for all the details.
GoCube | The Classic Puzzle Reinvented
What is it?
GoCube is like a Rubik’s cube on steroids. It connects to an app to help you learn to become a cuber.
Why do I like it?
I have always sucked at figuring out the Rubik’s cube but not for lack of trying. The GoCube knows the current state of the cube and helps you learn how to solve it and you can compete with others. What’s not to love? Oh, one small thing… it’s not going to ship until March of next year. Ouch! But, if you can wait that long it does look pretty fun.
Where can I find more info?
The GoCube campaign ends on 8/9/18 and they have already passed their funding goal of $25,000. You can pre-order a GoCube starting at $69. After the GoCube campaign ends, rewards are estimated to start shipping in March 2019. Visit their Kickstarter page for all the details.
Capsule360: Versatile Motion Control Box with 3-Axis Motion
blurb by Julian Perry
What is it?
The Capsule360 is a motion box that takes 360-degree video or photos. It also has the ability to Pan, Tilt, and Slide.
Why do I like it?
I like the Capsule360 because it has many versatile features that include the ability to perform Smart-Object Tracking, 360-degree Product Photography, Star Tracking for Astrophotography, Panorama shots and more. It also has a Face Recognition feature that will follow you as you record, so that you are always in focus and in the frame. This is a great feature for Vloggers and anyone self-recording. You can use up to three Capsules360 boxes at once, and there is an app for both Android and IOS to control it all.
Where can I find more info?
The Capsule360 campaign ends on 7/10/18, and they have already met and passed their funding goal of $75,000. You can back this project with a support pledge starting at just $1, or a pledge for one or more Capsule360 boxes, starting at $179. After the campaign ends, rewards are estimated to start shipping in December 2018. Visit their Kickstarter page for all the details.
The Arbor Instant Video Doorbell
What is it?
Arbor is a wireless doorbell with a built-in motion activated security camera.
Why do I like it?
I like the Arbor doorbell because you don’t have to pay monthly fees, it comes with a WiFi booster chime, the battery powers the unit for up to a year on a charge, it has a built-in alarm, and the shipping is free.
Where can I find more info?
The Arbor doorbell campaign ends on 7/17/18, and they have already met and passed their funding goal of $50,000. You can pre-order an Arbor starting at $159. After the Arbor campaign ends, rewards are estimated to start shipping in August 2018. Visit their Indiegogo page for all the details.
EverRatchet: World’s First Ratchet Keychain Tool
What is it?
EverRatchet is an EDC multitool that fits on your keychain and has a 1/4″ ratchet, fire flint, scraper, 7 wrenches, bottle & box opener and more
Why do I like it?
I like the EverRatchet because it’s the first tiny pocket tool like this that I’ve seen with a ratchet mechanism. And it’s ultra-affordable and it is available in stainless steel and titanium. Really, what’s there not to like about it?
Where can I find more info?
The EverRatchet doorbell campaign ends on 7/5/18, and they have already met and passed their funding goal of $3,200. You can pre-order an EverRatchet starting at $16. After the EverRatchet campaign ends, rewards are estimated to start shipping in September 2018. Visit their Indiegogo page for all the details.
Masta Box: The World’s First Fidget Controller Gadget
What is it?
Masta Box is a fidget toy that is actually a tool that can do something other than just entertaining someone who likes to fidget.
Why do I like it?
The Masta Box fidget “toy” that doubles as a multi-functional controller that can be used as a joystick, laser pointer, trackball, air mouse, music player control, and more.
Where can I find more info?
The Masta Box campaign ends on 7/12/18 and they are still working towards their funding goal of $24,232. You can pre-order a Masta Box starting at $28. After the Masta Box campaign ends, rewards are estimated to start shipping in November 2018. Visit their Kickstarter page for all the details.
Rymek Retro Bluetooth Mechanical Keyboard
What is it?
The Rymek Retro Bluetooth Mechanical Keyboard is a Bluetooth keyboard that is reminiscent of mechanical typewriters from decades past.
Why do I like it?
I like the Rymek Retro Bluetooth Mechanical Keyboard because it reminds me of my mother’s Underwood typewriter that I used as a kid to write my own newsletters and stories. I loved the way it felt to press the keys and see the metal arm pop up and strike the page. This keyboard from Rymek brings back a little bit of that same feel but in a high tech package with backlit keys and a multifunction knob that provides multimedia control.
Where can I find more info?
The Rymek campaign ends on 7/17/18, and they have already met and passed their funding goal of $20,000. You can pre-order a Rymek starting at $99. After the Rymek campaign ends, rewards are estimated to start shipping in August 2018. Visit their Indiegogo page for all the details.
Note: If you are subscribed to this feed through FeedBurner, please switch to our native feed URL http://the-gadgeteer.com/feed/ in order to ensure continuous delivery.
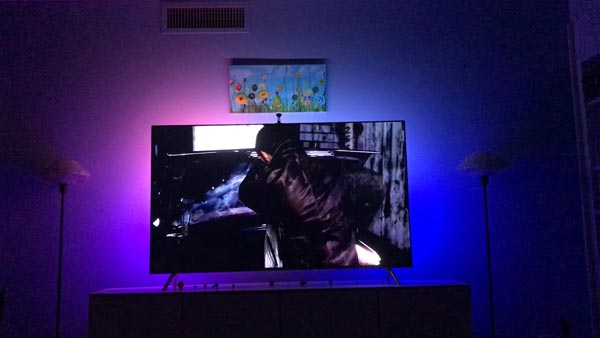
It’s hard to get the same movie-watching experience at home as you have at the theater. Some things are better at home (cheaper popcorn, more comfortable seats, no talking strangers), but other aspects, like ambient lighting, are more difficult to control. Room lights can wash out the TV screen, but watching in a dark room can cause eyestrain and means bathroom trips without those neat little pathway lights theaters have.
Dr. Andrew Weil describes an experiment that determined people experience less eyestrain when they watched a movie against a lighted wall. I don’t know about your setup, but there’s no room behind my TV for a lamp to light the wall. A lot of ingenious companies have come up with LED light strips that attach to the back of the TV to wash the wall with light. Some of these are static lights of a single color, but some companies have come up with systems to wash the wall in moving colors that match what’s on the TV screen. The Gadgeteer was recently offered the chance to review the Minger LED Smart TV Backlight kit with Camera which promises to wash the walls with moving colors. Since I was already looking for a backlight for my TV, I asked to be given the chance to review the Minger kit. Let’ see how it works.
What’s in the box?
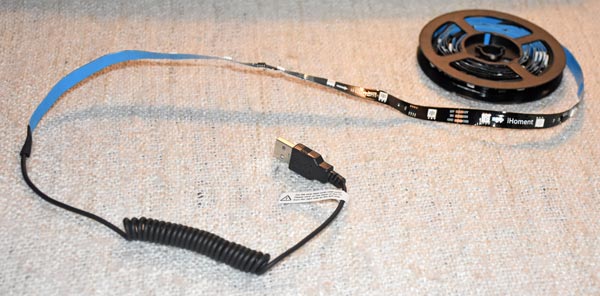
The first component is the 8.5 feet of LED strip lights. This kit is sized to fit a TV with a 55″ – 65″ screen. They also offer a kit for a 46″ – 55″ screen. I received the larger kit for my 65″ Samsung TV. The strip was nicely coiled around this film reel, so there were no kinks. The back of the strip has a press-to-stick adhesive to make applying it to the TV simple. It’s actually three strips of lights, with permanent connectors already joining the strips. This makes fitting it around the corners at the sides of the TV a snap.
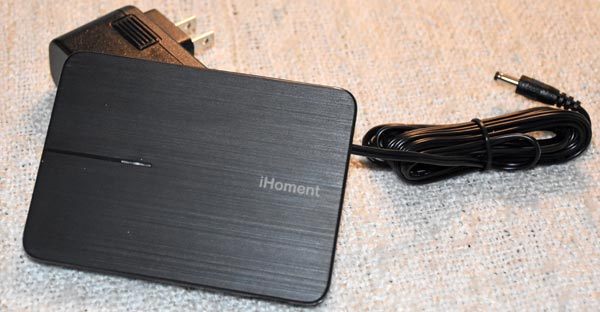
The controller box also has adhesive on the back to attach it to your TV. There are three connectors on the box. Two USB connectors attach it to the camera (on top of box) and to the light strip (bottom of box). You also attach the included AC power supply to the bottom of the box.
Please note that the seller calls this the Minger system, but some of the components are marked iHoment, and the controller app is called iHomentLight.
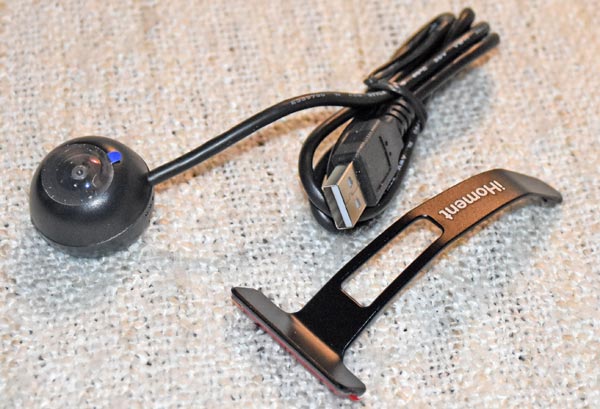
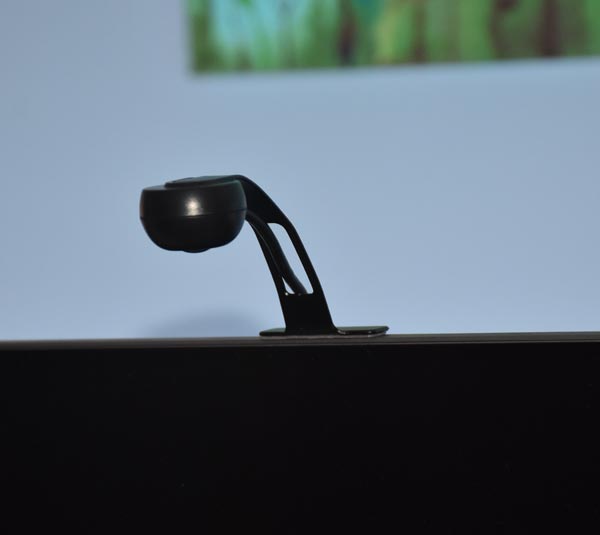
Instead of reading signals through the TV’s HDMI cable, and thus limiting the equipment it can work with, the Minger system attaches a camera to the top of the TV to “see” what’s on the screen. The stand attaches to the TV with an adhesive base. The camera plugs into the iHoment controller attached to the back of the TV.
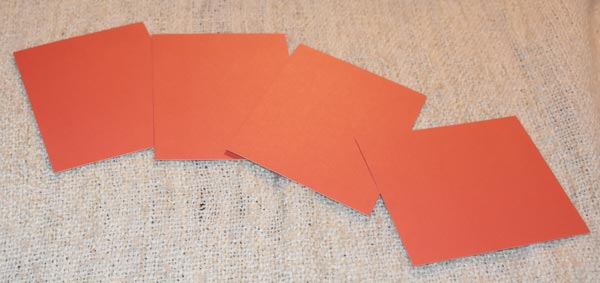
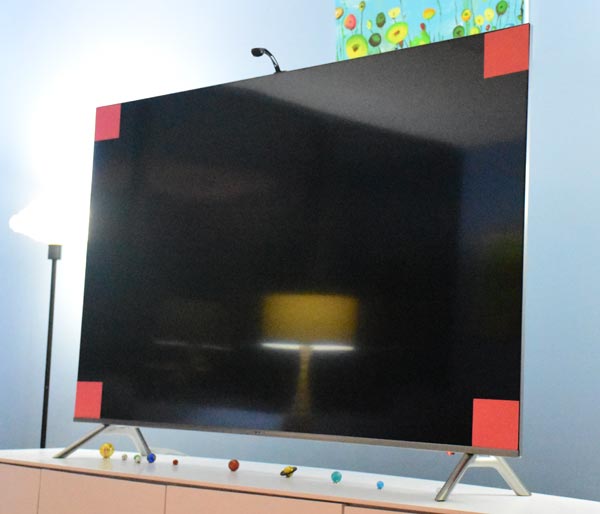
These four red cards are used for calibrating the Minger system. They have adhesive strips on the back so you can attach them to the four corners of the TV’s screen. They remove without leaving behind a residue.
Lastly, you’ll get a detailed set of installation instructions. The included paper tape measure is needed for installation. You’ll use it to find the middle of the top of the TV so you can apply the strip lights evenly on the top and sides of the back of the TV.
Setup
The installation guide has illustrations and instructions in three languages for each step. You first find the midpoint of the top of the TV, and center the long strip to the top using the adhesive back. The short strips attach to the sides, with the end with the USB plug on the right side (as you face the back of the TV) and the end with no connector on the left side.
The adhesive on the strips attaches easily with light finger pressure. The back of my TV isn’t smooth plastic; it has thin, raised lines on the surface. I’ll need to periodically check it for a while to be sure it’s sticking well to the textured surface over time.
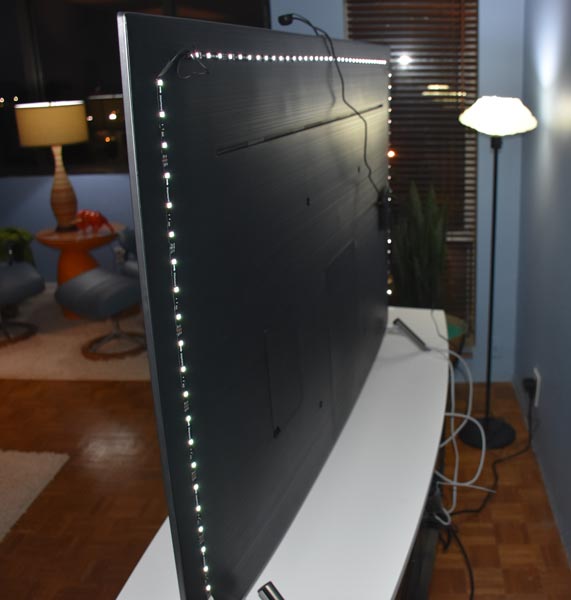
I couldn’t move the TV far enough from the wall to get a great picture, but you can see the installed light strips from this angle.
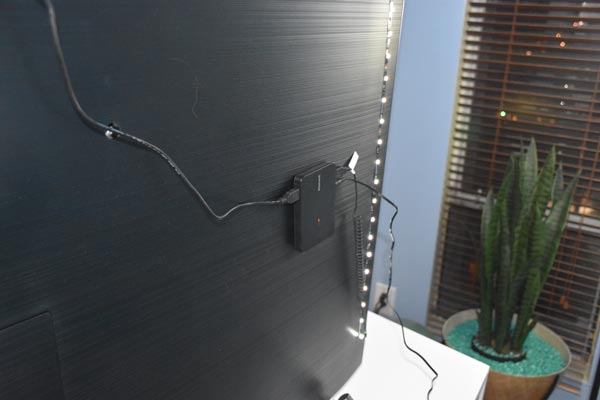
The pictures on the manufacturer’s website show the controller box beautifully centered on the TV, but I can’t do that with my TV for two reasons. First is there’s a bunch of connectors and plugs in the center of my TV, and they are hidden behind a removable door. Secondly, my TV has a cable guide system to hide all the cables so nothing is visible below the TV. I need to guide the power cable over to one of the TV’s legs so I can conceal it with the rest of the cables. I’ll probably end up just using some 3M Command cable guides to run it down the back of the leg and behind my media cabinet.
This is the camera adhered to the top center of the TV. I was really unhappy at first about having something sticking up off the TV in front of my picture my daughter painted for me, but the camera is pretty discreet.
Here’s the TV with everything installed and ready for calibration. I turned off the TV and left on the room lights so the camera could “see” the color of the calibration patches, as instructed. I pushed the TV and media cabinet back into place so the TV would be lighted as it normally is in my living room.
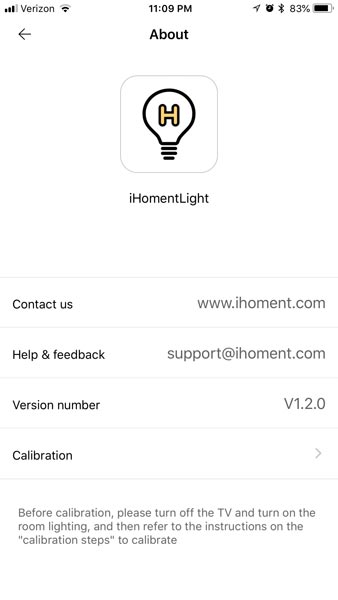
I downloaded the iHomentLight app from the Apple App Store to my iPhone 7 Plus. (The app is designed to fit the iPhone screen, but it will run on the iPad, if needed. There’s also an app for Android.) After connecting to the iHoment controller via Bluetooth, I was able to select the calibration setup from the app. The app walks you through every step of calibration.
During calibration, the lights blink and change. When calibration is complete, the backlights turn to steady green.
I’m ready to start watching TV!
Performance
This is how my living room normally looks while I watch TV. I turn off all the other lamps in there because they cause screen glares and reflections. I leave on the lights flanking the TV so we can see if we need to leave the room. It’s okay this way, but the two lamps can be a bit harsh, even when I dim them. The lede photo (at the top of this review) shows my TV with the Minger lights in use.
By the way, the images you’ll see in photos and in the short videos are from Thor: Ragnarok, Annihilation, and episodes of the Supernatural TV show.
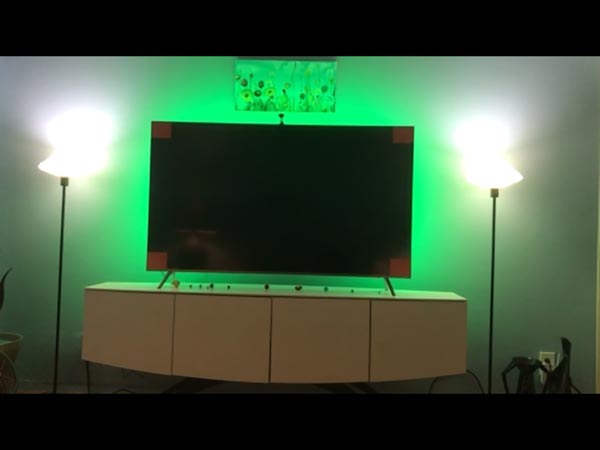
There are three modes for the light strips. First up is the Color mode. This allows you to choose a color by selecting one of the pre-selected colors or by scrubbing the slider bar to choose a custom color from the gamut.
For this picture, I choose the static red color, with the brightness setting maximized. I wouldn’t use red, but the static color is a nice way to add some light to the room without using those lamps to the side of the TV. If I were going to use static, I’d select a blue and dim it down a bit.
By the way, my living room is painted a medium blue. This color will impact the appearance of the colors the Minger system is shining onto the wall behind the TV. They will differ from the actual color and brightness you’d see against a white wall.
The next mode is Video. This mode uses the camera to monitor either Part of the screen (the edges) or All of the screen to select the colors for the strips. With All selected, the camera seems to select the color in the center (from left-to-right) of the screen, about a third of the way down from the top to use for all of the lights on all three strips. With Part selected, the camera monitors the edges of the screen and selects different colors for the various positions of the light strips, so it seems the color is bleeding off the TV screen onto the wall. Part monitoring is shown in the above video. All other clips for the Video mode show All monitoring.
You can also choose Dynamic or Mild for the speed of the color changes. The Dynamic changes are quick and abrupt – suitable for action movies, especially. The Mild changes are slower and less abrupt. Again, I’ll try to show this in videos.
Something I noticed that didn’t depend on the settings in Movie mode was that the color changes seen on the wall lagged a bit behind the color changes on the screen. (I’m sure this was an artifact of the time needed for the camera to read the color, send it to the controller box, where it was evaluated, and instructions then sent to the light strips.) This was especially true when the action on the screen was changing rapidly. While I was carefully watching the performance of the Minger system for this review, I was aware of the lag. When I was just watching a show, I wasn’t really aware of the color lag. It didn’t bother me that the color on the wall didn’t match what was showing in that portion of the screen when using Part mode any more than having the entire wall washed with a single, but changing color when using All mode.
I did enjoy the changing color display on the wall behind the TV regardless of what mode I was using. I didn’t prefer the Part or All option over the other. I just liked the movement of the colors that mimicked the action on the screen.
I didn’t dislike having a single, unchanging color on the wall with the Color mode. That was actually a nice ambient light that was easy on the eyes, but I did prefer the motion of the Video mode.
You’ll notice a power button at the top of the app screen. Because the light strips aren’t plugged into the TV itself, you’ll need to open the app and turn on the lights manually each time. This also means that you can use the light strips even with the TV off. The system uses a microphone to “listen” to ambient sounds and creates a light show based on what it hears.
My video shows the color display while listening to Gary Numan’s I Am Ruin from his Savage (Songs from a Broken World) album. The lights were also just as happy to dance to the sounds of a conversation I was having with my husband. I can’t imagine what it would do at a party with music playing and a lot of people all talking at once!
I’m sure that there are many other light kits on the market that do what the Minger system does, but most of the other kits I’ve seen cost much more than the $60 this system costs. I haven’t tried any of the other systems, but I think they’d have a hard time performing so well that I’d be willing to pay a premium for them when the Minger kit does such a great job.
What I like
Easy installation
Neat installation with only one wire coming off the TV
Lots of color modes so I can customize how I like it best
Nice ambient lighting for the room without reflections or glare on the TV screen or bright lights shining in your face
Can create a light show for music without having the TV on
Could even use the kit as an accent light for the room without watching TV or listening to music
Using a camera means you don’t have to insert it into the cabling path of your home theater setup
Camera also means you can use it with older TVs without HDMI
What needs to be improved
Some people may be bothered by the slight lag in the color change, especially action movie fans
Final thoughts
The Minger kit is still installed on my TV, and it will stay there. My husband, daughter, and I all agree that the Minger LED Smart TV Backlight kit with Camera makes watching TV and movies at home more like going to the theater. It’s a keeper!
Price: $59.99 Where to buy: Amazon 20% Off Code on Amazon: WFW5U34K (Expired 07/15). Source: The sample of this product was provided by Govee for Home
Note: If you are subscribed to this feed through FeedBurner, please switch to our native feed URL http://the-gadgeteer.com/feed/ in order to ensure continuous delivery.


 At the bottom part of the holder mechanism, there are two ports, one USB, and one micro USB. The micro USB port is used to power/charge the battery that is built into the holder, and the regular USB port can be used to power/charge your cell phone or any other USB accessory. The built-in battery means that once charged, the holder can operate and charge your device without being plugged into a power source.
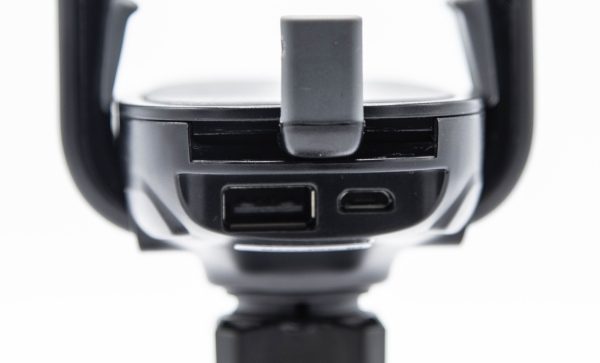
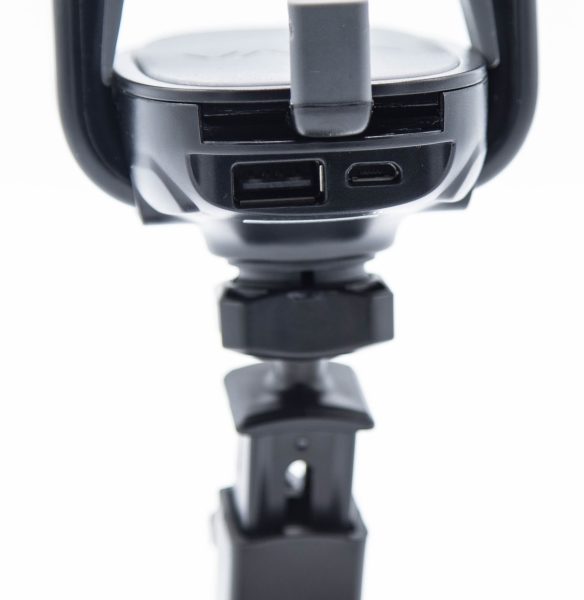
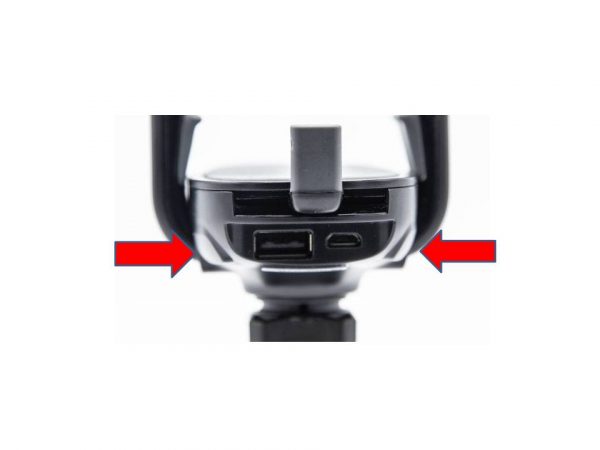 The picture below shows the accessory charging cable plugged into the bottom of the holder. This cable can be used to charge any accessory that can be charged via USB, or to power any such device.