

REVIEW – Recently, I had the opportunity to review Skylum Software’s Luminar Flex photo editing plugin which offered much of their full Luminar product’s AI-based (Artificial Intelligence) editing available in Photoshop or other supported software. Skylum has been in the lab and has released Luminar 3.1.0 with their new Accent AI 2.0 logic for one-touch photo editing.
What is it?
Luminar 3.1.0 is an update to Luminar 3, a full-featured photo editing package with tools like clone and stamp, cropping, transformations, layers, lens correction, color adjustments and so on. So what, you say? There are a lot of tools like that, you say? Yup – I agree with you. They’re a dime a dozen. Just pick the one with the interface and price that make the most sense to you and cents to your bank account and edit away. Of course, you will take a lot of time editing your photos, tweaking curves, balancing exposures, adding layers in various opacities to get the look you want. Or…you can use Luminar 3.1.0. Its full plate of AI-based looks makes one-touch image enhancement stupid-simple for those of us that don’t have the time to fiddle. OK – I’m retired, so I have the time, but I have far better things to do.
Fair warning – this review is about photo editing software, so this is going to be photo-heavy. Also, I left the photos large-ish, so you can get a better look at the results.
Design and features
Let’s get this out of the way right now – Luminar is a full-featured photo editing package. It does all the things other editing packages do and does them all well. It can add layers. It can blend effects in a multitude of ways. It can adjust exposure, color balance, contrast, brightness, tint, and so on. It can crop, clone, transform, skew, and basically do anything to your images that you could want. Its interface is fairly good, but like Photoshop or any other heavy-duty tool, there is a lot to it and it will take some learning to get good at it.
Photoshop has several “automatic” fix tools that are pretty good at one-click image improvement. Luminar takes that up a notch, or ten notches, with their AI-based one-touch tools. And, they provide a ton of ’em. That’s what this review will focus on since that’s what sets Luminar apart from the competition.
Setup
After downloading the software, I installed it on my Microsoft Surface Book.
The installation was pretty standard until it asked for my photo library. Since it asked, I pointed it to my library. Big mistake, I have my photos on my Drobo 5N2 storage robot. I currently have it populated with 5400 RPM disks. Given that it is network-based, and has relatively slow disks, it simply isn’t that fast. Add to that that I have over 160,000 photos on it, and I had to sit for a couple of hours while Luminar spun through them all, building a catalog. Note to self: point it a small folder and add catalogs for specific subjects!
Once it finished, I created a new catalog for images for this review. As you add new images to a cataloged folder, Luminar automatically adds them to the catalog, so they show up the next time you open Luminar.
Here are the minimum requirements:
System Requirements for Mac OS
- MacBook, MacBook Air, MacBook Pro, iMac, iMac Pro, Mac Pro, Mac mini
- Processor Intel 64-bit Core 2 Duo or better
- Memory 8 Gb RAM or more
- macOS Mojave 10.14, High Sierra 10.13.1, Sierra 10.12.6, El Capitan 10.11.5
- Hard disk 10 GB free space, SSD for best performance
- Display 1280×768 size or better
System Requirements for Windows
- Windows-based hardware PC with mouse or similar input device
- OpenGL 3.3 or later compatible Graphics Cards
- Processor Intel Core i5 or better
- Memory 8 Gb RAM or more
- Operating System Windows 7 (only 64-bit OS), Windows 8.1 (only 64-bit OS), Windows 10 (only 64-bit OS)
- Hard disk 10 Gb free space, SSD for best performance
- Display 1280×768 size or better
I ran tests on my Microsoft Surface Book with 8GM RAM, Core i7-6600u 2.6GHz processor and Win 10 Pro 64-bit. Based on the requirements, my laptop is at the bottom in terms of RAM, but better than the minimum processor speed. While I have an SSD, as stated above, my images are on network attached storage, so I pay a performance hit there as well.
Performance
When I chose images for this review, I decided to grab a selection of pretty good images, and some pretty bad ones, in terms of lighting and contrast. If we’re going to have AI do the heavy lifting here, let’s see how intelligent it really is.
I created a new catalog for these images and let Luminar grab the images once I copied them into the catalog. Luminar has a complete suite of image management tools that include folders, where Luminar can manage your image folders and albums, where you can put similar images from different physical folders – think playlists in iTunes.
I also decided to try the batch processing option to get an idea of how practical that process is. If Luminar really bills itself as easing photographer’s workflow, it should actually make that workflow easier!
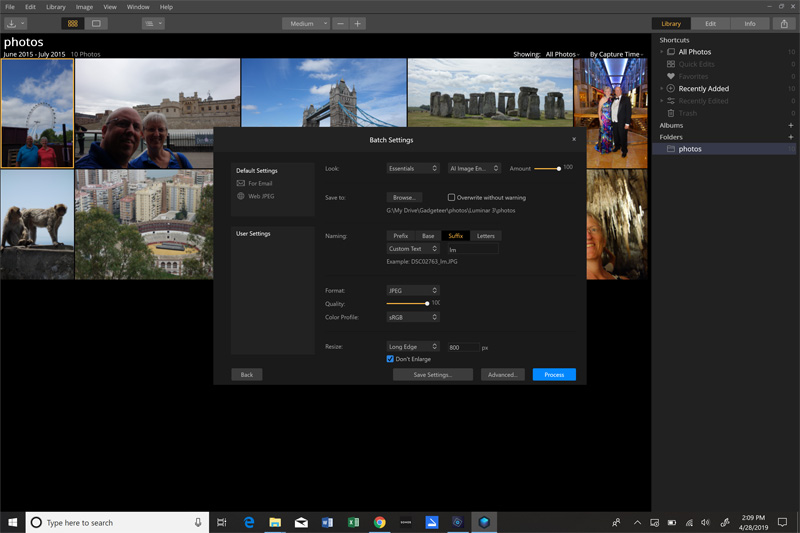
The batch processing window has a couple of default options to export images for email or the web. You get to decide what family of “looks” filters, and the specific AI filter to use when each image is processed as well as the level of the filter’s strength, from 0% to 100%. You pick the output destination, naming options, output file format, quality, and color space. Finally, you can resize the images with a variety of sizing or edge-binding options.
Given the limitations I have on my laptop, after grabbing eleven images for this review and choosing the Essentials collection AI Image Enhancer look at 100%, high-quality JPG output, setting an 800-pixel long-edge resizing and firing it up, I was prepared to sit and wait. I was pleasantly surprised when just about 90 seconds later, my images were all exported. Let’s see how they turned out.
Image 1
Let’s start with a shot of my wife & me in front of the London Eye. The lighting was horrific and the image was dark and flat. We were in shadows and are quite dark.
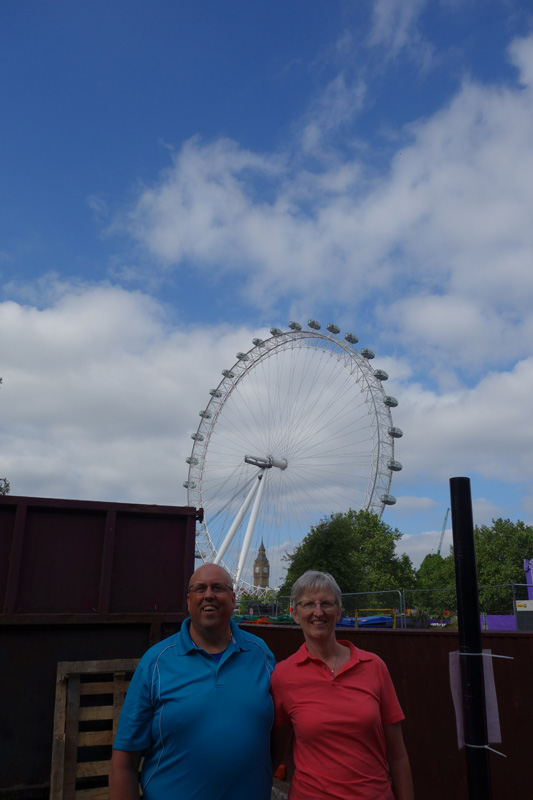
After processing, you can see how much richer the sky looks and we are brightened considerably.
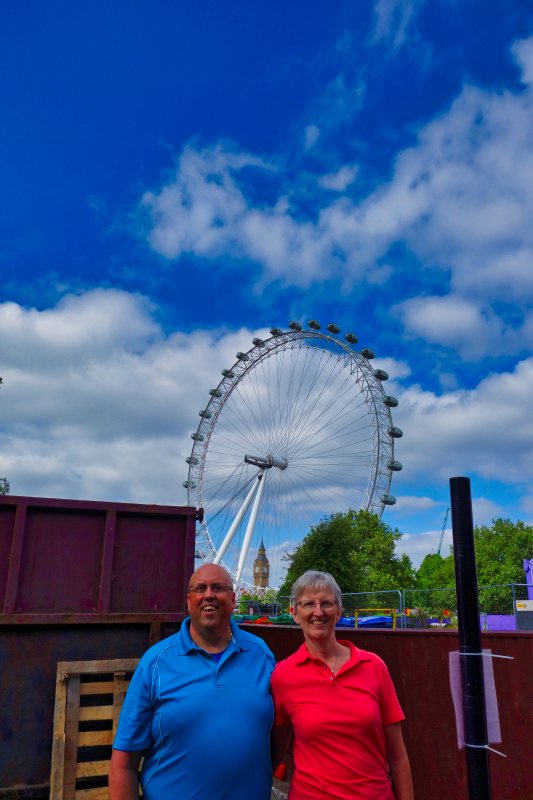
To my eye, our shirts are a little over-boosted and have a bit of red tint added to our faces. This is easily controlled by dialing back the filter from 100% to perhaps 75%, but since I processed this all in batch mode, it was what it was.
Image 2
Here we are at the Tower of London on a cloudy day. We are backlit and pretty dark and the overall image is flat with little contrast.
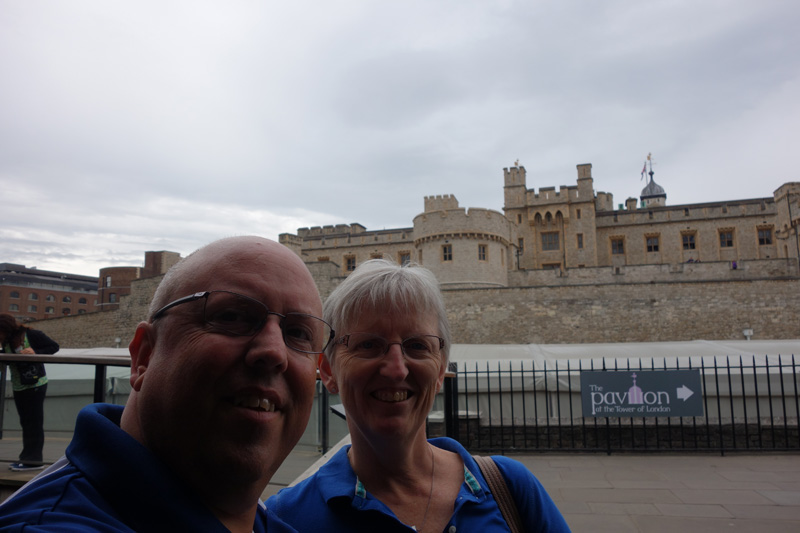
After processing, contrast is up and everything looks much sharper. The traces of blue that were actually in the sky are now visible and our faces are brighter but like Image 1, have a red tint.
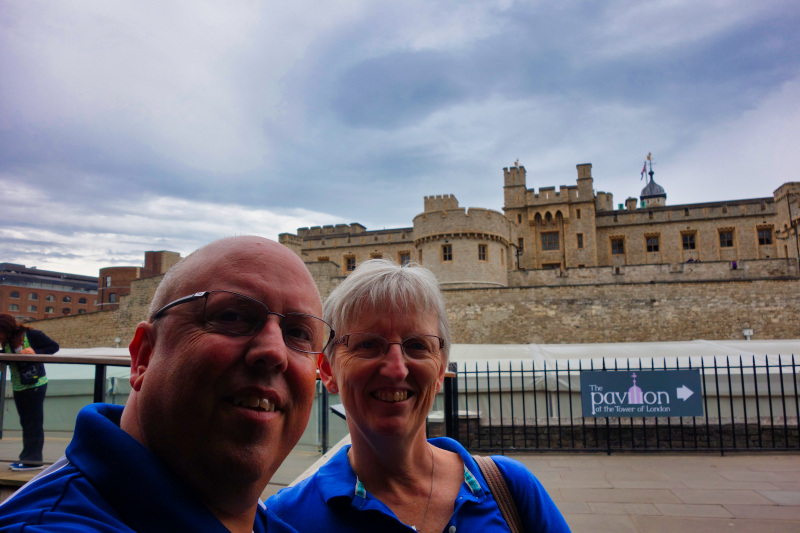
There was only so much Luminar could do lightening our faces. I would have to spend time in a new layer and process that layer with our faces independent from the rest of the image.
Image 3
London Bridge on a beautiful day. Colors look pretty good, but a little flat, compared to what the eye sees – a typical limitation of cameras.
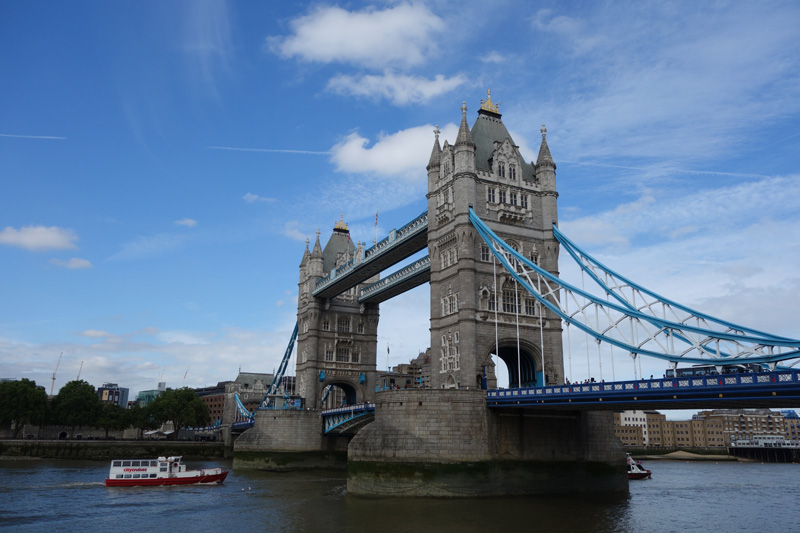
After processing, everything is boosted and richer. This should be a postcard! The algae just above the waterline is now visible, where it fell off in the shadows in the original image.
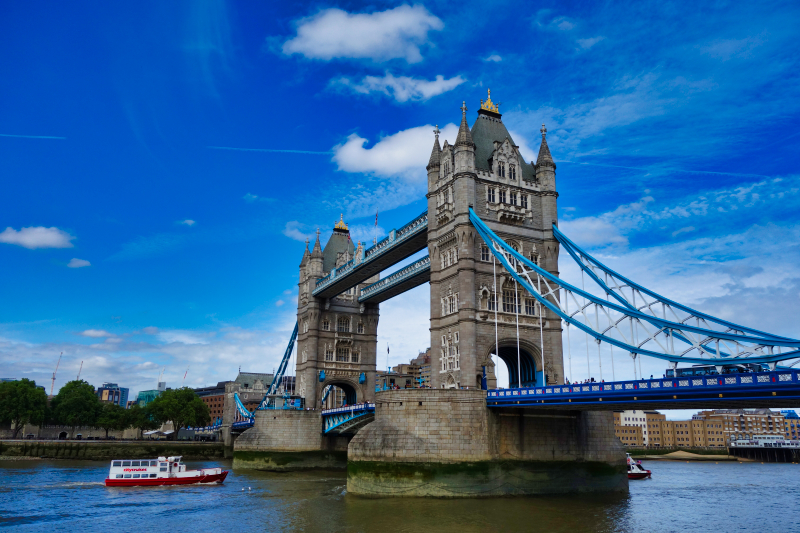
Image 4
Stonehenge. Another partly cloudy, low-contrast day. Colors are all muted and the stones look flat and featureless.
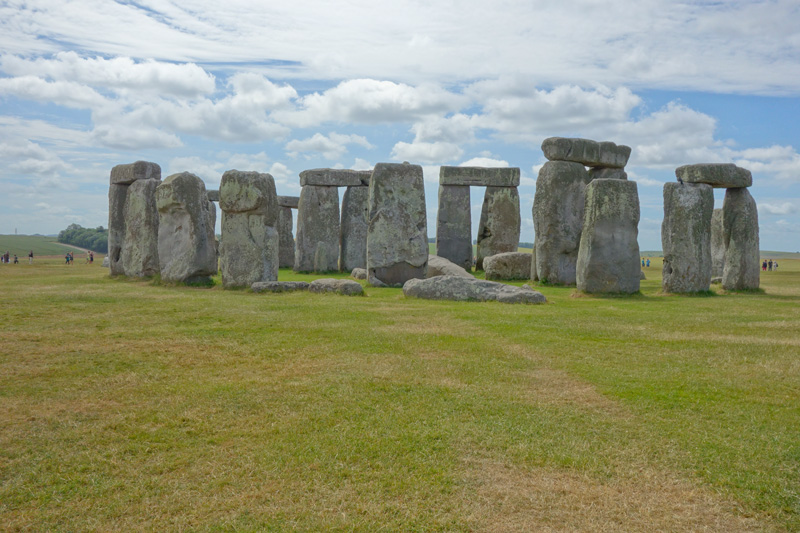
After processing, contrast is improved and colors are boosted. I’m not as thrilled with how the stones were rendered as they are now darkened and some detail is lost.
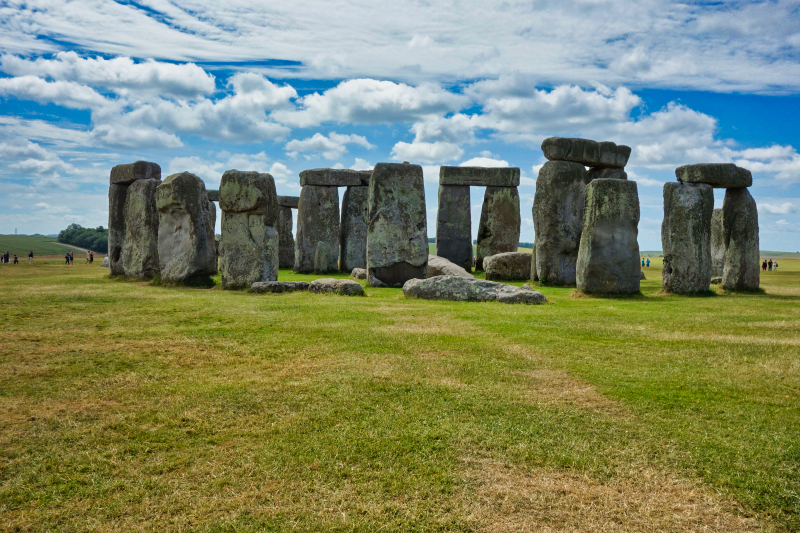
Image 5
Here we are on a formal night on a cruise. Overall, I thought this looked pretty good straight out of the camera.
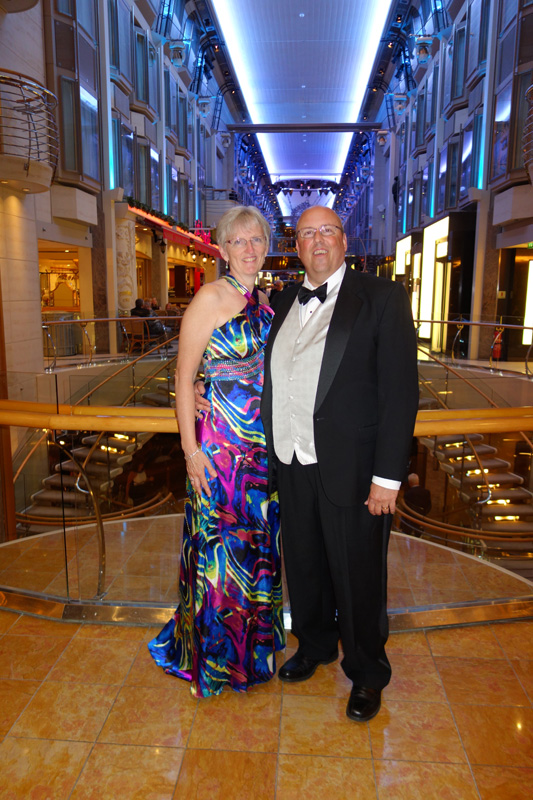
After processing, I do like the brightened shadow area in my tux, but I think some of the colors in my wife’s dress are a tad over-boosted. Like other images, there is a bit of red introduced in our faces.
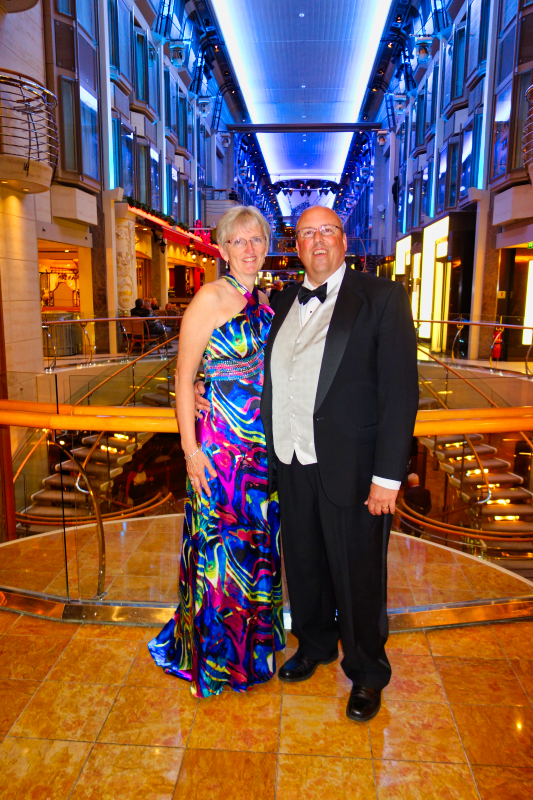
Image 6
Another horrible image out of the camera. These Barbary macaques on Gibraltar were posing perfectly but there was no light on their faces.
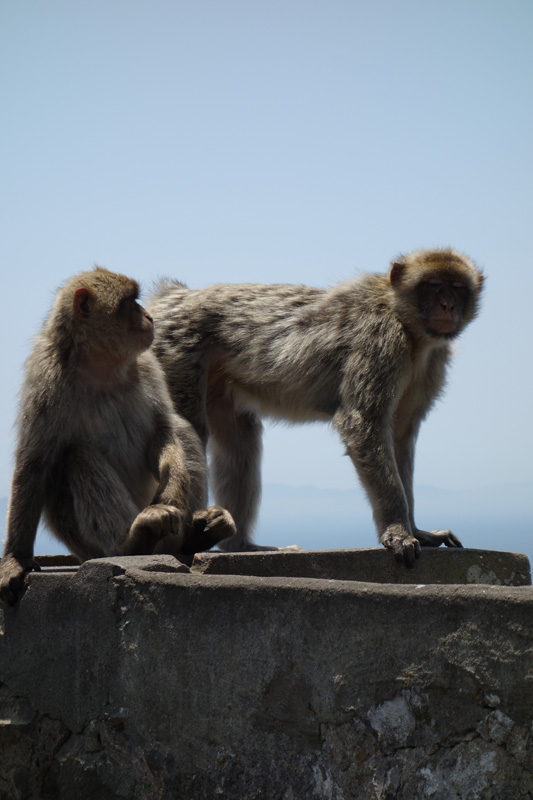
After processing, the detail in their faces comes out as well as detail and color in their fur and detail on the wall
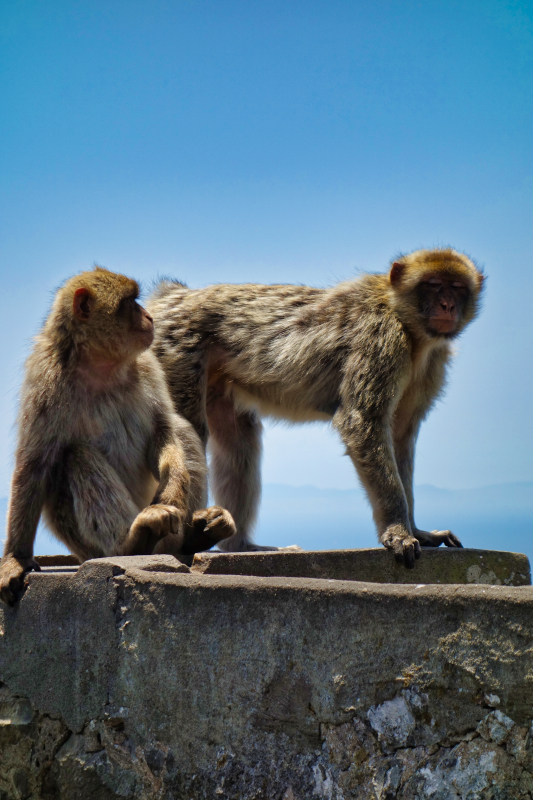
Image 7
This is a bull ring in Malaga, Spain. Straight out of the camera, colors are flat and the image is pretty low contrast.

After processing, the image pops. I really like how this turned out.
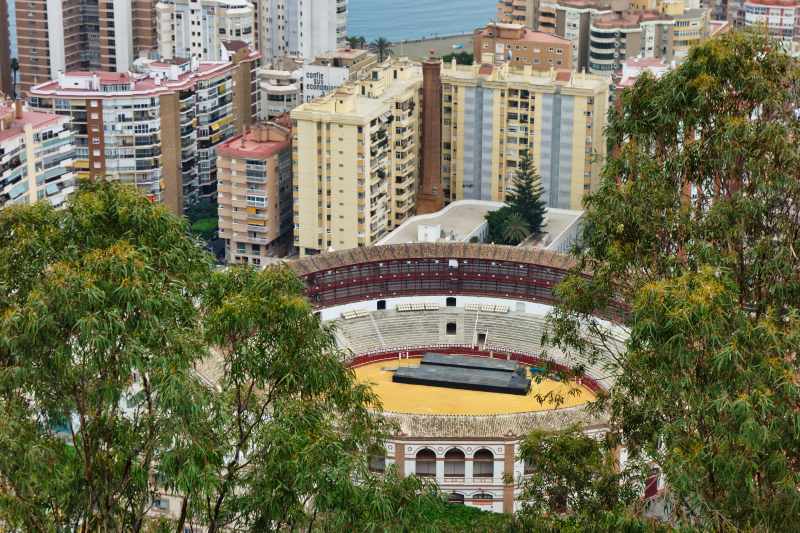
Image 8
Here we are, overlooking the marina in Monaco. This image looks pretty good out of the camera as the lighting was good and the sun was high, providing good contrast.

After processing, the sky and water are enhanced but my shirt, that was pretty darn bright already, is a bit overblown. The red tint we have been seeing on skin is there, but not as pronounced in this image as in previous ones.
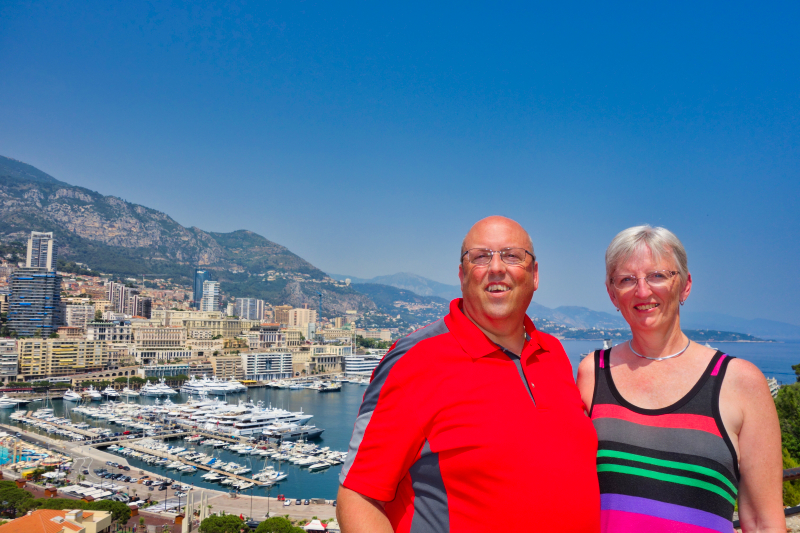
Image 9
This is a view of Cassis, France from a bluff. There was a bit of light haze that day, making it difficult to get a really great photo.
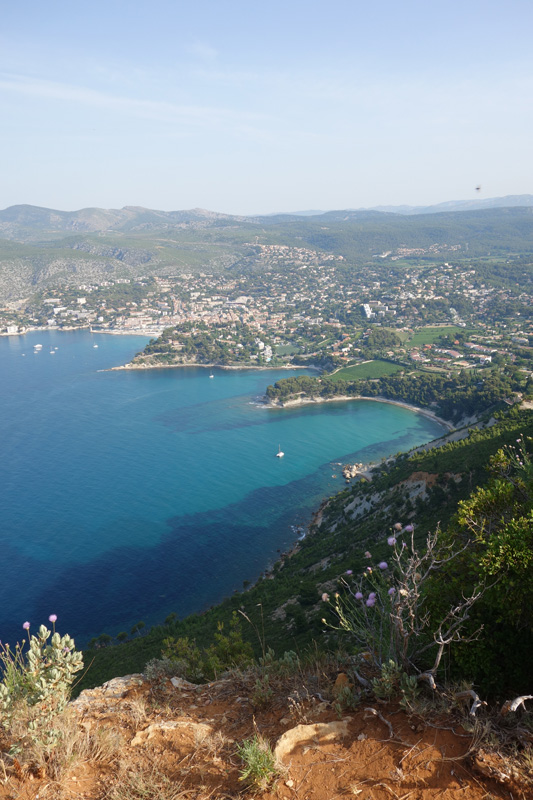
After processing, the filter took care of the haze and really made this look great! Look at how it pulled the light purple out of the shadows on the plant in the lower right.
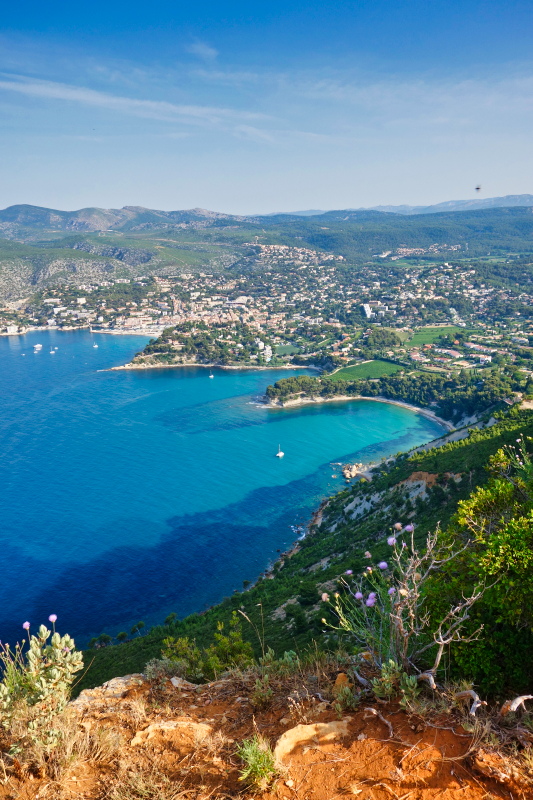
Image 10
Here we are in the Caves of Drach in Porto Cristo, Mallorca, Spain. This is underground with limited lighting and no flash.

After processing, everything is lightened up. While there is red/yellow tint, that is mainly due to the incandescent lighting, not the AI filter. I would take more time to edit this image, removing the color cast in Luminar – a very simple task.

Image 11
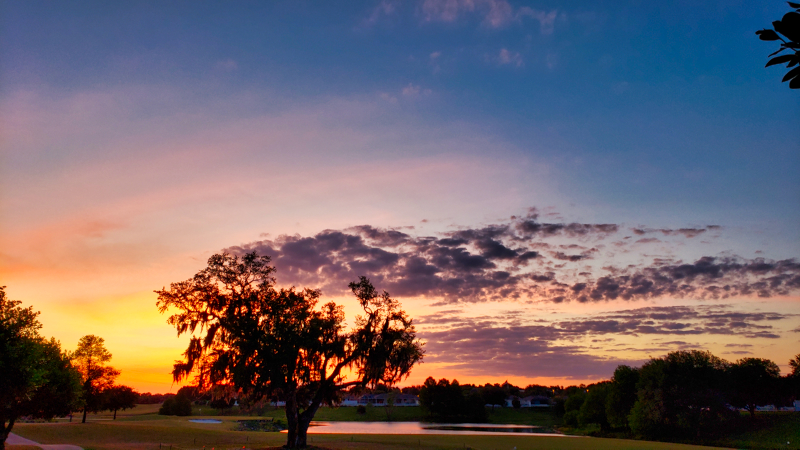
We had yet another beautiful sunset a couple of days ago, so I ran outside with my phone and took this. My Galaxy S9+ did an admirable job but failed to really capture the depth of colors I saw with my eye.
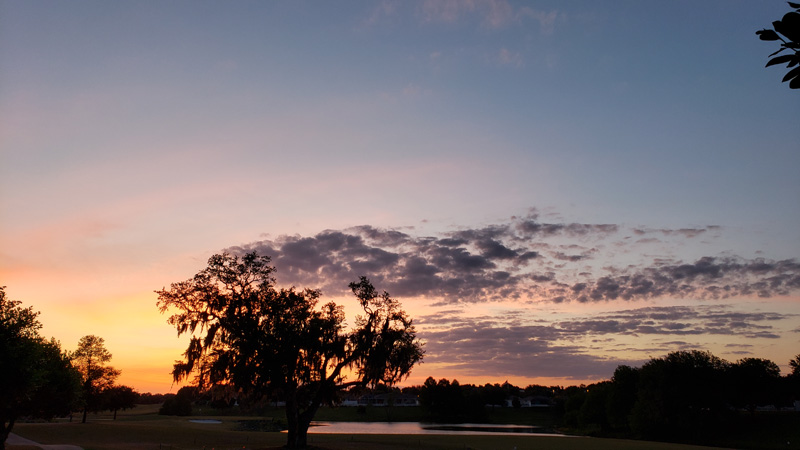
After processing, I now see pretty much what I saw with my eyes outside that evening.
I want to reiterate that all examples here were processed with me doing exactly no work at all. I just put them in a folder, chose a couple of options and came back two minutes later to complete, resized, processed images. Even with multiple images with really poor lighting and exposure, Luminar did a pretty good job rendering usable images, and in the worst cases, would only take a tweak or two to finish up.
What I like
- A plethora of included, AI-based looks – about 70 different looks
- Comprehensive manual image tools
- Complete control over how much each look adjusts the images
- Beyond simply scaling back on the filter, you can also tweak how it gets applied with the updated Accent AI 2.0 slider
- Comprehensive file naming tools for batch processing
What needs to be improved
- The interface takes some learning, but that’s pretty much the case with any image editing tool with this much power. Overall, Luminar does a good job being easy to use once you spend some time with it.
- Filters at 100% seem to over boost pretty regularly
- This can be mitigated by scaling back from 100% filter application
- When exporting images, either directly or as a batch, there is no option to save the file in its original folder – that would be a nice option, especially with all the batch renaming and overwriting protection options
Final thoughts
Overall, I am pretty impressed with Luminar 3.1.0 and its ability to improve images with a single touch. In addition, the variety of provided looks, from artistic to dramatic to simple to complex is impressive. The amount of power it brings to improve your images is terrific, especially at its price point.
If you are looking for a tool that can definitely help you process your images to get them to look like what you envisioned when you hit the shutter release, Luminar 3.1.0 should be on your short list of tools to consider.
Price: $60; $69 with a Photography 101 online class; $129 with the Photo 101 class plus Aurora HDR editor
Where to buy: Direct from Skylum Software
Source: The sample of this product was provided by Skylum Software.
Filed in categories: Reviews
Tagged: Photo editing software
Skylum Software Luminar 3.1.0 with Accent AI 2.0 photo editing software review originally appeared on The Gadgeteer on May 7, 2019 at 12:00 pm.
Note: If you are subscribed to this feed through FeedBurner, please switch to our native feed URL http://the-gadgeteer.com/feed/ in order to ensure continuous delivery.