Native Union Eclipse 3 port charger review

I’m pretty good about charging my phone throughout the day, and with wireless charging now included on more phones it’s easier than ever to stay charged. Inevitably though, I’m actively using my phone or other non-wireless-charging device when I really need a charge. My solution has been to strategically place cables around the house. It gets the job done, but the result is a visual mess (cables never getting put away), or the cables get into a fight with the Roomba. This has resulted in countless hours browsing for a functional and aesthetically pleasing solution. The latest candidate is the Eclipse Charger from Native Union which I’ve been using for a couple weeks now.

What is it?

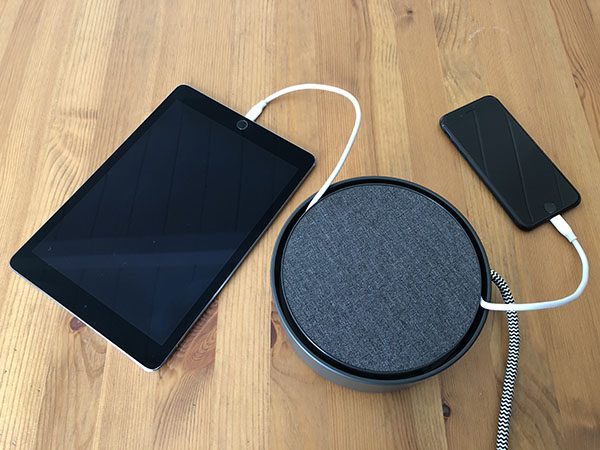
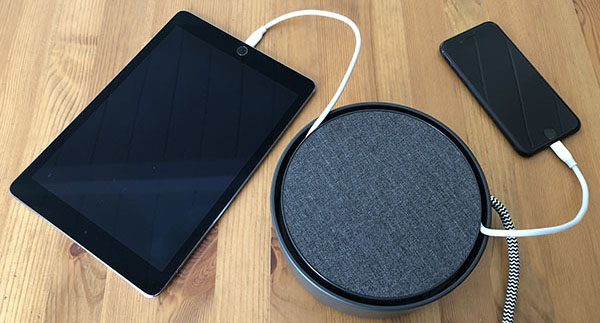
The Eclipse is a smart USB charger that has more in common with home decor than the typical wall adapter. It sits on a table top and can provide 7.8 Amps of power for up to three devices at the same time. Native Union clearly has a vision for the Eclipse, and for a device that’s meant to blend in visually, they’ve made sure that it still stands out.

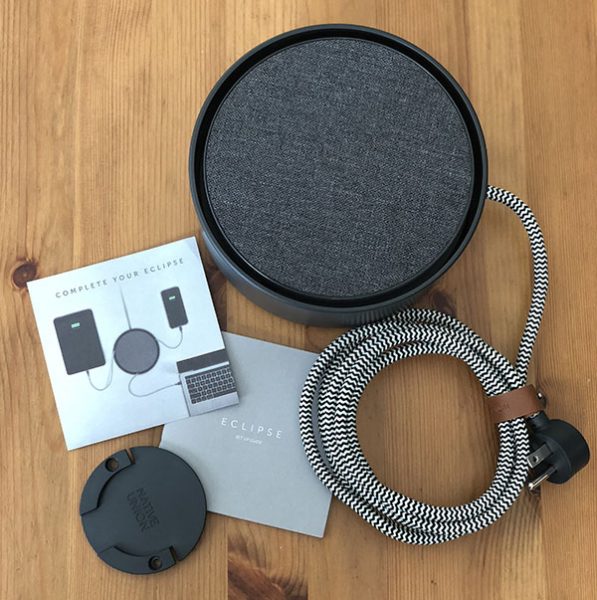
What’s in the box

Eclipse Charger
Wall Mount
Quickstart Guide and Cable Offer

Design and features

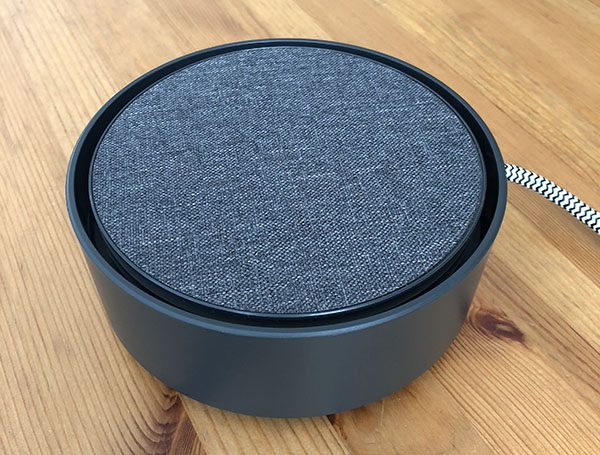
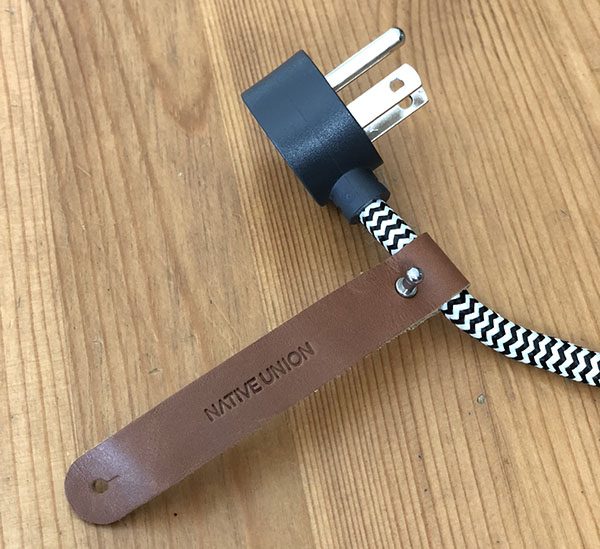
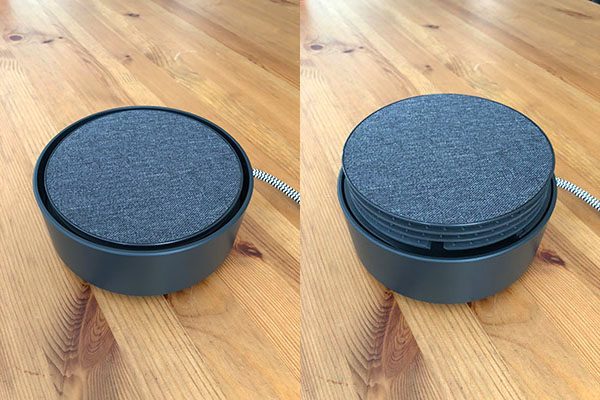
The Eclipse is available with different top surfaces. I’ve chosen to review the textile version (shown here) that looks right at home next to our fabric covered sofa. It’s also available with wood or marble top surfaces for a premium. It has a good heft keeping it in place during operation with smooth sides and fabric covered power cord giving it a clean look. The 90º plug keeps the cord close to the wall with a letter wrap to handle any extra length.

Cable management is a central function of this product and Native Union has a pretty novel solution that involves providing your own cables. The Eclipse uses a gesture based system where two taps on the top results in a cable reel magically emerging out of the center of the product. A single tap activates a nightlight “halo” feature that helps you find and connect your cables in the dark.

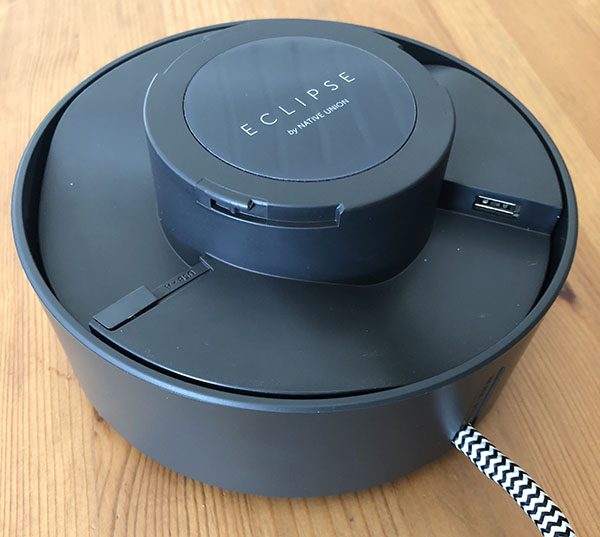
You should only need to access the ports during initial setup. A slight counterclockwise turn and then a lift of the reel, reveals 3 USB ports, one of which lets you choose between USB-A and USB-C.

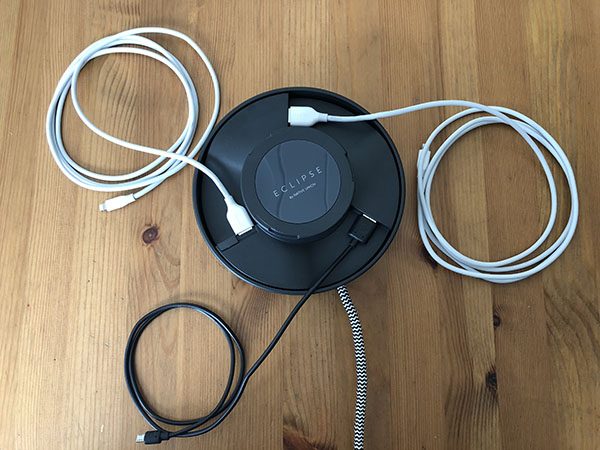
Connect your 3 favorite cables (up to 6’ long) to each of the USB ports. I’ve used a pair of Anker 6’ Powerline Lightning cables and Micro-USB that came with a Mophie battery case.

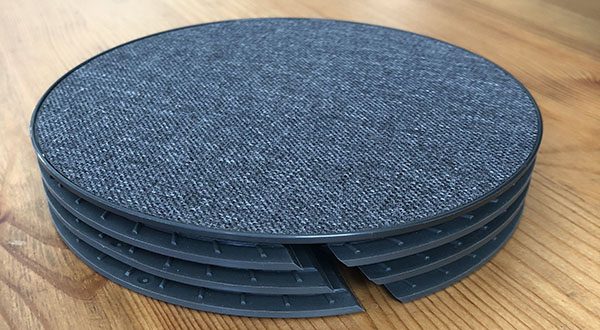
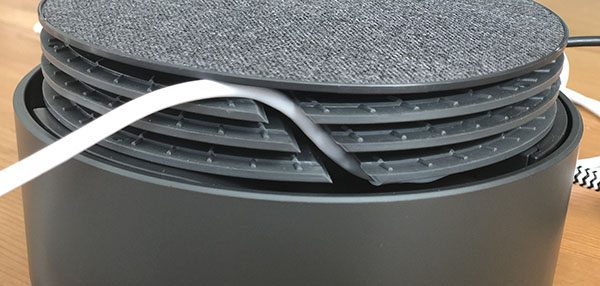
The reel has 3 channels equidistant around the perimeter and it’s important to note how they work as you put it back into place with a clockwise twist.

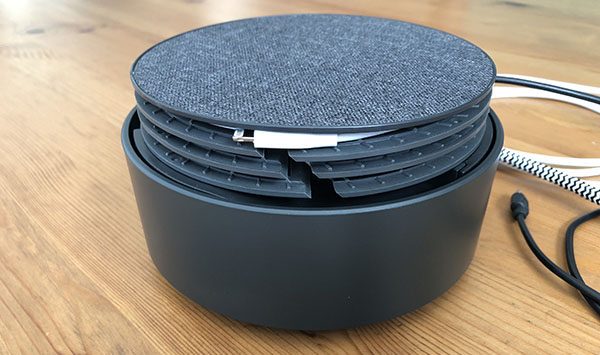
Your first cable needs to route up to the top channel through the slot that breaks through all three tiers. From there you’ll wind it clockwise until your cable end tucks away. Repeat this process with the second and third channels. When finished a double-tap hides it all.

What I like

It looks great and is very functional. In designing the Eclipse, they purposefully left a gap between the center reel and the outer wall which lets you close the mechanism with cables in use. You can unwind as much (or as little) cable as you need before closing it back up.

What needs to be improved

There are a couple of things that I feel could use some refinement. It’s supposed to work with most cables, but cables come in a lot of sizes and shapes. The micro/USB cable I used has an oversized end that barely fits. Winding it loosely allowed me to shift the end to an area with more allowance. It’s not a deal-killer as you likely have a few varieties as I do.

The gesture thing is cool at first, but seems to misfire frequently, either ignoring my taps or reading it as a single tap turning on the nightlight that glows from the bottom of the device. Adding a slight delay between taps helps remedy this but I find myself wishing for a physical button that just works every time.

Final thoughts

Overall I like the Eclipse as it has solved a rat’s nest cable problem for me. Something about the design and the manual nature of winding has me wanting to put them away when not in use. A quick tip is to put your most frequently used cable into the bottom channel. If you connect your top cable and go to use cable 2, you’ll end up having to thread it under the first cable every revolution.
The only other thing you should know is that the Eclipse is significantly bigger than you might think. Here it is next to a soda can for reference. That said, the diameter makes sense for limiting the number of times you need to wrap cables and if you have a big enough table, it’s not a major issue. The Eclipse has found a place on my side table.

Price: $80 / $100 / $160 for Textile / Wood / Marble
Where to buy: Native Union and Amazon

Source: The sample for this review was purchased with my own funds.

Filed in categories: Reviews

Tagged:

Native Union Eclipse 3 port charger review originally appeared on The Gadgeteer on March 7, 2018 at 11:00 am.

Note: If you are subscribed to this feed through FeedBurner, please switch to our native feed URL http://the-gadgeteer.com/feed/ in order to ensure continuous delivery.

Bellroy introduces Pencil Cases and Classic Pouches

Known primarily for their high-quality, thoughtfully-designed wallets (several of which have been reviewed here at The Gadgeteer), Bellroy has recently launched a line of cases pouches. Intended to store and organize your smallish items, the YKK-zippered pouches are made from either Leather Nubuck leather or Soft-woven Polyester, available in multiple colors and in three sizes: Pencil Case, Pencil Case Plus and Classic Pouch. The Pencil Case and slightly larger Pencil Case Plus have a single compartment that can fold out into a tray and are sized for holding writing instruments or other small items, while the clamshell-styled, wide-opening Classic Pouch has mesh wall pockets inside for organization and is collapsible for travel (including one pocket with a discreet magnetic closure). Prices vary from $39 to $79 depending on the material and size of the pouch. Visit Bellroy.com for more info or to order.

Filed in categories: News

Tagged: , ,

Bellroy introduces Pencil Cases and Classic Pouches originally appeared on The Gadgeteer on March 7, 2018 at 10:00 am.

Note: If you are subscribed to this feed through FeedBurner, please switch to our native feed URL http://the-gadgeteer.com/feed/ in order to ensure continuous delivery.

The Dracast LED180Halo Ring Light – A real gem.

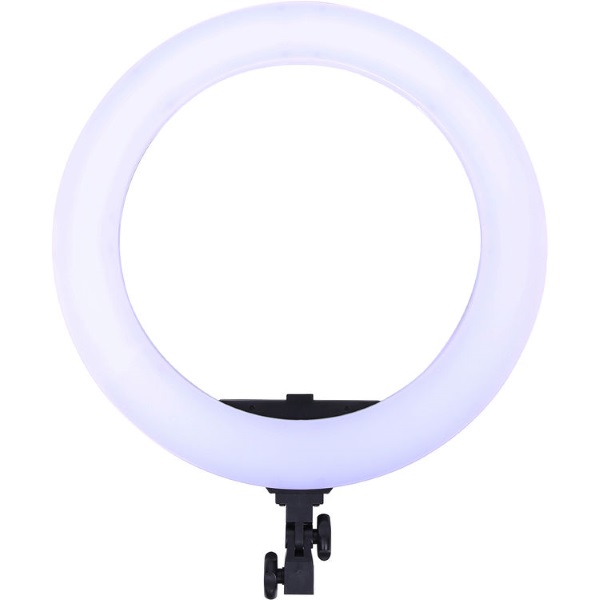
Many photographers use ring lights both in the studio and on location to help produce wide, even, and flattering light that eliminates almost all shadows, and is very good for highlighting beautiful skin tones. As a photographer, I have also tried a few ring lights, and most recently I purchased the Dracast LED180 Halo Daylight Ring Light in the 19” size, and in the Daylight version. This light is offered in both 13.5” and 19” sizes, and in color temperatures of Bi-Color or Daylight.

The LED180 features 252 surface-mounted LEDS in a 360-degree light that works great. The lens of the camera can be placed in the middle so that the light surrounds the lens and provides even light over the entire subject. It also has 10 to 100% dimming, and a CRI – color rendering index of 96. The CRI is the measure on a scale of 0 to 100 of how accurately the light can illuminate objects in “true colors”.

The light also comes with a nice case, AC adapter, an extra diffusion filter and a base that allows it to rotate 180 degrees when securely attached to a light stand.

I have also used this light on the side on a light stand to provide beautiful lighting from angles, and to create interesting shadows. It is important to note that it is made entirely of plastic, so while it is well made, care should be used when handling it.

The Dracast LED180 light is a real gem, and you can purchase one at B&H Photo Video for $199.

Filed in categories: News

Tagged:

The Dracast LED180Halo Ring Light – A real gem. originally appeared on The Gadgeteer on March 7, 2018 at 9:00 am.

Note: If you are subscribed to this feed through FeedBurner, please switch to our native feed URL http://the-gadgeteer.com/feed/ in order to ensure continuous delivery.

To boldly listen as no-one has listened before

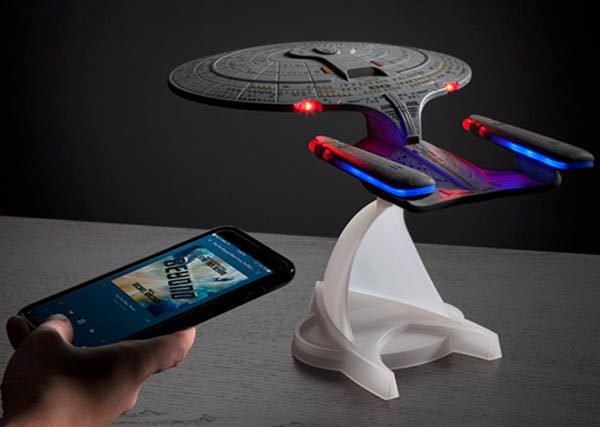
Over the decades, the Starship Enterprise has taken many forms, but this time she’s taken the form of a Bluetooth speaker.  This speaker is designed after the Galaxy-class Enterprise NCC-1701-D from The Next Generation.  The ship is a 12″ long scaled replica; it stands 12.5″ x 7″ tall x 9″ wide when displayed on its 2-piece stand modeled after a combadge. It connects to your mobile device or computer via Bluetooth 4.1 and has a 33ft range.

Inside is a 45mm single, full-range speaker.  It’s powered by an 800mAh lithium-ion battery, which charges with a DC 5V 1A source and included microUSB-to-USB charging cable.  You’ll get 6-8 hours of playback time at average volume on a single charge.  The ship also has LEDs on the engines, deflector dish, and saucer section; these can be turned off, if desired.

When you aren’t listening to music, the speaker can play various TNG sounds:  engine hum, torpedo blast, warp acceleration, and “incoming transmission” and”one minute to auto destruct” messages. You can use the engine hum sound as a white noise generator; it turns off automatically after one hour.

The Star Trek TNG U.S.S. Enterprise NCC-1701-D Bluetooth Speaker is officially licensed and available for $79.99 exclusively at ThinkGeek.

Filed in categories: News

Tagged: ,

To boldly listen as no-one has listened before originally appeared on The Gadgeteer on March 7, 2018 at 8:00 am.

Note: If you are subscribed to this feed through FeedBurner, please switch to our native feed URL http://the-gadgeteer.com/feed/ in order to ensure continuous delivery.

DockCase MacBook sleeve with built in USB C hub review

I love my 12″ MacBook that I bought as a refurb from Amazon a couple years ago. It’s the perfect size and the perfect weight for everyday use and especially for travel. I actually downsized from a 13″ MacBook Pro just to get a smaller and lighter machine. But downsizing also meant that I would have to sacrifice performance and expansion capabilities.

I honestly haven’t had any issues with the smaller MacBook’s performance, but expansion, on the other hand, has been a challenge at times due to the machine only having one port which is used for both charging AND peripherals.  A USB hub is pretty much a necessity with this computer if you ever want to connect something to it like an external monitor, wired keyboard, wired mouse, flash card reader, etc. USB Type-C expansion hubs are a dime a dozen, but have you ever seen a sleeve style case with a built-in hub? You will now because this is a review of the DockCase for the 12″ MacBook.

What is it?

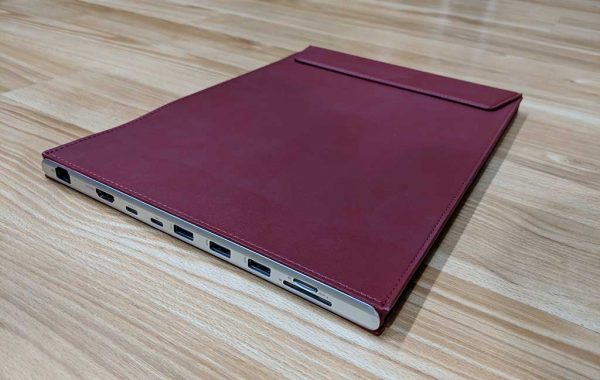
The DockCase is a slim microfiber leather and aluminum sleeve style case for 12, 13, and 15 inch Apple MacBooks that has built-in USB, USB Type-C, Ethernet, HDMI, microSD and SD card readers.

What’s in the box?

  • DockCase
  • USB Type-C to Type-C cable
  • Quick start guide

Design and features

If you didn’t look at the end of the case, you might not even realize that it’s more than a slipcover for your MacBook. Depending on the size of your MacBook, the DockCase comes in several colors like the red version that was sent to me.

On the end of the case, you’ll find the following ports:

1 LAN Ethernet(1000M Gigabit)
1 HDMI Video Output (4K@30Hz,1080P@60Hz)
1 USB C Power Delivery Charging (Up to 100W)
1 USB C 3.1 Data (Up to 5 Gbps)
3 USB 3.0 Data (Up to 5 Gbps)
Multi-in-1 Card Reader (SD-XC, SD, MMC, RS-MMC, SD-HC, Micro-SD)

A third Type-C port is on the side of the DockCase. This port is used to connect the DockCase hub to your MacBook using the included Type-C to Type-C cable.

As a case, the DockCase is just a basic sleeve that’s made of microfiber leather which is a synthetic (fake) leather with the look and feel (but not the smell) of real leather.

The interior of the DockCase has one main pocket to hold the MacBook, and a narrow pocket on the side that holds the included USB Type C to Type C cable.
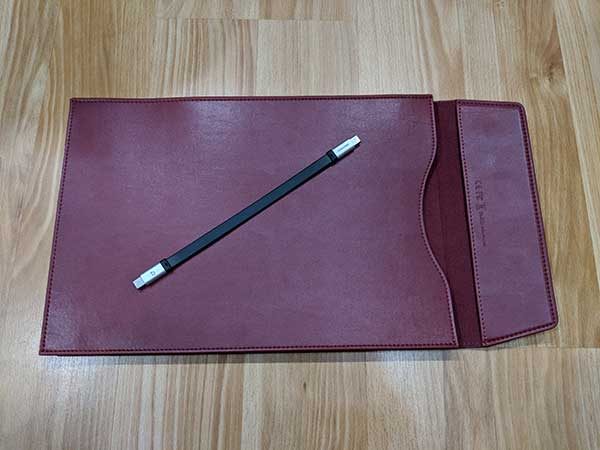
The short cable is easily removed and stowed in the DockCase when it’s not being used.

My 12-inch MacBook it nicely in the 12-inch DockCase along with the cable.

Using the DockCase with my 12-inch MacBook
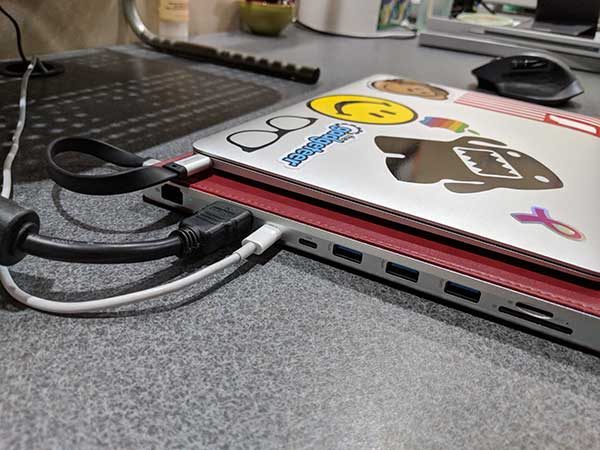
To use the DockCase, you connect one end of the included USB C cable into the USB C port on the MacBook and the other end of the cable goes in the USB C port on the side of the DockCase. To keep your MacBook charged you will need to connect your existing charger cable into the USB PD port on the DockCase which is located next to the HDMI port. You can see how the cables are connected by checking the image above.

I do wish that the included Type C cable was a round cable instead of a flat cable, which looks awkward routed from the MacBook to the back of the DockCase.
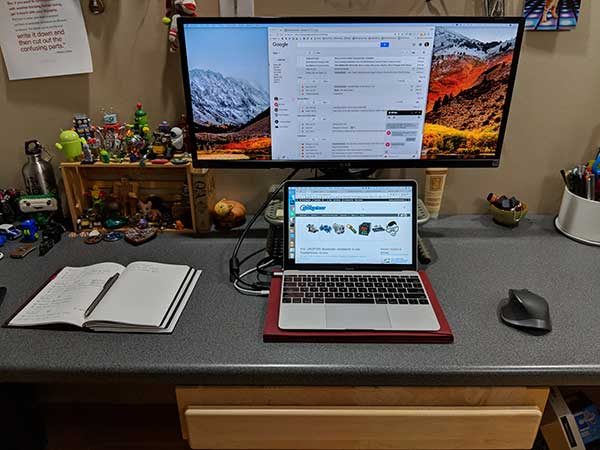
I tested the DockCase with my 12-inch MacBook connected to 4-year-old 29-inch ultra wide LG LED monitor. The LG monitor is not 4K, but the DockCase is able to handle 4K@30Hz or in my case, 1080P@60Hz. I couldn’t tell any difference using the DockCase’s HDMI vs. using the LandingZone docking station’s HDMI, which is what I’ve been using for the last several months.
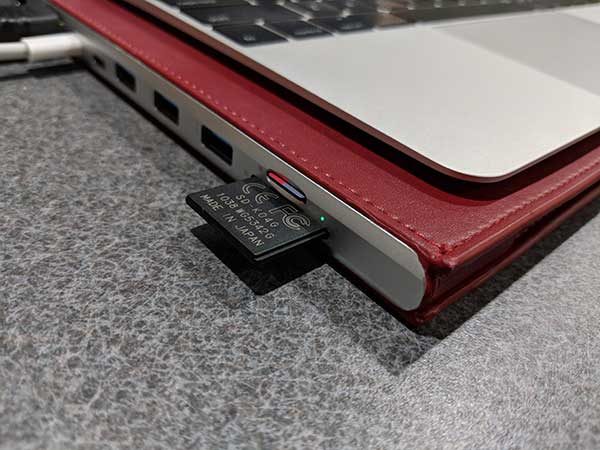
The documentation that comes with the DockCase advises that you NOT use the USB ports to charge your phone or other devices. They are supposed to be used for data transfers only. Even so, I had to test them to see if they would actually charge my phone, a Pixel 2 XL. The 2nd Type C port next to the Type C PD port would not charge my phone at all, but the other three USB ports did seem to be charging the phone.

I tested the DockCase’s card slots which worked fine. I was able to read each one individually and transfer files between two cards. I was also able to copy files to and from USB flash drives. So, the hub does work as intended. But there is one problem and that’s heat.

The DockCase hub gets noticeably hot after several minutes of use (especially when you’re connected to an external monitor using the HDMI port). I used an IR thermometer and recorded readings of 100F to as hot as 120F. These temps weren’t hot enough to burn my skin, but the heat did make me nervous that it could become a fire hazard at some point and made me leery of leaving my MacBook connected to it while unattended. That said, the heat dissipates when the MacBook is not being used.

What I like

  • It’s a case with a built-in hub
  • Nice for the newest MacBooks that only have one USB Type-C port like my 12″ MacBook

What needs to be improved

  • The hub gets too hot
  • Not supposed to use it to charge phones or other devices
  • No room for other accessories like a charger

Final thoughts

Having a case for newer MacBooks that combines everyday protection with a USB hub is unique and useful while remaining relatively slim and sleek. If they can solve the heat issue, I think they have a winner on their hands, but as it is, I’m worried about recommending something that could be a fire hazard.

Price: $119.00 – $149.00 depending on size. $119 for the 12″ version reviewed here.
Where to buy: DockCase and Amazon
Source: The sample for this review was provided by DockCase.

Filed in categories: Reviews

Tagged: , ,

DockCase MacBook sleeve with built in USB C hub review originally appeared on The Gadgeteer on March 6, 2018 at 1:00 pm.

Note: If you are subscribed to this feed through FeedBurner, please switch to our native feed URL http://the-gadgeteer.com/feed/ in order to ensure continuous delivery.