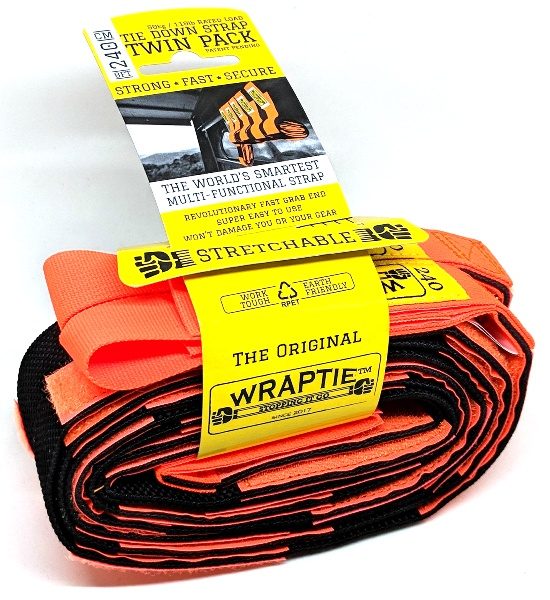
 REVIEW – We recently tried to transport an 8 foot fiberglass step ladder across town on the roof of our SUV and found that our ratcheting tie-down straps that anchored the ladder to our vehicle were inadequate for the job because we didn’t have a way to safely hook them onto our roof rails. Rope would have been a better choice than my tie downs, but when the Wraptie was offered to the Gadgeteer to review, I was eager to see if these would function better for us and if it was as easy to use as advertised.
I received the largest size available, the 240 cm length version, and I was interested to see if these tie downs compromised safety for the sake of ease of use. After using them I can say that they work very well when used properly and are so much easier to use than rope or ratcheting tie down straps. The only downside to these (if you can call it that) is that their ease of use may lead to misuse by some individuals who don’t take the time to make sure their load is secured properly and to consider the inherent limitations of the elastic / hook and loop Wraptie design. However, that isn’t really the fault of the Wraptie, and these straps do exactly what the manufacturer says they will do, and they do it very well. When following the manufacturer’s instructions, these can be used to safely restrain a load for transport.
What is it?
The Wraptie is an elastic and “hook and loop” (don’t call it Velcro!) multi-function tie down strap used to “wrap” or tie down items for transport or to bundle items together. It is intended to be an alternative to bungee cords or buckle and strap tie downs (like NRS straps). These do not take the place of ratcheting tie downs straps which have much higher load limits.
The Wraptie 240 Twin Pack contains two Wrapties that are 240 cm long and are the largest version made. The 240 would be used for attaching larger items to the top rack of an SUV or in the back of a pickup, thus this review will focus on that type of use. The manufacturer literature states that the 240 size could be used to attach surfboards to roof racks, for moving furniture, and for bundling bulky goods. Wraptie also makes smaller 180 cm and 130 cm long ties. The 180 is often used by motorcyclists to attach small cargo to their bikes and can also be used to bundle PVC pipe/conduit or tie-down of small ladders. The 130 is ideal for securing small items to backpacks, luggage, and roof racks, for camping and biking, and for keeping hoses and power cords tidy.
Specs
- Length: 240cm (94.5″) …. can be stretched to 480cm (189″)
- Width: 2.5cm (1″)
- Materials: High tension industrial grade elasticized webbing, knitted polyester high strength webbing, nylon “hook and loop” fasteners
- Weight (Approx.): 150g
- Rated Load: 50kg (110 lbs.) @ 60cm (23.6″) diameter – Using 2.4m length*
* Load rating decreases as load diameter increases. Max recommended diameter is 75 cm (29.5″)
* Different length straps give different performances
* If in doubt use a longer WRAPTIE tie-down strap
- Avoid heat or open flame
- Avoid fuels
- Avoid sharp edges
- Not for lifting
- UV resistant
- Minimum overlap: 3 x Hook & Loop
- You can join two Wrapties to double the length
What’s in the box?
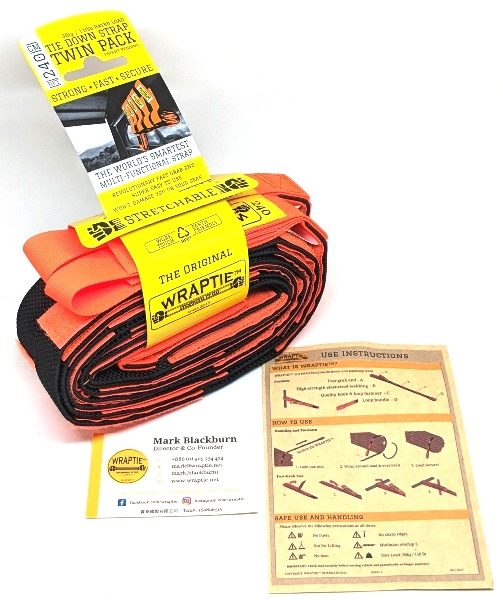 The Wraptie 240 Twin Pack comes with two 240 cm long tie-down straps. Also included were instructions on how to use the ties and a business card from the director and co-founder of Wraptie.
Design and features
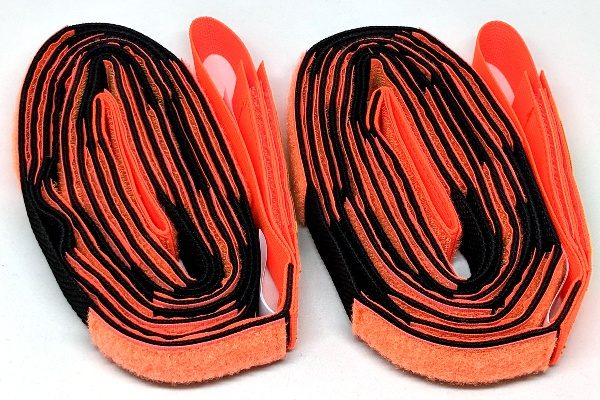 The Wraptie 240 tie-down straps come in safety orange and black.
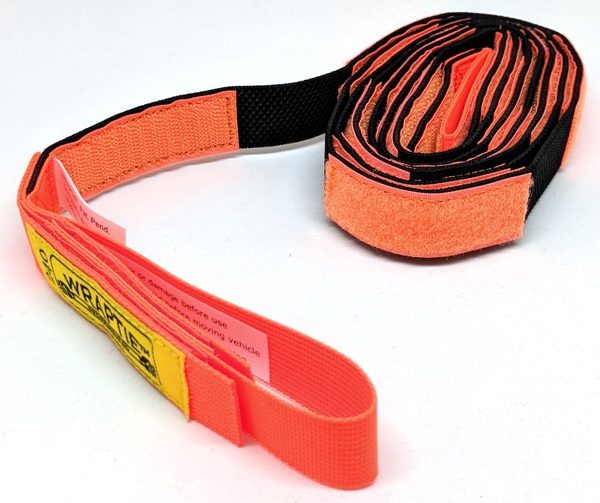 The end shown in the photo above is the “fast-grab end”. The opposite end located in the center of the bundle contains the loop handle. These are made from “knitted polyester high-strength webbing”.
The straps also contain nylon “hook and loop” fasteners. Like the handles, the hook and loop fasteners are a nice bright safety orange.  The main portion of the straps (the black portion as shown in the photo above) is made from “high-tension industrial-grade elasticized webbing”. It is strong and durable and can be extended to up to twice its unstretched length.
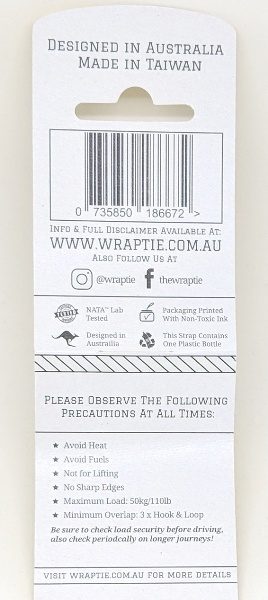
I contacted Wraptie to get some additional details about the load ratings and failure modes of these straps. The load ratings were developed based on testing conducted in Melbourne at a NATA (National Association of Testing Authorities, Australia) accredited polymer testing laboratory. When I asked Wraptie about the failure mode, this was the response from Paul McNeill, the inventor and company co-founder:
We conducted a specific test to simulate actual use, which involved wrapping the product around 2 cylinders and then pulling the cylinders apart – the peak load was then recorded. We also tested the webbing materials and stitching independently. We were then able to confidently provide the load rating as specified. The [hook and loop fastener] is indeed the weakest link since it is the actual fastening mechanism – similarly the buckle is generally the weakest link in cheaply made webbing buckle straps.
This means the load rating considers all parts of the Wraptie, including the polyester and elastic webbing, as well as the hook and loop fasteners. The hook and loop fasteners, specifically the fast-grab end, would be the first to fail by coming apart, but this would always occur at a load that is greater than the load rating of 110 lbs. This load rating is applied up to the maximum recommended bundle diameter which is 75 cm (29.5″) for the 240, 50 cm (19.7″) for the 180, and 30 cm (11.8″) for the 130. The same load rating can also be applied when two Wrapties are connected to double the length.
One other important unique feature about the design of Wraptie was mentioned by Paul:
One aspect of WRAPTIE worth noting is that when you wrap it over itself the tension in the webbing puts the [hook and loop fastener] under pressure and actually increases its shear strength. If you wrapped a WRAPTIE 240 several times around a bundle of timber is really is impressively strong and shows no signs of slackening.
Securing a Load for Transport
Before discussing how the Wrapties performed, I’d like to take a moment to mention how critical it is to properly tie down a load. There is no easy way to state this other than with cold hard facts. A study published by the AAA in 2016 found that between 2011 and 2014, road debris contributed to nearly 200,000 crashes injuring 39,000 people and killing 500. This study found that about two-thirds of these accidents were the result of items falling from a vehicle, and some of those incidents were due to unsecured loads. However, a more applicable study was performed by the GAO in 2012 focusing only on non-commercial loads. This study found that in one year, 51,000 accidents were the result of non-commercial loads falling from vehicles, and these accidents resulted in 10,000 deaths and 440 fatalities.
Every time you are securing a load to a vehicle, it is absolutely vital to use the right number and type of tie downs that are in good condition and properly attached. In fact, in many states it is the law (see here for state statutes for non-commercial loads), and you can be pulled over and/or fined if you have an improperly secured load. You can also be held criminally and financially liable for damages if your load falls onto the road and causes an accident. The laws typically state that the responsibility falls with the driver of the vehicle, regardless of who secured the load. And if your load is commercial (meaning used for business purposes), then federal Department of Transportation (DOT) rules may apply, which are even more restrictive and would not allow the use of the Wraptie since it is not DOT certified.
So what does this mean? It means that you should use common sense when securing a load and consider the size and type of load and the limitations of your vehicle and any straps that you might be using. I’m speaking from the point of view of someone who has made poor choices for tying down loads in the past. In the example I mentioned above with the ladder, I was lucky that I didn’t lose the ladder when my tie down straps popped loose. The Wraptie makes it very quick and easy to secure a load, but it is important to first make sure that the Wraptie is the appropriate type of tie down to use. It has a low load limit (110 lbs) which means that you should not be using this to tie down a pallet of Quikrete bags or to secure a lawn tractor to a trailer. It is appropriate for moderately light weight items that you might secure to the roof rack of your SUV or in the bed of your pickup. My Honda Pilot has rails that are rated for 165 lbs, and crossbars that are rated for 132 lbs, so I would never exceed these limits. For example, an 8 foot 2×4 weighs 13 lbs, so no more than 10 of those would ever go on my roof rack at any one time. However, it could potentially be used to secure a larger load (like a piece of furniture) in the back of a pickup, but more straps might be required.
Adhering to the manufacturer load rating is vital because this ensures the load will remain restrained under potentially varying conditions. Manufacturers like Wraptie provide the load rating considering a factor of safety up to the failure point that accounts for variable loads that can occur during transport (such as acceleration/deceleration/turning that could cause a load to shift or wind loads that can apply forces during high speed travel on interstate highways). If you are loading the strap beyond its rating, you are using up the factor of safety and significantly increasing the likelihood of failure because the margin to the failure point has been reduced.
So now it’s time to see how the Wraptie performed …..
Setup / Use
Using the Wraptie takes a little practice since it is so much different than a ratcheting tie down or a rope. You can’t tie this in a knot or cut it to length, plus unlike rope or ratcheting straps, it is harder to get taut. However, it isn’t too difficult to figure out, and is definitely easier than tying a knot.
The first thing to do is to determine if the fast-grab end should be used. If you are tying something down, then you will probably want to use it, but if you are only wrapping something (like a bundle of wood) then there may not be a need to. Also, if you have connected two Wrapties together, you will have used the fast-grab end for that purpose. The fast-grab end allows quick and easy attachment to a roof rail and consists of a loop that can be opened and secured easily using the layered hook and loop fasteners.
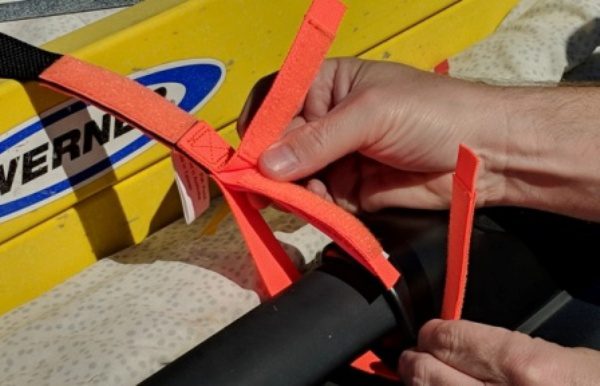 First you detach the overlapped top piece, then pull apart the loop to open it up and pull it around your attachment point (in this case our roof rail).
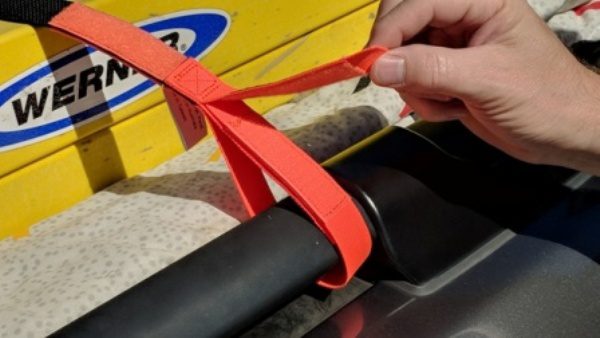 Next, pull the open end around the rail and secure the loop with the hook and loop fasteners …..
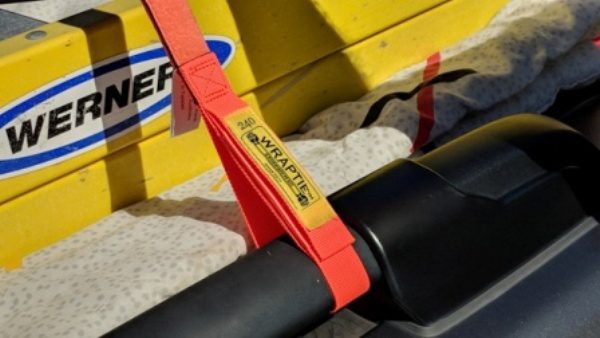 then reattach the overlapped top piece ….. and voila! Much easier than tying a knot!
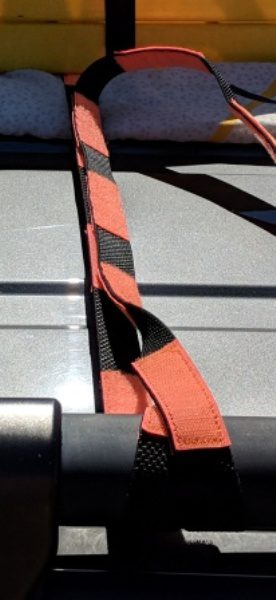 The next thing you will notice in the photo above is that on the loop handle end (the non fast-grab end), you can’t just loop around the rail once and attach the Wratpie to itself. It won’t work because in that configuration the hooks face the hooks or the loops face the loops, unless you twist it one time to get the hooks to face the loops as shown above. Also note in the photo above that in order to get three hook and loop pads to attach, I had to also loop it around the rail.
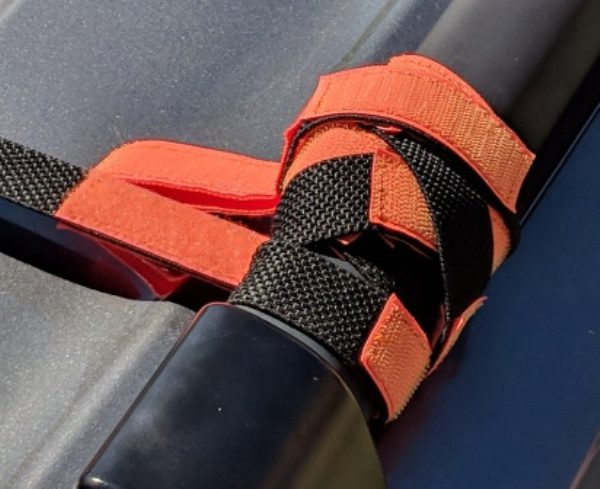 It is preferred to just wrap it around the rail several times to ensure you get at least three hook and loop pads to overlap (per the manufacturer instructions), as shown above. Wrapping would be the preferred option because it is tighter and more in keeping with how the Wraptie is intended to be used.
One challenge I noticed when wrapping was to make sure that at least three full hook and loop fastener pads were attached together. Depending on the diameter of what you are wrapping, the pads may not line up right on top of each other. In this case it is obviously important to have an equivalent of three full pads worth of contact.
We used the Wraptie to attach several different objects to the roof of our Honda Pilot. First we first did two tests where we attempted to tie something down on the roof of the vehicle directly, using only the side rails with no cross bars; an 8 foot fiberglass ladder, and an empty box. These are tests intended to show how NOT to use the Wraptie.
Test 1 – Ladder on Roof
In a duplication of my near fiasco described in the opening paragraph, I decided to try to tie down my 8 ft fiberglass step ladder (~ 25 lbs) directly to the top of the vehicle with no cross bars.
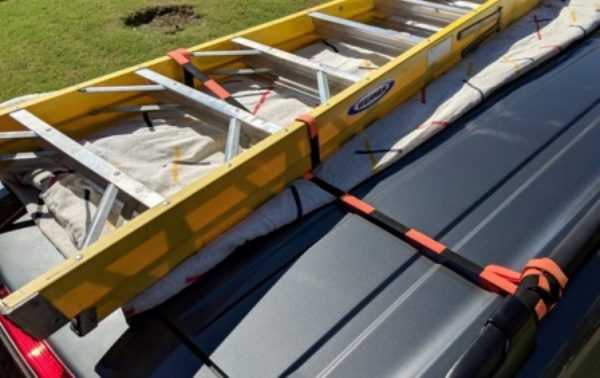
We set the ladder directly on the roof of the vehicle and used the Wrapties to secure the ladder to each of the roof rails. This involved first attaching the fast grab end to the driver side roof rail, then looping the Wraptie around one side of the ladder, and then the other side. Finally, the loop handle end was pulled to the passenger side roof rail, pulled as taut as possible, then looped around the rail numerous times. The Wraptie is looped around the ladder, so it is “captured”, meaning that it isn’t possible for the ladder to come completely detached unless the Wraptie were to fail in multiple locations.
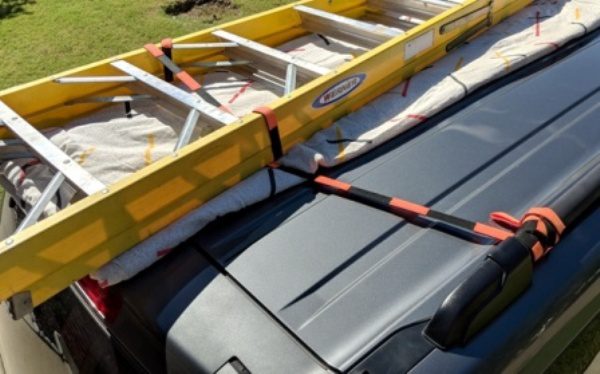
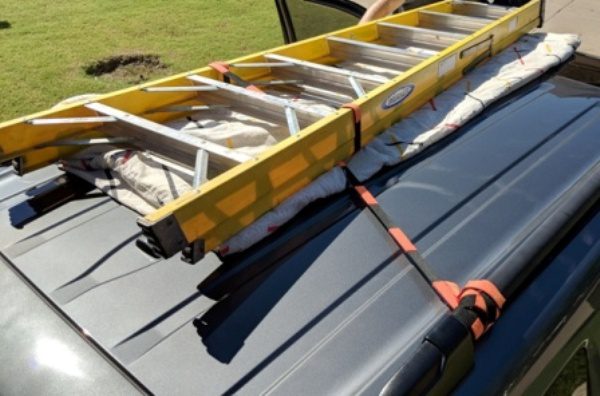
However, in this configuration, the ladder is too loose as shown in the above two photos, so I did not drive the vehicle with it this way. The problem is that you are relying on only the tension from the Wraptie to keep the ladder in place, and the elastic design won’t provide enough tension to keep the load from moving. Even though it is captured, this load is not secure, and thus the ladder would move around as we made turns or stopped and started. It was very easy to move the ladder forward and backward.
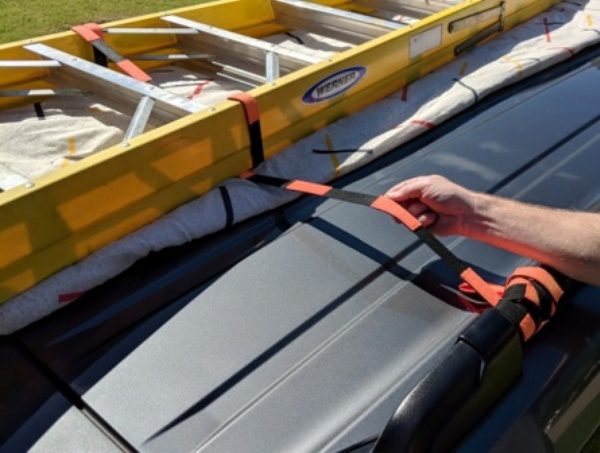
This illustrates the catch 22 that is the elastic design. While the elastic will help to keep things from working loose, it is not possible to get it as taut as a rope or nylon strap. This is an important consideration when using Wrapties.
One important thing to note about securing the ladder in multiple points with one tie is that you have to provide tension for each loop individually. For instance, once I looped around the left side ladder rail, as I pulled the strap over to loop it around the right side, the Wraptie will not tighten any more on the left side due to the hook and loop fasteners. Furthermore, as I pulled it to wrap it around the passenger side roof rail, neither of the two loops around the ladder would tighten any more. The Wraptie will not slide by itself like rope will, which is part of its inherent design.
Test 2 – Box on Roof
I wanted to try to hold a larger object down that was very light weight, so I got a large empty cardboard box (18″W x 16″H x 28″L) and placed it directly on the roof of the vehicle, again with no cross bars. I attached the fast-grab end to the driver side rail, the went over the box and attached the loop handle end to the passenger side rail. It was not possible to loop around the box due to its size.
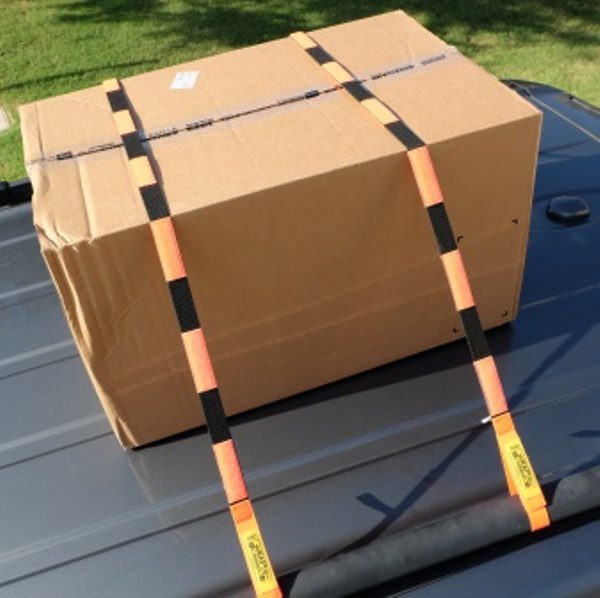
I pulled the Wraptie as tight as I could without crushing the box, and I used two straps as shown above. In this case, the box was not captured, so this is definitely not a desirable way to restrain this load. In this configuration the load can slip out even if the Wrapties don’t break, and the only thing holding the load (in the horizontal direction) is friction between the box and roof or Wraptie.
Now it was time to hit the road, but I was concerned so I used the nearby interstate service road and I did it at 2:00 A.M. when there was very little traffic. Once I got to about 50 mph, the box went flying.
This wasn’t really a fair test because bungees, buckle type (NPS) straps, or even rope may not have worked in this configuration either, although a rope or other type of strap would have been able to get more taut. In order to properly secure this item, I should have used a third and maybe even a fourth Wraptie across the front and back to keep the box from moving due to the wind force. This was mostly just a data point to illustrate that Wrapties are better at wrapping than tying down. One other thing to note; the wind force on this box at 50 mph is about 3 lbs, and at 60 mph it would be 4 lbs. This just shows that not much force was needed to work the box loose. This should be a consideration when tying down large light weight items (like a kayak for instance).
Test 3 – Ladder on Racks
Now it is time to try attaching some loads with the cross bars installed on my roof rails.
The same 8 foot ladder was now set on top of my cross bars.
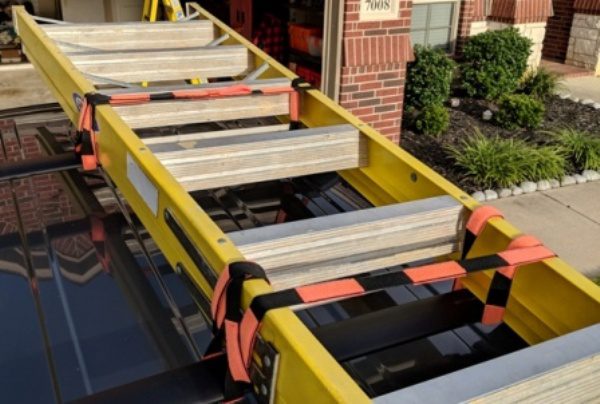
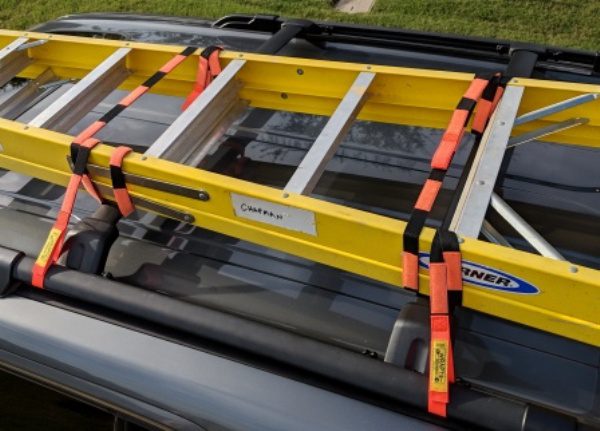
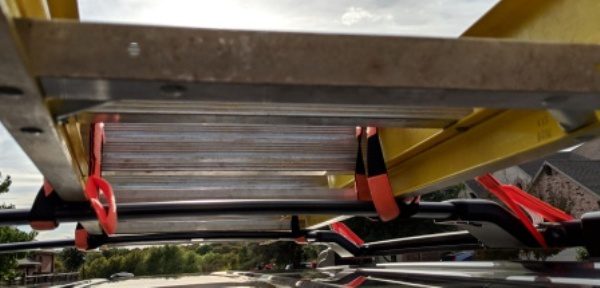
Like before, I attached the fast-grab end to the driver side rail, then looped around the ladder and the cross bar on one side, then did the same to the other side of the ladder. However in this case I did not extend the Wraptie over to the passenger side rail. I repeated this with the second Wraptie to generate 6 attachment points (4 on cross bars and 2 on the driver side rails rails). This is a proper attachment because the ladder is captured and tightly restrained to the cross bars. It is restrained from moving front to back by looping the Wraptie around the cross bars. It is also restrained from moving left to right by the driver side rail attachments and also by the tightness (in wrapping) around the crossbar in two locations for each Wraptie.
Time to hit the road again. We did several sudden stops and starts and some quick turns, and then also got up to about 65 mph, and the ladder didn’t move at all. Success!
Test 4 – Bamboo Roll on Racks
Now it was time to try something a little larger and heavier. We have rolls of bamboo fencing that are 6 feet long 16″ in diameter (when bundled) and weigh about 50 lbs. I placed one bundle on the crossbars next to the driver side rail, then tried two different attachment methods.
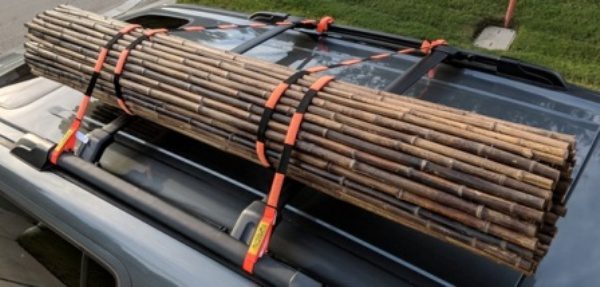
Method 1: I started with the fast-grab end attached to the driver side rail, then looped the Wraptie around the bundle and crossbar once, then pulled the Wraptie to the passenger side and wrapped it multiple times around the rail.
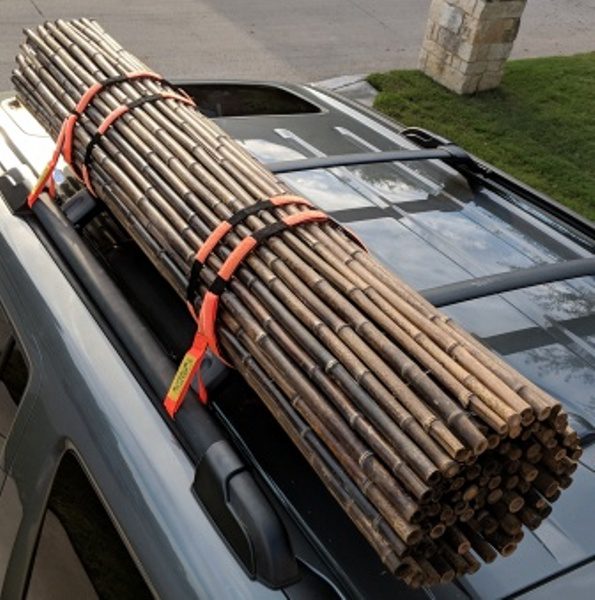
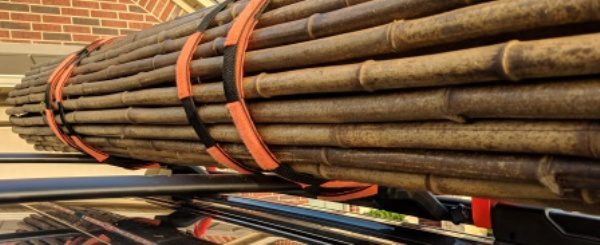
Method 2: I started with the fast-grab end attached to the driver side rail then wrapped the remaining length of the Wraptie at least two times around the bundle and crossbar (keeping tension as I wrapped) while ensuring that I had at least three hook and loop pads in contact.
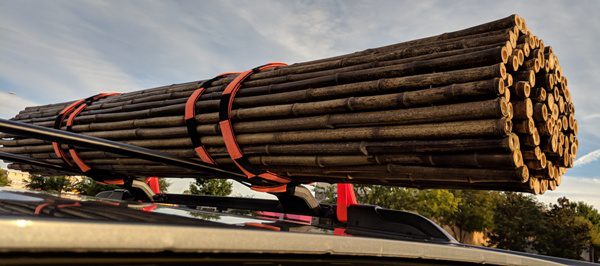
Method 2 is the clear winner and shows the best way to use Wraptie …. for wrapping. The second loop around the bundle and crossbar did a lot more to tighten the load down (and to keep the bundle together) than pulling the Wraptie over to the passenger side roof rail. This further illustrates the point I was making above, that the design of the Wraptie is great for wrapping, but its elastic design prevents it from being pulled taut, and thus it is not as ideal when using a long length like you would a rope. The longer the distance between the load and the attachment point, the more force is required to pull it to get it tight. Additionally, this bundle is not captured and could potentially slide out even if the Wrapties did not break, and therefore having it attached really tight to the cross bars is vital.
When we did our test drive in this configuration, we had success. The load did not shift at all with sudden stops and starts, sharp turns, and driving up to 65 mph (the above photo was taken while driving). Also note the other benefit of Wraptie …. no flapping excess strap material!
Performance
The Wraptie did exactly what it was designed to do, and did it quite well. It is designed to restrain or bundle objects by wrapping. It is not a rope, or a bungee cord, or an NPS type buckle strap. It definitely stands out because it is so versatile and is very easy to use because the hook and loop design is much easier to attach than tying knots. I was able to tie down objects to my roof racks and I when I drove around the loads did not move at all. As I noted above, the load should be secured by wrapping to a rigid cross bar. Wraptie does not do as well when you try to extend it and use it like a rope because of the elastic webbing, and it isn’t really designed for that.
Another great feature is that it is easy to secure the loose ends you aren’t using so you don’t have excess straps flapping in the wind.
The stowage of Wraptie is also quite a nice feature. If you take the few minutes to carefully roll the Wraptie up, it will stay together in a nice small tight bundle that can be stored almost anywhere. However, if you don’t take the time to do this, and you decide to toss a couple of these together on the floor unrolled, get ready for a challenge to separate them! They are extremely sticky and difficult to untangle.
The manufacturer has stated that these are UV resistant, and although the color may fade slightly over time, this does not affect the performance. I live in Texas, so time will tell how these perform in this area. I don’t expect any problems here since they won’t likely be exposed to sunlight for an excessive amount of time.
The only real downside I can see to these is that they are so easy to use that they may be easy to misuse. This is not as a result of any defect in the product, but more about the end user not following the manufacturer’s instructions.
What I like
- Much easier to use than rope, bungee cords, or buckle type straps
- Very versatile
- Excellent wrapping capability by design
- Elastic design prevents slackening
- Easy to restrain excess to prevent flapping in the wind
- Reasonable price
- Rugged design
What needs to be improved
- Elastic design limits how taut you can get it – maybe provide a version with stiffer elastic
- Could be easily misused by someone – but so can rope, bungee cords, and ratcheting tie down straps
Final thoughts
The Wraptie is an extremely rugged elastic and “hook and loop” strap that is excellent for wrapping to attach loads to roof racks or in pickup beds. It is much easier to use than rope since tying a knot is not required, and the elastic design prevents slackness and loosening of the load. It is very strong when wrapped multiple times over itself to bundle or restrain a load. It is quite versatile, reasonably priced, and easy to store. It offers several benefits over bungee cords and buckle type straps. The only real limitation is the elastic design which prevents how taut you can get the strap (which isn’t an issue if you are wrapping it). Also, as with any type of strap, it is possible to misuse the Wraptie since it is so easy to use. However, as long as the user applies common sense, follows the manufacturer instructions, abides by the load ratings and limitations, and follows the local laws, the Wraptie is an excellent tool to safety secure a load and save time in the process.
Price: $43.00
Where to buy: Wraptie and Amazon
Source: The sample of this product was provided by Wraptie.
Filed in categories: Reviews
Tagged: Tools
Wraptie 240 Twin Pack review originally appeared on The Gadgeteer on November 10, 2018 at 9:00 am.
Note: If you are subscribed to this feed through FeedBurner, please switch to our native feed URL http://the-gadgeteer.com/feed/ in order to ensure continuous delivery.


 tie-down strap


