Smart locks are all the rage these days and once you own one, you’ll find it hard to go back to the old-fashioned key lock. This is the second smart lock that I’ve used and this PIN Genie smart lock has some great features that I’ve never seen or used before. To me, the convenience of unlocking my front door with an app, or being able to give someone a code to get in is a luxury that I don’t plan on giving up…until the next generation lock comes out anyway!
What is it?
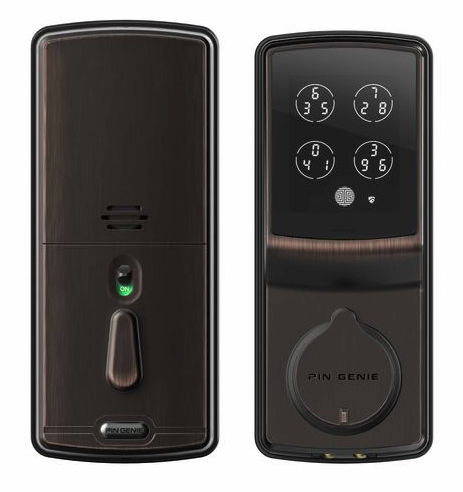
Touted as the easiest and most secure way to allow guests, customers or family members to gain access to your property, this smart lock is a great option for use in homes or offices and for people with rental properties. It is a Bluetooth enabled, app-controlled, digital deadbolt that has a peep proof PIN pad with numbers that shuffle after each one is pushed. Even if someone watches you enter your PIN, they will not be able to figure out what it is! Not that I have to worry about this at my home, but in an office, or AirBnB rental it would be great to have. The video below shows the lock being opened without the PIN crazy setting enabled. In this mode, the numbers will be in a different place when the touchscreen is enabled; however, they don’t shuffle each time a button is pushed. I know the touchscreen is difficult to see in the video, but I wanted to show how the screen is enabled by placing your hand over it.
Hardware Specs
It has a single cylinder deadbolt that requires a face hole size of 1 1/8″ and a 1″ latch hole, and works with a door thickness of between 1 3/8″ to 2″. It can be used on either the left or right side of the door. It has a one-inch throw, steel deadbolt and comes with a key to use in an emergency situation should the battery die (even though that shouldn’t happen because there is a battery strength indicator on the app AND there is a 9-volt backup battery socket on the underside of the lock).
What’s in the box?
The lock and parts with the hardware needed to install the lock.
2 backup keys
Manual
Installation
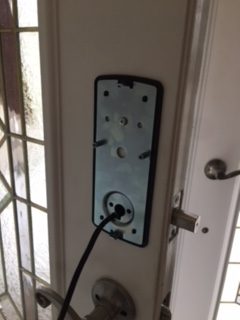
The installation for me didn’t go very easily in the beginning because I didn’t realize I needed to drill another hole in my door. The directions do say that you can use some 3M tape instead of drilling the top hole, but I wanted to do it right, so I got out the drill. Also, the latch bolt mechanism had square edges, and my door had round edges, so I had to have them ground so I could finish the install. All doors are different, and as we all know with any home improvement project, there may be some modifications needed to customize a product for your home. After those two issues were addressed, the install was a snap, and the directions guided me through it with ease. Below is a pic before I did the install, but after the new hole was drilled.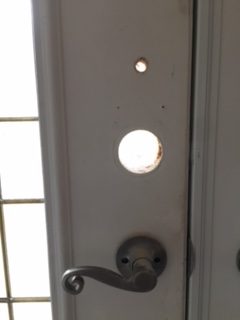 In the pic below you can see the bracket that is bolted to the door and the latch bolt sticking out on the side of the door. This is the piece I was referring to that needed to have the corners rounded off on the bracket surrounding the bolt so that it could be set into the recessed area on the side of the door.
Design and Features
The model I received has a Venetian bronze finish, which pretty much looks black to me (see the first pic). It also comes in a satin nickel finish as well. I personally like the design and look of the lock and the touch-screen display is very easy to read, even without my glasses on which is nice. The picture below shows the 4 switches that can be turned on and off to enable the features I’ll describe next.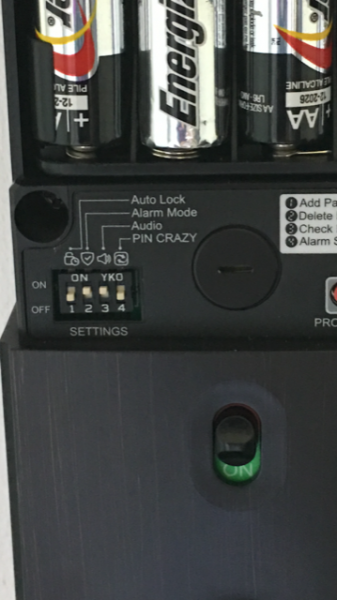
Switch 1 is Auto-Lock. This feature automatically locks the door 30 seconds after the door is unlocked. This feature is great for those who don’t want to bother to lock the dead-bolt when they leave the house, but a pain in the butt if you are just letting your dog out. I will probably end up disabling this feature because when I leave the house for work in the AM it is easy to just use one click on the app to lock the door when I leave. Switch 2 is the Alarm Mode. You can switch this on or off on the lock, then set the sensitivity with the app. The sensitivity refers to the external activity, ie. someone beating on the door or possibly breaking in, and if this occurs and you’ve enabled this feature an alarm will sound and hopefully scare off the perpetrator before they can enter your home. I set mine to medium, and then to high and the two settings seemed to be identical. You just needed to knock on the door for it to set off the alarm. My door is a bit “jiggly” so that may have something to do with it. See the video below to view my daughter knocking on the door, and then running away completely frightened when the alarm goes off.
Switch 3 is the Audio switch. This just enables the “beeping” sound (you can hear the beeping in the videos) when you push the buttons on the keypad, and when the lock connects to the app, unlocks, or locks it will beep as well. Switch 4 is called PIN crazy. This is the function that this lock is most notable for. It changes the display keypad every time a number is entered so that you never know which of the 4 buttons you will press to enter your code. This is the function that makes it impossible for someone to view, or record you as you put in your code and be able to repeat it and gain access to your property. The video below is filmed over my shoulder as I enter in the code…I challenge you to try and figure out what my code is!
Another great feature is the display keypad switch. That is a switch that is accessed on the inside of the home and allows you to disable the outer display keypad so that nobody is able to enter the passcode and gain access to the property. This would be useful for when you are inside the home and you don’t want any visitors to enter that have the code. Those with an actual key to the lock will still be able to get in, however.
The APP
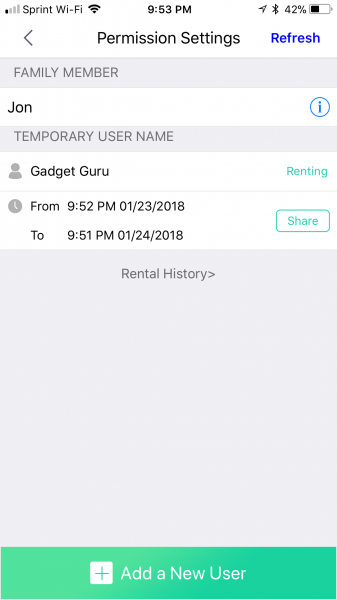
The app itself is very user-friendly and makes changing the settings or the passcodes a breeze. I use the app to lock and unlock the door via Bluetooth, change the passcode, see the history of who has accessed the lock and assign new passcodes to family members or temporary users. The pic below shows the permission setting in the app and you can see that I gave Gadget Guru access to the lock for 24 hours. When the “share” button is selected, the renter, or whoever the person you’ve granted access to will get an email or text with an access code and directions on how to set up their PIN for entry. This is great for those who can’t be there to let someone in.
Also in the app, there is a feature called “direct entry” which you can choose to enable and that will allow quick access to settings and permissions without having to enter in a password. Most people have security on their phones, and it’s nice not to have to enter another password for the app. There is also a nifty widget you can enable that makes it even quicker to access the lock and unlock feature for your lock.
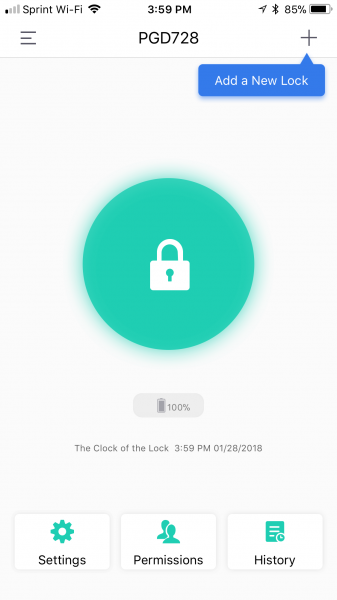
The pic below shows what the app looks like when you open it. You simply push the green lock button in the middle to unlock the door, then push it again to unlock it. Right below the green button, you can see the battery percentage also and it looks like mine is still at 100%. Through this screen, you can access the settings, give others permission to access the lock, and view the history log off all the people and the different times the lock has been accessed.
Positives
I think the lock is great for an Airbnb or office type situation where you need to monitor the people coming and going on the property. There is a log you can access through the app that lets you see the exact time a person accesses the lock, and how they accessed it as well, ie. which code was used, or if the app was used. I like the fact that you could videotape someone (as you can see in my video) putting in their PIN code and you would still never be able to figure out what the code is. The app is very user-friendly and you can change the code via the app or right on the lock if for some reason you don’t want to or you don’t have access to a phone. Also, I found the Bluetooth range to be very good at about 40 feet!
Negatives
I can see how the installation can be an easy process, but for me, it was not. I had to drill another hole in my door as I only had one with my last deadbolt smart lock. Also, the latch bolt that I had on my door had rounded edges, and the one that came with this lock had square edges that did not fit my door. Luckily I have an awesome man in my life who was able to assist me with grinding the metal edges so that it would fit. These negatives really aren’t directed at the product itself…it’s more to just let you know that with any installation, there can be issues with customization that will need to be addressed. Another negative is with the alarm sensitivity. I did not notice a difference between them, as the alarm goes off if you simply knock on my door (see video above), no matter which setting it’s on. If it’s set to low sensitivity, a simple knock should only cause 2 beeps and as you can see, the alarm went off in medium sensitivity mode with just a knock. As mentioned before, my front door is not tight and tends to move a lot when the deadbolt is in use and occasionally even cars going down the road can make it jiggle. This could be a reason why I don’t notice a difference in the settings.
Final thoughts
I absolutely love this lock. I think the satin nickel finish would look a lot better on my door, but other than that I think the design is wonderful. The Bluetooth range is excellent, it’s easy and convenient to use and I enjoy knowing that anytime I want to allow someone to have access to the home, I can give it to them whether I am there or not. The battery seems to last a long time because, after a month of usage, it hasn’t dropped a bit. I’m still not quite sure if the alarm feature sensitivity is a problem because my door fits loosely, or there really isn’t much difference in the settings. Regardless, I would highly recommend this lock to those with rental property or offices that need to be accessed by different people at different times. You’ll be able to track who is coming and going and have comfort knowing that your property is secure, yet available at all times.
Price: $249.00
Where to buy: Amazon
Source: The sample of this product was provided by: PIN Genie

