The HOVR exercise gadget might help you not die from sitting at your desk all day

We’ve all heard that sitting all day is the new cancer. And that explains why standing desks and treadmill desks have become so popular in the last couple of years. But what about those of you who don’t want to or can’t stand for an extended period of time? Should you just give up and make a reservation at the morgue? Don’t give up just yet. There is another way that you can add more movement to your otherwise sedentary day and burn up to 20% more calories while you’re at it.

I’m talking about the HOVR under the desk active-sitting device. HOVR is kind of like a swing set for your feet and comes in two styles. One that attaches to the bottom of your existing desk, and one that comes with its own frame that sits on the floor under your desk. Both styles provide a place for your feet to rest to provide a non-distracting way to move all day without even thinking about it.

The price for the HOVR ranges from $79.99 – $149.99 depending on which version you go with. For more info visit hovrpro.com and head over to Amazon to order one.

Increase your security and peace of mind with this doorstop when you travel

I’ve seen a lot of security devices for travelers, but many of them tend to be alarms that sound when someone attempts to open the door.  The Veritas Travelers Doorstop is designed more to keep out intruders than to merely alert you to someone breaking in.  It’s made of a solid aluminum wedge with a hardened steel adjustment- and anti-slip screw.  Simply slide the wedge under the door and use the screw to elevate it until the door is solidly wedged closed.  Should anyone push in against the door, the Veritas simply wedges in tighter and the pointed screw digs into the subfloor to keep the door from sliding open.

The wedge works with both concrete and wooden subfloors, and there will be no damage to either the carpet nor the subfloor if no one tries to force open the door.  Veritas weighs only 7 ounces, and it comes with its own travel case.  It’s available for $29.50 from Lee Valley Tools.

Wisenet SmartCam D1 video doorbell review

What is it?

Remember watching the Jetsons as a kid, with their video phone, video doorbell, and flying car? Well, of those three, the flying car is the only one that’s not already sitting on store shelves waiting for you to take one home. Anyone with a smartphone has a raft of video chat clients at hand. There are several video doorbells on the market. In fact, we were offered one from Wisenet, née Samsung Security. It’s called the SmartCam D1 and is installed in place of your existing wired doorbell. Follow along on my adventure to the future.

Note: Photos may be tapped or clicked for a larger image.

Hardware specs

System Requirements
  • Internet Connection: High Speed Internet, Wi-Fi 802.11 b/g/n
  • Mobile: iOS 8 or higher, Android OS 5.0 or higher
  • Requires an existing hard-wired doorbell
  • Requires wiring to a 16-24 VAC doorbell and transformer

What’s in the box?

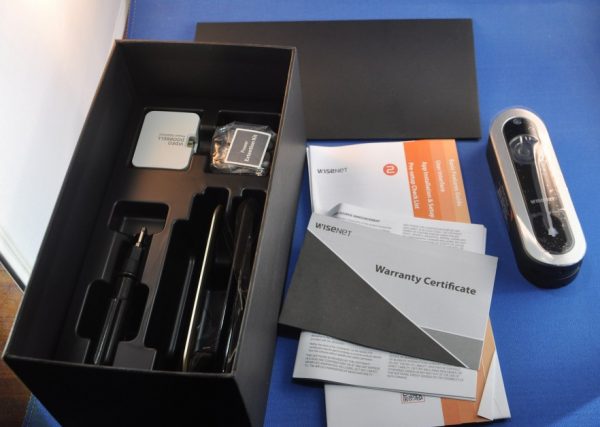
  • SmartCam D1 Video Doorbell Camera
  • 3 Interchangeable Faceplates
  • Power Stabilizer Kit (For existing chimes)
  • Power Extension Kit
  • Screws and Anchors
  • Screw Driver
  • Quick Start Guide
  • Warranty Card

Design and features

This item had come into the queue and I had taken possession of it just around Halloween. I was procrastinating installing it, after skimming through the instructions. All it took was a break-in at our home two weeks before Thanksgiving to put it on the front burner. After getting into the specifics, it’s far easier than I was imagining.

Setup

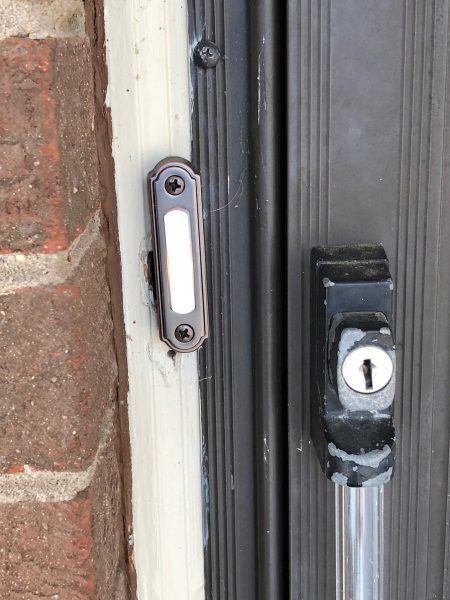
The kit itself comes with everything you will need except a drill and a ladder, and the drill is optional. There is a power stabilizer that attaches onto your existing chime, and three trim rings (silver, black, and brass) to best match your door, and all manner of screws and terminal clips. Let’s take a look at how it worked.

According to the manual, the first thing is to cut power. With a light-enabled doorbell, this is pretty easy – have someone watch the doorbell light while you flip breakers until the light goes out. “That’s the one!”

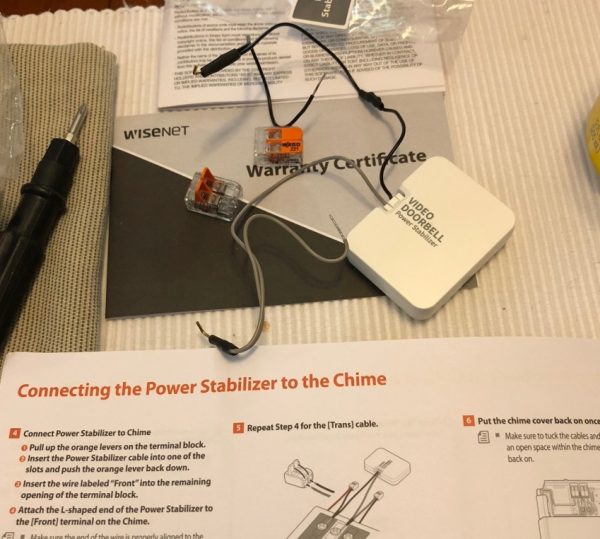
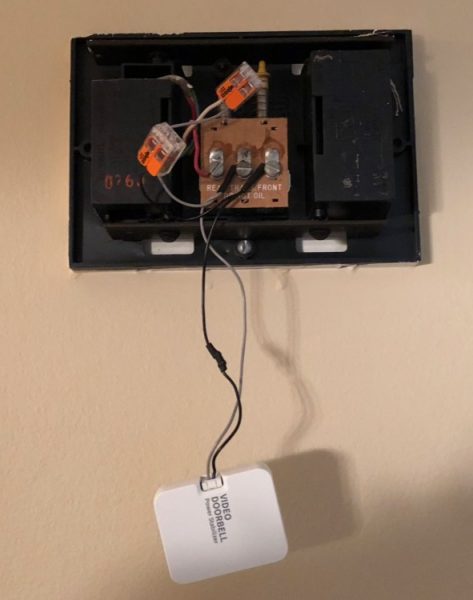
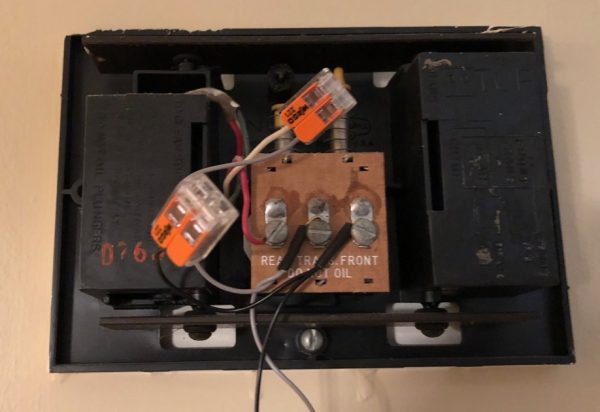
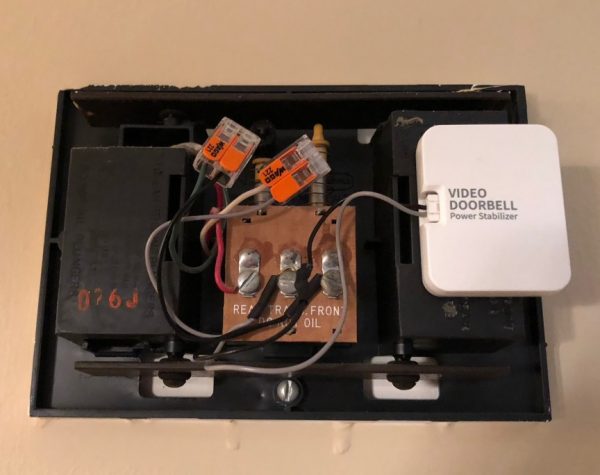
The next step is to unhook two leads from your chime and connect the little harness for the power stabilizer. This is as simple as it sounds: disconnect two wires, connect them into single terminal blocks from the kit, and screw the other wire back to the chime terminals. It took me longer to compose and type out that sentence than it took to do it.


Next, disconnect the existing doorbell, and attach the SmartCam. Then, ask the person in the house who will care which trim ring they prefer. Acknowledge the importance of their contribution, and put the other two rings in the box. (This most likely applies only to those in a long-term, committed domestic partnership, but I do my best in that “ensure domestic tranquility” thing the Constitution talks about.)


The instructions at this point say to put everything into place, but I opted to test before buttoning it all up. Your confidence in your ability to follow instructions will determine your path at this point.


Download the SmartHome software, create an account and get to the authentication screen. Flip the breaker back on, and make sure your doorbell is getting power, sign it into your WiFi, and test it. While this sounds simple, this is probably the most tedious part of the whole process.


Once everything is working as expected, screw the SmartCam over the place your old doorbell was and test again. There is a reset button to the upper left of the unit before you install the trim ring, so be sure everything is working before installing the trim ring. There is a small brass set screw that goes into the lower side of the SmartCam tightened with an Allen wrench that is the final piece. This finishes the doorbell and covers all the attachment points and reset buttons. The Allen screw is recessed, and a pain to get to, which is what you want in the link to bypassing your video security doorbell, right?
At this point, you can stick down the power stabilizer and put the cover back on the chime unit. This was the second hardest part to me, because while it’s the size of a book of matches, there isn’t a lot of spare space inside that chime box, and you have to allow the chimes to vibrate, so nothing can touch them.


Once it’s all installed, you can go into the settings and set the notification preferences, sounds, etc. You can also install it on the phones of your housemates, so that they can participate in the joy of remote door answerage. This is left as a challenge to the installer and their communication skill, as well as the depth of commitment in the earlier mentioned long-term domestic partnership…


So, the doorbell was installed, I freaked the dog out sufficiently by ringing the bell and talking to him through the SmartCam, and felt pretty good about it. Having previously been notified from test security camera systems by every single car that passed on the street, I was happy that there are multiple activity areas that can be set up, and thus am spared my neighbors leaving for work at 4 AM causing my alert to activate. The next day at work, however, I got an alert to a human activity at the door. I pulled up the SmartHome software and activated the live view, just in time to watch the UPS truck drive off.

The video record of the delivery showed the entire process, with the delivery person walking up while talking on their phone, placing the boxes on the porch, and trudging off through the leaves back to their truck. I now enjoy hearing that alert, knowing that something has been dropped off. Should a second alert sound, I can immediately check to see if it’s a second delivery, someone wanting to rake my yard, or someone snooping around my deliveries. And I can speak to them, just like Jane and George or the kids, and they don’t know if I’m inside or at Spacely Industries.
Now, about those flying cars….

Performance

I found that the performance is very fast. While raking the leaves last weekend, I finally had to turn off notifications before being vibrated to death. I have been in a neighbor’s yard, showing them the system, and could scream and activate the “human detection” signal. That’s pretty cool.

Positives

  • Much easier to do install and use than to read directions about
  • Everything is provided and explained in detail
  • Software is friendly, has many options, and works as expected

Negatives

  • There is a registration and on-going fee for video storage. Granted, this is fast becoming an expected thing, but it’s just one more “only $5 a month” service.

Once it was installed and I got a few notices at work, I found it fits into my lifestyle very easily. I get a message on my Apple Watch, check the video, and make sure it’s something I am expecting or need to handle, all without disengaging from a customer on the phone. If my Lovely Bride calls to ask, I am ready to let her know, after checking our expected deliveries and the doorbell video. I’m actually looking forward to salespeople coming by this spring, just so I can turn them away!

Oh, and one last fun thing. You start to really wonder about the attitude of delivery folks. I’ll leave these videos right here without further comment.

Price: $249.99
Where to buy: Amazon
Source: The sample of this product was provided by Wisenet.

This Apple Watch charging stand includes a backup battery

The GLAWEE charging stand for the Apple Watch holds the watch horizontally, so you’ll be able to make use of the Watch’s nightstand mode as it charges on your nightstand.  Then, you can take the stand with you as you travel, it will charge your Watch even without access to a power outlet.  The vertical tower holds a 5000mAh battery inside that can charge your Watch, and it has a USB outlet to charge your iPhone, too.

When connected to a power source, the backup battery charges your watch as it charges itself.  The four LEDs, seen above the Watch in the above image, shows the power reserve inside the battery.  GLAWEE says their “charger uses the latest safest protective tech for your Apple watch such as: over-voltage,over-current, over-power, over-heating, and short-circuit protection technology to ensure your watch and iPhone are safe during charging.”  Get this charger in black or white for $55.99 at Amazon.

Instant Pot Ultra 6 Qt review

I prefer to cook my own food than eating in a restaurant because it’s cheaper to cook at home and I by cooking it myself, I know exactly what is in my food. But the biggest downside to eating at home is the time that it takes to cook a meal and cleaning up the mess afterward. I’m happy to tell you that I’ve found a wonderful solution to both of those problems; it’s the Instant Pot Ultra Qt.

What is it?

The Instant Pot Ultra 6 Qt is an all in one electric pressure cooker that speeds up cooking by 2-6 times and can be used as a slow cooker like a crock pot, rice cooker, yogurt maker, sauté/browning pan, steamer, and a warming pot.

What’s in the box?
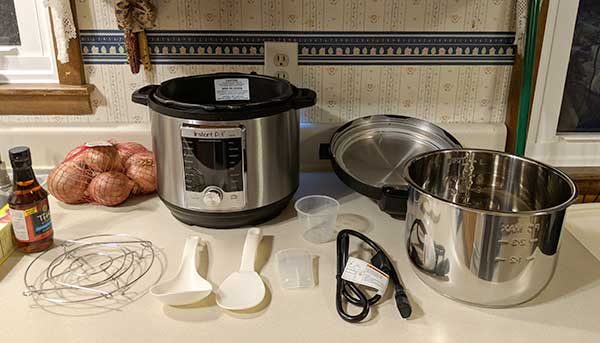
Instant Pot Ultra 6 Qt
6 quart stainless steel pot
Power cord
Wire steam rack
Plastic tools
Condensation drip catcher
Instructions

Design and features

First all, you’re probably wondering how a glorified crockpot can be worthy of a Gadgeteer review. I’m here to tell you that this thing is life changing for me even if I only use it to cook a few different things.

At first glance, the Instant Pot does look like a crockpot except that the lid isn’t made of see-through glass like most crockpots. That’s because the Instant Pot is a pressure cooker.
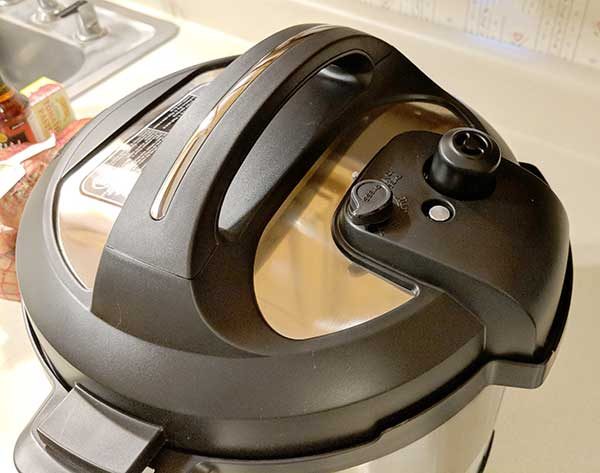
On the back of the lid is a steam release valve (large black knob shaped object), float valve (small silver object), and a stem release reset button (black comma shaped button).
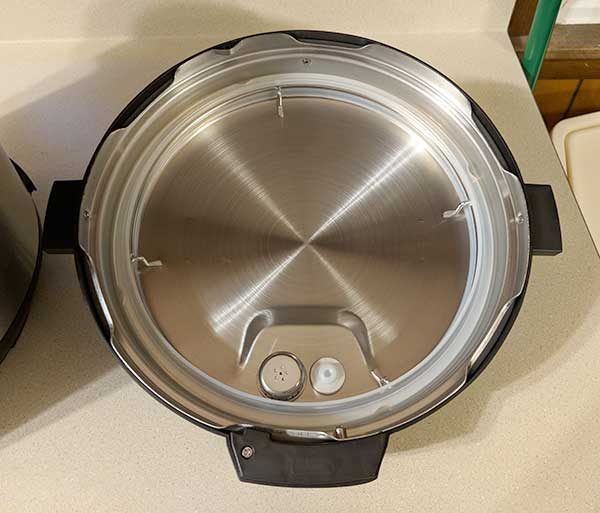
The lid locks and unlocks with a twist to reveal the stainless steel interior.
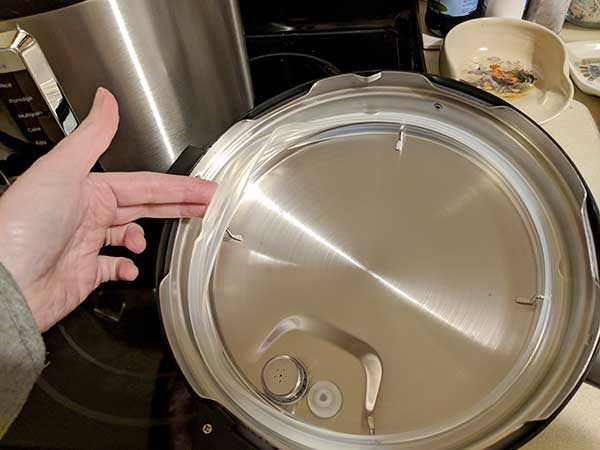
You will notice the removable and replaceable silicon seal which keeps the pot pressurized.

In the bottom half of the Instant Pot is the dishwasher-safe stainless steel cooking pot which has marks inside to show fill levels for pressure cooked foods. Instant Pot sells different models of their cookers but the one they sent to me has a 6 quart pot.
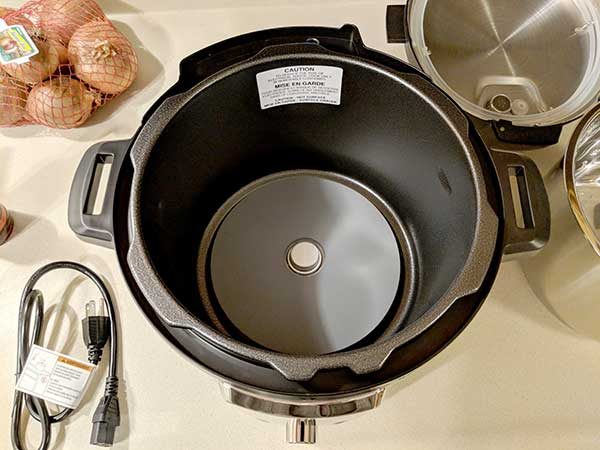
The 6 quart stainless steel pot lifts out of the bottom of the Instant Pot to reveal the cooking element at the bottom. It should be common sense that you never put food in this area of the Instant Pot.

The front of the pot has a white on blue backlit display that lights up when the Instant Pot is plugged in. The Instant Pot has 16 cooking programs listed on the sides of the display: Soup/Broth, Meat/Stew, Bean/Chili, Cake, Egg, Slow Cook, Sauté/Searing, Rice, Multigrain, Porridge, Steam, Sterilize, Yogurt, Warm, Pressure Cook, and Ultra.

The program is selected by turning the knob below the display and pressing the knob to select the mode. In the image above, I’ve chosen the Saute mode. It’s also important to note that some of the modes like Saute have different temperature settings that can be customized by using the knob after the mode has been selected.

The Ultra mode is also available to give the cook full control of pressure, non-pressure cooking and time. There’s also a timer that you can use for up to a 24-hour cooking delay start time.

My first test of the Instant Pot Ultra 6 Qt was to cook beef stew. Although I was excited to try the Instant Pot, I wasn’t expecting to be wowed by my first try and definitely didn’t think I’d be wowed by cooking a beef stew in it.

We usually cook a beef stew in a crockpot all day and in all my years cooking one, I’ve probably never uttered the words YUM after taking my first bite. Beef roasts in the crockpot are usually kind of blah, but we use the meat for soups that we make with the leftovers, which always taste better than the original dish.

So in anticipation of cooking the beef stew in the Instant Pot, I googled a couple recipes and settled on this one from Nom Nom Paleo. I picked it because it included ingredients like fish sauce and coconut aminos that I’ve never used in a beef stew before and thought what the heck, let’s see what happens! I couldn’t find any coconut aminos at my local grocery store, so I used soy sauce instead.

The first thing I did was put a little olive oil in the bottom of the pot with rough chopped onions. I used the saute program to cook them for a few minutes.

Then I cut up the beef in big chunks and added the meat, and other ingredients into the pot along with some baby potatoes instead of mushrooms because I hate mushrooms.

I put the lid on top, chose the pressure cook mode for 35 minutes and walked away. Yes, 35 minutes. I was very skeptical that it would be done that quick.

As soon as you put the lid on top, you’ll hear a video game style tune to let you know that it’s starting to cook. Then at the bottom of the display, you can see a graph which shows the temperature/progress indicator. The indicator provides a visual on the cooking progress from preheating through to cooking and the Keep Warm mode which is activated by default.

Although the beef stew is only supposed to take 35 minutes to cook, that’s actually the pressure cooking time. The 35-minute countdown doesn’t begin until the pot is pressurized, which can take 10-15 minutes or so depending on the temperature of the ingredients.

But the great thing is that you can set the mode and time and then just go do something else. When the cooking is done, you’ll hear a beep. You can release the pressure by pressing the pressure release button and wait about 5 minutes till all the pressure is disappate dand you can open the pot, or you can allow the pressure to release on its own and the food will be kept warm for you.

When I opened the Instant Pot, I was greeted with a drool-worthy aroma, but I still wasn’t impressed until I took my first bite. I have to tell you, that the beef stew I made in the Instant Pot was the best beef stew I’ve EVER had in my life. And no, I’m not just saying that. I’m being 100% serious. The meat was perfectly cooked and tender and the potatoes were perfect too. Just thinking about it makes me want to make it again.

For Instant Pot cooking test #2, I decided to try using up some Thanksgiving leftovers by making some turkey noodle soup. This time I didn’t have a recipe to go by. I just used leftover turkey broth that Jeanne’s brother gave us from their Thanksgiving day turkey that we shared with them. I used a couple cups of leftover turkey meat cut up into bite-sized chunks.

But I started out adding mirepoix and some butter to the pan in saute mode to sweat the veggies. If you don’t know what mirepoix is, it’s just a fancy name for diced carrots, onions, and celery.

Then I added the turkey broth, the turkey, some dry noodles I found in the cabinet that were probably 2 years old, ground pepper, and a hodgepodge of herbs. I gave all the items a quick stir, locked the lid, chose the soup mode and let the Instant Pot do its thing.

About 30 minutes later I opened the pot to another great meal.

With just those two dishes, I was already a huge fan of the Instant Pot, but then I also used it to cook some steel cut oats for breakfast one morning. They turned out decent but I need to tweak somethings before I use the Instant Pot to cook them from now one.

I also used the Instant Pot to make spaghetti using this recipe. I love pasta, but it’s a pain in the rear to pull out a frying pan to brown the hamburger, use a saucepan to heat up the tomato sauce, and use a big pot to cook and drain the spaghetti. With the Instant Pot, I only needed one pot for the whole meal.

You can brown the meat right in the Instant Pot using the saute mode. Then drain the fat (or if you use ground turkey like we do, you don’t even need to drain it), pour in the sauce, break up a pound of uncooked spaghetti noodles in half, pour in 1.5 jars of water, add some spices and herbs, shut the lid, pressure cook for 8 minutes and you’re done. It turned out perfectly yummy. Imagine a whole pot of spaghetti cooked in about 20 minutes with only one pot to wash (it can go in the dishwasher too). It’s truly a game changer in my house.

What I like

  • Fast cooking
  • One pot easy cleanup
  • Safety features prevent you from opening the lid if there is pressure in the pot

What needs to be improved

  • I seriously can’t think of anything

Final thoughts

I love the Instant Pot Ultra 6 Qt and know that I’ll be using it regularly from now on. I can’t wait to try making chili, steaming vegetables, and other recipes. If you like to cook or even if you don’t, you should really check out the Instant Pot. It makes cooking so easy, fast, and flavorful while making cleanup a breeze.

Price: $149.95
Where to buy: Amazon
Source: The sample for this review was provided by Instant Pot.