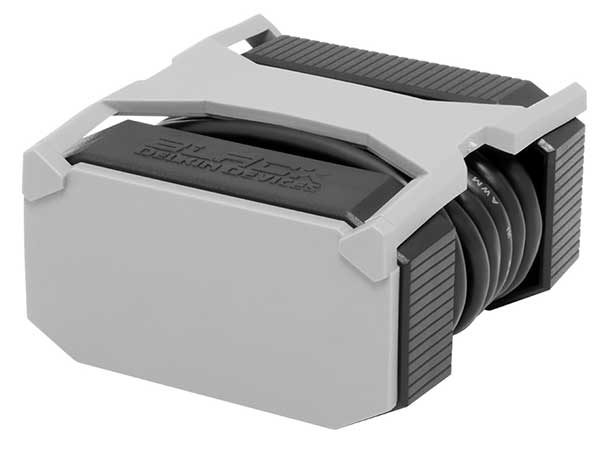
Delkin’s Black USB 3.0 rugged card reader is built to survive the apocalypse


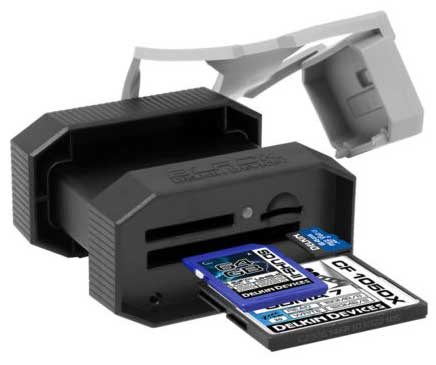
I don’t use Compact Flash, SD and micro SD cards all that often these days, except for the SD card in my Canon 70D DSLR which I use for Gadgeteer product photography. I mainly use my smartphone as my primary camera, but photographers still use flash cards and flash card readers. But I bet they haven’t seen a bomb proof card reader like the Black USB 3.0 card reader from Delkin.

The Black USB 3.0 Rugged Memory Card Reader features three cards slots that include a UHS-II SD, microSD UHS-II, and a CF
UDMA 7 card slot, all capable of simultaneous data transfer.

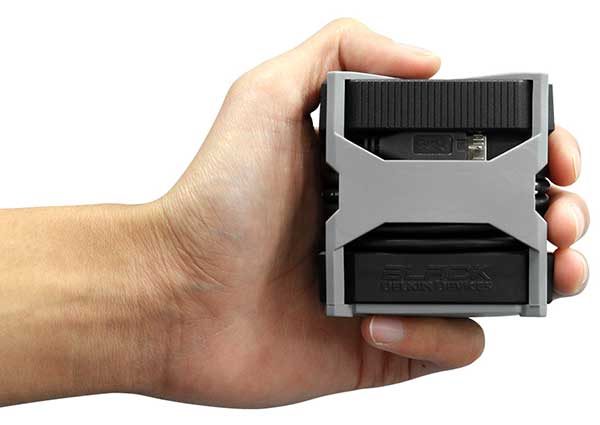
The Delkin Black USB 3.0 card reader has built-in cable storage and a rubberized protective cover.

Delkin stands by their products with a 5 Year warranty, but they also offer a free 48-hour replacement if this reader stops working. Now that’s service.

Now the bad news, Delkin BLACK products are not sold online through normal retailers. They are sold exclusively through authorized camera stores in the US and Europe. I can’t even find pricing…

For a list of authorized dealers near you, head over to delkindevices.com and if you don’t need something quite this rugged, check out Delkin’s other card readers that are available on Amazon.

Filed in categories: News

Tagged:

Delkin’s Black USB 3.0 rugged card reader is built to survive the apocalypse originally appeared on on June 20, 2017 at 11:41 am.

Note: If you are subscribed to this feed through FeedBurner, please switch to our native feed URL http://the-gadgeteer.com/feed/ in order to ensure continuous delivery.

BBQ Dragon Chimney of Insanity charcoal starter review


There’s something magical about charcoal grilling, especially during the long days of summer. You just can’t replicate that taste on a gas grill. Since 2013 BBQ Dragon has been bringing new innovations to the charcoal grilling market, and I have one of their latest gadgets on the back patio for testing. It’s the Chimney of Insanity, a chimney starter that BBQ Dragon claims is the best in the industry.

What’s a chimney starter? And is the Chimney of Insanity the best around? Let’s go make a fire and find out!

Design and Build

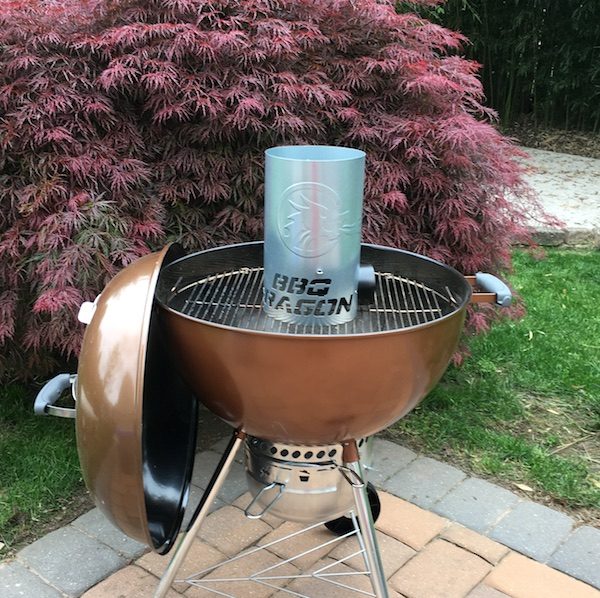
Before we begin, let’s take a moment to recognize how cool this thing looks. That raised dragon logo? The name die-cut out of the base instead of boring vent holes? You know you want it on display at your next cookout. I’d probably manufacture some story about how I won it in a martial arts contest at an ancient dojo, nestled in a hidden mountain valley… but that’s me.

Now let’s get down to business. For those of you who don’t know, modern-day chimney starters have been around since the 1960s. The basic concept is pretty simple: charcoal is suspended on a rack in a metal cylinder with holes cut in the bottom to promote air flow. Ignite your starter material under the charcoal and, as the charcoal starts to burn, and updraft is created that speeds up the process of firing up the whole stack. It’s a tried-and-true design, with variations offered by hundreds of manufacturers.

What makes the Chimney of Insanity unique? Well, they’ve added a 3″ tube, bent at a 90-degree angle, that’s accessible from a side vent on the cylinder. This allows for side-loading your starter material, which is a great safety feature (you don’t have to move a hot chimney to add more starter fuel underneath). That’s not the only benefit, however: if you blow air through that tube, it’s designed to create a vortex in the chimney that will dramatically accelerate the ignition of your coals. BBQ Dragon makes a fan specifically designed to attach to this tube that was not tested here, and videos show the rig lighting a full batch of charcoal in under 10 minutes. Given that a traditional chimney starter usually takes 20-25 minutes to fire up, this is an impressive time saver.

In addition to the innovative tube design, the overall build on the Chimney of Insanity is excellent. Heavy-duty materials are used throughout the construction, with extra rivets added at all the seams to ensure durability. It’s got a burly vinyl handle and heat shield, which allow for confident handling when loaded with rocket-hot coals. After killing several cheap chimney starters, I bought a heavy-duty Weber model that’s lasted several seasons. The Chimney of Insanity’s construction quality is easily on par with the Weber, and I expect that it will last just as long.

Testing the Insanity

I wanted to put the Chimney of Insanity through its paces, so I set up three different performance tests to see how it lives up to its claim.

For the first test, the Chimney of Insanity squared off against my old Weber chimney starter. I measured out two pounds of natural lump charcoal (my preferred heat source) for each chimney. Each chimney also got three sheets of 8-1/2″ by 11″ paper as starter material (rolled up and placed under the starter for the Weber, and inserted in the tube for the Chimney of Insanity). Both chimneys were fully lit and ready for grilling after about 25 minutes. I found the Chimney of Insanity easier to fuel with the side tube (and definitely easier to handle), but not particularly fast under normal circumstances compared to the Weber. 

For the second test, the Chimney of Insanity was loaded to the brim with traditional charcoals. Paper was loaded into the side tube and lit, adding additional paper every few minutes as needed to stoke the burn. Things got off to a slow start, so we added some manpower by blowing into the side tube periodically after about 5 minutes to speed things up. That’s when I started seeing the benefits of the design, with a fully lit chimney ready to go in under 20 minutes. A nice improvement, but my technique was still lacking. 

For the final test, the Chimney of Insanity was loaded with 50 charcoal briquettes and 6 hunks of raw hickory wood (to add flavor}, filling the whole chamber. We also borrowed one of the wife’s old hair dryers to simulate the effects of the BBQ Dragon fan (you know… for science). We started the fire, gave it a couple minutes to settle in, then turned on the hair dryer and aimed it at the tube.

Ladies and Gentlemen, please step back for your own safety. We have liftoff.

After a moment, you could hear a dull roar emanate from the chimney. Within a few minutes, we didn’t just have fire… we had roaring flames belching out of the top of the stack. It was as if Smaug himself woke up and decided to torch those pesky dwarves poking around for his treasure. Just check out the photo below:

Neat, right? It was impressive to behold. I’d say we had the whole chimney lit at about 15 minutes, which is great considering that I had some big ol’ chunks of raw hickory wood stuck in there. Honestly, we had to dial back on the hair dryer action every minute or so to make sure that we didn’t create a catastrophe in the back yard.

We’ve since used the Chimney of Insanity in this manner several times, with similar results. I would imagine that the BBQ Dragon fan, which is specifically designed to fit the vent, would produce more impressive results with a consistent low-velocity airflow. Sadly, I did not get the opportunity to test it here.

I can’t leave the testing portion of the review without a gratuitous food pic. Here was that night’s dinner: chicken thighs, legs & breasts with my homemade barbecue rub and sauce, baby sweet peppers marinated in garlic and olive oil, and sliced potatoes roasted in foil. The hickory wood adds an extra layer of flavor and smoke. Let me know if you want the recipes!

Additional Notes

The Chimney of Insanity is a nice chimney starter, but there are some things to consider if you’re looking to buy. It’s a good size (6″ diameter, 11″ tall), but there are bigger models out there if you need to fire up extra charcoal. The Weber I tested it against is 7″ in diameter and 12″ tall, and left more room when loaded with the same amount of charcoal (see picture above). I measured the Chimney of Insanity’s capacity at about 2 pounds of lump charcoal or 50 standard briquettes. If you are using standard briquettes, I don’t know that you’ll notice a size issue here; if you use wood chunks or natural lump charcoal, however, the extra size is helpful for managing odd-sized fuel. If you have a bigger grill, you might be firing up multiple stacks of charcoal anyway. Mine is a standard Weber kettle 22-1/2″ grill, and I found the Chimney of Insanity’s amount sufficient for most two-zone grilling (filling half of the grill, and leaving the other half for indirect cooking).

You’ll also see some discoloration in the pictures that resulted from firing up the chimney several times. This is something I have seen happen with every chimney starter I have owned, and it’s the result of the high heat you’re playing with. I think it shows that you’re using your toys often and well, but you should be aware that the shiny exterior will show signs of use over time.

Finally, it could be argued that you could get similar results by applying a steady air stream to any stack of charcoal. I’ve done this on camping trips with an air compressor. The BBQ Dragon fan, in fact, was originally sold for this purpose without the Chimney of Insanity (see our review here) . I do like the fact that the side vent give you much more control for a safe burn, however, and consistent results with each grilling session.

Conclusion and Pricing

Bottom line? I believe that the Chimney of Insanity performs well as a replacement for your current chimney starter with a solid build, a great handle, and some nice additional safety with the side-loading tube. The real magic happens when you get airflow going through that side tube. That’s when the beast earns its name, firing up a full stack of charcoal in half the time it would take otherwise.

At about $30, the Chimney of Insanity is just about right in terms of pricing when compared to similar models. You can get a cheap chimney for under $15, but it probably won’t last more than a season or two. The better-built models (like this one) usually range between $25 and $40 and can be expected to last several seasons. With the additional design features adding to the performance, I think the Chimney of Insanity is a good buy for the charcoal griller.

Source: The sample for this review was provided by BBQ Dragon. For more info visit their site or Amazon.


Product Information

Price: $29.95
Manufacturer: BBQ Dragon
Retailer: Amazon
Pros:
  • Solid construction
  • Great handle
  • Innovative design
  • Can light a stack of charcoal in half the time with air flow support
Cons:
  • Works best with a source for air flow (purchased separately)
  • Holds about 2 pounds of charcoal, which may not be enough for larger grills

Filed in categories: Reviews

Tagged: ,

BBQ Dragon Chimney of Insanity charcoal starter review originally appeared on on June 20, 2017 at 7:43 am.

Note: If you are subscribed to this feed through FeedBurner, please switch to our native feed URL http://the-gadgeteer.com/feed/ in order to ensure continuous delivery.

Julie’s gadget diary – The pull from the dark side is strong. I think I’m going to order an iPad Pro 10.5


I listened to Apple’s WWDC keynote a couple of weeks ago and didn’t come away with an immediate need to melt my Visa card on a bunch of new Apple gear like I usually do after such events. The new iPad Pro 10.5 looked nice enough, but I didn’t feel compelled to buy one.

I listened supportively as Dave Rees wrestled with his own buying decision. Dave and I both have older Samsung Galaxy tablets that are starting to show their age. Dave’s 12.5″ Galaxy Note Pro has freezing problems with his and the home button on my Galaxy S Tab 10.5″ has a short and often requires multiple button presses for it to go back to the home screen. It’s also very slow launching and switching between apps.

Dave ended up buying the iPad Pro 10.5 about a week ago and has been gushing about how great it is and that I need to get one. But even gadget peer pressure didn’t flip my gadget lust switch… until… it flipped. Now I am considering buying one to replace my sickly tablet. Why? Mainly because it’s time for me to have a new tablet and the iPad Pro 10.5 is the best tablet available right now. It would also be nice to have an updated iOS device so I can do some iOS app and hardware reviews again. The newest iPads in the house are the original iPad mini and an iPad 2 that Jeanne uses as an eBook reader. Yeah, it’s been awhile.

My mind isn’t 100% made up, but I’m definitely leaning in the direction of buying an iPad Pro 10.5 (and maybe a Pencil too). 

Anyone else in my shoes?

Be sure to check out Larry’s iPad Pro 10.5 accessories ideas post.

Filed in categories: Articles

Tagged:

Julie’s gadget diary – The pull from the dark side is strong. I think I’m going to order an iPad Pro 10.5 originally appeared on on June 19, 2017 at 1:47 pm.

Note: If you are subscribed to this feed through FeedBurner, please switch to our native feed URL http://the-gadgeteer.com/feed/ in order to ensure continuous delivery.

The Pocket Shot Hammer Full Kit Slingshot review


The Pocket Shot Slingshot is an innovative, modern take on the classic slingshot design. With the addition of the Pocket Hammer handle and Arrow Cap, this reimagining of the classic Y-shaped slingshot, a circular design which replaces strong rubber bands with an elastic pouch, is incredibly effective and so much fun to use.

The original Pocket Shot and Pocket Shot Arrow Cap was previously reviewed by fellow Gadgeteer contributor Larry Geisz. You can read those expertly conducted reviews here and here. I’ll be focusing on the Pocket Hammer Full Kit, which includes the Pocket Hammer handle and wrist brace.

The Pocket Hammer Full Kit comes with a standard Pocket Shot circular slingshot, a black Standard pouch, a blue Pro pouch, a Red Arrow pouch, the Arrow Cap, 100 5/16″ steel balls, four arrow nock caps, and the Pocket Hammer handle with wrist brace.

The Pocket Shot is super simple to assemble. The included circular rings and caps screw together, nesting whichever pouch you choose in between for a strong and secure fit.

According to the manufacturer, the material used to make the Pocket Shot is a durable, high impact polycarbonate composite.

Once assembled and held properly, wrapping your index finger and thumb around the circular notch of the Pocket Shot and pulling back the end of the pouch with your dominant hand, the unit feels natural and easy to handle.

The Pocket Shot can shoot a number of different types of ammo, including paintballs, marbles, smooth stones, and some airsoft pellets. The Pocket Hammer Kit comes with ammo in the form of 100 5/16″ steel ball bearings.

Most conveniently, you can use the Pocket Shot pouch to store your ammo as well as other pouches.

In use, the Pocket Shot measures about five inches long, but when closed it packs up into a very portable 2.3 by 1.3 inches.

The three different latex colored pouches, Standard (black), Pro (blue) and Arrow (red), provide different FPS rates when shooting and in the case of the Arrow pouch, when coupled with the Arrow Cap, allows you to shoot full sized arrows and crossbow bolts.

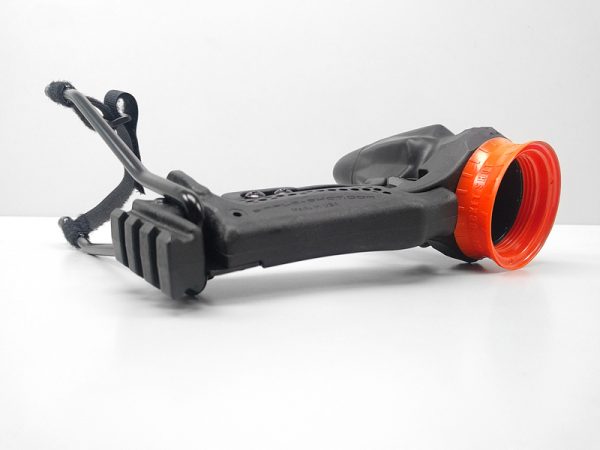
For more power and stability when shooting, the kit comes with the Pocket Hammer handle and wrist brace. The Hammer was designed by SimpleShot to provide a more traditional slingshot feel to the Pocket Shot while providing extra leverage and power.

The Hammer has a honeycomb, textured grip that was easy to maintain control of even with sweaty hands or in wet conditions.

The bottom of the Pocket Hammer has a standard rail mount attachment for adding accessories like flashlights or lasers for easier target acquisition.

The upper part of the Pocket Hammer has a metal tension clip that is secured by two screws at the base of the handle. By moving this tension clip outwards, you can break down the Hammer for storage or cleaning.

When fully extended and adjusted properly, the Hammer’s wrist brace stabilizes the slingshot and helps you get a deeper pull which translates into higher FPS when shooting.

The wrist brace itself is removable and the Hammer can be used with or without it.

You can attach any pouch to the Hammer just as easily as you would swap them out in the standard Pocket Shot configuration.

After attaching the red Arrow pouch to the Hammer, you’ll need to attach the Arrow Cap to be able to safely shoot arrows from the Pocket Shot.

The Arrow Cap consists off a standard looking archery whisker biscuit modified to fit on the Pocket Shot and Hammer. A whisker biscuit is an arrow holder with synthetic bristles that encircles and holds the arrow shaft in place and allows the feathers or vanes to pass through easily.

Once the Arrow Cap is securely attached to the Pocket Hammer you’re fully equipped to use the Pocket Shot to shoot full-sized arrows and crossbow bolts.

Now for the fun part! For the field test of the Pocket Hammer I needed an expert. Someone who’s logged hundreds of hours shooting and testing all types of equipment and weaponry. A fearless, rugged individual whose opinion I could trust.

So, naturally, I recruited my number one outdoorsman, my ten-year-old nephew, Enzo.

Enzo lives in the wilds of the Pacific Northwest with his mom and dad, his sister Carmela and his trusty canine sidekick, Ernie. Despite his young age, Enzo is an accomplished archer and marksman as well as a budding bladesmith. He’s tried out everything from Nerf guns to Daisy air rifles to high-powered drones and remote controlled cars.

We take safety very seriously, so all testing was done under the close supervision of Enzo’s dad and safety glasses were worn by all involved.

Our first priority was to try out the Standard Pocket Shot using the Pocket Hammer. We used the included steel ball bearings as ammo.

Enzo was pleasantly surprised with how easy the Pocket Shot and Hammer were to assemble and shoot. The wrist brace was a little uncomfortable for him at first, but he quickly became accustomed to it, hitting target after target with ease.

“I really liked that I could change the pouches myself and it was really fun and easy to aim and SO accurate!” Enzo said enthusiastically.

After voicing his approval of the Standard Pocket Shot and Hammer, Enzo excitedly moved on to the second round of testing, the Pocket Hammer with the Arrow Cap and pouch.

We set up our archery target and got to work. We used standard full sized arrows and the provided arrow nock caps to make the arrows easier to grasp inside the pouch. Pocket Shot does carry their own arrows on their website. The Pocket Shot arrows are specifically designed for use with the Pocket Shot and Hammer.

The verdict on the Arrow set-up was just as positive. It was easy for Enzo to get a full draw on the arrows and to consistently hit his mark. Although he still loves his bow, Enzo raved about how powerful, accurate and portable the Pocket Shot Hammer is.

“I can pack the whole thing up and take it camping with us,” he said with a grin.

Overall, the Pocket Shot Hammer Full Kit is an affordable, well-built and effective tool for target shooting and hunting small game. At just $99 for the entire kit and accessories, it’s a great buy over purchasing everything separately. The Pocket Shot Hammer Kit would make a terrific addition to your hunting, bug-out or camping gear. Enzo and I highly recommend it.

Note: Some types of slingshots and wrist braces are illegal in certain areas. Check the legality of such devices in your area before purchasing,

Source: The sample for this review was provided by Pocket Shot. Please visit their website for more info and find them on Amazon too.


Product Information

Price: 99.00
Manufacturer: Pocket Shot LLC
Retailer: Amazon
Pros:
  • Affordable
  • Very portable
  • Uses different types of ammo
  • Easy to assemble
  • Very accurate
Cons:
  • Small learning curve
  • Wrist brace can be uncomfortable until adjusted properly

Filed in categories: Reviews

Tagged:

The Pocket Shot Hammer Full Kit Slingshot review originally appeared on on June 19, 2017 at 8:23 am.

Note: If you are subscribed to this feed through FeedBurner, please switch to our native feed URL http://the-gadgeteer.com/feed/ in order to ensure continuous delivery.
Forget about counting sheep, use a Dreem sleep-enhancing headband instead


When it comes to sleep, the usual rule of thumb is that everyone needs 7-8 hours of sleep each night. But what if half or more of those hours are spent tossing and turning or staring at the ceiling wishing you were asleep. That’s where neurotech startup Rythm hopes to help with their Dreem sleep-enhancing wearable headband.

Dreem is a flexible fabric band work on the head that uses dry polymer EEG electrodes that measure brain activity. It then uses sound through bone-conduction technology to stimulate the brain to fall asleep faster and lengthen deep sleep cycles to improve the duration and quality of your sleep so that you wake up refreshed and well-rested.

The Dreem headband also uses a mobile app that keeps track of your sleep data to help you identify possible abnormal sleep patterns and then offer ways to increase your sleep quality.

Dreem is priced at $499/499€ and is now available for preorders at dreem.com. Those who order in the first 30 days will receive an early bird price of $399/€399 with shipping included until July 15. Dreem will ship this Fall.

Filed in categories: News

Tagged:

Forget about counting sheep, use a Dreem sleep-enhancing headband instead originally appeared on on June 19, 2017 at 7:00 am.

Note: If you are subscribed to this feed through FeedBurner, please switch to our native feed URL http://the-gadgeteer.com/feed/ in order to ensure continuous delivery.