iFrogz AIRTIME Truly Wireless Earbuds review

REVIEW – Another day, another pair of truly wireless earbuds to run through the review gauntlet. Do the iFrogz AIRTIME Earbuds have what it takes to jump ahead of the pack?

What is it?

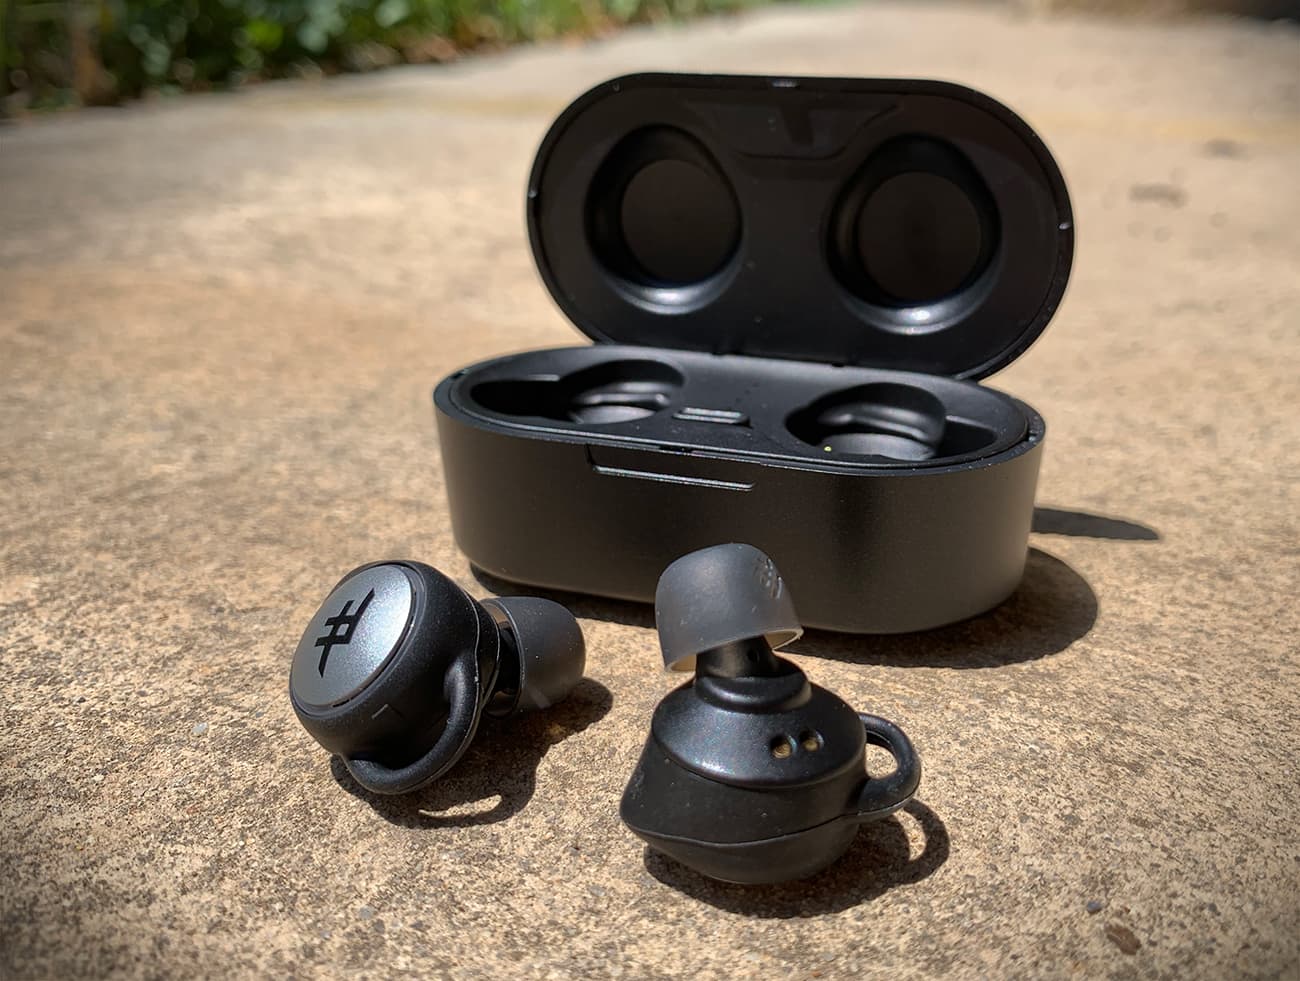
iFrogz’s AIRTIME are “truly” wireless earbuds that are geared for sports and workouts with their IPX-4 water resistance and 3-hour run time. They come in a low-profile charging case that can charge the earbuds an additional 4 times, for a total of 15 hours of playtime.

What’s in the box?

  • AIRTIME Wireless Earbuds
  • Charging Case
  • Charging Cable (Micro-USB)
  • Additional Earbud Tips (3 Sizes)
  • Quick Start Guide

Hardware specs

  • Bluetooth 5.0
  • IPX-4 water resistance holds up to sweat and light rain
  • earbud case supports quick-charging, 10 minutes delivers 1.5 hours of play
  • earbuds case charges over micro-USB
  • Auto-Pair Mode – open the charging case and the earbuds seamlessly pair
  • Dual microphones

Design and features

The iFrogz (part of the Zagg brand) AIRTIME Truly Wireless Earbuds look pretty great. That was my first thought as I opened the package to reveal a case that was smaller than I expected, housing a pair of earbuds that also looked nicer than I was expecting. And indeed, the case itself seems to be smaller, or a lot less tall, that other wireless earbuds that I’ve come across.

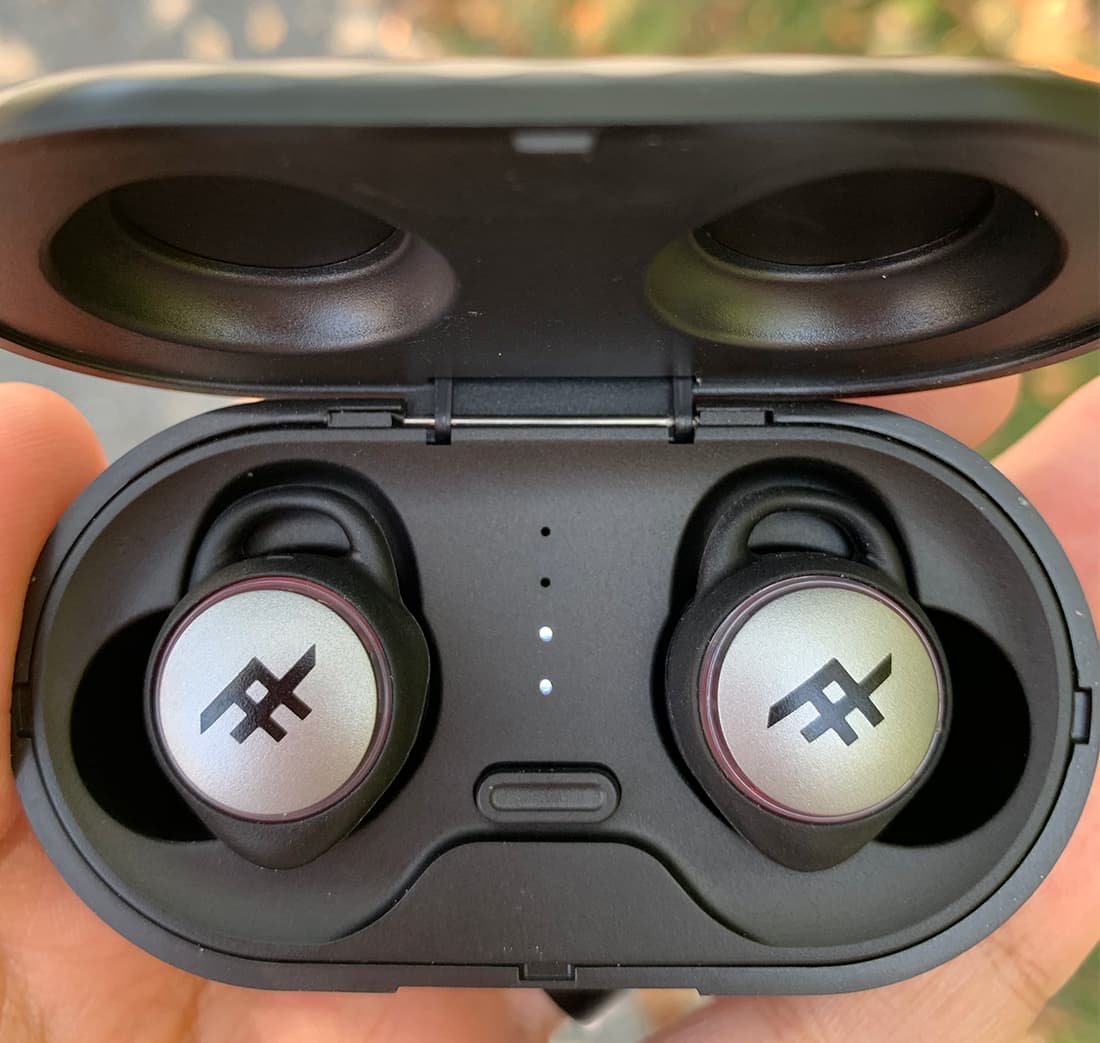
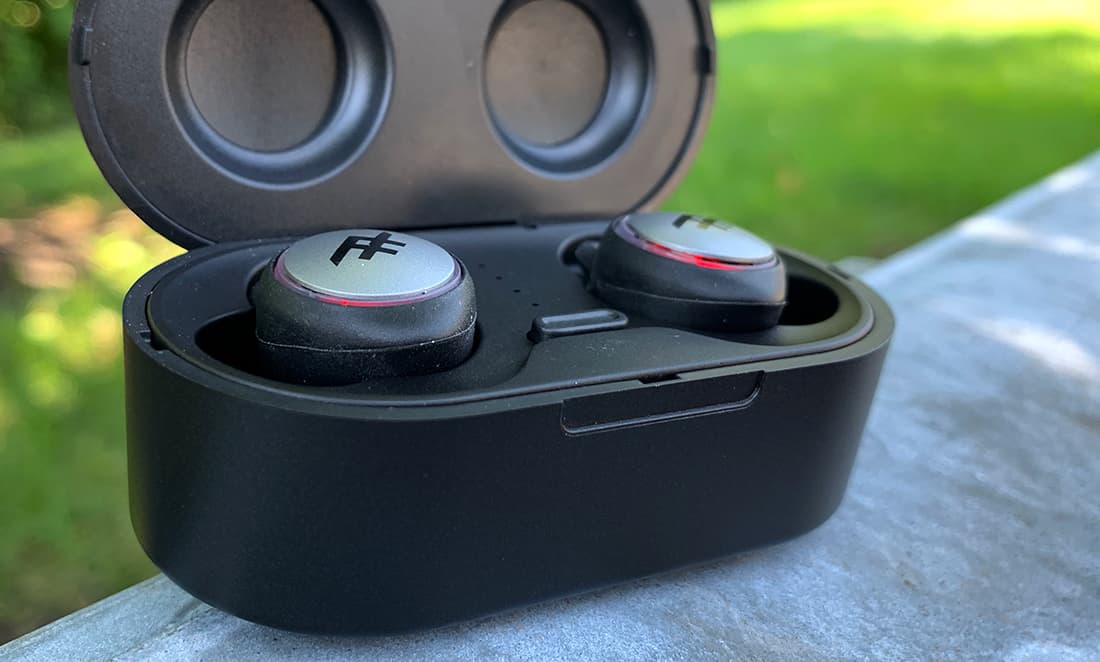
The case is very lightweight and low-profile.

Once I paired the AIRTIMEs, which was a simple process (for me, anyway, some people on the comments section of their website would disagree), the earbuds connect very quickly when the case is opened.

The AIRTIMEs come with the typical three ear tip sizes: small, medium, and large. However, even the largest size of the available tips was still too small to completely form a seal in my ear canal, which is important to the sound quality when you’re dealing with in-ear headphones. This degraded the quality a bit, and I would have appreciated a tiny bit of a size increase between the three available ear tips.

Obviously, I could simply have weird ears. But it’s worth mentioning.

My weird ears did hold the earbuds nicely, but the largest ear tip was too small for them. And the “sports wings” didn’t quite connect with my concha.

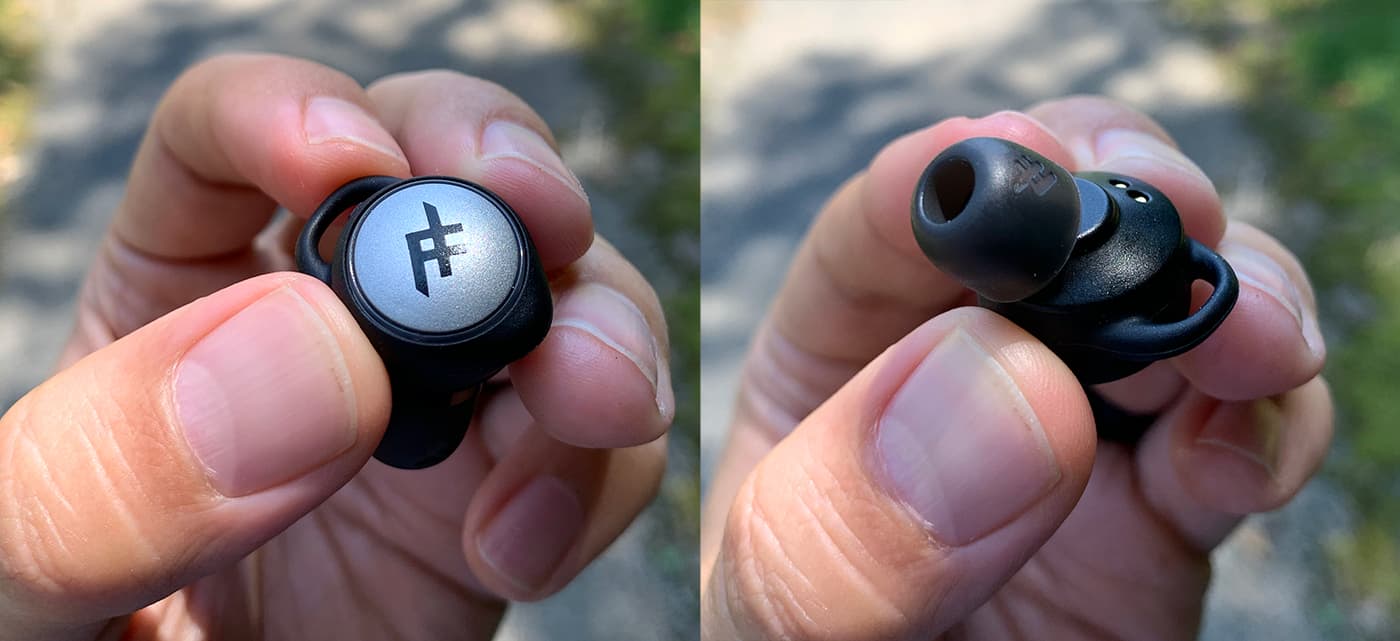
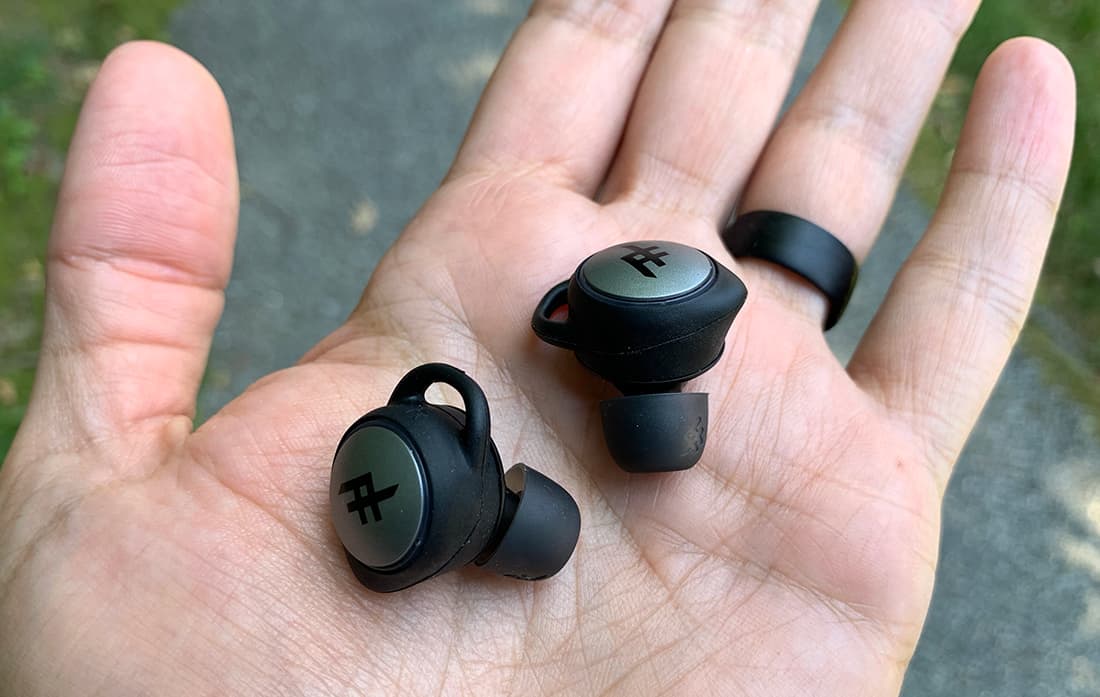
Using the AIRTIMEs is fairly straightforward. Simply open the case to pair, pop them in your ear, and start playing some tunes. Each earbud is equipped with a large button, in fact that button is almost the entire surface of the earbud itself. These buttons independently offer different functions, for instance, one quick press on either the left or right earbud pauses or resumes the music, but a double press on the right or left earbud plays the next or previous song, respectively.

You can also double-press an earbud to invoke Siri or voice command, but only when music is not playing.

Holding down a button for a few seconds changes the EQ setting from Signature (standard flat EQ) to Podcast (boosts voice and treble) or Bass Boost (lowers treble and greatly boosts the bass.) I didn’t find this feature particularly useful and kept it in normal “Signature” mode. I’ve never found built-in hardware EQ settings to be very good, and that “press and hold” button feature might have been put to better use as a way to adjust the volume, instead.

Yes, that entire silver circle is the button.

Speaking of the buttons, themselves, I’m not sure if it was because they were really large or if it was the materials they used, but they were pretty hard to press in. This made it difficult to double-press the button to skip the music track. Plus, when pressing the buttons, you’re actively forcing the earbuds even deeper into your ear canals, which can be painful if you’re not careful. It got to the point where I simply didn’t use this function.

At least the earbuds stayed put. Between the large-enough ear tips and the little sports wings on the side of the buds themselves, they stayed firmly planted in my ears.

The sound quality was decent — about what you’d expect from a middle of the road earbud. Overall they sounded a little flat, not very punchy in either end of the bass or treble spectrum. The Bass Boost mode certainly does louden-up the lower end of the sound range, but at the cost of muddy mids and highs.

You can clearly see how much juice is left in the case with the press of the center button.

I didn’t have a problem with the wireless pairing until I stepped outside for a walk, and things got bad real quick. I had my iPhone XR in the front pocket of my khakis and found that if I even so much as turned my head to the left, the sound cut out. First on one earbud, and then on both, until I turned my head facing front, again.

I did some more experimenting with head position, and indeed, the fabric of my pants and that extra few inches of turning or craning my neck was enough to cause an interruption in the connection. If I put my hands over my ears, all sound would stop within one second because of the extra blockage from my hands.

Holding the phone in outstretched arms seemed fine. Perhaps running with an arm case or holding your phone would be okay, too, but I wouldn’t be surprised to discover some interference in this configuration. I’d rather have a wire leading into my pocket than deal with all those pops and seconds of silence. Really disappointing.

These tiny buds get about 2.5 to 3 hours per full charge.

The battery life of the AIRTIMEs seemed close to advertised, getting nearly 3 hours out of a single charge, and then being able to charge the earbuds an additional 4 times. One could get more than a day’s worth of play time out of single “case charge.” The case itself is lightweight, but seems a bit flimsy. I don’t think it would survive a drop down… a flight of stairs, for instance. The case door seems likely to snap off, and since that’s integral to the function of turning on and pairing the earbuds, that wouldn’t be great.

Finally, for what they are, the price of the AIRTIMEs seems a little on the steep side, to me. A quick search on Amazon reveals a $35-55 price range for similar looking (and sounding I’m assuming) earbuds. While I think these look a little nicer than most of those, and the case is smaller and more discreet, function beats form any day, and the AIRTIME earbuds fell short in more ways than one.

What I like

  • connects quickly
  • discreet design doesn’t draw attention
  • pretty good “fit,” difficult to jar loose

What I’d change

  • needs much better connection strength
  • make the earbud buttons easier to push
  • the largest earbud tips are still too small (for my ears)
  • would rather have volume controls rather than useless EQ settings
  • and they should be about $20 cheaper

Final thoughts

While the design aesthetic of the AIRTIME is nice, there isn’t a whole lot here to differentiate itself from the growing sea of “truly wireless earbuds.” The connection issues, limited functionality and just-OK sound make it a hard recommendation for the asking price.

Price: $59.99
Where to buy: You can pick up a pair of the AIRTIME Earbuds directly from Zagg.
Source: The sample of this product was provided by Zagg.

Filed in categories: Reviews

Tagged:

iFrogz AIRTIME Truly Wireless Earbuds review originally appeared on The Gadgeteer on July 23, 2019 at 11:00 am.

Note: If you are subscribed to this feed through FeedBurner, please switch to our native feed URL http://the-gadgeteer.com/feed/ in order to ensure continuous delivery.

Ambronite meal replacement shakes review

REVIEW – I’m still on my quest to try a variety of meal replacement shakes and bars in an effort to curb my bad habit of eating unhealthy options for breakfast and lunch during the workweek. The latest meal shakes that I’ve been sampling are from Ambronite. Let’s take a closer look.

What is it?

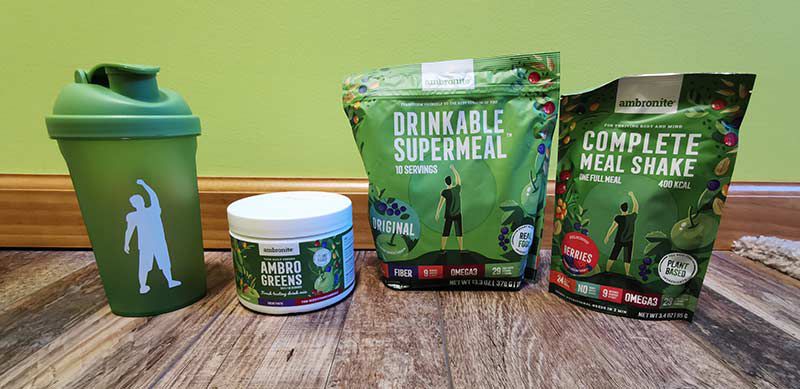
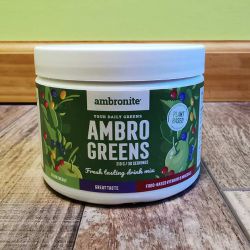
Ambronite offers complete plant-based meal replacement shakes that come in individual pouches, bags, and tubs. They also offer a green drink mix that provides 1 serving of veggies and greens.

Drinkable Meal Shakes

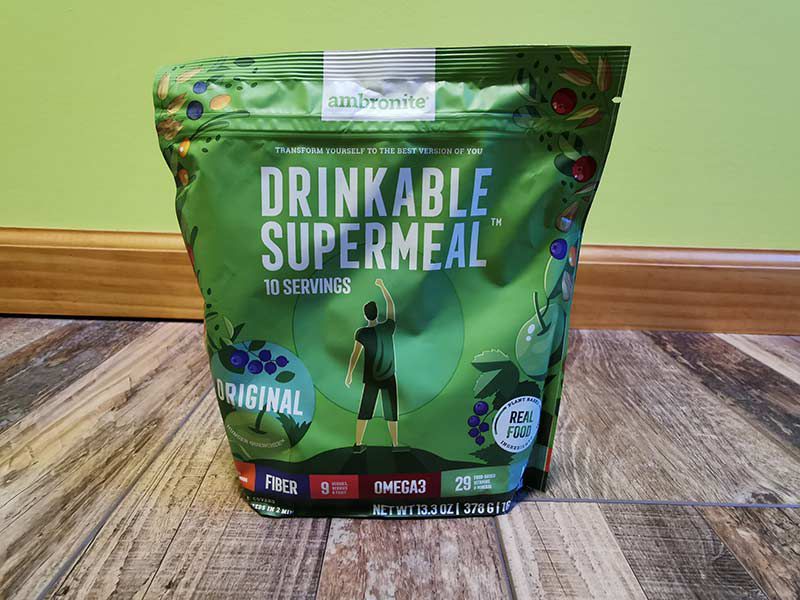
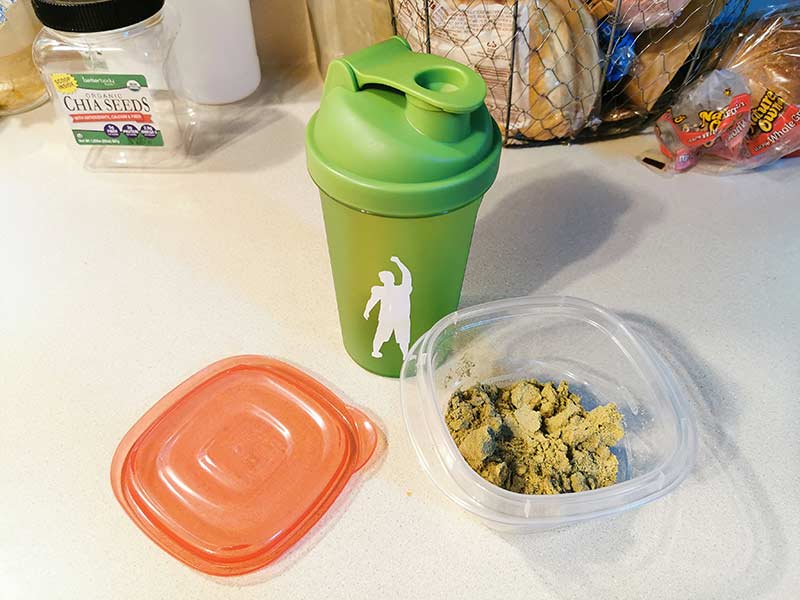
Ambronite offers its powdered meal shake mixes in three flavors and three package types. They have an original flavor, berry flavor, and banana flavor. They sent me one of the 4-meal bags of their original flavor and 3 individual 1-meal pouches of their berry flavor. No, I don’t like bananas, so I haven’t tried that flavor.

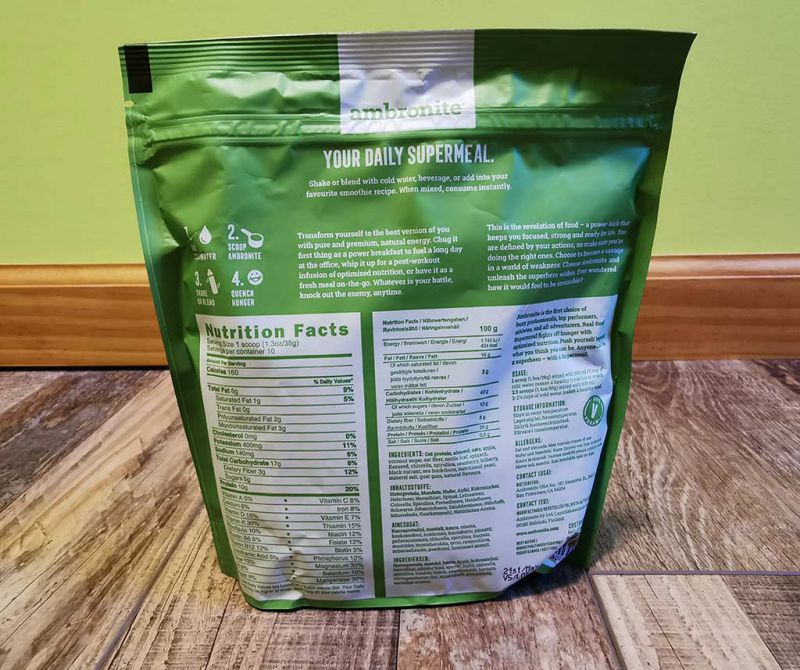
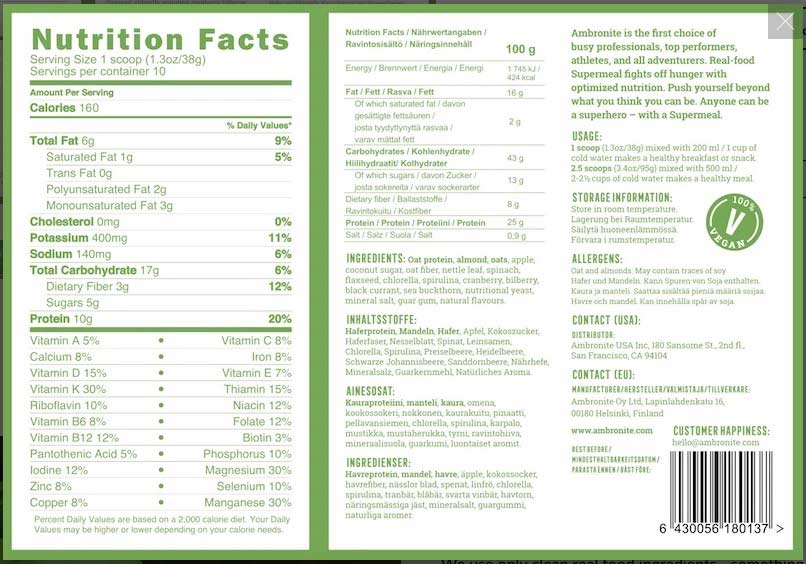
The 4-meal bags are based on 400 calories per meal. So you can actually make each bag last longer by customizing the meals by using less of the powder. One scoop = 160 calories and 2.5 scoops = 400 calories.

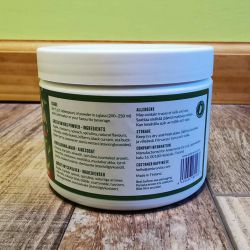
Ambronite uses oats and almonds as the protein source along with spinach, flaxseed, and other natural ingredients. Click the image above to see more.

Preparing the meal shakes

To prepare a shake, you just add the number of scoops for your preferred calorie meal and 1-2.5 cups of water in a shaker bottle. The bottle that Ambronite sent to me did not have a shaker ball or a shaker screen in it. I don’t know if that part was missing or that’s just the way theirs is, but using it to mix the shake left some clumps compared to when I use a shaker bottle with a ball or screen.

The resulting shake was a not so appetizing green color but that’s because each serving of the Ambronite meal shake gives you a 2 for 1 punch because it includes greens too.

Each serving is 100% vegan, 160 calories, and provides 10g of protein and only 14g of carbs which isn’t that bad at all. And no Sucralose! Yay!

Texture and taste


I first tried the berries flavored 1-meal shake package and found the flavor to be a vaguely berry-flavored medium sweet shake with a medium-thick shake-like texture. The only offputting thing about the shake is that it has small bits of what I think are almonds in it that make the shake a little “chunky”. I might not mind the almond chunks if the shake were chocolate flavored, but that texture doesn’t seem right in a berry-flavored drink, but that’s just me. You might feel differently.

The original flavored of the meal shake mix doesn’t really have much of a flavor at all unless “meh” could be considered a flavor. It’s lightly sweetened and has the same chunky texture as the berries flavor. I thought I might be able to “doctor up” the shake by adding a tablespoon of cocoa powder and a couple packets of stevia sweetener. It helped some, but not much.

I was able to remedy the problem with the chunks by putting the powder, water, and ice cubes in my Ninja blender. It didn’t help with the flavor though. Given a choice, I would go with the berries flavor, but neither one were enjoyable or all that tasty to me.

AmbroGreens


I don’t eat nearly enough fruits and veggies. I’m lucky if I eat one serving a day, let alone the 3-5 you’re supposed to eat with EACH meal. The AmbroGreens drink mix is a small container that provides 30 23 calorie servings of greens.

Note that while you are getting vitamins, antioxidants, and phytonutrients when you drink the AmbroGreens drink, but little to no fiber. That means that you should not substitute AmbroGreens for real servings of fruits and veggies, but it is a nice supplement or when you’re traveling.


To fix the green drink, you just mix a teaspoon with some water and drink. The flavor wasn’t bad but wasn’t something I looked forward to drinking every day either.

What I like

    • Healthier than other replacement meal mixes I’ve tried so far
    • No artificial sweeteners
    • No artificial ingredients
    • No preservatives
    • No wheat, dairy, or soy

What I’d change

  • Improve the flavor and texture of the meal shakes

Final thoughts

When it comes to ingredients and nutrition the Ambronite meal replacement drink mixes have Soylent, Huel, and Queal beat. They are high protein and lower in carbs and don’t include questionable ingredients like Suclarose and soy. But when it comes to flavor and texture, Ambronite comes in last – at least to my taste buds. I’ll continue to drink the rest of the samples that they sent me, but I don’t plan to order more until they improve the flavor and texture. That said, if they ever add a chocolate version of their meal replacement shake mix, I’d love to try it.

Price: $19.95 and up. Price depends on package size. Cheaper on Amazon.
Where to buy: Amazon
Source: The sample for this review was provided by Ambronite.

Filed in categories: Reviews

Tagged: , ,

Ambronite meal replacement shakes review originally appeared on The Gadgeteer on July 22, 2019 at 1:19 pm.

Note: If you are subscribed to this feed through FeedBurner, please switch to our native feed URL http://the-gadgeteer.com/feed/ in order to ensure continuous delivery.

Xerox Duplex Combo Scanner review

REVIEW – Each of my two printers at home has a scanner, but neither is a duplex scanner. When the Xerox Duplex Combo Scanner was offered to the Gadgeteer for review, I was excited to try it out. What’s the verdict? Well, it’s relatively small and lightweight. It scanned my large two-sided documents quickly and allowed me to save them as searchable-PDF files (there are lots of file types you may save your scan as). I also found that I was able to scan multiple photos at once and save them as individual files using the multi-crop TWAIN application setting.

However, when scanning a large document, it sometimes would crop off important information close to the edge of the page thus requiring me to rescan that page. In addition, while scanning photos using the multi-crop setting, the scanner would get crop-happy and chop a photo into tiny pieces creating for me my very own unique and challenging puzzle. Anyway, I had to rescan the image by itself without the multi-crop setting. Additionally, the quality of the photo scans was not quite as good as I expected.

Overall, this scanner makes quick work of large two-sided documents and scanning lots of photos but you need to review the scans carefully to make sure all the information is there and the photos are intact.

What is it?

The Xerox Duplex Combo Scanner is a device that will scan your documents and photos using either the duplex Automatic Document Feeder (ADF) tray or the flatbed scanner and will allow you to save the scans digitally in different file types depending on the scan destination. Duplex scanning means that this scanner can scan both sides of one sheet of paper simultaneously. This scanner is meant to supplement your existing printer(s) to give you or your small business additional functionality.

NOTE: This scanner is NOT WiFi or Ethernet compatible. It connects to your computer via USB and uses your computer’s processor and WiFi or Ethernet connection to your network to do its work.

What’s in the box?
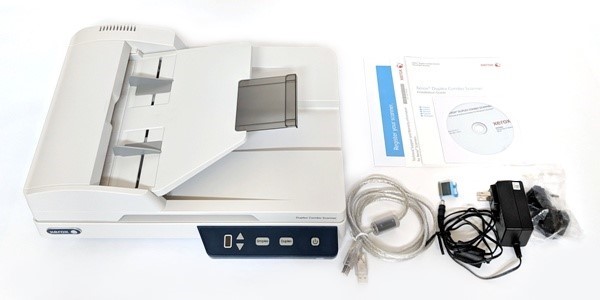
  • Xerox® Duplex Combo Scanner
  • Power Supply with Power Plug Adapters
  • USB Cable (USB-A to USB-B cable, USB 2.0 data transfer speed)
  • Spare ADF pad
  • Quick Installation Guide
  • Technical Support Card
  • Warranty Card
  • DVD-ROM including:
    • User’s Manual
    • Visioneer OneTouch
    • Visioneer Acuity
    • ABBYY Business Card Reader
    • ABBYY Fine Reader Sprint
    • Scanner Drivers: TWAIN, EMC® Captiva® ISIS® and Microsoft Windows Image Acquisition (WIA) Driver

Hardware specs

Document Requirements (ADF)

  • Minimum Item Size 3 x 5.9 inches (76 x 150 mm)
  • Maximum Item Size 8.5 x 14inches (216 x 356mm)
  • Capacity 35 pages of 20lb printer paper (75–80 gsm)
  • Paper Thickness 16–28 lbs. (60–125 gsm)

Document Requirements (Flatbed)

  • Minimum Item Size 0.5 x 0.5 inches ( 13 x 13 mm)
  • Maximum Item Size 8.5 x 11.70 inches (216 x 297 mm)
  • Item Thickness 0.39 inch (10 mm)

General Specifications

  • Model Number: XD-Combo
  • ADF Scan Speed: 25 ppm/50 ipm @ 300 or 200 dpi (Color, B&W, or Grayscale)
  • Duty Cycle: 1500 pages/day
  • Optical Resolution: 600 dpi
  • Interpolated Resolution with Visioneer Acuity: 75, 100, 150, 200, 300, 400, 500, 1200
  • Output Bit Depth: 24-bit color, 8-bit grayscale, 1-bit bitonal (black & white)
  • Scan Method: Duplex Automatic Document Feeder (ADF) or Simplex U.S. Letter / A4 Flatbed
  • Scanning Media Supported: Paper, plastic ID cards, photos
  • Image Sensor: CIS (Contact Image Sensor)
  • Light Source: RGB LED lamp
  • Interface: Hi-Speed USB 2.0, compatible with USB 1.1
  • Certifications: UL/C-UL, FCC CLASS B, CE, CB, WEEE, ROHS, ENERGY STAR, MEXICO ENERGY (CFE), RCM, USB-IF, CCC
  • Operating Temperature: 40° ~ 95° F (5° ~ 35° C without condensation)
  • Relative Humidity: 10% ~ 90%

Scanner Dimensions (Trays Extended)

  • Width 15.8 inches (402 mm)
  • Depth 13 inches (330 mm)
  • Height 5.5 inches (139 mm)
  • Weight 5.94 pounds (2.7 kg)

Power Information

  • Power Supply APD (WA-36A24R)
  • DC Jack, 2P, 100~240 VAC, 24 VDC, 1.5 A, 36 W, Class 1, ENERGY STAR, RoHS
  • Scanner Rating: 24 VDC, 1.5 A
  • Power consumption
    • ≤ 15 Watts (during operation)
    • ≤ 6.0 Watts (on standby)
    • < 2.0 Watts (power save after 15 minutes without scanning)
    • ≤ 0.5 Watt (power off)

Cable Information

  • USB cable 1850 mm, 28AWG, with core, RoHS compliant

Software Information – Supported Operating Systems

  • Microsoft Windows
    • 32-bit or 64-bit 7 (Service Pack 1)
    • 32-bit or 64-bit 8 / 8.1
    • 32-bit or 64-bit 10

Scanner Drivers

  • TWAIN, WIA, ISIS

Bundled Software

  • Visioneer® OneTouch®
  • Visioneer® Acuity Module

Design and features

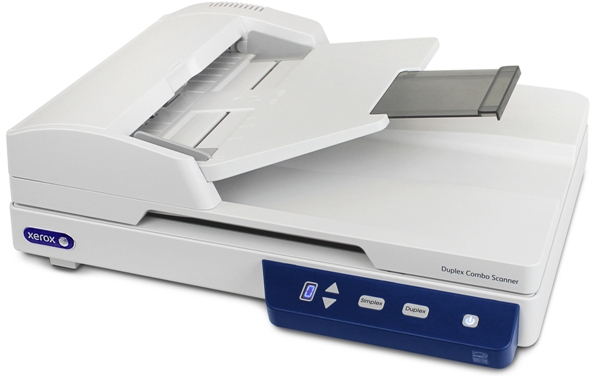
The Xerox Duplex Combo Scanner is a really lightweight and small flatbed/duplex ADF scanner. I was surprised by how lightweight it was. It is almond colored and made of hard matte plastic. The top of the scanner has paper guides and an Input Tray for the ADF. And just below that is the Output Tray.
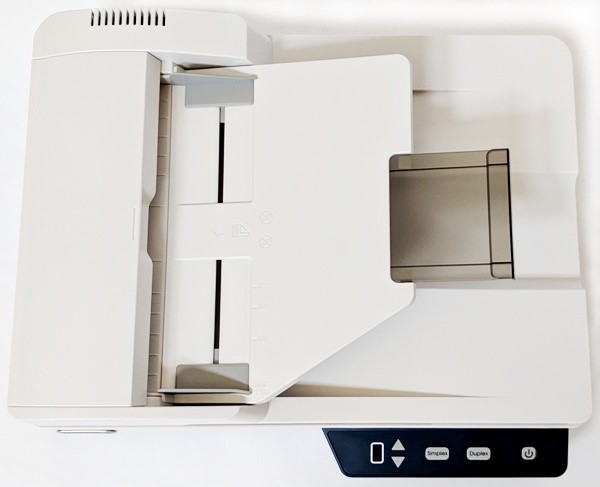
The plastic control panel is very simple and contains from left to right an LED display, the Up/Down Function keys, a Simplex button, a Duplex button, and a Power button/Status Light. The control panel looks black in my photos by is actually a very dark blue.
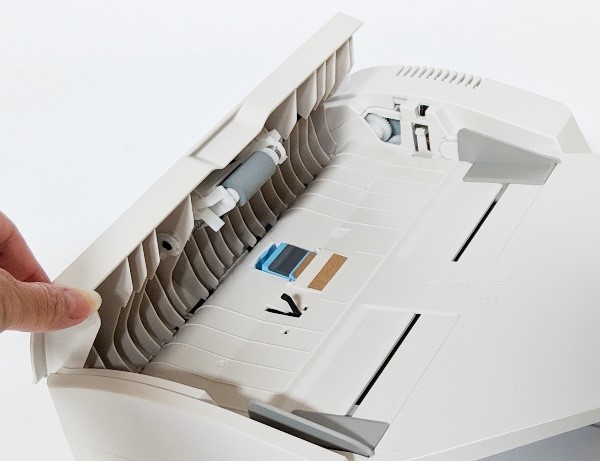
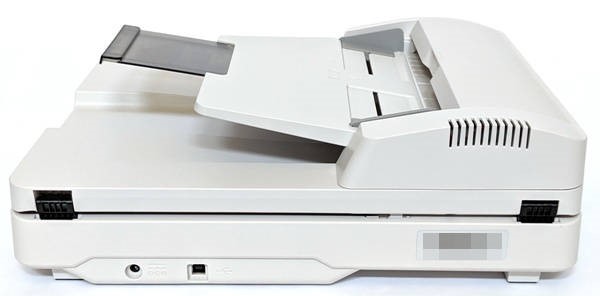
If the ADF gets a paper jam or you need to replace the small blue ADF pad, you can do so by lifting the ADF cover. Lifting the Scanner Lid reveals the flatbed scanner. The bottom of the scanner has rubber pads at the corners to prevent scratching furniture or moving around. You’ll also notice that on the left side of the bottom of the scanner is a grey sliding button. This is a locking button that will prevent the scanner from scanning when in the locked position. You must slide this button to the unlocked position in order to use the scanner. The back of the scanner has the power port and the USB-B port that you use to connect to an outlet and your computer, respectively.
Setup

I chose to install the driver and all of the scanning software. I did not install it from the web because I received errors, so instead, I installed the software from the DVD and checked for updates later. The installation took quite a bit longer than I anticipated. Each piece of software required me to accept the terms of use before proceeding.

Performance
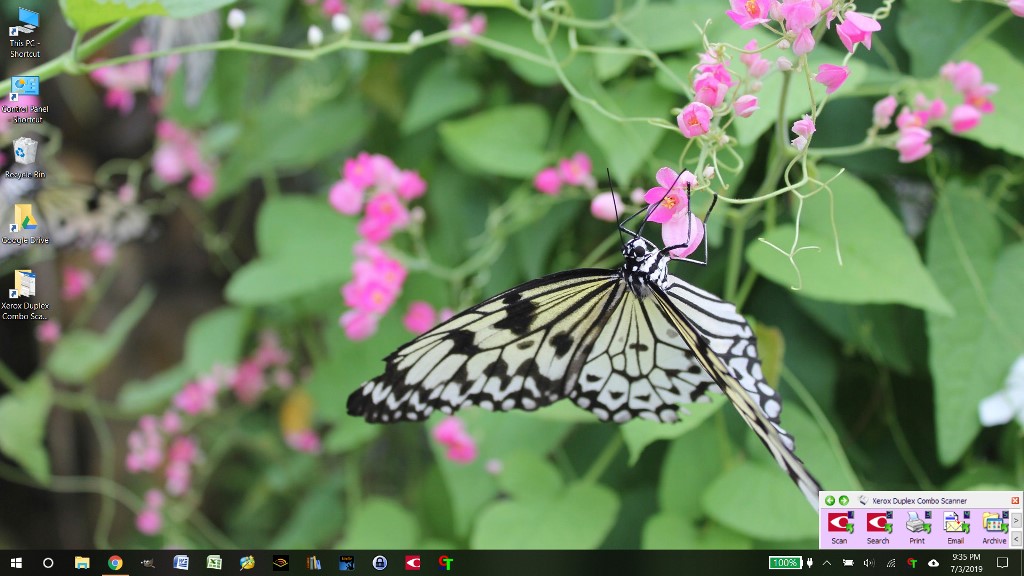
Once all the software was installed, I could launch the One Touch 4.6 software which would bring up the above tiny screen of scanning functions. Left-clicking on any of the icons (Scanning Function Presets 1-9) starts the scanning process when the scanner is powered on and connected to a computer. Right-clicking on any of the icons launches the One Touch configuration screen.

The OneTouch application provides nine preset scanning functions for this scanner:

  • Function 1 – “Scan” – the default uses the ABBYY FineReader Sprint application destination and saves the file as a searchable PDF
  • Function 2 – “Search” – the default uses the ABBYY FineReader Sprint application destination and saves the file as an sPDF
  • Function 3 – “Print” – the default uses the Microsoft XPS Document Writer setting destination and saves the files as a BMP
  • Function 4 – “Email” – the default uses the PackagedMail setting destination and saves the file as a PDF
  • Function 5 – “Archive” – the default uses the Transfer to Storage setting destination and saves the file as a PDF
  • Function 6 – “Photo” – the default uses the Transfer to Storage setting destination and saves the file as JPG
  • Function 7 – “Edit” – the default uses the Microsoft Word application destination and saves the file as a DOCX
  • Function 8 – “Contact” – the default uses the ABBYY Business Card Reader application destination and saves the file as a JPG
  • Function 9 – “Magazine” – the default uses the Transfer to Storage setting destination and saves the file as a JPG

Configuration settings for preset scanning functions
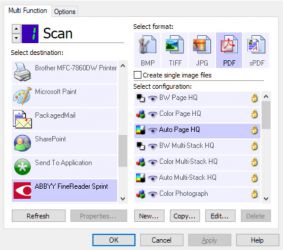


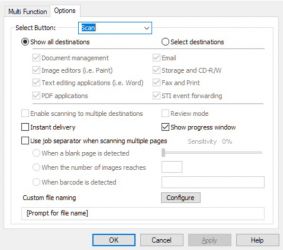
The first screenshot above is the OneTouch configuration screen for Scanning Function 1 entitled “Scan”. The default view is the Multi-Function tab which allows you to select the destination of the scan, the saved file type, and the configuration.

The Options tab located at the top of the screen (shown in the second screenshot above) allows you to select things like which destinations to show, “Use job separator when scanning multiple pages”, and “Custom file naming”.

The last screenshot comes up when you click on the Edit button from the default configuration screen. On this screen, you must first unlock the preset configuration by clicking on the lock icon to allow you to adjust the settings.

You can alter the Scan Settings as shown in the last screenshot above…
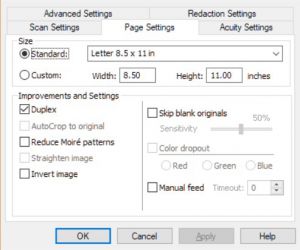


…Page Settings, Acuity Settings, Redaction Settings (not shown), Advanced Settings, and sometimes Storage Settings depending on which scanning function you are editing.
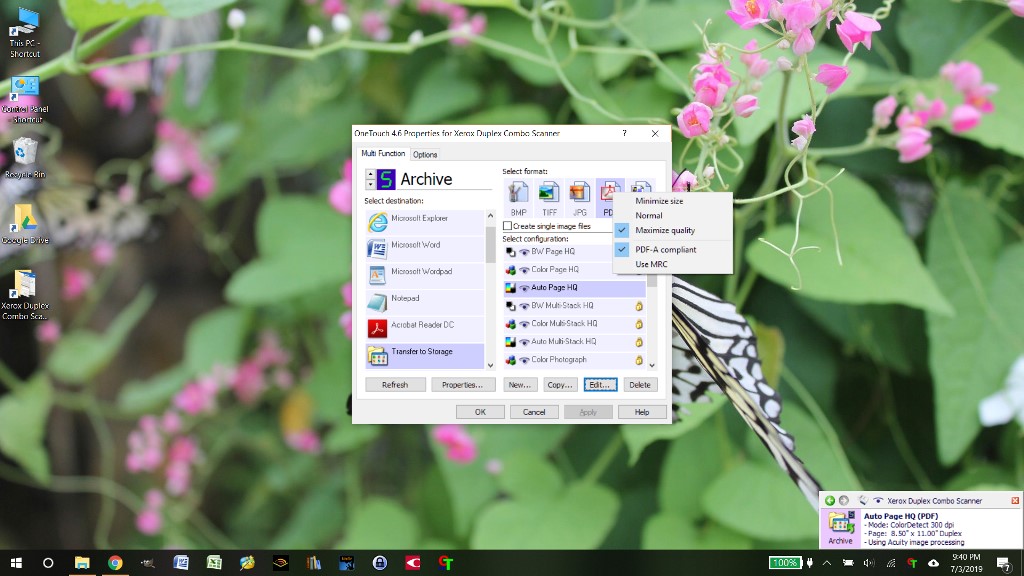
When selecting the file type from the default configuration screen, you can right-click on the file type to select the quality of the scan e.g. minimize size, normal, or maximize quality.
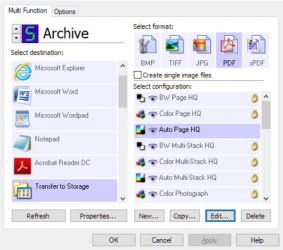
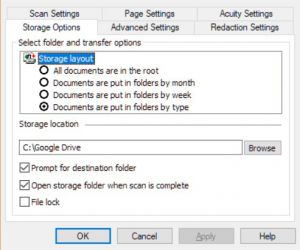
I tended to use Scanning Preset Functions 1 and 5. Scanning Function 5 is entitled “Archive”. When editing this function, I was additionally able to edit Storage Options settings like where to store the file.

Scanning large two-sided documents
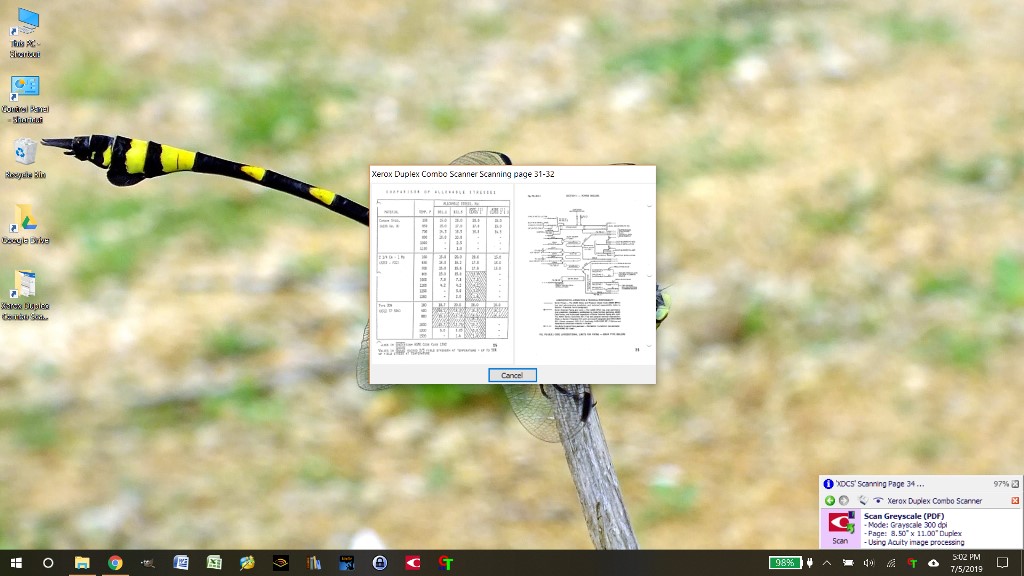
After altering the Scanning Function 1 to my preferences, I was able to start scanning some large two-sided documents by left-clicking on the icon. You can also use the control panel on the scanner to select Function 1 using the Up Function key or Down Function key and then press the Simplex or Duplex button on the scanner.
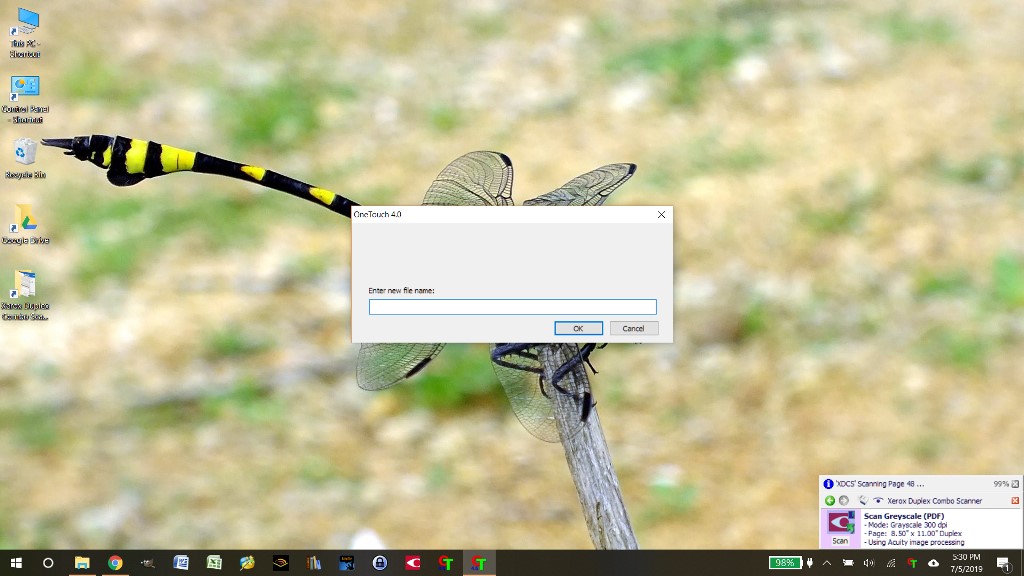
After the initial scan was completed, I was then prompted to enter a file name because that’s how I configured the scanning function.
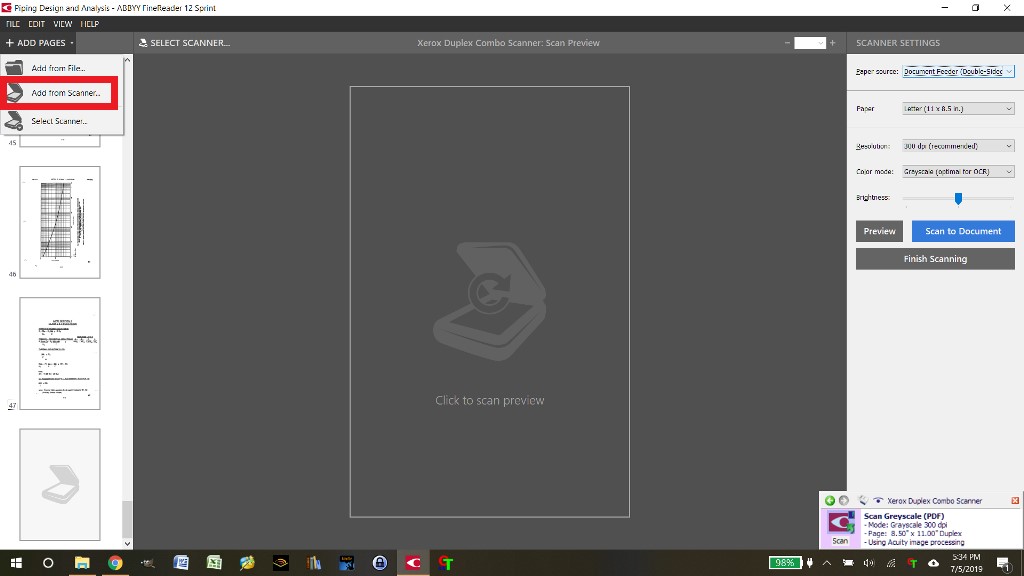
Because the ADF tray limits the number of pages it will hold to about 35, I had to divide large documents into sections. After scanning the first section and naming it, Scanning Function 1 opens up the ABBYY FineReader 12 Sprint application which was the destination for Function 1. However, this is only one section of the document that I was scanning and I wanted to save all the sections in one file. To do this, I needed to click on “Add pages” and select “Add from scanner”.
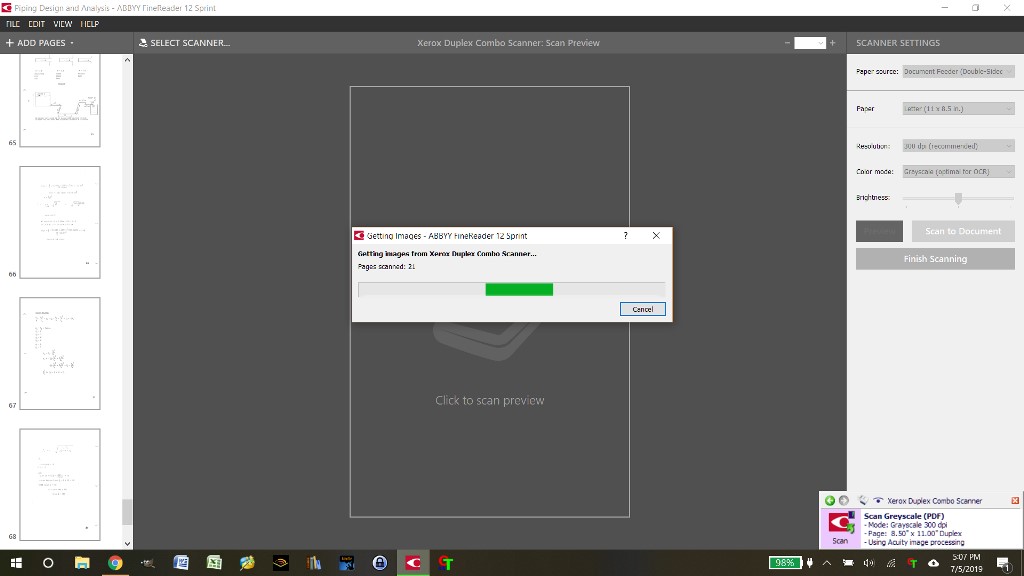
After selecting “Add from scanner”, the right pane of the application displayed settings for the additional scan (so, I guess I’m no longer using the OneTouch scanner settings but the ABBYY FineReader Sprint scanner settings?). I selected the ADF double-sided paper source, Letter (11″x8.5″) paper, 300 dpi resolution, and the Grayscale (Optimal for OCR) setting. I then clicked on the “Scan to Document” button.




While scanning a large document which was about 400 pages long, there where some cropping issues. Periodically, when there was important information near the edge of the page being scanned, it was cropped such that some of the information was lost as shown in the screenshots above. This happened to about 20 pages out of 400.

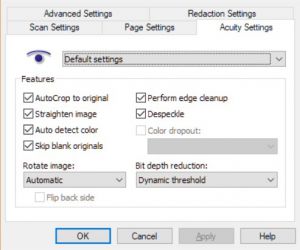
To illustrate the problem, the first and third images above were scanned using the ADF and lost some details, while the second and fourth images above were scanned using the flatbed scanner and did not lose any detail. I had to rescan the problem pages and place the new images in the correct position in the document then delete the messed-up image. This was a bit tedious. I tried to figure out if settings like “AutoCrop to original” were the problem, but nothing seemed to work.

You can also see in the above scans that even though the scanner was set to scan to 8.5″ x 11″, the widths of each page is slightly different. This drives me crazy! However, even though the pages are slightly different widths, most of those pages did not lose any information.
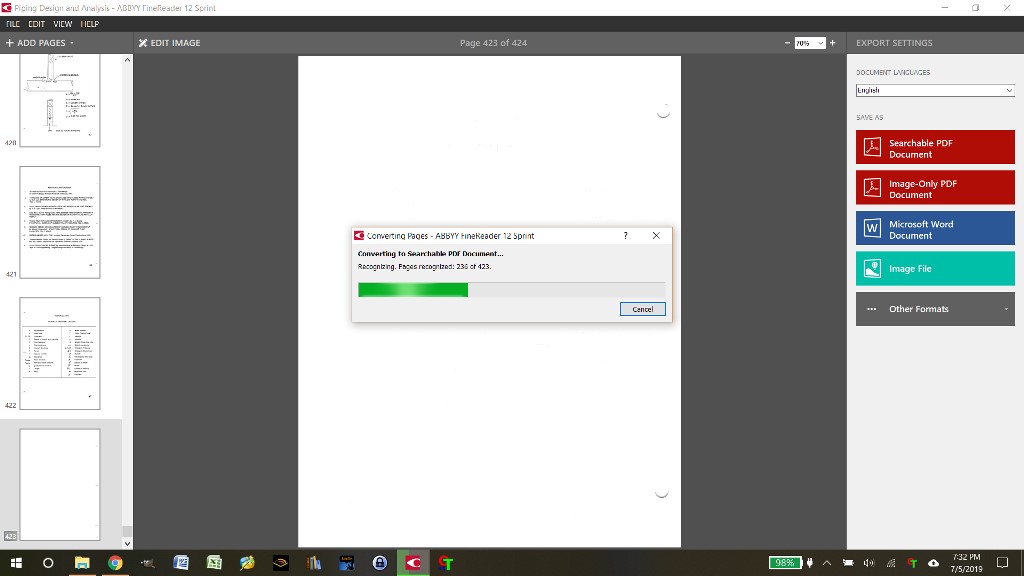
When I was finished scanning all sections of my large document, I saved it as a searchable PDF by clicking on the red “Searchable PDF” button located in the right pane of the screen. It successfully converted the document into the PDF.

The scan quality of the documents was really quite good – better than the scanners on our printers. The OCR capabilities of the ABBYY FineReader Sprint application was also pretty good. It made most of the text searchable (some text was not very clear on the original to start with).

Overall, even though the scanner made quick work of scanning my large documents, I had to be careful that it wasn’t cutting off important information. In the end, I think it was worth it. I saved a great deal of time using this duplex scanner over my other simplex scanners on my two printers.

Scanning old photos
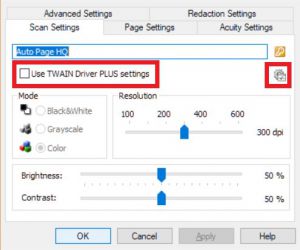


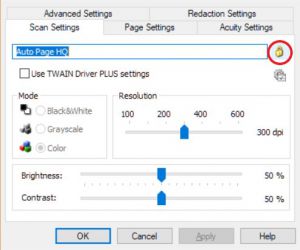
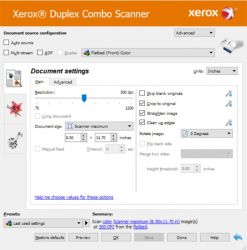
Using Scanning Preset Function 6, I also scanned lots of old photos. Since I wanted to scan about three photos at a time and save them as individual files, I had to alter the configuration settings for Function 6 to use the TWAIN Driver PLUS settings as shown in the first screenshot above.

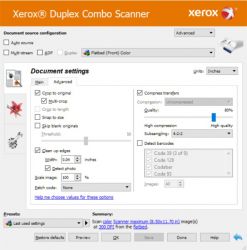
After clicking on the “Use TWAIN Driver PLUS settings” checkbox then clicking on the gear icon next to it, it launched the TWAIN driver settings screen (shown in the first screenshot above). I had to select “Advanced” from the dropdown menu located at the top right corner of the screen shown in the second screenshot above to reach the multi-crop settings that I needed which was located under the Advanced tab. It took me quite a bit of time to find the multi-crop setting. But once I found it, I was able to scan three photos at a time and save them as individual files as long as I was saving them as TIFF files (you can’t do this with JPG files).

However, while scanning several photos at a time using the multi-crop setting, the scanner sometimes cropped a photo into small bits as shown above. I’m not sure why – perhaps because of all the vertical lines in this photo? It was necessary to unselect the multi-crop setting and scan the photo by itself in order to get the image to appear correctly as shown above. This slowed the scanning process down some. This happened several times and not just with landscape pictures but also with people. The tops of some people’s heads were cut off and saved as separate files. Perhaps the scanner needs some therapy. Luckily, I was able to scan about two-thirds of my photos without this problem.


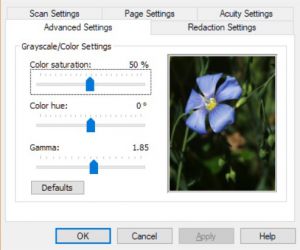
The above images are various captures of the same photo to give you an idea of how well the Xerox scanner captures the colors and details of the photo. The first image above is from the Xerox scanner (a 600 dpi JPG). The second image shown above is from the Google Photoscan app on my phone which uses my phone’s camera to capture the photo and the last image is one taken directly with my Pixel 2 XL camera. Each of the photos was resized to 800 x 800, but no other adjustments were made; brightness, contrast, color saturation, color hue, and gamma settings on the scanner were left at the default settings.

The image that best replicates the actual photo is that taken directly from my Pixel 2 XL camera. I suppose with some work, I could get the Xerox scanned image to better replicate that of the original by adjusting the scanner settings or by using photo software. However, if you need a scanner to scan all your old photos, perhaps it’s best to look for a photo scanner.

Overall, the scanner did an adequate job of scanning my old photos. Though you should know that I’m not a really sentimental or nostalgic person. Thus, I felt that I was able to save time by scanning several photos at a time and have the scanner automatically crop them as separate images and save them as separate TIFF files rather than scanning the photos one at a time.

What I like

  • The Xerox Duplex Combo Scanner makes quick work of scanning large two-sided documents
  • For my purposes, it also adequately scans about three photos at once and crops and saves them as individual TIFF files
  • The scanner is lightweight and is relatively small for a flatbed/ADF duplex combo scanner
  • It adds duplex scanning capabilities to your home office or small business at an inexpensive price tag

What I’d change

  • The scan widths of 8.5″ x 11″ scans were cropped at slightly different widths throughout the document, but only about 20 pages of a 400-page document were cropped such that important information was lost, thus requiring me to rescan those pages
  • It cropped some photos into several pieces also requiring me to rescan those photos individually with the multi-crop TWAIN driver setting turned off
  • I would love for it to be WiFi or Ethernet compatible

Final thoughts

When I first received the Xerox Duplex Combo Scanner, I was disappointed that it didn’t connect to my network either via WiFi or Ethernet (it must be connected to a computer via USB to work). However, I think that if those things were included in this scanner as well as the processing power necessary to quickly scan large documents, it would be more expensive. Because the scanner was connected to my computer, it used my computer’s processor and my computer’s WiFi connection to allow me to scan quickly then save the document anywhere that my computer had access to. I guess that means I’ll be hauling my computer into the room where the scanner resides because I don’t have room for the scanner where my computer normally sits.

In addition to the fact that the scanner must be connected to your computer via USB to work, I noticed that when scanning documents, all of the widths of 8.5″ x 11″ scans were slightly different. And on about 20 pages out of 400, the scanner would crop them such that some valuable information was cut off along the edge of the paper. Because of this, I had to rescan those pages and move them to the correct position in the document and delete the old ones before saving the whole document. Incorrect cropping also occurred when scanning in several photos at a time and saving them as individual TIFF files using the multi-crop TWAIN driver setting. Approximately one-third of the time, the scanner would crop one photo into several pieces and save those pieces as separate TIFF files, thus requiring me to rescan them in without the multi-crop setting.

Overall, the Xerox Duplex Combo scanner did a decent job of scanning my large documents quickly and clearly and an okay job of scanning my photos. Using the scanner saved me a lot of time even after correcting for all the issues that I had with it. My husband (who works at home) and I intend on using the scanner mainly for digitizing our personal and work papers so this scanner will suffice for now. If your main purpose is to scan photos, it may be best to search specifically for a photo scanner.

Price: $219.99 (down from $269) from Xerox, $229.99 from Amazon
Where to buy: Xerox or Amazon
Source: The sample of this product was provided by Xerox.

Filed in categories: Reviews

Tagged: ,

Xerox Duplex Combo Scanner review originally appeared on The Gadgeteer on July 22, 2019 at 11:00 am.

Note: If you are subscribed to this feed through FeedBurner, please switch to our native feed URL http://the-gadgeteer.com/feed/ in order to ensure continuous delivery.
Waterfield Designs Travel Wallet review

REVIEW – Waterfield Designs Finn Wallet has been been on a wallet rampage of late.  A few months back they administered their Next Generation Wallet survey, soliciting feedback from customers and wallet fans far and wide.  As a result, they have updated several of their classic wallets and created a few new styles, one of those being their Travel Wallet, a large wallet designed to organize and secure documents, cards, cash, and other small items while traveling.    I do a fair amount of travel for work, and I always seem to find myself wishing I had something in which to carry all of my small, personal travel gear, so I was excited to review the Waterfield Designs Travel Wallet.  Let’s check it out!  Gadget on!

What is it?

The Travel Wallet is a large, pouch-like wallet with a zipper closure and several organizational pockets inside that has been designed to hold items while traveling, such as cards, cash, a Passport, or even small electronics.

Hardware specs

  • Size options
    • Travel Wallet: 7.25” L x 4” H x .25” W weighing 2.5 oz. for $49
    • Travel Wallet Plus: 10.25” L x 5.25” H x .25” W weighing 4.0 oz. for $59
  • Material and color options
    • Oil-tanned full-grain leather in Brown or Black colors each for an additional $10
    • Waxed Canvas in Brown color
    • Ballistic Nylon in Black color (reviewed here)
    • Italian Forza in Blue and Red colors
  • Capacity by size
    • Travel Wallet: Passport, larger foreign currencies, cards, and coins.
    • Travel Wallet Plus: Fits the same items as the Travel Wallet plus other travel documents.
  • Zipper: YKK self-locking
  • Location of manufacture: Workshop crafted in San Francisco, CA, USA

Design and features

The new Waterfield Designs Travel Wallet is also a result of the Next Generation Wallet survey that was conducted in  January-February of 2019.  One of the results of this survey was that folks wanted a larger wallet that could hold several items—and even a smaller wallet—while traveling.

My initial impressions of the Travel Wallet were that it was BIG—bigger than the Waterfield Design Passport Finn Access Wallet, which is a big wallet in its own right.  However, both of those wallets are large for good reasons.

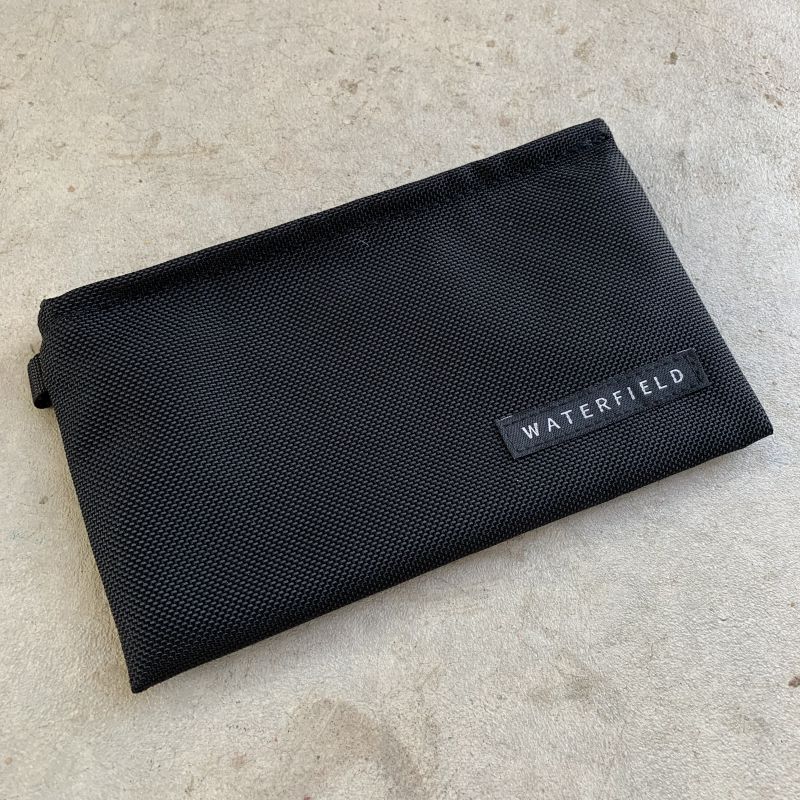
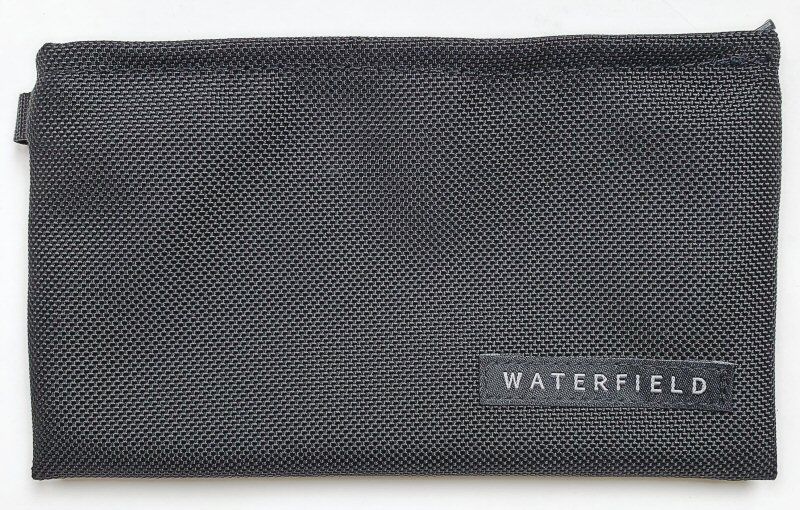
The Black Ballistic Nylon fabric of this review sample had a technical and tough look and feel, and I immediately liked it.  The Travel Wallet is also available in Brown or Black oil-tanned full-grain leather, Brown Waxed Canvas, or Blue or Black Italian Forza fabric.

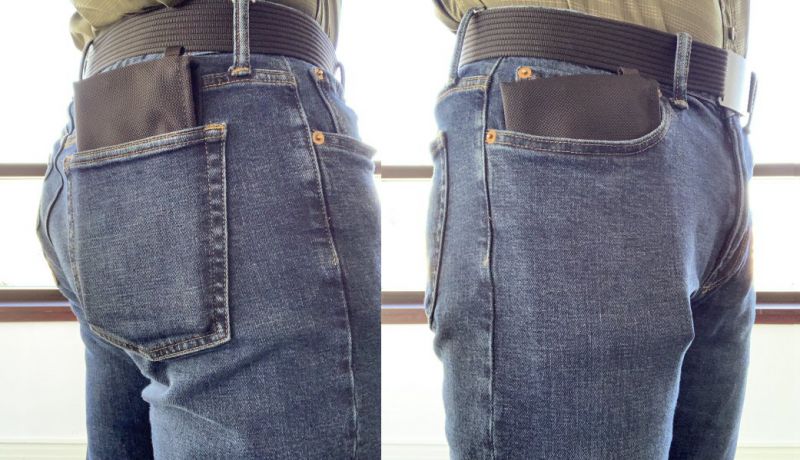
The Travel Wallet is actually available in two sizes: Travel Wallet (shown here), and Travel Wallet Plus, an even larger version designed to hold more and larger items.  The Travel Wallet is not going to reasonably fit into anyone’s pants pocket (front or back) unless perhaps they are wearing cargo pants.  I suspect that it probably be better suited for jackets pockets, or being carried inside a purse, bag, backpack or similar item.

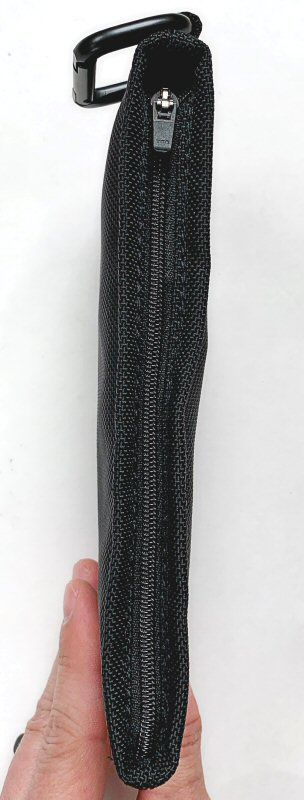
As with all of the Waterfield Designs wallets reviewed above, the Travel Wallet begins quite thin for a wallet of its size.

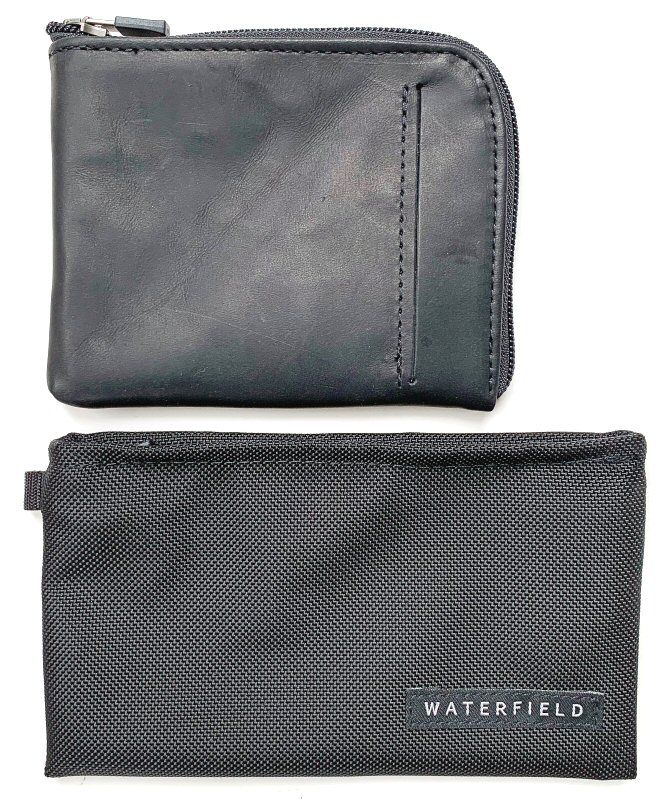
For size comparison purposes, the above photo shows the quite large Passport Finn Acess Wallet from above on top and the larger Travel Wallet beneath it.

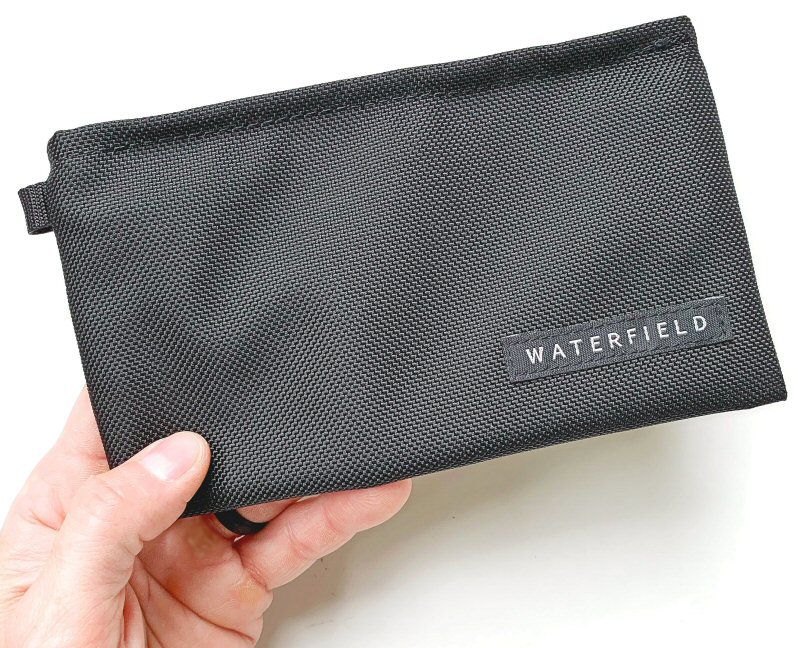
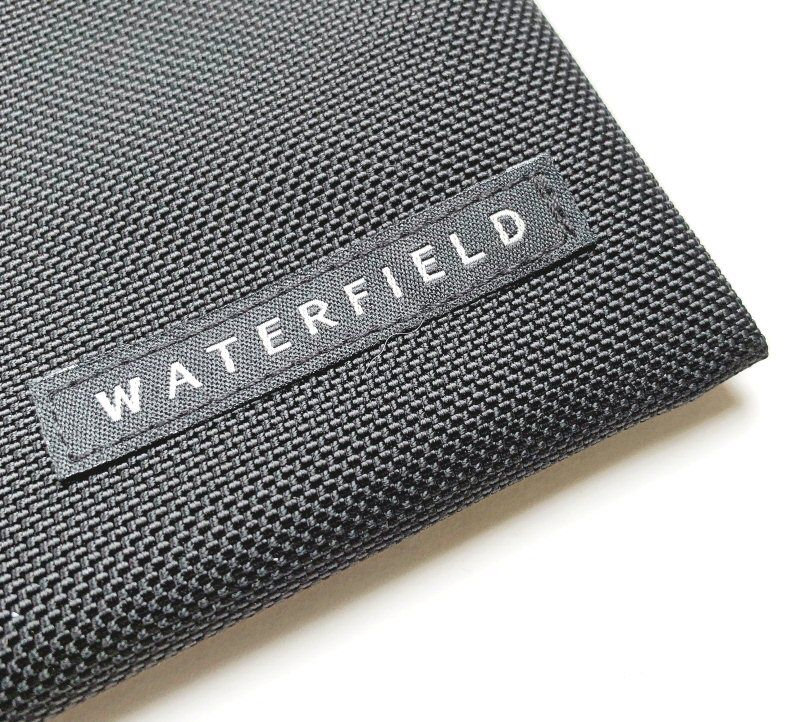
Above is a closeup of the Travel Wallet’s Black Ballistic Nylon material.  Ballistic Nylon is known to be a very tough, abrasion-resistant material, and depending on the fabric’s makeup, it can have a somewhat rough texture.  However, Waterfield Designs has selected a type of Ballistic Nylon that is relatively soft to the touch, and it has a really nice feel.  Waterfield Designs has also included a logo tag on the exterior of the Travel Wallet, which I found a bit interesting considering that no such logo tag seems to be on any of Waterfield Designs’ other wallets.  I’m typically not a fan of exterior product logos, but this one is classy and fairly understated, so it was not an issue to me.

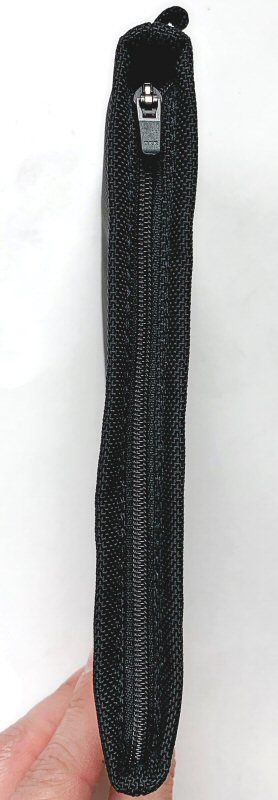
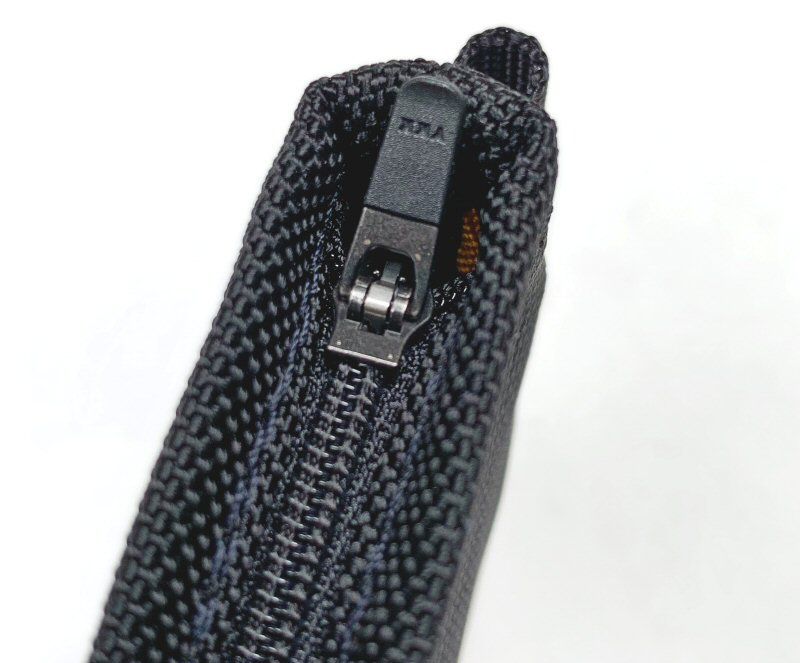
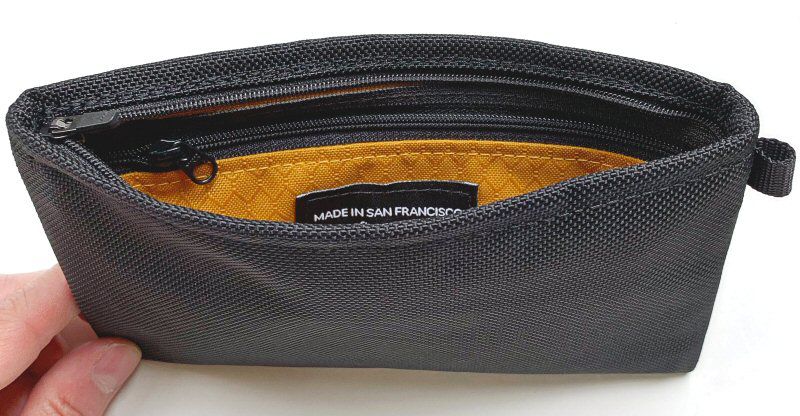
Like the Waterfield Designs’ other zipper wallets, the Travel Wallet also features a YKK locking zipper to help avoid accidental opening and keep the Travel Wallet’s contents secure.

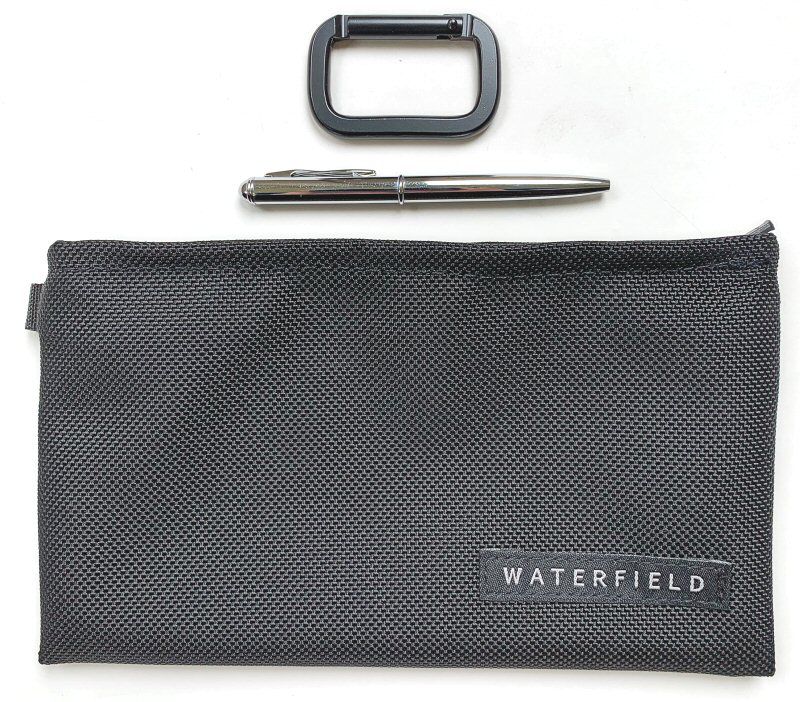
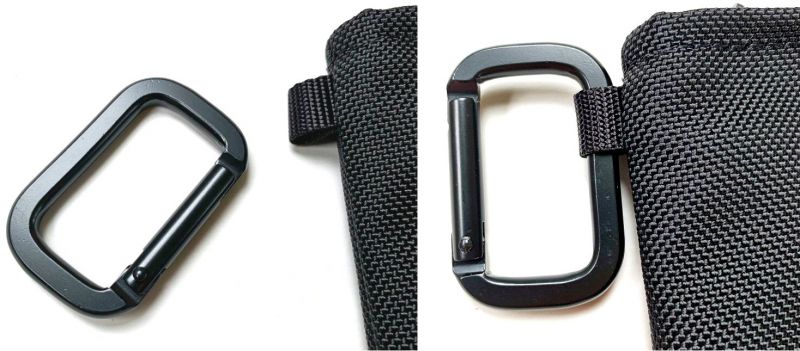
The Travel Wallet includes two accessories shown in the photo above: a small travel pen and a rectangular-shaped carabiner with a spring clip.

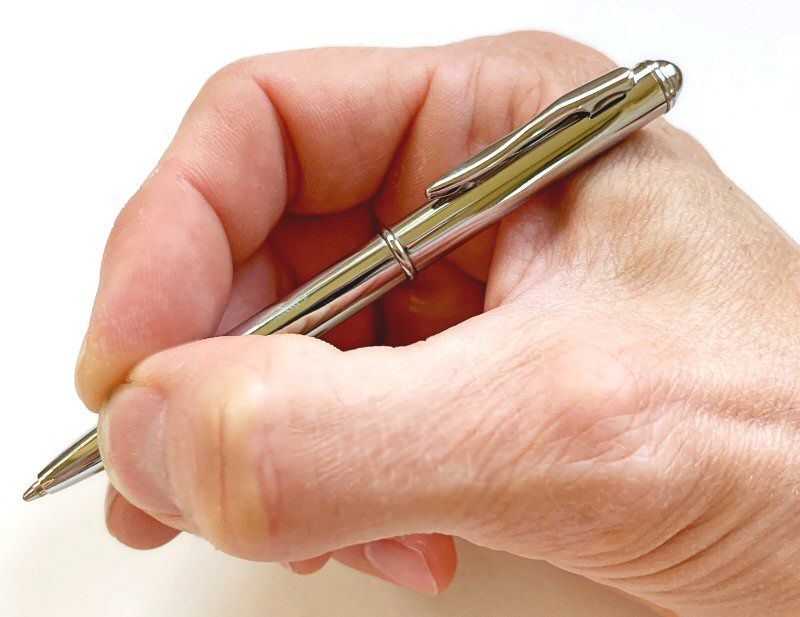
This miniature pen is a ballpoint twist-type, and fits in the hand nicely.  However, I would use it more in a pinch, such as for signing a receipt or a customs form, than for writing the Great American Novel, but it is certainly handy in a pinch.  It also includes a pocket clip.

The Travel Wallet includes a small loop of nylon webbing to which the rectangular spring carabiner can be attached, which then allows the Travel Wallet to be attached to a belt loop, purse or messenger bag strap, backpack webbing, keyring or any number of other places.

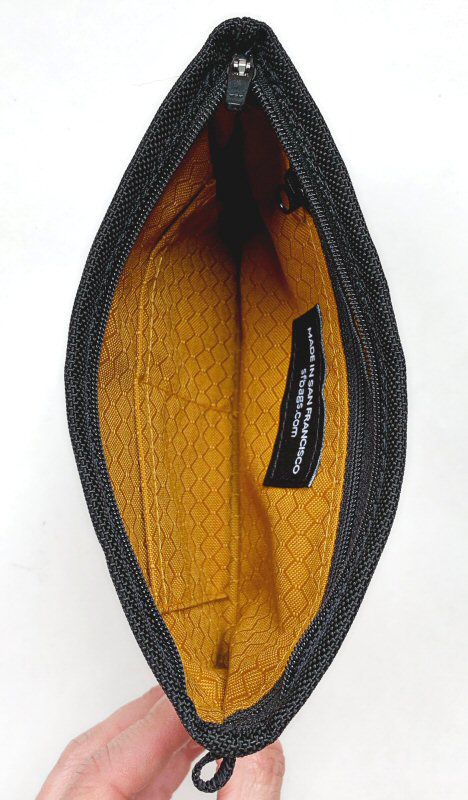
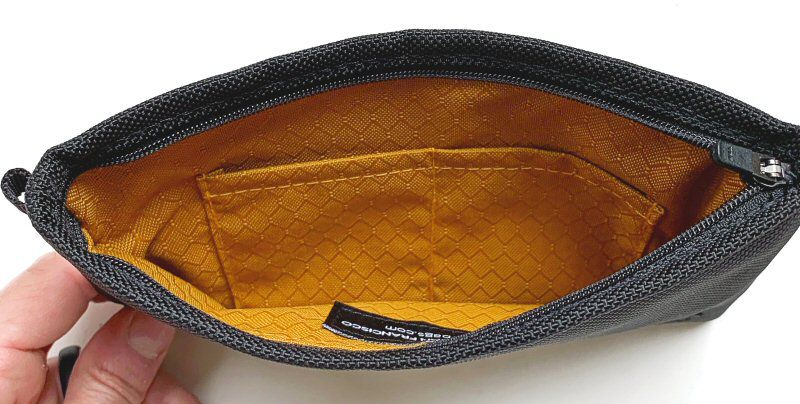
One of the Travel Wallet’s features that really caught my eye was its bright gold interior lining with its zig-zag/diamond pattern.   A bright lining such as this helps the user to find items placed inside the Travel Wallet, especially in lower-light conditions.  Plus, it looks pretty cool.   However, I was a bit surprised that Waterfield Designs did not include an option to add an RFID blocking liner, as they have in nearly all of their other wallets.  This is something I would definitely want to have while traveling to help protect my travel documents and cards from RFID theft.

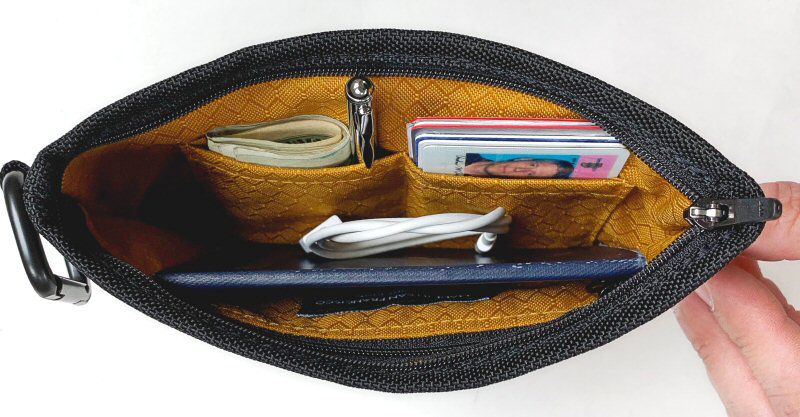
Looking at the interior of the Travel Wallet, one side has two open-top pockets of identical size sewn into the liner.

The opposite side of the interior has a large zipper pocket that spans the entire length of the Travel Wallet intended to hold small items such as coins, tokens, receipts, keys, small electronic accessories, or other travel essentials.

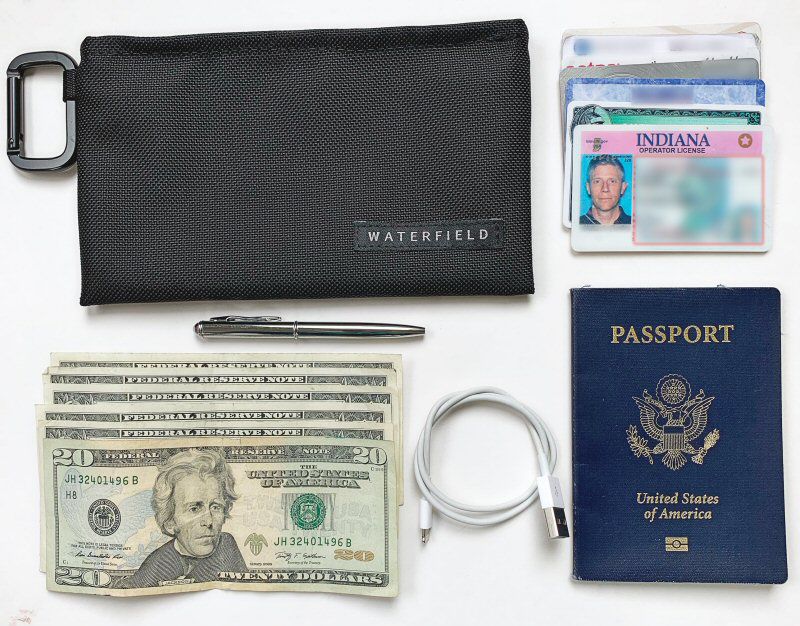
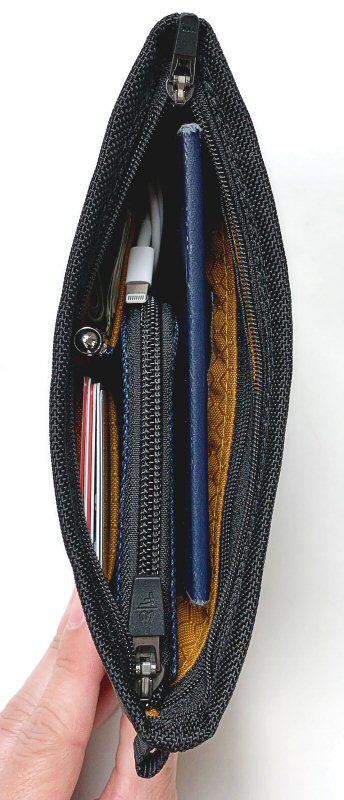
To test out the Travel Wallet, I loaded it up with the above items: 6 bills and 7 cards, the mini pen, an iPhone Lightning charging cable, and my US Passport which is a fair representation of what I might typically carry in my wallet while on a business trip, especially outside the US.

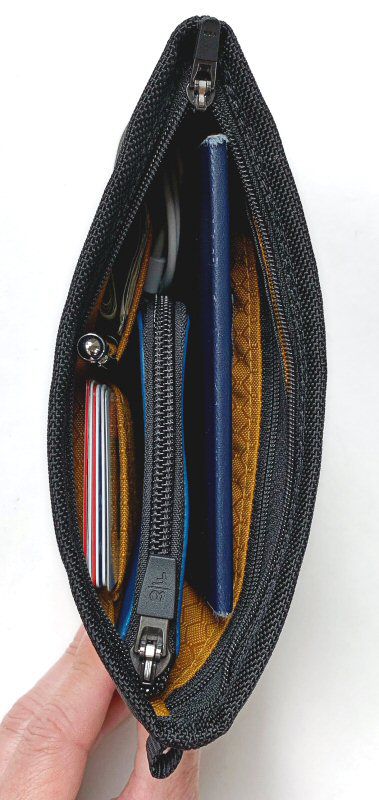
The image above shows the items loaded into the Travel Wallet.   The 7 cash bills fit into the left open pocket, and the 6 cards fit into the right pocket.  The only item that didn’t fit quite so well was the mini travel pen.  More on this below.

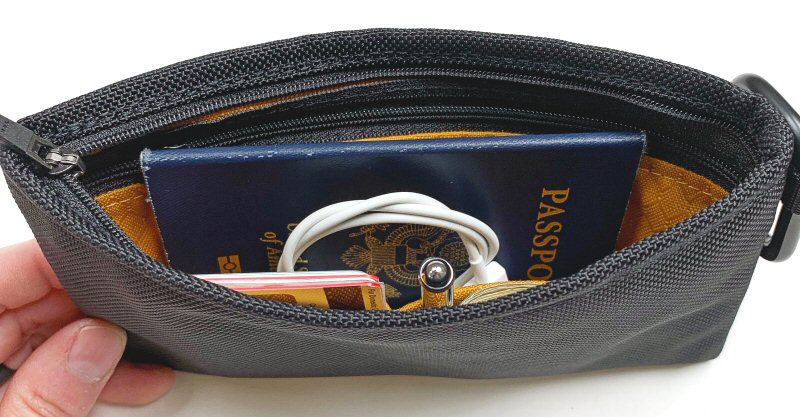
My Passport fit into the open center portion of the Travel Wallet, but there was no dedicated pocket inside that could hold the Passport, which I did find a bit odd.  The Passport would only fit into the inner zipper pocket if I left it open.  However, the Travel Wallet’s outer zipper did zip closed just fine with the Passport inside it, and with clearance to spare.

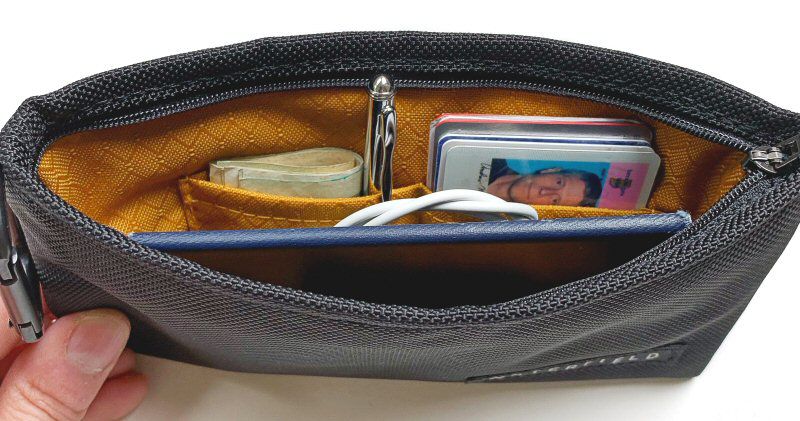
The above photo illustrates the issue with the included mini travel pen not fitting well into the Travel Wallet.  I was a bit surprised by this, considering that this mini pen was included with the Travel Wallet—I would have expected the Travel Wallet’s interior to have a dedicated pocket for this included pen, as Waterfield Designs’ Passport Finn Access Wallet has.  Further, the mini pen sticks up so far that it can be a bit challenging to zip the Travel Wallet closed because the mini pen protrudes upward into the zipper area like a periscope.  I suppose I could have placed the mini pen into the interior zipper pocket, but that seemed like a less than elegant solution.  I should mention that the Waterfield Designs site does show a photo of the interior of the Travel Wallet in which there is a small pocket on one end of the inside into which the mini-pen has been placed.  However, I suspect that these photos may perhaps depict the larger Travel Wallet Plus, which may have a small, dedicated mini-pen pocket.

Even with all of the items shown above placed inside the Travel Wallet, once again, like other Waterfield Wallets I’ve reviewed, it manages to remain very slim and in fact, could easily hold even more items than what I placed into it.

The Travel Wallet is probably not very realistic for either back or front pocket carry, as seen in the images above.  The even larger Travel Pocket Plus is probably less realistic.

As mentioned above, the Travel Wallet is designed to hold a smaller Waterfield Designs wallet inside it for travel.  Above, I’ve placed a Compact Finn Wallet inside the Travel Wallet and there is still room to spare.

And finally, I placed the Waterfield Designs Micro Wallet inside the Travel Wallet, and again it fits perfectly fine with plenty of room to spare.  Based on these two smaller wallets fitting inside, I feel pretty confident that a smartphone would fit inside as well.

What I like

  • For a large wallet/pouch, it still retains its slimness, even with several items placed inside
  • Well laid-out interior organizational pocket, with the exception of a spot for the mini pen
  • Locking YKK zipper provides quick yet secure access to contents and could also be used to hold small items like cables, adapters, etc
  • High-quality materials and construction–the Black Ballistic Nylon looks and feels great and seems very durable
  • Gold high-vis lining helps see contents

What I’d change

  • Add an RFID blocking liner option
  • Needs a better place to hold the mini pen

Final thoughts

The Waterfield Designs Travel Wallet is a very large wallet, and in fact is really more of a travel pouch.  But don’t let that deter you—it still manages to remain quite slim even with multiple items loaded into it.   The locking zipper helps keep contents secure and the Black Ballistic Nylon of this review sample has a very tough, technical look and feel.  I think the price is very reasonable considering its size, functionality as a passport (and other items)-holding travel wallet/pouch, materials, and construction, which give me the impression that it will last a long time, as Waterfield Designs’ products are known to do.

Price:

  • Travel Wallet for $49
  • Travel Wallet Plus for $59

Where to buy: Waterfield Designs (AKA SF Bags)
Source: The sample of this product was provided by Waterfield Designs

Filed in categories: Reviews

Tagged: ,

Waterfield Designs Travel Wallet review originally appeared on The Gadgeteer on July 22, 2019 at 9:00 am.

Note: If you are subscribed to this feed through FeedBurner, please switch to our native feed URL http://the-gadgeteer.com/feed/ in order to ensure continuous delivery.

Cosori Premium 5.8-Quart Air Fryer review

REVIEW – Fried okra?  Yes, please!  Chicken-fried steak?  Of course!  Fried chicken?  You betcha!  When it comes to home cooking, it seems that I’m a bit of Southern boy.  But while I love fried foods, I don’t like cleaning up the mess that frying makes, and I really shouldn’t be consuming all that oil.  What I need is a way to fry foods without frying them in oil, and so I’m hoping that Cosori’s air fryer is just the gadget to make this happen.

What is it?

Cosori’s Air Fryer (model number CP158-AF) is a kitchen appliance that “fries” by rapidly circulating hot air around food.  This air fryer is not actually a fryer, at least not in the traditional sense of the word; rather, it’s a smaller version of a convection oven.  Convection technology is what allows it to cook food faster than a conventional oven while using a lot less heat, and though it sometimes uses oil, it uses far less than a deep-fryer.  According to Cosori’s manual, their air fryer “uses rapid 360° air circulation technology to cook with little to no oil for quick, crispy, delicious food with 75% few calories than deep fryers.”

What’s in the box?

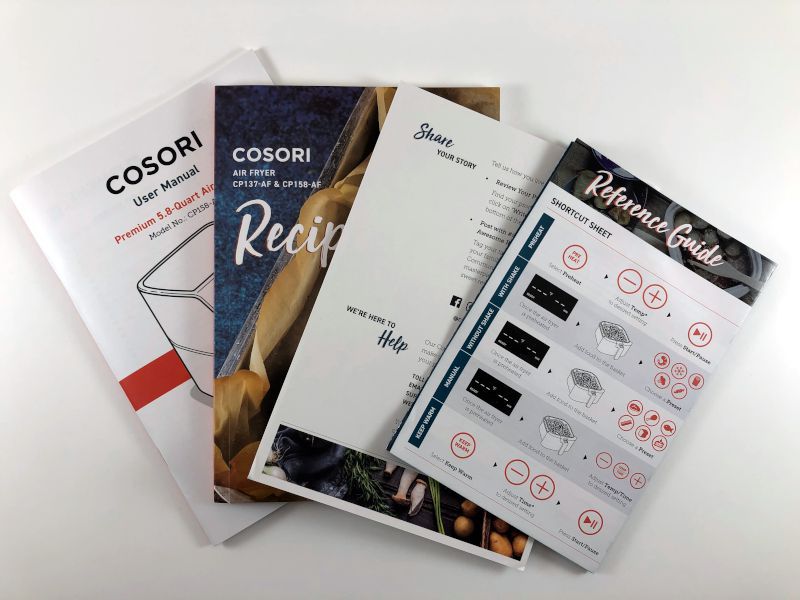
  • The air fryer
  • A user manual with 18 pages of instructions in English
  • A recipe book with over 100 recipes for the air fryer, including breakfast, entrees, appetizers, sides, and desserts
  • A reference guide with handy shortcuts
  • A thank you card that includes contact information for Cosori’s Support Team

Hardware specs

  • Temp Range: 170-400°F (77-205°C)
  • Time Range: 1–60 minutes
  • Power: 1700W
  • Capacity: 5.8 qt
  • Dimensions:  13 in tall, 11 in wide, 11 in deep (+3 in for the handle)

Design and features

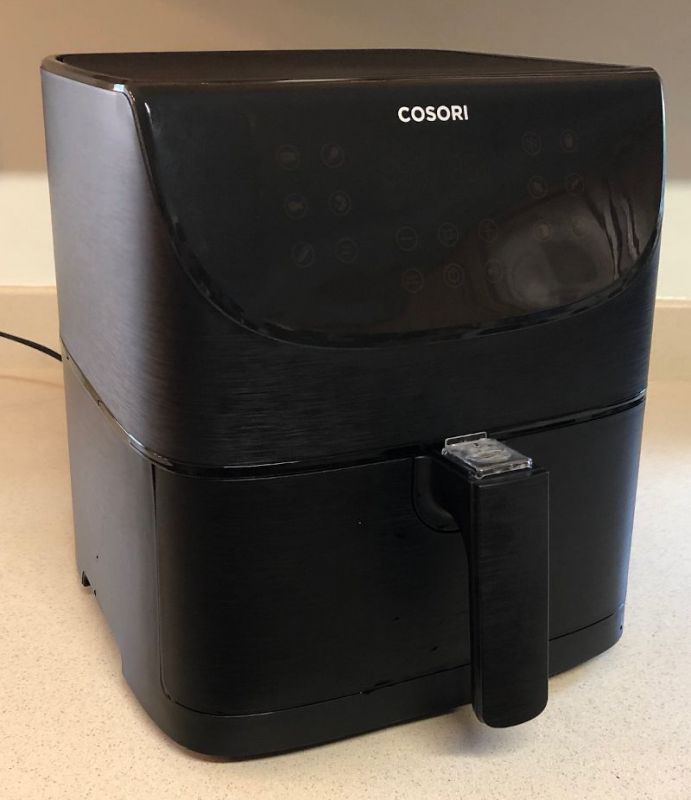
The Cosori Air Fryer is a fairly typical size for a kitchen appliance; it’s about the same as our Instant Pot and our Gourmia ice cream maker.  It’s made of black plastic—white and red colors are also available—except for the baskets, which are metal.  It’s surprisingly light weight, yet it doesn’t seem cheap or flimsy.

Installation and setup

To set up the fryer, I removed the warning stickers from the outside and the various packing materials from the inside.  As I skimmed through the manual, I noted even more warnings, so I decided to read the entire manual slowly and carefully.  It is very well written, and the instructions are quite clear.  One thing that stood out to me is the plethora of warnings about getting burned or starting fires.  Here are a few examples:

  • Do not touch hot surfaces.
  • Do not block any ventilation openings.  Hot steam is released through air outlets.
  • Do not place your air fryer near gas burners.
  • Never fill the baskets with oil or fat.
  • Do not place cardboard into your air fryer.
  • Keep your air fryer away from flammable materials.

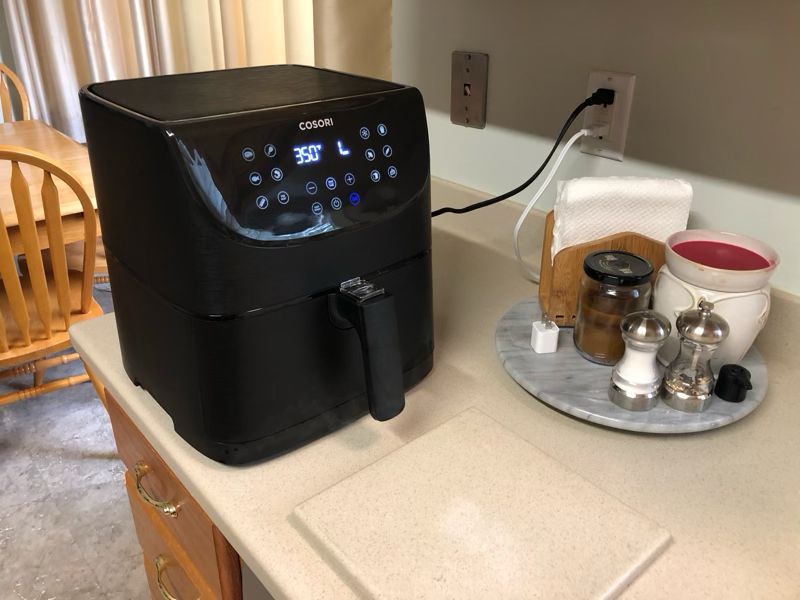
While some of these are mildly humorous, they are a good reminder that this gadget gets very hot, and if I’m not careful, I could get burned or cause a fire.  If you have little kids at home, you’re going to want to spend extra time training them to leave this appliance alone and put it a location where they can’t touch it or pull on the power cord.  We put ours on a counter facing away from the wall and placed a large, ceramic hot pad in front of it.

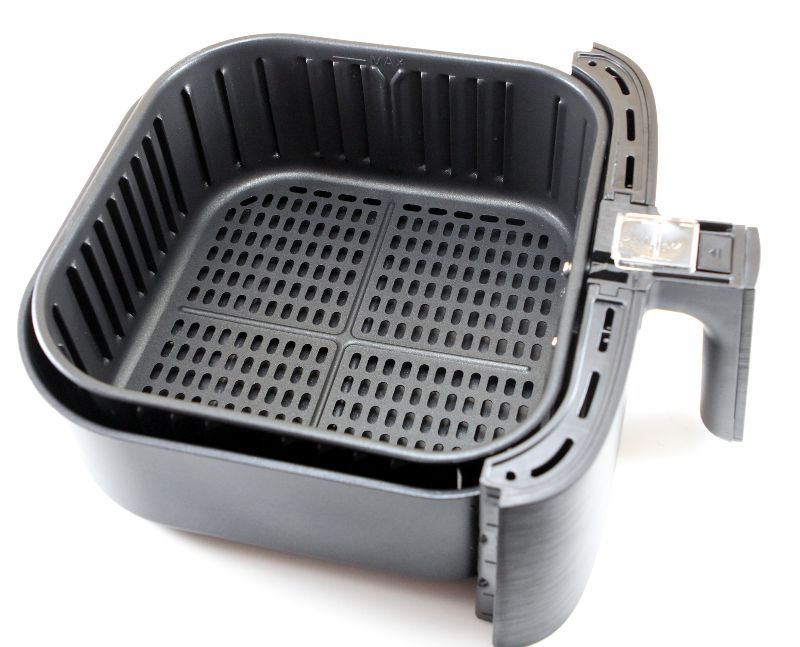
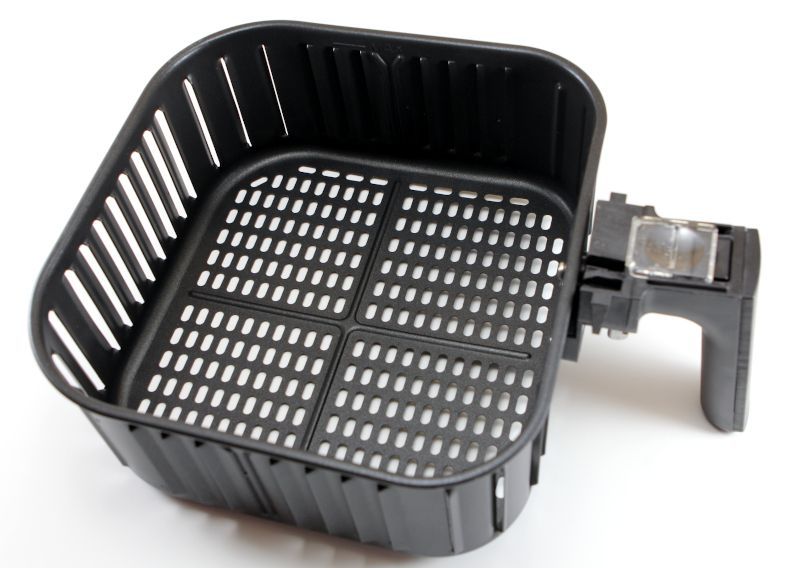
Many of the instructions were about the unique basket-in-a-basket system that is used to hold the foods while frying.  The inner basket is where the food goes, and it has a lot of holes, like a colander.  It sits in and just above the outer basket, which is used to catch any oil or grease that drops from the food.  This is nice, as it prevents the food from cooking in and soaking up extra oil or grease.

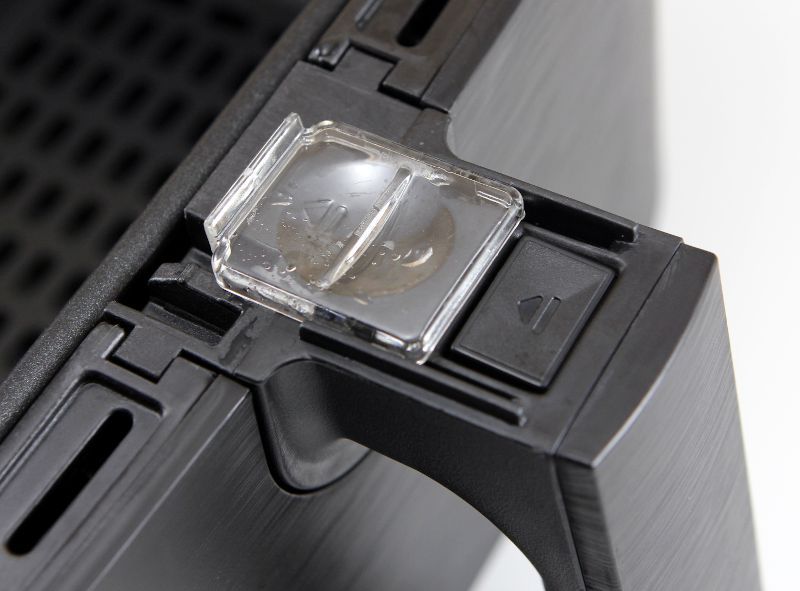
These baskets are connected, and when you pull the handle, they both come out of the fryer together.  When you slide the button guard, you can then press a button that detaches the inner basket from the outer.

When you do this, you need to make sure the outer basket is resting safely upon a heat-resistant surface, hence our ceramic hot pad, else you risk dropping it and splattering hot oil, which could be dangerous.  Once inner basket pops free from the outer basket, you can dump the food into a serving bowl or use a spatula to serve it onto a plate.

Once the basket was removed, I looked inside to see how the food was heated.  There was a heating coil, reminiscent of the coils on old stoves, and a fan, pretty much what is expected of a convection oven.

Chicken Nuggets

In order to test the fryer, we decided to start simple, so my wife bought a package of frozen chicken nuggets, Kirkwood’s “Fully Cooked Waffle Flavored Chicken Bites.”  First, we used the default Preheat setting to preheat the fryer.  The default value is 400°F for 5 minutes, but both the time and temperature are adjustable if desired.  Second, we put the nuggets, still frozen, into the basket and inserted it into the fryer.  Third, we selected the Frozen preset.  This setting is 350°F for 10 minutes, and half way through it gave a reminder to remove the basket and shake the contents up, which allows the food to heat more evenly.  Many if not most of the foods that we fried needed to be shaken at the half way point to ensure even cooking. The result was a wonderful bowl of chicken nuggets.  They were crispy and lightly-browned on the outside and heated all the way through on the inside.  After seeing how convenient this is, I’m thinking that anyone with a toddler at home should probably be putting this air fryer on their Christmas list.

Tater Tots

Our second test was also a simple test.  For breakfast, we decided to test the fryer on some Season’s Choice Potato Puffs, more commonly known as tater tots.  We preheated the fryer and chose the Frozen preset, but as these values are also adjustable, my wife lowered the time to cook from 10 minutes to 8 minutes, just to see what would happen.  The results were much the same as the nuggets, although we agreed that they probably should have been fried the entire 10 minutes, as some were still a wee bit undercooked.

Grilled-Cheese Sandwiches

For our third test, we slightly increased the difficulty.  Looking through the recipe book, we found a recipe for grilled-cheese sandwiches.  It was simply bread buttered on both sides with cheese in the middle.  We used the Bread preset, which is 320°F for 8 minutes.  The results were mixed.  On the one hand, the bread was toasted and the cheese was melted, making for a delicious sandwich; on the other hand, the bread was a bit too toasted for our preferences, and one side was quite a bit crispier than the other.  I think we can fix these issues by reducing the cook time to 6 minutes and by rotating the bread half way through.  My wife observed that rotating the bread was a bit harder in the fryer basket than in the omelet pan we normally use for this recipe, simply because the sides of the basket are much taller.  We agreed that while the fryer did a good job, this is a recipe that would probably be easier to do in an omelet pan or a cast iron skillet.

Quick Doughnuts

For our fourth test, my wife found an online recipe for quick air-fried doughnuts.  We started with a roll of Grand’s refrigerated biscuits, cut them into doughnut shapes, and then basted them with butter.  We dipped them in a cinnamon-and-sugar mixture and put them in the air fryer.  We tried the recommended settings from the recipe (350°F for 5 minutes), but the first batch of doughnuts were overdone.  Next, we tried it with the Bread preset (320°F for 5 minutes), and they turned out perfectly.  We also made a sugar glaze and drizzled it on top after frying.  The doughnuts were a crispy brown on the outside and light and flakey on the inside; they were so good!

Fried Chicken

For the next test, we used another online recipe, this time for fried chicken.  My wife made breading from flour, salt, and Old Bay and then dipped chicken legs and breasts in the breading, in eggs, and then in the breading again.  She put the legs in the basket and used the Chicken preset (380°F for 25 minutes).  After 10 minutes, she turned the legs over and added the breasts.  The result was crispy, golden brown chicken on the outside that was tender and juicy on the inside.  It tasted delicious.  If you look in the picture below, you can see that some of the flour from the breading wasn’t cooked all the way, something that doesn’t normally happen with traditional frying.  We’re not sure if we added too much flour and failed to shake the excess off, or if there’s something about the air fryer that didn’t quite fry everything evenly.  In any case, it certainly didn’t stop us from enjoying some very yummy fried chicken.

Pork Tenderloin with Peppers and Onions

For our final test, my wife found a recipe for an entrée.  I thinly sliced peppers and onions, seasoned them, and put them in the middle of a small, round baker.  I cut a pork tenderloin into slices, rubbed them with powdered mustard, salt, and pepper, and then put them over the vegetables.  I put the baker into the basket, and cooked the whole thing for 15 minutes on 350°F, pausing halfway through to mix them up.  The result was super yummy, though very different from the other tests.  The meat was tender and juicy, and the peppers and onions were soft yet slightly crunchy.  The big difference between this and the other tests was the baker, which trapped the juices and reduced the crispiness of the tenderloin slices.  This recipe really shows the flexibility of the air fryer:  It can cook foods that are typically fried, like chicken and French fries, yet it can also cook like a traditional oven (in half the time).  If you were concerned that an air fryer can only fry less-than-healthy foods, then rest assured that you can cook a whole variety of meats, vegetables, and other foods and eat as healthy as you want.

We also made a variety of other dishes that I haven’t cataloged here, including smores, bacon and eggs, cinnamon rolls, and potato chips.

Cleanup

Cleanup is pretty simple.  The two baskets have to be washed, either by putting them in the dishwater—they do take up a lot of space—or by washing them by hand.  If you do the later, don’t use anything abrasive, like steel wool, as this could damage the non-stick surface of the baskets.  Using a washcloth that is damp with hot water, wipe down the inside of the fryer, just in case any oil splashed around.  That’s it.

Safety Features

The air fryer has several safety features that are designed to make sure accidents don’t happen.  I appreciate Cosori’s attention to detail when it comes to safety.

  • There’s a button guard over the button that releases the inner basket.
  • When the baskets are withdrawn from the fryer, it automatically stops frying.
  • If the fryer is inactive for 3 minutes, it will automatically shut down.
  • If the fryer overheats, it will automatically shut down.

Other Features

The baskets on this fryer are 5.8 quarts in size, which is pretty big.  It’s easily big enough to serve a dish for 2 people, and for most things it’s probably big enough to serve 4.  If you don’t need such a large fryer, Cosori also makes one that is only 3.7 quarts.  For our family, we are super happy with the larger size.

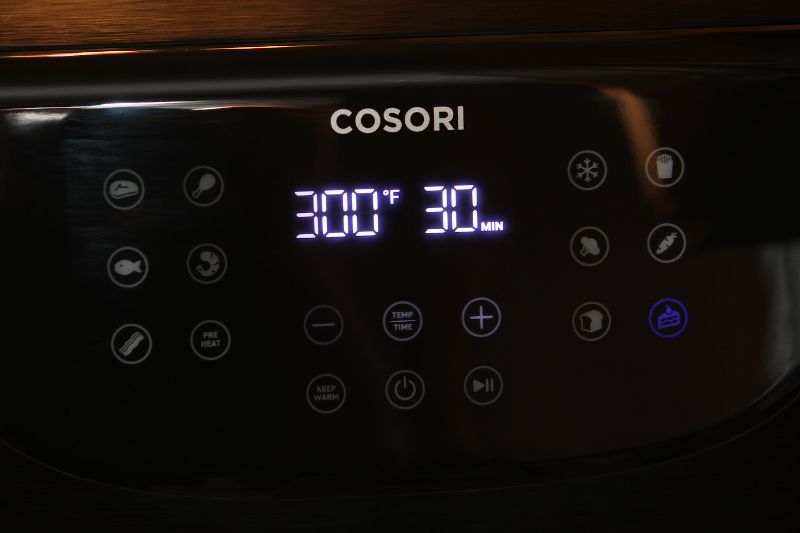
The interface is a digital display along with a set of touch controls.  The display is primarily used to show the temperature and the time remaining.  Most of the controls are the presets, and each has an icon that makes it easy to remember what it’s for.  The remaining controls turn the fryer on, change the temperature and the time, pause it, and so on.  Cosori has done a nice job with this interface, as it’s really easy to use.

As mentioned previously, the air fryer works by blowing air.  There’s a sizable fan inside, and I can definitely tell when it’s on.  It’s nowhere near as loud as a handheld vacuum cleaner, though louder than our ice cream maker.  Probably it’s just softer than our microwave oven.

What I like

  • It cooks fast and uses less heat than the stove or oven, which is especially nice during summer.
  • It fries food without using lots of oil.
  • It’s easy to use, easy to cleanup, and machine washable.
  • Lots of recipes to try that use an air fryer, both in the included cookbook and online.
  • Everything we tried was delicious!

What I’d change

  • I can’t think of anything.

Final thoughts

Our family is very glad that we got this chance to test out Cosori’s Air Fryer.  It’s quick to cook, easy to use, and easy to clean.  If you enjoy fried foods as much as we do, or you’re looking for a simple way to cook without heating up your kitchen with the stove, you should consider purchasing Cosori’s fryer.  Our family plans on enjoying this one for years to come!

Price: $119.99
Where to buy:  Cosori’s Online Store and Amazon
Source: The sample for this review was provided by Cosori.

Filed in categories: Reviews

Tagged: , ,

Cosori Premium 5.8-Quart Air Fryer review originally appeared on The Gadgeteer on July 21, 2019 at 11:00 am.

Note: If you are subscribed to this feed through FeedBurner, please switch to our native feed URL http://the-gadgeteer.com/feed/ in order to ensure continuous delivery.