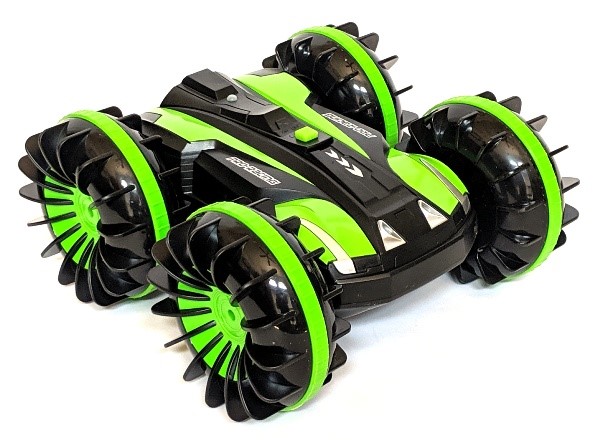
FREE TO FLY Amphibious Radio Control 4WD Car review

REVIEWThe FREE TO FLY Amphibious Radio Control 4WD Car is not your typical radio-controlled car, it’s a radio-controlled boat too. That’s what caught my eye and was the reason I had to try it out. And was it worth it? You bet! This car was totally fun to play with and seems to be pretty well made. It does actually drive on water, believe it or not. Will it last? Who knows, but it will be a blast to play with until then!

What is it?

The FREE TO FLY Amphibious Radio Control 4WD Car-Boat-Truck is a radio-controlled car (or boat or truck) with very large wheels that has full function controls (but no brakes), including 360 rotation, and drives on many different types of terrain. It is waterproof and will drive on the water. 

What’s in the box?

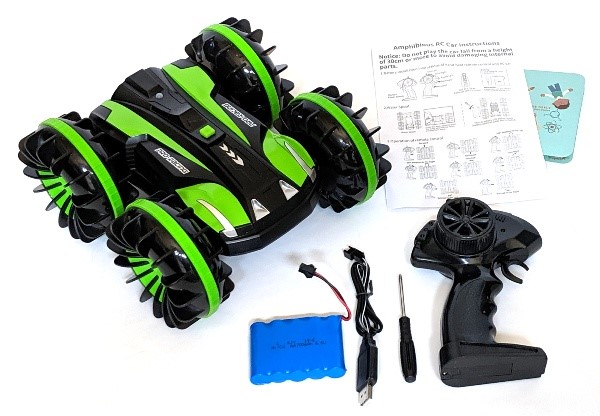
  • Amphibious 4WD Radio-Controlled Car
  • Remote Control
  • USB Charging Cable
  • Operating Instructions
  • 6 V/700 mAh Nickel-Cadmium Battery
  • Screwdriver

Hardware specs

  • Waterproof
  • 2.4Ghz Anti-Interference Frequency Remote Technology
  • 6 V/700 mAh Nickel-Cadmium battery – 2 hours charging time will power the car for more than 20 minutes

Design and features

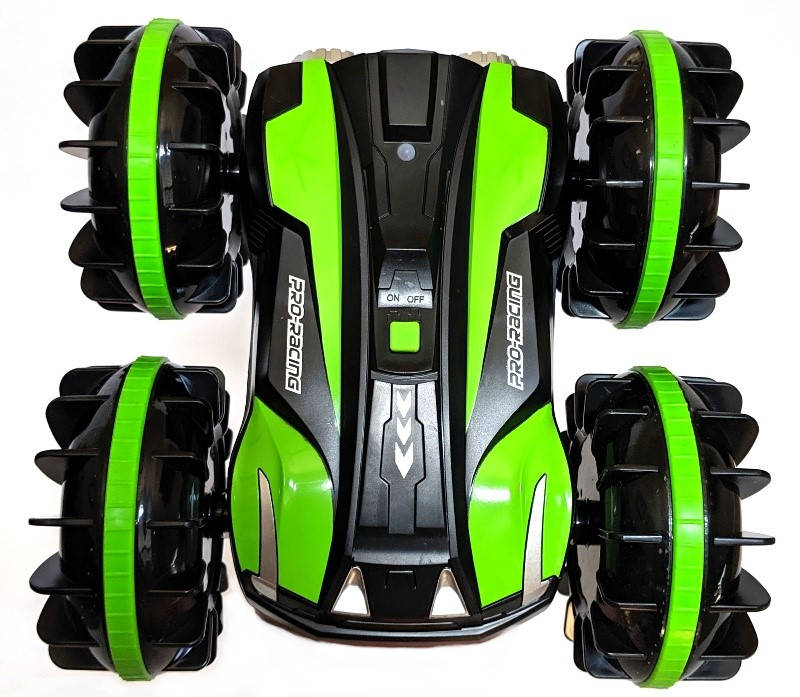
The FREE TO FLY Amphibious Radio Control 4WD Car-Boat-Truck has a pretty cool-looking design, is made of plastic, and has large wheels that have a rubber track for gripping the surface. The wheels are large enough to let the car flip over and drive upside down. The car comes in green, blue, or red.

The top of the car has a fluorescent green silicone On/Off button as shown above. There is also an LED indicator light (the small white circle behind the On/Off button which is actually a silicone covering for the light). 
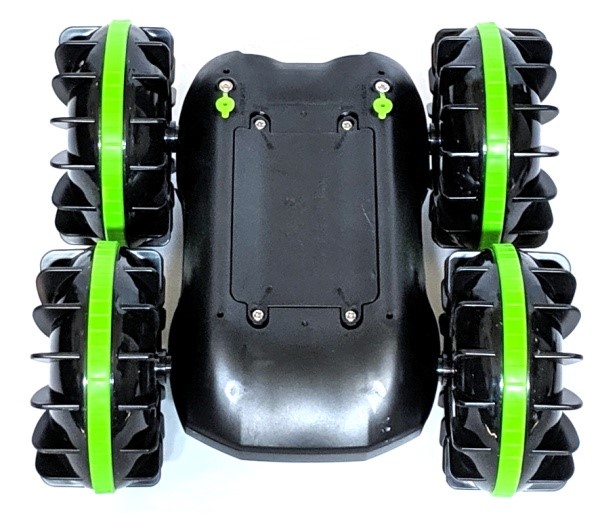
The battery compartment is located on the bottom of the car and is watertight. There are also drain ports to allow water to be removed (the green circular silicone plugs seen on the body of the car in the photo above).


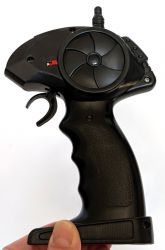
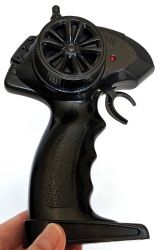
The remote control unit is a gun-type design where the trigger is the accelerator. There is a red On/Off switch located on the left side of the remote control (shown in the first photo above) and a red LED indicator light on the right side of the remote (shown in the second photo above).

When both the car and the remote are powered on, pulling the trigger allows you to drive the car forward and pushing the trigger out allows you to drive in reverse. A turn knob is located on the right side of the remote that allows you to steer the car to the right or left. The remote control needs two AA batteries which do NOT come with the car.

The car requires a nickel-cadmium battery that DOES come with the car. You first need to remove the screws of the battery compartment located on the bottom of the car, connect the battery to the connector inside the compartment, lay the battery flat inside the compartment, then screw the battery cover back on.

Immediately, I could see that recharging the batteries would be a pain – requiring me to open the battery compartment, disconnect the battery, connect the battery to the other end of the USB charging cable, then find a USB charging port to charge the battery. The nickel-cadmium battery is a 6.0 V/700 mAh battery. You can also see in the above photo that there is a silicone ring around the battery compartment to make it watertight.

Performance

We had absolutely no difficulty with any of the controls. Every control feature worked as designed. The car is fairly easy to control, although it took some practice to get the hang of it. I first tried it inside our house, which was a bit difficult since the car goes so fast that it is easy to run out of space. It is much easier outside on a street where there is plenty of space.

This car moves pretty fast (we didn’t confirm the speed, but the specs say 16 mph).

When you hold the trigger down the car moves very fast in either the forward or reverse direction (with all four wheels turning), depending on which way you pull or push the trigger. Given the way the car is designed (the front of the car looks very similar to the back of the car), it is sometimes difficult to tell which is forward or reverse. There also isn’t any way to adjust the speed. It either moves at full speed or not at all.

Brakes aren’t really needed since the car comes to a stop fairly quickly when the trigger is released. As the car is moving, the turning knob on the remote control will allow turning, and as long as there is adequate space. When turning the car this way, the controller stops the wheels from spinning on one side, and since the car is moving very fast, it will turn fairly quickly. The turn knob spring-returns to the center position when you let go of it, and does not provide precision steering control. It is more like a three position switch where it is either in the left position (only right side wheels are spinning), center position (all wheels are spinning), or right position (only left side wheels are spinning).

If the accelerator trigger is not pulled or pushed, then turning the turn knob causes the car to spin in a circle very vast (one set of wheels is going forward and the other set is going in reverse). It was fun to make the car spin like this, but it isn’t a very effective method of picking a direction of travel since it spins so very fast. I found it difficult to get the car aligned using this method.

The car drives best on hard surfaces but has some trouble in taller grass and would get stuck if the grass was too tall as shown in the video above. It also had some trouble climbing up a pile of dirt, mostly because of the uneven surface and the fact that the car has no speed control. It would very quickly veer to one side based on the slope and it was difficult to correct it before it tumbled off the pile. We also tried a pile of rocks, and it did okay but not great. This car is definitely best for flat surfaces, and maybe some gently sloping terrain, but not much else beyond that.

One thing the car will do is climb up a wall and then flip over. It is just as easy to control the car when it is driving upside down as it is right-side up.

We took the car to our community pool and drove it off the edge and into the water. It performed well in the pool. The wheels have integral paddles that allow it to move fairly well in the water, and the steering controls worked also.

Given the fact that we live in Texas and it is August, we were not able to test the car out on the snow. Bummer.

The car ran for about 15 minutes before the battery needed to be charged and it took about three hours to charge the battery.  This doesn’t quite meet the documented specifications.

What I like

  • The FREE TO FLY Amphibious Radio Control 4WD Car is fun to drive on large flat surfaces and even more fun to drive in water.
  • The car is reasonably well made and isn’t too difficult to control, as long as you have adequate space.

What I’d change

  • I’d prefer more precise throttle control (instead of just go or stop) so it could be driven at a slower speed. This would make it easier to control and might even help it to drive better on rough terrain.
  • It would be better to be able to charge the battery without having to remove it from the car.

Final thoughts

The FREE TO FLY Amphibious Radio Control 4WD Car is very fun to drive around and even more fun to drive in the water. The controls worked well once I got the hang of the turning knob on the remote control. However, the battery only works for about 15 minutes or so before needing to charge and charging the battery takes about three hours. Charging is also a pain since you have to remove the battery from the car and connect it to a charging cable. For some of you, this may be a deal-breaker, however, if you don’t mind this, the car is really fun to play with especially in water and seems fairly well made.

Price: $39.98
Where to buy: Amazon
Source: The sample of this product was provided by FREE TO FLY.

Filed in categories: Reviews

Tagged: ,

FREE TO FLY Amphibious Radio Control 4WD Car review originally appeared on The Gadgeteer on September 5, 2019 at 10:00 am.

Note: If you are subscribed to this feed through FeedBurner, please switch to our native feed URL http://the-gadgeteer.com/feed/ in order to ensure continuous delivery.

Here’s a remote for your Christmas tree!

NEWS – Have you put up your Christmas tree or other holiday lights yet? Many times, the outlet that controls the lights is located an inconvenient place that requires stooping, bending, and/or crawling to access it every time you want to turn the lights off or back on. The Treemote solves that problem with a handy and cute tree shaped remote control. With just two buttons, this remote will make your holidays easier but allowing you to toggle power to your lights without any bodily contortions. The Treemote has a remote receiver which plugs into the outlet. Your lights plug into the receiver and then the battery-powered (battery is included) Treemote acts as the transmitter. Simple and it’s only $19.99. Get more info at treemote.myshopify.com and Amazon.

Filed in categories: News

Tagged: ,

Here’s a remote for your Christmas tree! originally appeared on The Gadgeteer on November 19, 2018 at 1:00 pm.

Note: If you are subscribed to this feed through FeedBurner, please switch to our native feed URL http://the-gadgeteer.com/feed/ in order to ensure continuous delivery.

Nanoleaf remote review

REVIEW – Not all 12 sided dice are for role-playing games. At least one of them can help automate your home.

What is it?

The Nanoleaf remote is pretty unique as remotes go. It doesn’t have any buttons, screens or even charging ports. Instead, it has 12 sides that encourage you to pick it up and play with it. How does it work? What can it control? Let’s find out.

Hardware specs

Dimensions: about the size of a tennis ball (but 12 sided)
Power: runs on 2 AA batteries
Battery Life: 3 years standby, 1 year of active use

What’s in the box?

  • 1 Nanoleaf remote
  • 1 Pair of AA batteries
  • 1 Instruction manual

Design and features

The Nanoleaf remote is a dodecahedron with softly rounded corners and edges. It feels good in the hand and it should as the whole premise is that this remote is meant to be touched, picked up and rotated. It’s also a very visual system which makes sense given that Nanoleaf’s core product is a modular lighting system. Each side is numbered 1 through 12 while producing its own color. Each can be individually programmed to act as a trigger for Homekit scenes or Nanoleaf panel color changes. There’s additional functionality if you’re using it with the Nanoleaf panels, as rotating the remote on a given side can adjust the brightness of your panel’s lights.

Setup

Physical setup is as simple as installing the batteries. The remote is already disassembled in the box.

The only thing to note is that the left battery should be negative up and the right is positive up. There’s no physical markings inside on the battery compartment that I could see and the illustration is confusing.

Pretty trivial though as the compartment is easy to open and close, and it lights up right away if you’ve got it right. Here’s a quick video of that startup sequence. (Please excuse the vertical video. I have no idea what I was thinking.)

Before you snap the two sides together, you’ll need to download the Nanoleaf app for Apple or Android and there are QR codes for both in the manual to get you to the right place quickly. Once you’re in the app, create an account and you’re now ready to pair with the remote.

Click the ‘Remote’ button in the bottom center and then the big ‘+’ at the top. Click on ‘Remote’ and then follow the instructions. I used the Homekit Setup Code which found the remote quickly and landed me on a page to customize the name and choose from the rooms I already have set up in Homekit.

That same ‘Remote’ icon at the bottom now drops you to a screen where you’re presented with all 12 sides to customize. From having set this up originally I had ended up setting side 1 to an ‘All Off’ function, so I repeated that step in the Nanoleaf app for this walkthrough. As you can see in the pic, it has you finish the configuration in the Apple Home app.

From the Home app, you need to press and hold ‘Nanoleaf Remote’ to see that I have 12 unconfigured buttons and see the ‘Settings’ button. Pressing ‘Settings’ lets you customize all 12 sides. For side 1, I’ve selected 5 lights that I want to turn off. All the others are already on schedules or infrequently used.

When you hit next, you need to define what action is being taken. In my case, they’re all set to ‘Turn Off’. Then you click done. Continue this for each side and set the action that you’re looking for. In my case, I set each even number to turn a specific Wemo on, and the next odd number to turn that same one off. I did not have actions for the final 3 sides.

I’ll cover that last pic a bit more about the way I programmed the remote in the next section as I definitely feel like I’m using the remote for a very specific, narrow functionality and not taking advantage of its power.

Performance

In our house, we recently set up an Apple Homepod and added a Wemo Bridge to allow our multiple Wemo products to be Siri/Homepod compatible. We primarily have Wemo Outlets (both original and the newer minis) and then two Switches. As we continue please know that my review is based on controlling Wemo products and not any other Homekit accessories or Nanoleaf products.

We’ve been using Siri to turn on our various accessories, and used Alexa before getting a Homepod. The Nanoleaf remote added a very tactile (and quiet) action to accomplish the same thing. It’s actually quite refreshing instead of talking to a disembodied voice. In our case, picking up the remote and turning it from side 1 to side 2 activates the lights around our sofa.

I started realizing how narrow my use was when I originally set up the remote. I had 2-6 turning on different lights and realized that I needed the ability to turn off specific ones while leaving others on. That meant I needed to be able to remember which sides did what which led me to the even/odd setup which has been working pretty well.

Here’s a video of turning on and off our deck lights at night to give you an idea of the interaction of using it as an on/off trigger.

I can imagine that if you’re using the remote to control Nanoleaf’s own light panels or any other Homekit compatible color changing bulbs, part of the charm may be in the discovery of different color palettes as you rotate to find one that fits your mood. When using it as a binary on/off, you end up looking at each side more to find the number you want to turn to.

It helps that each side produces a different color as you can pick it up and rotate it in your hand until you see the color you want and then wait or set it down to trigger the action. It still means you need some recollection of what each color means. Here’s what that looks like.

There’s also haptic feedback as you rotate the remote in place looking for which number you want to turn to. I’m guessing this is to provide tactile feedback when controlling brightness levels on compatible hardware.

Within the Apple Home app, there’s no additional interaction unless you want to change settings. Back in the Nanoleaf app, however, I was surprised to see that each of the different sides all had the same name… ‘Home App Scene’ (the last photo in the setup section shows this). You could go into each one and retitle it, but it appears that there’s no back and forth communication between the Home and Nanoleaf apps as far as naming action goes, so it would really just be a housekeeping exercise. The Home app (settings) is going to be your source of truth for what the action is anyway.

The Nanoleaf app does show a good bit more of what I’m missing by not having Nanoleaf light panels. There are schedule settings, a store and a ‘Discover’ section that has some amazing looking Colors and Rhythms which unfortunately look like they don’t work with the lights within the remote itself as I cannot select it as a device to download to.

As often as Alexa would respond with ‘you have multiple devices with that name’ (I guess many of them share the word ‘lights’); the Nanoleaf remote is not a surefire replacement either.  It’s pretty reliable, but sometimes you’ll turn to the side and nothing happens. I’m going to hedge my bets here and say that this is unlikely to be a sole Nanoleaf issue. Nanoleaf plus Homekit, plus Wemo Bridge, plus Wemo outlet… You get my point. Multiple opportunities for a handoff failure.

What I like

  • The size, shape, and illumination
  • The action of picking it up and rolling/rotating to trigger an action
  • The battery life (assuming it meets their claims)

What needs to be improved

  • Would like to see some of that color customization available for the remote
  • When it doesn’t trigger a light, it’s hard to understand what didn’t work

Final thoughts

I have to say that it’s incredibly fun to play with.  It’s also a great conversation starter. It looks cool, so guests pick it up and are intrigued by the light changing on the remote itself, and even more so when lights around them power up.  Somehow this just feels more magical than asking our non-human family member/assistants to do the same thing.

Price: $49.99
Where to buy: Nanoleaf
Source: The sample of this product was provided by Nanoleaf.

Filed in categories: Reviews

Tagged:

Nanoleaf remote review originally appeared on The Gadgeteer on September 17, 2018 at 4:00 pm.

Note: If you are subscribed to this feed through FeedBurner, please switch to our native feed URL http://the-gadgeteer.com/feed/ in order to ensure continuous delivery.

Satechi has released a new aluminum wireless remote control

Satechi has released a new Bluetooth aluminum wireless remote that claims to make it easy to control music, movies, and videos, all from one small device. It can be used at home to control an HTPC (home theater PC) or be brought to the office to give a presentation, from up to 33 feet away. It supports a range of Bluetooth-enabled devices including modern Macs, iPhones, iPads, Samsung Galaxy phones, Microsoft Surface, Google Chromebook and more.

It’s available in silver, gold, space gray, and retails from $44.99. You can find out more on their site at satechi.net and you can order one not from Amazon.

Filed in categories: News

Tagged: ,

Satechi has released a new aluminum wireless remote control originally appeared on The Gadgeteer on November 1, 2017 at 8:00 am.

Note: If you are subscribed to this feed through FeedBurner, please switch to our native feed URL http://the-gadgeteer.com/feed/ in order to ensure continuous delivery.

O6 puts world control at your fingertips


Do you agree that it’s much easier to click a button or twist a dial to control something vs. grabbing your phone, unlocking it, and navigating to an app or setting? If you nodded your head to that question, then you’ll be as interested in the O6 from Fingertips Lab as I am.

What is the O6? It’s a small “eyes-free” controller that pairs with an iOS device via Bluetooth and uses an app to turn your apps into “radio stations” that you can listen to and interact with.

Why is it called O6? That’s what I wondered about too, so I asked and was told:

Operating System is abbreviated as OS. O6 is a new operating system that intends to be your 6th sense Operating System, hence the name O6. O6 does not need any visual attention or speech to operate. Our technology uses sophisticated algorithms to provide a seamless, discreet experience.

Using O6, you can have your emails, news, tweets, etc read aloud to you. But it doesn’t stop there, in addition to hearing your emails, and other content, you can respond to emails, texts, and more without touching your phone. This means you’ll be safer while driving and can keep your eyes exactly where they need to be, which is on the road.

The O6 device has an aluminum shell and features a button and a dial for easy navigation through your apps and music while driving, walking, cycling and more.

The O6 is powered by a rechargeable battery that lasts 5-7 days per charge.

Currently, the O6 is only compatible with iOS devices, as far as interacting with all the various apps. But, there is limited Android functionality that will allow it to Play/Pause, change tracks, and change volume for your favorite music, podcasts, and audiobook apps. Full Android support will be coming in the future.

You can order the O6 for $99 from www.o6app.com.

Filed in categories: News

Tagged:

O6 puts world control at your fingertips originally appeared on on June 14, 2017 at 5:10 pm.

Note: If you are subscribed to this feed through FeedBurner, please switch to our native feed URL http://the-gadgeteer.com/feed/ in order to ensure continuous delivery.