DEENKEE DK600 robot vacuum review

REVIEW – For years my wife and I have looked with envy at the Roomba robot vacuums.  We have always looked at them as a luxury item though and have never pulled the trigger to get one.  So when competing products started coming out and the prices started coming down, we started looking again.  At a price point of $220, the DEENKEE is considered a budget robot vacuum that has many of the features of the more expensive products.  But are there enough features to make a clean-freak like my wife happy?  Let’s find out.

What is it?

The DEENKEE is a robot vacuum that cleans the house for you and returns to its charging base when done.

What’s in the box?

  • The DEENKEE robot vacuum
  • 4 side brushes
  • 2 Hepa filters
  • Docking/charging station
  • Power supply
  • Cleaning tool
  • remote control
  • owner’s manual

Hardware specs

  • Dimensions: 12.4 x 12.4 x 2.7 inches
  • Weight:  8.8 lbs
  • Runtime:  100 min
  • Charge time:  5-6 hrs
  • Dust collector capacity:  .6 L (20 fluid oz.)
  • Battery:  DC 14.4V Li-ion 2600mAh
  • Maximum suction power:  1500Pa
  • Sensor technology:  infrared

Design and features

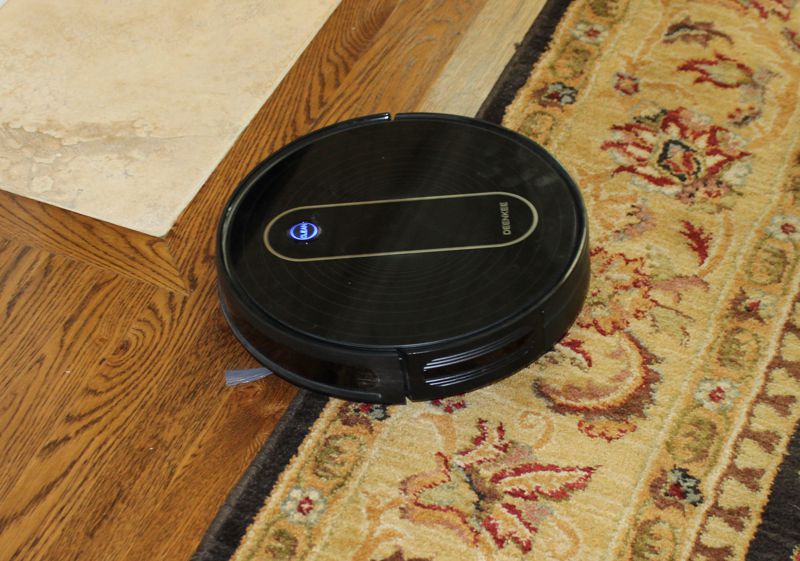
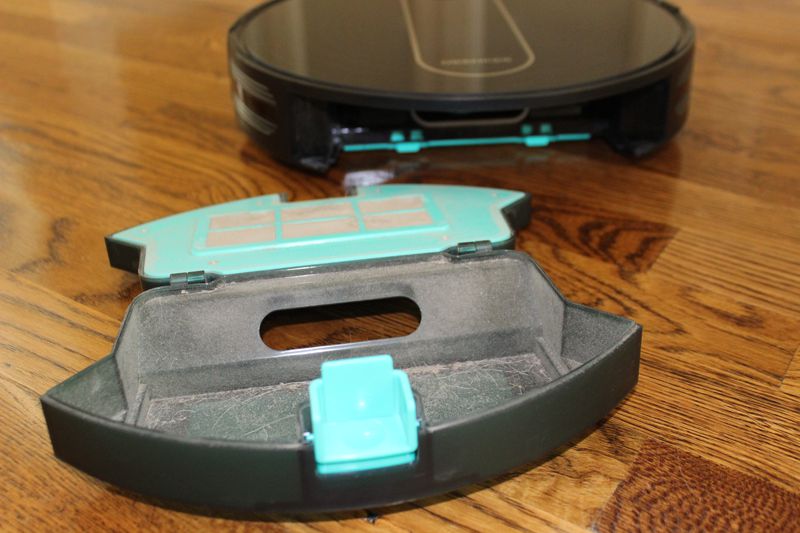
Like other robot vacuum cleaners, it has a charging base where it sits to charge and then after it cleans it returns to the base.  It can clean about 100 min before returning to the base, so that is just about enough time for it to cover the entire bottom floor of our house which is about $1,500 square feet.  It sits 2.7 inches tall and it easily goes under all our furniture which is nice.  The dust under there never gets cleaned of course, so the first time it cleaned our floors the dust bin was packed!

There are 6 modes of cleaning that we have to choose from:

  • edge cleaning mode – clean just the edges of the rooms
  • spot cleaning mode – clean a small area of the floor about 3 feet by 3 feet. (this is helpful if you have a spill of debris and want the DEENKEE to clean it up for you)
  • maximum power mode – this mode greatly increases the suction for things like rooms with carpet, but it also means that you reduce the operating time.  We only use this mode when we use it in bedrooms with carpet.
  • timed mode – you can set a specific time, like in the middle of the night, to start cleaning the house.
  • single room mode – put the DEENKEE In the room and close the door, and it stops when the room is done
  • auto mode – this is the mode we use the most. We just press the auto button on the remote and it cleans as much of the house as it can before the battery dies.

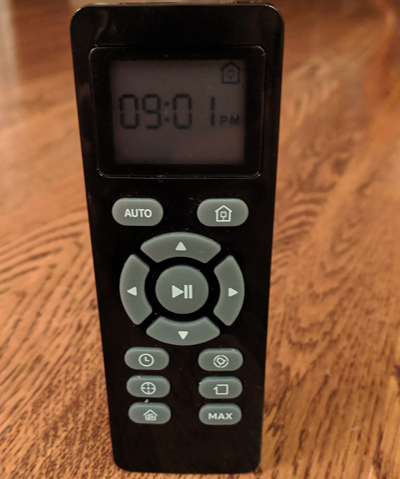
There are buttons on the remote for all 6 of these modes.  There are also buttons on the remote to make the DEENKEE return to the base immediately, set the time on the vacuum, schedule the timed mode, and pause the vacuum and manually control the direction of the vacuum.

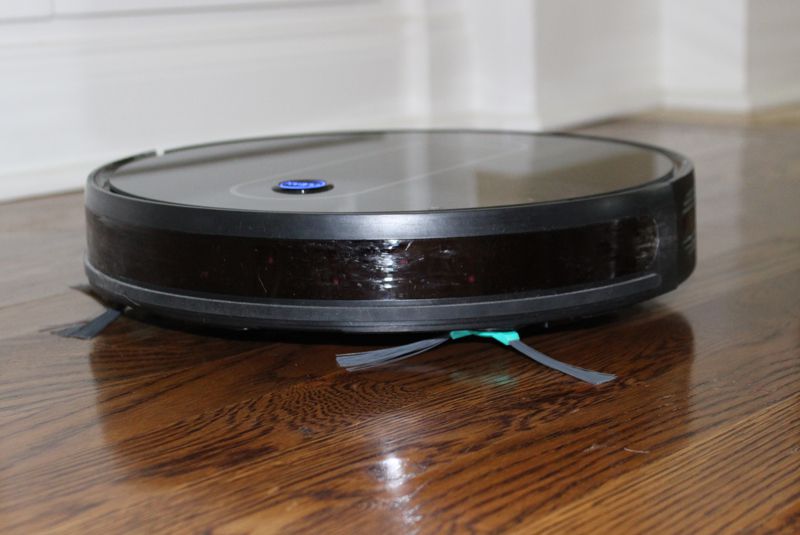
One of the best features of the DEENKEE, in my opinion, are the side brushes that allow it to get into corners and sweep debris under the vacuum.  I have looked at more expensive Roombas at twice the price that have only 1 side brush.  I have also picked up the DEENKEE in the middle of a cleaning mode (like for this review for example) and then set it back down in a different direction and it still finds its way back to the base.

When I asked my wife for her opinion of the DEENKEE she commented, “Well, it doesn’t completely replace my upright, but I would rather have it than not.  It does a great job of cleaning the floors.”  High praise from a person who prides herself on cleaning the house.  To give up some of the work to a robot is a pretty big deal for her!

It has edge-sensing technology so that when we use it upstairs it won’t fall down the stairs.  It hasn’t damaged any furniture either because it gently bumps into things and backs away.  The advertising says it is one of the quietest robot vacuums at 55dB and that you should be able to sleep with it running.  Well, I don’t exactly agree with that, as I will explain in the next section!

We haven’t had any issues with the DEENKEE not going over any of our rugs or floor transitions.  The only small issue is that we have a sisal natural fiber rug.  For those who know about those types of rugs, the fibers easily shed I guess you could say.  So if we let the DEENKEE run over it, the bin fills up in minutes.  So this is what we do in the dining room when we run the DEENKEE.

Pretty silly, I know.  But it also helps with getting the dust under the rug!

And what would a robot vacuum be without some interesting stories, right?  So let’s go!

Interesting stories

Our dog kinda freaked out the first time we used the DEENKEE.  I mean, he went bananas.  So after an hour or so he just jumped up on the furniture to get away from it while he barked at it, and after a week or so he pretends the vacuum isn’t even there.  I would also say that our dog doesn’t make messes in the house, so we haven’t had to deal with those horror stories you have read about dog poop and robot vacuums.  Thank God.  But we did give the robot a name, “Tinky”, so that our dog would know what is getting ready to happen when we tell him that “Tinky” is getting ready to go.  Yeah, that’s a little silly too, but hey, you do what you gotta do.

We decided to set up the DEENKEE to run overnight so that the house would be clean while we sleep because they said it was really quiet.  Perfect, right?  Not so much.  At 3am Tinky starts coming down the hallway (we have hardwoods through the entire main floor) and it sounded like a train was coming down the hall.  So the next night we decided to put up the doggy gate in the hallway to prevent it from coming down the hall into the bedroom and it spent a few minutes bumping into the gate over and over at 2am.  So we don’t do that anymore.

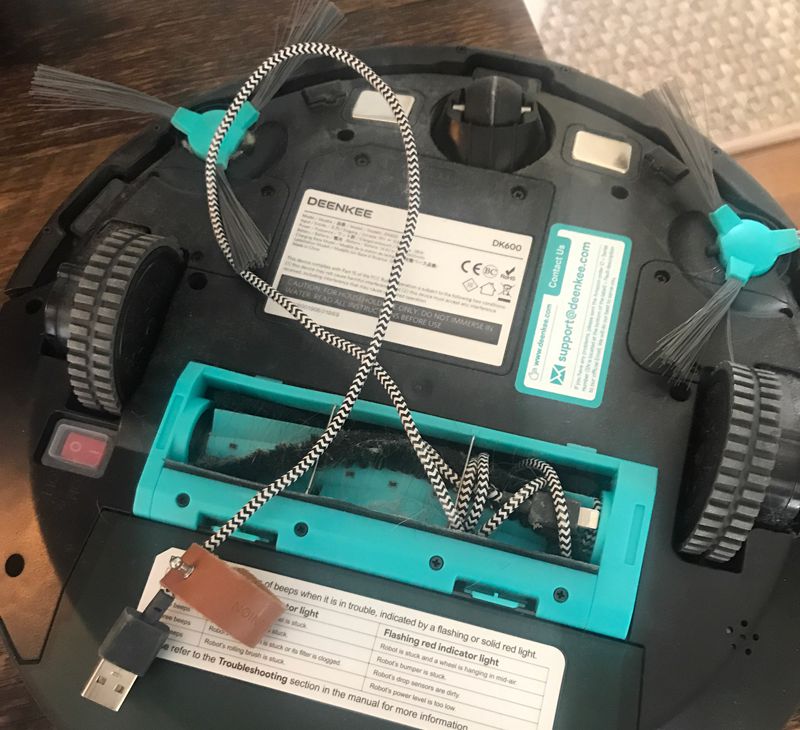
If you don’t get your cables up off the floor, this happens:

We accidentally left the door open to the washroom where the dog’s food dish and water bowl are located, twice.  So it knocked the water bowl over and water went everywhere.

And finally, we have had a couple of instances where Tinky just stopped and didn’t return to base.  For example, it went into our bedroom bathroom, into the room with the toilet which is a very small room.  It moved between the toilet and the wall and just stopped.  It didn’t back out and continue.  But I would say that probably 2 times out of 30 times that we have run the vacuum it stopped with something like that.  I can live with that.

What I like

  • Large number of features and cleaning modes
  • Great price
  • Does a great job of cleaning
  • It has a remote to control it

What needs to be improved

  • You can’t specify protected zones to prevent the vacuum from going to certain places.
  • There is no smartphone app to control it.

Final thoughts

For the money, this vacuum is awesome.  We only use it when we are home and we control which rooms it goes into and monitor it so we can catch it quick if it snags a cord.  As I researched other more expensive vacuums and the features they had, I found that paying the extra price for those features wasn’t worth it to me.  I don’t need a smartphone to start the vacuum while I am on vacation.  And we have developed a routine with the DEENKEE where we don’t need to set up virtual walls or protected zones.  The DEENKEE has all the features we want at a price that is affordable.  It doesn’t replace our upright vacuum completely, but I will say that our upright is starting to gather some dust.  How’s that for a vacuum joke?

Price: $220
Where to buy: DEENKEE or Amazon (Use coupon code: 578BI79 to save 15%. Code expires 10/06/2019)
Source: The sample of this product was provided by DEENKEE.

Filed in categories: Reviews

Tagged: , ,

DEENKEE DK600 robot vacuum review originally appeared on The Gadgeteer on September 7, 2019 at 9:00 am.

Note: If you are subscribed to this feed through FeedBurner, please switch to our native feed URL http://the-gadgeteer.com/feed/ in order to ensure continuous delivery.

ZWraps Reusable Beeswax Food Wraps review

REVIEW – We live on planet Earth. We are stewards of our world, and as it’s the only world that we have, we should probably take care of it.  In our culture, there’s a growing awareness that as individuals and families we should live a manner that damages the Earth as little as reasonably possible.  One way that we can do this is to reduce our usage of consumable items.  Instead of using plastic straws, we can use a stainless steel one.  Instead of cleaning with paper towels, we can clean with microfiber towels.  Instead of drinking water from disposable plastic bottles, we can drink from one that we wash and use again.

If your kitchen is like ours, you have a drawer that has several boxes in.  One box contains plastic wrap, another Ziploc bags, another sandwich bags, and so on.  Wouldn’t it be nice if there was a reusable product with which we could keep our food fresh instead of all this disposable plastic?  That’s exactly what the food wraps by ZWraps are for!

What is it?

ZWraps are all-natural, reusable food wraps designed to keep our food fresh.  They are cotton fabrics crafted with beeswax, jojoba oil, and tree resin.  They come in a variety of sizes from small (8×8 inches) to extra-large (16×26 inches) as well as a variety of designs, and all are handmade in the USA.

What’s in the box?

Each package contains one, two, or three wraps, depending upon which pack is purchased.  The back  and inside of the package contains instructions for use and cleaning.

Materials

The wraps are crafted with the following:

  • Beeswax – makes the wraps sticky
  • Jojoba Oil – keep the wraps soft
  • Tree Resin – helps it keep its seal

Design and features

First Impressions

Each wrap comes in a thin, cardboard package and is wrapped with plastic.  (Yes, it’s a bit ironic that a product designed to reduce disposable plastic comes in disposable plastic.)  When I first touched the wrap, I immediately noticed that it is sticky and leaves a slight, waxy residue upon my fingers.  This is, of course, by design, as they are made out of beeswax, but it is slightly disconcerting at first, as I’m used to plastic bags that are not sticky.  When I lay the wrap out on the counter, the wax gets on the counter as well.

Let me go ahead and point out the elephant in the room:  Whether or not you enjoy using a ZWrap will largely depend upon how you react to this stickiness.  You might go “ewwwww!” and choose to never touch one again.  You might, however, decide that it’s not really that big of a deal and get used to it.  Both my wife and I are in the “not a big deal” camp, and we are happy to use them. After sealing food with a wrap, I simply wash my hands and the counter with hot water, something I already should be doing when handling food.  It’s a very small price to pay for using this gadget.

The other thing I noticed is how attractive the various designs are.  They mostly come in greens and reds, a mix of patterns and stylistic artwork.  The ZWraps add some nice-looking color to our kitchen.

How to Use

The ZWraps are easy to use. If you’re wrapping food, lay the wrap flat on a counter, put the food in the middle, then wrap it up.

If you’re wrapping a container (or a bowl) that contains food, set the container on a counter, lay a wrap on top of the container, then fold down, and pressing the wrap against itself.  It helps to use a wrap that is a couple extra inches longer on all sides than the container. If the wrap isn’t sticking to itself very well, hold it for a few seconds and let the natural warmth of your hands seal it.

One note of caution: Do not use these wraps for raw meat or eggs.  They can contaminate the ZWraps, and there’s no good way to remove the contamination.

My wife and I have been testing the wraps with a variety of fresh food items, including breads, cheeses, fruit, and veggies.  Without exception, the ZWraps easily wrap around the food and seal it tight.  Here’s a canary melon from our garden that is sealed tight.

Four of our tests were especially rewarding.  One, we used the extra-large wrap on a fresh baguette that we bought at Lidl.  Typically we have to eat bread like this within one day, as it doesn’t stay fresh long.  After 2 days, however, the baguette was still perfectly fresh with no sign of getting hard.  This was a huge improvement!

Two, we used the medium wrap on an avocado.  Normally we have to eat an avocado as soon as we cut it open, as it will very quickly turn brown, become soft and squishy, and look most unappealing.  After 24 hours wrapped with a ZWrap, it was only mildly brown, still (relatively) firm, and was good enough to eat.  We were surprised and very pleased!

Three, I picked some fresh basil from our garden, rinsed it, then ZWrap’d it and put it into the fridge. I opened it back up three days later, and the leaves were fresh as could be.

Four, we peeled a carrot, wrapped it, then put it in the fridge.  Four days later, I could find only the slightest signs of browning.  It’s ready to eat.

It’s clear to us that not only are ZWraps great for our environment, they are also great at keeping food fresh.

How to Clean

ZWraps are unique items, so they need to be taken care of in a special manner.  They can’t be washed with hot water, nor can they be used in an oven or a microwave; naturally the heat would melt the wax and ruin the wrap. The best way to clean them is to lay them flat and wash with cool, soapy water; to dry, spread them out over a flat surface, perhaps a cutting board, but do not wring them out.  To store them, roll them up and put in a basket or a canning jar, anywhere that is cool and dry.  ZWraps estimates that a wrap should last 100 washes, which is usually 6 to 12 month.

If you’re looking for more information about how to use or take care of a ZWrap, their website has an informative set of videos.

What I like

  • Reusable wrap instead of disposable plastic
  • Bright and cheery designs
  • Keeps bread and veggies super fresh

What I’d change

  • Nothing

Final thoughts

I’m a big fan of being good stewards of our planet, so I like what ZWraps is doing.  My wife and I really like their wraps, and we really, really like the way they keep fresh those foods that normally spoil quickly.  If you are at all interested in reducing the amount of disposable plastic that you use, I recommend purchasing one medium or large ZWraps to start out.  This will give you a chance to test it out and see for yourself.  If you like it, then you can buy as many others as you need.

Price:  From $7.50 (small) to $22.50 (for a multi-pack)

Where to buy:  ZWraps online store or Amazon.  The ZWraps website also has a store locator, if you want to purchase locally.

Source: The sample for this review was provided by ZWraps.

Filed in categories: Reviews

Tagged: ,

ZWraps Reusable Beeswax Food Wraps review originally appeared on The Gadgeteer on August 31, 2019 at 9:30 am.

Note: If you are subscribed to this feed through FeedBurner, please switch to our native feed URL http://the-gadgeteer.com/feed/ in order to ensure continuous delivery.

UTEN Vacuum Sealer review

REVIEW – With only the two of us in our household, grocery shopping can be a bit of a challenge.  Many items come in bulk or in large quantities.  I often end up buying food items and have them go to waste because it is more than I need.  I have been wanting a vacuum sealer for a while, so when this popped up I jumped at the chance to review it.  Let’s see if it helps to solve some of my bulk food issues.

What is it?

The UTEN vacuum sealer is exactly what it says it is.  It is a vacuum food sealer.  It can seal bags and it also comes with a hose attachment to let it vacuum the air out of storage containers that have the proper fitting.

What’s in the box?

The sealer came well packaged in a basic cardboard box.  It had a nice film strip over the top of the sealer to protect the finish.  There is an extra strip of protective film over the stainless stripe at the bottom of the top cover.  That is what the blue-colored stripe is.  The following items were inside the box.

  • Five large (9.84 x 13.78 in), ten medium (7.87 x 11.81 in), and five small (5.91 x 9.84 in) vacuum bags
  • The vacuum sealer
  • Suction hose attachment
  • User manual

Hardware specs

  • Voltage: 110V
  • Frequency: 60Hz
  • Motor Power: 125W
  • Vacuum Degree: -40 ~ -55Kpa
  • Sealing Width:0.1in
  • Sealing Length: ≤ 11.8in
  • Dimension: 14.4*4.5*2.4in
  • Net Weight: 0.98Kg

Design and features

I really love how the vacuum sealer has a storage compartment for the power cord.  It makes putting the appliance away very easy.  Cabinet space is a premium in my kitchen and I was able to just slide this puppy into a very small spot.

The picture above shows the sealer opened up.  The sealer has four different options.  The first is just vacuum.  You would use this if you had a separate storage container you wanted to suction the air out of using the hose attachment.  The hose attaches to the protrusion just on the right side of the drip tray.  The seal button can be used if you have a roll of vacuum bags.  You would use it to make the initial seal on the bag.  The next button is the food button.  I have more information on it below.

Performance

I purchased two containers of chicken wings.  One was drumsticks and the others were the flats.  There were way too many for a single serving for my husband and myself, so I decided to use those as my test subjects.  When sealing food in vacuum bags, you first choose if the food is dry or moist.  The moist option will take longer to seal.  In the case of the chicken, I chose the moist option.

I loaded the bag up with the wings and then placed the open end of the back to where the opening was over the drip tray.  The silver band at the bottom is where the heat will be used to seal the bag.  I closed the sealer making sure both buttons on the side of the sealer popped out with clicks letting me know it was closed all of the way.  I then pressed the last button on the right labeled ‘Vac Seal/Cancel’.   That button vacuumed out the air and then sealed the bad with the heat strip.  Any time during the process I could have pressed cancel to stop it.

The above picture shows the chicken wings fully sealed.  I think it did a great job.  I ended up making three bags of wings.  I placed a video below showing the vacuum process.  The blue blinking light stops when the sealing process is complete.

What I like

  • Very reasonably priced.
  • Gets the job done exactly like it is supposed to
  • Nice storage compartment for the power cord.
  • Very compact

What I’d change

  • Nothing that I can think of!

Final thoughts

If you have been thinking about getting a vacuum sealer then don’t wait any longer.  You will have a tough time beating the price.  Maybe other sealers have more features, but this one gets the job done and is very easy to store.

Price: $39.99
Where to buyAmazon
Source: The sample of this product was provided by UTEN.

Filed in categories: Reviews

Tagged: ,

UTEN Vacuum Sealer review originally appeared on The Gadgeteer on August 26, 2019 at 11:01 am.

Note: If you are subscribed to this feed through FeedBurner, please switch to our native feed URL http://the-gadgeteer.com/feed/ in order to ensure continuous delivery.

Honeywell TP70PWK dehumidifier review

REVIEW – One of the drawbacks of having a dehumidifier is the task of constantly emptying the tank. I jumped at the chance to review the Honeywell TP70PWK Dehumidifier because it has a built-in pump.

What is it?

Honeywell TP70PWK Dehumidifier is one of Honeywell’s largest home dehumidifiers capable for use in a room or basement up to 4,000 sq ft.

What’s in the box?

List contents – you can remove this heading and section if it doesn’t apply to your review.

  • Honeywell TP70PWK Dehumidifier
  • Drain Hose
  • Pump Hose
  • User Manual
  • Instruction and Warranty Sheets

Design and features

Honeywell TP70PWK Dehumidifier is a 70 pint/9 gallon dehumidifier for medium to large rooms. This dehumidifier is a large beast, yet it is Energy Star qualified which means this compact, but powerful unit removes moisture with less energy than conventional dehumidifiers, saving you money.

The TP70PWK has easy to use controls and an easy to read LCD display. There’s also a humidity display on the front of the unit that shows through the surface.

I was most interested in this particular unit because it has a built-in pump that is capable of draining condensation vertically or horizontally up to 15 feet. This means you can drain it out a window or into a sink or drain. This is a great convenience feature for me because I was tired of spilling the water from my old unit, and was quite tired of emptying it every day. There is also a drain hose for continuous draining if you have a drain near the unit. The pump is optional to use, the unit still has a tank that can be used if you don’t want to use the drain hose or pump hose.

The built-in air filter helps reduce dust and is easily cleaned under a faucet which means there are no costly replacement filters to buy. The unit even has a light that comes on to indicate that the filter needs to be cleaned. The filter is located on the back of the unit.

The humidity control can be adjusted in 5% increments between 30% and 90%. A recommended healthy humidity level is between 40% and 50%.

The unit can be set to automatically turn off or automatically turn on using the timer functions. There are also two fan speeds, high and low. The sleep mode simply reduces the LED brightness while it is on.

The Honeywell TP70PWK also has an Auto-Restart feature which will automatically resume its operation after a power outage.

There is also a carry handle that conveniently pops up making moving the unit a bit easier on the smooth-rolling wheels.


Panel Indicators/buttons left to right:

  1. Filter Alert
  2. Fan Speed Control
  3. Water-Full Indicator (top), Humidity/Timer set increase (bottom)
  4. Display Screen (top), Power on/off (bottom)
  5. Continuous Operation Light (top), Humidity/Timer set decrease (bottom)
  6. Timer Control
  7. Sleep Mode
  8. Auto Drain Pump Mode

What I like

  • Built-in Pump
  • Wheels
  • Front and top displays

What I’d change

  • Nothing I can think of

Final thoughts

Overall the Honeywell TP70PWK Dehumidifier has worked flawlessly and just as advertised. The built-in pump means that it is basically maintenance-free.

Price: $339.95
Where to buy: Honeywell and Amazon
Source: The sample of this product was provided by Honeywell.

Filed in categories: Reviews

Tagged: ,

Honeywell TP70PWK dehumidifier review originally appeared on The Gadgeteer on August 26, 2019 at 9:00 am.

Note: If you are subscribed to this feed through FeedBurner, please switch to our native feed URL http://the-gadgeteer.com/feed/ in order to ensure continuous delivery.

Love the candle, hate the flame? Try a Darice candle warmer.

NEWS – Vanilla. Apple pie. Sugar cookie. Pumpkin spice. Festive pine. It doesn’t matter the season, I love the smell of a scented candle. 

At the same time, I’m not a big fan of open flames. My house is too full of kids and dogs, chaos and crazy. But my niece turned me on to these Darice candle warmers, which give you all the benefits of a delicate sugar-cookie aroma wafting through the kitchen, without the fire (or any actual baking).

Just plug it in and switch the toggle to turn it on, and you can set any jar candle or glass/metal votive on the electric burner plate. Don’t light the candle! Just wait as the wax melts and let the yummy fragrance permeate.

The felt-covered feet make it possible to leave the candle warmer on delicate surfaces like wood tables. Just keep it away from places where it could get bumped or knocked over.

Purchase a single burner for $7.69; two for $10.95; three for $12.42; or four for $22. Find them on Amazon, where they currently have 4.3 out of 5 stars with 1,396 reviews.

Filed in categories: News

Tagged:

Love the candle, hate the flame? Try a Darice candle warmer. originally appeared on The Gadgeteer on August 15, 2019 at 10:00 am.

Note: If you are subscribed to this feed through FeedBurner, please switch to our native feed URL http://the-gadgeteer.com/feed/ in order to ensure continuous delivery.