BriteOWL light-up wall outlet cover review

REVIEW – In May, BriteOWL released outlet covers that double as nightlights and emergency backup lighting, without taking up outlet space.

What is it?

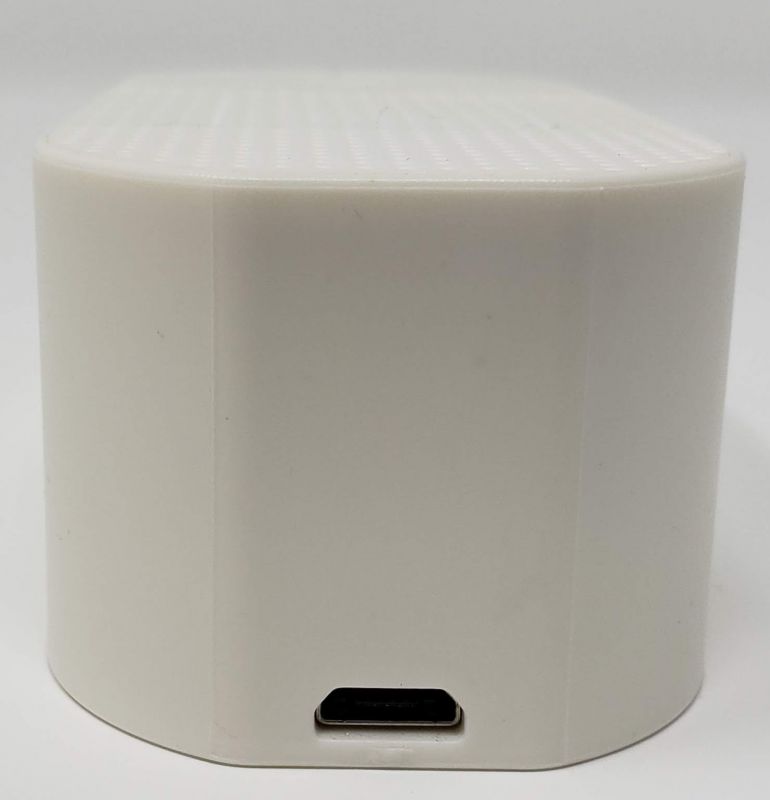
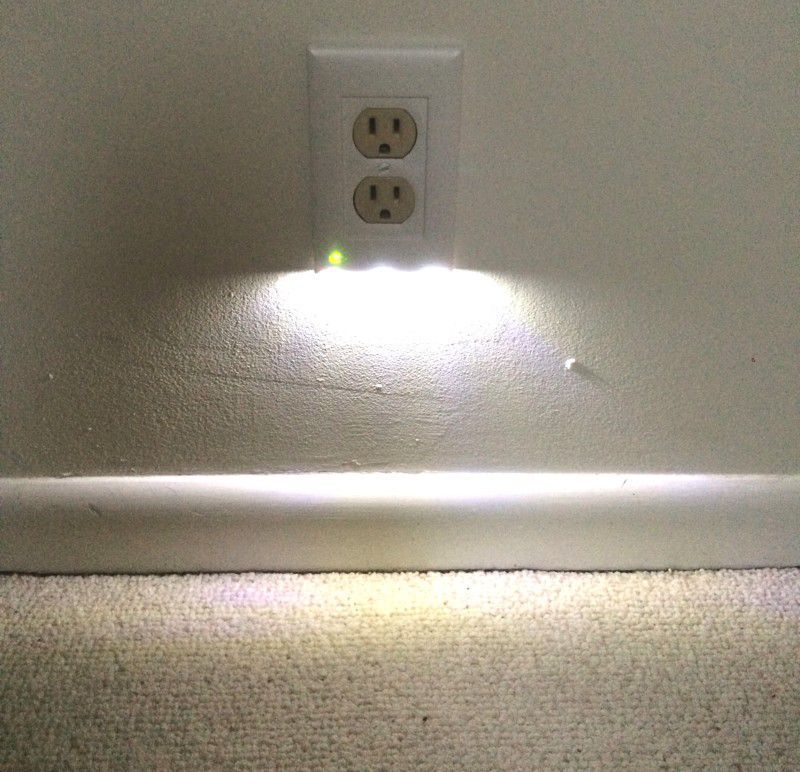
A replacement power outlet cover with LEDs across the bottom that turn on automatically when it’s dark or if the power goes out.
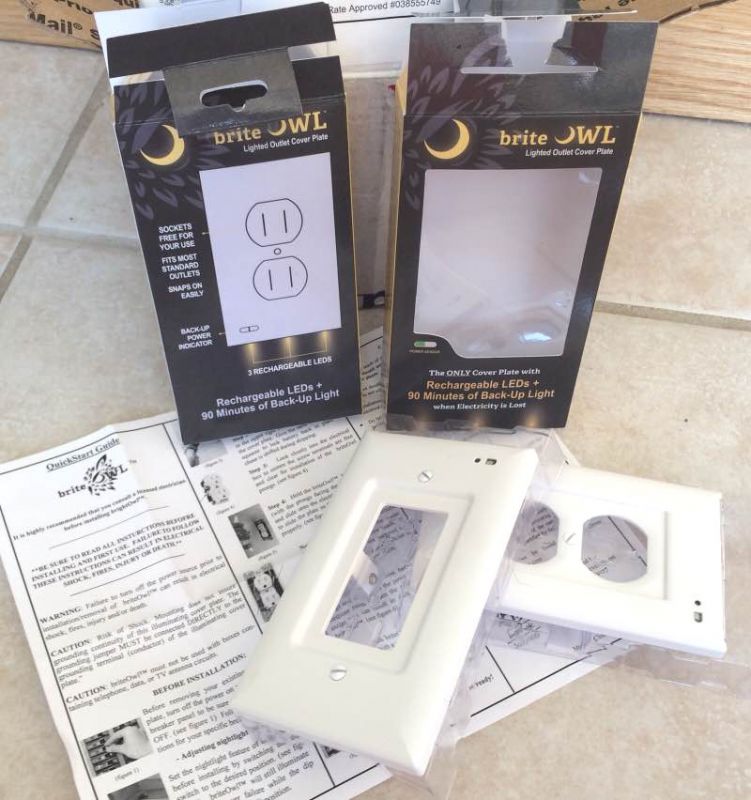
What’s in the box?

  • The outlet cover
  • Screws
  • Instructions

Hardware specs

  • 50 Lumens, with LEDs angled at 25 degrees
  • 90 minutes of emergency backup light
  • Rechargeable battery seamlessly incorporated into the design
  • 7-10 year battery life
  • UL and FCC certified
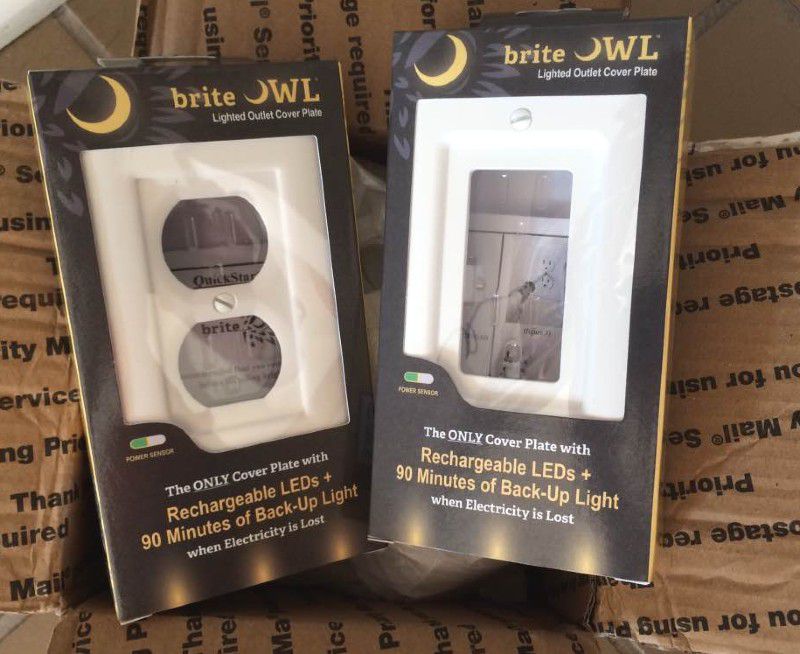
  • Four options in two colors (white and almond) and two styles
  • Costs approximately $0.056 per month to operate

Design and features

Our house is a tri-level, with some additional sunken areas. That means lots and lots of stairs. I also have a black dog who likes to hang around underfoot, making herself an adorable tripping hazard.

In addition, my children host sleepovers at least once a week, often with a whole crew of buddies. So I’m constantly worried someone will trip or fall down the stairs at night. 

As a result, I leave on at least one light, often two, each night when I go to bed.

When I saw these outlet covers, I was hoping they’d provide an alternative to leaving lights on every night. I’ve shied away from nightlights in the past because we use just about every outlet, thanks to the teens in my house. Plus, someone would probably complain about a traditional nightlight being too babyish.

So I was eager to try these. 

They come in two colors (white and almond) and two styles, so you need to make sure your outlets are compatible in shape, size and screw position. Also, they don’t work with GFCI outlets, so for my house that ruled out most of our kitchen and all of our bathroom outlets.

While the 90 minutes of backup power might not seem like a lot, it will continue to light (slowly fading) for approximately 2 hours after that. The designers did their homework and found the average outage is 5 to 10 minutes, with most accidents occurring the first 2 minutes without power. They note the average home loses power 215 minutes per year. Also, most home accidents that lead to ER visits are from falls, and most falls are from obstructed vision. (Statics are for the United States.)

Setup

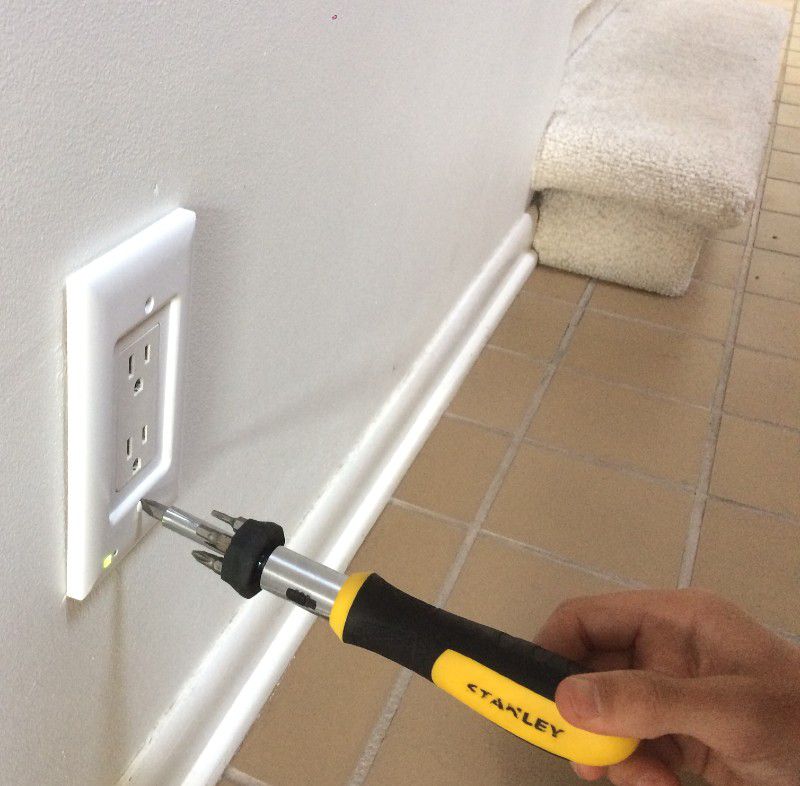
The installation guide has a disclaimer to turn off your power source and check with your electrician before installation.

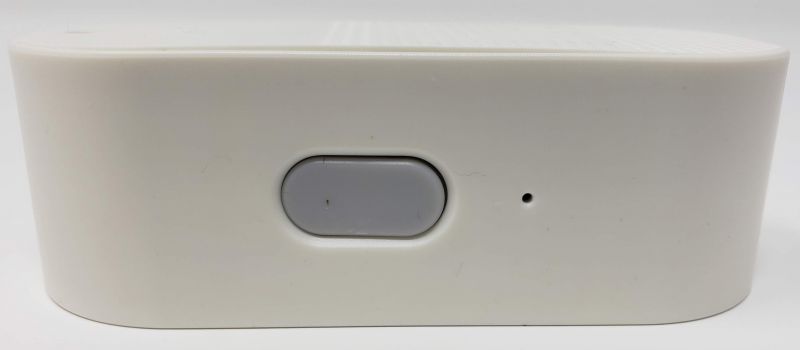
From there, it’s pretty simple. Just unscrew and take off your current outlet cover plate. Then you have to make sure you’ve clicked the teeny, tiny toggle switch on the back to either to the off position on the left (which means it only turns on in a power failure) or to the right for the nightlight feature (turns on whenever it senses darkness, plus during power failures). Locating that tiny switch was the hardest part of the installation for us!

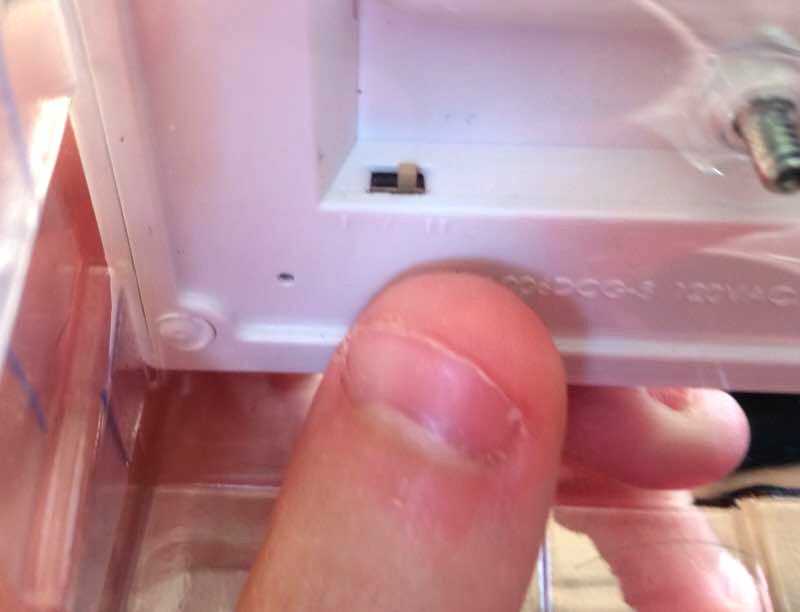
Make sure you pull the clear tab on the back and give the battery a little squeeze to make sure it’s firmly in place after shipping.

From there, you line up the plate so the LEDs are facing down. Then you slide the prongs into place on either side. Make sure the screw holes are lined up. Then screw them into place (note that the screws from your original plate will be much too shallow, you’ll definitely need the longer ones that come with it).

Performance

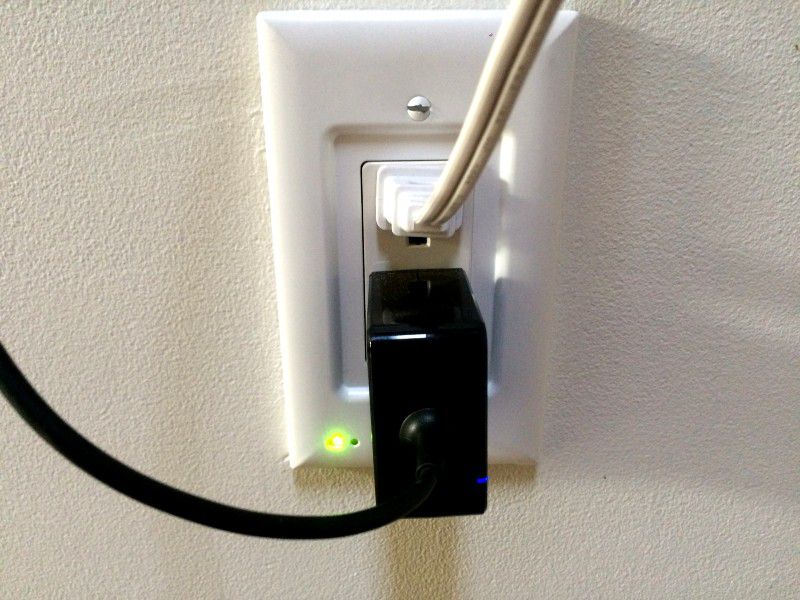
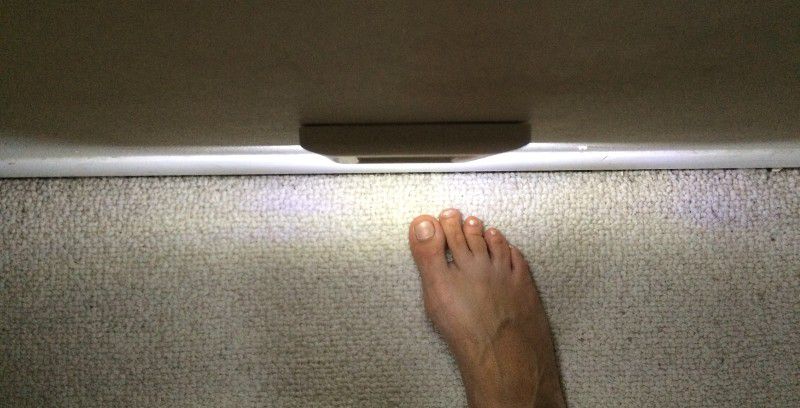
These work great! They give a good amount of light, plenty for nighttime trips to the bathroom or navigating during a power outage. The design is sleek, simple and modern. They blend right in during the day, the only giveaway is the small green light in the lower left corner (which turns red during an outage).

I also like that you install them and that’s it. No need to go around turning lights on and off. They recharge themselves. You just put them in and forget about ’em.

And most importantly for me, they eliminate my need to leave on lights at night. Plus, it reduces the chance that someone in my home will be one of the 18,000 people in the U.S. who get injured from a fall each year.

What I like

  • Provides plenty of light, an effective safety feature
  • Easy to install
  • Sleek design that leaves outlets open for use

What I’d change

  • Options for GFCI outlets and light-switch covers  

Final thoughts

The BriteOWL light-up wall outlet cover is a great safety product, especially for households or any places frequented by children and/or senior citizens. Especially useful around stairs.

Price: On sale for $19.95 (normally $21.95)
Where to buy: BriteOWL web page
Source: The sample of this product was provided by Owl Power Solutions.

Filed in categories: Reviews

Tagged: ,

BriteOWL light-up wall outlet cover review originally appeared on The Gadgeteer on July 19, 2019 at 9:00 am.

Note: If you are subscribed to this feed through FeedBurner, please switch to our native feed URL http://the-gadgeteer.com/feed/ in order to ensure continuous delivery.

Nitecore NTK05 titanium keychain knife review

REVIEW – If you’ve been looking for a tiny, incredibly sharp and usable blade to add to your EDC, you have to check out the Nitecore NTK05. Let’s check it out.

What is it?

The Nitecore NTK05 is a key sized titanium folding knife with a replaceable scalpel blade.

What’s in the package?

  • Nitecore NTK05
  • 1 no. 11 scalpel blade

Design and features

The Nitecore NTK05 is tiny. It’s made of a TC4 Titanium alloy and when folded it’s only 2.17 inches long.

The end of the knife has a large opening so that you can easily attach it to your keyring or a lanyard.

When closed, the NTK05 is so small, thin, and lightweight (.169oz) that you could easily lose it in a pocket.

The knife opens easily to reveal the ultra-sharp blade.

Companies who make knives always claim that their blades are super sharp, but in this instance, Nitecore isn’t just saying that to say it. This time it’s true because the stainless steel blade used with the NTK05 is a real scalpel blade.

This little knife can easily slice through box tape, cut cardboard, score the peel of an orange, sharpen the lead of a pencil, remove tonsils, aid in an emergency appendectomy, and other light-duty everyday tasks.

Replacing the Nitecore’s blade after it has become dull is just a matter of unfolding the knife blade to 90 degrees, lifting the bottom edge of the blade and then sliding the blade up and off the blade holder. Adding a new blade is just as easy.

Although the blades resemble X-Acto knife blades, X-Acto blades are not compatible with the Nitecore NTK05. You have to use no. 11 scalpel blades.

No. 11 scalpel blades are readily available through Amazon where you can get a box of 100 blades for less than $12.

The only “problem” I encountered while testing the NTK05 is that it’s possible to flex the blade in such a way that it doesn’t close correctly if you’re not paying attention. This happened to me a couple of times and although I didn’t cut myself, that would have been a possibility if I had been in a hurry and hadn’t noticed the problem and slid the knife in my pocket in that configuration.

What I like

  • Tiny
  • Sharp!
  • The blade can be replaced with a no. 11 scalpel blade

What I’d change

  • I’d include 1 or 2 extra blades with the knife
  • Fix the blade flex issue

Final thoughts

If I ever decide to add a sharp blade to my keychain, the Nitecore NTK05 ultra-tiny titanium knife will be that knife. It’s so small it won’t add much bulk to your keychain and the fact that you can replace the blades when they become dull is a great selling point.

Price: $29.95
Where to buy: Nitecore store
Source: The sample for this review was provided by Nitecore.

Filed in categories: Reviews

Tagged: , ,

Nitecore NTK05 titanium keychain knife review originally appeared on The Gadgeteer on July 19, 2019 at 8:00 am.

Note: If you are subscribed to this feed through FeedBurner, please switch to our native feed URL http://the-gadgeteer.com/feed/ in order to ensure continuous delivery.

Urbanista Stockholm True Wireless Earbuds review

REVIEW – Ever since a major tech company took the headphone jack out of their phones, I have been stuck cycling through various Bluetooth headphones, as I’ve never been a fan of their lightning adapter toss-in headphones that are included with the phones. Thus, I jumped at the chance to test out these Urbanista Stockholm Earbuds to see if this option would be the one to make my ears happy at work!

What is it?

The Urbanista Stockhold Earbuds are wireless, Bluetooth enabled headphones that come in a charging case and touts a 14 hr total playtime per charge.

What’s in the box?

  • Charging Case
  • Headphones
  • Instructions

Design and features

The earbuds connect easily to your phone via standard Bluetooth pairing. I’ve found the easiest way to get them to re-pair if they become disconnected is to just put them in charging case and pull them back out again. The headphones will tell you “Power On” and “Connected” once they are pulled from the case. Touch controls on each earbud have controls built-in based on long or short presses of each bud individually. For instance, a short press or tap on the left will turn the volume down, while a long press will go to last track played. Two quick taps on the left bud will play/pause the current song. A long press on the right will skip to the next song while a short press or tap turns up the volume. They really are very simple controls and intuitive.

Performance

The overall sound is of good quality, I listen to a variety of music and haven’t found that any sounds off or bad. I have not experienced any interference or downgrade in quality when I switch to my corded earphones, which I still have to use at times. The reason for this is because they do need time to charge as their internal battery lasts for about 3.5 hours. The charging case batteries will charge the buds three additional times for a total of 14 hours of play time on a single charge of the case/buds.

There are a couple of features I like here when it comes to the charging. First, the buds will beep when they have approximately 15 minutes of charge left, giving you plenty of warning rather than them just dying on you. Secondly, when they are charging, there is a red indicator light on the side of the case that gives you a visual cue for how much the buds have charged. Each single blink of the LED on the side indicates 25% charge, so once you see it blinking 4 times consecutively, you know you’re ready to pull them out again. I’ve found it takes about 30 minutes to charge completely. It works great with my work schedule, I can get into the office in the morning, put them in until about lunch, charge them while I eat, listen for most of the afternoon and then re-case them when I’m ready to leave for the day with extra battery to spare. Simply plug the case in via provided USB cable to charge it again.

The only thing I haven’t quite gotten the hang of is call handling, as every time I’ve got a call with them connected, I have performed the two tap command on either bud to answer but each time it’s switched the audio back to the phone, which has left me scrambling to get to the call. I’m not sure if it’s user error and product problem but I can say it’s the one area where I could see improvement.

As far as comfort, I find the texture of the plastic to feel better in my ears than the hard plastic of some earbuds. Not sure how to explain it, but my ears don’t feel fatigued after long periods of use like they do with other in-the-ear headphones/buds.

What I like

  • Charging – while you can’t listen for 8 hours straight like some headphones – they provide a reliable charge and extra charges. Ideal for those who listen in shorter spurts, like in an office.
  • Design – they have a nice design and are comfortable.
  • Ease of use – between the easy Bluetooth connection, charging prompts, touch commands and indicator lights, these headphones pack a lot of punch while remaining easy to use.

What I would change

  • Again, about the only thing I had qualms with was the call handling for picking up phone calls.
  • If I were someone who would NEED more than 3.5 hours of continuous playing, I don’t think these headphones are for you, maybe finding a way to extend battery life, but this may be limited by the size of these units.

Final thoughts

Overall, I would have to say that I highly recommend these earbud headphones. Urbanista has done a great job designing these with comfort, ease of use and quality sound. I use them on a daily basis and outside of the phone issue, haven’t had a problem with them. And personally, I prefer actually holding the phone to my ear anyway so I’ve learned to just pull them and pick up my phone as usual. I don’t think the price is bad on these either, I think they are well worth the $99.99 price tag.

Price: $99.99
Where to buy: Amazon
Source: The sample of this product was provided by Urbanista

Filed in categories: Reviews

Tagged:

Urbanista Stockholm True Wireless Earbuds review originally appeared on The Gadgeteer on July 18, 2019 at 10:00 am.

Note: If you are subscribed to this feed through FeedBurner, please switch to our native feed URL http://the-gadgeteer.com/feed/ in order to ensure continuous delivery.

Atmos Portable Vacuum Pump review

REVIEW – I may have mentioned this already, but I travel a LOT for work.  Because of that, I am always on the lookout for gadgets which will make my travel easier or which reduce what I have to carry.  I’ve tried packing cubes, roll-up bags, and many other clothing compression options but so far all have come up short.  The Atmos pump is a small, lightweight, battery-powered option that I hope will do the trick…

What is it?

The Atmos Portable Vacuum Pump is an inflation/deflation pump that lets you either pump up a volleyball for a day at the beach or compress clothing to let you carry a single bag to the beach.  Although these devices have been around for a while, Atmos is running a Kickstarter project to fund a smaller and lighter version of a vacuum pump.

What’s in the box?

  • The Atmos Vacuum Pump
  • An 11 inch micro-USB charging cable
  • 1 plastic space bag adapter (for deflating)
  • 4 inflation needles of varying sizes
  • 1 medium space bag (19.7 inches by 27.5 inches)
  • Instruction sheet

Contents will vary depending on the pledge level.

Design and Features

The Atmos pump is a 3.1 oz. device that is 3.6″l x 1.4″w x 1.6″h. The pump in its final delivery model sports 8-1000mAh Lithium batteries – I was sent what appears to be a pre-production unit because the battery life is not close to the advertised specs.  As the pump is just going into production as I type this, I am assuming the pre-production state.  Delivery of the production units to backers is scheduled for September of this year.

Looking at the first picture in this review, you can see a small hole above the logo on the front of the pump.  This is the connection for deflating and as you can see there is no screw attachment here.  The port relies on a pressure connection, and the supplied plastic adapter for space bags fits snugly in this port.  I am concerned that over time the friction of inserting and removing in this fashion will cause the adapter to lose the seal and will end up becoming less effective.  Hopefully, replacement adapters will be available for sale.  More on the adapter in a minute.

On top of the unit there is a screw-mount for the inflation needles.  The needles supplied in my kit fit pretty much any type of sports ball you want to throw at it (pun intended).  Missing, however, are any sort of attachments to inflate pool floaters, most air pillows and similar products.

On the bottom of the unit is the micro-USB charging port.  The Atmos does not come with a wall charger and the 11 inch cord is VERY short.  I started off because of the size of the plug by charging via a USB port on my Surface Book 2, but after 4 hours of seeing the red charging light on the Atmos, I decided to try a different approach.  I plugged the supplied cord into an Anker charging block but could not get the unit to charge – no red light or for that matter, any light at all.  I tried a Samsung travel charger with the same result.  So I changed to a different cord and all chargers worked – and worked much faster.  Fully drained battery to fully charged using the Anker charger and alternate cable was just under 3 hours.

The left side of the pump has the on/off switch.  A right light glows through the plastic housing when the pump is charging and changes to green when fully charged.

How does it work?

In two words, not well.

For inflating a ball or two, the Atmos is an adequate solution if time is not a factor.  At a 3 liter per minute flow rate, you are not going to win any speed contests.  The Atmos team claims that on a full charge the pump should be able to inflate 25 average balls.  Assuming I have a pre-production unit, I can’t confirm that.  At best, I could get maybe 3 balls inflated before the performance was so degraded that I had to put it back in charging mode.  And I learned that the pump does not function while charging – you must have a charge on the battery in order to use it.

As I said, though, my primary use case is for reducing storage while traveling, so that is where my focus is.  With the size of the storage bag sent, I grabbed 2 pillows from our guest bedroom to use as an experiment.  Here’s where we started:

Before being stuffed into the bag, I was looking at just over 14 inches of pillow to compress.  I moved the sealing cap from the bag, attached the adapter (it just screws on like the sealing cap does) and then stuffed the pillows into the bag.  As with any Ziploc-style bag, sealing it was quite the chore, even with the supplied plastic clip meant to help speed up the process.  Eventually the bag was sealed and I was ready to deflate.

I plugged the fully charged Atmos pump into the adapter and hit the on button.  The pump made some noise and it looked like a little air was starting to come out.  After about 3 minutes, however, there was little evidence that the pump was working.  I turned it off and checked the bag for leaks – and none were found.  I put the pump back on charge and opened the bag to let the air back in.  I fully sealed the bag again, and once the pump said it was charged, I started over.  This time, I let the pump go until it sounded like the charge was mostly exhausted.  This is how far in 10 minutes I was able to deflate:

I was able to compress about 4.5 inches on a single charge.  After removing the pump, the bag was stable – it did not reinflate for over an hour, so it would appear that the pump did all it could for this experiment.  According to the campaign, however, the pump should be able to compress 8 storage bags (although the sizes of those 8 bags are not specified).

I wanted to be sure this was not a problem with the bag – just trying to be fair here – so I grabbed a pump I already own.  The ZK190 is a powered pump with a 5 liter per minute flow rate.  The adapter for this pump was just a tad too large for the port so I had to hold the adapter against the bag while deflating.  Using the same bag, fully inflated, this is what it looked like 90 seconds later:

Just over 5.25 inches.  Without a good seal to boot.

One last shot – I intended to use a small Ziploc branded bag with the now fully charged Atmos.  Problem was that the adapter diameter was too small – I just could not get it to fit on any size of the other space bags I had, where the ZK190 adapter fit all of them perfectly.  This may be a solution that works with only their bags.

What I like

  • The size and weight of the pump

What I’d change

  • Pretty much everything else

Final thoughts

There are a few other considerations, some targeted at this device while others are more generic of the devices in this category.

First, there are TSA regulations against carrying Lithium batteries in checked luggage.  As a travel device, you would have to carry it onboard your flight to be compliant with regulations.  The Atmos could only be packed in a suitcase if it was rendered inoperable – for example, if the device could not power on, so batteries fully depleted.  With this restriction, I cannot recommend the Atmos as a travel device.

Then there is the wrinkle factor.  If you use any compression device for travel, at some level you will have wrinkled clothing to deal with at your destination.  I have found that compression cubes and rolling space bags (the kind where you roll up the bag rather than use a pump to remove the air) yield less wrinkled clothes.  The more air you remove, the more wrinkles you will end up with.  And so-called wrinkle relaxing sprays do little to help with the situation, so you are pretty much assured you will be spending quality time with an iron before you go out in public.  In the end you trade space for effort – given the cost of checking a bag on airline flights these days, that might be an acceptable trade-off.

Finally, you have to consider the size of the bag and the average suitcase.  The medium bag I received when fully compressed barely fits width-wise inside a 26 inch Samsonite suitcase.  I can pack probably 4 days of clothes in a medium bag, but with an average trip length of 10 days, I have to take 2 medium and a small – and, fully compressed, I still need to bring 2 bags to fit that plus toiletries and other essentials.  I just have more empty space nothing else will fit in because of the bags themselves.  So, for me, this really isn’t a good solution.

Price: Varies depending on the pledge level.  Pledges start at $24 for the pump alone.
Where to buy: You can contribute to the Kickstarter campaign here.
Source: The sample of this product was supplied by Flextail Gear.

Filed in categories: Reviews

Tagged: ,

Atmos Portable Vacuum Pump review originally appeared on The Gadgeteer on July 18, 2019 at 8:00 am.

Note: If you are subscribed to this feed through FeedBurner, please switch to our native feed URL http://the-gadgeteer.com/feed/ in order to ensure continuous delivery.

VOAMOKO Mouse Pad with USB Hub review

REVIEW – Our family computer is a MacBook Pro that lives on the kitchen table but floats around the house wherever it’s needed.  It’s not a particularly powerful laptop, but we only use it for ordinary things, like banking online, writing documents, and checking Facebook.  In general, our setup works, but it does have a couple of drawbacks.  One, our table isn’t a great mousepad, and two, our MacBook doesn’t have enough ports.  The perfect solution to our problem would be a mousepad that doubles as a USB hub, and that’s exactly what VOAMOKO’s gadget is!

What is it?

The VOAMOKO Mouse Pad with USB Hub is exactly what its name says:  It’s a metallic mousepad with a built-in USB hub designed to work with laptops.

What’s in the box?

The only two things in the box are the mousepad and a 7-inch-long USB cable.  Atypically, there are no manuals, quick start guides, or any warranty information.

Hardware specs

The mousepad is made of an aluminum alloy.  It’s available in gold, rose gold, black, space gray, or silver. It’s 10.5 long x 8 inches wide and has 6 ports on the back:

  • 1 x RJ45
  • 3 x USB 3.0
  • 1 x SD
  • 1 x Micro SD

Design and features

I have the silver mousepad, and it matches the silver on our MacBook Pro pretty well.  The main part of the mousepad is a flat surface, like any mousepad, but the back part that houses the hub is a raised, triangular shape.  The connector to the host is indented on the left side.  It almost looks like something that Apple would have designed.

Installation and setup

Installation is super simple.  I connected the USB cable to the port on the left side of the mousepad to the USB port on the right side of the laptop.  Done.  No power supplies or drivers required.

Performance

The mousepad is a slick, metallic surface, which means it’s very fast and not very tactile.  Personally, I prefer this to the slower speed of a cloth mousepad, but if it’s too fast for you, you can adjust the tracking speed of your mouse, if it supports this feature.  The mousepad seems very rigid and sturdy to me, and I expect it will work very well for a long time.

The great thing about this design is that when I need to use the laptop somewhere else, I only need to disconnect two cables, the USB cable to the mousepad and the power cable.  Everything else can remain right where it is, ready for whenever I bring the computer back.

The ports on the back of the hub work great!  I connected an SD card from my Canon EOS 60D camera, a SanDisk USB drive with some files, the wireless dongle for my Logitech mouse, and my SanDisk SSD drive for Time Machine.  Everything just works without any fuss or drama, which is exactly what I want, and there’s plenty of space between each port.  It should be noted that the 3 USB ports implement the older, slower USB 3.0 specification, so the max throughput is only 5 Gbps.  If you consistently need to move lots of large files, you may find this to be too slow, but for normal, everyday usage, it’s probably just fine.  Amazon has an alternate version of this mousepad that connects to the host computer using USB-C, but as far as I can tell its ports are still USB 3.0, so you won’t see any difference in performance.

There are a couple of constraints that you should be aware of.  First, the port for connecting to the host computer is only available on the left side of the mousepad, which means that the mouse pad only works on the right side of your laptop.  Unfortunately, all of you “lefties” out there have been left out.  If you want to move the mousepad to the left side of your laptop, or if you don’t want your mousepad to be right next to your laptop, you’ll need to buy a longer USB cable.  Second, the cable is fairly rigid, which means that the mousepad is exactly 6 inches away from my laptop.  My personal preference would be to move it closer, but the cable won’t let me move it very far.  I wish that VOAMOKO had included a braided cable, which would provide the flexibility to adjust the mousepad’s location.

The bottom of the mousepad has a black, rubber surface attached to it, which provides good traction.  I never have problems with it slipping around while using it.

One final consideration is the price, which is currently $59.99 on Amazon.  You can buy an aluminum mousepad for less than $20, and you can buy a similar USB hub for less than $20.  That means you’re paying an extra $20 for the convenience of merging these into one product and decluttering your workspace.  I’m a fan of simplicity, so this seems like a good deal to me.

What I like

  • Solid construction
  • Nice aesthetics
  • Functional ports

What I’d change

  • A braided USB cable for connecting to the host computer

Final thoughts

I like this mousepad from VOAMOKO.  It does everything that I hoped it would do without any problems.  The functionality of the extra ports and the convenience of only having to plug in the one USB cable are good things.  If you’re in need of a mousepad and a hub, then I commend the VOAMOKO Mouse Pad with USB Hub to you.

Price:  $59.99
Where to buyAmazon
Source: The sample for this review was provided by VOAMOKO.

Filed in categories: Reviews

Tagged: ,

VOAMOKO Mouse Pad with USB Hub review originally appeared on The Gadgeteer on July 17, 2019 at 10:03 am.

Note: If you are subscribed to this feed through FeedBurner, please switch to our native feed URL http://the-gadgeteer.com/feed/ in order to ensure continuous delivery.