Matrix PowerWatch X review

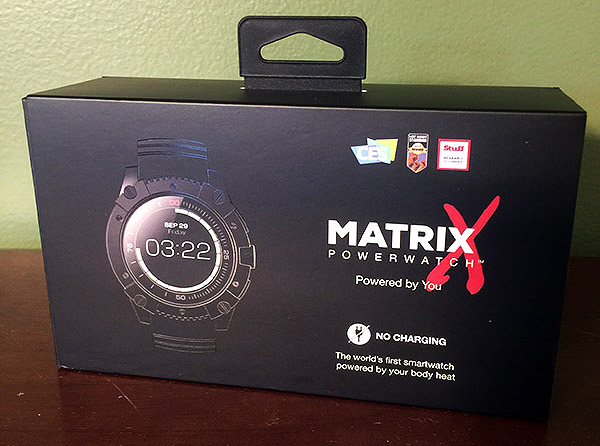
REVIEW – Smart watches are one of the hottest tech trends in recent years, but one of the main drawbacks of these popular “wearables” with their wealth of features is their battery life, or lack thereof. Many smartwatches require daily charging, which can be a bit irritating and sometimes inconvenient.  That’s why the Matrix PowerWatch X was developed.  It’s a smartwatch that is powered by the wearer’s body heat. Let’s check it out!  Gadget on!

What is it?

The Matrix PowerWatch X is a multi-function smart watch that is powered by the wearer’s body heat.

Hardware specs

  • Model number: PW05
  • Diameter: 50mm
  • Thickness: 13.5mm
  • Weight: 60 to 70 grams
  • Water resistance: 200 meters
  • Display diameter: 1.2 inches
  • Strap width: 24mm
  • Connectivity: Apple iOS/Android
  • Power supply: Thermoelectric generator
  • MCU: Ambiq Apollo
  • Features:
    • Step counter
    • Calorie counter
    • Notifications
    • Sleep meter
    • LED backlight

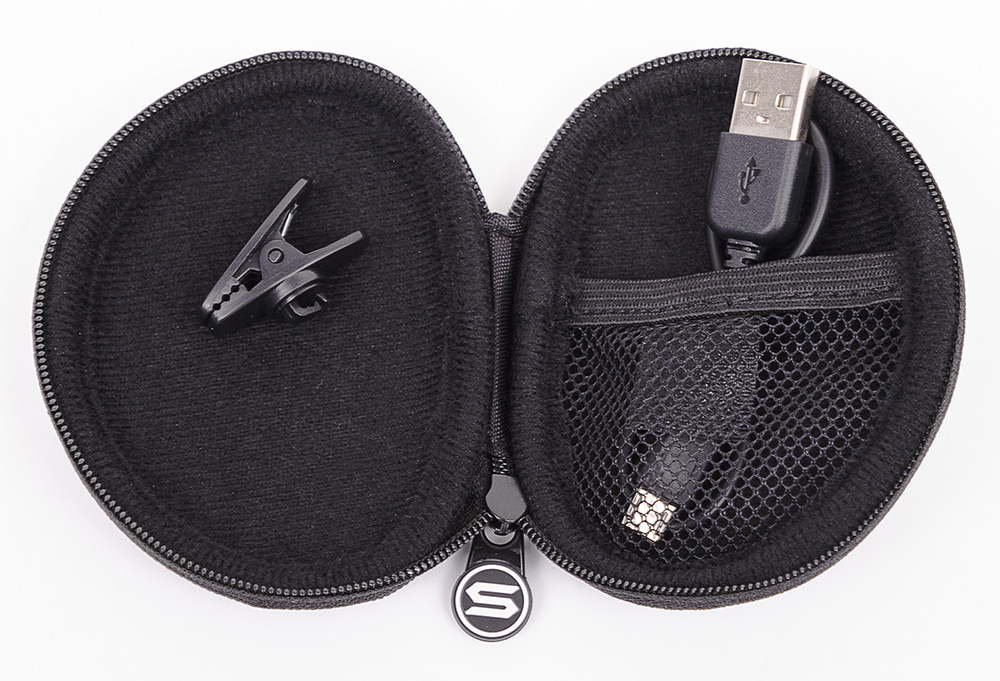
What’s in the package?
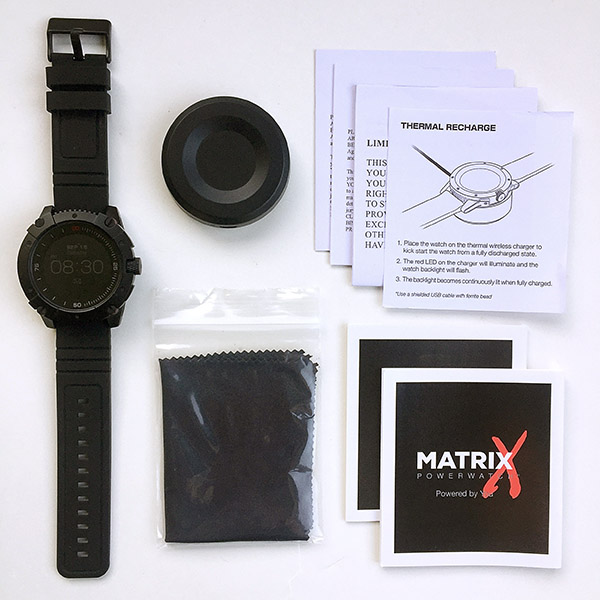
 

  • Matrix PowerWatch X
  • Charging base
  • Quick-start guide, Instruction booklet and various other informational inserts
  • Microfiber cloth

Design and features

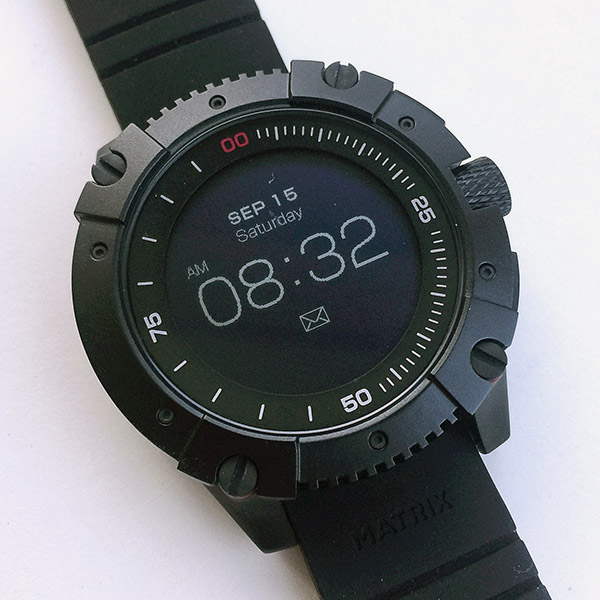
First thing I noticed about the Matrix PowerWatch X: It looks wicked tough.  Matte black case, black LCD face, matte black strap.  Ironically, one of Matrix’s other PowerWatch models is called the “Black Ops,” but I actually think the PowerWatch X looks even more black ops than their Black Ops.   The display appears to be an LCD screen, but I suspect it may be an “e-ink” type display, which would make sense because I understand that e-ink displays typically use less power than other LCD displays.  Also, I think the face is likely a mineral glass material, not sapphire crystal.

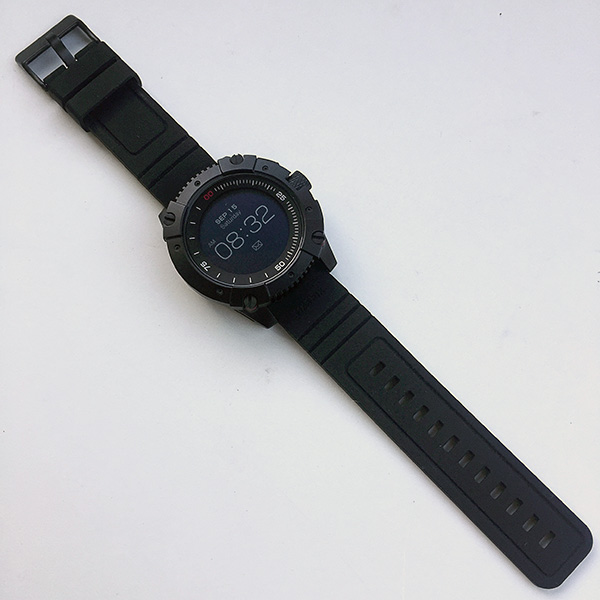
The PowerWatch X is quite thick at 13.5mm, which honestly doesn’t bother me at all, since I like big, thick watches, but others may find this undesirable depending on your wrist size and personal preference.

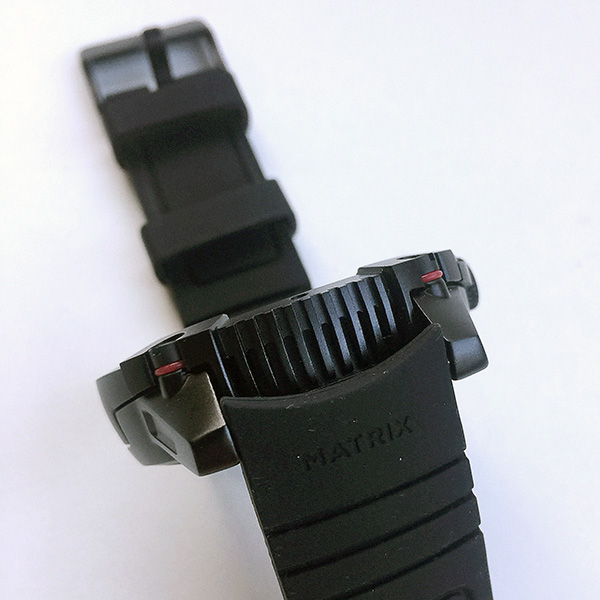
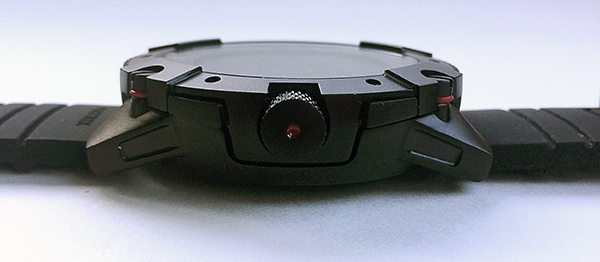
The top and bottom of the case, near the strap ends, have a grille-style look that is a bit reminiscent of Darth Vader’s mouth, which as an old-school Star Wars fan, I can totally appreciate.

The PowerWatch X’s crown is actually used to cycle through its various modes by rotating it clockwise.  More on this below.

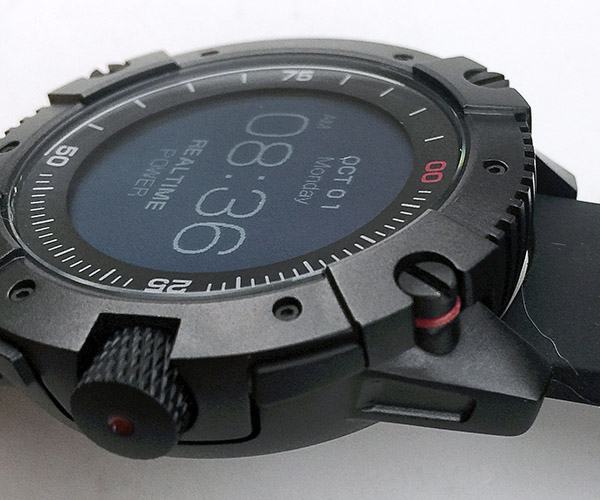
Above is a closeup of the PowerWatch X’s stem, with its thick knurling, and one of the four screws around the perimeter of the watch’s case.  My understanding is that these screws are mainly cosmetic, but I’ve read many comments online that these screws are not secured well in the aluminum case and many PowerWatch X owners are finding that one or more of their screws are spontaneously unscrewing and falling out.  Although this did not happen to me, it is something to be aware of.

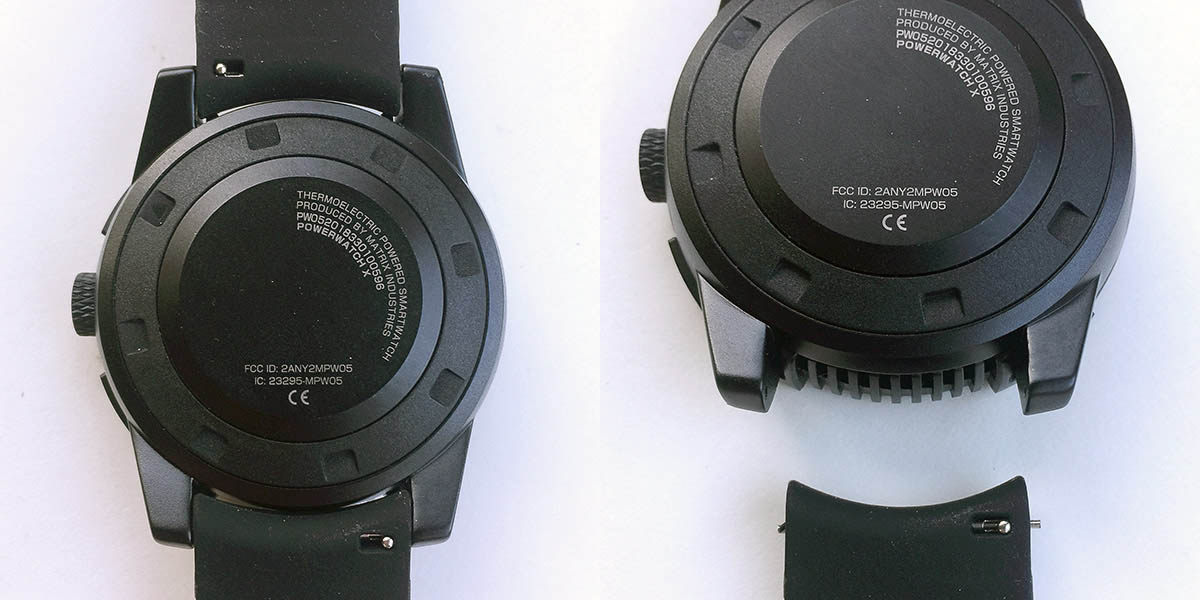
The technology employed by the PowerWatch X to generate power is called thermoelectric generator (TEG) that sense the wearer’s body heat and converts it into energy that charges a battery.  In order to function, TEGs need a hot side and a cold side to operate.  The “hot side” is the circular aluminum back plate seen in the image above.  The “cold” side is the entire metal bezel and body of the watch.  The “hot” and “cold” sides are physically and thermally separated and from each other by a layer of insulating thermoplastic.  The TEGs then harvest the heat flowing from the “hot” side to the “cold” side and convert this heat into electrical energy that powers the watch’s battery.  This means that the greater the relative difference in temperature between the ambient air and the wearer’s skin will allow the TEGs to generate energy faster, whether this means a lower air temperature, such as on a cool day, or a higher skin temperature, such as when the wearer is active.  In fact, above 90 degrees F, the PowerWatch X is unable to charge.  So if you live in a high-temperature climate, the PowerWatch X may not work for you.  I have to be honest here and admit that, as a mechanical engineer who has taken both undergraduate and graduates coursework in heat transfer, this is geekishly awesome tech.

Also seen above, the PowerWatch X has a 24mm wide black silicone strap that is soft and has a bit of stretch to help keep it flat against your wrist without feeling uncomfortable.  It utilizes a really clever and easy-to-use set of quick-release pins which make removing the strap from the case’s lugs very quick and simple.

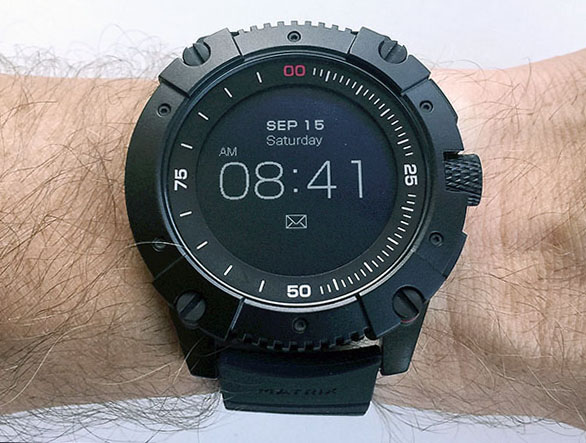
Let’s dig into the PowerWatch X’s various modes and functions.  Above is the default mode screen that shows time, date and day.

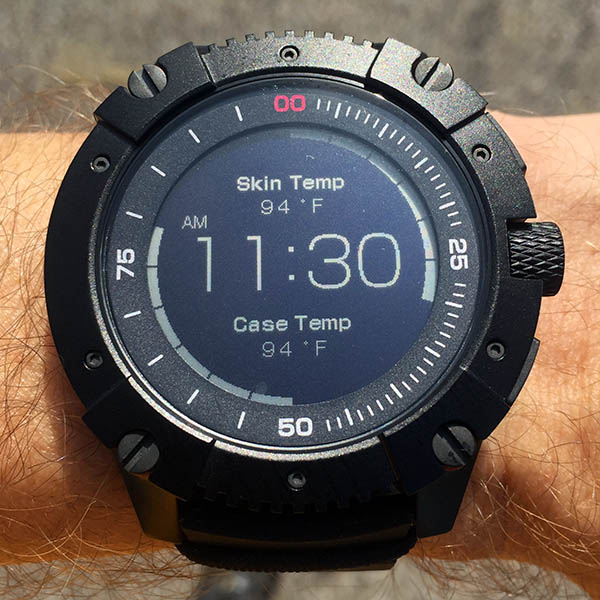
Rotating the crown clockwise while in the default mode screen changes the display slightly.  The date and day disappear and are replaced by two temperature readings: Skin Temp and Case Temp.  The bars on either side of the display in this mode show how much charge the watch is receiving at that moment.

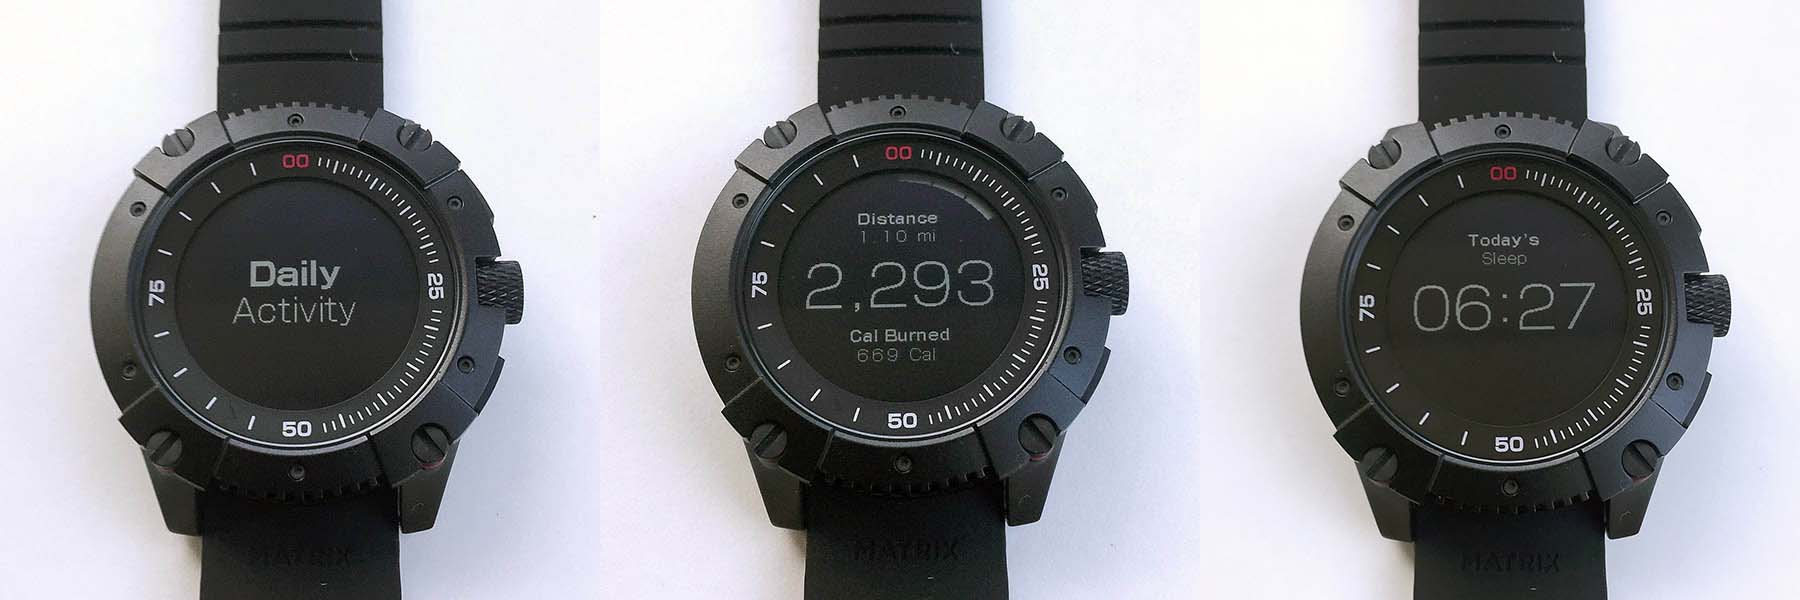
Pressing the top button cycles through the PowerWatch X’s modes.  The first, Daily Activity mode, actually has two screen, as seen in the image above. The first screen shows distance traveled (on foot) in small print at the top, steps walked in large print in the center, and calories burned in small print at the bottom; all of these values are for the current day.  Rotating the watch stem clockwise switches to the second Daily Activity Mode screen, which shows the amount of sleep in the previous night’s sleep session.  The step, calorie and sleep counters reset every night at midnight and each day’s totals are sync’d with the smartphone app.

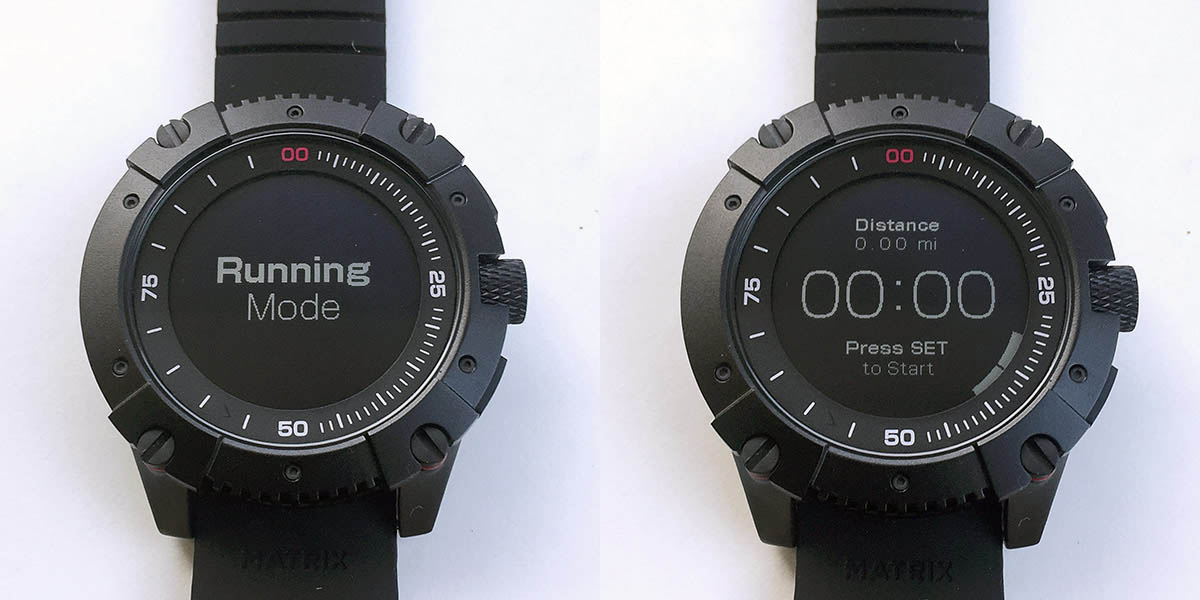
Pressing the upper right button again switches to the next mode, Running Mode, which is then activated by pressing the bottom button, which acts as the start/stop.  Running Mode displays the duration of your run in minutes and seconds in large text in the center and the distance in miles in smaller text above.  Since the PowerWatch X does not have a GPS (that I am aware of), this mode seems to be calculating distance based on your steps while running.  It seemed to be fairly accurate compared to the GPS watch that I typically use.

Pressing the upper The next is Stop Watch mode, which is a simple stopwatch that records in minutes and seconds only, not fractions of a second like most other digital stopwatches in the world, which is a bit disappointing.  Again, the bottom right button is used as the start/stop button for Stop Watch mode.

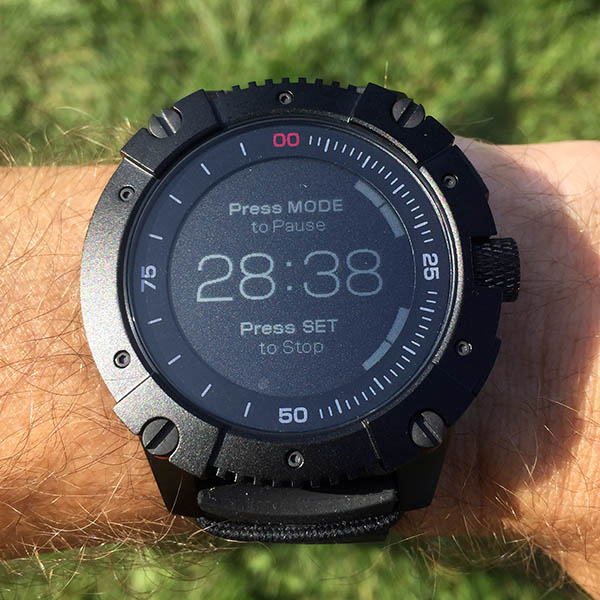
Above, I was using the watch to record times at my son’s cross-country meet.  Again, it was a bit disappointing that the time only displayed in minutes and seconds and not fractions of a second.

Pressing the upper right button gain puts the PowerWatch into Watch Settings mode.  This mode has several functions, but its main one is setting up pairing the watch with a smartphone, which requires downloading the free PowerWatch app from either the Apple App Store for iPhones or Google Play for Android phones.  It should be noted that the app is necessary for initial setup and doesn’t really require the app after that, but some of the watch’s functionality will be limited.

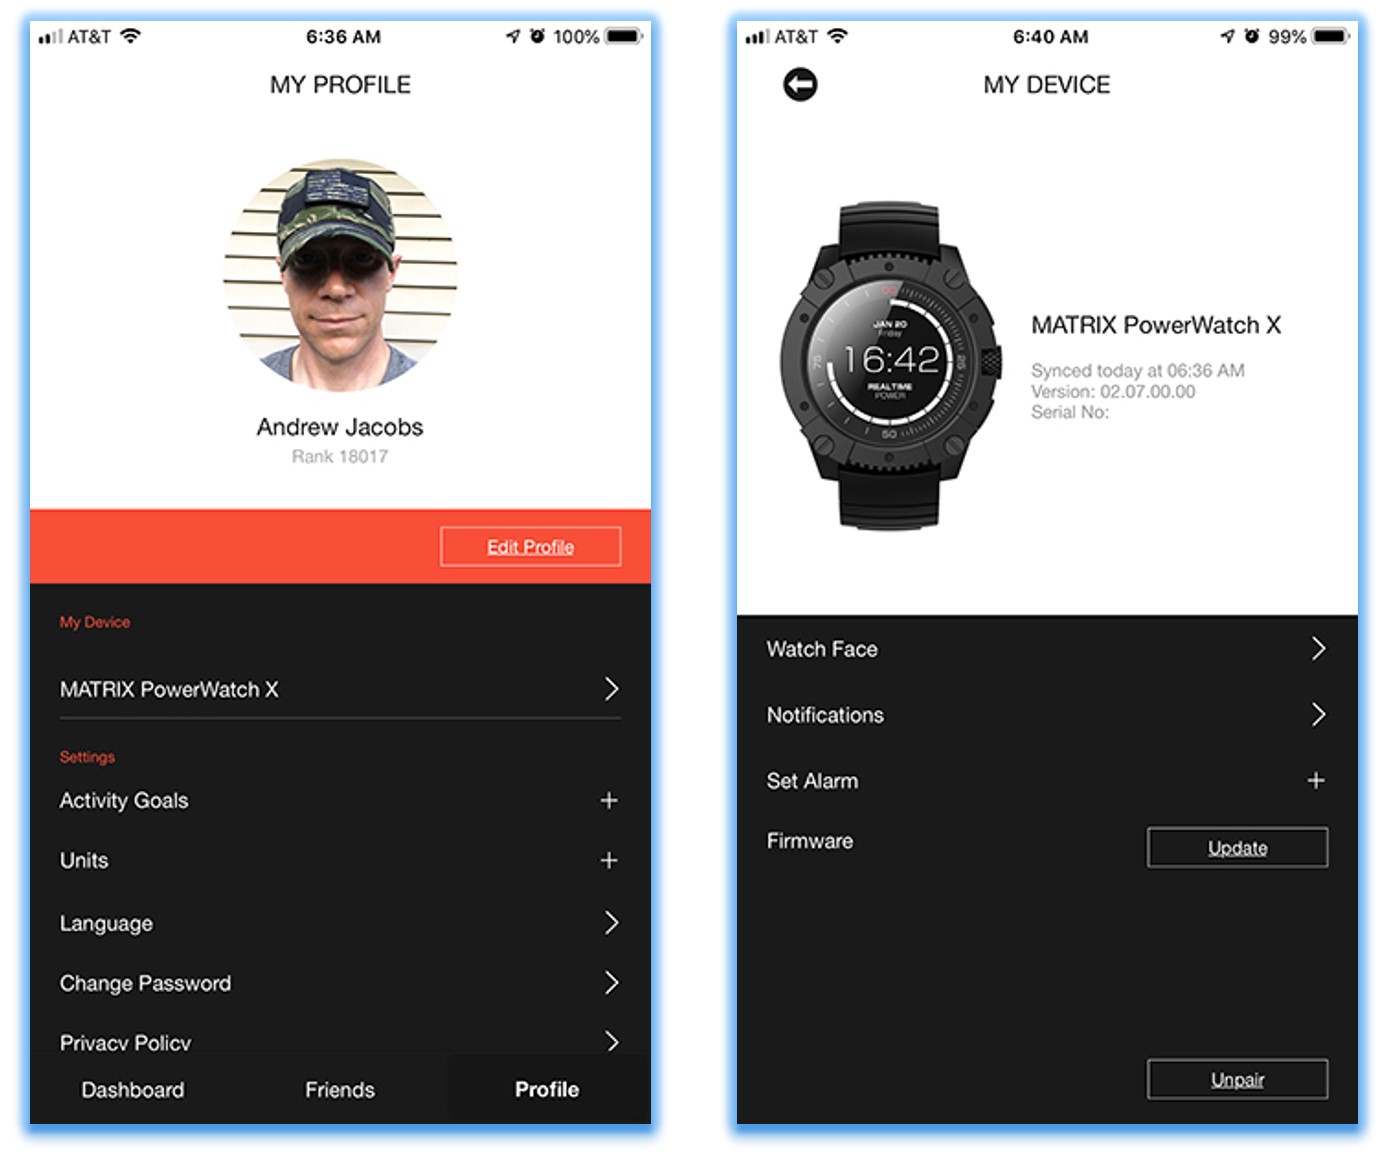
The PowerWatch app is fairly basic, with its main function being to facilitate pairing of your PowerWatch with your smartphone.  I was able to pair my iPhone 6 Plus with the PowerWatch X easily by following the prompts.  Let’s walk through a few things that you can do with the app.  First, you can select your watch under the “My Device” section.  From there, the first thing you can do is select Watch Faces; however, there is currently only one watch face, the default, so that isn’t useful until Matrix makes some additional watch faces available.  Notifications can also be controlled via the app, though this is somewhat limited: you can only turn Notifications on/off, and only for Calls, Messages, Alarms, and Activity Goals.  I had some issue with the Notifications.  I was receiving them when I first set up the watch, I was receiving them, but shortly after that, they spontaneously stopped.  I had to reset the way ch to get them working again, but the watch stopped vibrating when I received them, where previously it had vibrated slightly with every Notification.  This brings me to probably the most curious and irritating “feature” of this watch/app combo: you actually have to use the app to set an alarm, it can’t be done on the PowerWatch X itself!  Talk about missing a very basic watch feature.  This is enough to make me almost call it an “un-smart.”  Finally, you can update the Firmware from inside this “My Device” section.  Backing out to the “My Profile” section under “Settings,” the app also lets you edit Activity Goals (Steps, Calories, and Distance), Units, Language, and Password.   The app’s Dashboard screen shows Distance, Sleep time and Calories burned for that day and lets you scroll to past days.  Also note that the watch cannot be connected to any type of external Bluetooth biometric sensors (e.g. heart rate sensor), nor can it control music apps, or import fitness data into other fitness apps or to a computer.

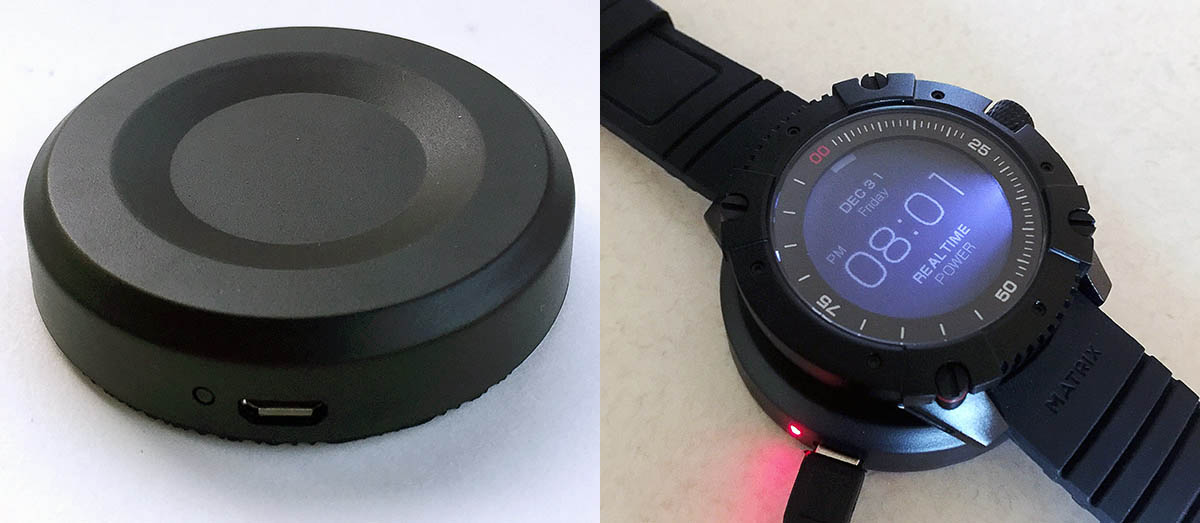
The single accessory that is included with the PowerWatch X is an external charging base, as shown above left.  It uses a standard micro USB cable, which is not included.  I found this base to be a bit of an odd accessory to include, considering that the watch is supposed to charge with your body heat and never need charging otherwise, but I suppose if you for some reason you don’t wear the watch every day, you may need this.  In fact, after a week of inactivity, PowerWatch X will enter Power Save mode and turn off the screen.  If fully charged, the watch’s setting will be saved for one year.  In any case, as seen above right, when the watch is resting on the base, it automatically illuminates the PowerWatch X’s backlight, and a small red LED on the base illuminates.  The backlight can also be activated by pushing the top right “Mode” button for 2 seconds.   However, because of the origination of the light from only the side, I found it a bit difficult to read the display with the backlight on, even in completely dark conditions.

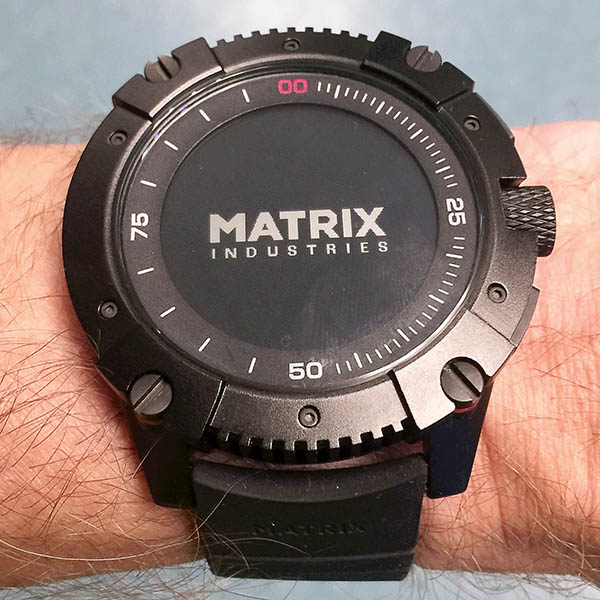
I wore the Matrix PowerWatch X for several days continuously, including during various types of exercise.  One very frustrating thing was that, during any activity, the watch’s screen would blank out and display the above “MATRIX INDUSTRIES” logo—and it would stay this way for long stretches of time, preventing me from reading the information that was supposed to be displayed in whatever mode it was in at the time, like Running Mode or Stop Watch model.  At first I thought that this might have been due to the watch attempting to conserve power because it was in a depleted state, but it even exhibited this behavior after having charged it on the base all night.  The PowerWatch X’s FAQ page states that the PowerWatch X will go to screensaver mode after 45 minutes of inactivity, but I found that it went into screensaver in a lot shorter time.

What I like

  • Never needs charging–thermoelectric generator is powered by the wearer’s body heat!
  • Looks tough—very spec ops/ninja style

What needs to be improved

  • On-board and app functionality is pretty basic and limited for a “smartwatch”
  • Goes into “screensaver” right in the middle of activities
  • Notifications system has some pretty serious issues

Final thoughts

The Matrix PowerWatch X was a mixed bag for me.  While I was very impressed with its thermoelectric generator technology, which generates energy to power the watch’s battery through harvesting the heat transferred between cool ambient air and the wearer’s warmer skin, that was about the extent of what I was impressed with.  Its actual functions are very basic, and almost not worthy to be called a “smart” watch.  While I think Matrix has the start of something really great here with a bodyheat-powered watch that never needs charging (and looks way cool), I think they have a bit of ways to go with the watch’s functionality, which I think they can likely continue to improve with further watch firmware and app updates.  For a retail price of $279.00, to me it may be a bit overpriced, but it is still really unique and cool gadget and worth a look.

Price: $279.00
Where to buy: Direct from PowerWatch or from Amazon
Source: The product sample for this review was provided by PowerWatch.

Filed in categories: Reviews

Tagged: ,

Matrix PowerWatch X review originally appeared on The Gadgeteer on October 31, 2018 at 9:00 am.

Note: If you are subscribed to this feed through FeedBurner, please switch to our native feed URL http://the-gadgeteer.com/feed/ in order to ensure continuous delivery.

Jaybird X4 Wireless Sport Headphones review

REVIEW – I’m on a mission to find my next favorite pair of Bluetooth earbuds and so far I’ve been focusing entirely on truly wireless earbuds, but in reality, if I had to pick a pair of Bluetooth earbuds that sound the best and fit the best, the ones I’d pick are not completely wireless. They have wires that connect the earbuds together and they are the Jaybird Freedom 2’s that I reviewed back in November 2017. Well, now I have a pair of Jaybird X4 Wireless Sport Headphones. Let’s check them out.

What is it?

The Jaybird X4 Wireless Sport Headphones are Bluetooth headphones for sports enthusiasts because they feature a sweat and waterproof design.

What’s in the box?

Jaybird X4 Wireless Sport Headphones
3 extra ear tips including 2 pairs of ultra foam tips
2 extra ear fins
Clip
Charging cable
Storage pouch
Quick start guide

Design and features

The X4 headphones have a more rugged design compared to the Freedom 2 headphones. The cord that connects the earbuds to each other is wide and flat, with an inline controller that has three buttons and a built-in microphone. The outer buttons are used to adjust volume and skip/prev tracks, while the center button is used to toggle power, play/pause, and answer/end calls.

There’s also a removable clip and cord cinch that you can use to keep the cable from flopping around against your neck.

The battery is charged using a proprietary USB clip that you see in the image above. I’m not a fan of this change from the previous Jaybird headphones because it means you will have to remember to take this cable with you when you travel and it also means that you’ll be left with no way to charge the headphones if you happen to lose this special charging cable. Luckily the cable is short enough that it will fit in the storage pouch.

Although I’m not a fan, the charging cable/clip is easy to snap on and off of the inline controller and once charged, these headphones can play up to 8 hours on a single charge.

Fit and comfort

The X4s can be worn over or under your ears. I prefer wearing them under since I already wear glasses and don’t want two things resting over my ears. I realize that everyone has differently shaped ears, but for me, the Jaybird X4 earphones are the most comfortable Bluetooth earbuds that I’ve found so far. They don’t hurt my ears and they stay in my ears even when I’m working out which I can’t say about 99% of the completely wireless earbuds that I’ve tested over the years.

Sound quality for music and calls

Since the Jaybird X4s fit so well in my ears, music and other audio sounds great too. While these earbuds will not impress an audiophile, they still provide enjoyable quality while listening to music. I like to listen to all types of music and found the X4s to have good bass, clarity, and volume.

For calls, the X4 side of calls sounded just fine. But when I would ask the person on the other side of the call how I sounded, they would say that they could tell I was talking using a Bluetooth headset as I didn’t sound as sharp and crisp as I usually do.

No matter what I do with the X4s, whether it’s listening to tunes while typing at my desk, or listening to tunes while working out, I’ve not experienced any drops or problems with the Bluetooth connection to my phone.

Battery life

With 8 hours of battery life, the Jaybird X4s will last through an entire day at work or several days of shorter listening sessions. I charged the headset and listened to them on and off for 30-1hr sessions throughout a week and I still have 20% battery life left. How do I know how much battery life is left? A female voice tells me when I turn on the earbuds after they’ve paired with my device.

What I like

    • Good sound quality
    • Comfortable fit
    • 8hr battery life
    • IPX7 waterproof

What needs to be improved

  • Proprietary charging cable
  • Expensive

Final thoughts

The Jaybird Freedom 2 earbuds have been my favorite non-truly wireless earbuds for the past year, but now I have a new favorite and it’s the Jaybird X4 earbuds. They fit great, are comfortable, easy to control with the inline controller, and they sound good. The only problems that I can complain about with the X4s are the price and the fact that they use a special charging cable. The charging cable isn’t a deal breaker although it is a little annoying given the fact that Jaybird’s previous headphones didn’t require a special cable. The price, on the other hand, is a little harder to swallow since even many truly wireless earbuds are selling at the sub $100 range these days.

Price:$129.99
Where to buy: Amazon
Source: The sample for this review was provided by Jaybird.

Filed in categories: Reviews

Tagged:

Jaybird X4 Wireless Sport Headphones review originally appeared on The Gadgeteer on October 30, 2018 at 12:00 pm.

Note: If you are subscribed to this feed through FeedBurner, please switch to our native feed URL http://the-gadgeteer.com/feed/ in order to ensure continuous delivery.

Loop personal WiFi display review


REVIEW – For a long time, I have been into digital picture frames, and other devices that can play/show high definition video and photos independently. While all of these functions can be easily handled by a tablet, I like affordable devices that I can leave on shelves around my studio or at the corner of my desk and have them showcase some of my work. I already have the large screen monitor on my wall, but a smaller device for my desk would be nice. The Loop seems to offer something interesting that might fit my needs, so let’s see.

What is it?

The Loop is a communication display device that allows you to view and share video, photos, and video chat with anyone with another Loop, anywhere in the world.

What’s in the box


1 x Loop
1 x AC Adapter
1 x Quick Start Guide

Design and features

On the front of the Loop, there is the display screen with a bezel around it that is approximately .5″. The Touch top that is on the top side of the device does not have any visible marks or indication. There is a camera in the center of the bezel at the top of the screen.


At the back of the Loop, there is a carrying handle and the AC jack.


At the bottom of the Loop is the sleep/power button. The micro USB port beside it is not currently used.


On the right side of the Loop, there is the scroll knob and the channel knob below it.


On the left side of the Loop, there is the speaker, the volume up/down buttons and an SD card reader.

Performance

Specifications

Dimensions
Height 7.2 inches / 182 mm
Width 9.5 inches / 240mm
Depth 3.0 in / 78mm
Weight 2.5lbs / 1134 grams

Storage Capacity
Loop comes with 4GB of on-device storage will be expandable in the future.

Display
9.7” inches diagonal
1024×768 pixels
IPS technology
Intelligent dimming

Inputs
Scroll knob
Channel knob
Touch top
Volume buttons

Camera
5 megapixels
70-degree field of view
f2.8 aperture

Audio
50mm speaker

Connectivity
Wi-Fi (802.11 a/b/g/n); dual-band (2.4GHz and 5 GHz)
Bluetooth 4.1

Features
Private photo and video sharing
Video chat
Streaming pictures and video
Social media and cloud storage integration
Voice control (coming soon)
Intelligent dimming (coming soon)
Bluetooth speaker playback (coming soon)
SD card reader (coming soon)

Integrations
iOS Photos
Facebook
Instagram
YouTube
Dropbox (coming soon)
Flickr (coming soon)
Google Photos (coming soon)

Supported formats
All photos and videos that are taken on an iOS device

Image formats supported: .bmp, .gif, .jpeg, .png, .webp
Video formats supported: H.264 AVC – 3GPP (.3gp), MPEG-4 (.mp4), MPEG-TS (.ts, AAC audio only). H.265 HEVC
MPEG-4 (.mp4). MPEG-4 SP – 3GPP (.3gp). VP8 – WebM (.webm), Matroska (.mkv). VP9 –
WebM (.webm), Matroska (.mkv).

Power and Battery
Built-in battery for up to 4 hours of playback
Power adapter for always-on use in the home

Warranty
1 year limited warranty

Requirements
Loop account
Internet connection for continued photo/video updates
Loop iOS app for setting up Loop and adding new content

Android app coming soon

Once you connect the power supply to the Loop and download the app, the setup is easy. You create an account and get right to creating your channels. I created separate channels for my Instagram channel, my kids’ photos, and YouTube videos by selecting the type of pictures I want to see on the display. Once you select the desired channel, the Loop displays the pictures like a slideshow or the videos. It shows all of my Instagram pictures and all of the pictures of my kids/family that I add from my iPhone. I tried the video chat feature between the app on my phone and the Loop and it was nice and clear both in audio and video. As I understand it, you can chat either between the app and the loop or two Loops. You can set up multiple Loops on one account and control them all and share content acting as an Administrator, or you can set up the Loops on separate accounts and then invite each Loop to connect and to share content. A nice feature of this device is that if you have a parent or family far away, you can set up the device to their wifi remotely, and they can see the content you add. This can obviously include family photos and videos, etc.

From the Loop, you can press and hold the scroll knob and the volume button up to 5 seconds to bring up the settings menu, and perform specific functions as seen in the photo below.

App

The screenshots of the app below show the various categories and capabilities of the app and device, as well as some of the available customizable settings.


What I like

  • The display resolution
  • The ability to add channels and therefore add selective content to have at your fingertips
  • The build quality
  • The audio quality
  • The video chat capability

What can be improved

  • Touch Screen capability added as opposed to Touch top even though the design is focused on preventing smudges on the screen
  • The price
  • The size (Thickness)
  • If wifi is disconnected because of a reboot of the router, the Loop does not always reconnect automatically

Final thoughts

In my opinion, the Loop device is an interesting device since it allows you to gather quite a bit of online content in one place and at your fingertips, all according to your preference. It also offers the video chat capability that can be set up and given to someone else in a remote location to chat or to share content. It is well built and the display resolution is great. However, I am very “torn” between recommending the purchase of this device versus a device like a 9.7″ iPad for $329. While the Loop does all that it is designed to do quite well, so do many tablets. While the access to the content that you pre-setup on the Loop is specific and quick, the tablet offers the same content availability and much more. I think that the choice to purchase this device would be based on very specific needs and capabilities, and so I will pass on a recommendation and just say that if this works for you, then buy it.

Price: $249 (Includes current promotion for 15% off)
Where to buy: Loop website
Source: The sample for this review was provided by Loop.

Filed in categories: Reviews

Tagged: , ,

Loop personal WiFi display review originally appeared on The Gadgeteer on October 30, 2018 at 10:00 am.

Note: If you are subscribed to this feed through FeedBurner, please switch to our native feed URL http://the-gadgeteer.com/feed/ in order to ensure continuous delivery.

Thinkware F200 Dash Cam review

REVIEW – The Thinkware F200 Dash Cam is a reliable, somewhat simple-to-set-up dash cam with a ton of great features at an affordable price. The majority of the really great features are only available after purchasing some accessories and having the camera hard-wired, but the base F200 Dash Cam’s feature set and included companion app are definitely worth the $139.99 price.

What is it?

Dash cams are small cameras placed on your windshield or dashboard that continually record video while you drive and sometimes when you’re parked and away from your car. Dash cams have increased in popularity as the tech behind them has become smaller and more affordable. There are a number of great reasons for having a dash cam in your car; they can help you document accidents for insurance purposes, get you out of a ticket for a traffic violation you didn’t commit, or record something that happened to your car while it was unattended.

Hardware specs

  • Camera: Sony CMOS 2.12M
  • Camera Resolution:
    • Front: 1080p Full HD (1920 x 1080)
    • Rear: 720p HD (1280 x 720)
  • Frame Rate: up to 30 fps
  • Viewing Angle: 140° (Diagonal)
  • Capacity: Micro SD Card 16GB/32GB/64GB/128GB (UHS-I)
  • Recording Modes: Continuous Recording, Incident Recording, Manual Recording, Parking Recording
  • Sensor: Triaxial acceleration sensor (3D, ±3G)
  • GPS External GPS receiver (Optional)
  • Dimensions(WxDxH): 3.9 x 0.9 x 1.3 inch
  • Weight: 55g (0.121 lb)
  • Storage Temperature: -4°~ 158°F / -20°~ 70°C
  • Operating Temperature: 14°~ 140°F / -10°~ 60°C
  • Capacity: MicroSD card 8/16/32/64/128GB (UHS-I)
  • Input Power: DC 12/24V, Built-in Super Capacitor

The Thinkware F200 Dash Cam is a mid-range dash cam with a moderate feature set. Thinkware has about eight different dash cams on the market of varying prices and functionality and the F200 falls around the middle. The front camera records in a beautifully clear 1080p at 30fps and the rear camera records at 720p.

The Thinkware F200 arrives in a great little box with a tamperproof seal on it.

The F200 is nestled nicely into the box to protect it in transit and showcase the dash cam upon opening.

What’s in the box?

  • Thinkware F200 Dash Cam
  • Thinkware Rear-view Camera (optional, but included with my review unit)
  • Rear-view Camera Cable (optional, but included with my review unit)
  • 12v Socket Power cable
  • Cable mounting clips
  • Dash cam mounting plates
  • 16gb Micro SD Card with Reader
  • Instruction manual

Setup

Fortunately, the F200 comes with everything you need to quickly install, set up, and run your dash cam. I reviewed the Thinkware F200 with three optional accessories; a rear-view camera, a GPS module, and a hard-wiring kit. None of these are necessary to run the F200, but they add some cool features such as parking monitoring, speed camera detection, and dual camera recording.

I love that Thinkware includes a preformatted SD card and card adapter with the F200. I haven’t seen this before and it really helps you to get started setting up your dash cam right away.

Along with the F200 dash cam and the SD card, all you need to start using your dash cam is the 12v socket power cable and mounting kit.

Once you find a good mounting spot for the dash cam, center of your windshield preferably near the top, simply peel away the backing on the main mounting clip and press it into place. Slide the F200 into place fitting the mounting notch on top of the camera into the slot on the mounting bracket.

Be sure to insert the included SD card in the slot on the bottom of the F200.

Next, connect the power cable to the open power port on the top of the F200 by the REC button.

Once everything is plugged in and powered, download the Thinkware Dash Cam MobileViewer app for your device, it works on both Android and IoS. Once downloaded and installed, the app will attempt to walk you through the setup procedure. There’s a WiFi button on the back of the unit that activates a hotspot for your phone to connect to for setup.


This is usually where a lot of car-tech devices lose points with me, and the F200 is no exception. The printed documentation is very vague and difficult to follow. It took me several tries and more than a few internet searches to get everything connected, synced, and functioning. The physical setup was easy, but the technical setup took a bit of finagling. Fortunately, and to Thinkware’s credit, once everything was up and running, the system has worked flawlessly for about a month now.

As I mentioned, the unit I’m reviewing included the optional rear-view camera, GPS module, and a hard-wiring kit. The rear view camera is pretty unobtrusive and has only one port on it for a video cable that connects back to the main unit. Wiring the rear-view camera was no easy feat and ideally should be done by a professional.

Thinkware provides about 19.6 feet (6 meters) of cable to reach a good spot on your rear-view window and the camera itself has mounting tape attached.

The GPS module is probably the simplest accessory to install.

The little puck has a short cable on it so it must be mounted on the windshield near the F200.

Both the GPS module and the rear-view camera plug into ports on the left side of the F200.

The final optional accessory I installed was the hardwiring kit. This is an included set of wires and inline fuses that allow you to run continuous power to the F200. The benefit of continuous power is that once wired correctly, the unit will power on and off with your automobile. Another great feature made available after hardwiring is parking monitoring. The F200 will monitor for incidents even when the car is powered off. If the F200 detects any movement while parked it will start recording. The best part of this feature is that the unit will monitor your car’s battery life as well, making sure that is never dips below a predetermined voltage. If the battery’s voltage drops to that point, the F200 automatically shuts off.

Performance

Once I had everything mounted, synced, connected, and adjusted to my liking the F200 did what all great technology should do, it disappeared. The unit dutifully powered on every time I started my car, recorded every trip I made, and then shut off when I exited the car.

When I downloaded my first few videos to check the camera’s quality, I was really impressed with the amount of information that was recorded as well as the stunning video quality. Because I was using the GPS module, the F200 takes note of my car’s location as well as my speed, marking my trip with a tracking dot on Google Maps during playback. Additionally, the F200 unit itself has a built-in accelerometer recording the X, Y, Z axes of my car during all trips.

Accessing the videos on the F200 was as easy as connecting my cellphone to the unit as I did in setup and downloading what I needed. The F200 records videos in one minute blocks and then writes over the oldest videos once the SD card is full. You can also access the videos by popping the SD card into your Mac or PC and using Thinkware’s desktop app.

Check out a sample video recorded by my F200. The front facing dash cam mic picks up a lot of wind noise from open windows in addition to whatever is going on in the car’s interior.

What I like

  • Excellent build quality
  • Easy Initial Setup
  • Reliable performance
  • Great, stable companion app
  • 16GB Micro SD Card included

What needs to be improved

  • Documentation confusing and lacking in specifics
  • Some extra features like parking monitor only available if hard-wired
  • Rear-view Camera, GPS, and Hardwiring Kit cost extra

Final thoughts

I really like the Thinkware F200 Dash Cam, especially after adding on all of the accessories needed for it to be fully functional. The base F200 is definitely worth the $139.99 price tag though, and gives you plenty of built-in features. What’s great about the F200 is that you have the option to build it out and add accessories as you need them. As dash cams become more popular and affordable, this would make a great first dashcam for someone just getting their feet wet with this relatively new technology.

Price: $139.99 for the F200 Dash Cam only, $39.99 for External GPS, $49.99 for Rear-view Camera, $29.99 for Hardwiring Kit
Where to buy: Thinkware and Amazon
Source: The sample of this product was provided by Thinkware.

Filed in categories: Reviews

Tagged: ,

Thinkware F200 Dash Cam review originally appeared on The Gadgeteer on October 29, 2018 at 11:00 am.

Note: If you are subscribed to this feed through FeedBurner, please switch to our native feed URL http://the-gadgeteer.com/feed/ in order to ensure continuous delivery.

Soul Electronics Run Free Pro BIO Bluetooth headphones review

REVIEW – I normally only run for two reasons: to get away from something or for exercise. In this case, it’s running for the exercise and health is the reward.

But it takes motivation and determination to get out and run. You have to be your own personal coach to get yourself motivated and moving.

But what if you had someone, or something, to push and encourage you on your running, and all the while, keeping track of your progress?

Well, look no further because with the Run Free Pro BIO headphones from Soul Electronics, now it is possible.

What is it?

The Run Free Pro BIO  headphones are Soul Electronic’s first A.I Earphones with GAIT Analysis technology to monitor  your running form and give real-time voice coaching.

With the Beflex BiomechEngine® app, it tracks your running form using GAIT Analysis technology. The real-time voice coach informs you on how you are running and if you need improvement in certain aspects of your running.

And you are able to review your results with the help of the app.

What’s In The Box?

The headphones come with several sizes of eartips and earlocks. It also comes with a zippered carrying case, USB cable,  cable managers, User Guide, and pamphlet.

Design and Features.

The Run Free Pro BIO are Bluetooth 4.1  headphones that are rated  IPX5 water-resistant with weatherproof  Nano coating. It comes with a special LED safety light so that you can be easily visible to everyone at night. The headphones feature an long 11 hour battery life and fully charged within two hours.

What I like

  • Safety LED Light
  • Real-time voice coaching
  • Even weight distribution and symmetry of headphone wires
  • 11 hour battery life
  • Sound quality
  • Able to connect to two devices via multi-point technology

What needs to be improved

  • Micro USB door seems flimsy
  • Bulky earbuds
  • Bluetooth only 4.1 and not 5.0

Please watch the video below for my full review on the Run Free Pro Bio Headphones from Soul Electronics.

Final Thoughts

I really enjoyed using these headphones. At first, I thought that the voice coaching would be annoying to have to hear someone “coaching” me in my headphones while I ran. In the end, it actually helped me in keeping proper form when running. And it didn’t annoy me as I thought it would. I actually looked forward to hearing any feedback that would help me in my running form. Having the voice prompts in real-time reassures me that the Soul FIT app is monitoring me right at that moment I am running.

The ability to see the results after my run was both educational and entertaining. Plus, seeing my results makes me want to run better and improve my running performance.

Those results are something I wouldn’t have known by myself. So, it’s good to know that I have a “coach” looking out to help me improve my running.

Price: $149.99
Where to buy: Soul Electronics
Source: The sample for this review was provided by Soul Electronics.

Filed in categories: Reviews

Tagged: ,

Soul Electronics Run Free Pro BIO Bluetooth headphones review originally appeared on The Gadgeteer on October 29, 2018 at 9:00 am.

Note: If you are subscribed to this feed through FeedBurner, please switch to our native feed URL http://the-gadgeteer.com/feed/ in order to ensure continuous delivery.