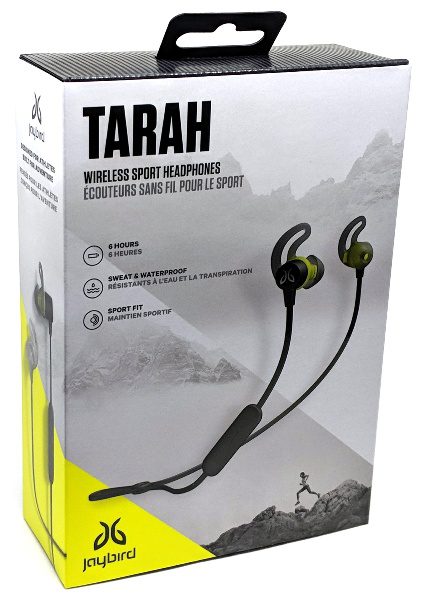
 REVIEW – Jaybird recently came out with a couple of new in-ear headphones, one of which were the Jaybird Tarah Wireless Sport Headphones. I was excited to try them out because I’ve had such a good experience with the Jaybird X3 Wireless Bluetooth Headphones over the past year and a half. I think that my favorite things about the X3s are that you can save a custom equalizer (EQ) preset to the earbuds using the Jaybird app and that they play for a little over seven hours.
How do the Tarah headphones stand up to the X3 headphones? Well, for the most part, they are quite good. They use the same Jaybird app which allows you to save a custom EQ setting to the headphones just like the X3’s and have fabulous Bluetooth range and connectivity. However, the playing time is about five hours and forty minutes when set at a moderate volume level. In addition, the current app for Android freezes and crashes frequently on my Pixel 2 XL phone.
What is it?
The Jaybird Tarah Wireless Sport Headphones are an in-ear pair of Bluetooth 5.0 headphones which are great for athletes because they are IPX7 rated (good for running in the rain and handling perspiration well, but not for swimming, showering, pool water, or ocean water).
Hardware specs
AUDIO
Type: In-ear style
Noise-isolation: Passive
Impedance: 16 Ohm
Speaker sensitivity: 99 +/- 3dB at 1KHz
Output max. 10mW RMS (with level limit)
Total harmonic distortion <5% (1KHz, 1mW)
Audio format: 16-bit stereo
Codec: Bluetooth SBC implementation
Response bandwidth: 20Hz – 20kHz
Driver size: 6 mm
BLUETOOTH
Bluetooth version: 5.0
Frequency band: 2.4 GHz
Profiles: Handsfree, Headset, A2DP, AVCRP, SPP
Wireless range: Class 2 standard range 10m/33ft
INTEGRATED MICROPHONE
Type: MEMS, omnidirectional
Sensitivity: -38dB +/- 1dB (Test conditions: 1KHz, 0db = 1V/Pa)
COMPATIBLE PRODUCTS
Any Bluetooth device with HFP, HSP, and A2DP
WEIGHT & DIMENSIONS
Headset: 528mm x 13.25mm x 23.6mm
Controller: 45.7mm x 11.7mm x 5.6mm
Charger: 112mm x 33.6mm x 7.2mm
Weight of headphones (without eargel): 13.85g
Weight of charger: 6.5g
BATTERY
Playtime: 6 Hrs*
Charging time: 2+ Hrs
Quick charge: 10 min = 1+ hour playtime
Charging: Via USB charging cable with Pogo pin connector
Input power: DC 5V 1A
Type: Lithium Ion
Battery voltage: 3.8V
Energy voltage in watt hrs per battery: 0.2wh
*May vary depending on usage, device & aging
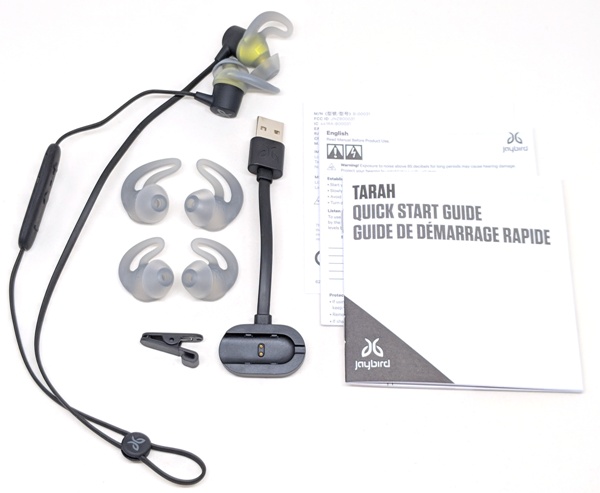
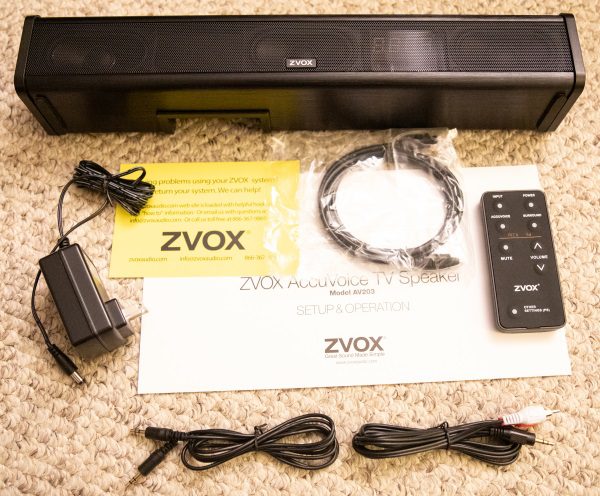
What’s in the box?
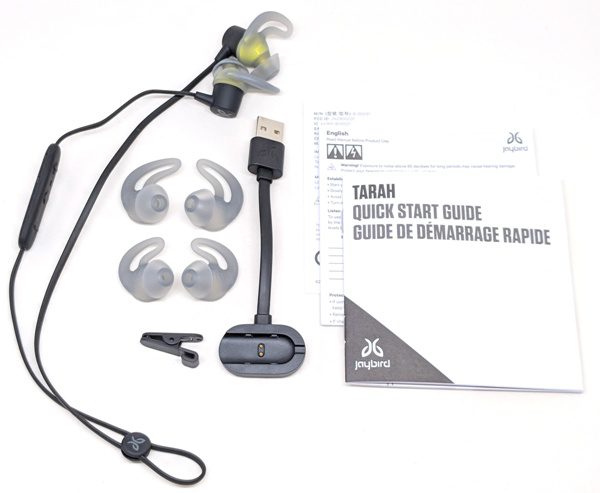
- Jaybird Tarah Wireless Sport Headphones
- Ear gels (SM/MD/LG)
- Charge cradle with integrated cable
- Shirt clip
- Cord speed cinch
- Quick Start guide and safety information (here’s the online User Guide)
- There’s no carrying case!
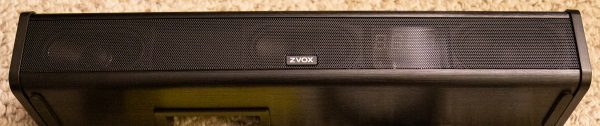
Design and features
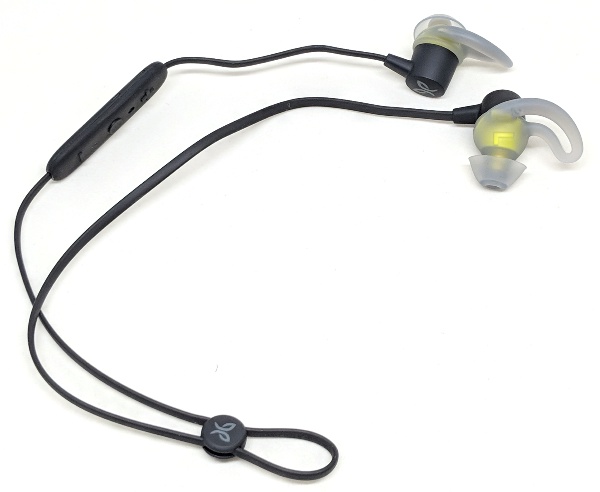
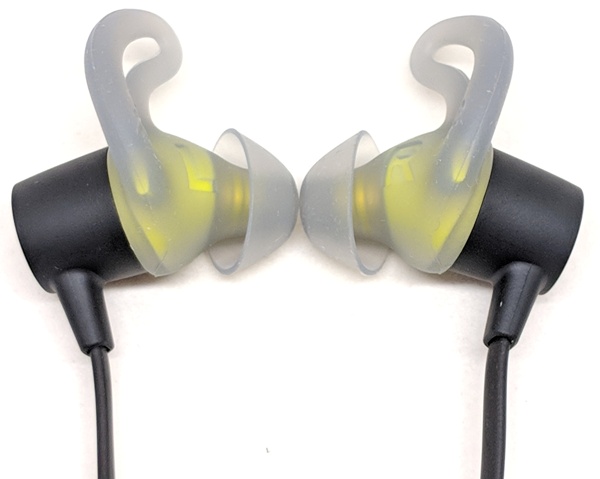
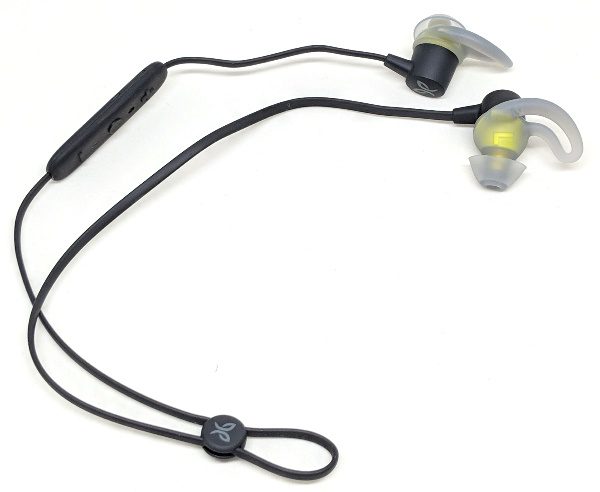 The Tarah Sport Headphones are made up of plastic earphones, silicone ear gels (no memory foam ear tips included), flat silicone covered wire, a plastic in-line remote with silicone buttons for controls, and a plastic sliding cord cinch to adjust the cord slack between the earpieces.
These Bluetooth 5.0 headphones are sweat and weatherproof (IPX7) which means you can wear them in the rain, mud, outdoors and when you get sweaty. NOTE: They are not for swimming, showering, pool water, or ocean water. The charging cradle is not water resistant so be sure to dry your headphones before attaching them to the cradle for charging.
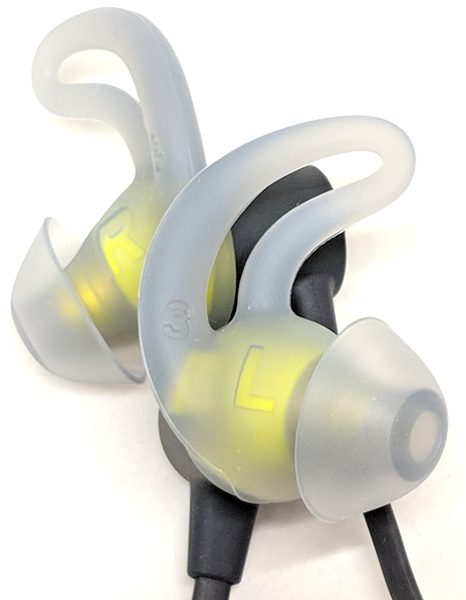
Also, according to the documentation, they are supposed to provide up to six hours of playtime. They also have calling features. 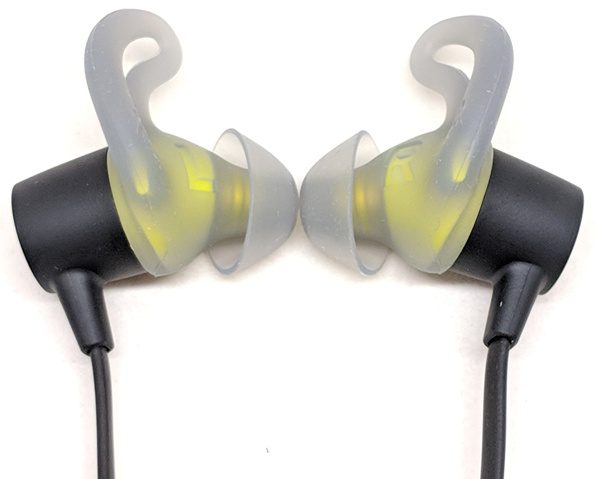 Each ear gel is labeled “L” (left) or “R” (right). Notice how each of the ear “fins” is curved inward toward your head (if you were wearing them). Also, notice that each ear gel integrates the ear tip and ear “fin” (or “wing”) into one piece instead of two separate pieces per earphone.
 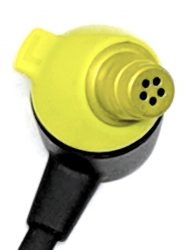 The yellow portion of the earpiece has a tab (labeled “L” or “R”) that helps to position the ear gel correctly when placing it over the earphone.
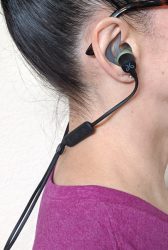
 In the above photo, you can somewhat see the yellow tab on the earphone that is positioned inside the base of the ear gel’s “fin”. Each ear gel is also labeled 1, 2, or 3 to indicate its size (small, medium, or large).
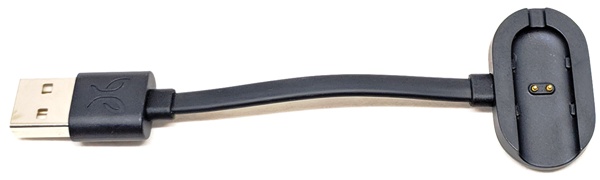
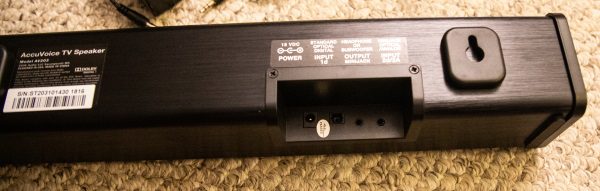
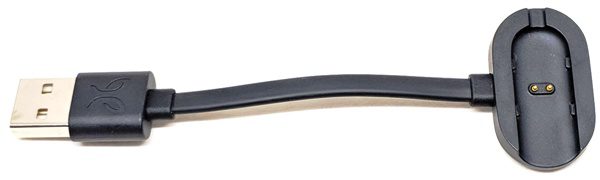 Unfortunately, the Tarah headphones like other Jaybird headphones, have a proprietary charging cradle instead of the standard micro-USB or USB-C charging cables that would make charging easier and more convenient.
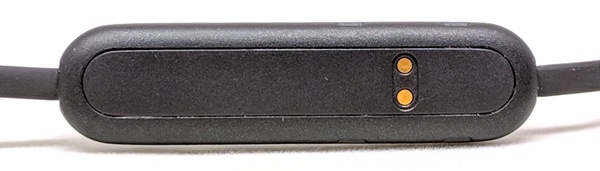
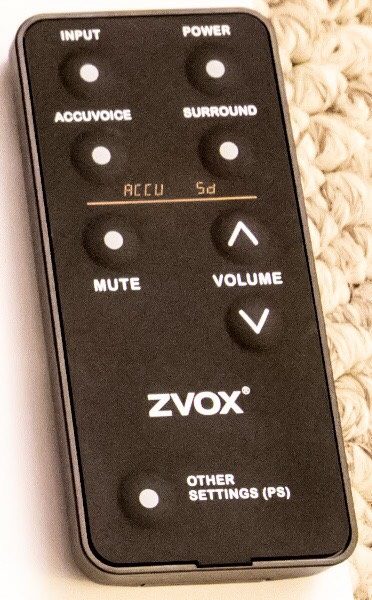
One improvement that Jaybird made to the charging cradle is that it now has a curved indentation that makes inserting the in-line remote easier. 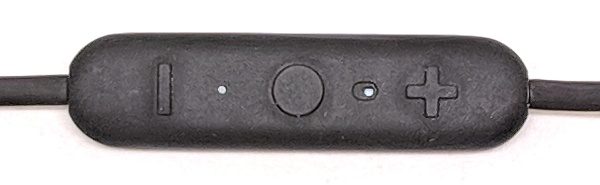 The headphones’ in-line remote contains (from left to right): the Volume Down button, LED status light, Middle button, microphone, and Volume Up button.
 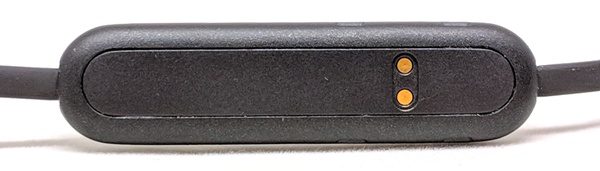 The back of the in-line remote contains the contacts for charging the headphones.
  The two indentations on the sides of the in-line remote are provided to help you to properly line up the remote on the charging cradle.
 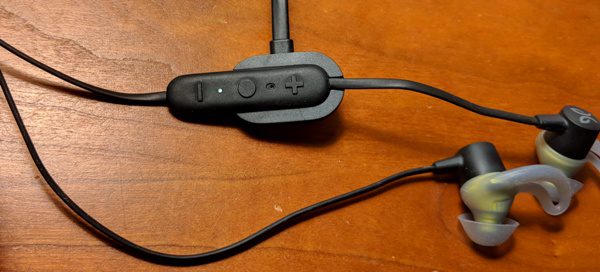 While the headphones are charging, the white LED light flashes slowly. When they are fully charged, the LED light remains on.
Setup
 Pairing
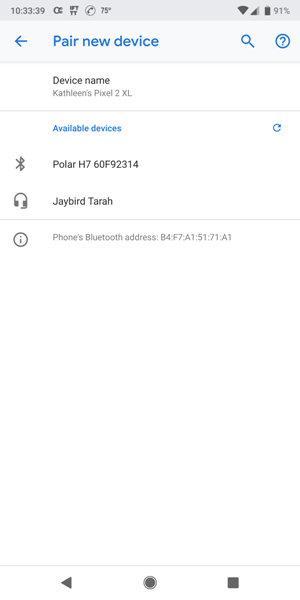
I paired the Jaybird Tarah headphones with my Pixel 2 XL phone (running Android 9). To do this I first made sure that Bluetooth was turned on in my device and then tapped on “Pair new device” (you do this last step if you are using Android 9). Then, with the Tarah earbuds completely off, I long-pressed the Middle button (center button on the in-line remote) for a total of about six seconds to put them into pairing mode.
While I was holding the Middle button, I heard the power-on tones which were a series of ascending temple block notes (a percussion instrument), a female voice prompt which said, “Battery [%] charged”, more temple block notes, and then another voice prompt that said, “Ready to pair. Download the Jaybird app for an assisted setup.” The white LED status light blinks quickly when in pairing mode. I then went back into my device’s Bluetooth settings (or Connected device settings in Android 9) and tapped on the newly discovered Jaybird Tarah headphones, after which I heard additional temple block tones, and finally, a voice prompt which said, “Connected.”
I also performed this pairing procedure on an iPhone 7, iPad Mini 4, and iPod Touch 6G too and there were no issues.
The Tarah headphones can be actively connected to two devices at the same time (multipoint connection) and will remember up to eight devices. When powered on, they will connect to the most recently connected device.
Resetting the headphones
If you have problems with device pairing or connections, you can reset your Tarah earphones. I tested this. I first removed them from my Bluetooth settings (or Connected devices settings) by tapping on the gear icon next to the name of the headphones and then selecting “Forget this device”. I then powered off the earphones and then put them back into pairing mode as described earlier. While in pairing mode, I double pressed the Middle button to reset them. The LED flashed red once and the earbuds shut off and then immediately powered back on in pairing mode.
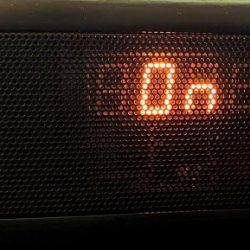
Powering on/off
To power on the headphones, I needed to press and hold the Middle button for about three seconds, after which I heard a series of ascending temple block notes (power-on tones) and the LED flashed white once. Interestingly, there is no way to tell when the headphones are powered on because the LED light does not stay on nor does it flash.
These headphones have an Auto off feature, the timing of which can be adjusted in the settings of the Jaybird MySound app (more on that later). My headphones were set to automatically turn off when idle for 15 minutes, but I noticed that the auto-shutoff times varied between 15 minutes and just over 30 minutes. I’m not sure why.
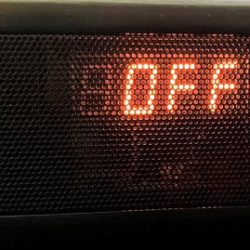
To power off the headphones, I had to press and hold the Middle button for two to three seconds after which I heard a series of descending temple block notes (power-off tones) and the LED flashed red once.
Performance
Bluetooth Connectivity
I tested the distance at which Bluetooth connectivity was maintained and found that it was 95+ feet in line-of-sight of my Pixel 2 XL and iPhone 7.
I also found that I was able to listen to my earbuds with FOUR walls separating me from my connected device without drops or interruptions. That’s impressive.
I did have some connectivity issues when I was using the Tarah earbuds with my iPod Touch 6G. The connection was dropped several times within a period of an hour when my iPod was only a foot away from my Tarah headphones (Bluetooth was shut off of all my other devices). This did not occur while I was using my Pixel 2 XL, iPhone 7, or iPad Mini 4.
Fit
The Tarah headphones fit a bit better than the X3s, perhaps because of the silicone ear gels that came with the Tarah earphones. The ear tips of the ear gels flare out more providing a better seal than the ear tips that came with the X3s. I ended up using the largest size ear gels on the Tarah earbuds – size 3. It is important to note that you may have to use different sized ear gels for each ear to get the right fit for you. Unfortunately, the Tarah headphones do not come with memory foam ear tips – just the silicone ear gels.
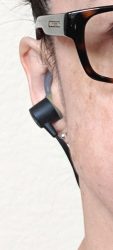
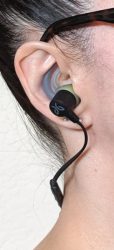
You can only wear the Tarah headphones in the under-ear position using the Tarah ear gels as shown in the photos above. It just so happens that I prefer the under-ear position.
However, if you prefer the over-ear position and you happen to have separate ear tips and ear fins from other headphones (in my case Jaybird X3 and MPOW Swift), you could try to use these on your Tarah earbuds. I tried using my old X3 and MPOW Swift ear tips and fins on the Tarah headphones and they worked fine, although the Tarah earphones are a little larger than my X3s and thus required me to stretch the round portion of the X3’s ear fins quite a bit to get them to fit over the tabs of the earphones. But it worked and I could wear the earphones in the over-ear position just like my X3 earbuds (to see how to set them up in the over-ear position, go to the Jaybird MySound app > Menu > How to Guides > X3 Guide > Fit > Over-Ear Fit).
In addition, if you don’t like the idea of using the cord cinch that comes with the Tarah headphones and you prefer the cord clips that came with the X3 earbuds, those clips will fit on the Tarah headphones.  The Tarah headphones also come with a shirt clip.
Comfort
I find that the headphones are comfortable to wear for up to two hours or so, at which time my ears start getting sore from the ear fins. When that happens, I pop out the fins while leaving the earphones in my ears (this works as long as I am not exercising). This allows me to wear them for many more hours.
The headphones also stayed in my ears very well while doing high impact workouts as long as I tucked the ear fins into my outer ears.
Jaybird MySound app
This app works only with Jaybird Freedom, Freedom 2, X3, X4, Run, and Tarah headphones. The above screenshots were taken from my Pixel 2 XL (left) and my iPod Touch 6G (right). All of the rest of my screenshots for this review come from my Pixel 2 XL.
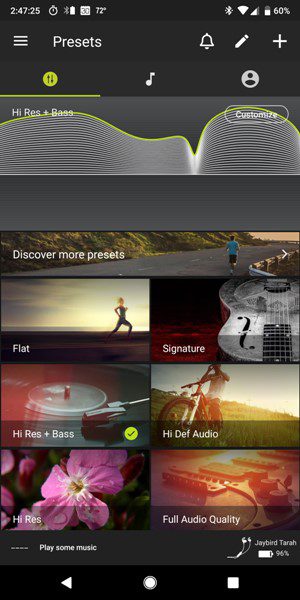
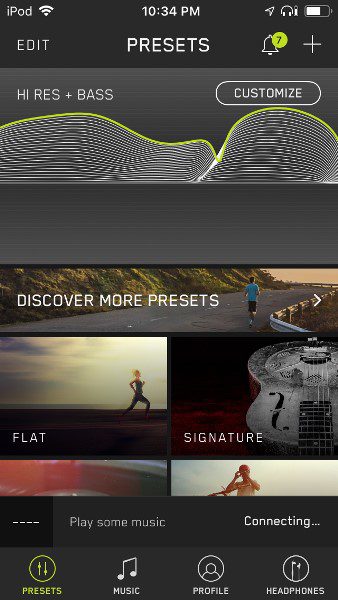
Dashboard: The MySound Dashboard contains the following (starting at the top left of the app): menu (three-line menu icon), notifications (bell icon), edit the dashboard (pencil icon), and add new preset (“+” icon). It also has three tabs just below the aforementioned icons: your saved presets (equalizer icon), music (music note icon), and your profile information (profile icon).
When you launch the app, the default dashboard shows your current EQ preset frequency response curve beneath the tabs. You can further customize that preset by tapping on the “Customize” button to adjust your frequency preferences.
Beneath the current EQ preset frequency response curve, there are several tiles: “Discover more presets” and then each of your saved presets.
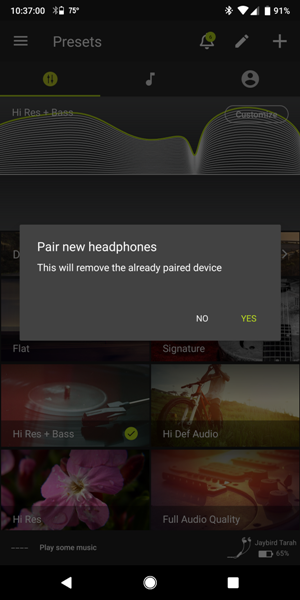
I already had the MySound app on my Pixel 2 XL and iPod Touch 6G. However, I needed to connect the Tarah headphones to the app in order to customize the earbuds. To do this on my Pixel 2 XL, I tapped on the Menu icon located in the upper left corner of the app dashboard then tapped on “Pair new headphones”. A message popped up alerting me that this would remove the already paired device (my X3s). So apparently, you cannot connect more than one set of headphones to the app at a time. (If I have my X3s powered on and the Tarah headphones off, it will find and connect to the X3s and visa versa).
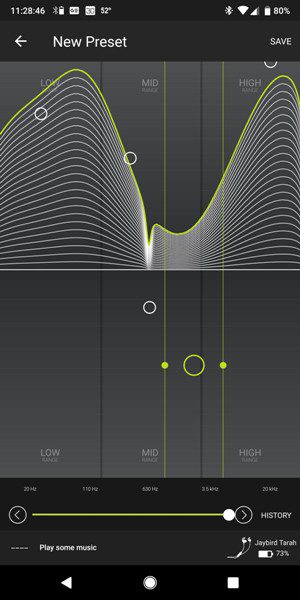
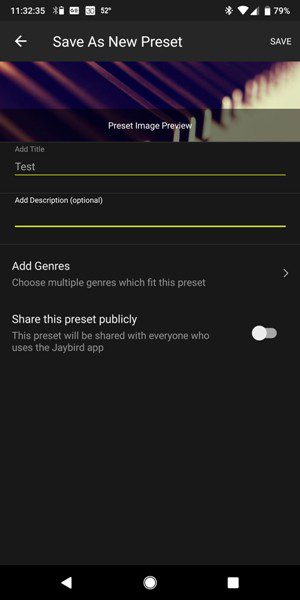
Equalizer tab: Using the MySound app, you can do many things like creating your own equalizer presets. To create my own EQ preset, I tapped on the “+” icon located at the top right of the MySound Dashboard (first screenshot above). The next screen allowed me to adjust the frequencies to the levels that I prefer (middle screenshot above), after which I tapped on the Save button located at the upper right of the screen. I then named my equalizer settings and could add a description, select the music genres that it works best for, and I could select whether or not to share it with other Jaybird headphone users (last screenshot above).

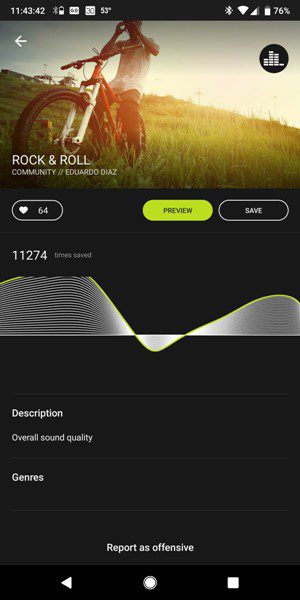
The app also allows you to try out the sound presets created by other Jaybird users when you tap on the “Discover more presets” tile. I could preview others’ EQ presets by tapping on the Preview button (I needed to be playing music to preview) and if I liked it, I could save it to my dashboard.
 Music tab: I never use the music tab (screenshot above) on the dashboard because I do not use Spotify. If you are a Spotify user, this is where you can sample some of the playlists used by other Jaybird headphones users.
Profile tab: The Profile tab allows you to log in or out of the app, change your profile information, and connect to Spotify.
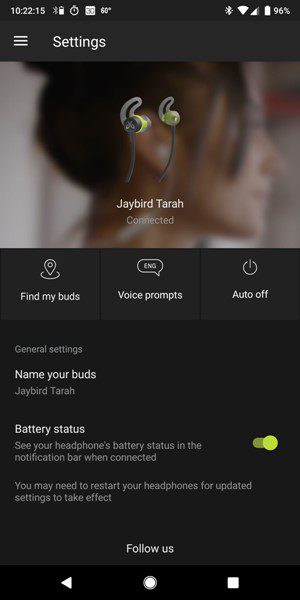
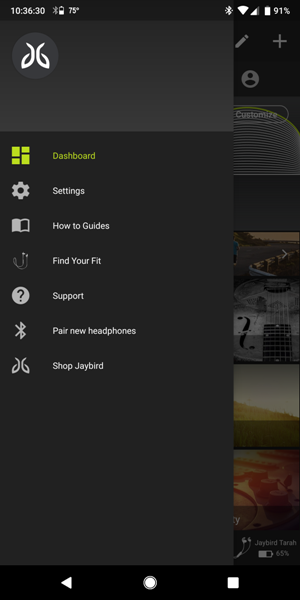
Menu: You can also access the headphone’s settings, how-to guides, find your fit, contact Jaybird support, or even shop Jaybird from the menu of the app (tap on the menu icon on Android devices as shown in the left screenshot above, or tap on the Headphones tab on iOS devices). The settings section of the app (shown in the right screenshot above) contains the following: “Find my buds”, “Voice prompts”, “Auto-off”, “Name your buds”, and “Battery status” settings.
By turning on “Find my buds”, the MySound app provides you with a map to see where they were last used. The “Voice prompts” setting allows you to select “Voice prompts and tones” or “Tones only” for your headphones. This is also the area where you could change the language. When the headphones become idle, the “Auto-off” setting allows you to select “Don’t turn off “, “Turn off after 15 minutes [of being idle]”, or “Turn off after 60 minutes [of being idle]”. And when the “Battery status” toggle button is turned on, it allows Android users to view the headphones’ battery status in the notification bar when connected.
This app is what clearly makes the latest Jaybird headphones awesome – mainly because you can create your own equalizer settings. Since a custom EQ preset is saved directly to the earphones (one equalizer setting is saved to the earbuds at a time), your Tarah headphones will use that preset on all your devices and for all of your music and video apps. Whenever you wish to change the EQ preset on your headphones, all you have to do is open the MySound app, make sure that the app connects to your Tarah earbuds, and then select any of your other saved EQ presets.
I’ve never had any issues with this app until recently. After the latest update, the app gets hung up when tapping on items and also crashes frequently on my Pixel 2 XL. It does work, but I had to launch it a few times to get there. I hope they fix the issue soon because this is what make the Tarah and X3 headphones that I own, great.
Music Controls
The following tests were performed when my Tarah headphones were connected to my Pixel 2 XL phone.
A short press of the Middle button allowed me to play/pause music on Pandora and Google Play Music. However, I needed to use a one-second press of the Middle button (not a short press) in order to play/pause Netflix shows. And I was completely unable to play or pause Amazon Prime Video content using the in-line remote on my Tarah headphones.
A short press of the Volume Up or Down buttons successfully increased or decreased the volume when listening to music or watching streamed movies. The volume buttons were also synchronized with each of my devices. While listening to music, a one-second press of the Volume Up button skipped ahead a song and a one-second press of the Volume Down button skipped back a song.
Playing Time
The playing time of the Tarah headphones was a little less than I expected. The documentation states that the headphones will play for six hours on one full charge. I generally listen to all my media at a moderate (middle) volume level which allowed me to play only about five hours and forty minutes of music or videos on one full charge of my Tarah earphones.
Charging
The Tarah User Guide on the Jaybird MySound app states that it takes 1.5 hours to fully charge the headphones. It also states that you should never use a charger that uses more than 5.5V which will damage the earbuds. I found that when connected to an Aukey multiport desktop charger (5V/2.4A max – variable power output according to the device’s needs), I was able to fully charge my Tarah headphones in a little over 1.5 hours (one hour and forty minutes). Although this was a little more time than stated in the user guide, it was acceptable to me.
NOTE: Ten minutes of charging provides one hour of play time according to the documentation. In my tests, ten minutes of charging time provided one hour and ten minutes of playing time.
Calling Features
According to the “How to guide” in the MySound app for the Tarah earbuds, they include the following calling features: “Switch a call”, “Accept/End Call”, “Mute/Unmute”, “Decline a Call”, and “Redial”. However, the printed Tarah Quick Start Guide that shipped with the headphones does not include “Switch a call”, “Mute/Unmute” and “Redial”. I tested all of the features according to the app’s guide.
The only calling features that worked for me were the “Accept/End Call” and “Decline a call” features (it would appear that the printed guide is the correct guide). When I received a call, a short press (less than one second) of the Middle button answered/accepted the call while another short press of the Middle button ended the call. A one-second press of the Middle button declined an incoming call.
My tests of all the other calling features obviously failed (because they don’t exist?). The app’s how-to guide stated that a short press of the Volume Up button would allow you to switch between calls and the short press of the Volume Down button would mute/unmute calls. Guess what happened when I short pressed the Volume Up and Down buttons while on a call? That’s right, it increased or decreased the call volume accordingly. Surprise! I could not get the “Switch a call” or “Mute/Unmute” features to work no matter how long or short I pressed the buttons, apparently because these headphones do not have those features.
Also according to the app’s guide, to redial the last number, I was supposed to be able to short press the Middle button twice. What did it actually do? It launched my Google Assistant. “Hey, Google! How’s it goin’?”
At least I can say that the call audio quality was very nice on both ends. My callers could not tell whether I was using my earbuds or not and they sounded crystal clear on my end.
Audio Quality
The factory setting of the Jaybird Tarah headphones seemed to me to be decent, although they lacked the stronger bass that I prefer. So, of course, I opened up the MySound app to try out some different EQ settings. Whenever I tap on a preset on my dashboard, it saves it to my earphones (the headphones need to be powered on). And if I want to listen to music using a different EQ preset, all I have to do is open the app, make sure the app connects to my Tarah headphones, then select another preset in the app. The last preset you select is the one that is saved to the earbuds and used for all of your music and videos on all of your devices until you select another in the app. This is my absolute favorite feature about the latest Jaybird headphones. Every person tends to like different equalizer settings, so why don’t other headphones have this awesome feature?
Anyway, after selecting the “Hi Res + Bass” preset that I typically use with my X3s (this is my very slight alteration of Colton Tate’s Hi Res preset), I found that the audio quality went from “decent” to “perfect” (a non-audiophile opinion). After choosing this preset, all frequencies were crisp and clear and the bass was fuller, giving the music more depth and making it sound more complete, I was able to thoroughly enjoy all different kinds of music (classic rock, blues, jazz, classical music, pop, electronica, etc). I listened to the Vikings main title theme “If I Had a Heart” (the vocals shine), the pop/dance song “Salute” by Little Mix (the bass is awesome), the big band song “Moonlight Serenade” by BBC Big Band Orchestra (it was sweet and clear), and “Don’t Bring Me Down” by Electric Light Orchestra (it was just plain fun) all using the Hi Res + Bass preset and loved them all.
While using the headphones to listen to music or watch videos, I did not experience any lag when using the earbuds with my Android or iOS devices. This was nice because I had some lag issues with the X3s when they were connected to my iPod.
There was one thing that I noticed while using my Tarah headphones (as I mentioned before), they tended to disconnect and reconnect to my iPod several times within an hour when listening to music or watching streaming video. This did not happen on my Pixel 2 XL, iPhone 7, or iPad Mini 4.
What I like
- I am able to create my own equalizer presets and save one to my headphones.
- I can change the EQ preset saved on my headphones at any time using the MySound app.
- The audio quality is great after having saved my favorite preset to the headphones, making all music enjoyable.
- The Bluetooth range (95+ feet in line-of-sight) and connectivity (maintained through FOUR walls) is fantastic.
- The headphones charge fairly quickly (one hour and forty minutes).
What needs to be improved
- The current MySound app (ver. 3.0.0) for Android freezes and crashes a lot on my Pixel 2 XL.
- The headphones use a proprietary charging cradle.
- There is no carrying case provided.
- The headphones run only for about five hours and forty minutes.
- The headphones have only basic calling features (accept/end call and reject a call).
Final thoughts
The Jaybird Tarah Wireless Sport Headphones are my second favorite Bluetooth earbuds, just behind my X3s. The MySound app (when it works) is the reason I enjoy using them because I can create and select my own equalizer preset(s) and save it directly to the earbuds. I can change the preset whenever I want to by opening up the app and choosing another preset which is then saved to the headphones. Because of this, all genres of music sound great.
The headphones’ music controls work well when using several different apps on my devices (although not on Amazon Prime Video), the Bluetooth range and connectivity are fantastic, and the charging time was pretty fast (about one hour and forty minutes to fully charge). They were also comfortable to wear for up to two hours or so and stayed in my ears very well while doing high impact workouts.
There were a few things I didn’t like about the Tarah Sport headphones. The current MySound app (ver. 3.0.0) for Android keeps crashing on my Pixel 2 XL. The earbuds also use a proprietary charging cradle that can easily be lost, and they don’t come with a carrying case. In addition, the playing time is fairly short (about five hours and forty minutes). I guess I’m spoiled by my X3’s playing time (over seven hours).
The Jaybird Tarah Wireless Sport Headphones are kind of expensive ($99), but since you can create your own EQ presets and save them to your earbud to be used across all your devices, well, that’s huge to me. Thus, I would definitely purchase them just for that reason despite the aforementioned problems (I expect that they will correct the app crashing problem in the next update).
Price: $99.00
Where to buy: Jaybird or Amazon
Source: The sample of this product was provided by Jaybird
Filed in categories: Reviews
Tagged: Bluetooth headphones
Jaybird Tarah Wireless Sport Headphones review originally appeared on The Gadgeteer on November 1, 2018 at 9:00 am.
Note: If you are subscribed to this feed through FeedBurner, please switch to our native feed URL http://the-gadgeteer.com/feed/ in order to ensure continuous delivery.