Bellroy 13-inch Laptop Sleeve Extra review

Like you, I have a sizable investment in my gear so I am always on the lookout for anything that helps me protect that investment.  And I choose bags and sleeves like I choose my clothes – smart, stylish and functional always attracts my attention.  Bellroy – a company I have known more for their wallets than any other type of product – has a laptop sleeve that satisfies my first two requirements, but how well does it do with my third – functional?  Read on to find out. 

Fit and Function

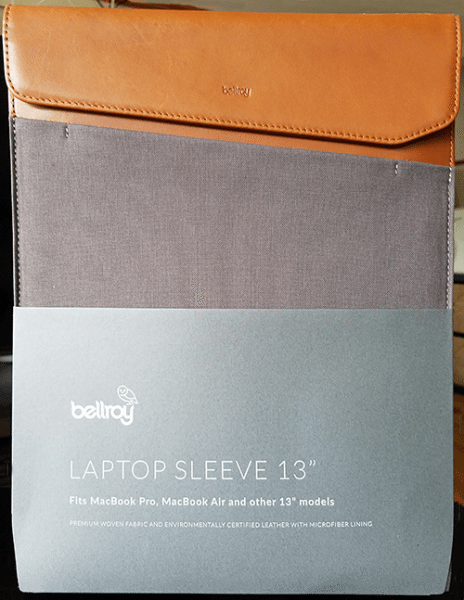
The first thing to catch my eye with the 13-inch Laptop Sleeve Extra is the color and material combination.  I personally think the combination of leather and a canvas-type material can be very business-like and on this sleeve the combination is stunning.  The sleeve I received to review is the Warm Grey Woven version, a tan leather with a medium gray body.  This color combination nicely accents the black leather Tumi bag I carry my laptop in.  The sleeve also comes in a Charcoal Woven (black leather accent with a darker gray body) and Teal Woven (medium gray leather with a teal body) in case you are a taste hipper (or not) on the color scale.

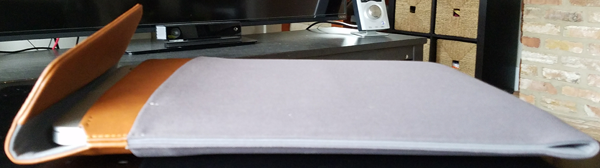
The sleeve is well made.  The stitching is tight and no loose threads.  There is a very small and subtle stamp of the company name on the top flap so you don’t feel like a walking billboard.  On the back of the leather accent, there is an imprint of the owl logo for the company.  Personally, I would like that in reverse, but if the name is going to be front and center at least it was done nicely and with style.  There is a magnetic catch to hold the case closed and under the top flap there is a very small pocket.  More on that in a minute.  The interior of the sleeve is lined with a microfiber and the bottom of the sleeve has about a 1.5-inch opening.

Depending on the task and the client, I switch frequently between an early 2015 13 inch MacBook Pro Retina, a Microsoft Surface Pro 4 (12.3-inch screen) and Microsoft Surface Book (13.5-inch screen).  According to the information on the front of the package, the sleeve “Fits MacBook Pro, MacBook Air, and other 13 inch models”.  Going in, my expectations were that the MacBook and the Surface Pro would fit nicely and the Surface Book would be questionable.  I started with the first on the list, the MacBook Pro.

MacBook Pro Retina

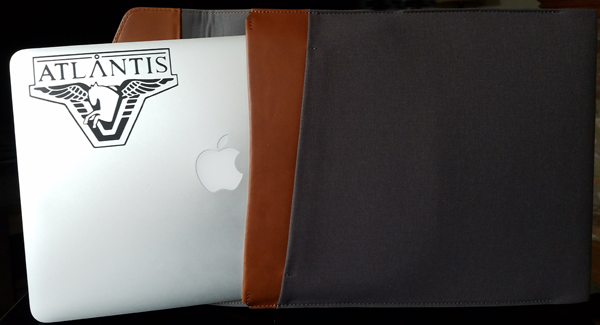
I would have thought that having been called out specifically on the packaging this would have been without question the one that worked.  And I was wrong.  No matter what I did, I could not get my MacBook in the sleeve and get the flap to lock in place with the magnet.  When inserting the laptop I could get it about a third of the way in reasonably easily, but the remainder took quite a bit of effort as did removing the laptop from the sleeve.  To be fair, I would hope that over time this would become easier, but I tried this 10 times and each time it was just as difficult as the time before.  I have a decal on the front of my MacBook and a few times the friction from removing the laptop caused a part of the decal to come off.

The bigger problem, though, is that when fully inserted the protective flap just can’t close over the top let alone get to a place where the magnet can engage.  As you can see in the second picture above, it looks like it should close, but the laptop is just too thick for the sleeve to handle.  And that is where the second problem comes in – the front pocket.  There is a pocket on the front of the sleeve that is just below the leather trim (where the other part of the magnet is located).  At just 6 inches deep, I am not entirely sure what you can store in there – it is too small for an Apple power supply or most mice, and it definitely will not hold papers or writing tools.  Plus, when a thick laptop like the MacBook Pro is in the sleeve, anything in the pocket will protrude from the front of the sleeve.  There will also be a gap at the opening of the pocket that will serve as a scoop to collect anything rattling around inside a larger bag.

So, on to the Surface Pro 4…

Microsoft Surface Pro 4

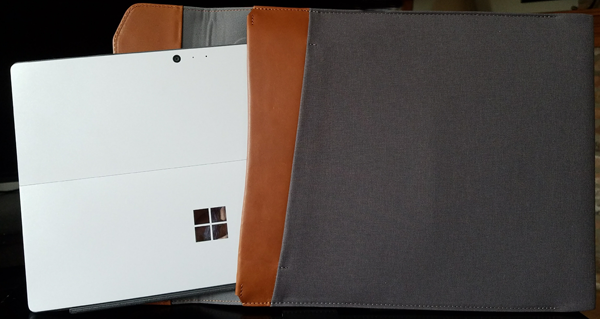
My Surface Pro 4 is slightly thinner and smaller than the MacBook Pro, and it is better suited for this sleeve.  The tablet hybrid fits snugly all the way in the case and the flap locks nicely in place.  When secured, the Surface is protected all the way around except, as expected, at the opening at the bottom.

The tablet is easy to put in and remove from the sleeve, so in this case, the sleeve passes my third test.

The unique hinge on the Surface Book simply laughed at the sleeve and suggested the ridges on the hinge would rip the stitching out of the sleeve.  Since it wasn’t really made for this device, I passed on the attempt.

Final Thoughts

So the Laptop Sleeve Extra is smart, stylish and in the case of the Surface Pro, functional.  Is it a value for the money, though?  At $139.95 retail for the 13″ version, it certainly is pricey.  It is made from quality materials and feels well made, but in my opinion not actually worth the price tag especially since it fails at the thing it tells you it does best – fit the MacBook Pro.  It protects my Surface Pro in my daily carry bag, but I am not willing to pay the “style tax” that goes along with owning this.  At a more reasonable $99.95, I would be an enthusiastic customer.

Source: The sample for this review was provided by Bellroy.  For more info visit their site and Amazon to order.


Product Information

Price: 12 inch: $129.95; 13 inch: $139.95; 15 inch: $149.95
Manufacturer: Bellroy
Retailer: Amazon
Pros:
  • Stylish
  • Well-made
Cons:
  • Pricey
  • Fails at its primary mission – the MacBook Pro

Filed in categories: Cases and Covers, Reviews

Tagged:

Bellroy 13-inch Laptop Sleeve Extra review originally appeared on on February 27, 2017 at 8:30 am.

Note: If you are subscribed to this feed through FeedBurner, please switch to our native feed URL http://the-gadgeteer.com/feed/ in order to ensure continuous delivery.

Prynt case review

In this day and age, it’s nice to still have physical copies of favorite photos to have something tangible to look at on your desk or wall. Prynt brings a polaroid type experience by printing photos straight from your phone. It will also replay a video if you hold your phone over the photo with the Prynt app. Let’s take a look at this nifty case!

I received the Prynt case in white, along with a pack of Zink paper (a special inkless photo paper), instructions, and a microUSB cable to charge the case.

The Prynt case is compatible with the following smartphones:

  • iPhone 6/6S
  • iPhone 6/6S Plus
  • iPhone 5/5S/SE
  • Samsung Galaxy S5

My iPhone 7 Plus wasn’t listed on the compatibility list, but I was lucky and found it to work just fine!

I made sure to charge the Prynt case with the MicroUSB cable. It only took a couple of hours to fully charge, then I was ready to go. I added the Zink paper into the hatch, which fit one ten-pack at a time.

I had to press this side button to get my iPhone into the case.

Here’s the back of the case with lightning port.

The iPhone 7 Plus fit very snugly into the Prynt, but I had to remove my own iPhone case.  It made me a bit nervous to push in, but then I realized I was able to remove the “top” portion of the case by pressing against the two latches, and then snapping the cover back in.

Here I used the Prynt case with the super thin Totallee case, which I’m reviewing soon. It doesn’t sit well, so I recommend to just remove any case altogether.

After downloading the Prynt App from the iOS store, I connected the Prynt case by hitting the shutter button, and it connected automatically.

Here’s a screenshot of what the Prynt app shows you when taking a photo. You can mail a Prynt, physically print it, or edit the photo.

When printing the photos, it comes out of the case near the top of the phone. It’s similar to a Polaroid camera, but the nicer since the photo is printed right away, instead of having to wait for the photo to develop.

I found that when printing my photos, the colors were a bit “washed” out, and not very accurate to what’s on screen. It’s not terrible, but not great.

Here I was playing with the built in photo editor in the Prynt app. They have basic effects such as adjusting light, color and hue, as well as fix redeye, and adding text to the print.

You can do some freehand drawing right on the photo before printing.

You can also create your own memes.  This is the best I could do for this coffee setup. 🙂

There is a cool feature within the Prynt app where it can record a short video while you’re taking a photo. That six second video that was recorded after the shutter press is actually embedded into the photo. The video plays on the photo itself in augmented reality style when you hold the Prypt app over the physical photo. It’s like AR (Augmented Reality) with your own printed photos and the Prynt. More can be seen on their own website via the “how it works” link.

Overall, I had fun using the Prynt case. I printed a few shots and gave them out to my friends at a party, which was fun, but having the phone in the Prynt case was a pain since it’s so bulky.  I think I’d rather have a thinner case or separate printer. I’m going to guess that the next revision of the Prynt will be thinner, and hopefully, the quality of the photos will be better. For now, it’s a lot of fun to have at gatherings and nice to have a physical print of your favorite photos.

Source: The sample for this review was provided by Prynt. Please visit their site for more info and Amazon to order.


Product Information

Price: $149.99
Manufacturer: Prynt
Requirements:
  • iPhone 6/6S
  • iPhone 6/6S Plus
  • iPhone 5/5S/SE
  • Samsung Galaxy S5
Pros:
  • Fun to use
  • Never failed to connect
Cons:
  • Huge in size
  • Photos look washed out and not accurate to digital version

Filed in categories: iOS, Reviews

Tagged:

Prynt case review originally appeared on on February 26, 2017 at 9:45 am.

Note: If you are subscribed to this feed through FeedBurner, please switch to our native feed URL http://the-gadgeteer.com/feed/ in order to ensure continuous delivery.

Ably Apparel with Filium review

Do you enjoy doing laundry? If you answered yes, then click the back button on your browser because this isn’t a review that you need to read. But if you answered no, then stick with me because Ably Apparel with Filium might have the perfect shirts, hoodies, and sweatpants for your laundry hating heart.

What is it?

Ably Apparel makes clothing that repels odor and stains – for weeks. Their clothing line is made of 100% cotton that is Filium activated. Filium is an eco-friendly technology that makes natural fabrics like cotton repel dirt, stains, liquids and resist odors.

They carry men and women’s garments that include short sleeved t-shirts, long sleeved shirts, zippered jackets, hoodies, and sweatpants.

They sent me a sample of one of their long sleeved women’s t-shirt.

Testing their claims

I knew that I would have a hard time testing their odor claim because it’s very rare for me to have body odor. In fact, I already wear my clothes several times before washing them just because they never smell bad. I know it’s hard to believe, but my workout t-shirts don’t get smelly even when I sweat.

Stains, on the other hand, that’s where I have can have some issues. Especially when it comes to food or condiments that are red like ketchup and tomato sauce. Sometimes I think my shirts have a magnet for stains.

So let’s get to testing the Ably Apparel with Filium.

Instruments of torture

Red cooking wine
Kraft Classic Catalina salad dressing
French’s Classic Yellow Mustard
Heinz Ketchup

Red cooking wine

For test number one, I picked the red cooking wine, which I dripped on the shirt. As you can see, it beaded up perfectly and I was able to touch a tissue to the droplets and it sucked them right off the shirt without staining the shirt.

Result: The red cooking wine was no match for the Ably shirt.

Kraft Classic Catalina salad dressing

Next up is some red colored salad dressing. The drip did not bead up because salad dressing has a much higher viscosity (thickness) to it.

But I used a damp paper towel to wipe off the salad dressing blob with no residue remaining whatsoever.

Result: The Kraft Classic Catalina salad dressing was no match for the Ably shirt.

French’s Classic Yellow Mustard

Test three called for something of a different color… so I chose mustard, which I think is completely disgusting. I apologize to all mustard lovers, but yuck!

I deposited a quick squirt of the nasty substance on the Ably shirt and then followed up with a wet paper towel which smeared the mustard instead of cleaning it off the shirt. I got another wet paper towel and tried wiping at the mess a bit harder, but unfortunately….

The stain remained. If you click the image above, you can just barely make out a yellow streak to the right of the red arrow.

Result: The Ably shirt was no match for the French’s Classic Yellow Mustard.

Heinz Ketchup

Let’s go back to something red. This time I went with my all time clothes staining nemesis, ketchup.

Squirt, swipe with a paper towel, and…

Result: The Heinz ketchup was no match for the Ably shirt.

It wiped off easily with no residue. Wow. Filium, where have you been all my life?

After these tests, I lost a bit of interest and left the shirt in the laundry bin for a couple of days like I also do with my everyday clothes because no one who is “normal” immediately does a load of laundry when they get a stain on a shirt.

A couple days later I washed the Ably shirt with a load of other clothes and unfortunately, I could still barely make out the yellow mustard stain upon very close inspection.

I repeated the entire test with the freshly washed and dried Ably shirt and had the exact same results. Everything red could be cleaned off easily with no residue or resulting stain, but the mustard won again with another streak that I wasn’t able to clean off.

I also wore the shirt for several days during my workouts and checked for odors, but found none as expected.

Then I decided that I should try the same test with a regular 100% cotton shirt without the magic Filium. So I did…

As you can see, the results were not pretty.

  1. Red cooking wine
  2. Kraft Classic Catalina salad dressing
  3. French’s Classic Yellow mustard
  4. Heinz Ketchup

The reason for the large streaks is because that’s what happened when I tried to clean them off using the same method that I used with the Ably shirt. The difference between the Ably garment and another 100% cotton garment without Filium was like night and day.

Final thoughts

If your clothes tend to look like you used your shirt as a napkin, then Ably Apparel with Filium might be just the type of garments you’ve been looking for… that is as long as you stay away from mustard.

Source: The sample for this review was provided by Ably Apparel. Please visit their site for more info.


Product Information

Price: $48 and up
Manufacturer: Ably
Pros:
  • Stain resistant
  • Odor resistant
  • Dries quickly
Cons:
  • Mustard wins

Filed in categories: Reviews

Tagged:

Ably Apparel with Filium review originally appeared on on February 25, 2017 at 9:30 am.

Note: If you are subscribed to this feed through FeedBurner, please switch to our native feed URL http://the-gadgeteer.com/feed/ in order to ensure continuous delivery.

The IconFactory Linea iPad Pro sketchbook app review

One of my favorite tech innovations of the past year is Apple’s iPad Pro paired with the Pencil. There have been many digital styli that have preceded it, but for me, nothing’s come close to touching the Pencil for note-taking and drawing.

I’ve been dabbling in iPad sketching apps for almost as long as they’ve been available. Procreate, Adobe Sketch and Paper have been my go-to apps for different reasons. I like the simplicity of Paper, the depth of Procreate and the Creative Cloud integration of Sketch, and I’ve been bouncing between all three for quite some time.

When I found out that The IconFactory was creating their own sketchbook app that was built from the ground up around the Pencil, you can bet that caught my eye.

Linea feels like it pushes all the right buttons for me. Its toolset boasts the simplicity, and more important, the restraint, of Paper, while offering several very useful features. Let’s crack this nut.

The Interface

The IconFactory did a fine job with their layout. It puts everything within reach while remaining compact, maximizing the canvas area. It can be hidden with a simple tap on the arrow in the bottom of the screen. The layer, grid, and paper textures can be toggled with a quick double-tap on the respective icons. It’s fast and intuitive.

The interface is so tidy and gets out of the way.

I love the way they handled the color selection. Tapping on a hue reveals a second row of swatches with lighter and darker shades. Sliding the swatch bar up or down moves to the next row of colors. There is an entire row of customizable swatches if you want to pick out your own palettes.

On the opposite side, you’ll find the layer tab, grid selection, and paper texture. Five layers are all you get, but that’s been plenty, in my experience. Each can be moved up or down, turned on or off and adjusted for transparency. A layer can be merged down with the one under it. It’s worth noting there are no blend modes as you might find in other drawing apps.

Multiple layers make it easy to pencil, ink and color.

There is no import option, which is a shame. I often import source material to the canvas so I don’t have to swap back and forth between apps to keep drawing.

Blueprint, black construction, gray bristol, butcher paper and paper grain.

The paper textures are a nice touch. There are five distinct colors and the texture themselves can be turned on and off with a quick double tap. There are also five types of grids and a number of handy templates, including storyboards, app icons and mobile device screens, perfect for design prototyping.

I appreciate the multiple export settings available, such as multiple file types and transparency options. I can even export a layered PSD to finish up in Photoshop.

The Tools

Finally, there are the drawing tools, themselves. At your disposal are a mechanical pencil, art pencil, technical marker and wedge marker. Each have several tip sizes and utilize the Pencil’s pressure sensitivity in different ways. For instance, the pencil tools act as you’d expect, where a firmer press against the glass creates a darker line. Whereas the marker creates a thicker line with more pressure.

For an app claiming to be built around the Pencil, it’s curious that the art pencil tool doesn’t take into account the angle at which the Pencil is being held. It wouldn’t work if you were trying for an angled shading technique, for instance.

There’s also an eraser, of course. With a Pencil connected, the app defaults to using a finger as the eraser. It’s an intuitive approach that’s not unlike using your finger to remove marks on a dry erase board.

What’s more, undo and redo can be quickly accomplished with a two or three finger tap on the canvas, respectively. You can pinch to zoom, as you’d expect, but you can also rotate the canvas.

Conclusion

After spending some time with Linea, I found a lot to like. Right out of the gate, it’s a refreshing entry in a category with many excellent alternatives, and I feel like with a few tweaks and additions, it could prove to be the one I go back to the most

Linea is available on the App Store for $9.99. If you want to give it a closer look, you can watch some short demo videos on The IconFactor website.

Source: The app for this review was purchased with my own funds. Please visit The IconFactory for more info and the iTunes App Store to buy it.


Product Information

Price: $9.99
Manufacturer: The IconFactory
Retailer: iTunes
Pros:
  • Intuitive finger/Pencil control
  • Simplified art tools and color selection
  • Unique templates and grids
  • Uncluttered interface
Cons:
  • Could further utilize the Pencil's abilities
  • Lacking a selection tool and image import

Filed in categories: iOS, Reviews

Tagged: , ,

The IconFactory Linea iPad Pro sketchbook app review originally appeared on on February 24, 2017 at 10:30 am.

Note: If you are subscribed to this feed through FeedBurner, please switch to our native feed URL http://the-gadgeteer.com/feed/ in order to ensure continuous delivery.

Brightech DoublePlay HD Bluetooth 4.0 transmitter / splitter review

This is the Brightech – DoublePlay HD Bluetooth 4.0 Transmitter / Splitter. This little wonder lets you pair two wireless headphones to it, enabling both people to watch TV as long as they want, and as loud as they want, without disturbing anyone else in the house. 

The Brightech BPX2 has A2DP technology, and CSR apt-X Low Latency codecs. Why is this important? It effectively enables consumers to watch video while listening to wireless audio in a synchronized fashion. It means there is little noticeable delay in what you see on the TV compared to what your ears are hearing. It’s much faster than older Bluetooth technology: 40 milliseconds compared to (up to) 200 milliseconds. Bluetooth 3.x (and older) made it seem like you were watching an old Kung-Fu movie with poor audio dubbing.

This baby easily takes care of that problem. You can still pair Bluetooth 3.x wireless headphones to it, but you’ll be in Kung-Fu territory. I’ve paired to it using both Bluetooth 3.0 headphones and Bluetooth 4.1 headphones. The Bluetooth 3.0 isn’t terrible, but it’s not as good as watching TV live, which is what the 4.1’s sound like. So make sure your earbuds or headphones are Bluetooth 4.x compatible for best results.

Connection is super-simple. The attached USB cable is for power to the unit. The unit also comes with a 3.5mm male-to-male connector, and an RCA to stereo Y-cable, both of which can be used to connect to the audio source. You can connect it directly to your TV, the back of your cable box, even to the remote of your ROKU (if your ROKU remote has a 3.5mm headphone jack)! The unit must be plugged into a USB port for power.

Overall, I’m very pleased with the function, operation, quality, and size of this unit. It pairs easily with the push of a button, operates well, and most importantly, keeps the peace between the sleepy-heads and night-owls in the family.

The sample for this review was purchased with my own funds.  Please visit Brightech for more information and Amazon to order.


Product Information

Price: $27.99
Manufacturer: Brightech
Retailer: Amazon
Pros:
  • Small
  • Lightweight
  • Easy to hide next to your other electronics
  • Convenient
  • Maintenance free
  • Works well
Cons:
  • Pairing two Bluetooth headsets the first time is fairly easy, but re-connecting both of them later on is confusing and sometimes aggravating
  • Transmitting range is not very far (20-30 feet)

Filed in categories: Audio, Video, TV, Bluetooth Gear, Reviews

Tagged:

Brightech DoublePlay HD Bluetooth 4.0 transmitter / splitter review originally appeared on on February 23, 2017 at 8:25 am.

Note: If you are subscribed to this feed through FeedBurner, please switch to our native feed URL http://the-gadgeteer.com/feed/ in order to ensure continuous delivery.