Smart Nora Snoring Solution review

REVIEW – If you or your partner snores, you know the struggle. I’ve snored for years and tried all kinds of solutions, so I jumped at the chance to review the Smart Nora snoring solution. Has Bob finally secured peace in the bedroom after all these years? To the review!

What is it?

It’s a system that uses a sensor to detect snoring, activating an inflatable insert under your pillow to stimulate your throat muscles and resume normal breathing.

What’s in the box?

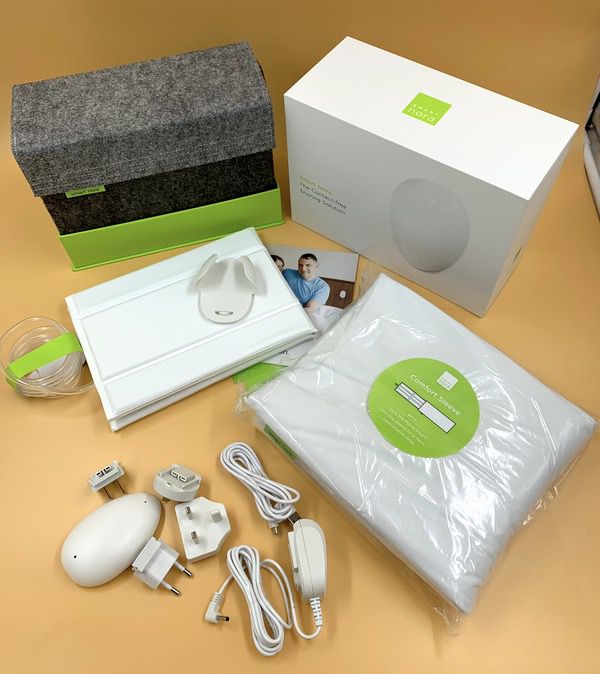
The Smart Nora kit includes everything you see in the picture below, including:

  • The base unit.
  • The Bluetooth sensor “egg” with a USB charging cable.
  • An egg cradle for wall mounting.
  • The pillow insert.
  • A soft sleeve for the pillow insert.
  • A standard power chord, with adaptors for international markets.
Design and features

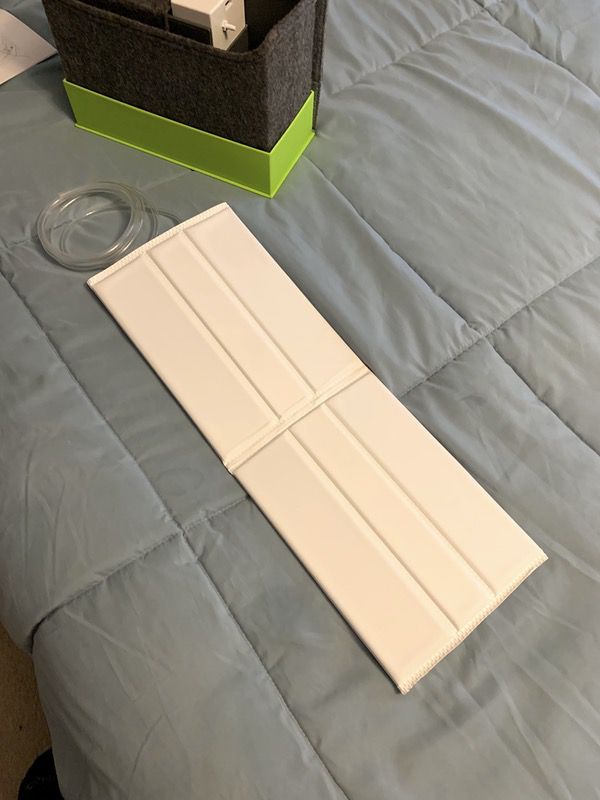
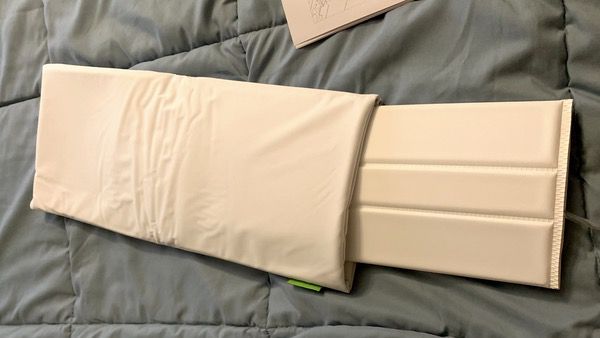
The Smart Nora is a non-invasive solution to reduce snoring. The unit consists of three primary components. The first is a 20″ by 8″ pillow insert connected to an air hose:
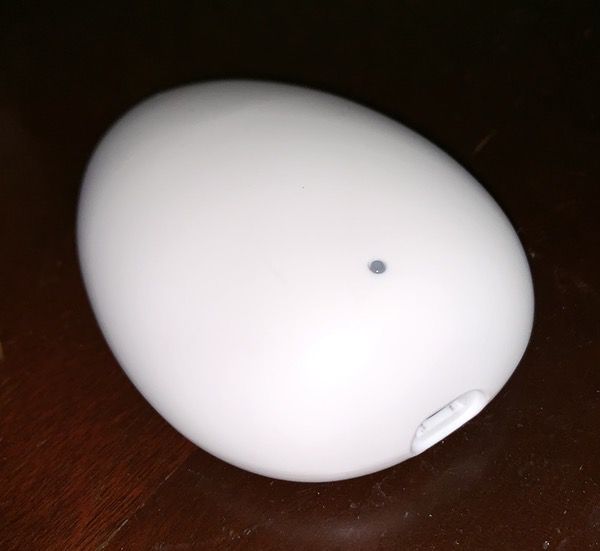
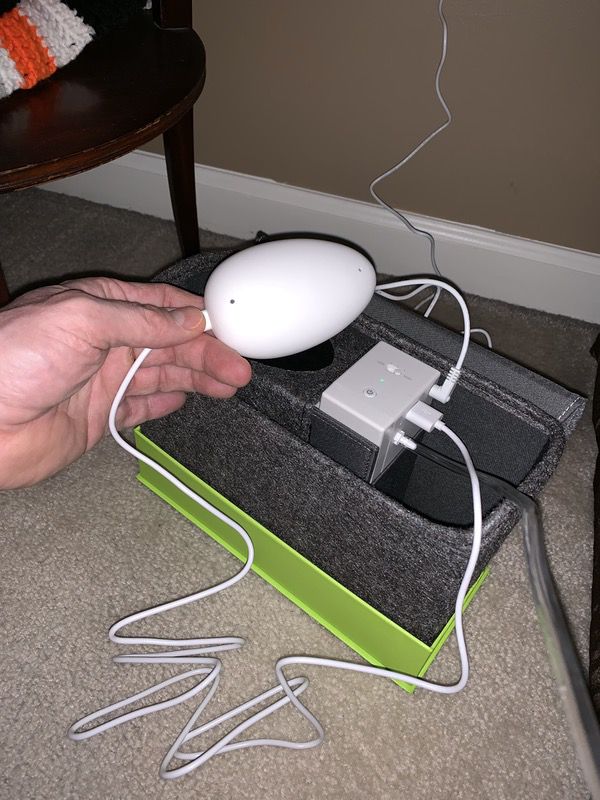
The second is the sensor egg, a palm-sized Bluetooth unit (4″ by 2-1/2″ by 1-1/4″) that detects your snoring:
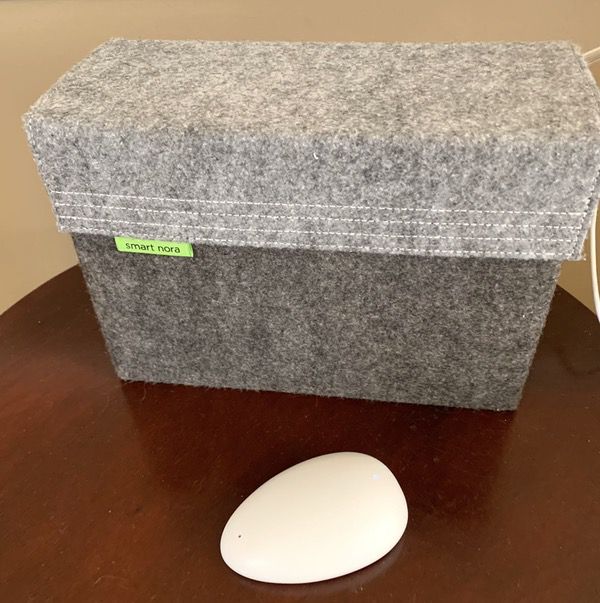
And the third component is the base unit, a 10″ by 4″ by 7″ box that manages all the functionality.  
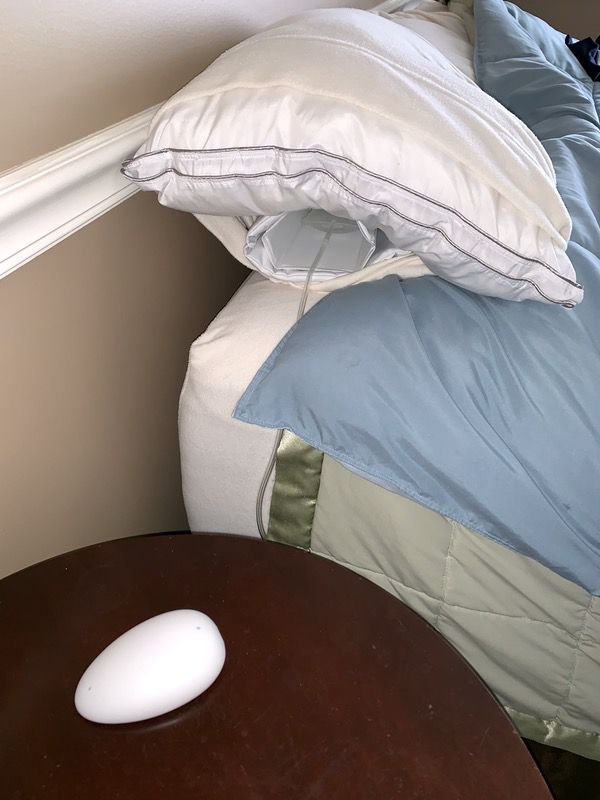
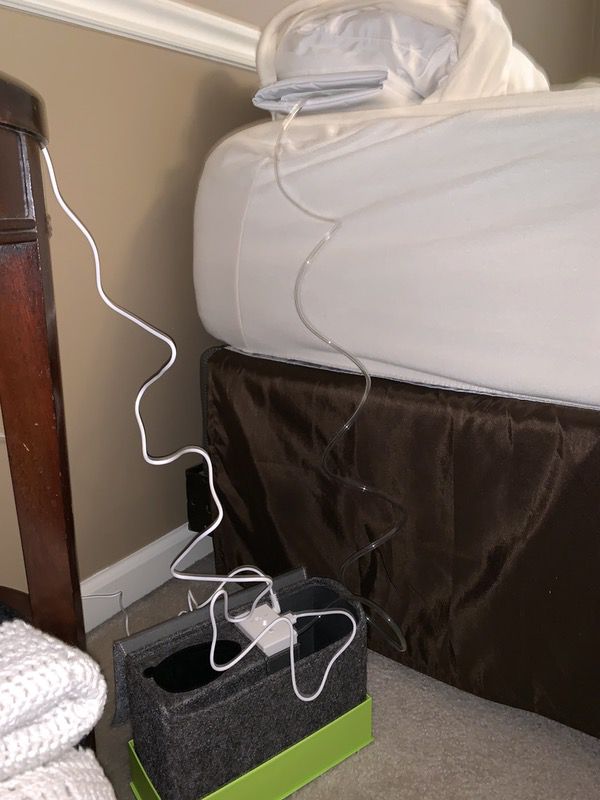
Here’s what it looks like when everything is in place:

And believe it or not, this thing really does seem to work in my case. Let’s walk through the setup, then we’ll talk about operation and performance.

Setup

You’ll have the Smart Nora setup in just a few minutes. You start by connecting the air hose from the pillow insert to the base unit.
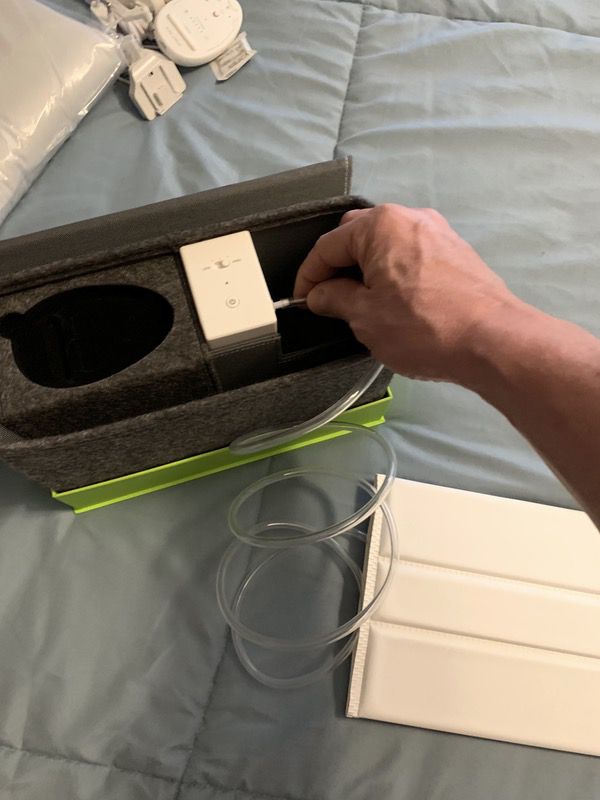
The power plug also connects to the base unit. The Smart Nora includes multiple adaptors for international markets, which is a nice bonus if you plan on taking it on trips.
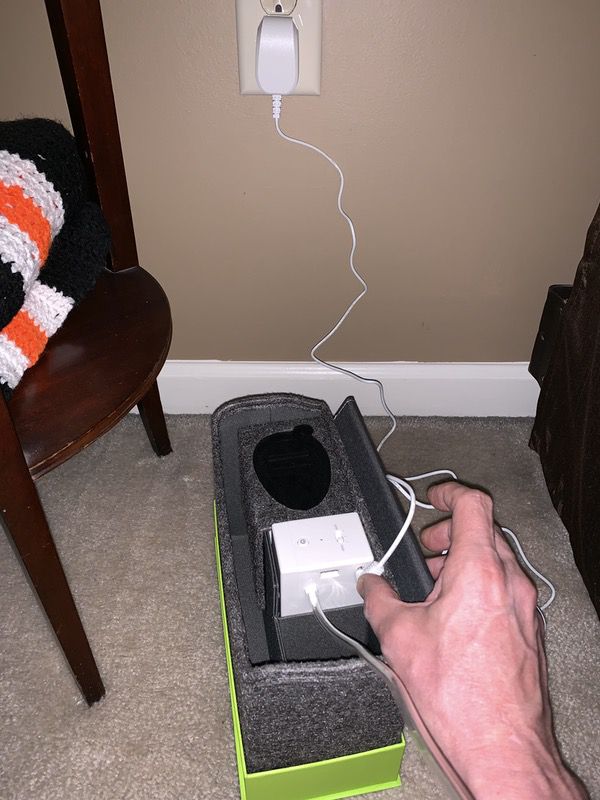
The sensor egg is charged by plugging it into the base unit with the USB cable that’s included with the package. Once charged, the egg can be disconnected and operates via a Bluetooth connection.
The pillow insert also includes a foam padded sleeve that can be used if desired.
Slide the pillow insert into your pillowcase under your pillow, and you’re good to go!
The sensor egg is designed to be in close proximity to the user when sleeping and includes an adhesive-backed mount so that you can position it on the wall or headboard above the sleeper’s head. I have a nightstand next to my bed right next to my pillow, so I’ve been keeping mine there.

Operation

The pillow insert is where all the action is. When snoring is detected, an air compressor in the base unit gently inflates air bladders in the insert to get things moving. Here’s what it looks like when the insert inflates:
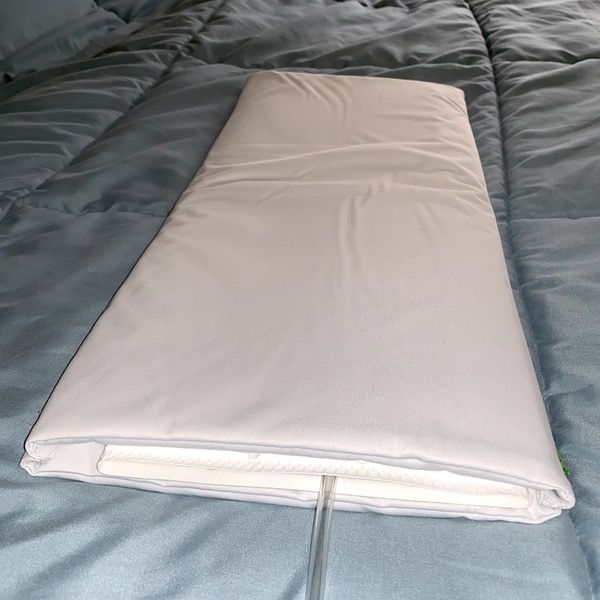
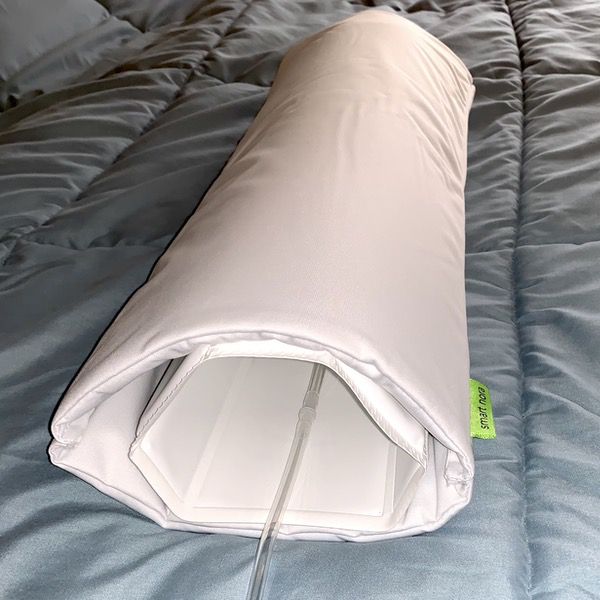
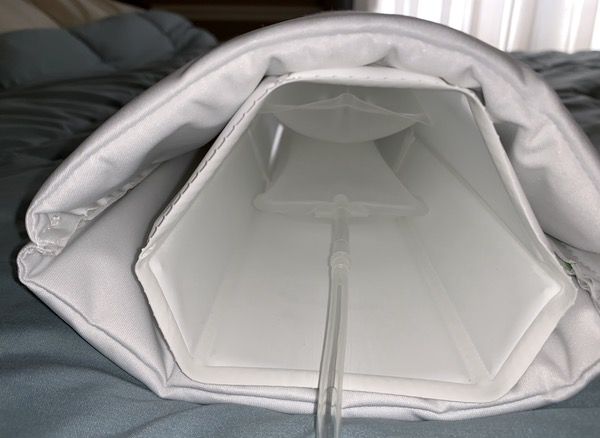
And here’s an inside shot of the air bladders. Once they come to full inflation, the weight of your head will gradually deflate them back to the flat position.
You can also select the height to which the insert will be inflated. I started in the “high” position, but found it to be a bit uncomfortable for me. I’m using the middle position right now.
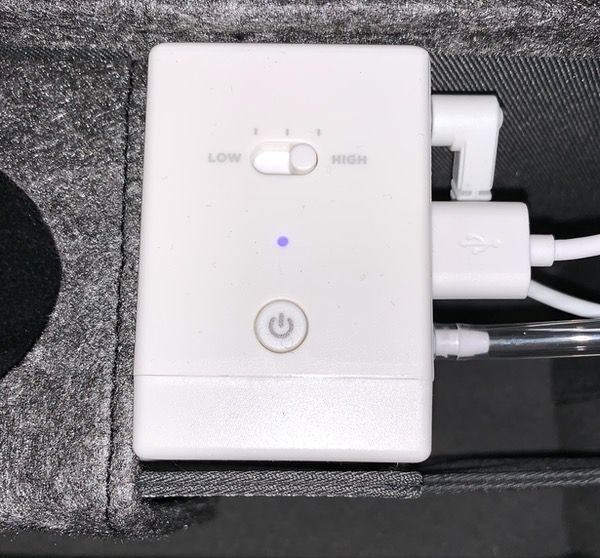
The controls for the sensor egg are all on the underside. You can adjust the sensitivity of the device to account for noisier bedrooms. The Bluetooth connection reset is there as well as the power on/off pad.
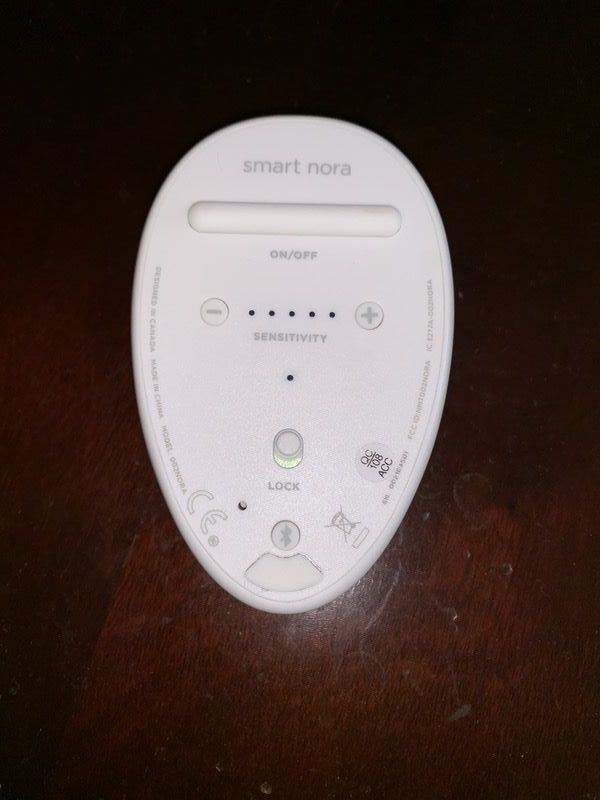
When fully set up, you just push on the egg to turn it on or off. A blue light indicates that the unit is on.

Throughout the course of the night the insert will slowly inflate when snoring is detected, then slowly deflate in a cycle that runs about 30 seconds. The gentle motion is intended to stimulate your throat muscles to resume normal breathing.

Performance

I really like the usability of the Smart Nora solution. A lot of snoring devices can be pretty invasive, involving mouthpieces or other equipment that takes a lot of getting used to. There’s none of that here. Setup takes minutes. No changes are required to your bed arrangement. When you’re ready to go to sleep, you just press the egg and go to sleep in whatever position you are comfortable with using your regular pillow.  You will hear the air compressor and some squeaking as the pillow inflates/deflates, but the noise is subdued and the movement is slow and gentle. It does take about a week to get used to, but I don’t even notice it now.

After a week of adjusting to it, my wife and I have both noticed significant improvements in my snoring. There are nights when I snore like a rusty chainsaw cutting through cinderblocks. While the Smart Nora hasn’t completely eliminated my snoring (I have some pretty bad allergy issues), it’s certainly much better. My wife isn’t getting woken up in the middle of the night by my commotion like she used to, and if I do snore she says it’s significantly less disruptive than it was before. Four weeks in and I feel like I am getting better rest as well.

The Smart Nora is clinically tested to be effective. I had an opportunity to chat with one of the researchers at Sleepscore Labs that ran the clinical trials on the Smart Nora. 29 couples were monitored in their homes for two weeks without the Smart Nora, and then two weeks with the device. Electronic monitoring demonstrated measurable improvements in sleep quality for both partners, and daily surveys indicated that 78% of the participants (both the snorer and partner) believed that their sleep was improved after using the Smart Nora. I’d say that pretty much aligned with my personal experience.

It’s important to note that there are lots of causes for snoring, and the Smart Nora isn’t a guaranteed fix. It won’t work for you if have sleep apnea, for example. I’d suggest you check out the Smart Nora web site and have a chat with your doctor to see if it might work for you.

What I like

  • Non-invasive snoring solution that’s easy to adjust to.
  • Simple setup and operation.
  • Excellent usability.
  • Subtle looks don’t stand out like a medical device in your bedroom

What needs to be improved

  • May not work for all snoring conditions.

Final thoughts

There can be lots of underlying causes for snoring, and the Smart Nora presents a unique solution that’s backed by clinical studies. I can’t say that it will work for everyone, but I can tell you that it’s worked for me and (more importantly) my wife. We’re both sleeping better on a nightly basis and I haven’t been banished to the spare room for month. Everyone wins. The excellent usability also makes for a solution that’s easy to use daily. I’ll keep you posted as I continue to use it.

Price: $329.00
Where to buy: Buy it at the Smart Nora web site.
Source: The sample of this product was provided by Smart Nora.

Filed in categories: Reviews

Tagged: ,

Smart Nora Snoring Solution review originally appeared on The Gadgeteer on March 30, 2019 at 9:00 am.

Note: If you are subscribed to this feed through FeedBurner, please switch to our native feed URL http://the-gadgeteer.com/feed/ in order to ensure continuous delivery.

moshi Symbus Q USB-C docking station with wireless charger review

REVIEW – Laptop + large monitor = a boost in productivity. But how do you connect your laptop to your monitor? When you have a 12inch MacBook like I do, you have to have a USB-C dock like the moshi Symbus Q USB-C docking station with wireless charger. Let’s check it out.

What is it?

The moshi Symbus Q USB-C docking station with wireless charger is a USB-C dock that has an HDMI port that supports 4K, 2 USB ports, an Ethernet port, and fast wireless charging.

Hardware specs

Qi-certified wireless charging – supports Apple 7.5 W and Samsung 9 W wireless fast charging
Charges through cases up to 5 mm thick
HDMI port for adding an external display (4K@30Hz, 1080p@60Hz)
Gigabit Ethernet port for wired data transfer up to 1000 Mbps
2 USB-A ports for connecting a keyboard, mouse, or hard drive with data transfer at rates up to 5 Gbps (USB 3.1 Gen 1)
High-speed USB port for charging your smartphone or tablet (2.1A)
Full USB PD function for fast-charging USB-C laptops (up to 60 W)

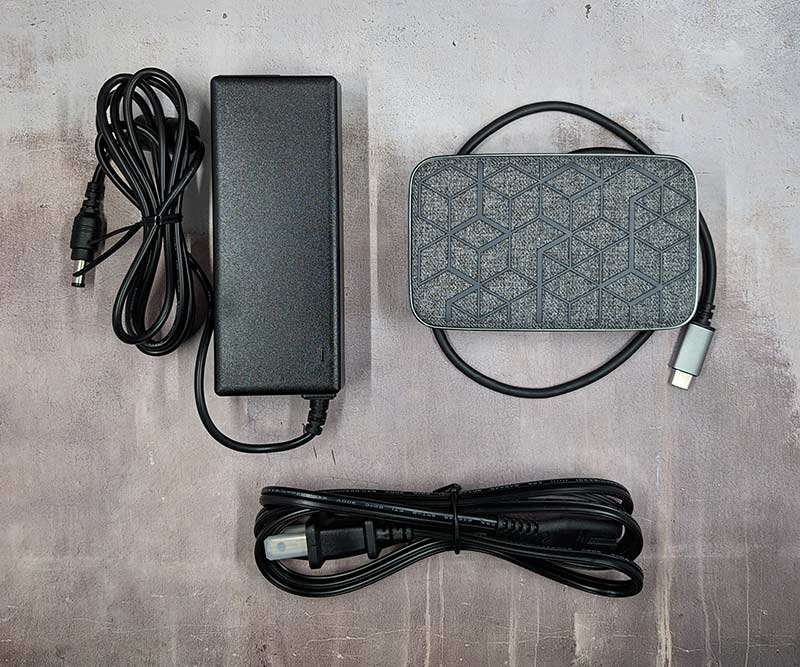
What’s in the box?

  • Symbus Q docking station
  • Power cord
  • AC adapter

Design and features

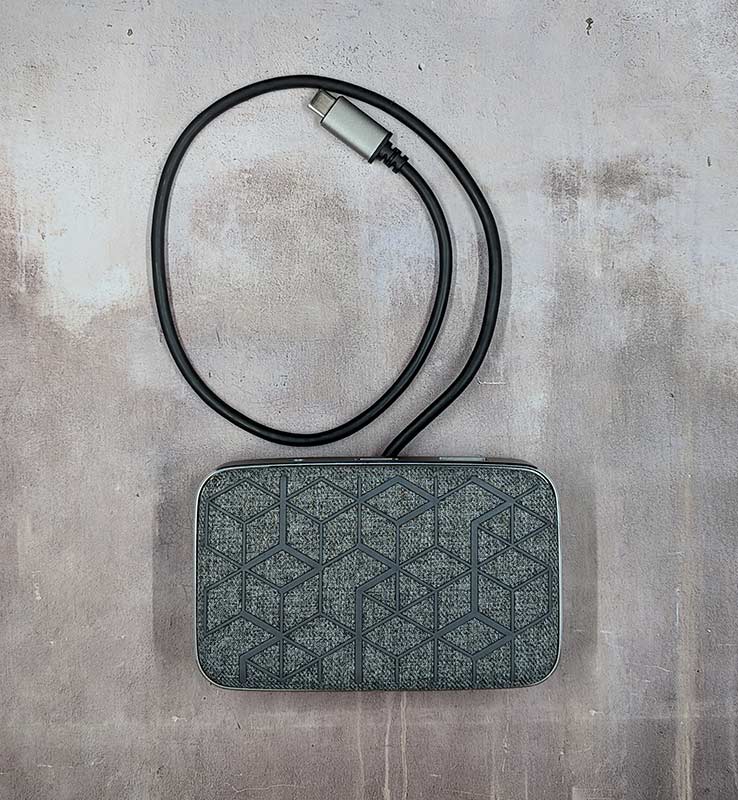
In the most basic sense, the moshi Symbus Q is a rectangular device with a 19.5 inch USB-C cable that comes out the back side.

The top of the dock has a woven cover with a geometric design that is made of raised rubber ridges that help to keep a device from sliding around when using the wireless charging feature.

The sides of the dock are made of what I think is brushed aluminum and the base is black plastic.

The front of the dock has a status LED on the left side that glows green while the dock is being used as an HDMI adapter between your laptop and a display. The status LED glows in red while throbs in green while the Qi wireless charging feature is being used and will blink red if you place a non-Qi compatible device on top.

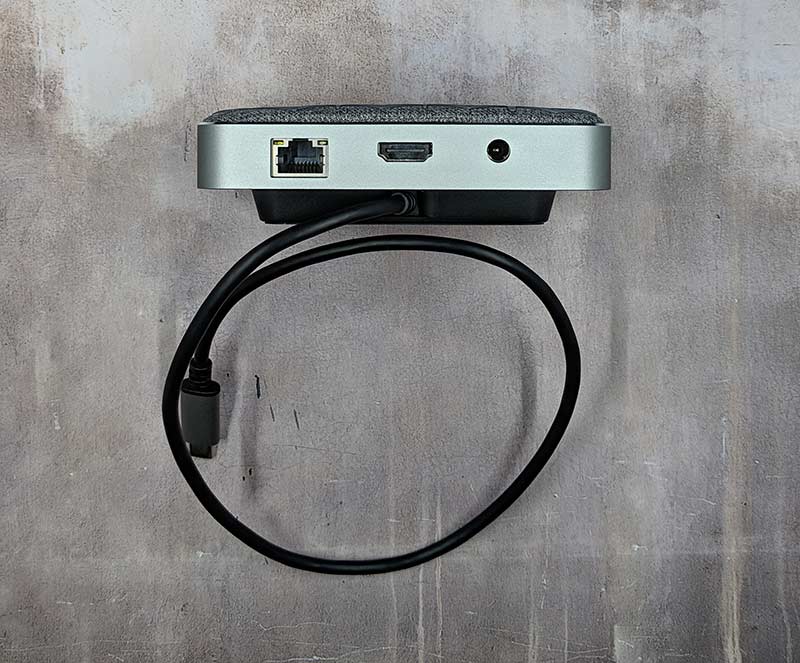
The back of the moshi Symbus Q has an Ethernet port, a 4K HDMI port, and the power port.

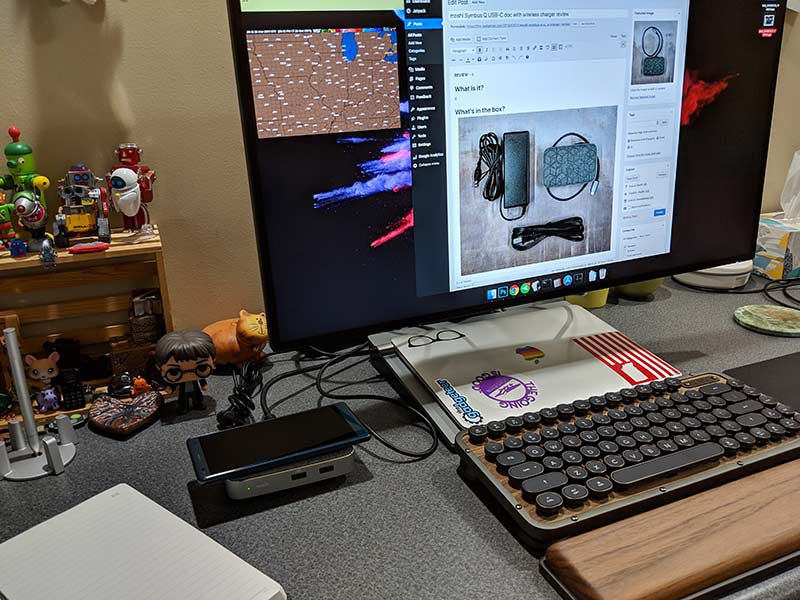
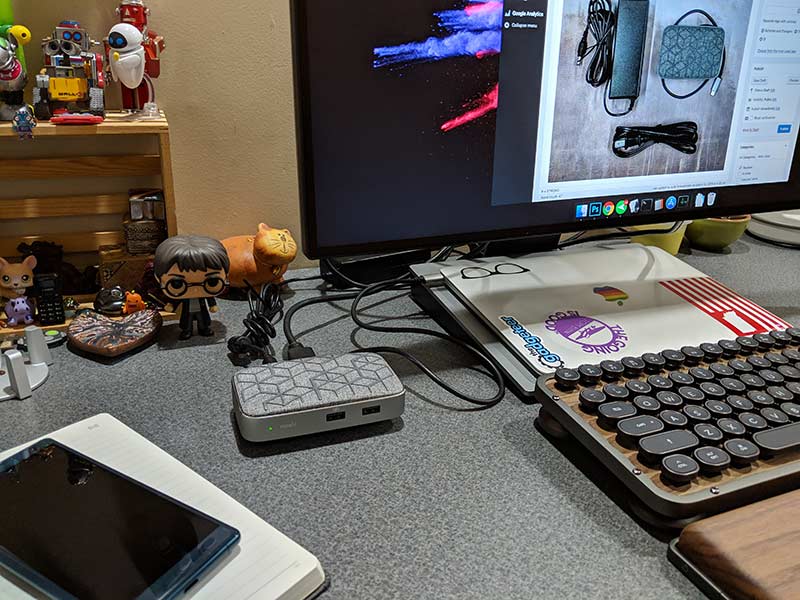
To test the functionality of this docking station, I tested it with my 12-inch MacBook and BenQ monitor. If you are familiar with the 12 inch MacBook, you’ll know that it has only 1 port, a USB-C port. That’s it. So the Symbus Q offers a lot of functionality by plugging directly into the MacBook’s USB-C port. Then I connect an HDMI cable (not included) from the dock to the monitor.

I had no issues using HDMI connectivity with this dock and my MB. It worked great. The dock supports 4K so I also tested with a 4K monitor and had no issues there either.

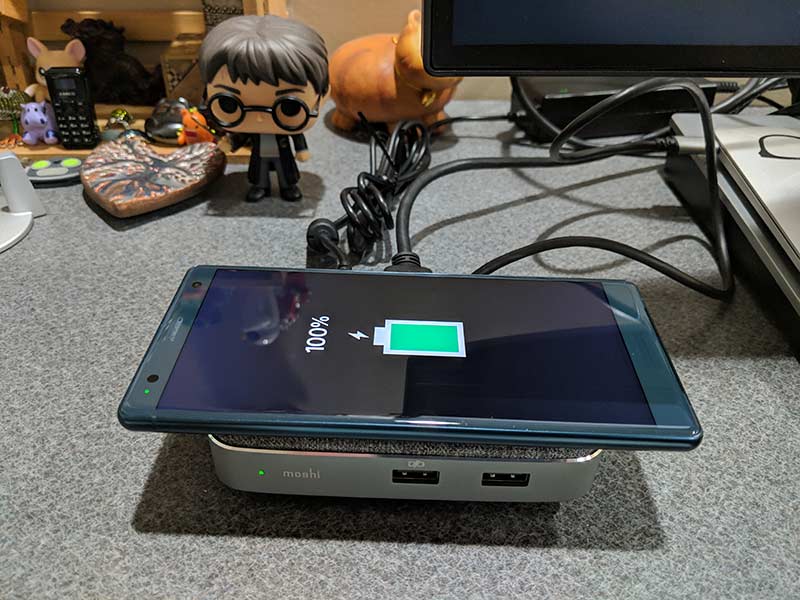
The wireless charging feature worked fine as well. I currently only have one device that I could test this feature though… a Sony Xperia XZ2.

I also tested the USB ports on the front of the dock and they both worked as expected.

One thing that I didn’t test was the Ethernet port. I don’t use a wired network in my office, so I had no good way to test the functionality of that feature.

The features that I was able to test all performed flawlessly. However, I did discover one bummer…

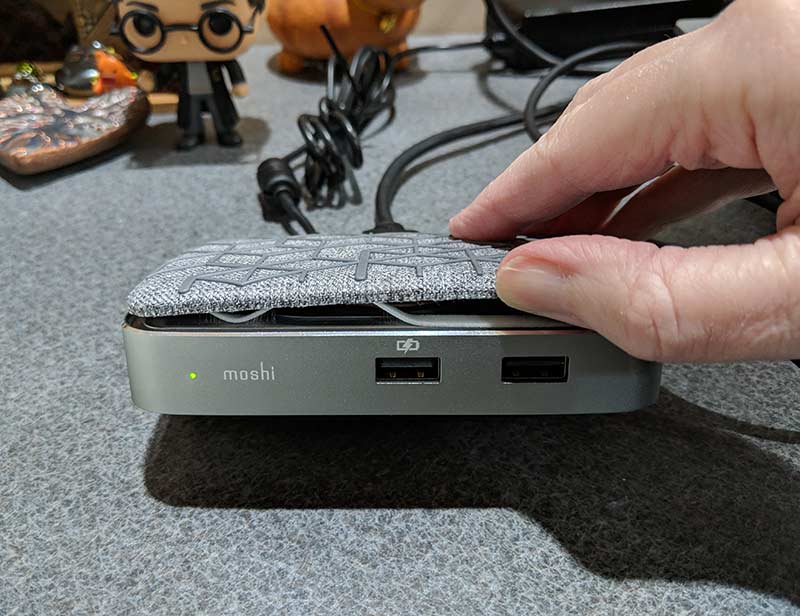
The snazzy padded cover over the wireless charging surface is just stuck on the top with a ring of adhesive that isn’t sticking all that well as you can see from the image above.

What I like

  • 4K docking station with a built-in Qi charger
  • Attractive design

What needs to be improved

  • Padded top is attached with adhesive

Final thoughts

I like the features and the look of the moshi Symbus Q USB-C docking station but the problem with the padded cover not sticking securely in place is a little worrisome especially when you factor in the $164.95 price tag. I’d rather just buy their $59 USB-C hub and their $40 Otto wireless charging pad and save $65.

Price: $164.95
Where to buy: Amazon
Source: The sample for this review was provided by moshi.

Filed in categories: Reviews

Tagged: , ,

moshi Symbus Q USB-C docking station with wireless charger review originally appeared on The Gadgeteer on March 29, 2019 at 11:00 am.

Note: If you are subscribed to this feed through FeedBurner, please switch to our native feed URL http://the-gadgeteer.com/feed/ in order to ensure continuous delivery.
Silca Seat Roll Grande Americano review

REVIEW – If you’re a cyclist, chances are you’ve heard of Silca. They’re known around the world for their bicycle pumps which they’ve been making for over 100 years. They also make amazing tools and accessories that all have an attention to detail that would be hard to call anything other than obsessive. My first job was building BMX bikes at my local bike shop. I picked up the wrenches again in college before my first real career in snowboarding. What’s the point of memory lane here? Silca recently launched an under-seat pack that uses a Boa reel for cinching it to the bike. I use a Boa system on my snowboard boots today and remember their launch almost 20 year ago. My two favorite sports coming together – Sign me up. Detail time.

What is it?

Silca’s Seat Roll Grande Americano is a fold-and-roll pouch that stores under the seat on your bicycle. Under seat bags are great for holding the necessities (like tools) that you don’t want in your jersey pockets or in a backpack.

What’s in the box?

  • Seat Roll Grande Americano
  • Hanging Card Packaging

Hardware specs

  • Ballistic nylon with a DWR coating (Durable Water Repellent finish)
  • Uni-body, one piece construction
  • Boa® closure system
  • Rail guard – Protects and grips seat rails
  • 3 internal pockets
  • Heavy duty elastic for adjustable volume closure
  • Sewn in the USA

Design and features

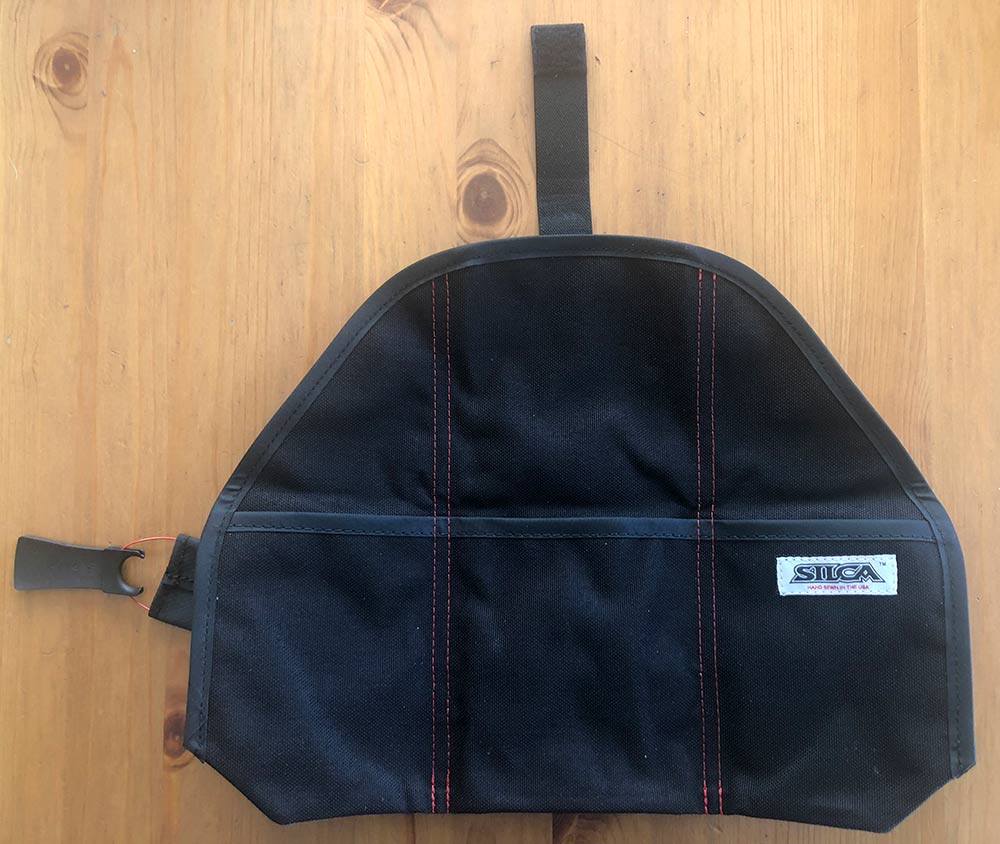
Deceptively simple, the Seat Roll Grande Americano is essentially a tool roll. It’s made out of a single pattern that’s folded and securely stitched to create it’s three pockets and flap and then a strong elastic strap to help hold the thing together.

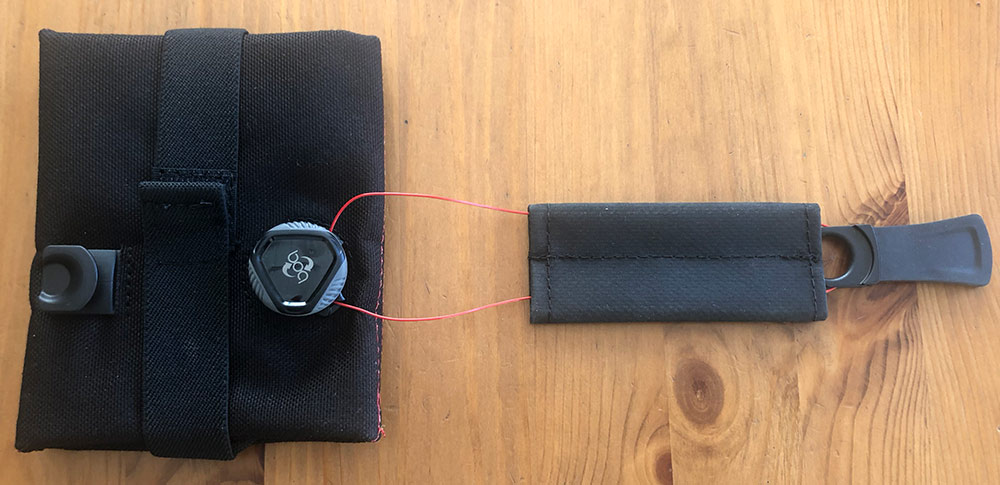
The other major design feature is a Boa closure system that uses a very thin cable that retracts and releases with a very intuitive reel. I’ll explain how to use one in just a minute, but what you should know is that it’s crazy durable, super light weight and leaves nothing dangling behind. Velcro can be a mess, pick up mud and the hook side can wreck clothing. Yay Boa!

Setup

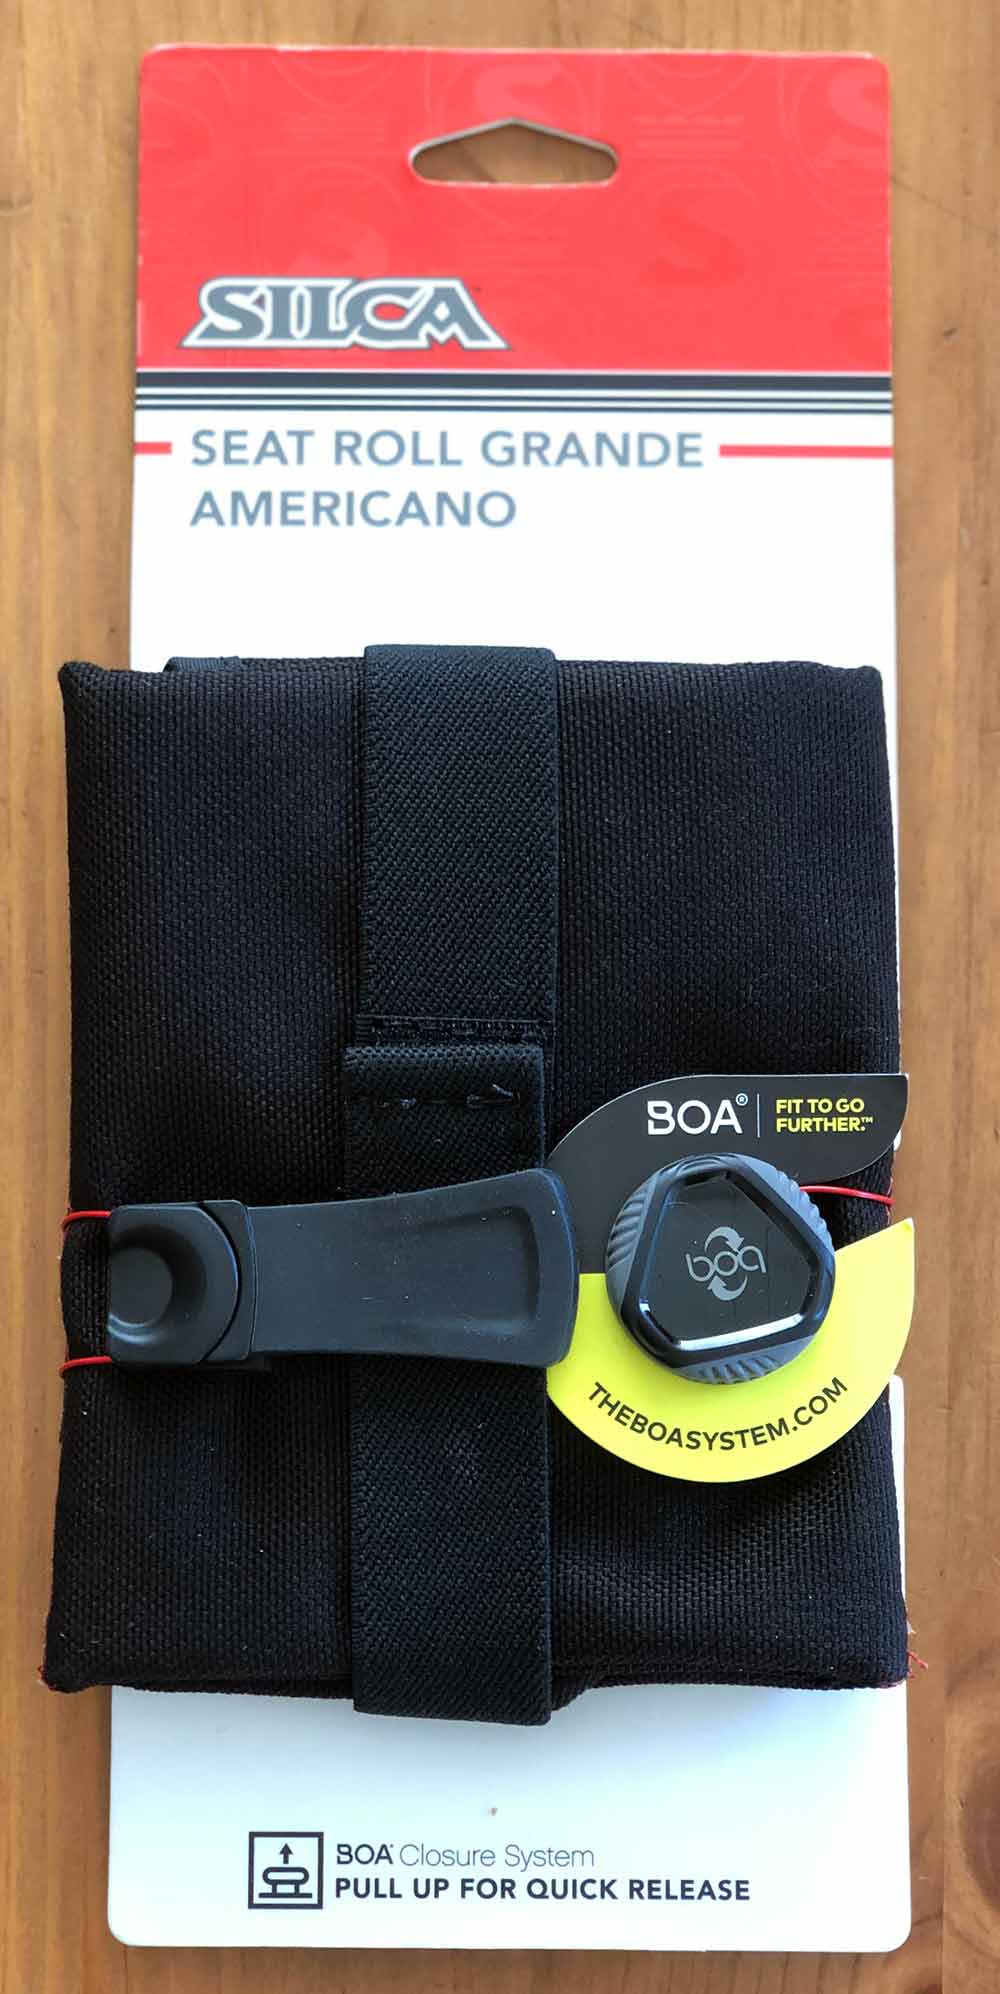
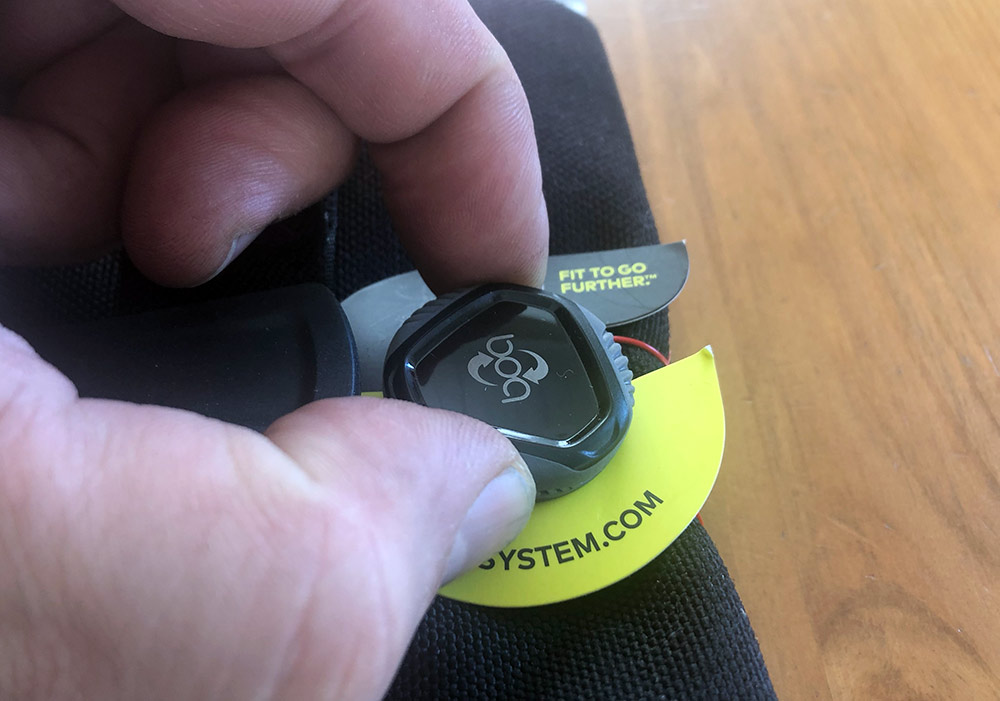
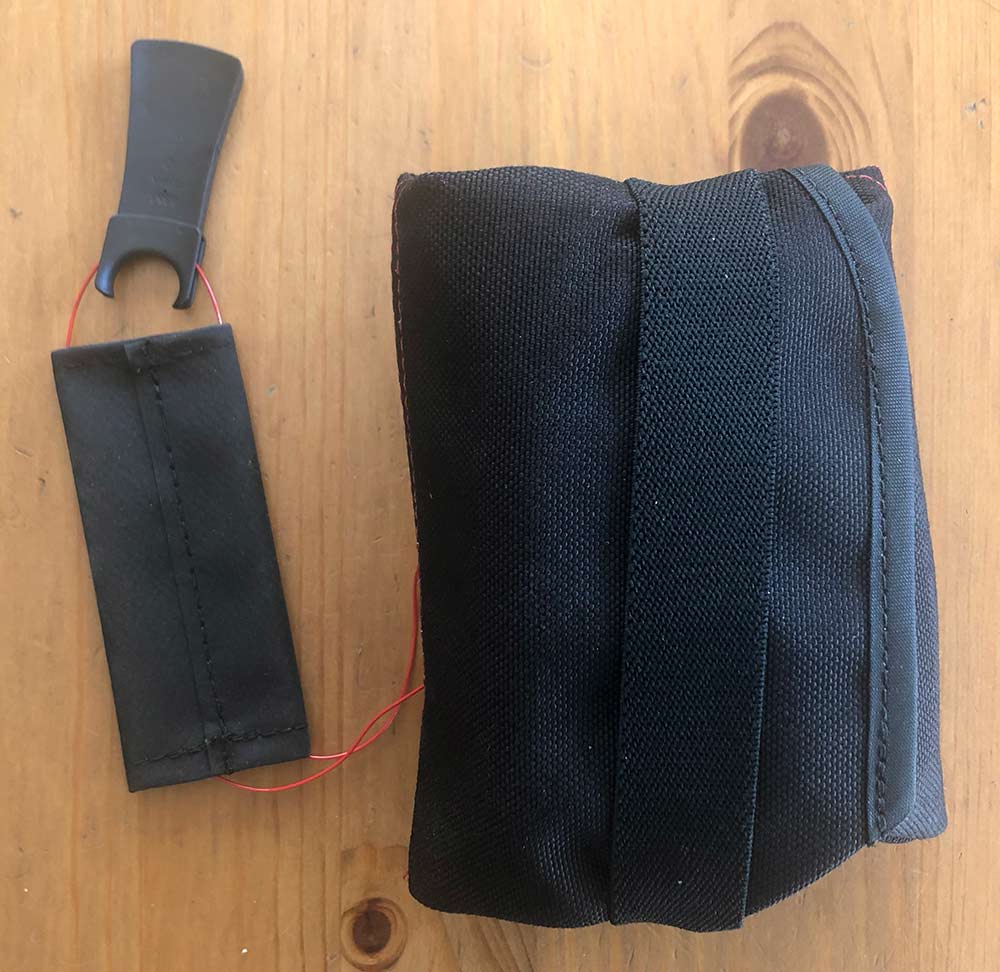
Removing the pack from the card can be a bit confusing if you haven’t used a Boa reel before. Grab the Boa reel with your thumb and forefinger and pull straight up until you hear a click.

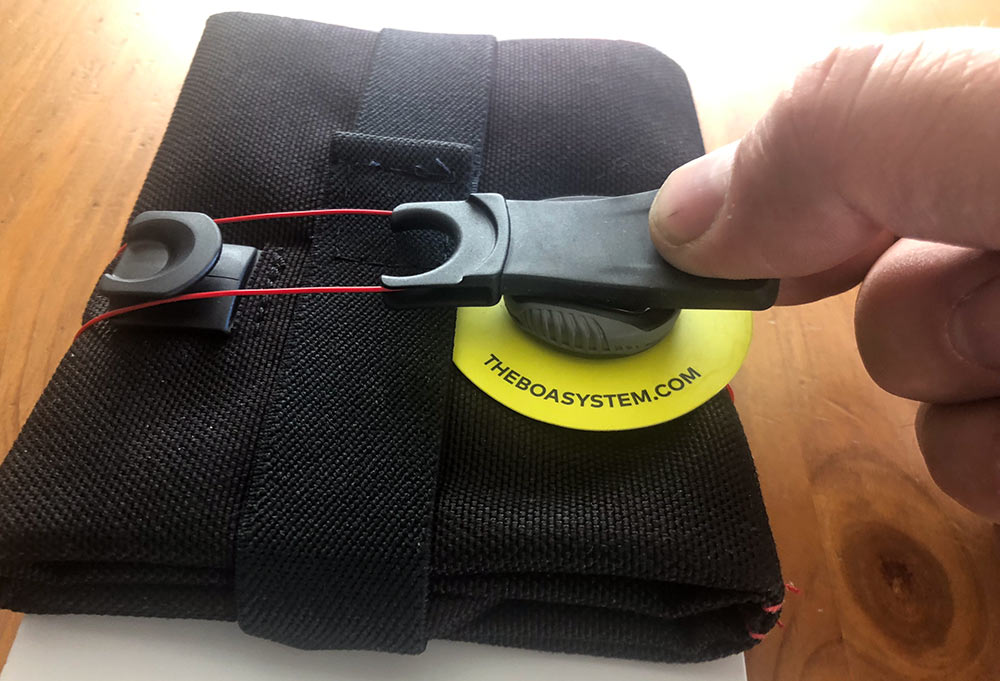
Then grab the pull tab and pull sideways to free the tab and “unspool” the reel.

Now you’re free of the hang card.

From there go ahead and undo the velcro and unfold your pouch.

Performance

As I mentioned up above I’ve been using a Boa system on snowboard boots for a while. I trust them to keep my feet safely in my boots, so lashing a pouch under a bike seat seems like a pretty easy task for this ingenious little reel.

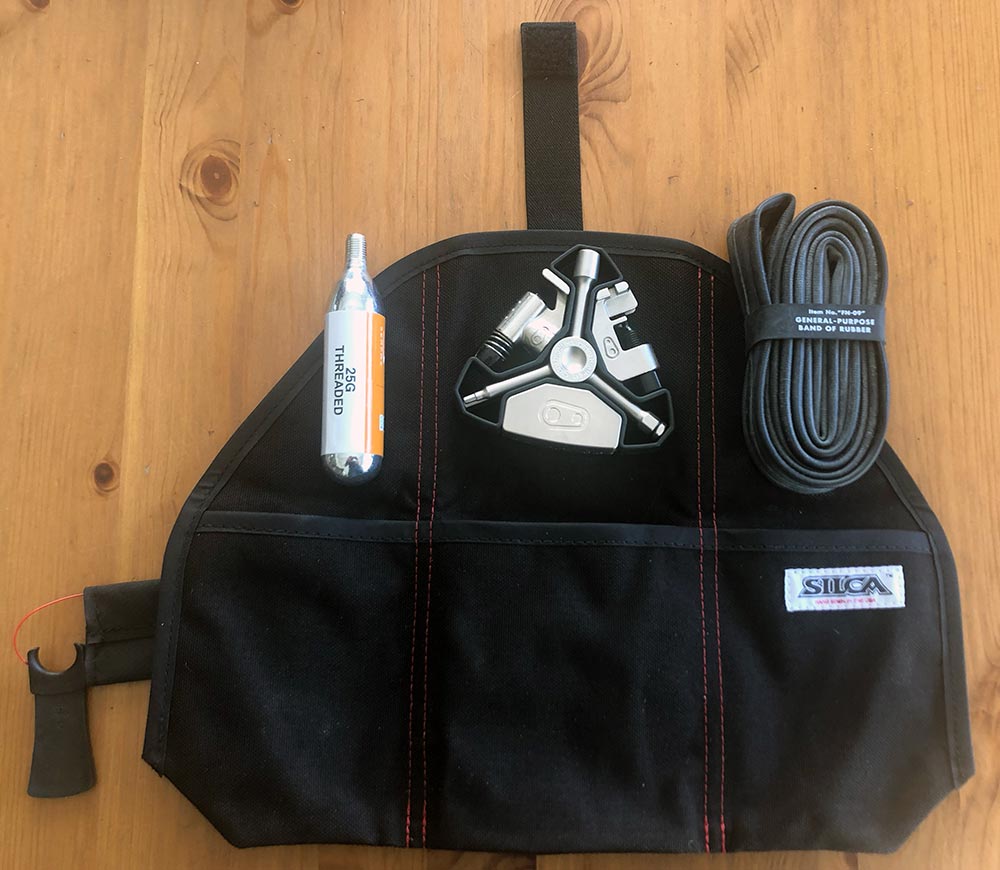
The three pockets are evenly divided with the center pocket being the largest.

I carry a rather large multi-tool with a CO2 regulator that only fit in the center pocket, so that decision’s made. The 700c x30 tube is in the right pocket and a CO2 cartridge and maybe some tire levers over in the left pocket.

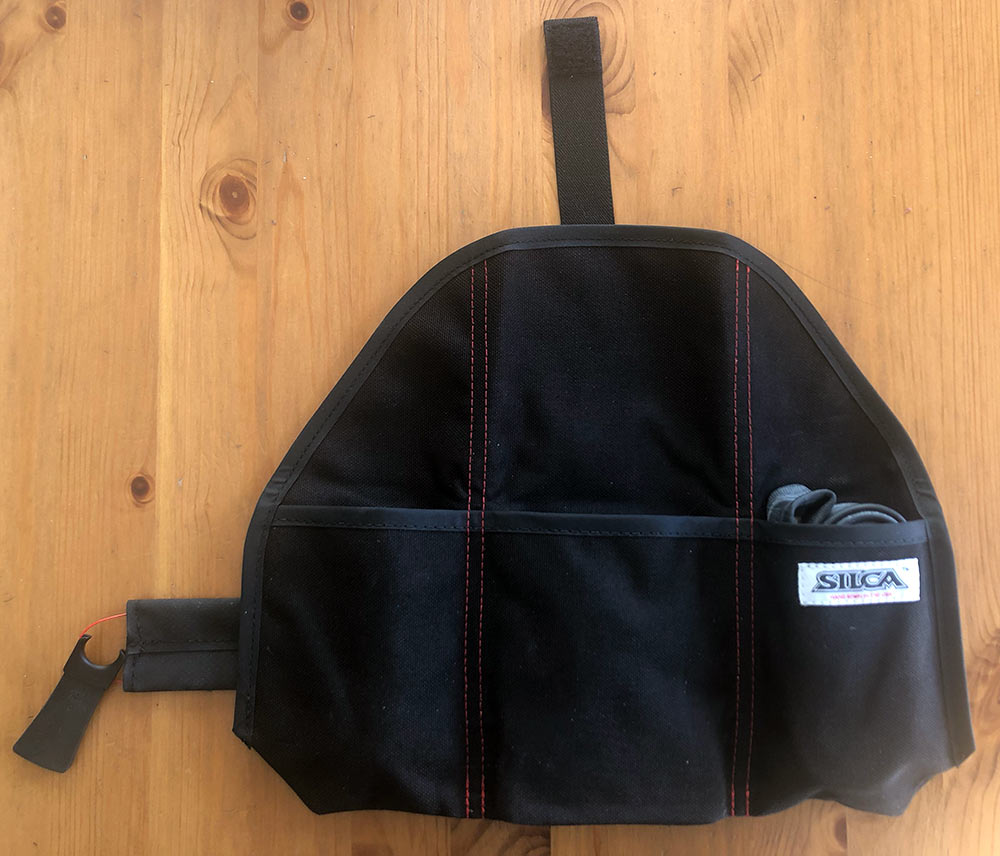
Here’s all those tucked firmly down in.

When folding down the top, you’ll want to fold as close to or actually on the pocket top if you can to reduce the risk of any gaps for stuff to get out or muck to get in. Fold each of the sides in and secure with the big, sturdy elastic band.

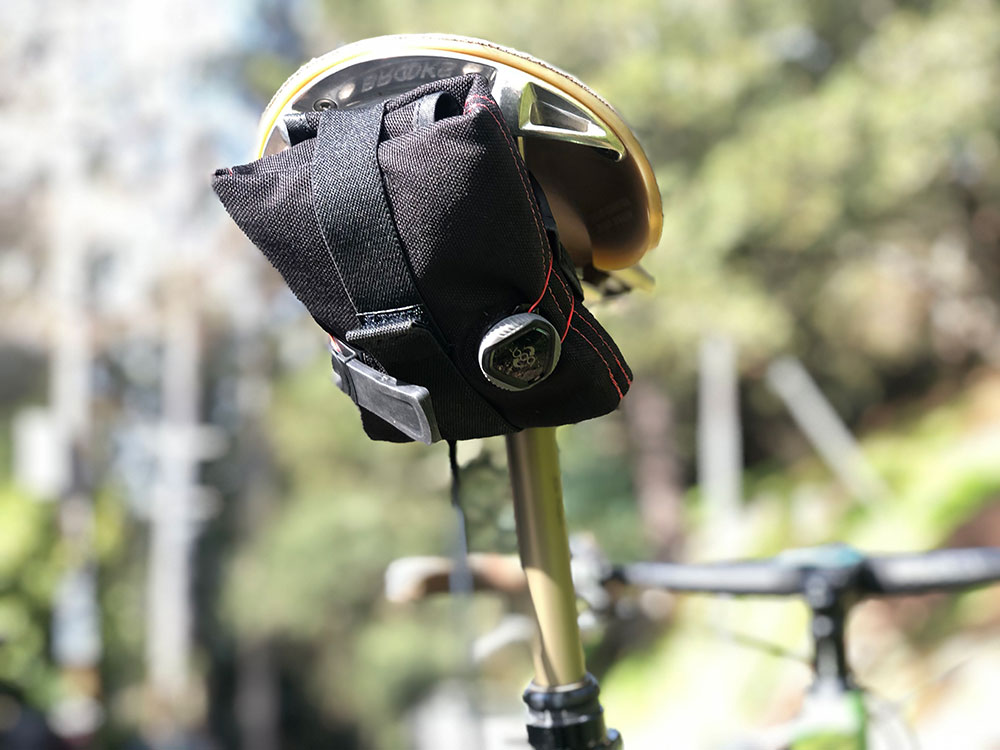
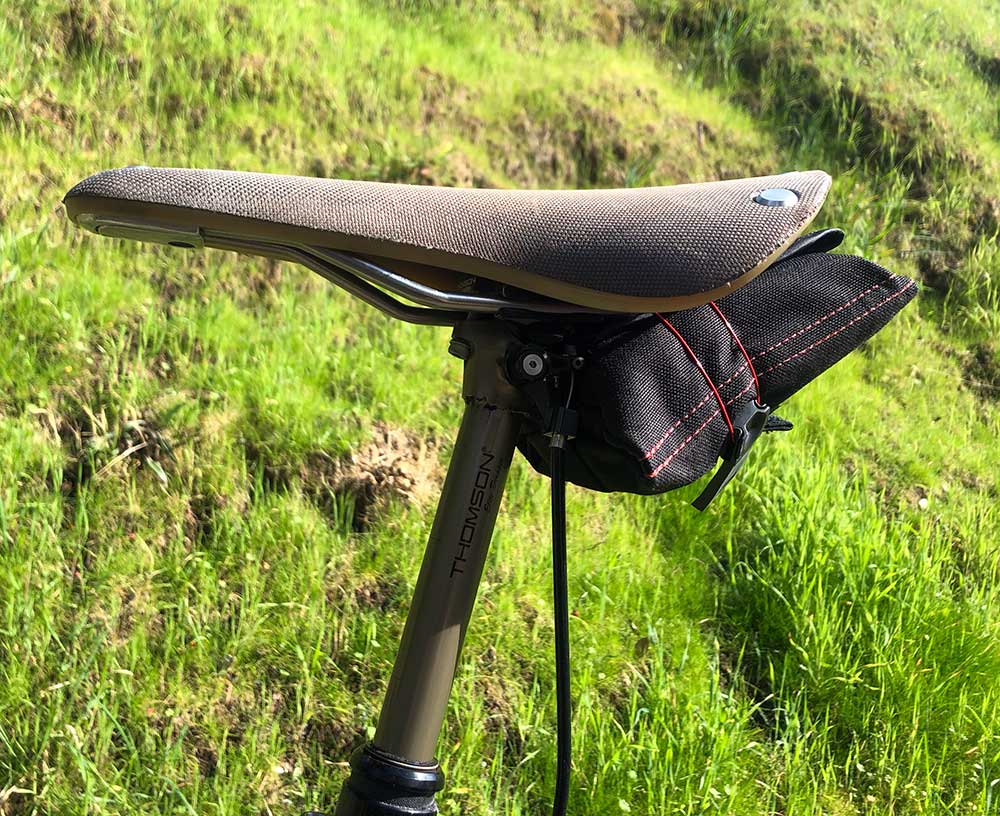
Putting it on your bike is a simple process of feeding the flat rail guard section shown above over your seat rails, hooking the pull tab on the receiver and then ratcheting it down. You may need to hold the guard in place, but it’s an easy process and you literally just turn until it gets hard to turn. Make sure you push the Boa reel down for the click to ratchet mode.

Here’s how it snugs up under a seat.

You may want to play with the organization of your stuff in the pockets to get them as flat as possible and pushed to the outer edges of the outside pockets as this will give you the smallest pack when folded.

One thing to know is that as a tool roll, it gets completely removed from the bike when you need access to your stuff. This is a good thing as all your tools can be visible at once on a flat surface, rather than digging in a tiny bag still on your bike.

The Boa system is ideal for this scenario as the volume completely adjusts depending on what you have in the roll, and then how tight you ratchet it down onto your seat. As a result, there’s no rattle or noise or swinging weight from under your seat. In a word… perfect. Great addition to my gravel bike.

What I like

  • Boa closure system
  • Materials and construction
  • Security to bike when riding
  • Jangle free

What needs to be improved

  • None that I could find

Final thoughts

I usually run a lightweight waterbag for rides, but the Silca Seat Roll Grande Americano holds my tools and some of the bulkier items so securely and silently that I’ll be throwing a cage and bottle on my bike now for shorter rides. Silca’s pack doesn’t move once it’s ratcheted down and there’s something immensely satisfying about the click and unspool of the Boa to get to your gear. It almost creates a desire for a flat tire to occur… Almost.

Price: $58
Where to buy: Silca.cc
Source: The sample of this product was provided by Silca.

Filed in categories: Reviews

Tagged: ,

Silca Seat Roll Grande Americano review originally appeared on The Gadgeteer on March 29, 2019 at 9:00 am.

Note: If you are subscribed to this feed through FeedBurner, please switch to our native feed URL http://the-gadgeteer.com/feed/ in order to ensure continuous delivery.
Edge of Belgravia Stingray frying pan review

REVIEW – The award-winning designers at Edge of Belgravia are at it again. But this time we’re not looking at knives… we’re looking at cookware! The Stingray nonstick pan is kicking off a new kickstarter campaign this week. I got a pre-launch sample to see if it’s more than just sharp looks. How did it perform in the kitchen? Let’s cook!

What is it

It’s a nonstick frying pan.

Hardware specs

  • 19.25″ long by 12.25″ wide by 2.5″ deep.
  • 2 pounds, 14 ounces.
  • Aircraft grade aluminum construction.
  • New ILAG nonstick surface.
  • FDA tested non-toxic and PFOA free.
  • Induction range compatible.
  • Oven safe to 480 degrees fahrenheit.

Design and features

I reviewed the Edge of Belgravia Gallatine knife set and Black Diamond knife block last year, and loved the combination of avant-garde design and performance. They’re still my day-to-day weapons of choice. The Stingray is the company’s first foray into other cooking products, carrying through their unique design language in a frying pan design.

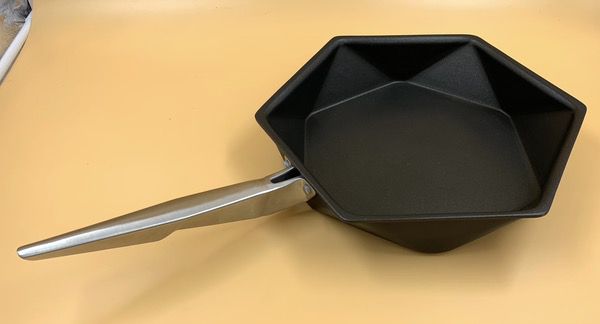
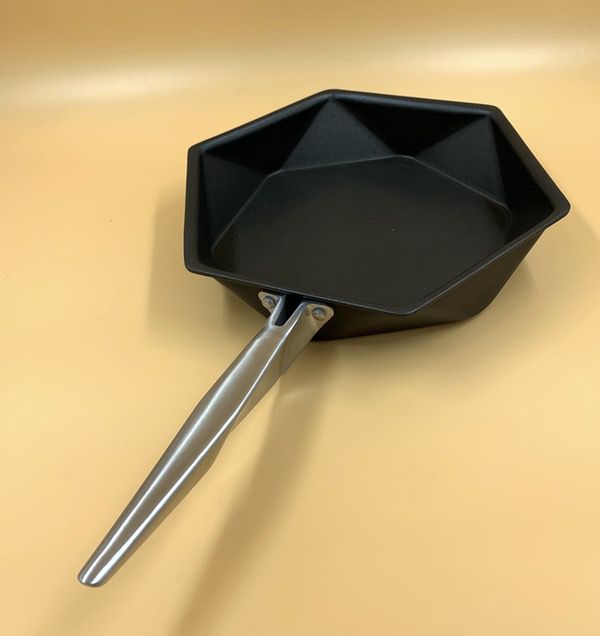
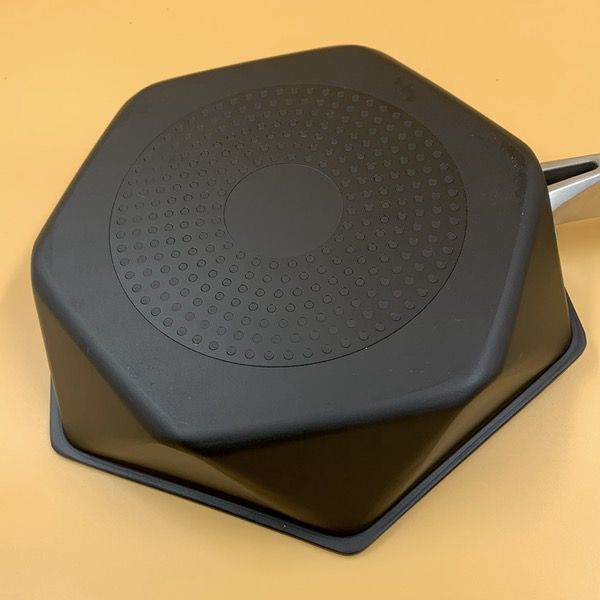
The hexagonal design of the Stingray just looks incredible. The “Stingray” moniker comes from the unique shape coupled with the contoured handle, that vaguely resembles the sea beastie that we all know and love.

But there’s more than pretty looks behind the design of this pan. Heavy-duty aluminum is the primary material. It’s got the stability and thickness of cast iron, but weighs in at just under three pounds. A diffuser on the base promotes even heating and is compatible with induction cooktops.

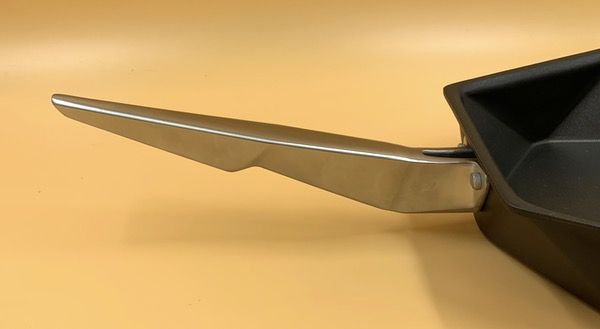
The handle has a nice contoured grip that makes for comfortable maneuvering when put to task. Notice that the angle of the handle keeps your knuckles from brushing against the stove top, and the 9″ length gives you plenty of room to keep your digits safe from the heat.

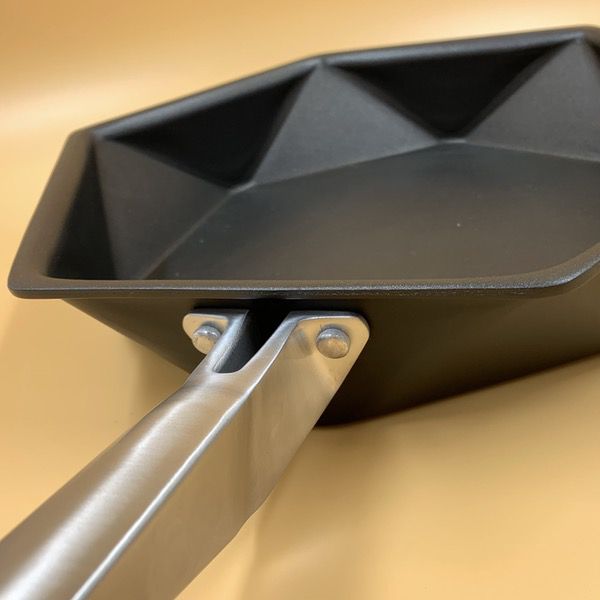
A pair of bolts connect the handle to the pan, and there’s no wiggle to be found in the grip. The construction is rock-solid.

To put the pan to the test, I decided that stir-fry was the way to go. The thick walls of the pan do a great job of absorbing & retaining heat, which is essential for stir-fry. I started with browning some chicken. The hexagonal shape is perfect for that fancy flipping maneuver that makes your guests say “oooh!” I was also able to get a nice sear on the chicken. Check out the action shot below.

The pan is coated with a new nonstick formula that is reportedly provides better durability and will last longer than traditional nonstick coatings. After browning my chicken, I was able to get nice even searing on the veggies with just a touch of cooking oil for flavor.

With a 2.5″ pan depth, this pan is great for both frying and simmering tasks. I added all my ingredients back in the pan along with a sauce to simmer for a few minutes. There’s 1.5 pounds of chicken in there, a whole bunch of vegetables, and a cup of the sauce liquid. I’ve got a meal for 6 in one pan.

Once the cooking is complete, that hexagonal shape is ideal for pouring out your masterpiece. Check out how the corners help me control things when I am pouring out the contents of the pan. I have a LOT of stuff in there, and nothing is leaking out onto my counter.

The finished product, ready to serve:

I’m liking the way the pan retains a consistent heat without the heft of a cast iron skillet. Check out the close-up. We’ve got some nice searing going on.

We’ll have to see how the nonstick surface holds up to long-term use, but I am pretty impressed with what I am seeing so far. It looks pretty tough in my brief test under higher heat, and cleans up well, and leaves no marks or residue on the pan. Edge of Belgravia states that the pan can handle up to 480 degrees in the oven, a temperature that will destroy many nonstick surfaces. We’ll see how that lasts in extended testing.

There are a few things I did find in my testing that you should be aware of. That abrupt vertical angle on the sidewalls is great for simmering and pouring out liquids, but I haven’t tested it on dispensing large flat items (like omelets) yet. I think it should do the job well. The handle can also get warm at higher heats, closer to the contact point with the pan. It does stay cool at the far end of the handle. I think a matching lid for this piece would also be an excellent addition. I used a round lid to steam some broccoli for this dish, but the mismatching shape does cause liquids to condense and dribble down the sides. Maybe we will see that in the future.

What I like

  • Hefty, yet well balanced for handling
  • Great handle design
  • Durable, with an excellent nonstick surface
  • Hexagon shape aids with flipping and pouring

What needs to be improved

  • Handle can get warm neat the contact point with the pan at higher heats.
  • Would like to see a matching lid for steaming and simmering.

Final thoughts

I’m really liking this pan, and have used it several times already for routine cooking tasks. It does a great job of retaining heat and even heat distribution, even on my old glass cooktop. It’s very maneuverable compared to cast iron, and that lighter weight combined with a great handle design makes for confident cooking. The nonstick surface looks to be a winner, too.

The Edge of Belgravia Stingray Kickstarter fires up this week. The pan will be offered in 8″, 10″ and 12″ sizes with a starting pledge of about $60 for the 8″ model. You can choose from a variety of packages and combinations from there. The Kickstarter ends on April 30, with a planned delivery date of November 2019. Check out the link below to learn more!

Price: Starting pledge of about $60 US.
Where to buy: Go to the Edge of Belgravia Kickstarter page.
Source: The sample of this product was provided by Edge of Belgravia.

Filed in categories: Reviews

Tagged: , ,

Edge of Belgravia Stingray frying pan review originally appeared on The Gadgeteer on March 28, 2019 at 3:00 pm.

Note: If you are subscribed to this feed through FeedBurner, please switch to our native feed URL http://the-gadgeteer.com/feed/ in order to ensure continuous delivery.
AUKEY Bluetooth 5.0 Transmitter Receiver review


REVIEW – Bluetooth connectivity has been around long enough now that I have been spoiled by it and simply refuse to consider portable audio devices that do not include this feature and I even look for it as an included feature in some non-portable components. None of the televisions in my home have built-in Bluetooth, but I figure that it would be great to use my Bluetooth headphones and watch TV in the living room while being able to ignore the kids as they engage in activities that I am now convinced are designed to blow my eardrums and make my head spin!! LOL!! The Aukey Bluetooth 5.0 Transmitter Receiver seems like it could be the answer for me and finally an opportunity to score one win in the dad vs kids duel.

What is it?

The AUKEY Bluetooth 5.0 Transmitter Receiver provides dual-mode connectivity for devices lacking built-in Bluetooth. It offers a connectivity range of up to 50m/164’, and it features the aptX Low Latency codec to ensure high-quality wireless sound and synchronized audio and video for gaming and watching movies. It also features a touch control display to control functions and to display the connection status and audio codec used. There are also two slide switches on one side to select the operational mode and function.

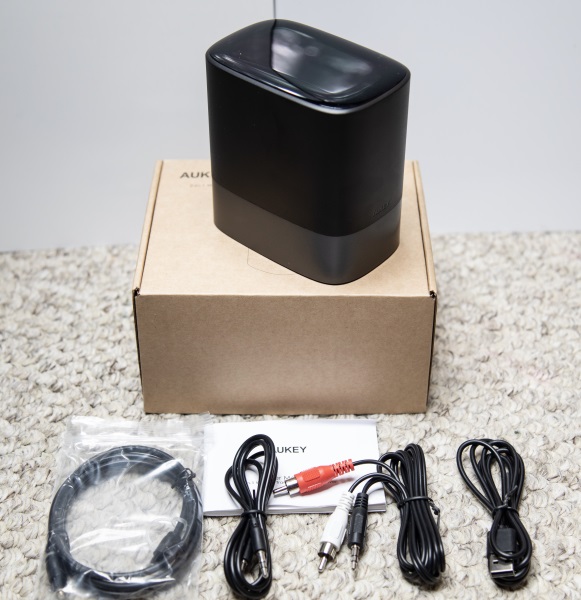
What’s in the box


1 x AUKEY BR-O8 2-in-1 Wireless Transmitter and Receiver
1 x Micro-USB Cable
1 x 3.5mm Audio Cable
1 x 3.5mm to RCA Audio Cable
1 x Toslink Optical Cable
1 x User Manual

Design and features

Specifications

Model Number: BR-O8
Technology: BT 5, aptX, aptX-LL
Frequency Range: 2.402GHz – 2.480GHz
Input: DC 5V
Operating Range: Up to 50m / 164ft
Dimensions: 113 x 110 x 73mm / 4.45” x 4.33” x 2.87”
Weight: 300g / 10.58oz

Features

Bluetooth 5 Technology:
The latest Bluetooth 5 greatly increases the connection range (up to 50m/164ft). Higher bandwidth enables faster pairing and better audio quality for compatible devices.
Low Latency Audio:
aptX Low Latency codec avoids sound sync issues when watching movies or playing games.
Dual-Device Connection:
Simultaneously connect two pairs of Bluetooth headphones. Share your favorite TV series or play a game with a friend or a family member.
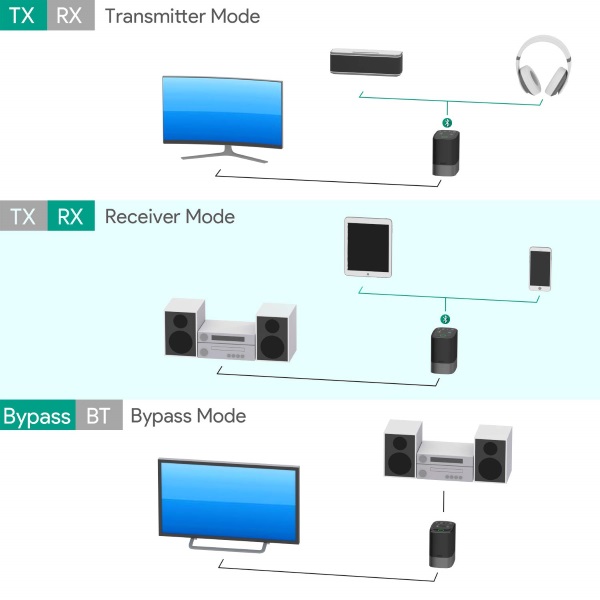
Transmitter Mode:
Wirelessly broadcast audio from your non-Bluetooth TV or computer to your Bluetooth headphones, headset or speakers.
Receiver Mode:
Wirelessly broadcast audio from your smartphone to your non-Bluetooth speaker or home stereo system.
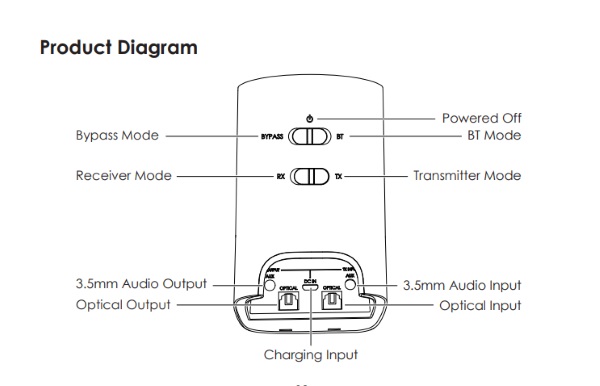
Bypass Mode:
Switch to a pure cable connection between two adjacent or non-Bluetooth devices without unplugging from the BR-O8.

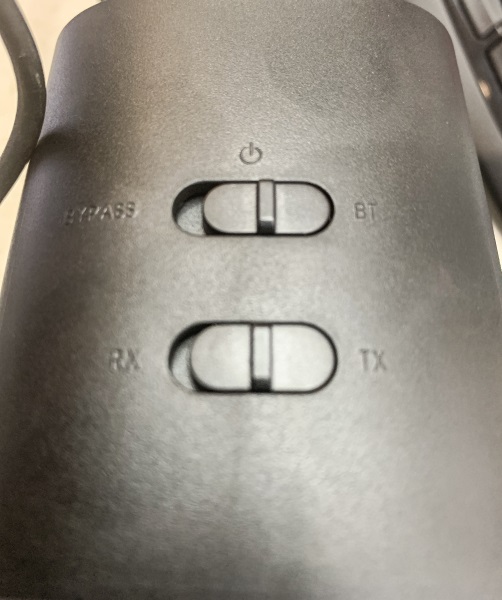
On the back of this device, there are 2 slide switches. the top one allows you to power on in Bluetooth mode or in Bypass mode. The second switches the device to either Transmit or Receive mode.

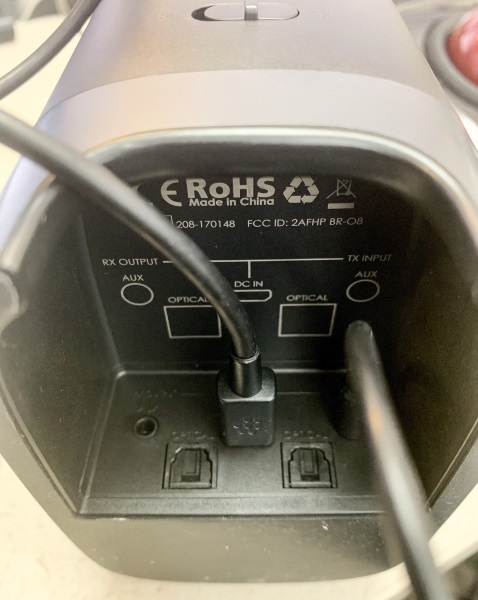
At the bottom of the device, there are the connectivity ports that include a DC in power port, an RX Output 3.5mm port, a TX Input 3.5mm port and one Optical port each for Transmit and Receive connections.
The illustrations below show the functionality, connectivity, and operational options.

Performance

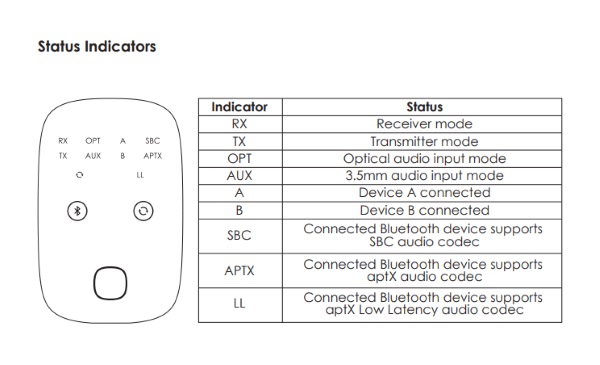
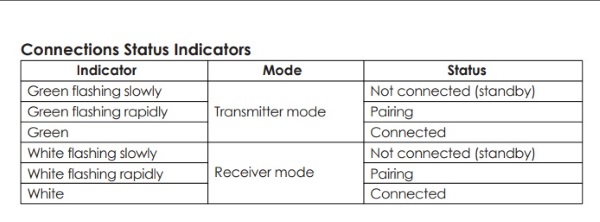
This Bluetooth 5.0 Transmitter Receiver is very easy to use. Right out of the box it is plug-n-play ready. Pairing with one or two devices is quite easy and I did not experience any issues using it in either Transmitter or Receiver mode. The diagram below lists the indicators and the meaning of each.

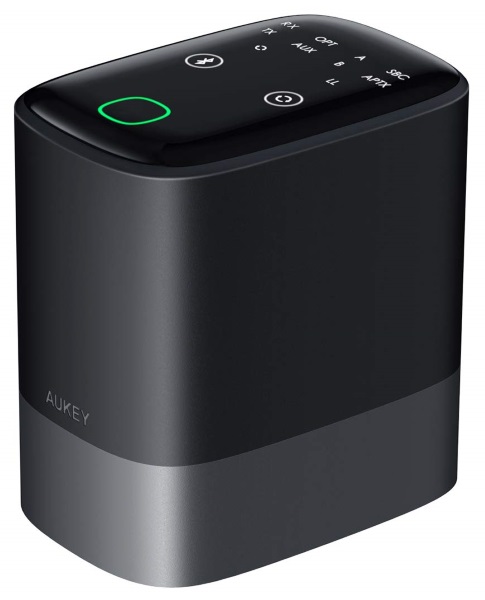
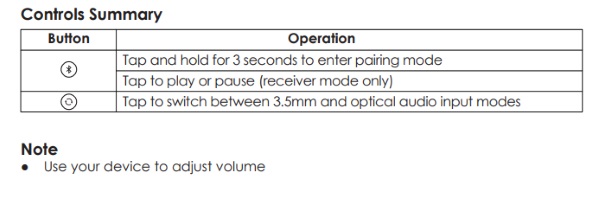
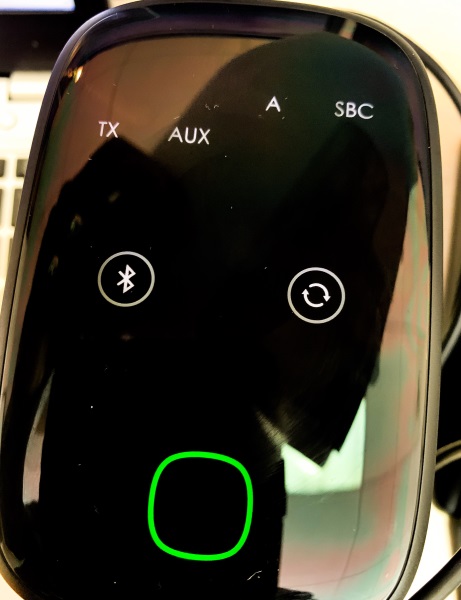
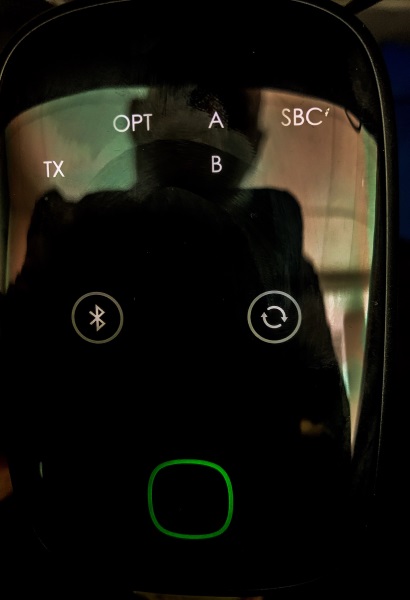
Connecting using Bluetooth is very simple and the instructions are clear and accurate. The touch screen at the top of the device displays the mode of operation (TX/RX), the type of connection and the audio mode. The circular button shown on the bottom right of the touch screen is the selector button that you use to switch connection types. For example Aux or Opt. The “A” shown indicates that one Bluetooth device is connected. In this case, it was headphones.


The photo below shows “A” and “B” indicating that I had 2 Bluetooth devices connected. In this case, it was headphones and earbuds. Oddly enough I forgot to change the connectivity selection to Aux, but it still worked in OPT mode with the auxiliary cable as the connection.

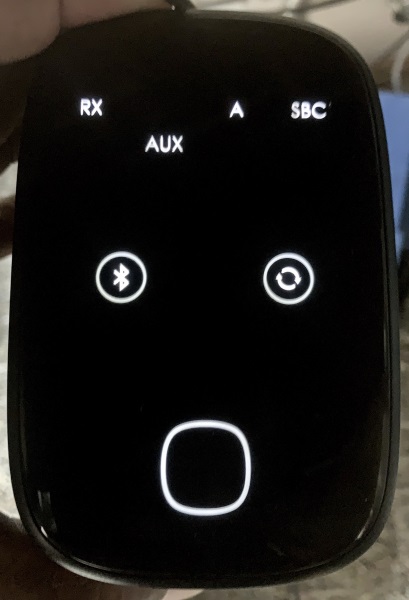
As shown in the picture below, the status indicator is white when it is in RX mode as opposed to green when it is in TX mode. The “A” indicates that I had one device connected which in this case was wired earphones, and I used the device in Receive mode to listen to music from my cell phone.


The following information confirms what you see in the pictures above with the indicator as green in Transmit mode and white in Receive mode. It also explains the visual indicators.

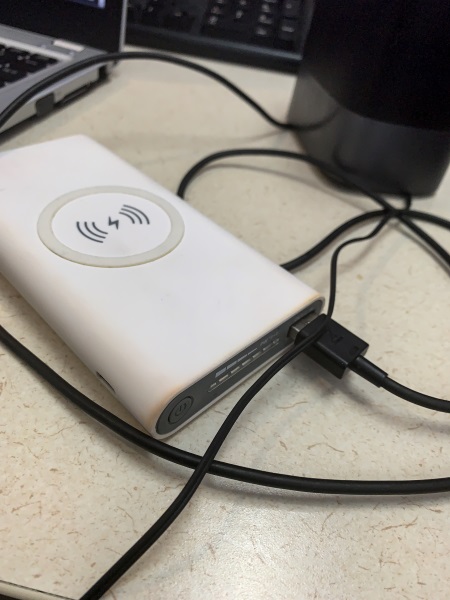
While testing this device, I became obsessed with trying to make it completely portable and I connected it to my USB power bank. It worked, but it seemed to draw too little power to be continuously recognized by the power bank and so the after less than a minute the power bank would turn off.

For additional information, you can read the manual by clicking here.

What I like

  • It is lightweight but not fragile
  • It is both a Transmitter and a Receiver
  • It can connect to two accessories simultaneously
  • The ease of pairing

What can be improved

  • The addition of a built-in battery so it is a stand-alone portable device
  • The touch control top is a fingerprint magnet

Final thoughts

This Aukey Bluetooth 5.0 Transmitter Receiver is a handy, compact and lightweight device that functions very well for what it is designed to do. I have no complaints except that since it is so lightweight, I can think of some scenarios I could use it for if it had a long-lasting built-in battery. Since it seems to need very little power, I would think that the addition of a battery would be doable even if it adds a bit of weight. Regardless, I am giving this device a two thumbs up and a well done!!
Price: $59.99
Where to buy: Amazon
Sample: The sample for this review was provided by Aukey.
Filed in categories: Reviews

Tagged:

AUKEY Bluetooth 5.0 Transmitter Receiver review originally appeared on The Gadgeteer on March 28, 2019 at 11:30 am.
Note: If you are subscribed to this feed through FeedBurner, please switch to our native feed URL http://the-gadgeteer.com/feed/ in order to ensure continuous delivery.