Yale Real Living Assure lock with Bluetooth review

I find myself at a point in life where my hands are always full. Whether carrying work equipment, groceries, or my children, I often find myself without a free hand to open the door to my house.

I was recently given the opportunity to review the Yale Real Living Assure lock. It’s a Bluetooth smart lock that can be opened with your phone or by the keypad. The Assure lock is also compatible with Z-Wave and ZigBee systems so it can be fully integrated into your smart home.

Hopefully, this is the hands-free device I’ve been looking for.

In the box

  • Exterior keypad
  • Interior locking mechanism
  • Latch
  • Strike plate
  • Battery cover
  • Batteries
  • Screws/Bolts
  • Instructions

Specifications

  • Fits on doors 1 3/8″ to 2 1/4″ thick
  • Backset 2 3/8″ or 2 3/4″
  • Face Bore Hole: 2 1/8″
  • Edge Bore Hole: 1″
  • Adjustable latch

Design

The Assure lock isn’t the first smart lock on the market, and it looks fairly similar to its predecessors; however, it does have a feature – or lack thereof – that I haven’t seen before.

The Assure lock doesn’t use a physical key; it can only be unlocked by keypad or by smartphone.

The black portion in the above picture is a keypad. The keypad lights up when the lock is in use but remains off otherwise.

The interior side of the lock looks the same as any other smart lock I’ve previously seen. The upper, black portion of the lock is where the batteries are stored. The black button to the right of the lock is a Privacy Mode button.


The “guts” of the lock also look like other smart locks I’ve seen in the past.

If for someone reason you forget to replace the batteries and find yourself staring at a “Dead” lock, you can use a 9-volt battery to temporarily power the lock.

You can see the 9-volt contacts on the bottom of the lock, in the picture on the right, above.

Installation

Although it probably goes without saying, the first step in using the lock is installing it.


For me, this met removing my old deadbolt from my door.


Next, you slide the latch into the door.


Now you install the keypad on the exterior side of the door. When doing this you have to be sure to run the attached cable under the latch.

Next, you install the mounting plate on the interior side of the door, making sure you run the cable through the proper channel.


You next insert the cable into the port identified by the yellow arrow in the left picture. Then you attach the lock to the interior side of the door.

Finally, you insert four “AA” batteries and attach the battery cover.

The Assure Lock installation was simple and easy; it shouldn’t take more than a few minutes to install.

Performance

For the most part, using the lock is simple.

The first step is “waking” the keypad.

This is done by placing your hand over the keypad.

After doing so, the keypad should light up like above.

When using the lock for the first time, you have to create a Master Pin code. This is done by pressing the gear button, selecting a four to eight digit code, then pressing the gear button again.

Once the Master Pin is set, you can do the following:

  • Create User Pin codes
  • Set Automatic Re-lock times
  • Activate Indicator Lights
  • Activate One Touch Locking
  • Activate Privacy Settings
  • Adjust Volume
  • Adjust Language
  • Activate Lockout Mode
  • Program ZigBee and Z-Wave (if equipped)
  • Program Bluetooth

After you’ve adjusted all the options, you’re ready to use the lock.

To unlock the door you have two options.

First, you can place your hand over the keypad to wake it, and enter the User Pin you created to unlock your door.

You can also unlock the door via Bluetooth with your smartphone, but I’ll get more into that later.

If you have One Touch Locking activated, you can lock the door by waking the keypad. If One Touch Locking isn’t activated, you lock the door by entering a User Pin.

If you’re inside the residence, you can lock the door by turning the knob.

If for some reason you didn’t want anyone entering your home, you can hold down the Privacy Mode button for four seconds. This disables all pin codes until Privacy Mode is turned off.

Before I move on, I should mention there is actually a third way to unlock the door. The Assure lock is Zigbee and Z-Wave compatible; unfortunately, you have to buy a separate module first. The module can be purchased from the Yale Accessories page for $75.

I wasn’t provided with the module so I can’t comment on how well it does or does not work.

Yale App

In order to take advantage of the Assure’s Bluetooth feature, you’ll first need to install the Yale app on your phone. The app is compatible with Android devices 4.3+ and iOS devices 9.0+.

After you install the app, the first thing you will need to do is add the lock to your account.

After the lock is added, you will be greeted by the above screen.

Clicking on the icon in the lower left corner brings up the above window. All the above options are self-explanatory and don’t require any further description.

Clicking on the key will bring up the options menu. From here you can adjust notifications, change the key image/color, rename the key, etc.

More importantly, this is where you can assign keys to friends or family.


First, you press invite user and enter a name, email, or phone number. If the person hasn’t registered with the app before, you will be asked to send them an invite.

Once they download the app and register, you can select them and send them an unassigned virtual key. Before finishing the process you will have to enter your password.

When assigning keys, you can choose to make the key permanent or temporary.


A temporary key can be for a specific date range or a weekly schedule; this is an exceptional feature if you have a weekly babysitter, cleaning service, or go on vacation and have a dog-sitter.

Once you have the app set up and keys assigned, using the Bluetooth function is easy; however, it took me forever to figure out.

This is how the instructions explain how to use the Bluetooth feature.

It seems easy enough, but I couldn’t get the Bluetooth feature to consistently unlock. It always took me three or four attempts to get the Assure to unlock. I took the exact same steps every time.

First, I’d twist my phone as described above. Then I’d wake the keypad by placing my hand over it. Finally, I’d press the check mark. Unfortunately, this never worked on the first try.

For the life of me, I couldn’t figure out what I was doing wrong. I tried finding better documentation online or through the Yale app but was unsuccessful.

Eventually, I did find the following video on the Yale website.

I must have watched the video half a dozen times before I realized the person in the video doesn’t wake the keypad before pressing the check mark.

I then tried to use the Bluetooth function without waking the keypad and… VIOLA!… the device unlocked.

Clearly, it’s my fault for not taking the instructions literally; nowhere in the instructions does it tell you to wake the lock. I just assumed the check mark would have to be lit to press it. That being said, I do think the instructions should indicate the keypad doesn’t need to be activated.

The nicest part about the Bluetooth feature is that is has a two-minute window. If you do have your hands full, you can twist your phone and you have two minutes to press the check mark.

My only complaint is that the two minutes may not always be enough time. If you’re bringing in a large amount of groceries or have to remove your kids from a child safety seat, you may run out of time. It would be nice if the two-minute window were adjustable.

Conclusion

The Yale Assure lock is an excellent smart lock. It’s easy to install and easy to use; although, the instructions could use clarification.

The fact that it requires an extra module for ZigBee or Z-Wave compatibility is disappointing, but in fairness, the Assure Lock is comparable in price to smart locks that only have either Bluetooth or Zigbee/Z-Wave.

I like the Assure so much I’m considering purchasing the module so it will work with my Samsung Smarthings system.

If you are in the market for a reliable smart lock, I would suggest investing in the Yale Assure lock. I assure you {rimshot}, you won’t be disappointed.

Source: The sample for this review was provided by Yale. Please visit their site for more information and Amazon to order.


Product Information

Price: $199.99
Manufacturer: Yale
Retailer: Amazon
Requirements:
  • For Bluetooth feature – Android devices running 4.3 or later, iOS devices running 9.0 or later and Samsung Gear smartwatches running 4.3 or later.
Pros:
  • Easy install
  • Easy to Use
  • Temporary Keys are an excellent feature
  • Ability to add ZigBee/Z-Wave
Cons:
  • Instructions could use clarification

Filed in categories: Home and Kitchen, Reviews

Tagged:

Yale Real Living Assure lock with Bluetooth review originally appeared on on March 5, 2017 at 8:00 am.

Note: If you are subscribed to this feed through FeedBurner, please switch to our native feed URL http://the-gadgeteer.com/feed/ in order to ensure continuous delivery.

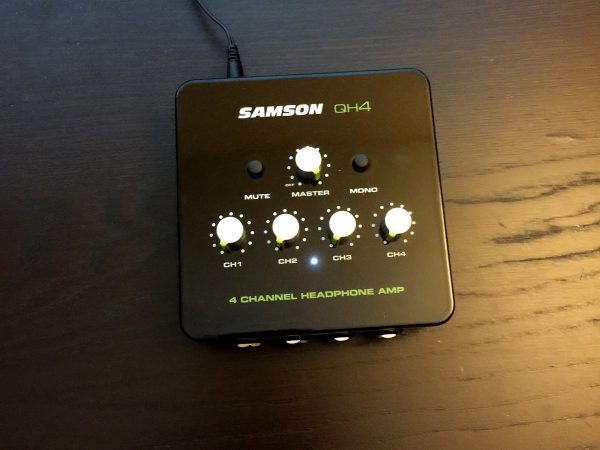
Samson QH4 4-channel headphone amplifier review

So, I’m a music guy. I like listening to music, writing music, talking about music, sharing music, and (other present imperfect continuous verbs) music. The SAMSON QH4 is a bit of a multitool for people like me. I can plug a few pairs of headphones into it, and share my music with friends. I can mix on multiple sets of headphones for those nights when I simply must mix quietly but don’t want to fall into any EQ traps. I can slay the Vicious Chicken of
… if you automatically said “Bristol” under your breath, congratulations, you likely have the same social issues that I do.  That, however, is irrelevant to this review, so I hope you’ll let it go and focus.

What is it?

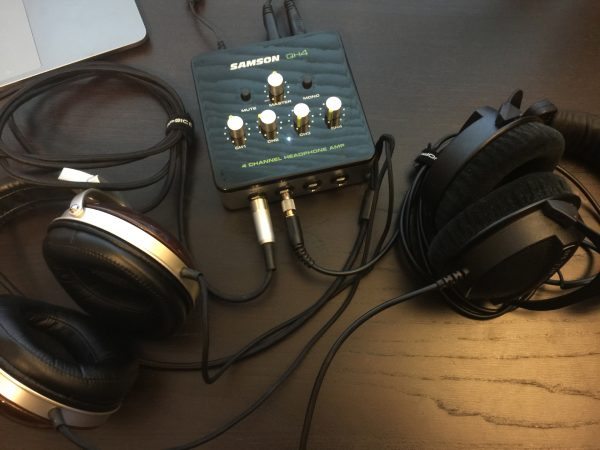
The SAMSON QH4 connected to a pair of Denon D7000’s (25Ω) and a pair of Beyerdynamic DT-770Pro’s (80Ω)

The SAMSON QH4 is a four-channel headphone amplifier with several neat tricks that belie its low price. I’m going to leave the technical details ’til later, so you don’t get overwhelmed with specs such as “Maximum Output: 8.3 dBu, 1% THD+N, loaded 16R,” and instead will talk about what it does well, and for whom it’s made.

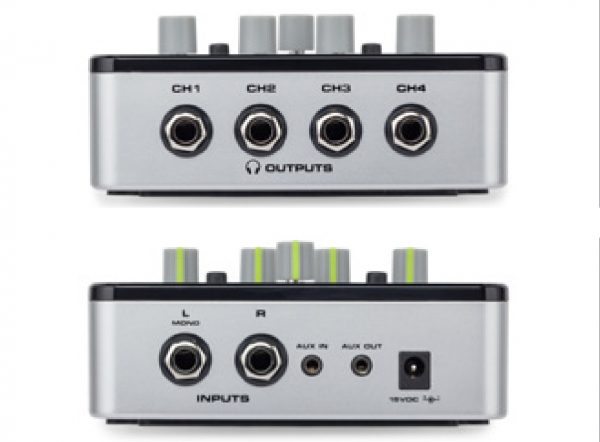
At its most basic, connect the included DC adapter, plug a source into the back, and as many as four sets of headphones into the front, and you’re in business. While there are input connections more commonly found in a studio, there are also 3.5mm jacks on the back for both input and output of your audio signal, allowing you to use it with something like a phone or tablet. This is one of those neat tricks, as there are alternatives to this unit at over twice the price that demand that you only feed them with connections not common to most music lovers. Furthermore, you can take the aux output, and run it to another QH4, and repeat until you have a massive head-bobbing horde. Each headphone output has its own discrete volume control, and these are limited by the master input knob. A stereo signal incoming from the back can be converted to mono, which is darn useful for folks that might be using this in a more professional environment, and there is a master mute button that does not cause any potentially headphone-damaging POP sounds when toggled. If you only have a mono source, you can connect up to the left channel jack on the back, and it will be doubled over to the right ear. This is not the same as pressing the mono button on the top, and unless you’re listening to some classic Beatles (and even if you are, honestly), you’ll likely want to avoid that unless you’re sure you need it.

As for who would get use out of this little guy, I’ll say that audio professionals will find everything they need to know in the next section. As for the rest of you, sit back and think of the possibilities! Chances are, you now know whether you would benefit from owning a QH4, but I’ll throw out some use cases:

  • I’m guessing you like everyone else within 400 meters of you has a podcast. When you reach that point of needing to add a co-host to act as the Lewis to your Martin, you can both listen to the same source, and both at comfortable levels.
  • Music teachers can have several students listening to a track, each with comfortable volume levels.
  • The QH4 is a perfectly reasonable headphone amplifier, even if only plugging in a single pair of headphones.
  • Couples and friends can share music in a less social, but more quality-focused way than gathering everyone around their cheap Bluetooth speaker, and this is good, because your friends think that weird LED light show it does when you’re listening to “Somebody That I Used to Know” is tacky and now Derek is crying again.
  • Video editors working in an edit bay can have multiple individually volume-controlled outputs for when the producer comes by and insists on sitting behind you while they work.
  • This one is rare, but relevant to my experiences. A single Bluetooth transmitter from your home entertainment system can be used to beam the audio across the room where mom and dad sit on the couch watching… Let’s say Jonathan Creek*, and of course, both need different headphones in order to be happy. (Perhaps they’ll never be happy. No, I misjudged, the BBC has saved another evening!)
  • Have more than one person mixing or just jamming in your church band? Easily split up your audio and ensure everyone is REALLY hitting that I – V – vi – IV that you’ve been practicing

For $69.99 (MSRP), you can get an awful lot of use out of this budget (price, not quality) amplifier.

Now, taking off the kid gloves, I will discuss:

Really, what is it? Like, in detail this time, please?

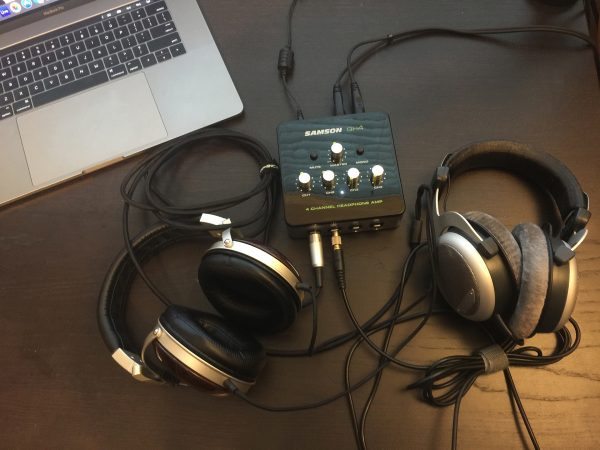
The SAMSON QH4 connected to a pair of Denon D7000’s (25Ω) and a pair of Beyerdynamic DT-880 Pro’s (250Ω)

As is sometimes the case, this more technical section will be shorter than the dross I wrote above. How can I even consider myself an audio product reviewer? I haven’t even discussed things like imposed vowel coloration or how liquid the sound is. Really, I didn’t because there are perfectly good tables of data that can give you a clearer picture of the sound. You know, a picture of a table that describes a sound. What could be more clear than that?

SAMSON provides the following specifications for the QH4 (emphasis mine):

  • Inputs: 2 x 1/4″ balanced, stereo 1/8″ unbalanced TRS
  • Outputs: 4 x stereo 1/4″ unbalanced, stereo 1/8″ unbalanced TRS
  • Controls: Master Volume, Master Mute, Master Mono, 4 x Channel volume
  • Noise Floor: -114dBu, 22k BW unweighted
  • Maximum Output: 8.3 dBu, 1% THD+N, loaded 16R
  • Dynamic Range: 22dB, 22k BW
  • Frequency Response: 17Hz–47kHz (-3dB)
  • Power: 15VDC adapter (reviewer’s note: The adapter is positive tip)

If you’re braving this section of the review, I will assume you know what at least a few of those mean, but I’m going to just point out a couple bits that will illustrate how the QH4 is, while inexpensive, still targeted at the budget pro audio market first and foremost.  One bit that I quite like is that it has balanced inputs. Because Terry is still reading, even though I explicitly said that this was for the more technical inclined, I’ll explain a bit. The venerable 3.5mm or 1/8″ TRS cable is ubiquitous and not going away any time soon, regardless of what Apple might think. In a TRS cable (tip, ring, sleeve) there are three conductors used. Just to throw a bit more knowledge at you, your phone headset uses a TRRS cable (tip, ring, ring, sleeve). The QH4 accepts incoming audio in one of three ways:

  • Stereo from the 3.5mm auxiliary input
  • Balanced stereo from the main balanced inputs
  • Single channel mono from the left input (you must leave the right input disconnected in order to monitor a mono source, in this case)

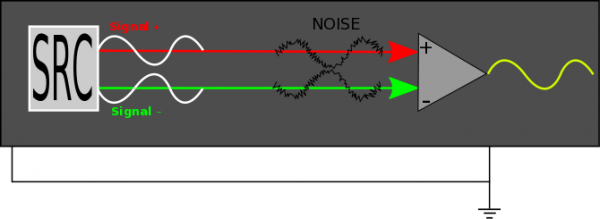
You might note that this is the second time I’ve bolded the word Balanced. This is because most people don’t have any balanced sources available, and I wanted to highlight the difference between balanced and unbalanced. In a balanced configuration, you will have one conductor for ground, and two conductors for the single channel of audio. Why you might ask? It’s all to do with noise, and the quest to prevent it from ruining our day. When using TS (mono) or stereo TRS cables, noise may be introduced or perhaps just magnified by the sheer fact that you’ve got yourself what amounts to an antenna the length of the cable. This can be what we in the music industry call “not good.” A balanced TRS or balanced XLR cable will have one ground conductor, one audio signal conductor, and a third conductor that carries that same audio signal only flipped upside down (inverted). If you understand how noise-cancelling headphones work,  it will make perfect sense. The device that is listening to a balanced source will run those two signals against each other, canceling out the noise.


This is especially useful when you are running cables over a long distance, as the length of the cable increases the effect of noise that is added to the signal.

So, if you have a balanced output like my Apollo audio interface or any number of mixers, you can be assured that you’re getting the best possible signal to the amplifier, and that can only be a good thing, right?

Impressions (technical)

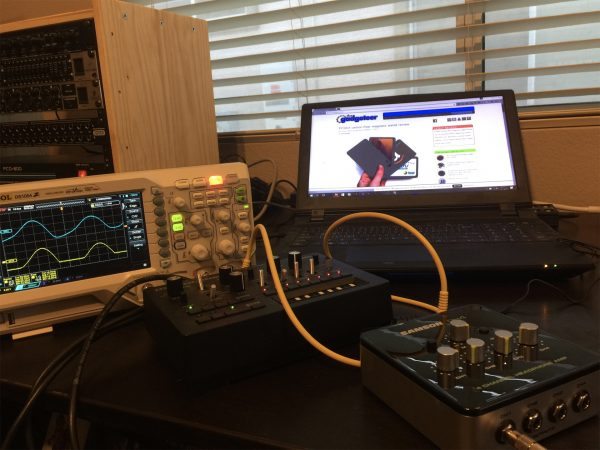
I ran a battery of tests against the QH4, attempting to take some small measure of the subjective nature of audio products out of the equation. I ran a few interesting tests but frankly, I only found two results to be significant. The first involved routing a few of my sources that also have built-in headphone amplifiers through the QH4 and into my oscilloscope. That is to say, a TRS plug was connected to the source audio device and run into channel 2 of my oscilloscope while the line out of the device was run into the QH4, then amplified and fed into channel 1 of my scope. This revealed some interesting, though ultimately not particularly audible clipping. In the display below, you can see where the QH4 seemed to run into some issues with clipping. Further investigation seems to have revealed a small DC offset introduced that flattened things out a bit as it clipped.

As severe as it appears to be on the scope, it seems to have a surprisingly small impact on the sound. I was able to recreate this clipping effect on every source I used. I swapped cables, held one cable over my head while chanting, and swore really loudly (all well-known diagnostic techniques), but the result was the same regardless of output type. I’m going to mark this up as “huh” and move on, as again, it doesn’t seem to impact the quality in a meaningful way. I used the mono output of a Korg Monotribe to go into the mono input of the QH4 (yellow cable), and a ran TRS to BNC cable from the QH4 to channel 1 of my scope. I then ran a TRS to BNC cable from the Monotribe’s built-in headphone output to channel 2.

SAMSON isn’t kidding when they say there are four discrete amplified jacks on the front. Regardless of what headphones I had plugged in, even over a dummy load of 600Ω plugged into all but one output, there was never any quality or

I call this wave the R. Lee Ermey. It’s got a flat top you could land a helicopter on.

volume loss in the other channels.   SAMSON claims that the headphone outputs are capable of reliably driving headphones with impedances from 16Ω to 600Ω, and I saw nothing that made me doubt that claim. I can say that I feel it drove the 250Ω Beyerdynamic DT-880 Pro cans better than the Denon, but you can say whatever you want, too. I’m sorry if I interrupted you!

One feature I wasn’t aware I was missing in my life is the mono button. Listening to one of my tracks as I was mixing it, I switched into mono mode and immediately heard holes where frequencies should be. Similar to noise-cancelling headphones, if your track has similar but inverted waves to any serious degree, there will be some cancellation, but it’s often difficult to track unless you have either a dedicated VST / tool that will help you identify phase cancellation issues or a big fat MONO button on your headphone amp. Ok, there are many more ways, really, but the mono button is just cool. I was able to locate and rectify the phase issues after a couple minutes in mono mode. Neat!

The build quality is best described as utilitarian. The QH4 weighs little enough that quite stiff but bendy patch cables could lift it off the table. If you prefer your devices beefy and with some heft, or you run into a situation where the QH4 is being moved around too much in normal use, you might consider hot gluing a couple fishing sinkers in the case. You’d be surprised at how effective a trick this is for nearly all electronic devices. The glossy black plastic top is a serious fingerprint magnet, so keep the microfiber cloths handy, or commit to washing your hands before each volume change. The pots are smooth, and with one exception, just right for the price. The exception is the master volume control. There is no dedicated power switch on the QH4, rather you turn the master volume all the way down past the click and it’s off. In my testing, however, I accidentally turned the device off easily a dozen times while quickly changing the master volume. This is because the actual off position is just before the click, so there’s nothing but a visual indication that you are turning it off. Further, when the device turns on, there is a mild but noticeable thump in any headphone that is not individually turned down. It is always best practices to either disconnect your headphones or ensure the volume levels are minimal when turning a headphone amplifier on or off, and this isn’t a serious thump like I’ve seen in some cases (I’m looking at you, Focusrite and Mackie.)

Impressions (subjective) and conclusion

I really like the SAMSON QH4. The sound is not quite up there with my other headphone amplifiers, but it also cost less than a fifth of the next contender, and I didn’t need to solder for two days to get it working! The build quality, while not incredible, is roughly what I would expect for an amp in this price range. It does feel like they’re using quality jacks, at least compared to some others in the same league, and that counts for an awful lot with me, as I know where these types of things tend to commonly fail. I predict that the first component to wear out will be the volume knob for output 1, as it will get by far the most use, and at this price point, I doubt they have top of the line ALPS pots inside. I’m not terribly pleased with their choice in knobs, either. The pseudo teardrop knob design is old and well-loved by many, but I find these knobs awkward to grasp without accidentally squeezing too hard and shifting the volume to some degree.

All of this said, I quite like the QH4, and I’m reasonably sure it will end up in my “keep, because you never know” box. The quality is just right for the price, and the little extras are similar to features on far more expensive amplifiers. It is a new product, so we won’t know how well this little sound enloudener will last with daily use, but at this price, I doubt anyone would get less than their money’s worth.

*If you somehow have managed to avoid watching Jonathan Creek, you must resolve this issue as soon as possible. A man who designs magic tricks solves murders with a fabulous investigative journalist. I suggest that if this doesn’t sound amazing to you, you might need to turn up the volume and try again.

†With a TRS cable, or more appropriately a TRS plug connected to a stereo source, one conductor carries the right channel, one carries the left, and the third is the ground conductor. With a TRRS plug, you get the usual stereo and ground conductors, but also have one heading right back into the phone, sharing the common ground. This conductor carries the audio from your headset microphone back into the phone.

Source: The sample for this review was provided by Samson. Please visit their site for more info and Amazon to order.


Product Information

Price: $69.99
Manufacturer: SAMSON
Retailer: Amazon
Pros:
  • Solid sound and flexibility at a low cost
  • Excellent connectivity options from TS mono to TRS stereo and dual TRS balanced
  • Modern design will look at home in most settings
  • Four truly independent channels mean no one listener will impact others
Cons:
  • It feels as inexpensive as it is
  • Fingerprint nightmare on top surface
  • Master volume control "off" latch occurs before the click

Filed in categories: Audio, Video, TV, Reviews

Tagged:

Samson QH4 4-channel headphone amplifier review originally appeared on on March 4, 2017 at 8:23 am.

Note: If you are subscribed to this feed through FeedBurner, please switch to our native feed URL http://the-gadgeteer.com/feed/ in order to ensure continuous delivery.

Monster Vision 1080p+ action cam review

The Monster Vision 1080p+ is an action / sports camera that can capture video at 1080P resolution. I recently reviewed my first action cam (the Andoer 4K action camera) and wasn’t overly impressed. When I was offered the chance to review another camera by a well-known name, I was happy to check it out. Let’s take a look.

What is it?

The Monster Vision 1080p+ action cam is a 1080P camera that can capture video with audio, and images. This camera can also be used as a dashcam.

What’s in the box?

Monster Vision 1080p+ action cam
16GB micro SD flash card
micro USB charging cable
Waterproof housing
Variety of mounting hardware for handle bars, tripod, window and more.
Quick start guide

Hardware specifications

Optics: 8MP CMOS 170 degree wide angle lens
Video: 1440p 1920×1440 30fps, 1080p 1920×1080 6fps, 720p 1280×720 60fps & 120fps
Video Format: MOV (H.264)
Photo: 3,5,8,10 & 12MP
Photo Format: JPEG
WiFi control via mobile app
Memory: 16GB micro SD card is included
Battery: Li-ion 1200mAh

Design and features

The Monster Vision 1080p+ action cam looks very similar to the 100’s of other action cameras on the market. It’s a rectangular black plastic camera with a lens on the front. Also on the front in the lower right corner is a charging and recording status LED. It lights up in blue while charging and blinks red while recording.

On the left side of the camera is the WiFi toggle button which doubles as the down button when navigating through on-screen menus.

On the opposite side of the Monster Digital action camera, you will find a speaker at the top and a micro SD card slot below it. A 16GB card is included with the camera. There’s also a micro USB port for charging and a mini HDMI port if you want to connect the camera to a display. Note that a micro HDMI cable is NOT included with the camera.

On the back of the action camera is the 2-inch color LCD display. In the upper left corner is the Power / recording status LED which glows solid red with the camera is powered on, and blinks while recording. On the right side of the LCD display is the Display / Menu button. This button can be used to toggle the display off and on and brings up the camera’s settings menu when you’re not recording video.

The menus are pretty standard for an action camera. You can switch video modes, resolutions, tweak white balance, etc.

On the bottom of the camera is the battery compartment. Note that the battery is rated for only about 1 hr and 75 minutes of video capture per charge and it takes 2-4 hrs to recharge it.

And on top is the power / mode button and the OK button which is used to select items in the menus.


Operating the camera

Like most action cams, operating it is pretty simple. Just get in the mode you want and start recording. For the Monster Digital camera, you can switch modes just by pressing the power / mode button on the top of the camera. Holding down the button for a few seconds toggles power and when the camera is on, pressing the button will cycle through video, photo, dashcam and playback modes. The camera is supposed to remember which mode you were in and will start back in that mode upon cycling power. I found this to be true, but only for video and dashcam modes. If you turn off the camera in photo or playback mode, it starts back up in video mode.

Controlling the camera via WiFi and the Monster Digital mobile app


To control the camera remotely, you have to install the free Monster Digital mobile app, turn the camera on, press the WiFi button on the side, switch to that WiFi connection on the mobile device, type in the password and go back to the app. You’re then able to remotely change settings, see a live view of the camera, snap photos, capture video and even play back photos and video.

Playing back video is a little wonky though. Most of the time I could hear the audio, but the image remained black.

Sample images


The photo capturing capability of the Monster Digital 1080p+ is ok. I wouldn’t consider using it as my primary camera, but in a pinch, it’s better than no camera at all.

Close up images like the first image on the left will show some slight bulging due to the wide angle lens. You don’t notice this with longer range shots.

Sample videos

I think this camera’s video quality which I had set at 1080p 60fps is pretty good. I’m not going to say that it blew me away because I feel like my Nexus 6P smartphone does a much better job capturing super clear video. But for a $100 camera, it’s not bad.

There are a couple things to mention though. First of all, the camera has an image stabilization feature that can be toggled on and off in the menus. I captured video with it enabled and disabled and could not tell any real differences. In the video sample above, the feature was enabled as I was walking around in the woods with the camera attached to the IK Multimedia iKlip Grip Pro.  I was also not overly impressed with the audio capture quality as it sounds a bit fuzzy and muffled to me.

Final thoughts

Is the Monster Vision 1080p+ the best action camera on the market right now? I think it’s safe to say that it isn’t. But when it’s all said and done, I do think the Monster Vision 1080p+ action cam is a decent sports / action camera that is easy to use, captures good quality video and isn’t overly expensive.

Source: The sample for this review was provided by Monster Digital. Please visit their site for more info.


Product Information

Price: $99.99
Manufacturer: Monster Digital
Pros:
  • Easy to use
  • 16GB microSD card included
  • WiFi mobile control
Cons:
  • Built in image stabilization seems to have no effect
  • Audio quality is not the best

Filed in categories: Camera Gear, Reviews

Tagged:

Monster Vision 1080p+ action cam review originally appeared on on March 3, 2017 at 7:06 am.

Note: If you are subscribed to this feed through FeedBurner, please switch to our native feed URL http://the-gadgeteer.com/feed/ in order to ensure continuous delivery.

DesignSkin The Slider iPhone 7 case review

Cases for smartphones are a constant subject of review here on The Gadgeteer. The latest craze I’ve seen in the case market is adding a place to store a few ID/Credit cards and some cash. The Slider, from DesignSkin, is one such case recently sent to me for testing.

Note: Photos may be tapped or clicked for a larger image.


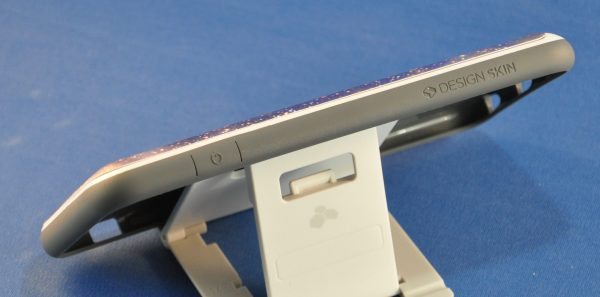
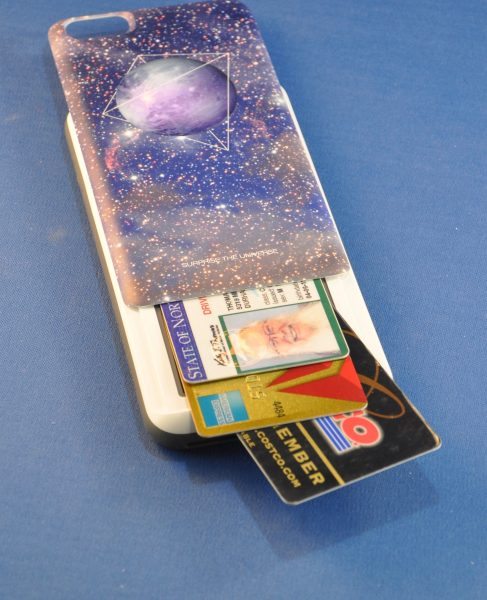
The case is available for a handful of the most popular smartphones on the market and comes with many different graphic back panels. I requested the “Surprise the Universe” pattern. It arrived very quickly, and fit my iPhone 6s Plus perfectly. The interior of the case and the outer edges are a slightly pliant grey plastic.

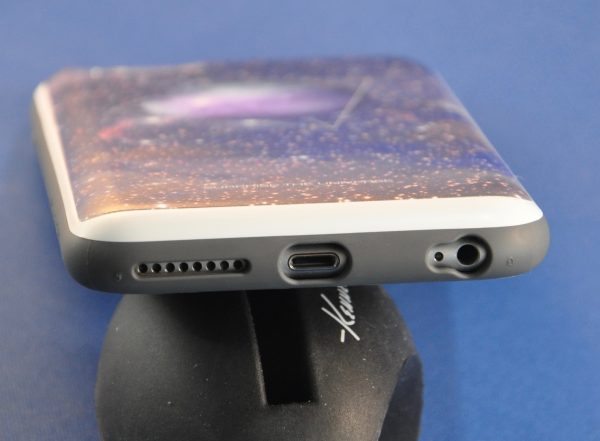
There are cutouts in the usual places for camera, flash, ringer silencing switch, speaker, microphones, lightning port and headphone jack.

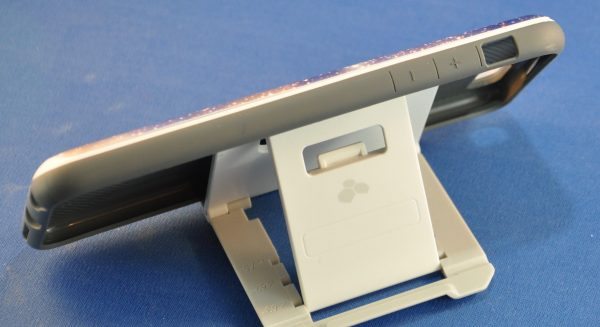
The volume buttons are covered, but their location is clearly marked on the case exterior. There is a similar denotation of the location of the Sleep/Wake button.

The case wraps around the screen and protrudes slightly – just enough to not actually touch any surface that you may place your phone on face down, but not really enough to protect it should there be sand or anything gritty on that surface. The edges, while not sharp, are not “grippy”, but slightly slippery. Though not as slick as a bare phone, it gives very little grip. The thickness of the plastic around the outside of the phone, however, should truly protect it in case of a drop, but that thickness works against things being connected through the ports. Docks, some headphones, several charging cables, and my DXO One camera are not able to connect well enough to operate normally. (See a dock and the regular Apple leather case versus the Slider in the two photos below.)


The “Slider” feature is just that: the rear panel of the case slides up to reveal a credit-card sized pocket that will hold 2 or 3 cards, depending on the thickness. The thin plastic that covers it shows no signs of being a screen for the wallet, so there is a good bit of stealth in the case as well. If you want to carry your driver’s license, a credit card, and a door access card, I’m sure you’d have no problem with the card being read through the backing. If you need to carry more than that, however, you’ll be out of luck, because there is zero “wiggle room” in the hidden pocket.


The printing on the back of the case is a matte finish and is evenly applied. The graphic actually appears to have depth in, but it’s just an optical illusion. Not sure if the paint will scratch off over time. It has zero scratches from the time I’ve been using it, but I usually don’t keep anything else in my shirt pocket with my phone.


All told, if you’re looking for a soft case with a nice look and a bit of protection that will let you hide a card or 3 inside, this could be your model. At $19.99, it won’t break the bank, even if you decide to get several designs.

Source: The sample for this review was provided by DesignSkin. Please visit Amazon.com to purchase.


Product Information

Price: $19.99
Manufacturer: DesignSkin
Retailer: Amazon
Requirements:
  • Device to protect
Pros:
  • Easy to insert phone into or to remove.
  • Allows easy, yet hidden access to cards.
  • Raises screen above tabletop
Cons:
  • Thick edges prevent some cords and accessories from attaching.

Filed in categories: Cases and Covers, iOS, Reviews

Tagged:

DesignSkin The Slider iPhone 7 case review originally appeared on on March 2, 2017 at 11:15 am.

Note: If you are subscribed to this feed through FeedBurner, please switch to our native feed URL http://the-gadgeteer.com/feed/ in order to ensure continuous delivery.

PITAKA carbon fiber magnetic wallet review

Have you been shopping for a new minimalistic wallet but don’t want one with the same old tired style as everyone else’s minimal wallet? Then look no further my friends because I have a wallet that you’ll want to check out. It’s the PITAKA carbon fiber magnetic wallet and it’s definitely unique. But is it the perfect minimalist wallet? Let’s find out.

What is it?

The PITAKA carbon fiber magnetic wallet is a minimal wallet that’s made of carbon fiber, which is RFID blocking. It also features a modular layered design that allows you to customize what it can hold.

Design and features

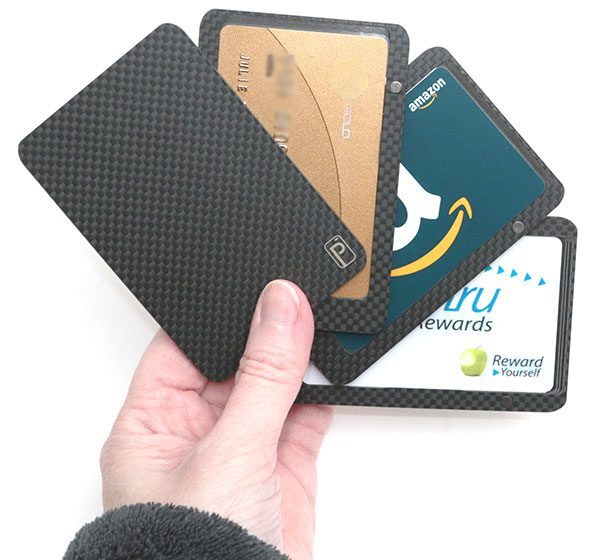
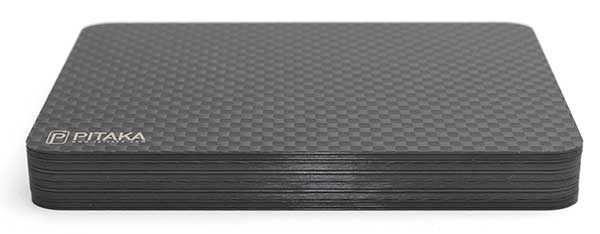
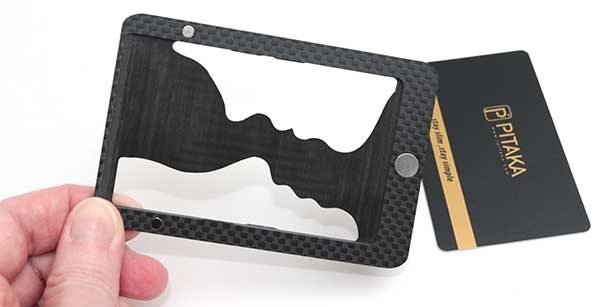
The PITAKA wallet resembles a deck of playing cards in shape, size and even with the layered “card” design.

Made of carbon fiber, the wallet is lightweight but tough.

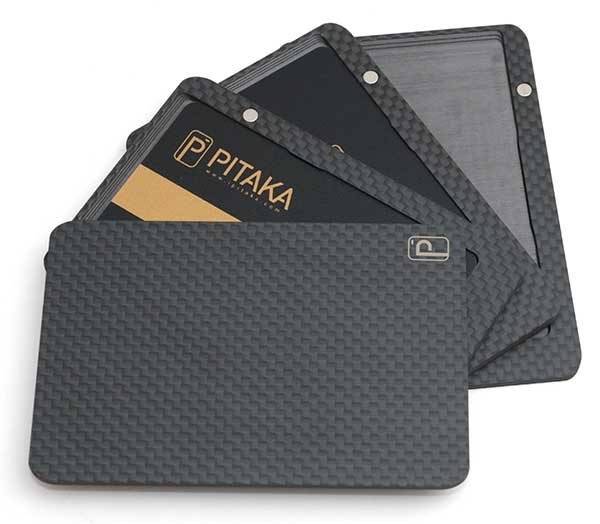
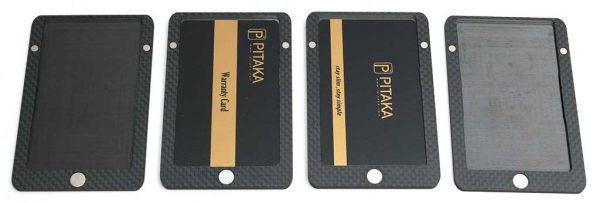
The main wallet ships with four layers that include the top and bottom layer end pieces that can hold one card each and two internal layers that each hold two cards. That means that the wallet can hold a maximum of six cards.

PITAKA also sells additional layers that can hold coins, a key, SIM card, micro SD cards, and cash.

There are three magnets embedded in each layer. The larger magnet in the center bottom edge and two smaller magnets on the side edges. The location of the magnets allows for the card fanning effect that you can do with one hand (see video demonstration below).


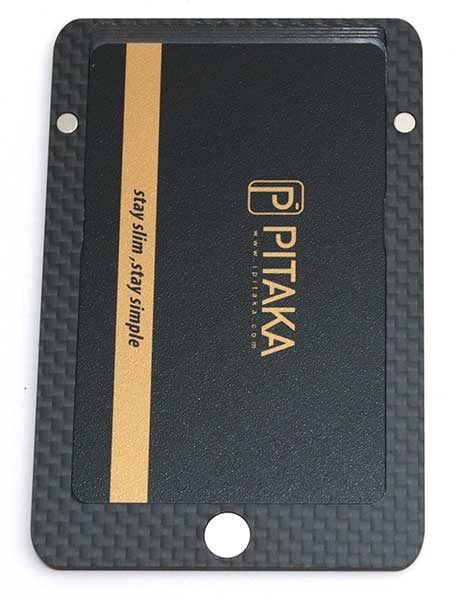
Each internal PITAKA layer can hold two standard-sized embossed or non-embossed plastic credit cards.

The cards are held in place with very small tabs that you can barely make out in the image above. Look on the straight rails across from the nose in the face cutouts and you will notice that the plastic has a slightly wider section.

See it in action

As you can see in the video above, you just hold the wallet in your hand and fan the “deck” with your thumb which is also used to raise the card. Although I didn’t do a very good job in the video, with a little practice, you can use this wallet with just one hand.

There are two issues/problems with this wallet that that should be discussed.

First of all, you need to pay attention to the orientation of the wallet, If you hold it in your hand so that the larger center magnet is on top, spreading open the wallet will either cause the wallet to fan open upside down or even worse, will cause the magnetic layers to disconnect. I show this towards the end of the video at the 36 second mark. I really think there some be a visual or tactile indicator of how to hold the wallet.

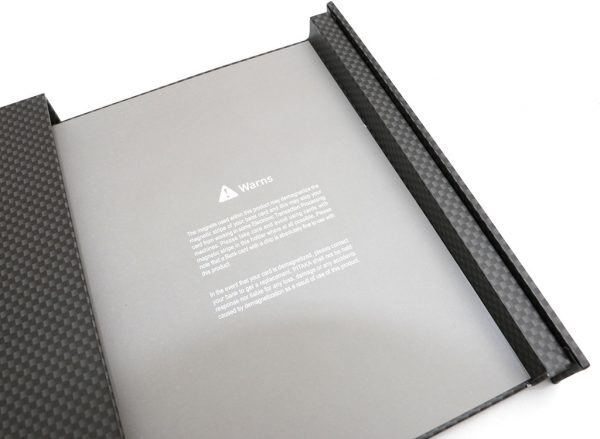
The bigger issue with the PITAKA wallet is not how to hold it, but what types of cards it can hold. The box that the PITAKA is packaged in has a warning (click the image for larger view). Basically, it says that you should not use cards with magnetic strips in this wallet. Why? Because the PITAKA wallet uses magnets to hold the wallet’s layers together and those magnets can demagnetize the cards. I contacted PITAKA to get some clarification on this issue and this is their reply:

Great to receive your email and reply you on demagnetize issue.

Since there are magnets on our carbon fiber wallet, they are enabled with one-hand cool operation, meanwhile bringing another issue of demagnetizing
card with a magnetic strip. But that could be fewer and fewer situations as the RFID chip cards (credit cards, metro cards…) are reported to be the trend.
Most European countries have been used RFID credit cards everywhere and Americans have been on the way. Below are a tech news FYI.
https://www.nfcworld.com/2016/06/23/345759/emv-claims-third-global-card-present-payments/

Also we surely understand it’s still a great trouble if demagnetizes. We tried so much find magnets won’t demagnetize and checked with many material experts, all told us no such magnets exist. If you know some please do inform us for research and resolution. But kindly noted Chip technology is an advanced, and it is more safe than stripe.
As an innovation company, it’s impossible to develop a product that will be conflicted with the trend and technology.

The problem is that my main CitiBank Visa credit card has both a magnetic strip and a chip. I still find stores where I have to swipe instead of use the chip. So that’s a big problem for me and I’m guessing will be an issue for others as well.

Final thoughts

The PITAKA carbon fiber magnetic wallet is a wallet that has a lot going for it. It’s lightweight, has RFID protection, can be customized to add or remove layers and is fun to use. But the main problem with it is the potential to demagnetize cards with magnetic strips. If you don’t use those types of cards anymore, then yay for you! I think you’ll enjoy this unique wallet. But if you use cards with magnetic strips, I don’t think this is the wallet for you.

Source: The sample for this review was provided by Pitaka. Please visit their site for more info and to order one.


Product Information

Price: $80
Manufacturer: Pitaka
Pros:
  • RFID blocking
  • Modular
  • Lightweight
  • One handed access to cards
Cons:
  • If you don't pay attention to the orientation of the wallet, you might disconnect the layers when fanning the "deck"
  • Can't use with cards that have a magnetic strip

Filed in categories: Reviews, Wallets

Tagged:

PITAKA carbon fiber magnetic wallet review originally appeared on on March 1, 2017 at 1:22 pm.

Note: If you are subscribed to this feed through FeedBurner, please switch to our native feed URL http://the-gadgeteer.com/feed/ in order to ensure continuous delivery.