PureSwitch Wireless Smart Plug review

If you’re a seeker of new and innovative accessories to control your smart home, read on fellow venturer!  The PureSwitch smart plug, made by PureGear, is a gem of a find and integrates with Apple Homekit to allow you to operate your appliances and doohickeys from wherever you are.  Let’s check it out. 

The Device

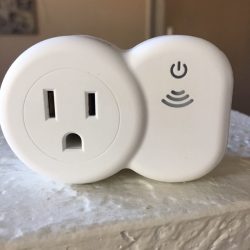
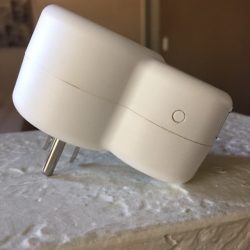
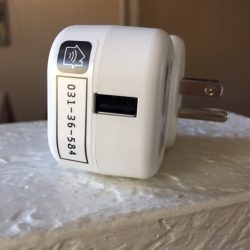
There is one outlet on the plug and one USB charge port.  This will be pretty convenient to plug in my bluetooth earbuds and free up a USB port on my computer. You can see in the pic on the right below that there is a little circular button that is flush with the edge of the outlet that you really wouldn’t know was there unless you searched for it. That is the manual on/off toggle switch if for some reason you want to power it on or off without unplugging the particular appliance that is plugged into it.


Setup

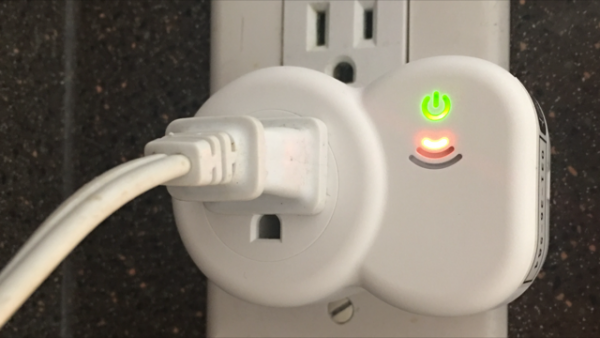
I decided that I would use this device to control the fan located in my daughter’s room, so I simply plugged the outlet into the wall, and plugged the fan into it. The image below depicts the plug being on, but not connected to the wireless network. After the outlet is paired, the wireless indicator turned green.

One thing to note is that this smart plug is only compatible with devices running iOS 8.1 or later and you must have your Wi-Fi enabled on the device (by saying device I’m referring to iPhone, iPad or iPod touch).

Next up is heading over to the App store on your device and downloading the free PureSwitch app. Once I downloaded it, I opened it and it asked me to add a “home”. If you already have a home set up in Homekit you will see it listed and you simply add this accessory to whatever room you’d like. If this your first accessory using the Apple Homekit, then you will need to set up your home.

The App

There are all sorts of things you can do with HomeKit and I’ll try and limit this review to the PureSwitch Smart Plug and not make this a tutorial for using HomeKit. The app walks you through step by step how to add the accessory by adding a room and then it will ask you to add an accessory to the room. The room I added the smart plug to is called “Em” which is my daughter’s name. When I tapped “new accessory” it began to browse for new accessories. PureSwitch popped up and the app instructed me to hold the viewfinder up to the six-digit code located on the plug.

The below pic is what it looks like when pairing. You can also type in these numbers manually if the light is too low or it’s at an angle that’s hard to get to.
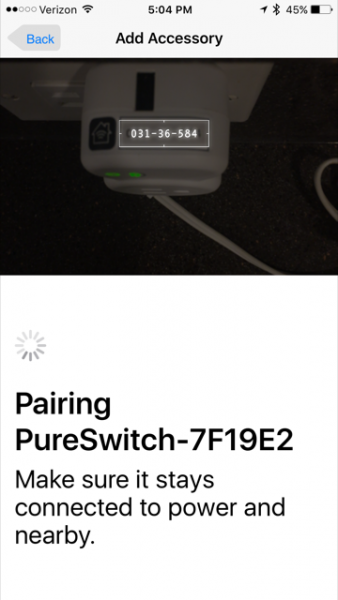

The pic above instructs you to make sure you keep the plug connected to power and stay near it so your device can connect. Now the plug is paired to my network and the fun can begin! You can choose to turn on “Include in Favorites” if you’d like to be able to access the outlet quickly in the Home app that controls your other Homekit accessories.
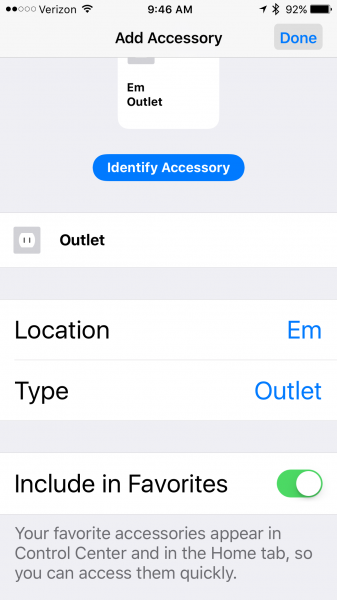

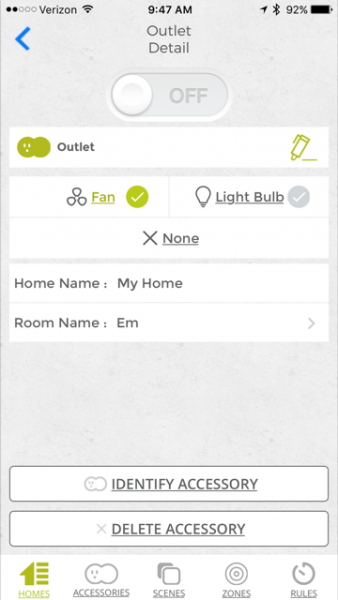
This screen in the app shows the outlet detail, what home and room it is located in, and you can switch the outlet on and off from here as well.

My favorite way to turn the fan off and on is to use Siri on my Apple Watch. I instructed Siri to “Turn on my fan” and this is her response. Siri always makes me smile.  🙂

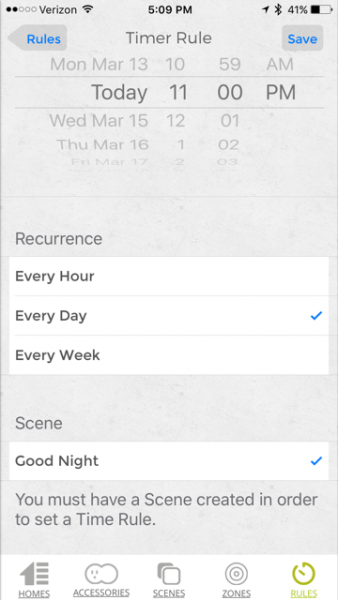
Another fun thing to do is to make scenes. If you make a scene, you can add a timer to it so that it will turn off or on at whatever time you specify. I set scenes called “Good Morning” and “Good Night.” You can see the menu along the bottom of the screen where you can choose to add a scene, set zones and make rules for the scenes.

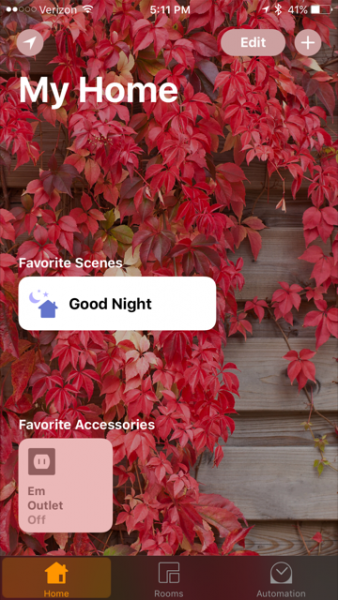
So now I have the fan all set to turn on at 11PM and to turn off at 8:30AM every day. I don’t have to do or say anything now that this is set up and it just turns on and off like I intended. I can still override these setting by either going into the app and turning it on or off, or asking Siri to do it for me. After the scene is set up, and you’re using it in your Home app with Homekit, you can simply say the name of the scene, like “Good Night” to Siri and she will do whatever is detailed in that scene. The below pic is the Home app, not the PureSwitch app, which shows my favorite scene and favorite accessory.

Summing it up

All in all, this is a great little plug. There are so many things that you can do with this smart plug because of its integration with Apple’s HomeKit. You certainly don’t need to use Apple HomeKit if you don’t want to, but if you do and you have the Apple TV (3rd Gen running Apple TV software 7.0 or later) then you can control your appliances even when you are not home. You can even set scenes so that they will turn on when you get home or when you leave home which really has me thinking I need to get and Apple TV! I liked how easy the plug was to set up and how useful the app was in helping to set up the scenes and set a timer. Having the added USB port is a nice little extra too. I thought the price was a bit high for this product as there are others on the market that are cheaper, but I haven’t reviewed all of them either to know if they work as well.

Source: The sample for this review was provided by PureGear, please visit their site for more information and Amazon to order.


Product Information

Price: $49.99
Manufacturer: PureGear
Retailer: Amazon
Requirements:
  • A place to plug it in
  • An appliance to plug into it
Pros:
  • Ability to control your electronics using Siri
  • Ability to control your electronics while you are away
  • Works with Apple's Homekit
  • Has a USB port for charging other accessories
Cons:
  • Only compatible with Apple products
  • A bit pricey for just one plug

Filed in categories: iOS, Reviews

Tagged: ,

PureSwitch Wireless Smart Plug review originally appeared on on March 22, 2017 at 8:08 am.

Note: If you are subscribed to this feed through FeedBurner, please switch to our native feed URL http://the-gadgeteer.com/feed/ in order to ensure continuous delivery.

Hive Design Edwin Wallet review


If you’ve ever used a binder clip as a pseudo-minimalist wallet, then you’ll want to check out this review of the Edwin Wallet from Hive Design. It’s like a binder clip on steroids and it just might become your new favorite wallet. Let’s take a look.

What is it?

The Edwin Wallet is a wallet based off a common binder clip.

The edwin wallet is the namesake of Mr. Edwin Baltzley, an avid writer, inventor, and father of Louis Baltzley, the inventor of the binder clip. In 1910 Louis created the binder clip as a more efficient way for his father to secure his manuscripts without damaging them. Fast forward a century and we’re still using the same basic mechanism of his original design.

Design and features


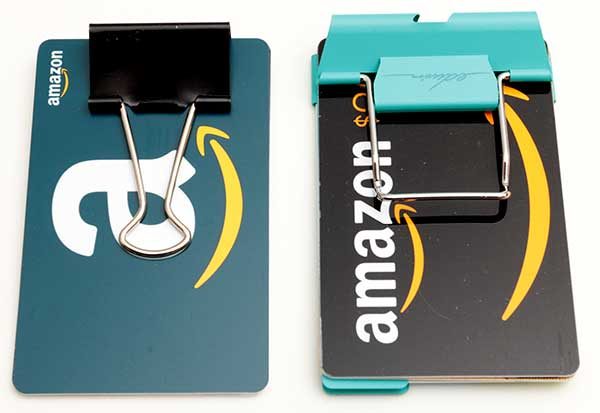
The “wallet” above on the left is a regular binder clip and the one on the right is the Edwin Wallet. Both are made of steel and feature a clamp that can hold several cards. But from there, the Edwin Wallet veers off into real wallet territory.

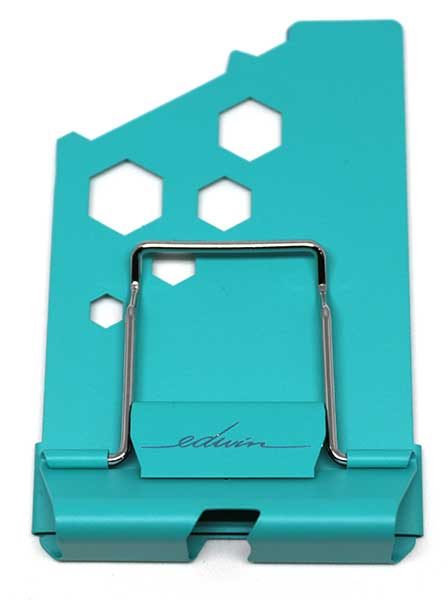
The Edwin Wallet is available in six colors including the shoal bay (aqua blue) shown above. The Edwin Wallet is also available in two styles. A Classic style not shown and the Plus style shown here. The difference between the two versions is that the back plate on the Plus has five hex wrenches, a flat head screwdriver, and a Phillips head screwdriver. The Plus version also has a bottle cap lifter on the edge, while the Classic version is just a solid plate without any built-in tools.

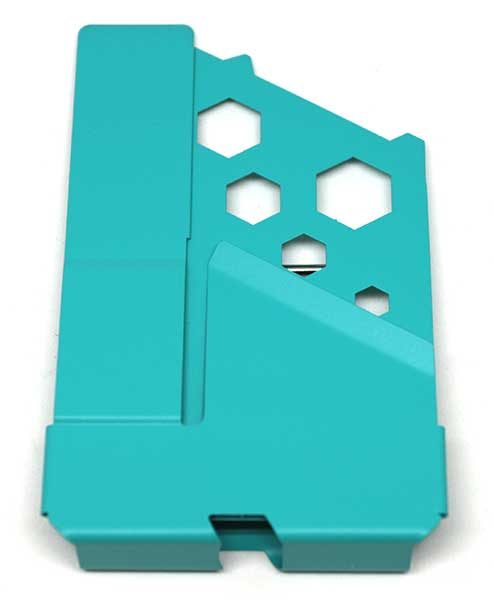
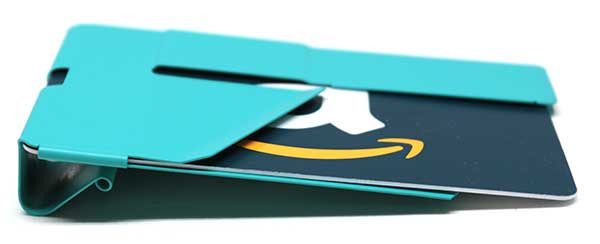
On the back of the Edwin is a quick draw slot for your most used card and a cash stem that is used to hold your paper money.

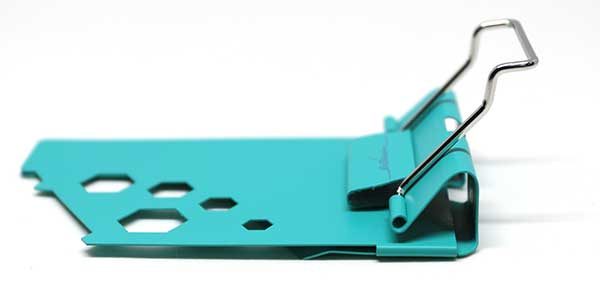
Like a binder clip, the Edwin Wallet has a spring loaded clamp that can hold from one card up to 10 cards.

Add the quick draw card slot on the back and you can carry a maximum of 11 standard sized plastic credit cards in this wallet.

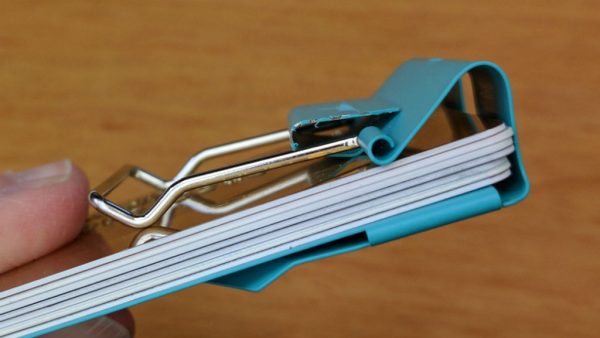
The clip opens the jaws of the clamp so you can feed it credit cards. It works pretty well, but it’s not quite as easy to open the clamp as it is with a regular binder clip because there’s only one set of clip arms to squeeze instead of two.

One thing that I noticed is that the clip’s arms rub against the edges of the clamp which causes the paint to peel off the edges of the clamp. Click the image above for a closer view.

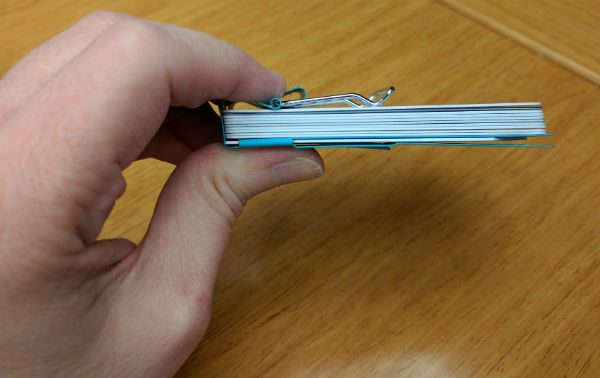
Here’s the Edwin fully loaded with 10 cards in the clamp and 1 card in the quick draw slot. Although the wallet can hold this many cards, I don’t recommend going full capacity because it makes the quick draw slot tight and not so quick to draw.

I think the sweet spot for the wallet is six cards in the clamp and one card in the quick draw slot for a total of seven cards.

If you’re careful, you can fan the cards to find the one you want without removing them from the clamp.

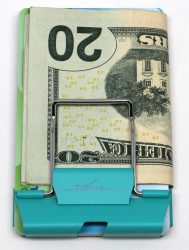
The main feature that sets the Edwin Wallet apart from an ordinary binder clip is the cash stem on the back. I’ve never liked money clips and the cash stem is a genius alternative to one. To use it, you just slide the bills under the stem and fold them in half.


Then you wrap the bills around the side of the wallet.


And finally, tuck the edges under the clip where they are held in place. The cash stem can hold one bill up to a max of about seven bills.

I like the Edwin Wallet quite a bit because it’s credit card sized. I just wish the clamp didn’t stick up on the edge like it does. If it was flatter, this would be my new favorite.

Final thoughts

I think the Edwin wallet is a cool minimalist wallet because it’s easy to use and well made if you don’t count the paint peeling issue with the clip.

If you’re already a fan of DIY binder clip wallets, the Hive Design Edwin Wallet is a big step up in functionality when you factor in the cash stem, quick draw card slot, and the built-in tools of the Plus version.

Source: The sample for this review was provided by Hive Design. Please visit their site for more info and check prices on Amazon.


Product Information

Price: $32.95 Classic, $37.95 Plus
Manufacturer: Hive Design
Retailer: Amazon
Pros:
  • Holds up to 11 cards
  • Quick draw card slot for most used card
  • Holds cash too
Cons:
  • Clip rubs paint off of clamp edges

Filed in categories: Reviews, Wallets

Tagged:

Hive Design Edwin Wallet review originally appeared on on March 21, 2017 at 10:38 am.

Note: If you are subscribed to this feed through FeedBurner, please switch to our native feed URL http://the-gadgeteer.com/feed/ in order to ensure continuous delivery.
ECOXGEAR EcoBoulder Bluetooth speaker review

Grace Digital must have adopted the slogan, “Go big or go home,” because the EcoBoulder Waterproof Bluetooth speaker from their ECOXGEAR speaker line is, well—B.I.G. This thing is huge—and heavy. The EcoBoulder comes with a retractable handle and wheels. From a distance, it could easily be mistaken for a small travel suitcase. It also doubles as an AM/FM radio, P.A. system and most importantly, is affordable. In fact, the EcoBoulder is one of the more wallet-friendly large Bluetooth speakers available. With all that going for it how does it sound compared to other large portable Bluetooth speakers?

Let’s get this out of the way first—I’ve reviewed a couple of larger (but not this big) Bluetooth speakers and both are more refined and richer sounding with sharper bass than the EcoBoulder. However, both the Monster Blaster and Braven BRV-XXL cost a LOT more than this monster (pun intended). And what you get for your money with the EcoBoulder is quite impressive.

The all-black shell of the EcoBoulder is hard plastic all-around. I was hoping for metal speaker grills for better protection, but those are plastic, also. Two carrying handles are rubberized for easy grip, but the less you have to carry the EcoBoulder, the better. It’s just easier to wheel it around. The top of the speaker has a non-slip rubber mat for setting a smartphone on as well as a rear slot for holding up a tablet, however, it’s too small for the larger iPad Pro. Even with all this plastic, the EcoBulder looks and feels durable for wet and dirty outdoor use.

Let’s go over some specs: The EcoBoulder is 100% waterproof and dust proof. It’s rated IP67—that means that it can be dropped into a pool or lake with no worries. And even though it weighs 27 lbs., it floats. It sports a 100-watt amplifier driving a 3” tweeter, 8” full range and 8” passive rear woofer speakers. There is 10 hours of rechargeable battery life built in and can charge a smartphone and/or tablet via two USB ports (charging devices will shorten battery life). Recharge time is about 7-8 hours.

The EcoBoulder’s 4.1 Bluetooth is rated at a max distance of 100 ft. This is a better dependable range than I ever got with the more expensive Braven XXL. Here’s something to keep in mind: I noticed that if I ran Bluetooth from my iMac, it sounded much weaker than if it was wired directly to the headphone out port. However, Bluetooth from my iPhone 7 Plus was much stronger and clearer than hard-wired using the lighting port with Apple headphone adapter. I can only guess that the iPhone’s newer Bluetooth is more compatible with the EcoBoulder than my older iMac is. If you plan to use the EcoBoulder for outdoor parties, Bluetooth should work great. Note that there is a built-in water-sealed compartment complete with extra AUX input and USB charging output than can hold and protect any connected smartphone. Not only is the speaker waterproof, but now your phone can be too.

The other side of the EcoBoulder houses two separate water-sealed areas for the main power port and AUX/USB/Mic ports. Note that all sealed doors must be closed to keep the waterproof rating.

The AM/FM radio is a nice addition. Even though sound quality from radio doesn’t approach wired or Bluetooth, it’s handy to have for any sports, talk radio or  other programming without using a smartphone’s battery. There’s also six digital presets for easy station switching.

Those radio presets—along with the rest of the EcoBoulder’s top buttons are backlit. That’s a good thing because it’s handy in the dark, plus there are a lot of buttons on this speaker: AM/FM switch, forward/reverse station search, backlit on/off, master volume toggle switch, source (Bluetooth, radio, AUX1, AUX2), Bluetooth pairing, master on/off, source pause/play and skip, and finally, a stereo button for pairing to a second EcoBoulder for true stereo Bluetooth (ECOXGEAR calls it EcoConnect).

Speaking of pairing for stereo Bluetooth—you can buy two EcoBoulder speakers for about the same price as one Braven XXL or Monster Blaster speaker. (Cosco price) That’s a lot of stereo boom for just a few bucks.

As I said earlier, the EcoBoulder resembles a small suitcase. Its wheels and retractable handle make it easy to take just about anywhere you want, especially since it’s heavy to carry.

Because the EcoBulder is designed for outdoor use, audio quality isn’t as good as some more expensive Bluetooth speakers. But let’s be fair: The EcoBoulder sounds absolutely fine for its purpose. What it lacks in sound quality, it makes up for in volume—perfect for outdoor parties and get-togethers. Understand that any audio nuances are lost in the open outdoors anyway, so why quibble about it? What you want is for everyone to be able to hear the music and that’s where the EcoBoulder’s 100 watts of audio power shines.

While 100 watts of volume will carry over a long distance, bass will suffer. Up close, the EcoBoulder has plenty of thump, but walk a few yards away and bass drops off significantly. That’s not the speaker’s fault—it’s physics. Lower frequencies need things to bounce off of to achieve that “bass” sound. When outdoors, audio has nothing to reflect its sound waves, so it just keeps going and going until it dies out.

With the EcoBoulder, ECOXGEAR has made a speaker perfect for its intended use. They didn’t try to fight the laws of physics with expensive gear or digital trickery that can compromise audio in a bad way. They just made a durable speaker that sounds good and loud for whatever excuse you can come up with to play music outdoors.

Think about it: here’s a good sounding speaker that’s weatherproof, will keep your Spotify enabled smartphone dry and charge it at the same time so the party can go on just about forever. Why try to do more?

Source: The sample for this review was provided by ECOXGEAR. It sells for $249.99. It’s available for Costco members for $179.99. Please visit their site for more information and check their Amazon store for other ECOXGEAR speakers.


Product Information

Price: $249.99 ($179.99 at Costco)
Manufacturer: ECOXGEAR
Retailer: Costco
Pros:
  • Inexpensive (from Costco)
  • Big and loud
  • Has retractable handle and wheels
  • Included AM/FM radio
  • Waterproof
Cons:
  • Bass not great over distance (but sounds good close up)
  • Plastic speaker grills
  • Heavy
  • Max volume can be harsh sounding

Filed in categories: Audio, Video, TV, Bluetooth Gear, Reviews

Tagged:

ECOXGEAR EcoBoulder Bluetooth speaker review originally appeared on on March 21, 2017 at 8:00 am.

Note: If you are subscribed to this feed through FeedBurner, please switch to our native feed URL http://the-gadgeteer.com/feed/ in order to ensure continuous delivery.
ADATA AI910 Card Reader Plus review

I have a lot of devices.  There, I said it.  Each has a purpose, but all share one common need for data, whether that is supplying it in the form of pictures (my Nikon S220 camera) or consuming it as video (my iPad and Android tablet).  The problem is that each has a different connector and a different way of getting data on or off the device.  This has required a variety of solutions to move data directly without using a single device as a central hub (like my MacBook Pro or my Surface Pro).  That is until I was introduced to the ADATA AI910 card reader.  The packaging says that it works with iOS, Android, and Windows.  Conspicuously absent from that list is macOS.  Let’s see whether this reader lives up to the claim.

The device

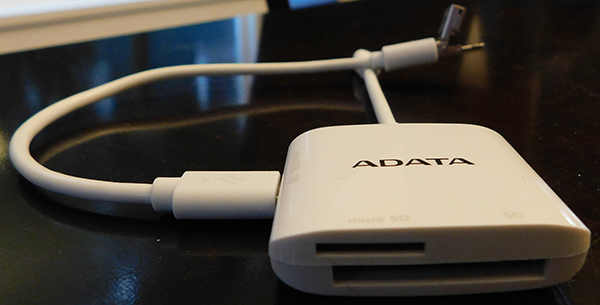
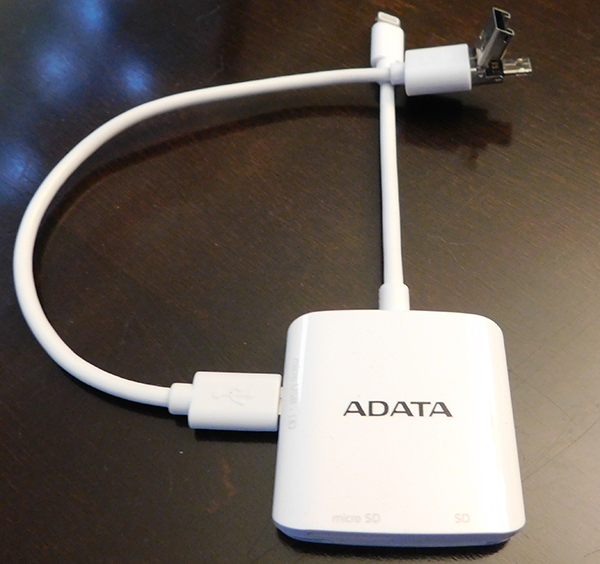
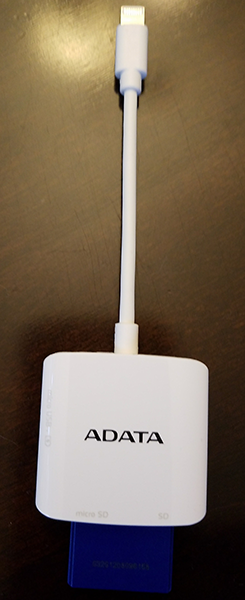
The reader can handle both standard SD cards as well as microSD.  That should cover most device needs.  Note, though, that the reader cannot simultaneously access both types – if you insert both an SD card along with a microSD, the default for the device is to use the SD card.  The same rule applies to external connections.  If you try to connect the reader to multiple devices (say, your Windows laptop and your iPad), the reader will default to the Lightning connector and ignore any other connections.  That behavior is expected, so nothing unusual there.  Just interesting to note in that you can’t use this device as a pass-through data transfer unit.

Somewhere between the 2 card slots, there is a blue LED that lets you know the device is being accessed.  If you have an SD card in the slot and that card is facing up, then the device oddly is upside down – that is, the logo is now down, which in turn makes the light less visible.  The next picture illustrates this – the device itself is what I would consider to be “top side up” and as you can see, the SD card label is facing down.  This would allow you to see the LED flashing, though.  Just seems a little like an odd orientation.

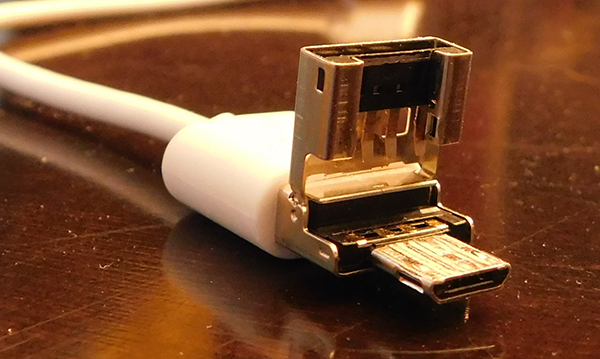
Looking at the front of the device, the Lightning connector is hard-wired into the top.  There is a micro USB port on the left side, and a supplied cable plugs into either a standard USB type A connector or another micro USB port.  It is kind of ingenious how they have built the device end of this cable – instead of 2 device cables, the top of the USB type A lifts to reveal the micro USB plug.

My only concern with this is simply that cables get lost, and small, essential cables even more so.  I searched the Internet briefly and could not find a USB micro to micro cable, so hopefully, if you lose this ADATA will sell you another – otherwise, you would lose the ability to connect the reader to any micro USB host (like most Android phones or tablets).  Also, ADATA does not appear to have a USB type C solution.  At the moment, that is not as big a problem as it would seem – it affects only a smallish segment of users like late model MacBook and MacBook Pro users or Google Nexus/Pixel owners.  Still, something to keep in mind if you own a device with the latest USB type C connector.

Windows

To test the card reader, I used an ADATA supplied and branded 32GB Class 10 SD card.  According to the label on the card, this should be capable of 95 MB/s reads and 45 MB/s writes.  Of course, the ability to achieve those speeds is not always within reach as a lot will depend on the type of port you will plug in to, the number of other devices competing for bandwidth on that channel and on.  For this test, I plugged the card into an Amazon Basics USB 3 10 port hub with 6 other devices simultaneously connected, ranging from a Logitech web cam to a Dymo LabelWriter.  The hub was connected to a Microsoft Surface Dock which in turn was connected to a Surface Pro 4 via the proprietary (and also under the hood, USB) connector.  The card was formatted as FAT32 and not exFAT just because I really wanted to cripple this test.

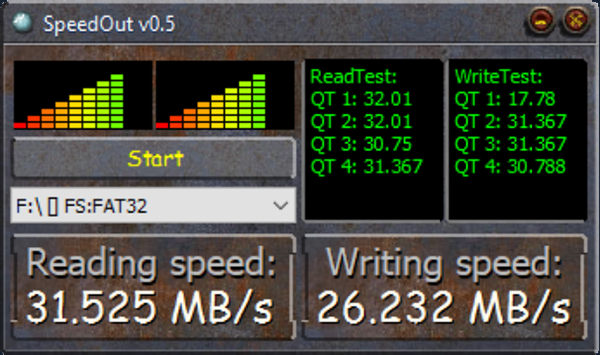
All of that to say this setup should bring the card reader to its knees in terms of read and write speeds.  I used the free SpeedOut utility to benchmark.  I was surprised by the results – approximately 31 MB/s reading and 26 MB/s writing.  Not stunning performance, but honestly better than expected given the circumstances.  The following is the average of 6 tests – once I managed to get reads up to 46 MB/s, but for the most part this is what I saw.

The verdict?  It should be fast enough for all but the most demanding of people – like, perhaps, professional photographers who are pushing 256GB worth of images at a time.  The device shows up as a standard external drive in Windows 10 – no special drivers to load.  Checkmark in the Windows column.

macOS

The packaging does not specifically name macOS as a supported operating system, but I didn’t see any reason why this would not work.  Using my MacBook Pro (early 2015 running Sierra), I plugged the device directly into the laptop, and within a second or so, the card mounted and was visible.  I did not benchmark on macOS, but the card reader felt snappy and responsive.  I copied a 2.5GB 1080p MKV video of The Hunt for Red October from a network share to the SD card in a little under 3 minutes.  Not bad at all, and a checkmark in the macOS column (the virtual one since ADATA did not say it would work).

Remember, though: my MacBook Pro is not the 2016 model.  I have USB type A ports where the newer model has only type C.

Android

Next, I plugged the card into my Nikon camera and took about 20 pictures of my dogs.  What can I say – Steve and Edie are cute.

My Nikon S220 does not have built-in wifi or pretty much any native way to get images from the camera to the cloud.  Long ago I lost the special data cable (see what I mean about external cables?), so every time I want to get images from the camera to Google Photos, for example, I use the tried and true “sneaker-net” – remove the card and follow a set of steps with my laptop to get the images into the cloud.  This meant I would have to wait until I got back to my laptop and that I had Internet connectivity.

I removed the card from the camera, plugged it into the ADATA reader and then using the extended data cable I plugged the reader into my Samsung Galaxy S7 Edge.  The device was recognized as an OTG (or On The Go) device type and in a couple of seconds, the card was mounted as external storage on the phone without the need for any special drivers or applications.  I opened Google Photos, and within another second or so, my images were on the way to the cloud directly from the reader.  Nice.  I also copied a video from my phone’s storage to the card.

Checkmark in the Android column.

iOS

Things are a little different in the iOS world, but not overly cumbersome.  In order for the reader to work on an iPhone, iPod or iPad, you must first load ADATA’s special reader application called i-Memory.  No, I don’t know why it is called that, either.  Regardless, a quick download and install from the app store and iOS was ready for the reader.

After plugging the reader into my iPad Air 2 via the Lightning connector and running the i-Memory app, the card mounted as external storage.  The app gives you the option of backing up your camera roll to storage or copying items to the tablet’s internal storage.  Instead of doing either, I opened the video player app and played the video I copied from my network under Windows.  It was apparent the player buffered the video by the delay starting it, but once playing it was smooth and glitch-free.

Checkmark in the iOS column.

Final Thoughts

The ADATA Card Reader Plus is a solid performer that works well with every platform it says it will and with one it doesn’t even mention.  At $49.95 retail, it is a little more expensive than other options, but then most of those options do not offer the cross-platform capabilities this reader does.  Other than the possible loss of the external data connection cable, there no real downsides to this device.  And if you have a need to transfer files between a variety of devices, the AI910 is a great choice.

Source: The sample for this review was provided by ADATA. For more info visit their site and Amazon to price check.


Product Information

Price: $49.95
Manufacturer: ADATA
Retailer: Amazon
Pros:
  • Solid performer
  • Compact size
  • Reads the 2 most common card types
  • Works with macOS even though it is not specifically named
Cons:
  • Connector cable for Windows and Android easy to lose

Filed in categories: Android, iOS, Reviews

Tagged:

ADATA AI910 Card Reader Plus review originally appeared on on March 20, 2017 at 10:08 am.

Note: If you are subscribed to this feed through FeedBurner, please switch to our native feed URL http://the-gadgeteer.com/feed/ in order to ensure continuous delivery.
Folditflat Unitensil 3-in-1 reusable and foldable eating utensil review

If you’ve ever found yourself in a situation where you have some food, but no spoon, fork, or knife to help you eat it, you might want to consider adding the Unitensil from Folditflat to your arsenal of EDC tools.

What is it?

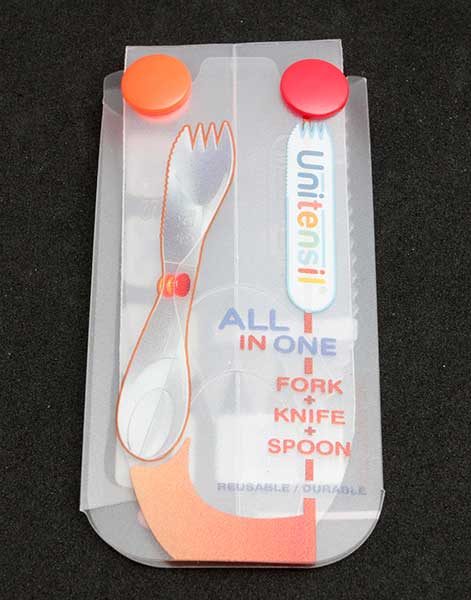
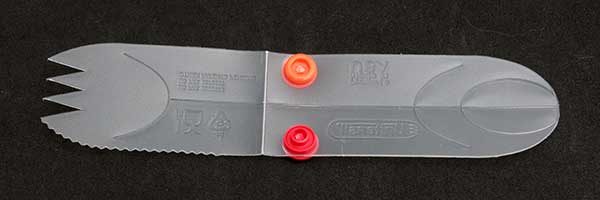
The Folditflat Unitensil is a 3-in-1 reusable and foldable eating utensil that has a spoon, fork and a knife all in one piece of cutlery.
Design and features

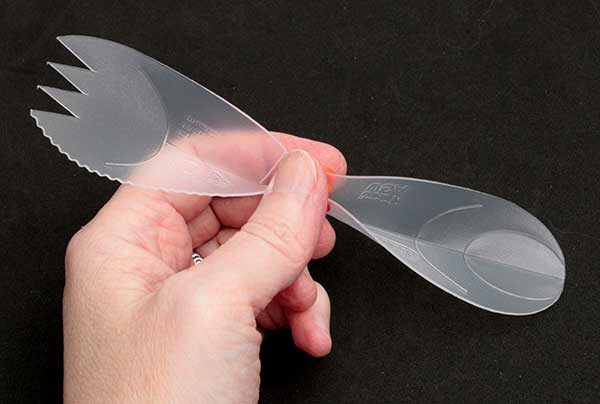
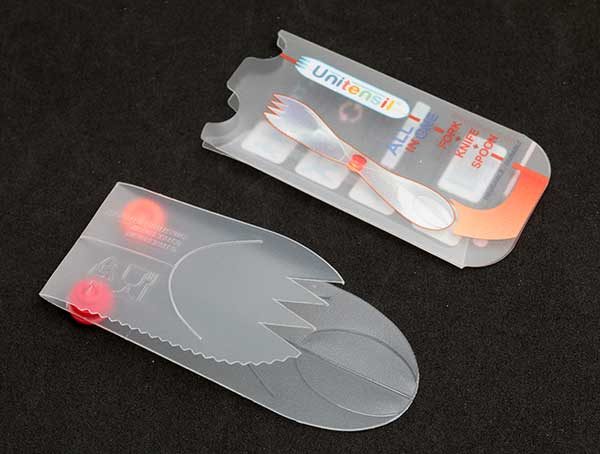
The Unitensil (I don’t even want to try to say that three times fast), is a lightweight alternative to the spork. It offers the same features as a spork, with a spoon, fork, and knife, but it folds up into a handy flat package that can be easily carried in a pocket or gear bag.

The Unitensil is made of food grade polypropylene which is BPA phthalate and lead-free. It’s also recyclable (#5) and dishwasher safe.

Using the Unitensel

To use the Unitensil, you just remove it from the protective sleeve, unfold it, and snap the center together. The snap closure is very strong and will not unsnap on its own.

Once it’s snapped, all that’s left to do is eat!

I tested the Unitensil with a variety of foods like my morning steel cut oats that you see above.

This eating utensil worked fine as a spoon. It wasn’t as “comfortable” as using a regular spoon due to the way you have to hold it, but that wasn’t a big deal.

Sometimes the oatmeal would get wedged in the slot near the snap, which was a little hard to dislodge without some tongue contortions.

I also tested the Unitensil as a fork with a pasta, broccoli and chicken dish. The fork worked fine at spearing the soft noodles and broccoli. I had a little trouble with the chicken though, especially cutting larger pieces using the serrated edge of the fork because it’s really awkward to try to cut a piece of meat with just a knife when nothing is holding the meat.

I realized immediately that the Unitensil is for right handed people. I’m left handed. When I went to try to cut a piece of chicken, The serrated edge of the knife was along the top edge of the fork instead of the bottom edge. So I had to switch to holding the Unitensil in my right hand which made cutting even more awkward.

I also tested the Unitensil’s spoon eating soup. It worked fine with thick soups, but for thin soups, the broth could travel backward down the handle under the snap to the other end of the utensil when I  would lift the soup to my mouth if I wasn’t careful.

Final thoughts

I think the Folditflat Unitensil works pretty well as a travel spoon and fork. Is it perfect? Nope. But you’re not going to care if you’re hungry and need a tool to get food in your belly. And although I’d probably prefer using a spork, the Unitensil is lighter weight and smaller than a spork, so it’s a slightly easier to add to your EDC. I’ve added the Unitensil to my EDC for my next oops-I-need-a-spoon moment.
Source: The sample for this review was provided by Folditflat. Please visit their site for more info.


Product Information

Price: $21 for a package of 6 which includes shipping
Manufacturer: Folditflat
Pros:
  • Lightweight
  • Small enough for a pocket or bag
  • Easy to use
Cons:
  • Not great for thin soups
  • Not optimal for lefties when using the knife

Filed in categories: Reviews, Travel Gear

Tagged:

Folditflat Unitensil 3-in-1 reusable and foldable eating utensil review originally appeared on on March 20, 2017 at 7:28 am.

Note: If you are subscribed to this feed through FeedBurner, please switch to our native feed URL http://the-gadgeteer.com/feed/ in order to ensure continuous delivery.