Eufy RoboVac 11 robotic vacuum review

When you live in a nearly 100 year old house with hardwood floors and 2 dogs that are over-achievers when it comes to shedding, you learn to live with pet hair.  Seriously, Steve – our older dog – sheds enough each week to create a 1/3 size replica of himself.  There are many automated solutions out there for vacuuming up the excess pet hair, but many of those devices have interesting definitions of how much is “excess”.  How well does the Eufy RoboVac 11 stack up against the competition?  Let’s find out!

The RoboVac 11

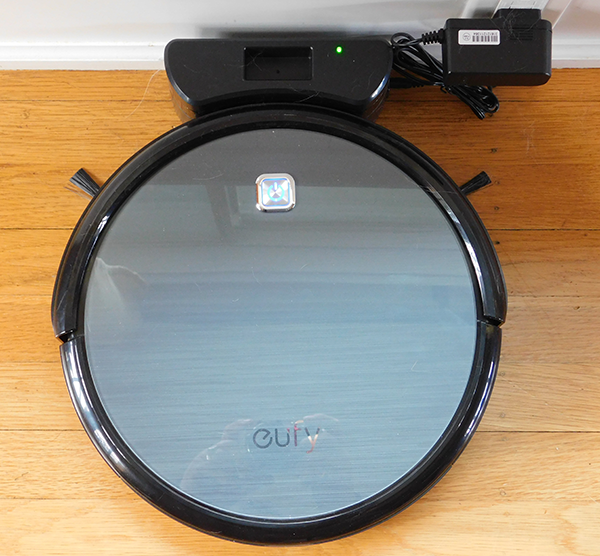
Eufy is about 13 inches across, 4 inches tall and weighs in at around 3 and a half pounds.  Pretty average, size-wise.  As you can see from the picture below, Eufy has 2 side brushes on the underside that spin as the vacuum moves to help dislodge dirt and debris.  The vacuum sits just ever so much higher off the floor than other robo-vacuums, and there is a pretty good reason for this.  More on that shortly.  Setup is easy – snap on the 2 side brushes, peel off the plastic cover that protects the body in shipping, place the unit on the charger and you are ready to go.

The manual tells you to place the base unit/charger in a place where you can have approximately 3 feet on both the right and left sides, and 6 feet behind – assuming you place the base against a wall.  Problem is, our house is 1200 square feet split among 2 humans and dogs, so finding anywhere with that much open space is as statistically close to impossible as you can get.  I am happy to say that is merely a guideline – I was able to get this in our dining room with about 2 feet on either side and maybe 3 feet behind, and Eufy seems to like that arrangement just fine.  After an initial charge of about 6 hours (unusual to say the least, and no subsequent charge has taken that long), Eufy was ready for action.

A remote control is supplied in order to program Eufy.  You’ll need 2-AAA batteries as they are not included in the package.  Once the batteries are in, you can set the time.  A word of caution here: whenever you use the remote, you should have it pointed at Eufy.  The remote does not operate on radio frequencies but rather on infrared, so if the command from remote does not reach Eufy directly, you may end up wondering why things don’t work as expected.  My example: I did not aim the remote at Eufy when setting the time, so I can only assume that Eufy’s internal clock started ticking at midnight.  That assumption was proven when Eufy started working on its schedule – which was off by as exactly the difference between midnight and the time when I set the remote.  Lesson learned.

But does it vacuum?

Like other robotic vacuums, Eufy has a bumper guard on the front and sensors elsewhere to help guide it through what it calls “obstacles” and you call “furniture”.  The RoboVac 11 does not come with any sort of electronic fence but it does appear to have a cliff sensor because not once has Eufy ever tried to fall down the basement stairs.  There are a few operating modes: spot (moving in ever-widening circles), edge (find the edges of the space and clean along them), single room (good if you don’t have an open floor plan) and manual (you guide with the directional keys on the remote).  There are also a couple of automatic modes including a max clean which amps up the suction for carpeting but drains the battery faster.  You can also program Eufy to clean at a specific time of day and when the time comes, it will clean using a variety of the modes to cover the most space.

The front of Eufy showing off the bumper:

And the back where the collection drawer and HEPA-filter is located:

This has to be one of the quietest vacuums I have ever seen.  I mean, this guy is astonishingly silent and yet effective.  Every time I empty the container I am surprised by how much dirt has been collected.  And the house shows it – in the couple of weeks Eufy has been on the job, there is a marked reduction in the dog hair hanging around.  The house just looks good.

The quirks

And you knew there had to be some, right?

The first one really isn’t a quirk, but more of a wish for different behavior.  Eufy does not have an app to control it as some others do.  It would definitely add to the price (which is tantalizingly low), but having the option would be nice, especially if it could tell me things via the Internet – like that it is stuck somewhere, the battery is low, it missed a cleaning cycle.  Just a bunch of different “smart-home” type data that is becoming common with automated appliances.

On the getting stuck thing: I suppose Eufy does not get stuck any more or less than any other vacuum, but there are a couple of places in my living room where Eufy just doesn’t seem to learn to avoid.  One is a cold air return grate of the floor, another is under an ottoman in the living room, and another behind the TV where the dangerous octopus collection of power cords live.  Eufy will wander into these traps a couple of times a week, and when Eufy becomes trapped, he beeps a few times and shuts down.  The first obstacle is easy, but if Eufy runs while you are gone, you may play an elaborate game of hide and seek when you see he isn’t on the charge base.  And the remote does not help.

Another quirk: carpeting.  Most of our house is hardwood flooring, but we have an area rug in the living room that Eufy navigates just fine.  Weirdly, though, we have a thinner runner rug by the front door, and about half the time Eufy gets on that carpet and then can’t keep going.  It must be something to do with the way the wheels interact with the carpet, but often I have to rescue Eufy from the rug.

Finally, getting back to home base can sometimes be a challenge.  There does not appear to be any sort of system that would allow Eufy to home in on the charge base, or if there is it is somewhat ineffective.  At least once a week I have to pick Eufy up and put him back on life support because he died in the field.  One afternoon just for laughs (thanks to the cold medication I was taking) I put Eufy on auto and let him clean a while, then hit the home button.  What ensued was a weird dance around the charge base even though he was only about six feet from it when he received the recall order.  All told, from the time I told him to go home until he finally parked on the base it took nearly 10 minutes.  And he was not vacuuming during that time.

One thing that isn’t a quirk, however, is the dog reaction.  The first couple of days Eufy was in the house, the dogs ran up to him and barked, and when he turned they ran away.  Steve spit tennis balls at him those first few days, but Eufy took it like a champ and kept on going.  Now Eufy is just another thing in the house and the dogs are OK with him as long as he doesn’t run into them while they sleep on the living room carpet.

Maybe the last quirk is that after having him around long enough, you too might anthropomorphize the device and start thinking of it as a “him” with the name “Eufy”.

The verdict

The Eufy RoboVac-11 is a great automated solution.  It works as well as any of the other big names but does so at a fraction of the cost.  It is very well made and appears that it can stand a very long life running into the sofa legs.  The house regularly looks cleaner than it has for some time, and in the end that is the reason you buy something like this.  Replacement supplies like the HEPA-filter and side brushes are available on Amazon, so you should have no trouble keeping your Eufy running smoothly for a very long time to come.

Source: The sample for this review was provided by Eufy.  For more info visit their site or check Amazon for pricing.


Product Information

Price: $240.00
Manufacturer: Eufy
Retailer: Amazon
Pros:
  • Low price compared to others in the same class
  • Well made
  • Incredibly quiet
Cons:
  • No app to control

Filed in categories: Home and Kitchen, Reviews

Tagged:

Eufy RoboVac 11 robotic vacuum review originally appeared on on April 1, 2017 at 5:41 pm.

Note: If you are subscribed to this feed through FeedBurner, please switch to our native feed URL http://the-gadgeteer.com/feed/ in order to ensure continuous delivery.

Autonomous SmartDesk 2 standing desk review

In my business travels, I’ve been starting to see more standing desks appear in the offices of both large corporations and small startups.  As health related studies have recommended periodic standing breaks for workers that are desk-bound, the convenient benefits of a standing desk are obvious.  Here, we will be reviewing the SmartDesk 2 from Autonomous.

SMARTDESK 2 OPTIONS

The SmartDesk 2 has several standing desk options to choose from.

Tabletop options include:

  • 5 different surface finishes from simple white or black to wood grains.
  • 6 different table shapes with different lengths(53″ or 70″), “cutout” styles, and curvatures

Frame options include:

  • 3 different colors consisting of white, black, or grey.
  • 2 different frame platform options:
    • Home Edition consisting of a single motor capable of supporting 220 lbs through a 29″ to 47″ height range
    • Business Edition consisting of dual motors capable of supporting 300 lbs through a 24″ to 51″ height range

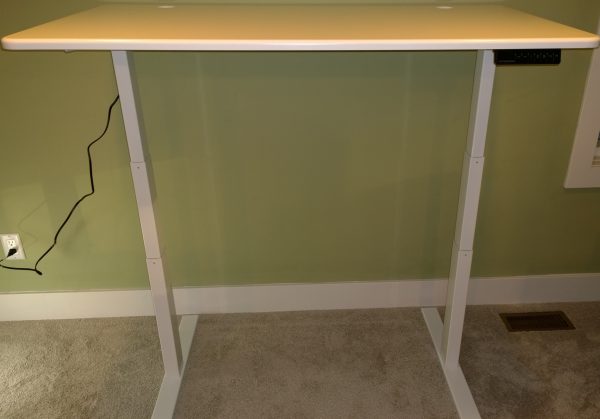
For this review, we have a white rectangular 53″ tabletop with a white Business Edition frame platform.

DELIVERY

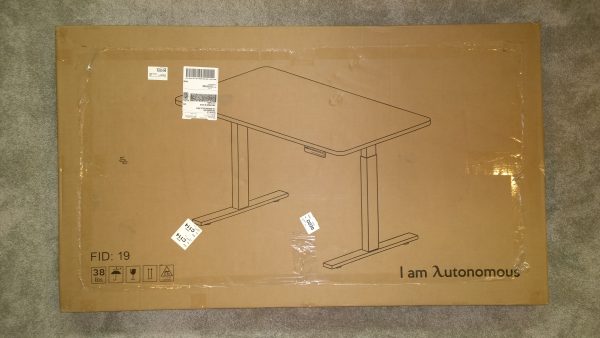
Your order comes in two boxes, presumably so they can efficiently send you separate tabletop/frame color options according to your order.
The box containing the frame is the heavier of the two, checking in at 67 pounds. It was laid down horizontally on my porch, and wasn’t the easiest package to handle as the size of the box was slightly unwieldy.
The tabletop package weighs a much more manageable 38 pounds and had outer nylon straps, enabling you to use those as handles to lift the package inside.
Overall, bringing the frame box indoors may require two people, or the box can be opened outside where the individual components can be removed separately.

Since my desk would be installed in a 3rd floor office attic space, it was easier to remove the contents from the frame box and bring each of the components individually upstairs.

UNBOXING

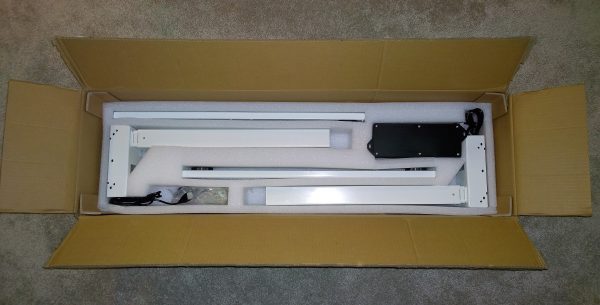
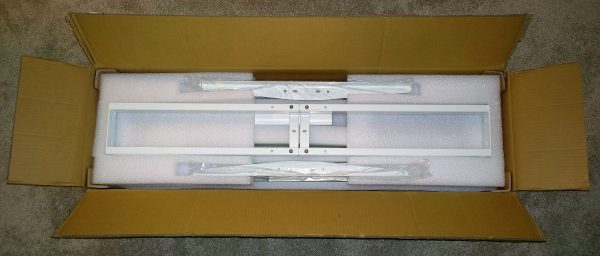
Opening the frame box, each of the components were housed with foam inserts protecting the contents from each other and from external damage.
In fact, my frame box had a sizable gouge on the side, but the foam did its job as all the components were undamaged.
Tucked away inside the foam inserts were a few more accessories.  A parts bag included bags of screws, adhesive backed cable organizers, and your standard fare Allen wrench.  The screw bags were each labeled with fastener specifications (i.e. Mx12) which removed any doubt for screw selection during assembly.
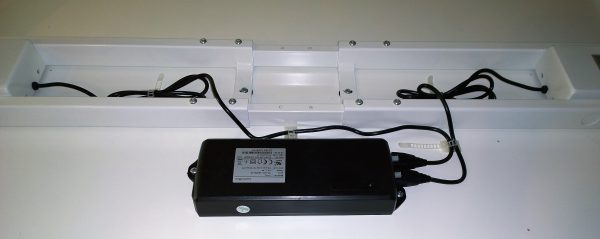
A few electronics components were stored here including a controller box, a control pad, a power cord, and two cables that connect the actuators to the controller box.

Likewise, there were foam inserts for the box containing the tabletop protecting both its edges and surfaces.

TABLE DESIGN

The frame platform consists of several parts:

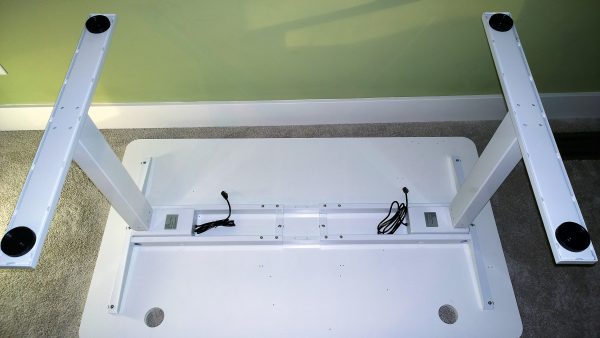
The tabletop is supported at each end with an “I” beam shaped configuration.  The horizontal pieces are comprised of the “side bracket” on the top, and “feet” at the bottom.  The vertical section, the “leg”, feature 3 tiered ‘telescoping’ structures that extend via a linear actuator.  The telescoping action is what ultimately gives the standing desk it’s height adjustability.

The tabletop is supported by horizontal components consisting mainly by 2 “crossbar ends” at each end of the table.  Both “crossbar ends” are joined together with lengthwise adjustable “center rails” that can accommodate all the different length tabletop options.

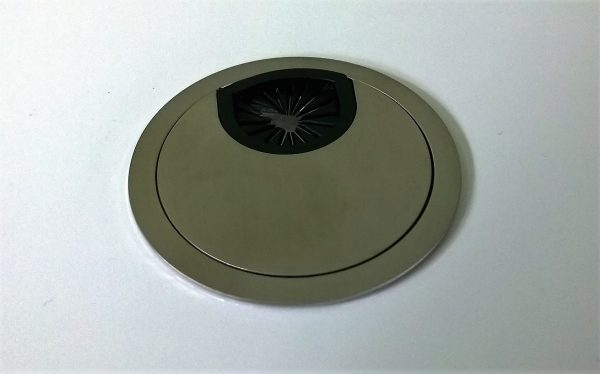
The tabletop itself is a nice semi gloss surface with rounded edges.  A “switch” panel at the right front edge controls the height of the table.  There are two cable holes at the rear of each side of the table to provide some measure of cable management.

ASSEMBLY

Assembly of the Smartdesk was straightforward and felt similar to putting together a piece of furniture from IKEA when it came to degree of difficulty.
The assembly manual consisted of two sheets with diagrams and instructions on half of a page.  The diagrams were small and sometimes it was difficult to discern details like screw placement.  I think I would have preferred a full sheet per page to have much larger diagrams to view.
Additionally, λutonomous had an assembly video on their YouTube channel.  I personally prefer paper instructions, but the video showed exactly how everything is installed/fastened to make things clear.
Assembly started with laying the desktop with the finished surface down and with the predrilled holes facing up.
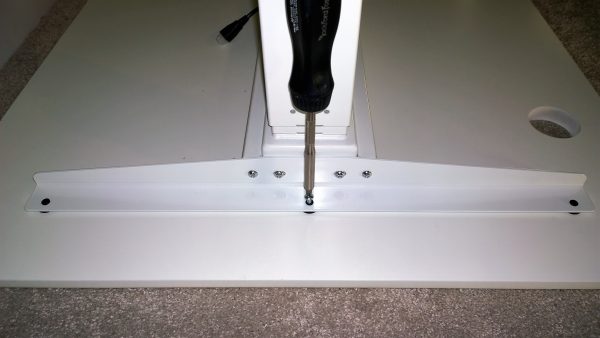
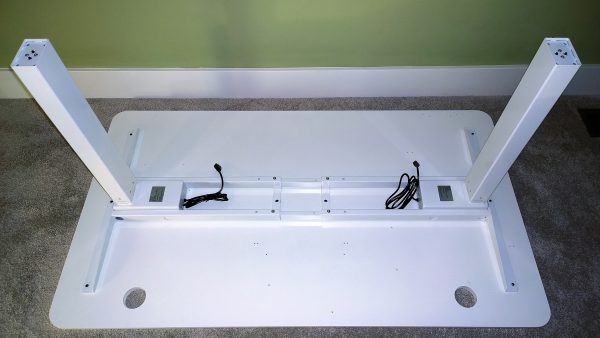
The horizontal frame support for the desktop was initially positioned into place using the specified predrilled hole locations as a guide.  The vertical legs were then positioned into receptacles on the frame.
The toughest part of the install was here, where you had to line up the holes of the leg and frame.  The leg needed to be raised just about a millimeter or two to line up the holes.
The relative locations of all the holes between the frames, desktop, and legs fit well and you never felt you had to force fit anything. Overall, the Smartdesk felt well manufactured from an assembly standpoint.
The last part of assembly involved the wiring of the linear actuators and the control panel.  A “controller box” serves as the junction between the power cable, and the wiring for the other electric/electronic components.  It was unclear where the “controller box” needed to be mounted, despite the paper and video instructions.  I suspect that different tabletop options may have different locations for the controller.  I assumed it would be located towards the back of tabletop, around the center.  I moved the controller into different predrilled screw hole locations until the hole brackets on the controller lined up with them.
The “switch” panel mounting point was in a far more obvious location based on its screw holes.  One thing to note, the “switch” sticks out on an angle beyond the perimeter of the tabletop.  So, if the table is upside down, care must be exercised to ensure you don’t bend the panel when you attempt to flip the table right side up.
 Once all the electronic components were mounted, it was a matter of routing wires from each leg actuator to the “controller box”.  There weren’t any instructions in the manual or video to guide you with this.  It was a matter of common sense to plumb the wires as neat as possible, and the included adhesive backed cable clips held the wires into their final position.
Finally, a metal flange and cover were inserted into the 2 cable holes of the desk.

I would estimate that it would have taken me 20 minutes to assemble the desk if I wouldn’t have stopped to take notes and pictures for review purposes.  It probably could have gone faster if one were to use an impact driver on the fasteners.  However, there weren’t that many screws to deal with, and I felt more comfortable in this case using simple hand tools to ensure that I didn’t cross thread the metal holes or over torque the wood holes.

AESTHETIC IMPRESSIONS

I tend to prefer minimalist modern furniture with clean lines and minimal decorative details.  So I liked the look of the all white table top/frame combination of my SmartDesk.  It blended in well with the mid-century modern style furniture and seating I had in my office space.

USAGE IMPRESSIONS

Operation of the SmartDesk was pretty straightforward via the control switch.  There are buttons for “up” and “down” along with four numbered “memory” positions.
Pressing any of the buttons moved the tabletop in a smooth fashion with a satisfying “whirring” sound.
I liked how the actuator attenuated as it reached it’s minimum or maximum heights.  It eased into those extremes which prevented jarring of the components and it felt sophisticated.
The “memory” feature was a convenient feature, as you could store positions for multiple sitting and standing heights.
At my height of six feet, I found that a 43-inch tabletop height was the most comfortable setting to type on a keyboard while standing.  With an additional potential for 9 more inches of travel, I imagine that this desk could easily accommodate someone well over 6 feet tall.
As far as stability goes, even at it’s highest tabletop height on a carpeted floor, it still took some effort to topple the table over.  So the length of the feet of the frame seemed to provide sufficient leverage from easily tipping the table over.
After using the SmartDesk for a few weeks, everything still worked nominally and the table still felt sturdy.  All this despite constant everyday abuse from my kids who liked to all sit on the desk and fiddle with the controls to mimic an elevator ride.
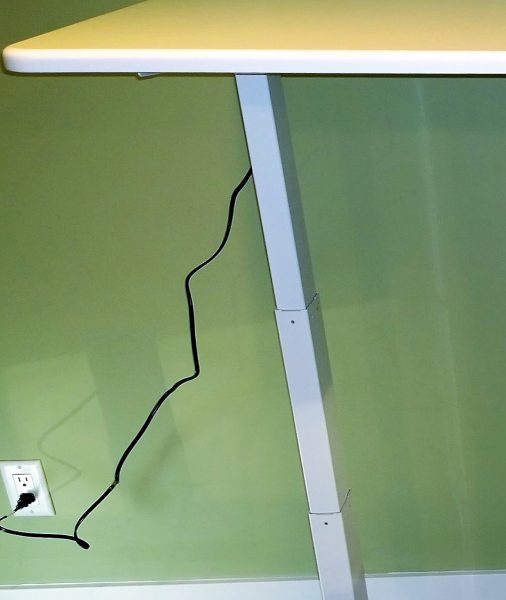
The only critique I had about the SmartDesk was that the power cable could stand to be longer.  You will need to have a power outlet within 2 feet outside of one of the legs in order to accommodate a fully raised desk position.

Additionally, once you set various electronics on the table, like a computer, laptop, and/or monitor, you’ll have power cables dangling from the tabletop.  You’ll have to exercise care and judgment to ensure that when the tabletop is at its fully extended position, that the power cables are sufficiently long enough and don’t snare on other objects while the table is in motion.  It would be nice if there was some sort of cable management system or hardware to make the cables tied in a neat fashion while maintaining freedom of movement.  I suspect this is generally an issue with most, if not all, standing desks.

FINAL THOUGHTS

The Autonomous SmartDesk 2 is a welcome addition to my space.  The clean lines, sturdy build, and well-executed height adjustability add up to a desk that will stay in my home office for the foreseeable future.  I feel far more productive now that I have the ability to periodically work from a standing position.
Source: The SmartDesk 2 was provided by λutonomous for this review.  For more information, please visit Autonomous.ai
 

Product Information

Price: $299.00
Manufacturer: Autonomous
Pros:
  • – easy assembly
  • – well constructed and manufactured
  • – fits in well with modern and contemporary room designs
Cons:
  • – Could use longer power cable
  • – Could use some sort of cable management system

Filed in categories: Computer Gear, Reviews

Tagged: ,

Autonomous SmartDesk 2 standing desk review originally appeared on on April 1, 2017 at 9:00 am.

Note: If you are subscribed to this feed through FeedBurner, please switch to our native feed URL http://the-gadgeteer.com/feed/ in order to ensure continuous delivery.

Berrolia No.2 Aluminum iPhone mount review

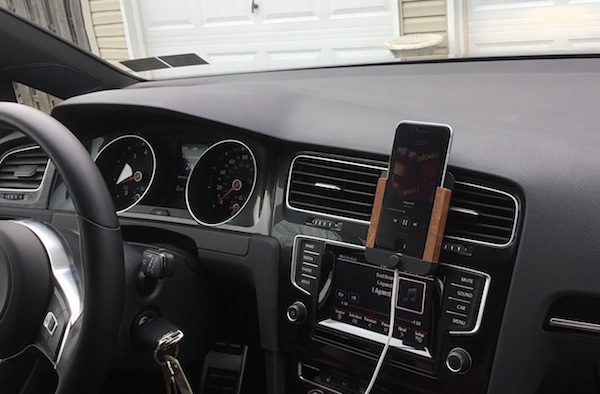
If James Bond was looking for an iPhone mount appropriate for his vintage Aston Martin, he’d probably pick the Berrolia No. 2 iPhone Mount. It’s classy. It’s beautifully constructed. Is it right for you? Let’s grab a martini (preferably shaken, not stirred) and check it out!

First Impressions

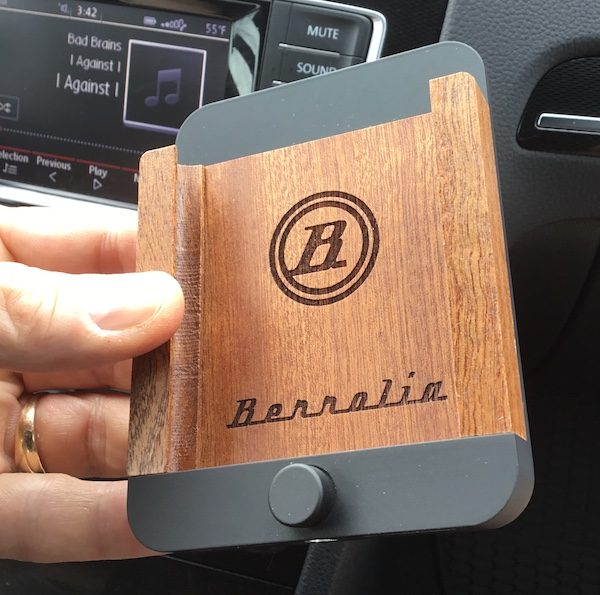
When I received the Berrolia No. 2 iPhone Mount for this evaluation, my first impression was… luxurious. Just look at it. Not only does it look premium, but it feels weighty and substantial in your hand. It even comes packed in a cool aluminum cylinder, with molded foam inserts for protection.   

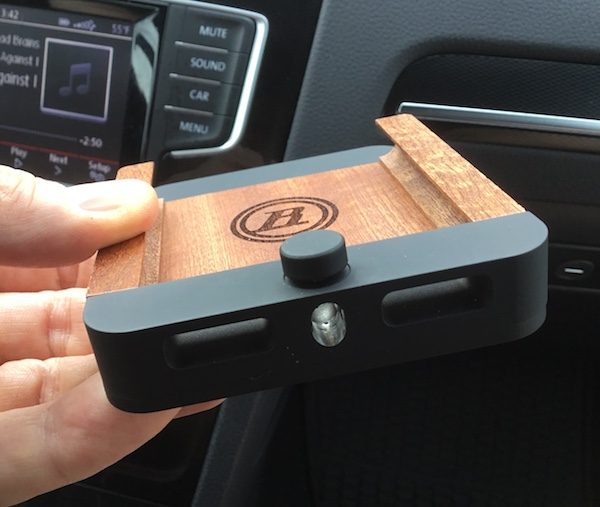
Looks aside, construction and materials are top-notch. The frame is made from premium-grade aluminum, which looks to be powder coated with a slightly rubberized surface. The wood is mahogany, with the Berrolia logo laser etched into the back piece. Everything is precision cut and the assembly is rock solid, with no noticeable gaps or cheap bits to be found. Even the clips are heavy & solid, and look like they won’t bend or snap after repeated use. All the finishes are smooth and pleasant to the touch.

This is no bargain-basement car cradle, folks. It just oozes style and quality craftsmanship.

Mounting the Cradle

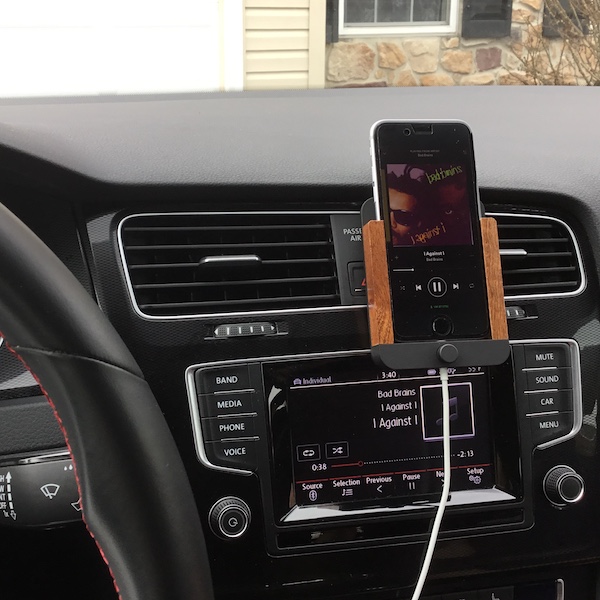
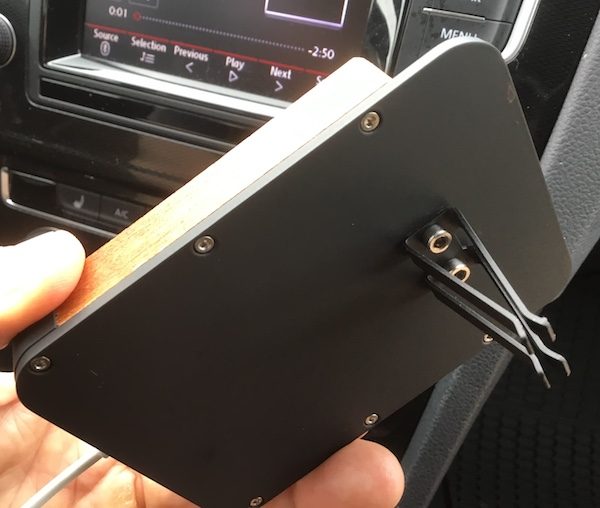
The Berrolia mounts to the air vent on your car, and it requires that your vent employs horizontal fins to clip onto. There’s another quality twist here: there’s a leather (possibly leatherette) mounting pad included in the package. You place the pad on the fin of your air vent, then slide the clip over the pad. Not only does this add extra grip, but it prevents scratching from the beefy metal clip. In my car, I found that the cradle stayed put once it was mounted, and was not prone to getting knocked off by an accidental bump. Nice.

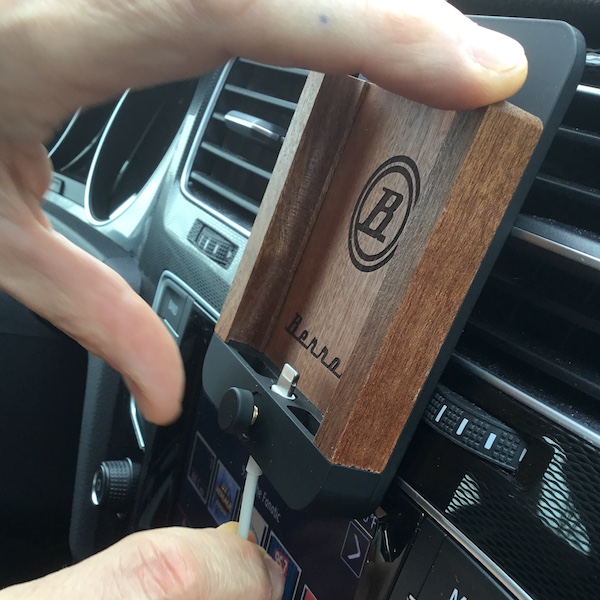
Once you have the mount in place, you can install your lightning cable. I found this to be another nice aspect to the design. There’s a knob on the front of the unit that you unscrew to allow the cable to pass through. The cable is inserted perpendicular to the unit. You pull the cable through, twist it to a position parallel to the mount, and pull the cable back down to lock it in position. Screw the knob back in place, and the lightning cable isn’t going anywhere.

The whole operation took about a minute to complete, at which point I could add my phone.

Daily Use

There are tracks on either side of the mount specifically designed for the iPhone, so it slides smoothly in and out of the cradle and plugs right into the lighting plug. It’s a silky smooth, one-handed operation that requires no wiggling or adjustment to get the phone in and out of the cradle.

After dozens of car trips, I’ve found that the construction continues to deliver. There’s no looseness anywhere in the unit. The lighting cable mount hasn’t loosened up. The finishes continue to look good after regular abuse, with no abrasions or scratches developing in the surfaces. It’s rock solid.

As far as on-the-road use goes, it’s a great mount. It stays firmly planted where you set it, even with the occasional bump or nudge. It’s nice to have the phone in a position where it doesn’t distract you from driving, especially if you are using Google Maps to get from point A to B. And one handed operation is a great for safety, so you are not fumbling around for your phone while trying to focus on the road. I really like it.

Some Caveats

There are three important issues that you should aware of in the middle of all of this luxury precision goodness. First, the mount is designed precisely to fit your iPhone. You can’t use it with a cover or case. I don’t like my iPhone to go naked, so this required me to take off my case every time I got in the car. I get that this detracts from the whole look and slick performance, but it is kind of an annoyance (especially if you have a complicated cover). Berrolia does make the leather versions of the mount that we have reviewed here, and they appear to have some tolerance for accepting a thin case on your phone.

Second, the cable mount is precisely machined to fit the Apple lightning cable. Third party cables are not likely to work with this setup. I found this out the hard way, as my car has a MIDI port that requires a third party MIDI-to-lightning cable. It would not fit in the mount, so I needed to acquire a lightning-to-USB adaptor, then I could plug the Apple-supplied cable into that. Most newer cars have a USB port so this won’t be an issue, but it’s a bit of a bummer if you use third-party lightning cables.

Finally Berrolia only provides this particular style of mount in the black/walnut finish, specifically for the iPhone 6, 6s and 7. They do offer a range of leather covers in different colors and styles which also accommodate iPhone 5 models or the larger iPhone 6 Plus and iPhone 7 plus. You’Il want to check your iPhone model and car interior to find the right match for you. 

Conclusion and Pricing

There’s no doubt that the Berrolia No. 2 iPhone Mount is a classy upgrade from a cheap plastic car mount. Not only does it deliver on style, but it is impeccably constructed and sure to stand up to years of abuse. Retail price is placed at 79 Euros (about $85 USD) which seems in line with the quality of the unit. If you are OK with the caveats, I feel its a luxury upgrade that’s worth the price. Happy motoring!

Source: The sample for this review was provided by Berrolia. For more info visit their site.


Product Information

Price: €79 (~$84.50 US)
Manufacturer: Berrolia
Pros:
  • Luxury look and feel
  • High quality materials and construction
  • Easy to install
Cons:
  • Does not work with iPhone covers
  • Requires original Apple lightning cable
  • Sized specifically to the iPhone 6/6s/7, though leather options are available for other models

Filed in categories: Car Gear, iOS, Reviews

Tagged:

Berrolia No.2 Aluminum iPhone mount review originally appeared on on March 31, 2017 at 10:00 am.

Note: If you are subscribed to this feed through FeedBurner, please switch to our native feed URL http://the-gadgeteer.com/feed/ in order to ensure continuous delivery.
ThruNite TH20 Headlamp review

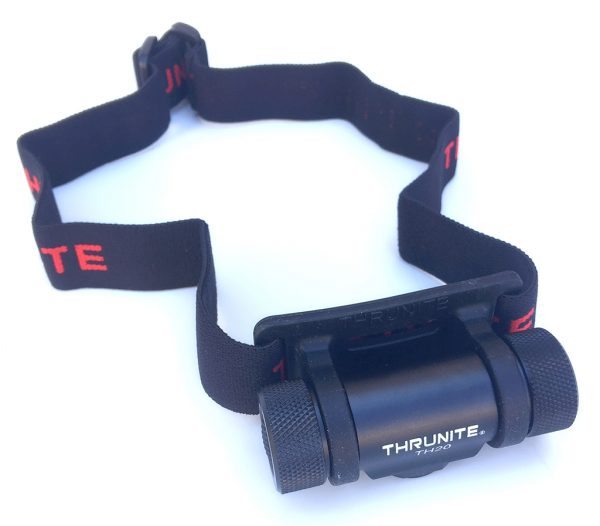
Since I began participating in (and actually completing) GORUCK Challenges back in 2014, I’ve thought a lot more about headlamps than I ever thought I’d think about headlamps. I have one that I have worn for thirteen GORUCK events and for tasks around the house, and it has performed fairly well for me, but it’s starting to act wonky and I had been considering getting one that was a bit more heavy-duty, and that could take more abuse. Thus, it was serendipitous timing that Julie offered the ThruNite TH20 Headlamp for review. With its super-adjustable beam brightness and metal body, not to mention tough-looking styling, I thought it would be worth trying. Let’s check it out!  Gadget on!

Tech Specs

Per the ThruNight site:

  • Max output = 520 lumens (using 14500 battery)
  • Peak Beam Intensity =1120 cd
  • Beam Distance = 67 m (max)
  • LED type = CREE XP-L V6 LED with a lifespan of 20+ years of run time
  • Brightness Control Mode & Runtime (Tested by one Eneloop AA 2450mAh NIMH rechargeable battery) = Logarithmic scale brightness adjustment, which varies by battery type.  Below shown values are for AA battery:
    – Firefly (0.3 lumens, 14 days
    – Infinity Low (1.6 lumens, 21 hours
    – Infinity High (230 lumens, 95 minutes )
    – Turbo (250 lumens, 93 minutes)
  • Working voltage =0.9-4.2 Volts
  • Power = 1x AA battery or 1x Li-ion 14500 battery
  • Reflector = Orange peel finish
  • Weight = 96g or 3.3 oz (without battery)
  • Dimensions = 70 mm x 24.5mm
  • Waterproof rating = IPX-8 (2 meters for 30 minutes)
  • Impact Resistance = 1 meter
  • Material = Main body is aircraft grade aluminum body with premium type III hard anodized anti-abrasive finish
  • Accessories included = O-ring, spare rubber slot

Options

The ThruNite TH20 headlamp is available with the following options:

  • Cool White beam
  • Neutral White beam (reviewed here)

Packaging

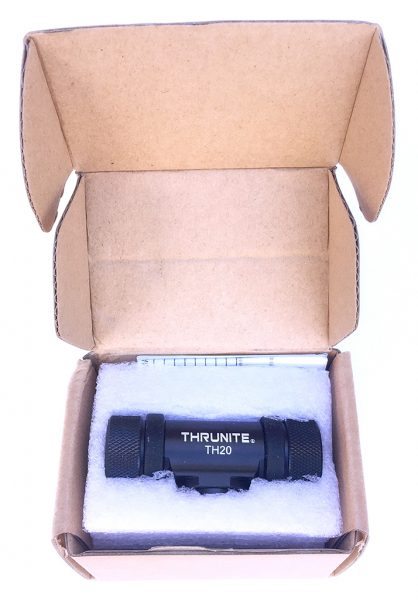
The ThruNite TH20 headlamp’s packaging was a simple fold-over lid style box.  The box is small, roughly the size of its contents with little wasted material and is made from recyclable corrugated cardboard material, all of which I consider a plus.  However, it has no window or other transparent area from which to view the product inside, which I generally consider a minus.  The caveat to this is that a view-ability of the product inside is only really useful if a product is sold in a retail setting; products sold only and shipped directly to the buyer do not have as much a need for view-ability of the product.

In addition to the corrugated cardboard box, which provides an outer layer of bump protection, inside the box, the TH20 headlamp is nestled snugly into a thick piece of foam for additional protection during the shipping and handling process.

Contents

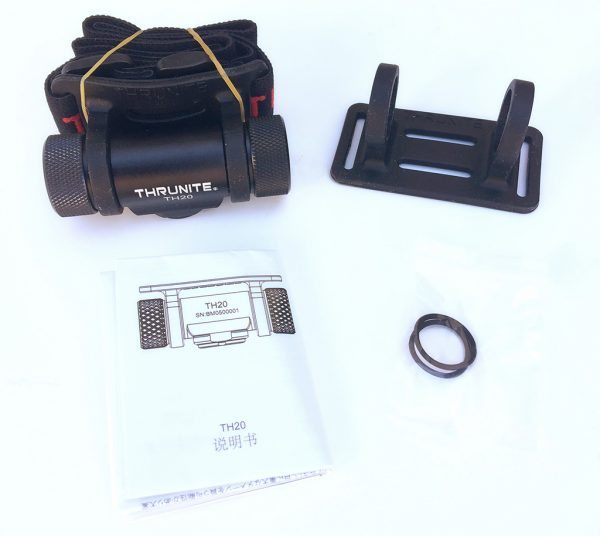
The contents of the ThruNite TH20 Headlamp are shown above, and listed below:

  • TH20 Headlamp
  • Instruction manual
  • Spare O-rings (2x)
  • Spare rubber mounting bracket

Features, Functions, and Performance

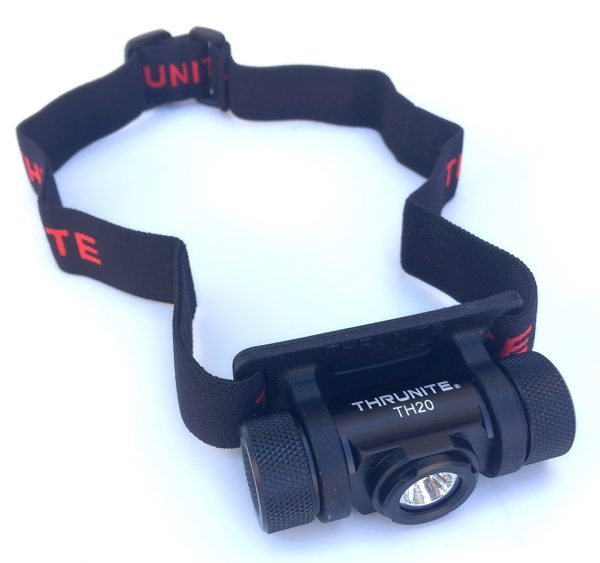
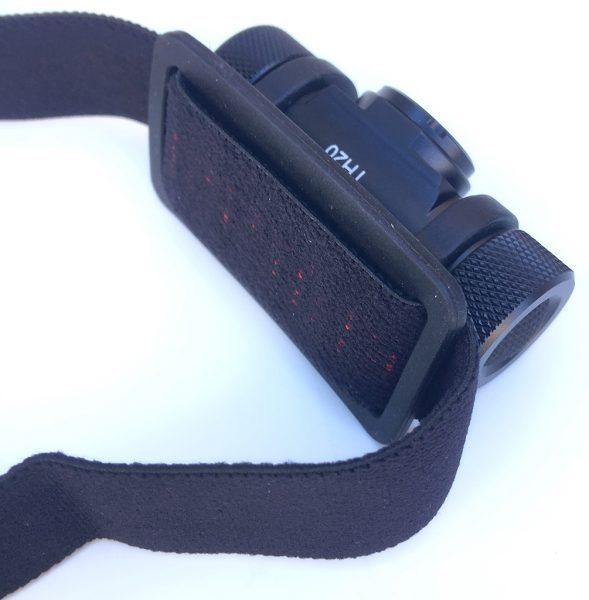
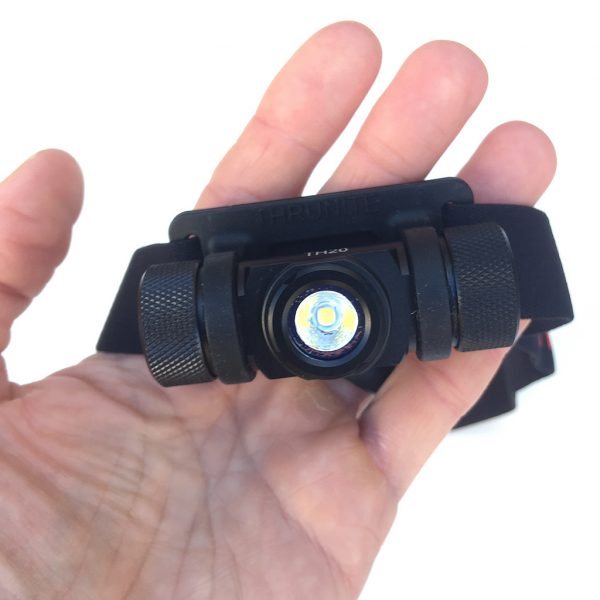
Right out of the box, my initial impression of the TH20 headlamp was that this thing feels solid.  Very solid.  With the main body being made from aircraft grade with a premium type III hard anodized anti-abrasive finish, it feels very heavy-duty and tough.  The adjustable elastic head strap appeared to be fairly standard, but well-built.  However, I found the rubber mounting bracket to be a bit curious.  I had expected it to be more like a hard plastic, but it is a very soft material.  More on this later.  Curiously, the TH20 arrived with the main body rotated such that the lens was pointed in a downward directly, and I had to rotate the body upward to be able to actually use the lens (as seen below).

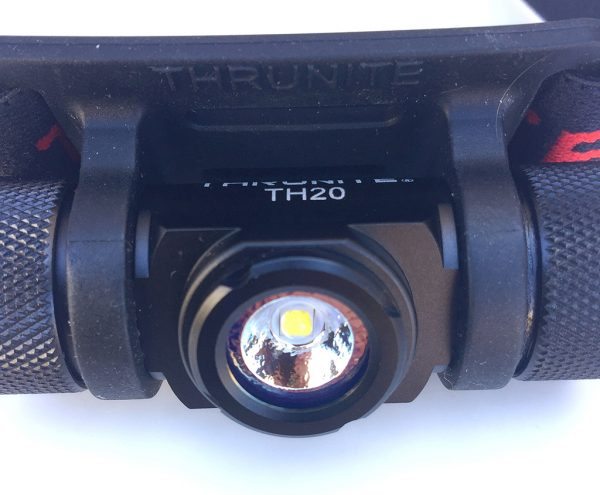
After rotating the main body upward, the lens was visible and ready to be used, as seen above.  The ThruNite logo and TH20 model number are printed on top of the body in white, which gives a good contrast against the matte black body.

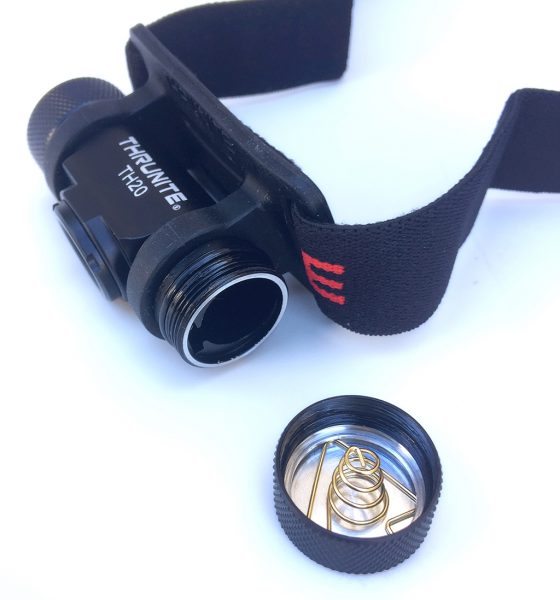
In addition to the main body, TH20’s battery cap is made from aluminum as well.  The aluminum components aid in heat dissipation, which could potentially be an issue when using the brightest modes for a long period of time, and in particular when using a Li-ion 14500 battery.  It has an O-ring seal that prevents moisture ingress, which contributes to its impressive IPX8 moisture resistance rating, which basically means that the TH20 can be submerged to a depth of 1 meter (though ThruNite claims it to be 2 meters, and it may well withstand this).  Note also that a battery is not included with the TH20, you must provide your own.  Although the TH20 can use either a single, standard AA battery or a more high-performance Li-ion 14500 battery, I only evaluated it with an AA battery because I had one on hand.  Li-ion 14500 batteries can be somewhat expensive and unless I was planning to do some back country camping or other extended duration activity, I would most typically use an AA battery with the TH20.

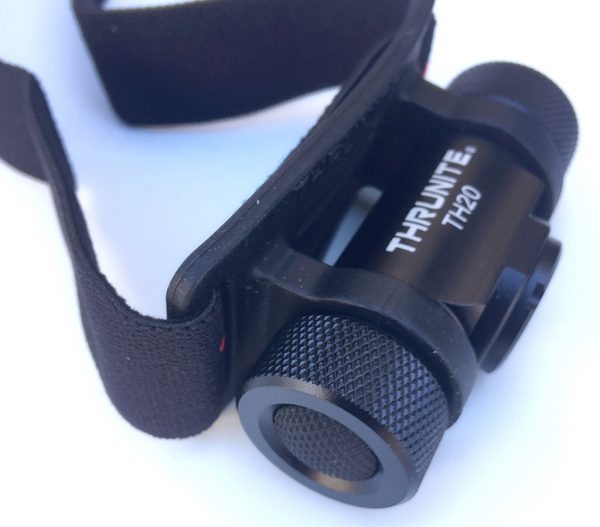
The switch end of the body as well as the battery cap are aluminum also, and both have a diamond-knurl pattern machined into them to provide a better grip when rotating the body or removing the cap, which is excellent if your hands happen to be wet.  In fact, the knurling made it very easy to unscrew the cap and change the battery.  The single switch controls all of the modes of the TH20 (more on this below). The switch is a “clicky” and it has a rubber cap which contributes to the device’s IPX8 moisture resistance.  Additionally, the switch is easy to use, even when wearing gloves.

The lens itself is surrounded by a thick, raised bezel that provides added protection to the lens and reflector.  Also, you can see that the reflector has an orange-peel finish which helps provide a more smooth, uniform beam of light than one with a smooth reflector finish.

The head strap is a 1-inch wide strip of elastic material that is looped through the rubber holding bracket.  Having a segment of the strap against your head provides a bit of cushion and comfort in this spot, which will typically be against the wearer’s forehead (see images below).

The head strap is adjustable and I found that it held tight once adjusted, so I didn’t need to worry about it loosening accidentally while I was using it.

The version of the TH20 reviewed here had an LED that produces a Neutral White light beam, meaning that it has a bit more of a yellow tint compared with the Cool White light version, which has a bit more of a blue tint.  I prefer the Neutral White LED light because I think it appears more like natural light, but this is of course just my own personal preference.  One big downside of the TH20 to me is the lack of a red light mode.  I find a red light mode to be useful in overnight GORUCK Challenge events for preserving night vision and keeping a lower profile and also when reading books in bed, in order to keep from waking up my wife.

The TH20 has several modes of operation that are all controlled by the single “clicky” style button on the right end of the main body. Initially, when the headlamp is off, a quick press turns it on.  A long press on the switch activates Firefly Mode. Once in Firefly mode, long-pressing and holding the switch gradually ramps between Infinity High and Infinity Low modes and back down to Infinity High again—just release the switch at your desired brightness. A double click press on the switch from any mode activates Turbo mode, and another double click press activates a mode where the TH20 automatically blinks the Morse Code for “SOS.”  A quick press in any mode turns the TH20 off.  In addition, the TH20 will “remember” the last Infinity setting it was in and will return to that setting when turned on.  I found these modes a bit tricky to learn at first, but once I did, they became second nature.  Having the ability to ramp gradually between Infinity High and Infinity Low modes was very useful to allow me to adapt my light level for various conditions.

Because of the way the TH20’s main body is held in its rubber bracket, it is very easy to rotate it up or down to virtually any position you may need it to be in, rather than just a handful of discreet positions as with other headlamps I have used.  Also, the rubber bracket holds the main body tightly and does not allow it to wander out of position.  The downside of the rubber bracket is that it can be a bit difficult to rotate the body within it and I sometimes needed to use two hands to do so.

So in practical terms, just how bright is it?  Using the AA battery and in full Turbo mode, I was able to illuminate my back yard and a good portion of my neighbor’s yard, out to a distance of probably 30 yards.  The beam might have gone farther had my neighbor’s house not been in the way.  In addition, I took it out for an after-dark ruck training session and it worked great—it was handy to be able to slightly adjust the beam for various lighting conditions.  I would probably characterize this headlamp’s  operation as more of a “flooder” (wider, shallower illumination) than a “thrower” (farther, narrower illumination).  However, for most things that I used or would use the TH20 for, that functionality is perfect.

Conclusion

The ThruNight TH20 Headlamp is very durable and functional.  Its aluminum body, O-ring battery cap seal and rubberized switch contribute to its impressive IPX8 moisture resistance, and its knurled ends help with gripping the device to adjust its position when wet.  Its rubber bracket holds the main body very securely in position, but it can sometimes be difficult to adjust the position one-handed.  The reviewed version here gave pleasant Neutral White beam and while it is probably more of a “flooder” than a “thrower,” this functional worked fine for me, but I’m sure would have been even brighter had I used a Li-ion 14500 battery rather than a standard AA battery.  It has several modes of operation, with its gradual “Infinity” settings being very useful for dialing in a specific brightness depending on your changing needs. The only mode it is missing is a red beam mode.  If you are looking for a durable headlamp with high moisture resistance and unique brightness level adjustment ability, have a look at the very affordable ThruNite TH20, which retails for $29.99.

Source: The sample for this review was provided by ThruNite. Please visit their site for more info or to order. Use the coupon code: THRUNITE to save 5% on orders through the ThruNite store. You can also check Amazon.


Product Information

Price: $29.99
Manufacturer: ThruNite
Retailer: Amazon
Requirements:
  • 1x AA or 1x Li-ion 14500 battery
Pros:
  • Very durable construction
  • Impressive moisture resistance
  • Multiple modes of operation, with "Infinity" setting being very useful
Cons:
  • No red light mode
  • Sometimes difficult to rotate body position one-handed

Filed in categories: Outdoor Gear, Reviews

Tagged:

ThruNite TH20 Headlamp review originally appeared on on March 31, 2017 at 7:46 am.

Note: If you are subscribed to this feed through FeedBurner, please switch to our native feed URL http://the-gadgeteer.com/feed/ in order to ensure continuous delivery.
Notion home awareness sensor kit review

Home automation, security, and remote monitoring are all hot topics right now. The ability to know that everything at your property is fine when we’re not physically there is a priceless gift for chronic worriers and people who like to feel in control. There are many systems on the market that will let you install cloud-enabled smoke alarms, window and door alarms, temperature alarms, leak detectors and more. But I’m going to tell you about a system where one sensor can do all of those things. Let’s take a look at the Notion home awareness sensor kit.

What is it?

The Notion home awareness sensor kit is a home monitoring system that uses a bridge and wireless sensors that will tell you if a door has been opened or closed, a window has been opened or closed, if there’s a leak, if the temperature is higher or lower than a set temp, and if there’s a smoke alarm. But instead of picking and choosing different sensors to monitor different things, each Notion sensors can do everything.

What’s in the box?

You can buy Notion systems with 3 or 5 sensors. I received the 3 sensor package which includes:

1 Notion bridge
3 Notion sensors
Quick start guide

Design and features


The Notion system consists of a bridge and a set of sensors. The bridge shown above looks like an AC adapter. It’s made of white plastic and has an LED on the top edge that blinks green to indicate that it’s communicating with the sensors.

The sensors are also made of white plastic with an LED at the 9 o’clock position.

The sensors are 2-inches across and have adhesive on the bottom that can be used to stick the sensor to a door, window, ceiling, etc.

You’ll also notice the QR code on the bottom, that’s used during the setup phase to identify each sensor that you want to install.

The sensors run on a CR2477N coin cell lithium battery. According to their online FAQ, that battery should power the sensor for about a year.

Installation


Setting up the Notion system is extremely easy. The first step is to install the Notion app on your iOS or Android device. You’ll then create an account and follow the step-by-step instructions to add the sensors to the bridge.

I installed one sensor on my basement door by peeling and sticking the adhesive.

I placed another Notion sensor on the front door. If you notice the oblong sensor above the Notion in the image above, that’s a sensor from the SimpliSafe security system that I reviewed almost 8 years ago.

I put the third sensor in the bedroom.

Note that each Notion bridge can handle up to 15 sensors on its network.

Each sensor can have a maximum of 3 tasks that can be chosen from the list above. When you add one task, it affects the rest of the tasks that you can add to that one sensor. For example, if you choose Door as one of the tasks, you’ll not be able to also add the window task to the same sensor.


Some of the tasks can be customized to alert based on a certain condition like the temperature going above or below a specified temp.


Once you’ve setup the tasks for each sensor, you can view their status through the app’s sensor screen. Clicking on each task will show you more details about that task including a log of alarms and the ability to customize how you would like to be alerted when an event is detected.

You can add multiple people to your Notion account who will be notified when an alarm is detected and you can also set a quiet time when you will not be notified of an alert or you can set the system to only notify you when you’re away from home.

The screenshot above might lead you to believe that the Notion system will alert fire or police if an alarm is detected. It won’t. The app just detects the emergency numbers based on your location and puts them on a screen for your reference. Of course, you really just need to call 911.

Using the system


After the Notion bridge and sensors are installed and configured through the app. You can just sit back and wait to be notified about alarms. The notifications show up on your mobile device like you see above.

Sounds fantastic right? Yeah, that’s what I thought. But unfortunately, it has not been all rainbows and unicorns…

Problems from the start

Things worked pretty well for the first day when I was mainly testing the door opening and closing tasks. But the next day, the basement sensor started reporting that it had gone offline.


It spontaneously came back online only to disconnect again the next day. Before you ask if the bridge was not close enough to the sensor, it was in the same room with an unobstructed line of sight to the sensor about 20 feet away.

I left the sensor in that state for a couple of days just to see if it would come back online on its own. It didn’t. I then removed the sensor’s cover and that must have done something (what, I don’t know) to fix it because it’s been online ever since.

That said, another sensor has gone offline and would not reconnect until I removed the cover and jiggled the battery.


The next problem happened today when the front door sensor reported that it had detected a leak when there was absolutely no water, steam, condensation or anything remotely damp near it. The weird thing is that when I went into the sensor log page, it didn’t show that it had detected a leak. An hour later a sensor that was sitting on the desk next to me also notified me of a non-existent leak and this time it did show up in the log but again, there was no reason for it to detect water.

Testing sensor tasks

I tested the leak detection feature and found that it doesn’t take much water for it to send an alert. But I don’t know why it sometimes detects a leak when there isn’t one to detect.

I also tested the door opening and closing tasks which was more reliable than the other tasks.

The temperature task also works well.

The most disappointing task is the smoke alarm task because the sensor does not really detect smoke at all. It actually listens for an existing smoke alarm and alerts off of the sound which I think is a lame way to do it because the sensor depends on a working smoke detector to work.

Final thoughts

I like the idea of the Notion home awareness sensor kit and had high expectations for it. But it didn’t take long to discover that this system has some technical problems:

The sensors randomly disconnect.
The sensors detect leaks when there aren’t any.
The smoke alarm task doesn’t really detect smoke.
No notification when sensor batteries are low.

Add in that the system won’t work without power and an internet connection and it just has too many issues for me to be able to recommend it.

Source: The sample for this review was provided by Notion. Please visit their site for more info.


Product Information

Price: $219 (3 sensors and 1 bridge), $299 (5 sensors and 1 bridge)
Manufacturer: Notion
Pros:
  • Easy to set up
  • Each sensor can do multiple things
  • No monthly fees
Cons:
  • Smoke alarm doesn't detect smoke
  • Leak detection task is not reliable
  • Sensors randomly disconnect
  • Won't work without power or an internet connection

Filed in categories: Home and Kitchen, Reviews

Tagged:

Notion home awareness sensor kit review originally appeared on on March 30, 2017 at 11:14 am.

Note: If you are subscribed to this feed through FeedBurner, please switch to our native feed URL http://the-gadgeteer.com/feed/ in order to ensure continuous delivery.