Parrot Swing drone review


Remote controlled planes, helicopters, and drones can be a lot of fun if they are easy to fly and don’t shatter into a million pieces when you crash them, which you know will happen. The newest drone to fly the skies near my house is the Parrot Swing minidrone. Let’s see how fun it is to fly and if it can survive a crash.

What is it?

The Parrot Swing minidrone is a remote-controlled flying toy with a built in camera.

What’s in the box?
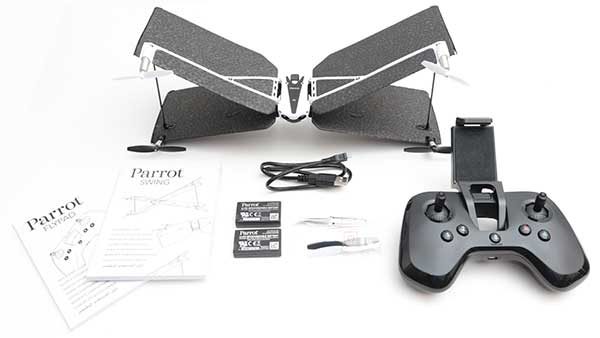
Parrot Swing drone
2 Batteries
Flypad remote control
4 replacement propellers
micro USB charging cable
Manuals for the Swing and Flypad

Design and features

The Parrot Swing drone is an X-shaped drone with lightweight foam wings.

The front of the Swing has 2 LEDs that give it a bug-eyed appearance, but they are really only there to provide status on the drone as far as battery life, connection to the Flypad, etc.

The rear of the Swing has a battery slot, micro USB charging port and a tiny camera which is located to the left of the micro USB connector. Before you get too excited, the camera will NOT capture video. It can only capture snapshots.

The Parrot Swing comes with 2 batteries. In the image above, one battery is installed in the drone. Charging is done with the included micro USB cable which can be connected to an existing USB power adapter or a port on your computer.

The power switch is located on the bottom/belly of the drone.

Also included with the drone is a very nice handheld controller called the Flypad. This controller pairs with an Android or iOS smartphone which attaches to the Flypad using the spring loaded holder.

The Flypad has joystick controls and shoulder buttons. It feels like a premium gaming controller.

In the image above, I have an LG G6 connected to the Flypad. The Flypad has built in rechargeable batteries which charge through a micro USB port in the center bottom edge of the controllers.

Let’s fly the Parrot Swing drone!

Before you can take the Parrot Swing on its first flight, you will need to charge it using the included micro USB cable. It takes about 30 minutes to charge the battery. My suggestion is to charge one battery, remove it, insert the second battery and charge it too. This way you can swap batteries for double the flight time. It’s too bad that Parrot doesn’t include an external charger that will charge both batteries at the same time.

The next step is to install the free FreeFlight Mini app on your iOS or Android device. You can use your phone as the controller, but it’s a lot more fun and easy to fly if you charge up the Flypad.

When the Swing’s battery is fully charged, the app is installed on your mobile device and the Flypad is charged, it’s time to head outdoors.

You press the power button on the Swing power it up and then place it on the ground with the propellers facing upwards.

When the 2 “eyes” on the drone are solid green, you can launch the FreeFlight mini app on your mobile device and make sure Bluetooth is enabled. The app will see the drone and connect to it. You can then turn on the Flypad controller and the app will detect and connect to it.

Pressing the dedicated take off and landing button on the Flypad will cause the Swing’s propellers to start rotating and will raise the drone a few feet in the air. Moving the left joystick on the Flypad up and down will raise and lower the drone, and using the right joystick will make the drone fly side to side.

When you first start flying the Swing, it’s in quad mode (image above) which means it can fly up, down, left, and right like a typical drone. But if you press the right shoulder button on the Flypad controller, it will switch to plane mode which flips the Swing over so it looks like a flying dragonfly (other images in this review) instead of a flying X if that makes sense. The joysticks and buttons on the Flypad react differently depending on the mode you’re in.

There are also dedicated buttons that will do a U-turn and a loop in the air. The U-turn is very useful if you happen to be flying straight towards a building or tree!


If you don’t want to use the Flypad, you can fly the Swing just using the onscreen buttons in the FlightTime Mini app. But I think the Flypad provides a much better experience.

The app does give you details about each flight and allows you to see and share the images that you took with the Swing’s built-in camera to Facebook or download them. But trust me when I say that you probably will not be sharing any of the images.


I kept trying to get a picture of myself and as you can see from the samples above, it wasn’t an easy task. Even if I would have been able to get a good picture, the resolution is really low.

See it in action!

I thought it was difficult to control the Parrot Swing the first time I flew it. But it only took a few minutes to get the hang of it. Unfortunately, the flight time per battery charge is just that, only a few minutes. That’s why I suggested that you charge both batteries before you head outside to fly it. Thirty minutes of charging will allow you to fly for about 10 minutes give or take. The app will start beeping when the battery power is down to 7% and the Parrot Swing minidrone will go into quad mode and land by itself when battery power goes to 2-3%.

Can it survive a crash?

Yes, it can and yes it did. Multiple times. But there was some “damage”. After one crash I noticed that one of the propellers was missing. Trying to find a small black or white object in piles of leaf clutter was impossible. The propellers really should be a brighter, more noticeable color.

I didn’t freak out though because I remembered that an extra set of propellers are included in the package. So I went back to the house and installed one of the black propellers. I then went back outside to resume flying. But each time I tried to fly, the Parrot Swing would flop over. I double checked all the propellers and the wings to make sure there wasn’t some additional damage that I had missed, but everything looked and felt fine. I continued to try to fly it, but each time the propellers spun up, the drone will flop over on its side.

I returned to the house, flipped through the manual to see if there were any instructions for replacing the propellers and found none. So I searched around on Parrot’s website and found a user forum where another person was asking about the same problem. Long story short, there are clockwise propellers and counter-clockwise propellers. But the weird thing is that the color doesn’t designate which way they should turn or be installed. I had to install a white propeller in place of the missing black propeller.

Once I had the right propeller installed, flying fun commenced.

Final thoughts

The Parrot Swing minidrone is a LOT of fun to fly either in quad or plane mode (I like the plane mode the best). It’s not hard to get the hang of it and once you do, crashes don’t happen that often unless you’re flying near a lot of trees like I am. But if you do crash, the Swing seems to be tough enough to handle it. Just make sure that you have extra propellers handy and know which one goes where.

At about $99, the Parrot Swing isn’t too expensive. I just wish the built-in camera was better and the flight times were longer. But even with those minor complaints, it’s still a really fun flying toy.

Source: The sample for this review was provided by Parrot. Please visit their site for more info and Amazon to order.


Product Information

Price: $139.99 MSRP
Manufacturer: Parrot
Retailer: Amazon
Pros:
  • Fun and relatively easy to fly
  • One press launch and land
  • Rugged
Cons:
  • Didn't include instructions for replacing propellers
  • Image quality isn't good

Filed in categories: Reviews

Tagged:

Parrot Swing drone review originally appeared on on April 18, 2017 at 4:03 pm.

Note: If you are subscribed to this feed through FeedBurner, please switch to our native feed URL http://the-gadgeteer.com/feed/ in order to ensure continuous delivery.

Nomad Tile Integrated PowerPack Review


The Nomad Advanced Powerpack is a well-built, powerful, ruggedized external battery pack that is unique in that it has built-in Tile integration. Not only will it quickly charge your various devices, if it’s ever misplaced you’ll be able to find it easily using Bluetooth and the Tile app. The added features will cost you though.

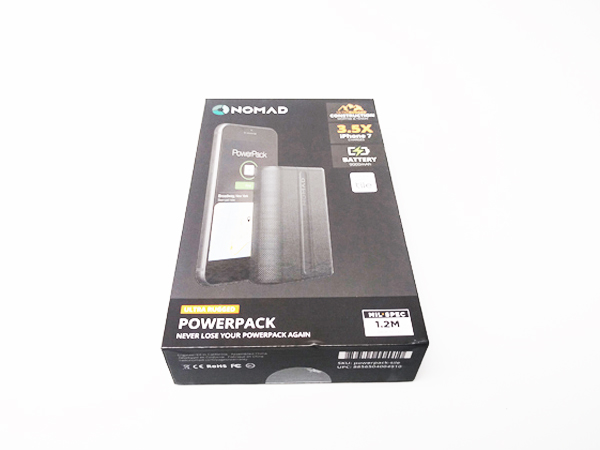
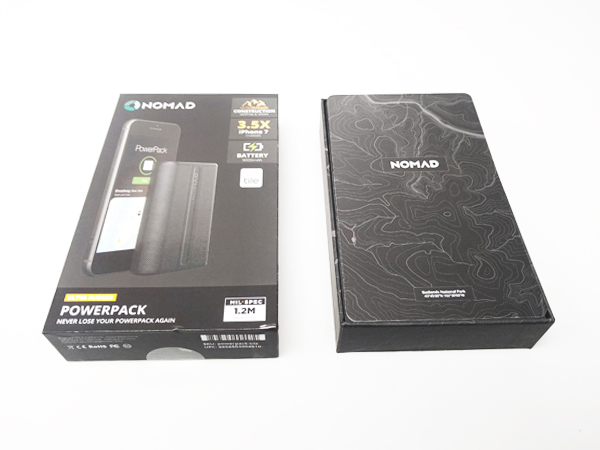
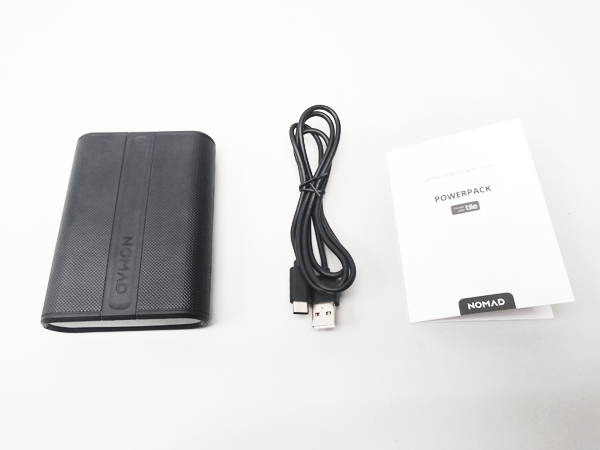
The Nomad comes in very sturdy packaging that appears just about as rugged as the unit itself.

In the box:

  • Nomad Powerpack
  • USB-C to USB-A cable
  • User Manual

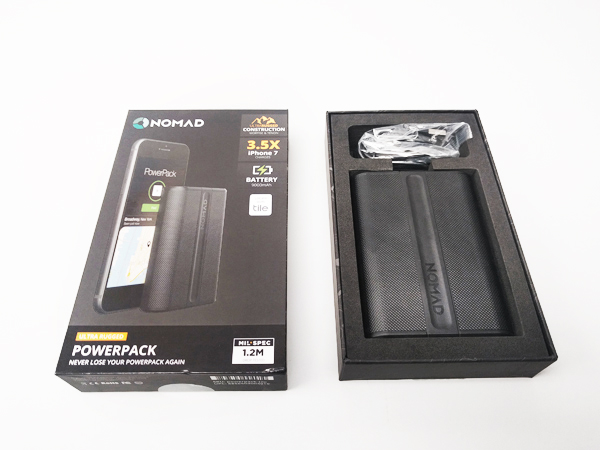
Inside the box, you’ll find the Nomad Powerpack, a USB-C to USB-A cord and a small manual.

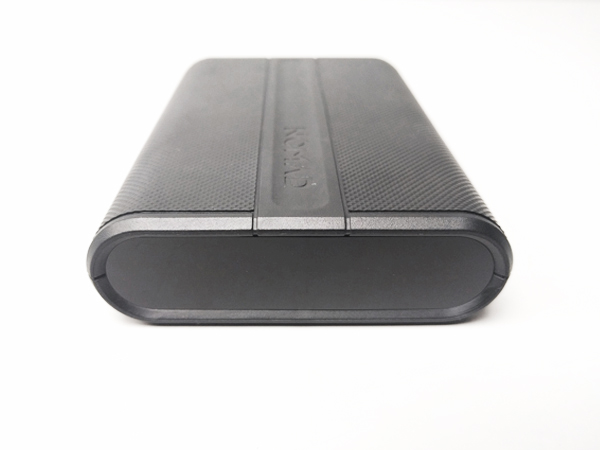
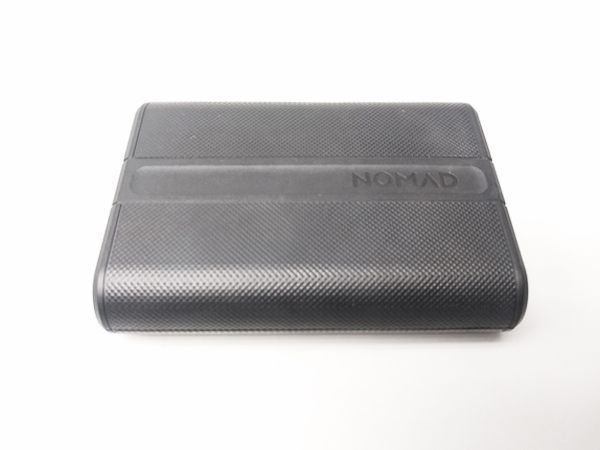
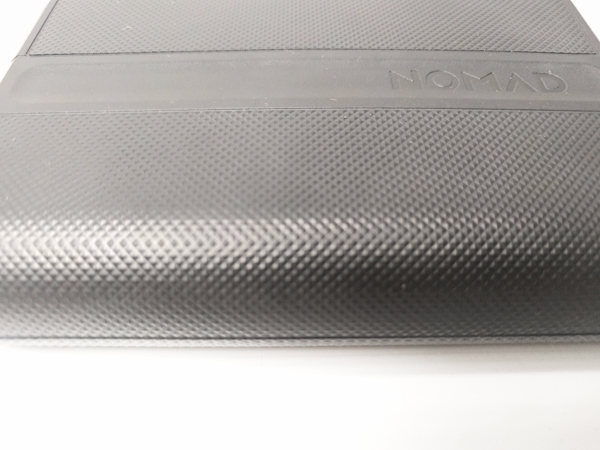
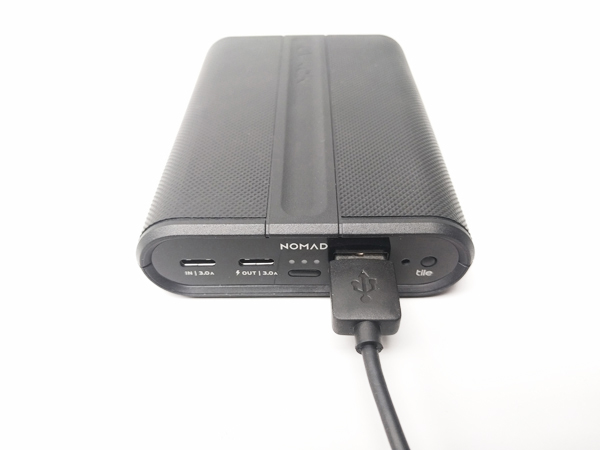
The overall design and look of the Nomad Powerpack is quite impressive. The Nomad has a very militarized, stealth aesthetic. The pack feels hefty in your hand, more like a weapon than a battery pack. The large size and weight is one of the Nomad’s drawbacks. It has matte textured plastic bevels with the Nomad named imprinted in a groove down the top of the unit.

The unit is protected by a thick rubberized diamond plate-like texture. Furthering the military theme, the specifications say that has 1.2M Mil-spec drop protection. Basically, this means that it can be dropped from a height of 1.2M on to its edge without suffering damage.

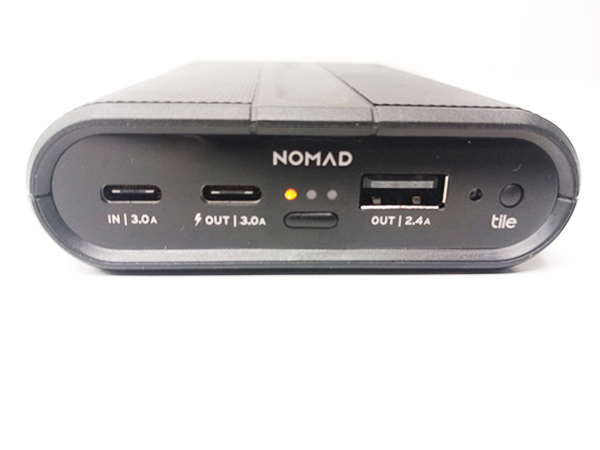
The Nomad comes uncharged. A low charge is indicated by a single orange light.

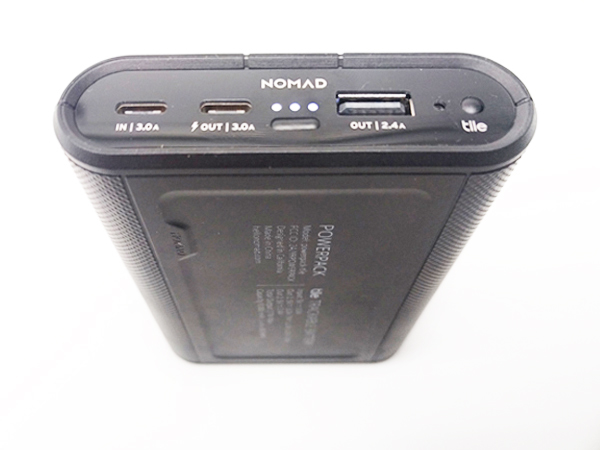
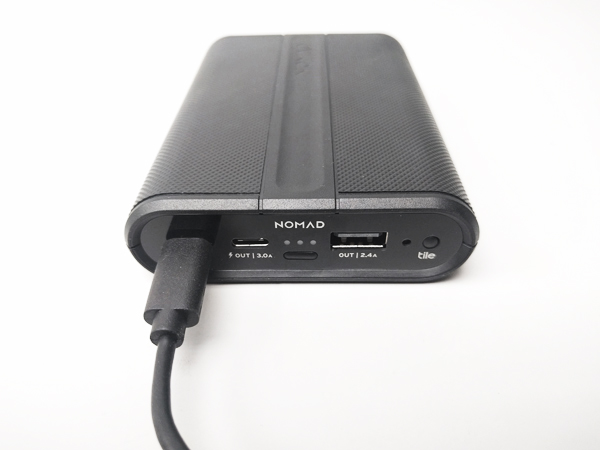
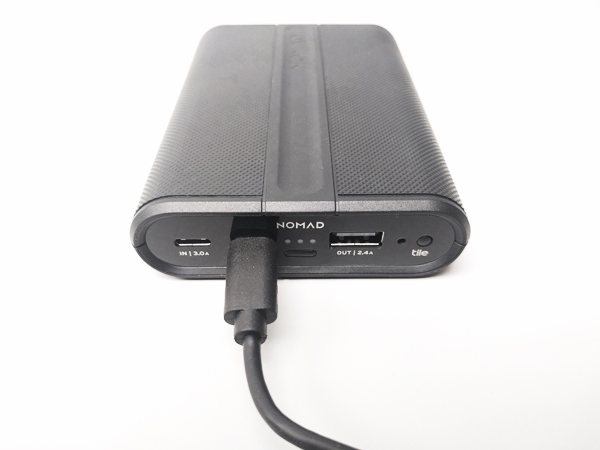
The unit charges by using the included USB-C to USB-A cord. Plug the USB-C end into the IN USB-C port on the Nomad and plug the USB-A end into a powered USB port or a USB-A wall charger. Plugged into my Anker powered USB hub using the included cable, the Nomad went from empty to full charge in about two hours.

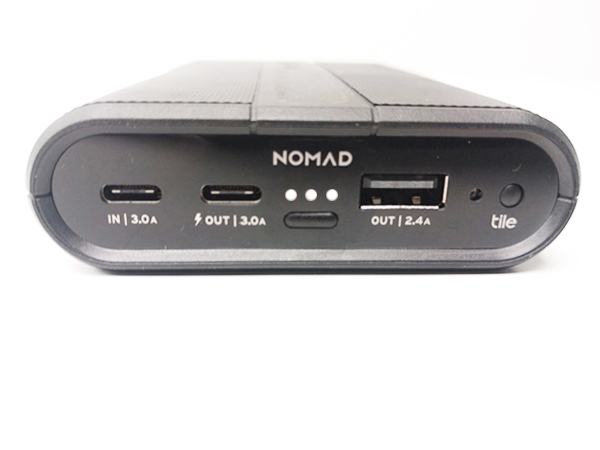
A full charge is indicated by three white lights. Interestingly enough, Nomad included an ambient light sensor on the powerpack right between the USB-A port and the Tile button. The unit will automatically dim the indicator lights in the dark preventing the bright lights from disturbing your sleep.

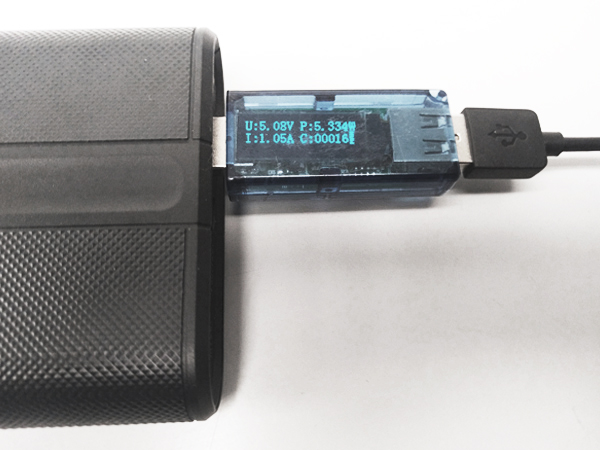
You power the unit on by pressing the small button under the charge indicator lights. I was able to charge my Android Nexus 5X from 10% to 100% in about two hours and thirty minutes using the USB-C to USB-A cable plugged into the USB-A out on the unit. I measured that charge at 5.08V / 1.05A / 5.334W; this was an average reading. Voltages always hovered around 5.00V. Amps averaged around 1.25A. Watts were anywhere from 5.25W all they way up to 8.75W.

The USB-A port is indicated as providing 2.4A out although my testing came in a bit lower.

To get the full benefit of the quick charge capability you will need a USB-C to USB-C cable for newer Android phones or a USB-C to Lightning cable for iPhones.

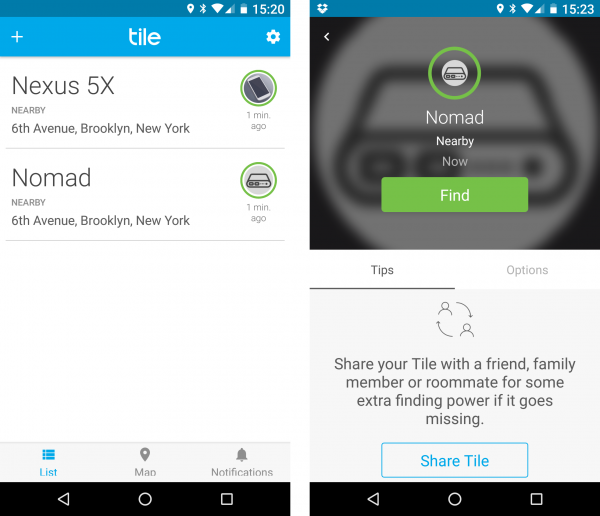
Setting the Nomad up to use the integrated Tile functionality is easy. Open the included user manual and scan the QR code to initiate the process and install the Tile app on your Android or iPhone. To find the Nomad using Tile simply select it in the Tile app and then select Find.

If your Nomad is within 100ft, it will start playing a little alarm tune repeatedly until you find it and press the Tile button. The alarm is a bit low so searching for the Nomad may take some time if it’s hidden someplace deep in your backpack or behind a couch for example. If the Nomad is out of Bluetooth range you still may be able to locate it using Tile’s community functions. If any other Tile user’s device is within Bluetooth range of the Nomad, you will receive an update with its location.

The Nomad Powerpack is a very powerful battery and the built-in Tile functionality is a great addition. It’s a good deal more expensive than most battery packs and it has fewer ports than a lot of more inexpensive ones. But, if a seriously rugged design and the option to track its location is important to you then it’s worth the higher price point.

Compatible Devices

  • iPhone 5 through 7/7Plus
  • iPad (4th Generation +)
  • iPad Mini (All generations)
  • iPod Touch
  • Android Type C and Micro USB phones and tablets
  • Most Micro USB Devices via USB-A port
  • PowerPack supports USB C, but it does not support USB PD (Power Delivery) so it will only trickle charge your 2016 Macbook.

Specifications

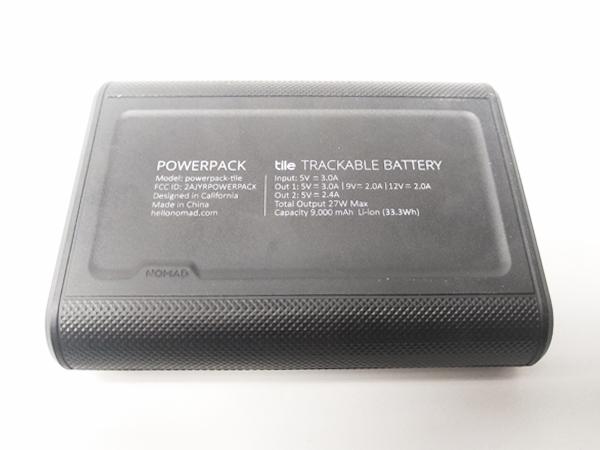
  • Capacity: 9,000mAh (29.6wh)
  • Input: USB C 5V/3.0A (cable included)
  • Output 1: USB A 5V/2.4A
  • Output 2: USB C 5V/3A – 12V/2A with Fast Charge technology
  • Panasonic lithium battery
  • 5.31″ (13.5cm) x 2.9″ (7.5cm) x .78″ (2.5cm)
  • 1.2M Mil-spec drop protection
  • Tile integration via Bluetooth

Source: The sample for this review was provided by Nomad. Please visit their website or Amazon to order.


Product Information

Price: $99.95
Manufacturer: Nomad
Retailer: Amazon
Pros:
  • Very rugged
  • Tile integration works well
  • USB-C port
  • Built-in ambient light sensor
  • Very good battery life
Cons:
  • Expensive compared to similar chargers
  • Big and bulky
  • Only one USB-A port
  • No Micro USB ports

Filed in categories: Reviews

Tagged:

Nomad Tile Integrated PowerPack Review originally appeared on on April 18, 2017 at 6:44 am.

Note: If you are subscribed to this feed through FeedBurner, please switch to our native feed URL http://the-gadgeteer.com/feed/ in order to ensure continuous delivery.

Archeer A320 Bluetooth speaker review


When you think furniture quality bamboo you probably don’t think Bluetooth speakers, but with the A320 Bluetooth speaker from Archeer that’s exactly what you get. The body of this speaker is actually made of bamboo, giving it a very unique and rich look. Add to that a skin – friendly rewind fabric material and you get one of the most beautiful looking Bluetooth speakers on the market. The Gadgeteer was fortunate to receive one for review. Is this a case of beauty only being skin deep or is there more to the A320 then just good looks? Time to find out if this Beauty really is a Beast.


In the Box:

  • 1- ARCHEER A320 Home Speaker
  • 1- Micro USB Charging Cable
  • 1- 3.5mm Audio Cable
  • 1- User Manual

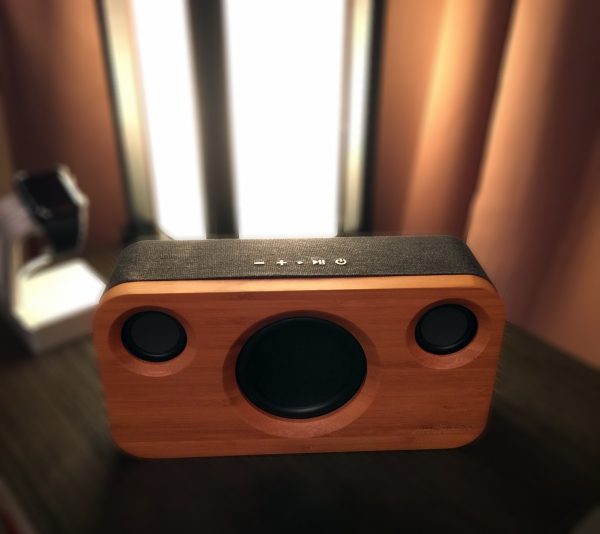
This speaker really is a stunner. Its classic design with dual exposed 5W tweeters and 15W subwoofer all set into warm colored bamboo make it a perfect complement to any room. I really like the solid build of this speaker. It has some heft to it but still maintains its portability. The universally understood symbol control buttons for play, pause and volume up/volume down located on top of the speaker are raised and have a rubber like coating.

I also like the rewind fabric that wraps around the body of the speaker. Its gray color is in nice contrast with the warm color of the bamboo. Just another touch that adds to the unique design of the A320. My only concern about the fabric wrapping is that there could be some wear on the bottom of the speaker due to the fact that it comes in direct contact with any surface it’s placed on. I remedied that by adding four rubber bumpers that I purchased for a couple of bucks at the store. One downside to the unit being made of bamboo and having exposed speakers is that it’s not weather or water proof. So if it is used outside keep it out of the weather and away from pools or lakes. This may be a deal breaker for some. But it would make a nice addition to any deck or covered patio this summer.

On the back you’ll find the AUX Port, DC in via micro USB to standard USB, charge light and reset button. In addition, near the bottom of the back of the unit is the bass port.

The A320 uses 4.0 Bluetooth to connect to your device of choice, or you can connect your non – Bluetooth device with the provided 3.5mm audio cable. Pairing the speaker is easy, it’s done by holding down the power button until the power light (located between the volume up and play/pause buttons) flashes green. This means the A320 is in pairing mode, then simply select it from your device’s Bluetooth menu. When connected you will hear a tone and the power button will flash blue.

The unit is powered by a rechargeable 5200mAh lithium-Ion battery. Listening time on a full charge is about 11 hours at 50% volume. It does take about 6 hours to fully charge the A320, however, you can use the unit while it’s charging. Charging is done using the micro USB charging cable. Archeer doesn’t provide an adaptor but you can use any 5V DC adaptor (I used one that I had from one of the many Apple devices I own) or a PC. If you don’t have an adaptor you can purchase one on the Archeer website. While charging the charge indicator light on the back will glow red. Once fully charged the indicator light shuts off.

Archeer also provides a thick nylon carrying bag for the A320. It’s nothing special but will definitely provide some protection for the speaker while traveling.

Remember when I asked whether this Beauty really is a Beast?  Well time to find out. I decided to use different genres of music to test the range of the A320’s sound quality. For my tests, I listened to rock, rap, classical and pop. The A320 handled every genre I threw at it very well.  The bass was very prominent thanks to the 15W subwoofer, but not overwhelming. The highs and mid-range tones were very clean and clear. Lyrics were also very crisp and discernible. As you might guess rap benefited greatly from the added bass. The Beastie Boys ‘Licensed to Ill’ never sounded better. Even listening to orchestra music was a joy on this speaker. In fact, I was listening to the soundtrack from The Lord of the Rings as I was writing this review and it sounded fantastic. I also like to listen to podcasts from time to time so I tested out an episode of ‘The Nerdist’ podcast. The sound quality of the voice only content was great. And the A320 even replaced a ratty old boom box I was using to listen to sports talk radio with my morning coffee. So no matter what you like to listen to this Beauty truly is a Beast.

The other thing I like to use the A320 with is my Amazon Echo Dot. If you own or have seen the Dot you know that the built-in speaker doesn’t get very loud, but pairing it to the A320 (which is very easy by the way) gave me a whole new Alexa experience.

In Conclusion:

I flat out LOVE this speaker. The Archeer A320 Bluetooth speaker is everything one could want in a wireless speaker. Classic good looks with sound to match. There are more expensive speakers out there, but you would be hard pressed to find one that matches the sound quality and design of this speaker, especially at a more than reasonable price of $79.99. So if you want a Bluetooth speaker with excellent room filling sound that also doubles as a great conversation piece the Archeer A320 is a no brainer.

Warranty:

Archeer offers a 40-day money back guarantee along with a 18-month hassle-free warranty. From the date of purchase.

Source: The sample for this review was provided by Archeer. Please visit their website or Amazon to purchase.


Product Information

Price: $79.99
Manufacturer: Archeer
Retailer: Amazon
Pros:
  • Great looks
  • Excellent room filling sound
  • Easy to use
  • Portable
  • Reasonable price
Cons:
  • Long recharge time
  • Not waterproof or resistant

Filed in categories: Reviews

Tagged:

Archeer A320 Bluetooth speaker review originally appeared on on April 17, 2017 at 3:50 pm.

Note: If you are subscribed to this feed through FeedBurner, please switch to our native feed URL http://the-gadgeteer.com/feed/ in order to ensure continuous delivery.

iClever Tri-Folding Wireless Keyboard review


Pairing a Bluetooth keyboard with your phone or a tablet turns it into a pseudo laptop for those times when an on-screen touch keyboard just won’t cut it. Add the ability to fold the keyboard into a smaller form factor and you have a perfect accessory to keep in your gear bag. What if I told you that there’s a folding Bluetooth keyboard that also has a built-in touchpad? Sounds like a match made in heaven right? Let’s see if the iClever Tri-Folding Wireless Keyboard earns a spot in my gear bag and my favorite gear page.

What is it?

The iClever Tri-Folding Wireless Keyboard is a portable Bluetooth keyboard with a built-in touchpad that folds for easy travel.

What’s in the box?

The iClever Tri-Folding Wireless Keyboard
Travel pouch
micro USB charging cable
User manual

Design and features

The iClever Tri-Folding Wireless Keyboard has a brushed gray aluminum alloy shell on the outside, and a black plastic keyboard on the inside.

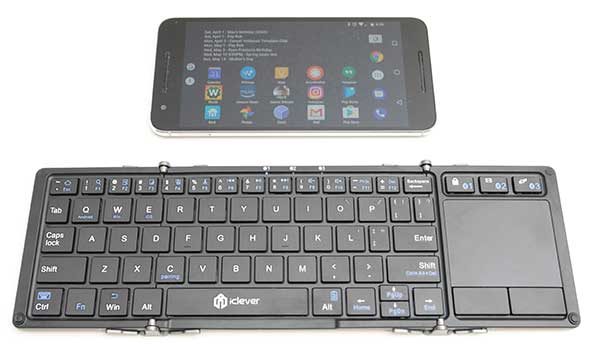
The keyboard easily unfolds to reveal a full QWERTY-style key layout that includes a number row with function keys and media control keys along the top edge and the touchpad with left and right “mouse” buttons below it. You can click the image above to see a larger view of the keyboard layout.

Two small feet fold down on each end of the keyboard to allow it to remain flat and stable on a table when in use.

Unfolding the keyboard doubles as a power switch that turns it on and pairs with your device. Fold it back up, and it powers down.

Size compared to other small Bluetooth keyboards

When folded, the iClever Tri-Folding keyboard is about the same size as a large smartphone like my Nexus 6P shown next to iClever Tri-Folding keyboard in the image above.

In the image above, there’s an Apple wireless keyboard at the top, the iClever Tri-Folding Wireless Keyboard in the middle and the Jorno folding Bluetooth keyboard on the bottom which looks almost identical to the iClever minus the touchpad.

Using the iClever Tri-Folding keyboard

The iClever can pair with 3 devices simultaneously with easy switching between the devices by pressing the Fn key with the 1, 2, or 3 key above the touchpad.

I tested the iClever Tri-Folding keyboard with my 12 inch MacBook, an LG G6, and a Nexus 6P. Pairing and switching between these three devices was quick and easy.

The keys on the iClever are small, but I was able to touch type without too much effort. That said, I did notice a few issues while using this keyboard to type this review. I had no problem typing letters A through Z, or numbers 1 through 9 without having to look down at the keys. Most punctuation symbols were not a problem either except for  ?, ‘, “, \, and /, which were located in non-standard locations and require a Fn key press to access them.

The single quote tripped me up the most because I have the muscle memory to press it with my pinky on my right hand. When I try that on the iClever, my pinky presses the enter key which means I’ll start typing on the next line… which just happened while typing this sentence. Grrrrr. Having to stop mid-sentence to press a Fn key combo to get an often used character is really frustrating when you’re a touch typist.

I also had a problem with the – character which I use a lot when typing the URL of The Gadgeteer. I would almost always press the = character instead.

Using the iClever Tri-Folding keyboard touchpad

Having a built-in touchpad means that there’s no need to add a mouse to your gear bag. The iClever’s touchpad works fine as long as you are using the keyboard with a Mac, Windows or Android. However, it will not work with iOS devices. Sorry about your luck iOS fans.

The touchpad not only moves the cursor around on the screen, but it is also capable of gestures like two finger scrolling up and down, pinch/zoom, two finger click for right mouse button and more.

The only problem I had with the touchpad was accidentally touching it when I didn’t mean to. If you find that this happens too often for your liking, you can turn off the touchpad by holding the Fn key and 3 key above the touchpad.

Final thoughts

The iClever Tri-Folding Wireless Keyboard with Touchpad has a lot going for it. It’s well made, pairs with 3 devices, and has a built-in touchpad.

I like the keyboard a lot except that it drives me nuts to use it due to the issues typing ?, ‘, “, -, /, and \ characters. I could deal with having to press a Fn key to access the -, /, and \ characters, but ?, ‘, and ” characters are a deal breaker for me.

If you’re not a touch-typist, this keyboard is great. But if you ARE a touch-typist, it will most likely frustrate you like it has for me.

Source: The sample for this review was provided by iClever. Please visit their site for more info and Amazon to order.


Product Information

Price: $79.99
Manufacturer: iClever
Retailer: Amazon
Pros:
  • Has a built-in touchpad
  • Can pair with up to 3 devices
  • Built-in foot stands keep keyboard balance
Cons:
  • Have to use function key to access certain often used keys like ?/'"

Filed in categories: Reviews

Tagged:

iClever Tri-Folding Wireless Keyboard review originally appeared on on April 17, 2017 at 6:47 am.

Note: If you are subscribed to this feed through FeedBurner, please switch to our native feed URL http://the-gadgeteer.com/feed/ in order to ensure continuous delivery.

Maverick Laptop Messenger Bag review


There are a few Gadgeteer reviewers who have liked Waterfield bags, myself included. For years, Waterfield has made bags of all sizes and uses—and they are made in the good ole U.S.A. My first Waterfield product was a small, zippered pouch to hold my iPod (remember those?) along with earphones and necessary wiring. Last year, I reviewed one of their  backpacks—the Bolt. Recently, I decided to downsize to a smaller bag, mainly because I was accumulating too much stuff and downsizing would force me to make hard choices. Waterfield’s timing was perfect when I was given the chance to review their new Maverick messenger bag, a svelte, full leather bag that is as tough as it looks, maybe even tougher.

When I receive a product (usually audio related) to review, I either photograph it right out of the box, treat it with kid gloves or photoshop out scratches, nicks and whatever can happen during daily use. Not so with the Waterfield Maverick. Since it was advertised to get only better with age, I decided to wait and not photograph it until is was aged by my daily use—which included a business trip to New York City. And now, it’s time to review and you know what? Waterfield was right, The Maverick is scratched, scarred and stained yet it does look better than new!

One interesting aspect about the Maverick messenger bag is that it’s made from a single hide. This ensures that the whole bag will have a uniform look. As someone who hand-made leather purses and belts years ago, I can tell you that different hides accept dyes differently, have varying thicknesses and can be as individual as the cow it came from.

There are three colors available: Black, Chocolate, and Grizzly. The reviewed bag is the lighter Grizzly, which has a more casual, western look.

The Maverick bag comes in two sizes—Full and Compact. The Full size will hold: A larger MacBook Pro, larger PC laptop, 12.9″ iPad Pro (and smaller) and other similarly-sized tablets. The Compact will hold: A 13” MacBook Pro, MacBook Air, 9.7” iPad and similarly-sized tablets and even a 12.9″ iPad Pro—only in the laptop compartment. I do not own a laptop but since my 12.9″ iPad Pro fits into the laptop compartment, I opted for the compact-sized bag. It’s the one mistake I made. True, the 12.9″ iPad Pro easily fits into the compact-sized bag, but that’s without a case. I have a case and while it still fits, it’s a much tighter fit. My advice is that if you have any doubt if your laptop or tablet will fit, go for the full-sized Maverick bag.

Despite the size issue, I have enjoyed using the Maverick bag. As I said before, the outer part is scarred—a lot after use. The interior is made of heavy-duty canvas with heavy-duty finished seams. There are two large open pockets that run the length of the bag for holding a laptop and tablet separately. Each is padded to help prevent scratching. The middle is an open area for dumping whatever will fit. The inside front of the bag has two (unlined) smaller canvas pockets—one open and the other zippered. After using the bag for a couple of months, I now wish both pockets were zippered. If I either pocket left open, I would then have the choice to leave it unzipped.

That’s it for the interior. There are no hidden or side pockets, no bottle holders, no built-in charger—just simple, effective design.

The front flap has two holes cut into a leather tab that fits offer a sewn on stud. Which hole you use largely depends on how much stuff has been crammed into the bag. I worry about the holes cut into the leather tab becoming stretched with repeated usage, but it hasn’t happened yet, so it’s probably me being paranoid.

As I said before, using the Maverick messenger bag has forced me to edit my stuff and that’s been a (mostly) good experience. Previously in my other backpack, I had a few chargers, way too many cables and other junk that I have since put in a drawer for when I really need them—not if I need them. My shoulder now thanks me.

Speaking of shoulders, the Maverick has a 1.5 in. wide nylon shoulder strap for carrying. Thankfully, Waterfield has included a removable non-slip leather shoulder pad that keeps the strap from digging into your shoulder which makes it much more comfortable to carry. Since it’s removable, it can be infinitely adjusted up or down the strap.

The strap itself is sewn into the bag at a vertical angle. It’s easier to look at the photos than have me explain it. I understand Waterfield’s reasoning, but I still haven’t gotten used to it. One thing that bothers me is that the strap seems to get twisted a lot after repeated use. It’s easy to untwist, but it’s still something I have to do before throwing it over my shoulder.

There is a leather handle sewn into the upper back of the bag’s flap rather than at the top. Again, Waterfield has a design reason for this. I’m not sure I agree, but I hardly use this handle, so I don’t think about it too much.

Despite me being picky about certain aspects, the Maverick is a handy bag that’s a pleasure to use. I’ve come to appreciate it more and more each day. True, I wish I had chosen the full-sized version, but that’s my fault. If you’re looking to buy a messenger bag, you can learn from my judgment error in sizing.

Waterfield has—once again—made a product that should give years of use. The leather Maverick messenger bag should last long enough to hand down to a new generation should you want to get a new bag or backpack later. I would only caution those who like their bag to look new as long as possible because it will get scarred. As I said though, I think it’s aging quite beautifully.

The Maverick messenger bag sells for $289.00 or $319.00 US.

Source: The sample for this review was provided by Waterfield. Please visit www.sfbags.com for more info.


Product Information

Price: $289.00 US (Compact size) or $319.00 US (Full size)
Manufacturer: Waterfield
Pros:
  • Well made
  • Tough
  • Comfortable to carry
  • Look better with age
  • Holds a lot for its size
Cons:
  • Not as roomy as a backpack
  • Expensive

Filed in categories: Bags, Reviews

Tagged:

Maverick Laptop Messenger Bag review originally appeared on on April 16, 2017 at 8:15 am.

Note: If you are subscribed to this feed through FeedBurner, please switch to our native feed URL http://the-gadgeteer.com/feed/ in order to ensure continuous delivery.