Amped Wireless Artemis-EX high power AC1300 Wi-fi range extender review


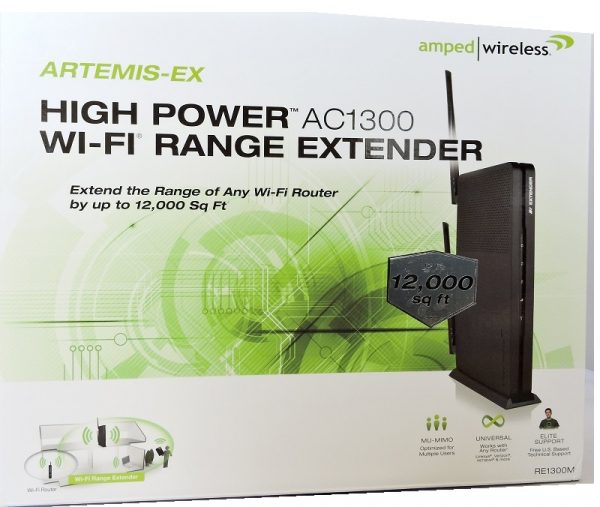
Do you have areas of your house that have weak or no Wi-fi coverage?  Perhaps the ‘dead zones’ are due to distance, numerous walls, or the type of walls between you and your router.  Not only that but maybe there are so many people in your house requiring Wi-fi that your bandwidth is getting eaten up.  Enter the Artemis High Power AC1300 Wi-fi Range Extender, model RE1300M.  This device can help your resolve your Wi-fi woes; extending your current routers’ range by up to 12,000 sq ft.
One of the best things about this Wi-fi extender is that it can extend the range of ANY router by up to 12,000 sq ft. That’s right. With only a few exceptions*, this extender will power you up with AC1300 speeds.

*May not work with non-standard Wi-Fi routers or routers with altered firmware or proprietary firmware, such as those from third party sources or some Internet service providers. May not work with routers that do not comply with IEEE or Wi-Fi standards. (per AmpedWireless.com)

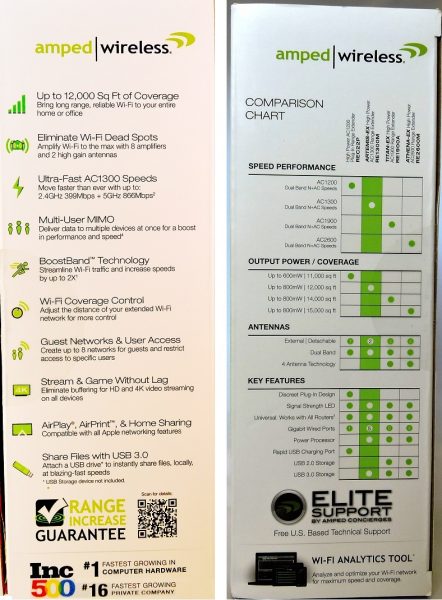
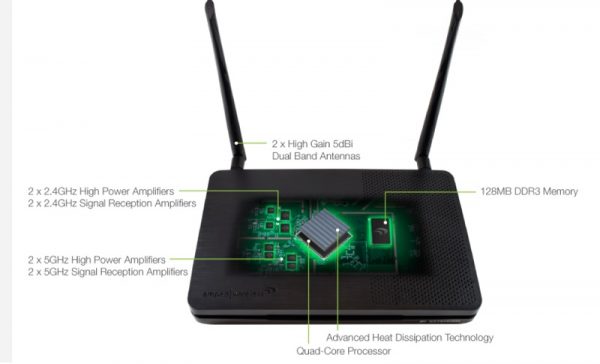
The device is loaded with special features, too. 8 strong amplifiers and 2 antennas, Multi-User MIMO, Unmatched AC1300 Wi-fi for flawless HD & 4K streaming, More bandwidth for more devices (with no lag, even when multiple devices are streaming), Parental security features and Guest Networks, BoostBand™ Technology maximizes speed, Universal compatibility, High-powered Quad-core internet processor, Network bridging with 5 Gigabit wired ports, a signal strength LED that ensures you have optimal placement of the unit, Simple setup (more on that later), and a USB 3.0 port that lets you share files quickly (over your network or via FTP client).

We all have so many devices connected to our networks at home. Smartphones, TV’s, ROKU, Apple TV, computers, laptops, tablets, even large appliances.  The list goes on and on.  A typical family of four can have around 50 or more devices pulling bandwidth from their network. Sometimes you just need a boost, and that’s where the Artemis-EX RE1300M comes in. It’s specially designed for multi-user, multi-device households. And with the features I mentioned above, this device can deliver unmatched range and reliability for up to 12,000 square feet of coverage in your home. The AC1300 technology can deliver 399 Mbps on the 2.4GHz band, and up to 866 Mbps on the 5GHz band. Another great thing about this extender is that it has MU-MIMO tech, too. That means that it can send data to multiple devices at the same time, and with no lag or buffering. Uninterrupted streaming for everyone!!

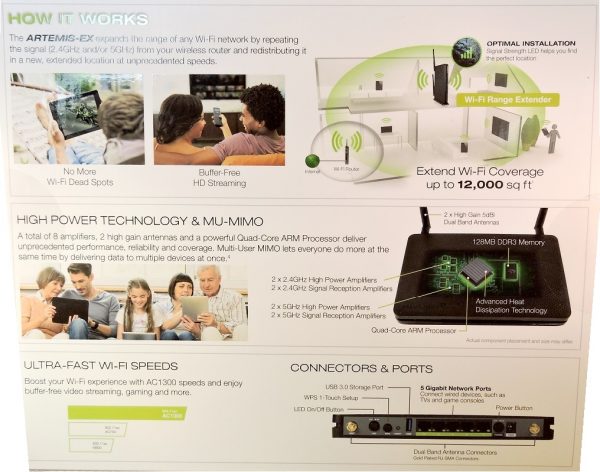
How can it do this? It expands the range of your EXISTING Wi-fi network from your current router (2.4GHz and/or 5GHz) and redistributes it farther away from your current router at very fast speeds. This helps you get rid of Wi-fi ‘dead zones’ in your home. Amped Wireless says that you can “seamlessly stream, game, and download on all your devices at once with up to 1.26Gbps Wi-fi speeds.”

The picture below shows why the Amped Wireless Artemis-EX RE1300M is better than other Wi-fi extenders out there:

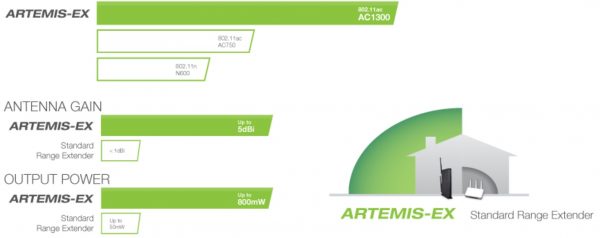
And these are comparisons between Artemis’ extender vs. “standard” range extenders:

It’s pretty cool that you get an antenna gain of up to 5dBi and output power of up to 800mW.

So let’s talk about the ports and connectors on the back.
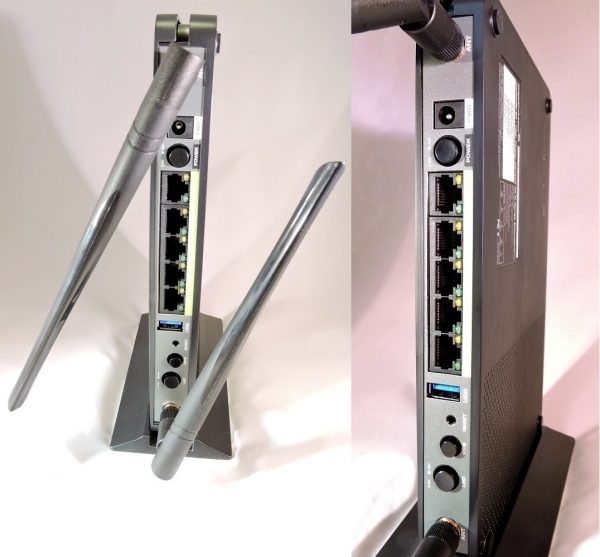
From top-to-bottom, you have your AC power jack, then the power button. You’ve got 5 Gigabit wired ports, then a USB 3.0 port (for file sharing). Below that is a little red “Reset” button, then a WPS 1-touch setup button. And finally, there is a button that lets you turn the LED’s on the front of the unit on/off.

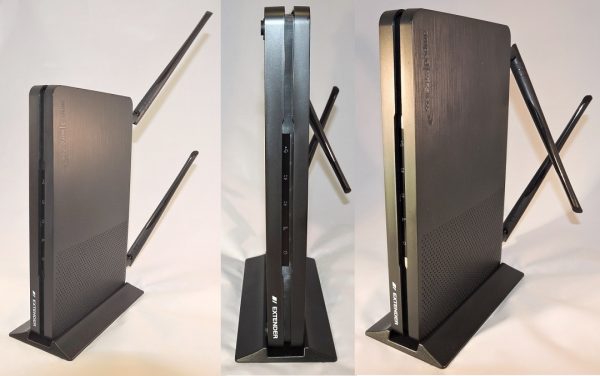
I like the layout on the back of the router. Everything is spaced nicely, and it’s laid out in a logical fashion. Another nice feature of the Artemis-EX is that it comes with a little attachable stand. You can put the stand on either of the extender’s sides, with the front facing down on the stand. or on its belly (using the pre-attached rubber feet). Basically, the stand allows you to decrease the footprint of the device.

What about the BoostBand technology that I mentioned earlier? I can’t explain it any better than Amped Wireless; “BoostBand Technology increases the overall speed and performance of your extended network by streamlining dual band network traffic through a single Wi-fi frequency band between the router and the Range Extender.” Here’s a picture to illustrate:

We need to talk about the setup of this Artemis-EX Range Extender. Before I begin, let me preface by saying that this unit extends your CURRENT network. Hopefully, you already have adequate security and firewalls on your current setup. If not, make sure everything is ‘up to snuff’ because 1) you need it, and 2) this extender basically clones your current network and puts an “_RE” on the end of your home network’s name. So if your home network’s SSID is “MIRROR2.4”, after being cloned, you would want to connect to the “MIRROR2.4_RE” network in parts of the house that previously had ‘dead zones’.

One thing I absolutely hate about this Range Extender is that there is no built-in security, firewall, or password. The moment you plug it in, scan for Wi-fi networks, and you see that there are two new networks available: “Amped_ArtemisEX_2.4” and “Amped_ArtemisEX_5.0”, and they are both OPEN networks. In my opinion, that’s a giant risk. The setup process IS pretty easy, and it only takes a few minutes get this unit up and running. But in today’s world, a few minutes is all a malicious hacker needs to get into your network. So work fast!! Read through ALL of the instructions before you even plug this thing in, and everything should go smoothly. You’ll know what you have to do and what to expect, and you should be OK. But I surely hate that it’s not pre-locked with a password or SOMETHING! Anyway, perhaps I’m paranoid, but I’m a secure paranoid.

Here’s what you have to do to get set up:
1) Find a location about half-way between your existing router and your ‘dead zones’.
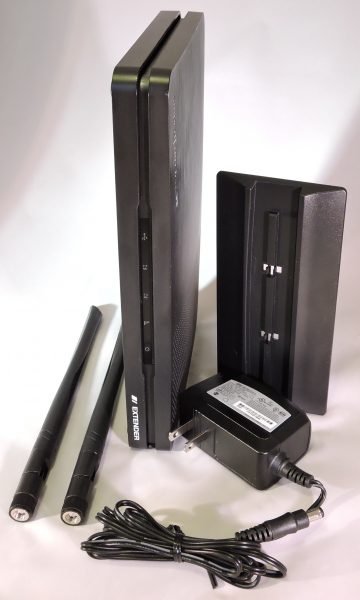
2) Attach the antennas to the Range Extender, then plug it in.
3) Go to your computer or tablet, scan for networks, and choose either “Amped_ArtemisEX_2.4” or “Amped_ArtemisEX_5.0”. (If your current router has 5.0 service available.
4) Open a web browser. Amped Wireless recommends using Google Chrome, Safari, or Internet Explorer 8.0 and up. You can NOT use Firefox. Go to the link they have listed on the included instructions. Accessing the site does not require internet access.
5) A Dashboard will come up. It looks like this:
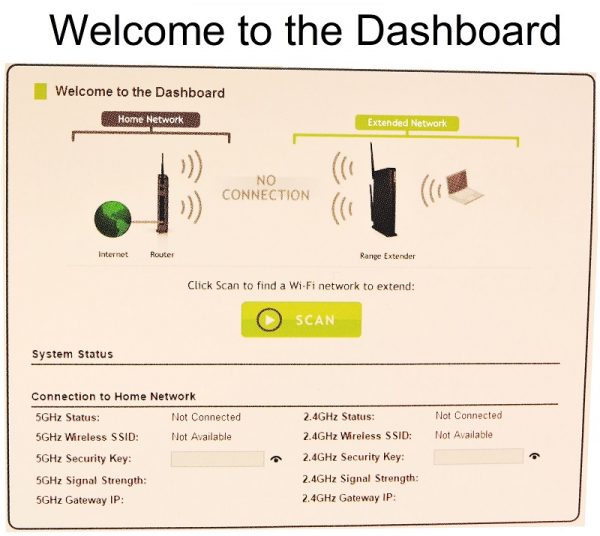
6) Click “Scan” for an available network to EXTEND.

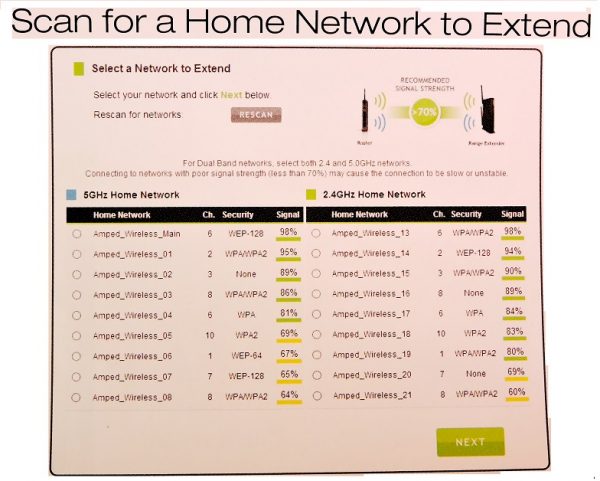
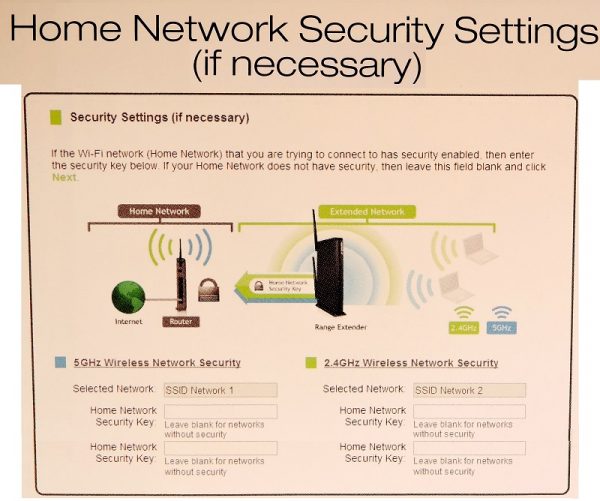
7) You’ll want to select your current network name. If your home network name is “MIRROR2.4” and “MIRROR5”, and you have both 2.4GHz and 5GHz, you would click on “MIRROR2.4” and “MIRROR5” in each column. (See Artemis_EX example below). Be sure to select BOTH the 2.4GHz and the 5GHz if you have them. The left side has radio buttons in a BLUE 5GHZ column, the right side has radio buttons in a GREEN 2.4GHz column.  See picture below.  Make sure that the signal strength from your current router is 70% or higher. If it’s below that, you’ll need to move the Range Extender closer to your router.
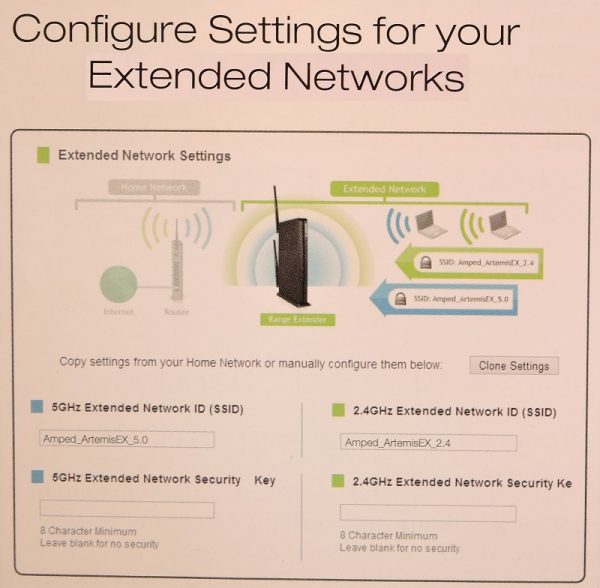
8) This is when you set up your home security settings, (as Amped Wireless puts it: “if necessary”).  :::eyes rolling:::  You need to enter your current Wi-fi security key, here.  HOWEVER, you CAN choose to “Clone” the settings of your current network (the one(s) you selected in Step 7).  In that case, go to step 9.

9) Configure settings for your new EXTENDED network. The default SSID’s of the extended networks are “Amped_ArtemisEX_2.4” and “Amped_ArtemisEX_5.0”, but if you Cloned your existing home network, your home network name AND security key(s) will automatically copy for you. The new SSID’s will be, for example, “MIRROR2.4_RE” and “MIRROR5_RE”. IMPORTANT!!! DO NOT CLOSE THE BROWSER OR REFRESH THE SCREEN AT THIS POINT!

This is something else I do not like about the Range Extender: It takes 140 seconds to reconfigure before it even reboots. 2 minutes and 20 seconds of vulnerable time…

10) Connect to the new Extended Network.  So after your 140 seconds are over, the Range Extender reboots and disconnects your Wi-fi connection.  After it restarts, scan for networks again, and choose your EXTENDED network SSID, like “Amped_ArtemisEX_5.0” or “MIRROR2.4_RE”
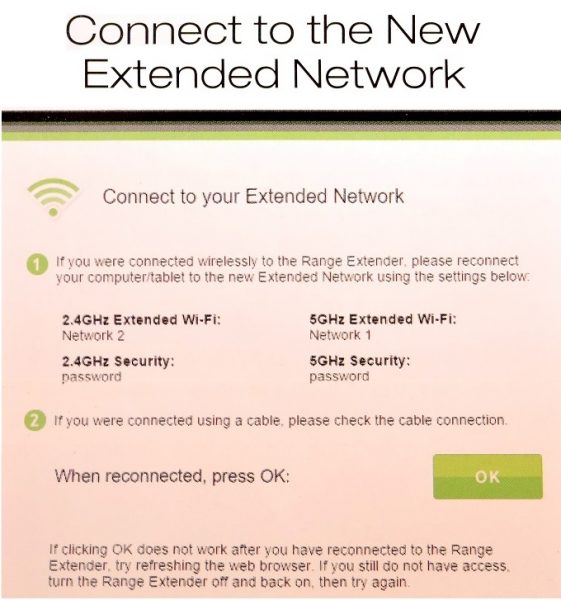
11) Apparently, depending on which browser you used to set the device up, you may or may not get a Setup Summary page displayed on your browser once the new extended network is reconnected, which looks like this:

If you don’t get a summary page (I didn’t when using Chrome) after you’ve re-connected to the extended network, THEN it’s okay to refresh the page or go to a different website.

Here are some other shots of the product & packaging:
Here is a list of all specifications for the Artemis-EX high power AC1300 Wi-fi Range Extender:

Wireless Standard: 802.11a/b/g/n/ac
Frequency Band: 2.4GHz/5GHz Simultaneous
Wireless Speed: 2.4GHz: 399Mbps (Rx), 399Mbps (Tx)
5GHz: 866Mbps (Rx), 866Mbps (Tx)
Amplifiers: 2 x 2.4GHz Amplifiers
2 x 5GHz Amplifiers
4 x Low Noise Amplifiers
Processor: Quad-Core Processor
Memory: 128MB DDR3
Wireless Coverage Control: 15% – 100% Output Power
(Individually adjustable for 2.4GHz and 5GHz networks)
Antennas: 2 x Detachable High Gain 5dBi Dual Band Antennas
Ports: 5 x RJ-45 10/100/1000M LAN Ports (Local Ports)
1 x USB 3.0 Port for USB Storage
Power Adapter Rating: Switching Adapter (Input: 100-240v, Output: 12v, 2A)
Mounting: Wall or Desktop
Warranty: 1 Year
Setup Requirements: 2.4GHz or 5GHz 802.11a/b/g/n or ac Wi-Fi Network
Computer, tablet or smartphone with a web browser
Package Contents: ARTEMIS-EX High Power AC1300 Wi-Fi Range Extender with MU-MIMO
2 x Detachable High Gain Dual Band Antennas
Power Adapter (100-240v)
Setup Guide

If you have any problems or questions, during or after setup, Amped Wireless Elite Support is readily available. And I can vouch for the “Elite Support”. I needed to contact them for some clarifications, and they arranged a day/time that was convenient for me, and called the exact minute they said they would. I was very impressed by that and with the Elite Support agent that assisted me who was patient, understanding, and professional.

In summary
Overall, this device is well worth the price ($99.00), and it performs very well. I’ve voiced my concerns about the security issues, but that being said, the ODDS that you would be successfully hacked during the setup time are slim. It has a wealth of features and functions, with advanced technology that will make everyone in your house a lot happier about their internet needs. Once you have it set up, you can set parental controls as you wish. It allows you to set the exact days and times that the networks are available, control the strength of your signal, and even block specific devices from accessing the network at all. It is compatible with Android and iPhone. In fact, it’s compatible with all Apple networking features, Like AirPlay® and AirPrint™.  It’s very fast, and with the Multi-User MIMO, it pretty much solves any streaming, downloading, and gaming issues you may currently be having. This device lets you create up to 8 networks for guests and restrict access to specific users. The 8 amplifiers and 2 antennas give you ample power output and signal boost. The Range Extender works with all brands of a standard single band (2.4GHz) or dual band (2.4GHz and 5GHz) wireless routers and service provider gateways. There are Red, Yellow, and Green LEDs on the front of the unit that indicate the signal strength being received from your router. The USB 3.0 port make file sharing easier than ever. It’s even wall-mountable! I would strongly consider buying this product. The only reason I can’t suggest to definitely buy is because of the setup time security issue.

Source: The sample for this review was provided by Amped Wireless. You can get more information on their website and order there, or visit Amazon to order.


Product Information

Price: $99.00
Manufacturer: Amped Wireless
Retailer: Amazon
Pros:
  • Good price
  • Multitudes of features
  • Powerful
  • Fast
  • BoostBand technology
  • Very customizable
Cons:
  • Security issues during setup
  • No built-in initial password protection

Filed in categories: Reviews

Tagged:

Amped Wireless Artemis-EX high power AC1300 Wi-fi range extender review originally appeared on on April 29, 2017 at 9:33 am.

Note: If you are subscribed to this feed through FeedBurner, please switch to our native feed URL http://the-gadgeteer.com/feed/ in order to ensure continuous delivery.

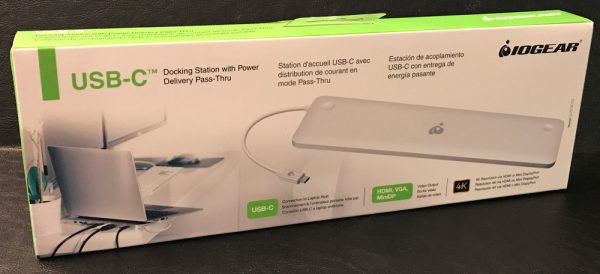
IOGEAR USB-C Ultra-Slim Dual Display Docking Station review


Recently Julie and I both purchased 12″ MacBooks and while extremely light and portable, the sleek and slim laptop is lacking in ports to say the least. That is a known “design feature” and for me, really is not an issue when on the move. But there are definitely moments where going port-less is a bit of an inconvenience. That said, IOGEAR has several USB-C docking stations engineered to provide you with what Apple has taken away 😉 including monitor support, USB ports, SD card slots, and everything in between. For this review IOGEAR sent me their Ultra-Slim dock to checkout. 

Note: Images can be clicked to view a larger size.

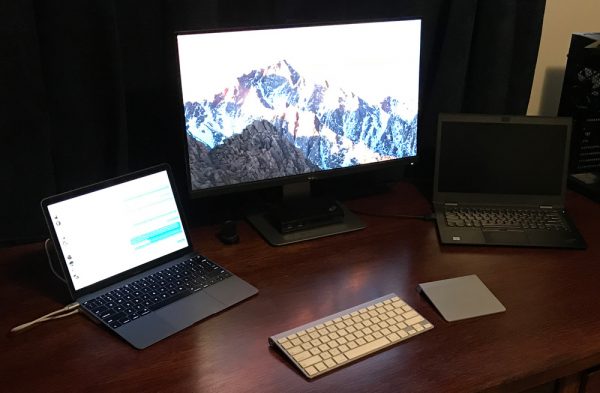
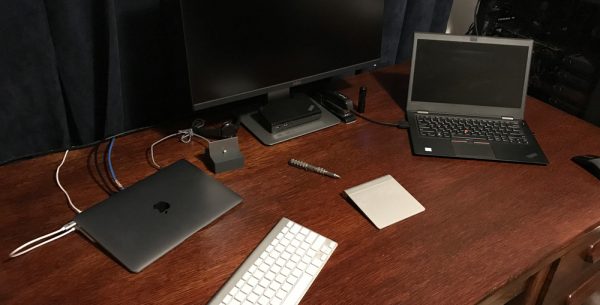
Here you can see (or perhaps you can’t) my MacBook resting on the Ultra-Slim stand, not only being powered but connected to wired ethernet and pumping video to my 25″ QHD monitor. If I didn’t know better, I would say this IOGEAR dock was designed specifically for the 12″ MacBook. The docking station is the exact width of the MacBook with insets/divots perfectly placed for the back feet of the laptop to sit in.

Features:

  • Stylish and ultra slim docking station
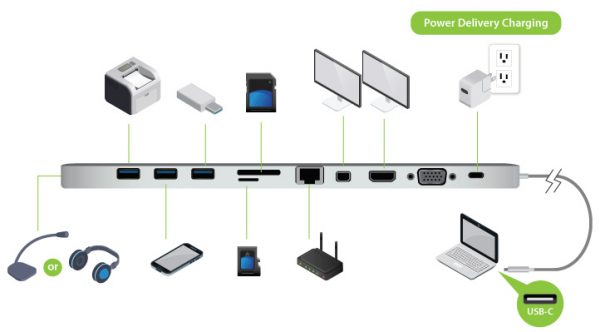
  • Instantly dock up to 10 devices including
    • 3 x USB 3.0 (USB Type-A) with 1 x BC 1.2 Quick Charge Port
    • Built-in memory card readers (SD/MMC/Micro SD)
    • 3.5mm audio input/output
    • Gigabit Ethernet
    • HDMI (4K), Mini DisplayPort (4K) and VGA
  • Charge your laptop while docked-Power Delivery Pass Through*
  • Stunning 4K resolution

* PD Pass-Thru requires USB-C charger from your laptop. Up to 60W can be charged to the laptop.

The Ultra-Slim docking station provides all the ports your MacBook or ultra-portable USB-C enabled Windows laptop are missing: three standard USB 3.0 ports (one has quick-charge), SD & microSD slots, gigabit ethernet connection, DisplayPort, HDMI, VGA, and docked-power delivery pass through.

Requirements:

  • USB-C compatible laptops with DP Alt-Mode support
  • USB-C AC Adapter from Laptop is needed for Power Delivery Pass-Thru Function
  • Mac OS X 10.10.5+ (*MST is not supported by Mac OS)
  • Only one additional video output can be utilized for extended desktop using Mac OS
  • For dual screen extended desktop in Windows, you must use HDMI with Mini Display Port
  • When VGA output is utilized, only one additional extended desktop screen will be available

The IOGEAR docking station is made from high-grade aluminum and is as small and compact as its name implies. It measures: 11″ (27.94cm) x 3.0″ (7.62cm) x 0.6″ (1.52cm) and weighs in at a mere 0.70 lbs (0.32kg). Here you can see the two insets in the top of the dock for the feet of the laptop to sit in.

The dock is sloped downward for a better typing angle if you do not use a separate keyboard and mouse. According to IOGEAR, “the intelligently contoured design provides the best ergonomic typing experience for your laptop.” The right side of the dock has an earphone jack andthe left side has a non-detachable USB-C cable for connecting to your laptop.

The rubber feet on the base of the docking station do a decent enough job of keeping the unit where you place it on your desk. Though due to its lightweight, the dock does slide around if you’re not careful inserting cables, SD cards, and thumb drives.

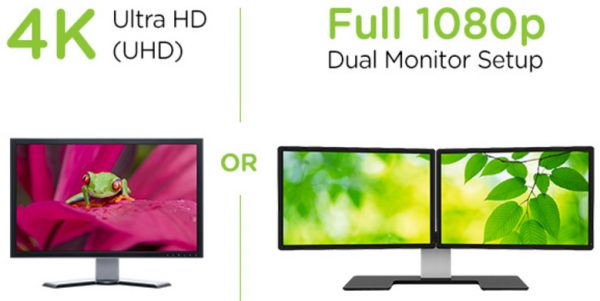
The IOGEAR Ultra-Slim dock enables you to connect a single 4K monitor or two 1080p monitors to your laptop concurrently.

The dock allows you to mirror or extend your Windows USB-C laptop to two monitors or extend your USB-C MacBook to one additional monitor (due to MacOS limitations).

Here you can see the ethernet, DisplayPort and power cables connected to the dock in addition to a thumb drive and SD card inserted as well. Overall the Ultra-Slim docking system works very well, delivering great connectivity and video quality.

The wired gigabit ethernet provides very zippy connectivity.

The only design tweak I would make on this docking station would be to shorten the USB-C cable that connects the dock to the laptop. Or better yet, engineer a standard USB 3.0 port on the side of the dock so you could choose any length of USB-C cable you want. The integrated cable is unnecessarily long and sticks out pretty far, lessening the tech-Zen the dock brings to my desk space.

A few other noteworthy limitations or nuances worth calling out:

  1. the dock is not able to power Apple’s optical SuperDrive,
  2. inserting and removing the microSD card is a bit of a pain/hassle. I found it difficult to do with the MB on the dock,
  3. the metal on metal design of resting your finely crafted 12″ MacBook on the dock’s metal casing worries me that the dock may eventually scratch or mare the underside of the MacBook. But a skin of some type would eliminate this issue.

The IOGEAR USB-C Ultra-Slim Dual Display Docking Station is a great way to expand the port and viewing options of a USB-C laptop lacking such features. There is little doubt in my mind this minimalist trend is with us to stay. And for the most part, I believe the average laptop user would trade ports for portability a majority of the time. Especially if when they are tied to their desk an integrated single-cable solution dock is waiting for them to plug into giving them a full suite of port options and expanding their workspace experience. The bottom line is the IOGEAR Ultra-Slim dock is making the transition from 15″ MBPro to the port-less 12″ MacBook nearly seamless.

Source: The sample for this review was provided by IOGEAR. Please visit their site for more info and Amazon to order. See below for latest price.


Product Information

Price: $129.95
Manufacturer: IOGEAR
Retailer: Amazon
Requirements:
  • USB-C laptop
Pros:
  • Quality construction
  • Well thought out design
  • Excellent single cable solution
  • Dual monitor support (Windows only)
  • Adds a multitude of ports – dock up to 10 devices
  • Supports HDMI (4K), Mini DisplayPort (4K) and VGA
Cons:
  • USB-C cable is longer than need be
  • Difficult inserting/removing microSD card
  • Metal on metal design

Filed in categories: Laptops and Gear, Reviews

Tagged: ,

IOGEAR USB-C Ultra-Slim Dual Display Docking Station review originally appeared on on April 28, 2017 at 11:00 am.

Note: If you are subscribed to this feed through FeedBurner, please switch to our native feed URL http://the-gadgeteer.com/feed/ in order to ensure continuous delivery.
LG G6 review


Thanks to Verizon Wireless, this is my first smartphone review of 2017 and this review of the LG G6 Android smartphone has a little surprise for our long time loyal readers of the Gadgeteer. It’s a special dual format review with Judie Stanford who was my partner in crime here on The Gadgeteer for several years before leaving to start her own site: Gear Diary. This review has two parts. Part one is what you’re currently reading and you can read part two of our dual LG G6 review on Gear Diary. Ok, let’s get started!

Julie: What is the first brand that you think of when someone says Android smartphone? How about the second brand? Was LG one of the names you thought of? To be honest, I’d have to answer no. The company name that is the first one that always comes to my mind is Samsung, and the second one is Motorola.

Judie: Yeah, I’d have to admit that Huawei and then Samsung are the first two I would usually think of, but LG has always been on my radar mainly because I like that they are willing to take chances and come up with innovative ideas, even if they don’t always catch on. I think that may be about to change, though …

Julie: It’s a shame that LG’s phones aren’t more popular because LG is a top tier Android smartphone maker and their new LG G6 is a great “little” phone in more ways that one.

Judie: This is true! I have to admit that I wasn’t overly excited about the LG G6 until I got one in my hands. Pictures, specs, and company copy are always going to make the latest phone seem like the greatest thing since sliced bread, but as reviewers, we tend to be a bit more skeptical and jaded because we see (almost) everything. That’s what happened to me with the LG G5; I loved the idea of the phone, but when I started using it I wasn’t sold. That has not been the case with the LG G6 — it’s a whole new little beast, and I mean that in the best way.

Julie: Same here. Although I liked the concept of the LG G5 as a modular phone, I was disappointed with the look and feel once I got to play with one. It just didn’t do anything for me and felt a little clunky and cheap. I am happy to see that the new G6 ditched the weird modular socket in favor of a more slab-like form factor.

Hardware Specifications

Processor: Qualcomm® Snapdragon™ 821 2.35Ghz + 1.6Ghz, Quad-Core processor
Operating System: Android 7.0, Nougat
Memory: ROM 32GB, RAM 4GB, supports microSD up to 2 TB
Network: Network: CDMA, GSM, LTE, LTE CA
Display: 5.7″ QHD Plus (2880 x 1440), 564 ppi, 18:9 aspect ratio, Gorilla Glass 3
Camera (rear): dual 13 MP
Camera (front): 5 MP
Bluetooth: 4.2
Wi-Fi: Wi-Fi 802.11 a/b/g/n/a
NFC
Battery: 3300 mAh (non-removable), wireless charging
Dimensions: 5.86″ (H) x 2.83″ (W) x 0.31″ (D)
Weight: 5.74 oz

What’s in the box?

LG G6
USB AC adapter
Type-C USB cable
SIM tray removal tool

Design and features

Julie: That’s my Nexus 6P next to the LG G6 in the image above. Both phones have a 5.7” display, but as you can see, the G6 has a smaller footprint which is more hand and pocket-friendly than the Nexus phablet. I carry my phone in the back pocket of my jeans when I’m walking around at work. I like that the G6 doesn’t stick out my pocket as far as the 6P.

What phone is your current daily driver and how do you think the LG compares when it comes to size?

Judie: My daily driver is the iPhone 7 Plus, and before I got the LG G6 to test, the Huawei Mate 9 was my go-to Android device. I usually prefer larger devices, simply because I find that if I am using one I am less likely to carry a tablet for reading. So from that perspective, I like the slightly longer G6 display in its slightly narrower body. I also regularly slip my phone into my back or front pocket, so it’s important that whatever I am carrying be pocketable; the LG G6 is that.

Just for fun here’s a picture of the G6 next to my iPhone 7 Plus, the BlackBerry KEYone, and the Huawei Mate 9. As you can see, the G6 has a longer yet thinner screen than the iPhone’s 5.5” display. The BB KEYone has a smaller 4.5” display, but the phone is about the same size as the others because of the keyboard. The Huawei Mate 9 has a 5.9” screen (which I love), but the phone is a little bit wider than I’d like.

Julie: What do you think of the LG G6’s overall style? Are you disappointed that it looks so “normal”, or do you like the flat unassuming look? I actually like it. Curved screens might be popular with some companies, but I am digging the flat slab look and feel of the G6.


Judie: I don’t mind the slab style at all, but I do prefer the look of the black on black LG G6 that you have to the black on silver G6 that I received. I think that the black on black looks sleeker. The silver bezel around the screen on the G6 I have just doesn’t give the illusion that the device is all screen like the black combo does (especially when the display is turned off), and I prefer that look — it’s why I have a jet black iPhone.

I do appreciate the G6’s slightly curved back, but I feel like its front edges are just a wee bit sharper and more abrupt than I’d like. The phone is also about 1mm thicker than the 7 Plus, so it makes the G6 appear blockier than it is when next to the 7 Plus. Does that make sense? Obviously, most people aren’t going to carry both phones next to each other, and this is all personal preference.

Julie: It’s funny, but the G6 reminds me of the iPhone 4 and 5 as far as the straight sides and shape.

Judie: Yes, that’s what it makes me think of, too! It’s not necessarily a bad thing, but even the iPhone has moved on from that style.

Julie: That was one of my fave phones back in the day, so it feels familiar to my hand. I don’t notice the edges of the aluminum sides feeling sharp when holding the phone in my hand, but I agree that the black on black version has a nice ninja look to it. But the shiny black glass back doesn’t come without its problems. First of all, it’s a fingerprint and smudge magnet.

Judie: That’s one area where the silver version might be better; it is shiny, but it has a brushed (appearing) finish, so it doesn’t seem to make the fingerprints seem as glaring.

Julie: Even worse, though, is that it’s crazy easy to scratch this phone. My loaner phone has a BUNCH of tiny scratches on the front display and back that I only noticed when I started taking pictures for this review. I don’t throw my phones around, but I don’t baby them either. The LG G6 is the first phone in a long time that I’ve scratched without even knowing it. People will definitely want/need to install a screen protector on the front glass, and if I were going to buy this phone, I’d probably buy a clear back skin to protect the back as well. Luckily the scratches are so fine and tiny that you don’t notice them unless you really look for them. I can’t even get a good image of them to show in the review. But I definitely wanted to mention it.

Judie: It’s interesting that you’ve had that experience with the black version. I’ve thrown the silver G6 in my backpack and carted it all over without a case or a screen protector, and so far so good. So I guess it’s a “your mileage may vary” type situation?

Julie: Possibly! Let’s take a tour around the phone. On the top edge, you’ll find a 3.5mm headphone jack and a microphone.

Judie: The 3.5mm jack is perfect for all of us who still have headphones that we love which aren’t wireless.

Julie: Very true. So what are your favorite headphones? Wired or wireless? Mine are wired (for now) and are the DUNU Titan 1 headphones that I’ve had for ages. They are really comfortable and sound great.

Judie; Nice sidebar! I review and use a lot of headphones, and I’ve tried so many great ones that picking a favorite isn’t easy. I keep the wireless Bowers & Wilkins P7s on my desk, though; I suppose that they are my go-to pair. For in-ear, I love the Pioneer Rayz (I keep a pair in my backpack at all times, as they are fab for travel), but they only work with iPhones that have a Lightning connector. They have a charging port on them so you can listen and charge your iPhone at the same time. Anyway, back to the review! 😉

Julie: On the opposite end of the G6 there’s a second microphone, a downward firing speaker, and a Type-C charging port. I’m happy to report that the LG G6 has Qi wireless charging capabilities. I forgot how much I missed this feature while I’ve been using the Nexus 6P for the last year and a half. The only downside is that the G6 does not have fast wireless charging like the Samsung Galaxy S8 devices. This doesn’t really bother me though because I mainly only put the G6 on my Qi dock when I go to bed at night, so I don’t care if it charges slowly.

Judie: I wish every phone available had wireless charging; it’s so convenient and easy! And since several automakers are starting to include wireless charging pads in their vehicles, and there are even coffee shops with wireless chargers on some of their tables, it’s all the more reason why wireless charging should be standard. However, if I’m not mistaken the wireless charging feature is only available in the US! Sorry, rest of the world! 😉

Julie: I totally agree. It felt like we were taking a step back with some phones in the past couple of years that removed that feature, but I hope that we see it become the norm going forward.

The right side of the phone has a dual SIM/micro SD card slot.

Judie: Obviously, if you need to use two SIM cards you’ll have to give up the memory slot, but if you travel out of the country a lot or if you need a separate number for work and personal use, it is so convenient to have the ability to consolidate two devices into one.

Julie: It didn’t even occur to me that you could put two SIMs in this phone. I guess since I’m not really a world traveler like you are, that capability hasn’t been on my radar. When you went to Lisbon last week, did you use two SIMs?

Judie; Not this time, but I have in the past. When I travel these days, I either use the KnowRoaming SIM sticker on my unlocked phone, or I’ll pay the $10 per day International Day Pass that AT&T just introduced — it allows you to use your existing data and texting plan overseas. Either is a good solution.

Julie: Although I’ve been able to get by without a microSD card in my phone for awhile now, I really like having that option.

Judie: The only reason I am able to get by without a memory card on my iPhone 7 Plus is because I bought the 256GB version. But being able to put a 200GB microSD card into the G6 is great — all the memory I need for downloaded movies, Dropbox documents, Kindle books, and Zinio magazines. Granted, with so much streaming content available now, having so much memory may seem like overkill, but I can’t be the only person who panics when they see a low memory warning. That’s why I always try to have a little more than I think I’ll ever need — I will inevitably find a way to fill it.

Julie: I keep seeing that low memory warning on my Nexus 6P these days which like the LG G6, only has 32GB of storage. But unlike the G6, the 6P does not have a microSD card slot. Ugh. It is freaking time for me to update to something with more space – or a microSD card!

Judie; What’s stopping you? Inquiring minds want to know!

Julie: I haven’t found the right one yet. It sounds like I’m trying to find a mate instead of a phone. Wow, first world problems huh? ;o)

Judie: Totally. 🙂

Julie: On the left side of the LG G6, you’ll find individual volume up and down buttons that stick out from the body of the phone far enough that your thumb has no problem locating them. They also have great tactile feedback.

Judie: I like that the volume buttons are on the same side as they are on the iPhone since it makes for zero fumbling when I go from one phone to the other. I don’t have the same luck when I switch to the Huawei Mate 9 or the BlackBerry KEYone. 😛

Julie: Since I’m a lefty, I always prefer that the volume buttons be located on the left side of the phone.

Judie: That makes sense! One of the things I wasn’t fully aware of when I first started using the LG G6 was that it has IP68 dust and water resistance and that it is also shock resistant with MIL-STD-810G testing; these are such great features! I think we’ve all got a personal horror story about soaking our phone(s) or we know someone who did that; with too many phones, the result is … not good.

Julie: Luckily, I’ve don’t have a personal horror story of drowning my phone, but knowing It can survive in up to a meter of water for up to 30 minutes gives me some peace of mind for any whoops scenarios that could happen.

Judie; I agree. It makes it less scary to take your phone to the pool or to use it in the bathroom (just saying).

Julie: This the end of Part 1 of Judie’s and my dual LG G6 review. Now you need to read part 2 at Gear Diary which includes our thoughts on the LG G6’s bezel-less display, camera, fingerprint scanner, software and our final thoughts.

Source: My sample for this review was a limited time loaner unit provided by Verizon Wireless, Judie’s was provided by LG. Please visit their site for more info.


Product Information

Price: $672.00
Manufacturer: LG
Retailer: Verizon Wireless
Pros:
  • Great size
  • Love the display
  • Really good fingerprint scanner experience (so far)
  • Wireless charging capabilities
Cons:
  • Scratches easily

Filed in categories: Featured Items, Reviews

Tagged:

LG G6 review originally appeared on on April 27, 2017 at 3:00 pm.

Note: If you are subscribed to this feed through FeedBurner, please switch to our native feed URL http://the-gadgeteer.com/feed/ in order to ensure continuous delivery.
Catalyst Water Proof Shock Resistant Case for Apple Watch 42mm Series 2 review


Since getting my Apple Watch, I have used it regularly for months for day to day activities. Now that winter is over, tennis season has started up, and with that, more physical activity that could potentially damage my expensive watch. With the Catalyst Case for the Apple Watch Series 2, I was able to set my worries aside. Let’s see how well it held up to everyday use.


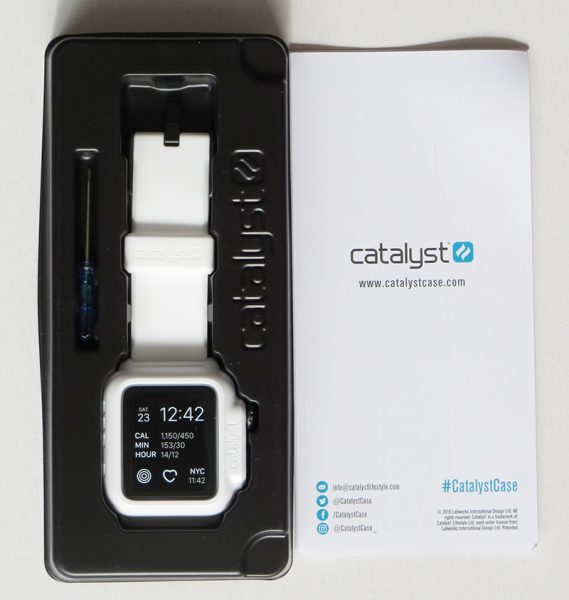
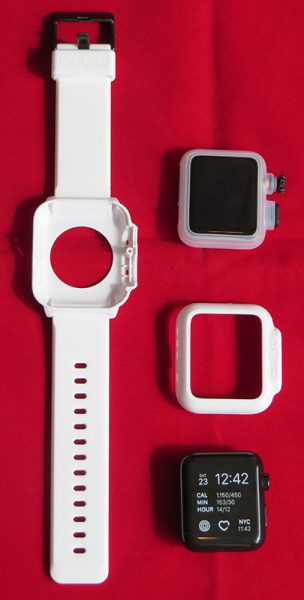
In the box, you’ll find the Catalyst case housing, wrist strap, silicone waterproof sealing wrap, a test unit (for waterproof testing purposes), a spare screw, and a small screwdriver.

My first thought when I saw the waterproof housing was.. “Why?” The Series 2 is already waterproof, right? That’s true, but the Catalyst case is waterproof up to 330 ft, which means you can go snorkeling with your watch, or your watch should be safe if it decides to go snorkeling without you.

I tested and made sure the case was indeed waterproof as the instructions say, and then inserted my Apple Watch inside. It was a bit of work getting the unit open, but that made me confident that it will not fall apart randomly. After removing the old wrist straps, you put the watch in the silicone sealing wrap, sit the wrap on the bottom plate, then snap the top into place. Lastly, using the tiny screwdriver, tighten the screw and it is ready to go.

The backside of the watch has silicone covering the heart rate sensor, but it has not had any problems registering my heart rate, and it doesn’t feel much different than without.

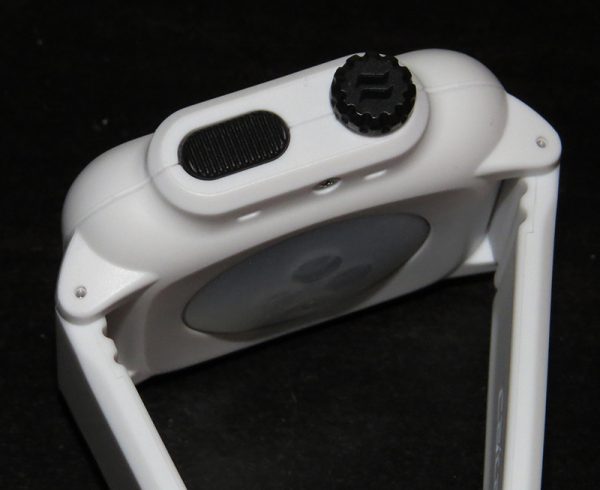
Using the dial and button located on the side of the watch was no different than before, though if the watch slid towards my hand, I would accidentally press down the dial and activate Siri. That was probably the number one thing that annoyed me with the watch; how often I activated Siri on accident!

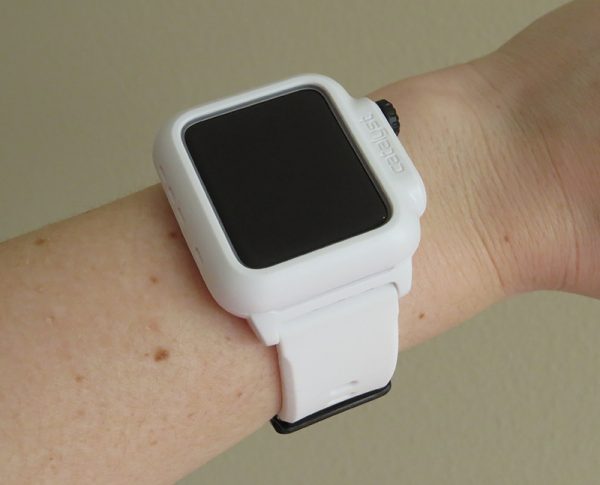
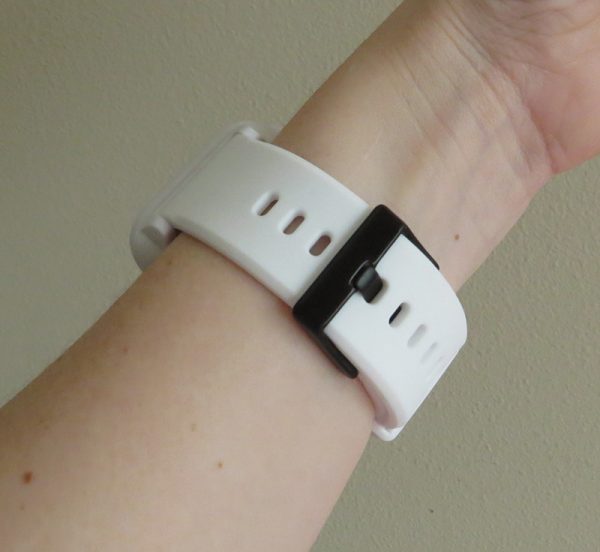
One thing I missed from my Fitbit Charge HR was the standard wrist strap. Don’t get me wrong, I am used to the Apple Watch sport band by now, but the standard strap just feels more secure. The Catalyst case gave me back that strap, so that made me very happy. It secures into place easily and the black clasp adds a dash of color to the white strap.


This case definitely adds some bulk to the Apple Watch. The watch is already big, but with the case, it seems massive, especially on the 42mm version. It took a good week or so to get used to having the case on it. Weight wise, it isn’t bad at all, it is just the size in relation to my small wrist.

Lastly, the case has done a very good job of protecting my Apple Watch while out on the tennis courts. It has withstood scraping against chain link, clanking against tennis rackets, and a drop or two at home with little to show for it. The top of the watch is exposed, but there is a lip that (theoretically) would stop a scratch from occurring on the screen. The strap also has stayed clean, which impressed me since I thought the white silicone would collect dirt and grime.


Overall, I am happy with the Catalyst Case for my Apple Watch Series 2 and plan to keep it on for the immediate future, especially since I will be outdoors more. The price point is only ten dollars more than a sport band from Apple, and it gives solid protection for the price. It definitely adds some bulk to the watch itself, but if you don’t mind a big watch on your wrist, take a look at the Catalyst Case for the Apple Watch Series 2 and see if it is the right fit for you.

Source: The sample for this review was provided by Catalyst. Please visit their site for more information and Amazon to order one.


Product Information

Price: $59.99
Manufacturer: Catalyst
Retailer: Amazon
Requirements:
  • – Apple Watch Series 2
Pros:
  • – Protective and lightweight
  • – Adds additional waterproofing to the watch
Cons:
  • – May be lightweight but it adds bulk to the size of the watch
  • – Dial sticks out a little more than normal, causing Siri to be activated on accident

Filed in categories: Reviews

Tagged: ,

Catalyst Water Proof Shock Resistant Case for Apple Watch 42mm Series 2 review originally appeared on on April 26, 2017 at 8:11 am.

Note: If you are subscribed to this feed through FeedBurner, please switch to our native feed URL http://the-gadgeteer.com/feed/ in order to ensure continuous delivery.
Hercules WAE Outdoor 04Plus FM Bluetooth speaker review


It’s that time of year again; the days are longer, nights are warmer, and the nature is calling. Like many of you, I enjoy spending time outside as Summer approaches. For me, a beautiful day outdoors isn’t complete without something playing in the background.

Almost a year ago I reviewed the Hercules WAE Outdoor Rush Bluetooth speaker. At the time I thought it was an excellent speaker to enjoy with the sun, surf, and sand.

I was given the opportunity to review another speaker from Hercules, the WAE Outdoor 04Plus FM Bluetooth speaker. Let’s see how it stacks up to its kin. 

In the box

  • WAE Outdoor 04Plus FM Bluetooth speaker
  • Micro USB charging cable
  • Wrist strap
  • User manual

Specifications

  • Bluetooth 3.0 A2DP wireless technology
  • 10 W peak power
  • Single-unit 2.0 speaker + passive decompression driver
  • Rechargeable 3.7 V 1500 mAh Li-ion battery
  • Speaker dimensions: 2.4 (H) x 5.94 (W) x  2.4 (D) inches
  • Weight: 300 g / .661 lbs
  • IP67 certified

Design

The 04Plus FM retains the same triangular design as the Rush.

It’s also roughly the same size and weight; 2.4 (H) x 5.94 (W) x  2.4 (D) inches / 300 grams compared to the Rush’s 2.56 (H) x 6.5 (W) x 2.24 (D) inches / 320 grams.


Unlike the Rush, the 04PLus FM doesn’t have any buttons along its spine.

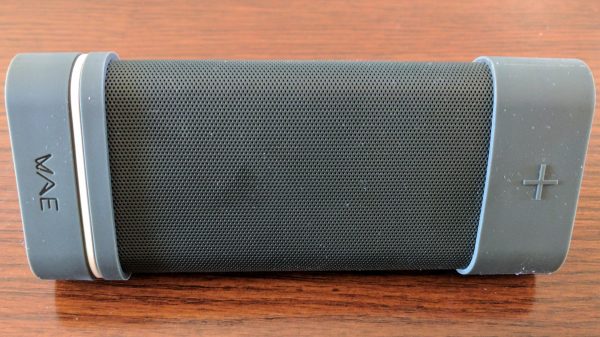
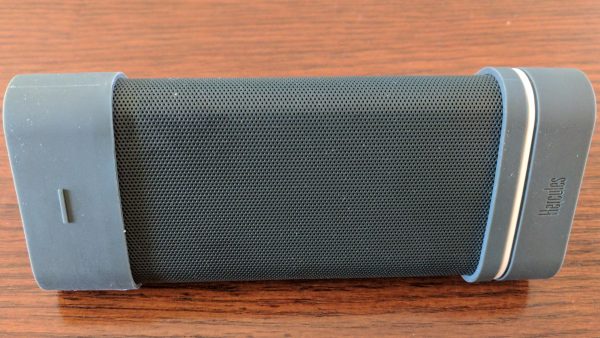
Whereas the Rush had dedicated play, pause, skip track, and volume buttons, the 04Plus FM only has a plus and minus button on either side of the body.


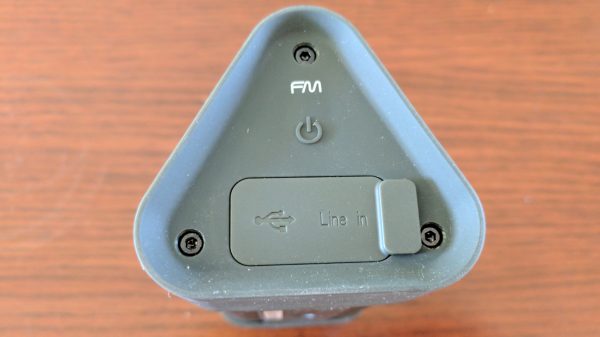
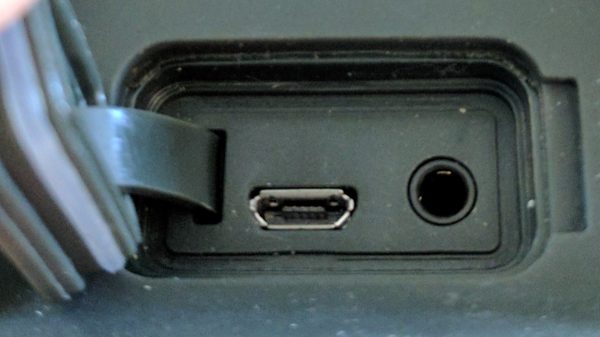
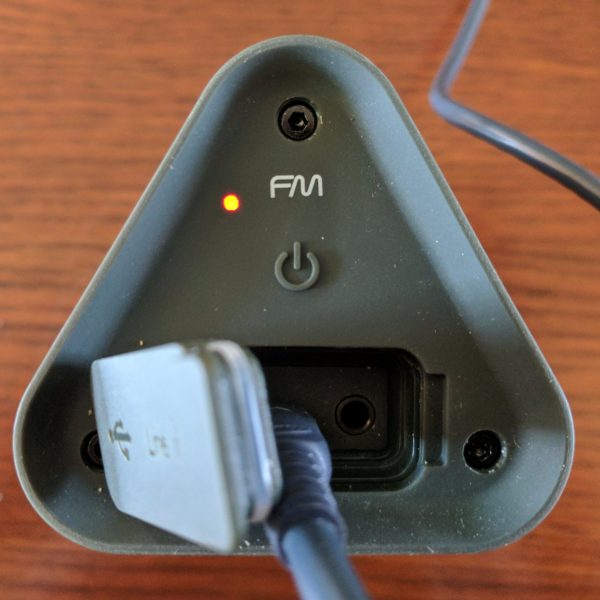
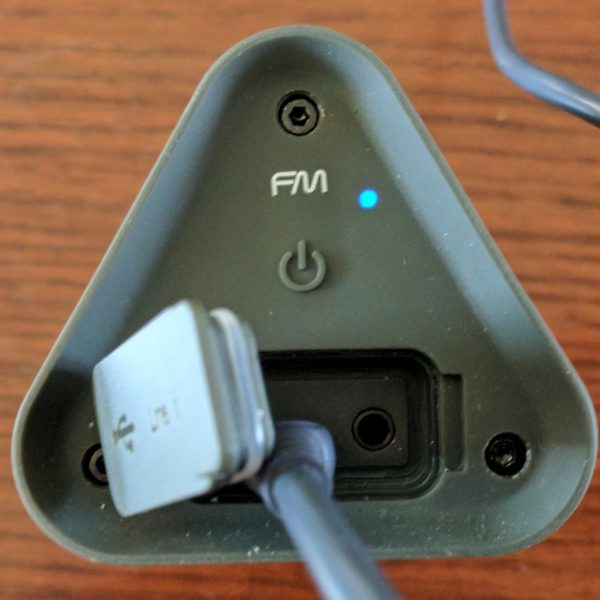
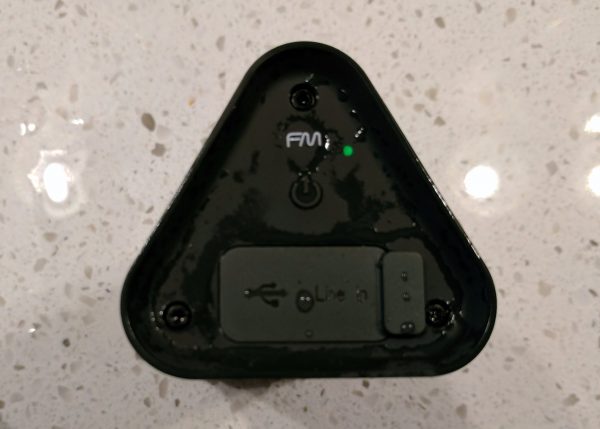
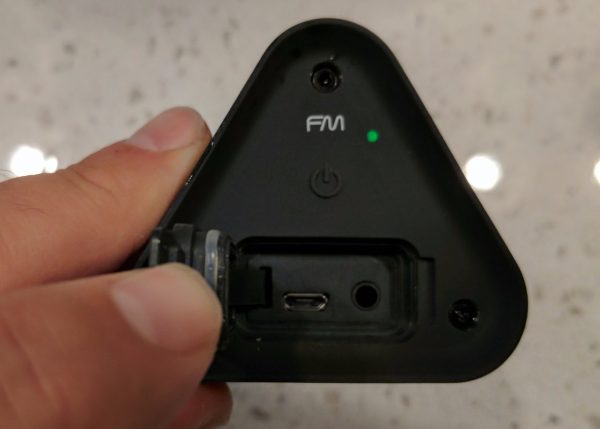
One end of the 04Plus FM contains the power button, the FM mode selector, and a protective cover. Lifting the protective cover reveals the Micro USB charging port and the auxiliary line-in port.

The 04Plus FM also has two notification LEDs.
The LED on the left is the charging indicator. It flashes while charging and remains lit when fully charged.

The right LED is blue when in Bluetooth mode and is green when in FM mode.

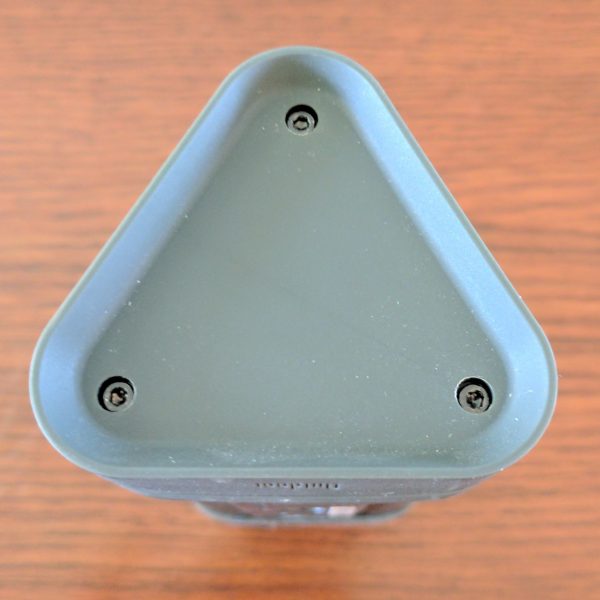
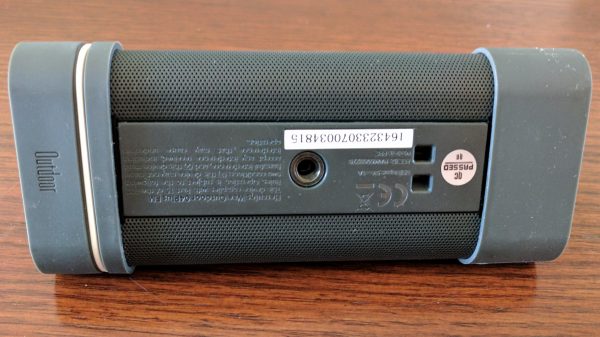
Finally, the bottom of the 04Plus FM has a threaded accessory port and an area to attach the wrist strap.

While the 04Plus FM is appealing to the eye, I have a couple of issues with the design.

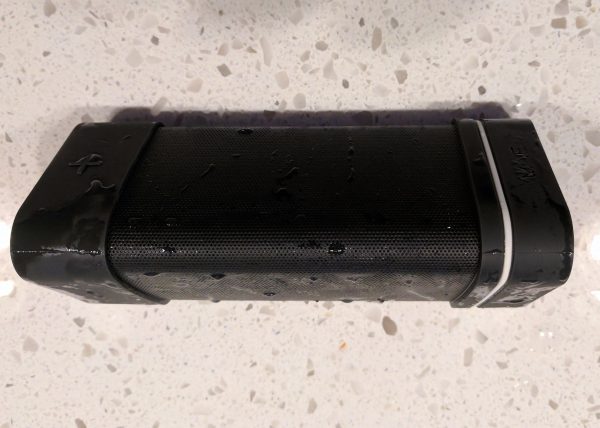
First, the ends are made of rubber; while this is helpful in protecting the device from damage, the ends are absolute dust magnets. You can see in every picture the ends are coated with dust.

Second, I cannot stand the fact the plus and minus buttons are used to perform every control function. One of the great things about the Rush was each function had a dedicated button.

Performance

When you initially turn on the 04Plus FM, it enters into Bluetooth pairing mode. To pair your device with the speaker, select “WAE Outdoor 04Plus FM” from your device’s Bluetooth menu.

Like the Rush, the 04Plus FM can be paired to 8 different devices. This is an awesome feature that allows you to share the speaker between friends and family or even between devices.

Pairing additional devices is as simple as holding the FM button down for 3 seconds. The speaker re-enters pairing mode and you can add devices.

Once you have a device paired, you can begin streaming music.

As previously stated, the Rush has a dedicated button for the most common functions, while the 04Plus FM does not. I found this extremely frustrating.

Volume is adjusted by quick pressing the plus or minus buttons repeatedly, and you can skip tracks by long pressing the buttons; I wasn’t really bothered by either of those functions.

What really frustrated me was having to press the plus and minus buttons simultaneously to play/pause music. Admittedly it isn’t a huge inconvenience; however, there were multiple times when it took more than one attempt to pause audio.

I could have understood volume and track skipping sharing the same buttons, but I think play and pause should always have their own button.

Other than my frustrations with the controls, the 04Plus FM played audio just as well as the Rush. Both Podcasts and Audio were crystal clear, even at high volumes. I didn’t detect even a hint of distortion or static.

The 04Plus FM is also very powerful. Despite being in such a small package, the speaker provides ample volume. It could easily provide the soundtrack to a backyard barbecue.

FM Radio

As the name, 04Plus FM would imply, the speaker doubles as an FM radio. This is a pretty nice feature that allows you to preserve your phone’s battery while still having music playing in the background.

Using the FM radio is simple.

First, you press the FM button on the speaker; the first time you do this the speaker will scan for available stations. Once the scan is complete, the 04Plus FM will play the first available station.

You can change stations by long pressing the plus or minus buttons and mute sound by pressing both buttons simultaneously.

Sound quality is surprisingly good; it’s on par with a standard FM radio. The only negative is there is no display, so you’re guessing what station you’re currently playing.

Ingress Protection

Ingress Protection or an IP rating is a device’s ability to withstand dust and water. The 04Plus FM has an IP rating of 67, meaning it’s dustproof and waterproof for 30 minutes in a meter of water.

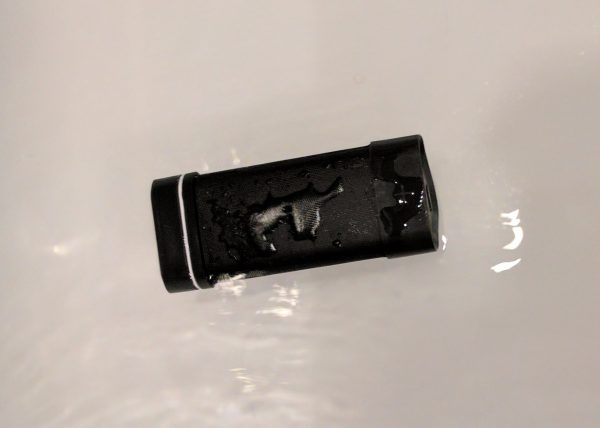
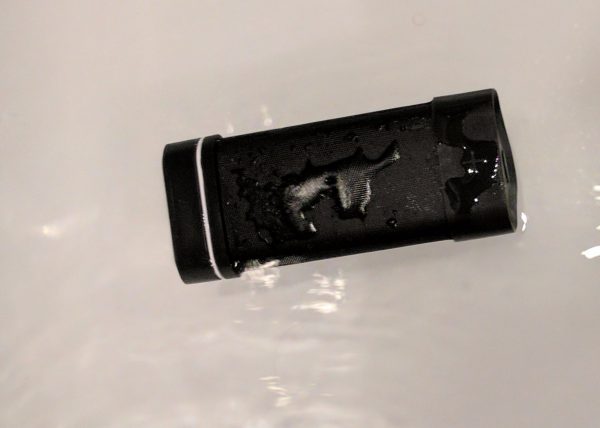
As always, I decided to test this by submerging the speaker in my bathtub.


As you can see in the photos, the 04Plus FM floats when placed in water. This is great because you don’t have to worry about damage from it sinking to the bottom of a pool or losing it on a boating trip.


I then held the speaker underwater while adjusting volume and changing stations.

Although the sound is a bit muffled from the water, the speaker itself performs flawlessly.


After removing the speaker from the tub, it continued to work perfectly despite being soaked. Additionally, the charging and auxiliary port remained bone dry.

I think it’s pretty safe to say the 04Plus FM is capable of performing in just about any environment you can imagine.

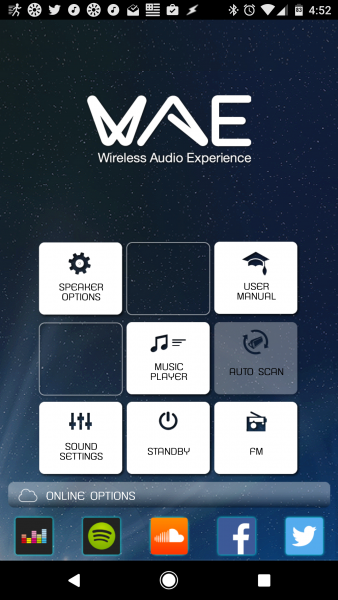
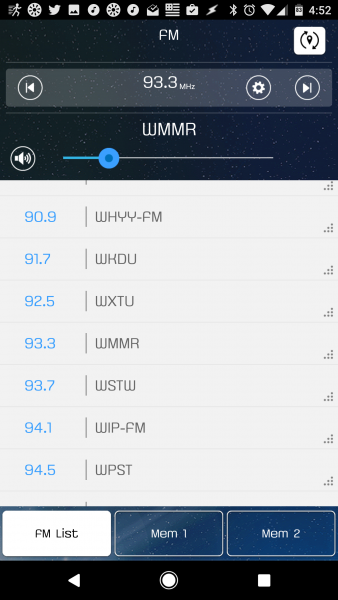
WAE App

The 04Plus FM is compatible with Hercules’s WAE App. It appears to be the same app that is used with the Rush.


It’s a pretty easy to use the app, with all the features being self-explanatory.  The best feature being the ability to select the FM station you want to listen to, rather than blindly guessing.

It’s a nice addition, but something I doubt I would use too often.

Conclusion

The 04Plus FM is a pretty solid speaker. While I found the controls maddening at times, its overall function was great.

The speaker is available for $71.99 from Amazon and would be a great purchase for anyone in need of a Bluetooth speaker.

Source: The sample for this review was provided by Hercules. Please visit their site for more information.


Product Information

Price: $71.99
Manufacturer: Hercules
Retailer: Amazon
Requirements:
  • Bluetooth capable device
Pros:
  • Appealing to eye
  • Great Sound
  • FM radio works well
  • Water and Dust proof
Cons:
  • Lack of dedicated buttons for music control

Filed in categories: Audio, Video, TV, Bluetooth Gear, Reviews

Tagged:

Hercules WAE Outdoor 04Plus FM Bluetooth speaker review originally appeared on on April 25, 2017 at 7:05 am.

Note: If you are subscribed to this feed through FeedBurner, please switch to our native feed URL http://the-gadgeteer.com/feed/ in order to ensure continuous delivery.