OxyLED stick-on lights review

Adding extra light where none exists can be a huge hassle and expense when wiring, and new electrical work is concerned. An easier way is to add easy to install stick up lights like the OxySense T-01 DIY Stick-On Anywhere 4-LED Touch Tap Light and the Motion Sensor Night Light from OxyLED. Let’s check them out.

What is it?

OxyLED lights are easy to install stick up lights that don’t require you to call an electrician or your friend who works construction. Anyone can install these lights including me. All you need is a place that needs some extra light and a flat surface to stick them.

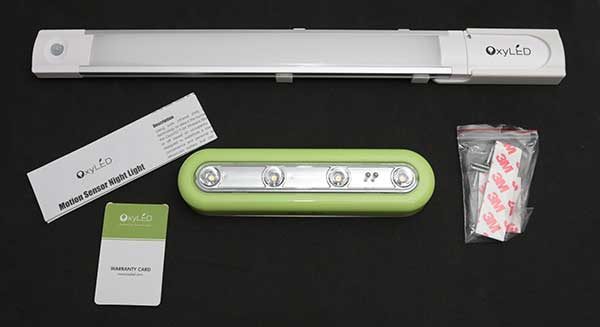
OxyLED sent me two lights. One runs on regular batteries and the other one has a rechargeable battery. Let’s take a look at the OxySense T-01 first.

OxyLED OxySense T-01 DIY Stick-on Anywhere 4-LED Touch Tap Light
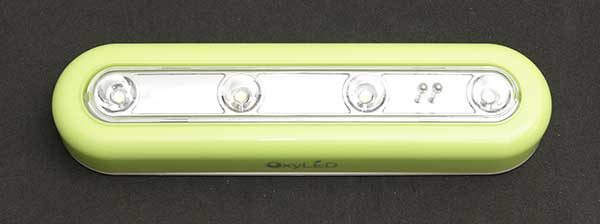
The OxySense T-01 DIY Stick-On Anywhere 4-LED Touch Tap Light which I’ll just call the OxySense from here on out, is a simple light that has 4 LEDs arranged in a horizontal line.

This light has a plastic 6.89 x 1.77in case which is available in a few different colors like the green that you see here.
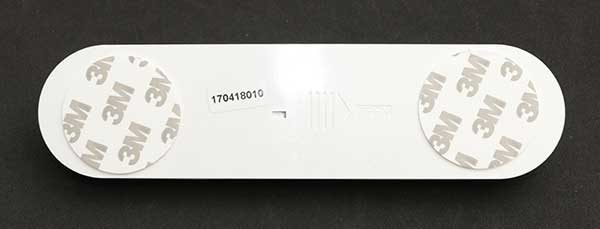
If you flip the light over, you’ll see two 3M adhesive pads which you’ll use to mount this light on a flat clean surface.
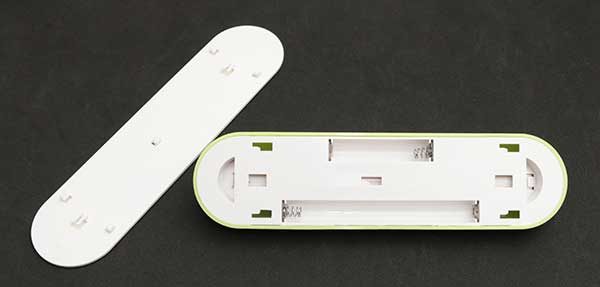
The back slides off to reveal the battery compartment. The OxySense runs on 3 AAA batteries which are not included. There’s also no info on the OxyLED site about how long the batteries should last.
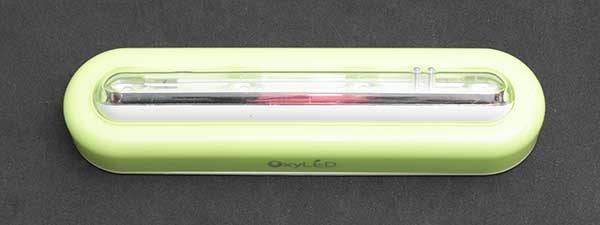
The light bar can rotate 180 degrees so you can direct the light to the right angle. Notice the two small “pegs” that protrude from the light bar on the right side. That’s the touch switch. When you touch that switch with your finger, it will toggle the light on or off.
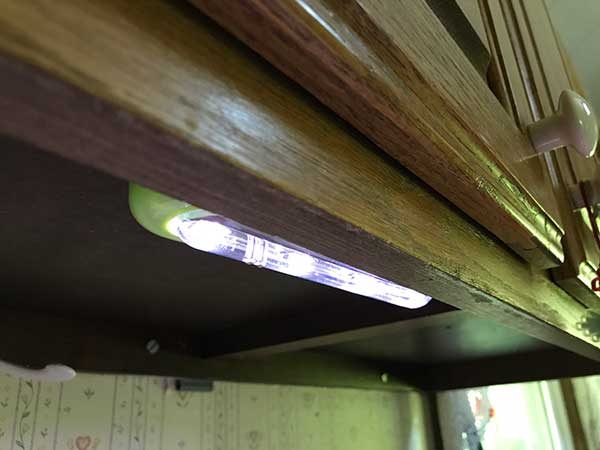
To install the OxySense, you insert 3 AAA batteries in the battery compartment, replace the battery cover, peel the covering off the 3M stickers and then press the light to a flat surface. As you can see from the image above, I’ve mounted the light under a cabinet in my kitchen.


How bright are the LEDs? Check out the photos above. The photo on the left shows the OxySense turned off and the photo on the right shows the OxySense with the light turned on. Drastic difference? I don’t think so. Actually, the only reason you can tell that the light is on in the images above is that it was a gloomy day when I took them. If I turn on the overhead light in the kitchen and then turn on the OxySense light, you can barely tell it’s on.
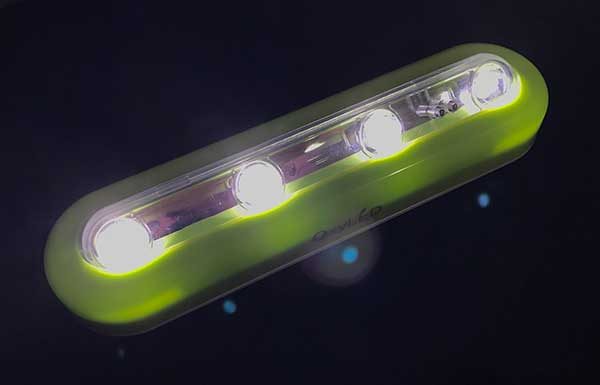
This light is only good for really dark areas. It’s not going to offer much in the way of additional lighting for an area that already has medium bright lighting.

Price: $8.99 from Amazon.

OxyLED T-04 Motion Sensor Night Light

I was more interested in reviewing the T-04 Motion Sensor Night Light than the OxySense T-01 because the Motion Sensor Night Light has a rechargeable battery, multiple ways to mount it and it’s motion activated, which means you don’t have to flip a switch to turn on the light.

The bar shaped light is 15.8 x 1.5 x 0.7 inches and comes in white.

The light comes with several ways to mount it. One way to mount it is with the small magnets on the back that will let you stick the light to a flat steel surface.
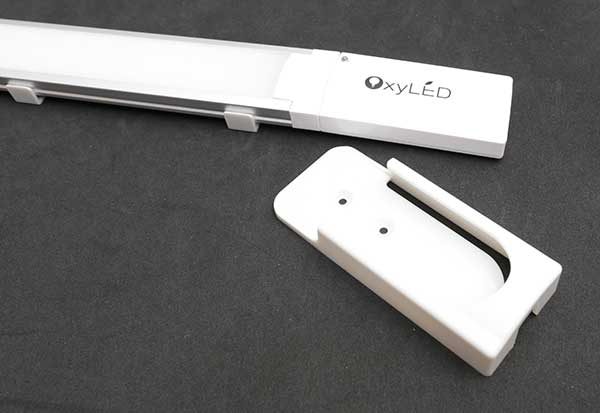
There’s also a vertical plastic clip that you can attach with screws on the included adhesive strip.
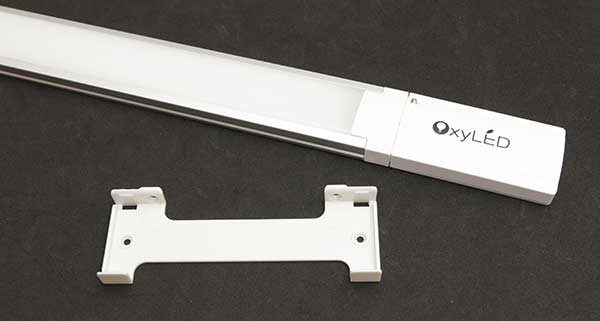
There’s also a horizontal bracket that you can also mount using screws or the adhesive strips.
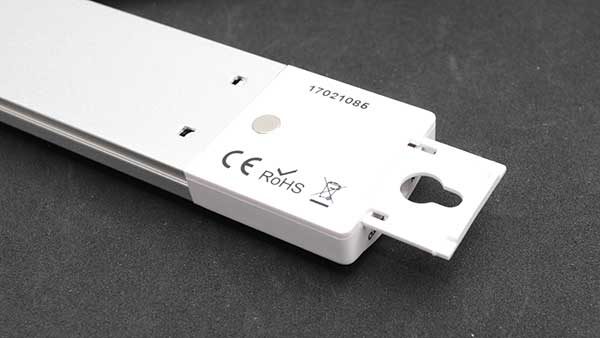
Another way to mount the OxyLED T-04 Motion Sensor Light is with the slide out hang tab.
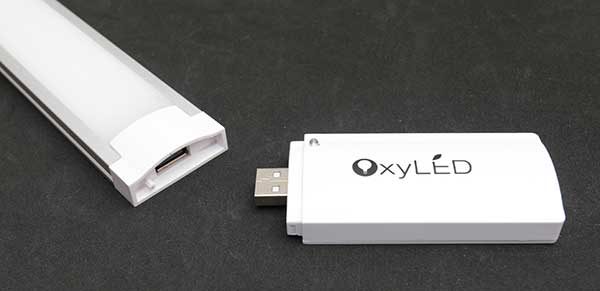
You won’t need to search around for batteries to power this stick-up light because it has a built-in rechargeable battery.  To charge it, you detach the battery pack from the end of the light and then plug it into a USB port on your computer or into a USB charging adapter.
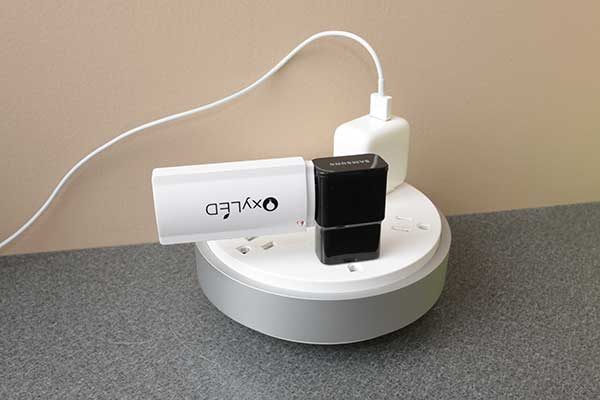
It can take up to 3hrs to fully charge the 900mAh battery pack. An LED on the front will glow red while charging and will turn off once charging has finished.

A full charge will provide up to 4 hours of light. Take into consideration that you’ll probably not turn the light on for that full time… although you can.
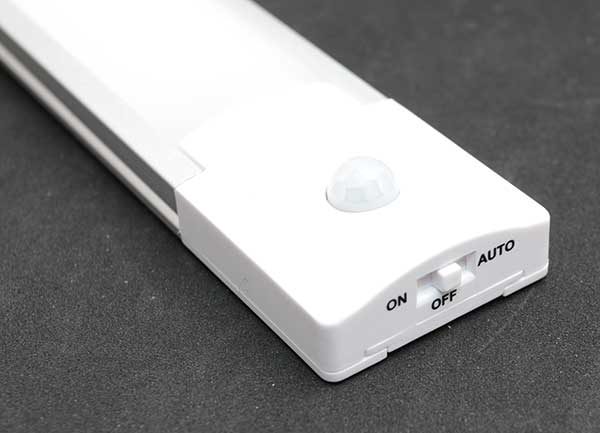
Most people will probably use the light’s motion switch and only light it when motion is detected like when the door to a dark closet is opened.

The switch on the end of the light has 3 settings that you can use to control the behavior of the light. Of means it won’t light at all. On means it’s always on and Auto means it will light up when it detects motion and will turn off after 20 seconds of inactivity.
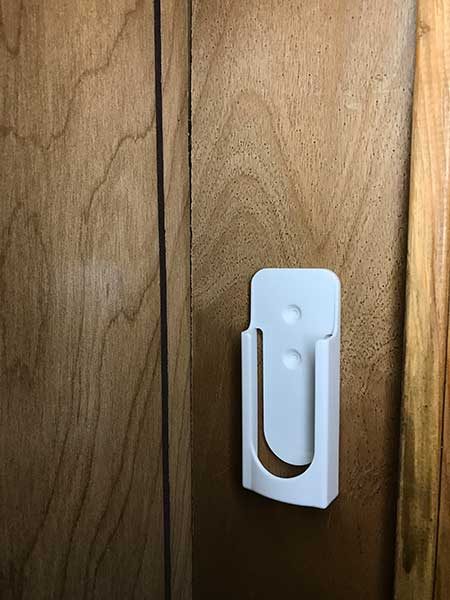
A dark closet is where I decided to mount the OxyLED Motion Sensor Light using the vertical clip.
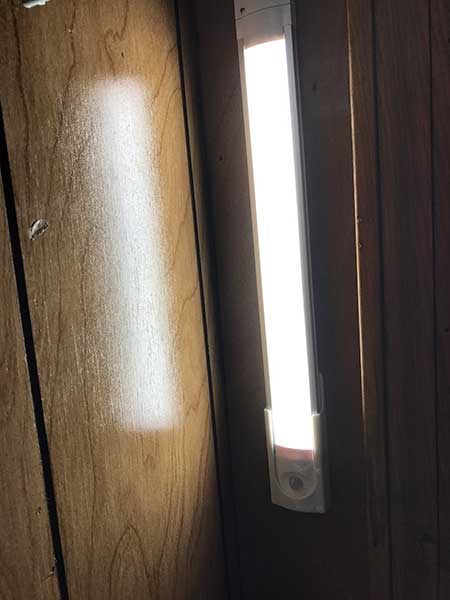
The light has 25 cool white LEDs that put out a decent amount of light. How much light?
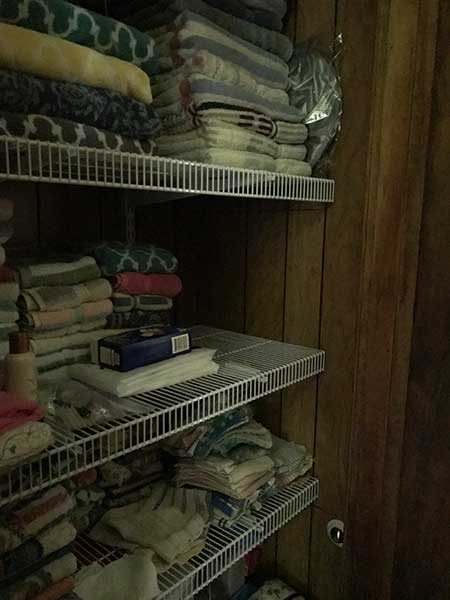
Here’s my hall closet with the T-04 turned off.
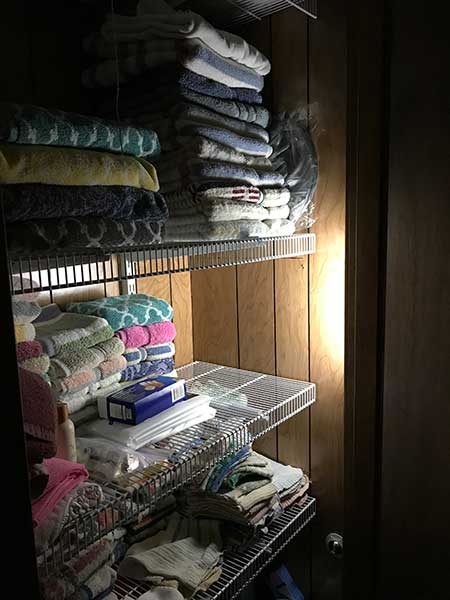
And here it is with the light turned on.

Although it’s twice as expensive, I like the OxyLED T-04 Motion Sensor Night Light a lot more than the OxySense T-01 light. With the T-04 you don’t have to worry about feeding it batteries and it turns off and on automatically.

Price: $19.99 from Amazon.

Final thoughts

OxyLED stick up lights are easy to install and use. I recommend the T-04 Motion Sensor Night Light. But the T-01 OxySense would work fine in a dark closet as long as you don’t forget to turn it off when you’re done.

Source: The sample for this review was provided by OxyLED. Please visit their site for more info and Amazon to order.


Product Information

Price: $8.99 – $19.99
Manufacturer: Oxyled
Retailer: Amazon
Pros:
  • Both: Easy to install
  • T-01: Easy on/off with a tap
  • T-04: Multiple mounting options
  • T-04: Motion activation
  • T-04: Rechargeable battery
Cons:
  • T-01: Doesn't come with batteries
  • T-01: Isn't very bright

Filed in categories: Reviews

Tagged:

OxyLED stick-on lights review originally appeared on The Gadgeteer on July 18, 2017 at 5:21 pm.

Note: If you are subscribed to this feed through FeedBurner, please switch to our native feed URL http://the-gadgeteer.com/feed/ in order to ensure continuous delivery.

Joopic CamBuddy Pro DSLR remote review

In January of 2017, I wrote a news post about the Joopic CamBuddy Pro. The folks at Joopic enjoyed the news post and provided me a Joopic CamBuddy as a sample to review. The CamBuddy provides WiFi control of the camera’s settings and also provides shutter release triggers from four different sensors: Light, sound, laser, and (on the CamBuddy Pro) radio transmitter. By combining the ability of WiFi remote control composure and viewing, an intervalometer for unattended time-lapse photography, and a multitude of remote triggering sensors, the CamBuddy provides capabilities that can be appreciated on even the latest WiFi enabled camera. Lets Take a look at what this gadget is capable of!

The Joopic CamBuddy  is 3.2″ long x 2″ wide and 1″ tall – about the size of  an old-school flip phone and weighs about 58 grams. (I apologize for the dated reference but nothing is that size anymore!) The unit comes with a velour carrying case, a micro USB charging cable, a N1 hotshoe mount and a micro screwdriver for uninstalling the C1 (Canon) hotshoe and replacing it with the N1 (Nikon) sized one, a protective rubber case with weather-resistant port lugs, and a Velcro cable strap.

The CamBuddy also comes with the following remote trigger connection cables that fit into the 3 conductor 2.5 mm port on the side of the CamBuddy:

  • DC0 shutter release cable – suitable for the following Nikon DSLR cameras: D3S, D4, D4S, D5, D300, D300S, D500, D800, D800E, D810, and D810A.
  • DC2 shutter release cable – suitable for the following Nikon DSLR cameras: D600, D610, D750, DF, D90, D3100, D3200, D3300, D5000, D5100, D5200, D5300, D5500, D7000, D7100, and D7200.
  • E3 shutter release cable – suitable for the following Canon DSLR cameras: 60D, 60Da, 70D, 80D, 100D (Rebel SL1), 550D (Rebel T2i / Kiss X4), 600D (Rebel T3i / Kiss X5), 650D (Rebel T4i / Kiss X6i), 700D (Rebel T5i / Kiss X7i), 750D (Rebel T6i / Kiss X8i), 760D (Rebel T6s), 1200D (Rebel T5), and 1300D (Rebel T6).
  • N3 shutter release cable – suitable for the following Canon DSLR cameras: 1D Mark IV, 1D X, 1D X Mark II, 5D Mark II, 5D Mark III, 5D Mark IV, 5DS, 5DSR, 6D, 7D, 7D Mark II, and 50D.

In addition, the CamBuddy comes with a 2 conductor 3.5mm to male-connector PC sync cable to enable synchronizing a flash with trigger events (Pictured to the left in the picture above).

As if that wasn’t enough, the CamBuddy also comes with a laser generator; it is essentially a laser beam with a large external battery and tripod mount to be used as a laser source for laser trigger shooting.

The laser should be targeted to the receiver on the left of the clear front window. The emitter end has a threaded defraction grating for making it easier to target the beam.

You can see the two extents of moving the defraction window in and out in the two pictures below

One thing that I did not receive with my sample was a manual, but you can download one from here or here.

In order to use the CamBuddy you’ll also need a USB control cable from your camera. For my Canon EOS Rebel T3i that is a customized mini USB, but your camera may have another adapter cable. When installed the CamBuddy does have plenty of wiring to and from it. In addition, considering the CamBuddy’s 4-hour continuous operation limit, you may also need to connect an external power source to the CamBuddy for long term operation. The CamBuddy’s main application is unattended use, so the two to four wires coming out of the side of the CamBuddy shouldn’t be an impediment to its normal use, but it’s definitely not “pretty.” All of these wires are on the left side of the CamBuddy to not interfere with the standard right side grip of the DSLR.

The rear of the unit has a multi color LED (red for charging, green for a full charge,  blue blinking for searching, blue steady for linked, and purple for linked and charging), power switch and pin-reset switch.

The base of the unit has holes for the microphone.

The front of the unit has two multi-color status LEDs, a receiver for infrared filtered light, and a receiver for laser light.

As indicated above, the CamBuddy is fitted with a hotshoe on the base of the unit, but this only serves as a convenient way to mount the unit to the camera; the mount on the CamBuddy has no electrical contacts on the hotshoe. If the hotshoe is not available the rubber boot may be used along with the supplied Velcro strip. It would be nice if the CamBuddy would also support a 1/4″-20 nut for a tripod mount.

The software can be downloaded from www.joobot.com/tools/download.php?file=joopicapp, The Android Google Play store has several comments that antivirus software identifies the Joopic app as a threat. I scanned the app on android with Kaspersky and did not discover any issues. The link above brings you to the Chinese iTunes page but the only Joopic app is the one that you’ll need, so it is easy to type in Joopic to the iTunes of your locality. Also, the Joopic page indicates the latest iTunes version is 2.2.3 but I couldn’t find this for my iPhone 6. The Joopic .apk and google play versions are both 2.2.3. The firmware that I’ve loaded onto the CamBuddy is 2.1.10. 

The software requires you to set up a username and password. The account will allow you to save pairing information for all of your CamBuddys no matter which device you are using. This was very convenient and allowed seamless switching from my iPhone to my Android.  The reset button must be depressed for more than 3 seconds when switching accounts with the CamBuddy.

The CamBuddy uses Bluetooth in the pairing sequence but the device operates via WiFi. If there is a prevalent WiFi signal then the CamBuddy can be set up to utilize that network, and if more than one CamBuddy is controlled by a single app then the group must use an external WiFi network. However, if there is no other network available the CamBuddy can set up an ad-hoc network for communicating with the app. Outside the ad-hoc network worked pretty well up to about 87 ft away. Beyond that range the signal got spotty and it became difficult to work with and unreliable. I expect that it would fare better indoors with some surface to bounce the signal off of. But here’s a selfie from 100 ft away.

Here’s the camera on a tripod with a purple clipboard serving as a laser target for the distance meter.

Most new cameras come equipped with built-in WiFi but my DSLR is older so it doesn’t have these features out of the box. It is great that I can add these features with an add on. If you have a WiFi camera with a bad app or a smaller range, the CamBuddy can still be used (assuming that the camera model is supported).

Except for remote shooting, the iPhone or Android device is only used to program the CamBuddy. For instance, the phone is used to program the intervalometer but the CamBuddy schedules the shots to occur at the prescribed time. Also, the phone does not need to be paired for the lighting, sound, or laser triggers to fire.

In order to test the intervalometer, I set the camera on a tripod and took pictures 10 minutes apart of the setting sun. 10 minutes is a long interval, but this was just to test how well the hardware performed and made the tripod getting bumped about halfway through a tolerable circumstance. The compiled video is linked below:

In order to test the sound trigger, I bounced a basketball in my basement against a tile floor. The camera went off quite quickly but was still slow for being able to catch the ball against the ground because Ii was using a shutter release. If you opt for using a flash trigger, you can prepare the camera in a darkened room and keep the shutter open, then the flash will go off when the sound is heard and the result should be a very crisp and quickly executed photo.

In order to test the light trigger, I tried using the CamBuddy as a reverse slow-synchro light triggered remote flash. I shot my flash against a door in a darkened hallway and triggered the camera to shoot when the flash lit the door up. This didn’t work too well in practice but it demonstrated the capability of the light trigger. The setup (with hallway lights on) and resultant picture (with lights off) is shown below.


This should in theory work quite well for lightening since a lightening bolt is usually a lot slower than a camera flash. The laser trigger is generally a light trigger in reverse. I tested its operation by aiming the laser at the CamBuddy and then moving the beam, but the same effect could be achieved by having a subject interrupt the beam.

Its price of $199 is much less than the $1360 worth of features that the manufacturer claims it replaces into one, small attachment. There’s no denying that the CamBuddy is definitely a convergence device. The real test of a convergence device is if it can perform moderately as well as the devices it is replacing. Not having the collection of photographic instruments at my disposal to test this premise, I can only say that the CamBuddy did everything that it claimed to (with a small difference in WiFi range). After having tested all of the features of this unit I’m quite impressed. This little gadget does a lot and in the right hands will provide enormous freedom of creativity for the photographer.

Source: The sample for this review was provided by JooPic. Please visit their site for more info and Amazon to purchase.


Product Information

Price: $199 – $209
Manufacturer: Joopic
Retailer: Amazon
Requirements:
  • Supported Camera with USB cable
  • Supported iPhone or Android
Pros:
  • Many features
Cons:
  • Does not have tripod mount
  • Requires a lot of external wiring
  • WiFi range may not reach 100 feet

Filed in categories: Reviews

Tagged:

Joopic CamBuddy Pro DSLR remote review originally appeared on The Gadgeteer on July 18, 2017 at 7:00 am.

Note: If you are subscribed to this feed through FeedBurner, please switch to our native feed URL http://the-gadgeteer.com/feed/ in order to ensure continuous delivery.

ANNKE 1080P lite security system DVR review

I think I’ve indicated before that I’m a bit paranoid when it comes to home security. I have several cameras in and outside my house, and I’m always considering adding more. Not only are the cameras great for deterring burglars, but they often help find toys my children lost.

Recently I volunteered to review a DVR security system by Annke. It’s a four camera indoor/outdoor system with a multitude of features.

In the box

  • Annke DVR
  • 4 x 720P indoor/outdoor cameras – wired
  • 4 x video cables (60 ft)
  • 2 x power adapters
  • Power adapter “splitter” for cameras
  • USB mouse
  • 4 x anchors for mounting cameras
  • Quick user manual
  • Software CD
  • 2 x door/window stickers

Specifications

  • Analog video input – 8-ch;BNC interface (1.0Vp-p, 75 Ω)
  • HD TVI input – 720P, 1080P
  • AHD input – Support
  • CVBS input – Support
  • IP video input – 2-ch;Up to 960p resolution
  • Audio input/Two-way audio input – 1-ch;RCA (2.0 Vp-p, 1 KΩ)
  • HDMI/VGA output – 1-ch, 1920 × 1080/60Hz,1280 × 1024/60Hz, 1280 × 720/60Hz, 1024 × 768/60Hz
  • Audio output – 1-ch, RCA (Linear, 1 KΩ)
  • Video compression standard – H.264+/H.264
  • Encoding resolution & Frame rate – 1080p lite/720p: 12 fps;960H:25fps(P)/30fps(N)
  • Video bitrate – 32 Kbps to 4 Mbps
  • Stream type – Video & Audio/Video
  • Dual-stream – Support
  • Audio compression standard – G.711u
  • Audio bitrate – 64 Kbps
  • Synchronous playback – 2-ch
  • Remote connections – 128
  • Network protocols – TCP/IP, PPPoE, DHCP, Hik-connect Cloud P2P, DNS, DDNS, NTP, SADP, SMTP, NFS, iSCSI, UPnP™, HTTPS
  • SATA – 1 SATA interface
  • Capacity – Up to 6 TB capacity for each disk
  • Network interface – 1; RJ-45 10 M/100 Mbps self-adaptive Ethernet interface
  • USB interface – Rear panel: 2 × USB 2.0
  • Power supply – 12 VDC
  • Consumption(without hard disks) – ≤ 12W
  • Working temperature – 14ºF to 131ºF
  • Working humidity – 5V DC±10%
  • Power Consumption – 10% to 90%
  • Chassis – 1U chassis
  • Dimensions(W × D × H) – 10.2 × 8.7 × 1.8 inch
  • Weight(without hard disks) – ≤ 2.2 lb

Design

The DVR looks a bit like a cable set-top box without an LCD display.


The front of the DVR has LED indicators for power status, hard drive activity, and network activity. The rear of the DVR contains all of its ports. The top of the DVR is plain while the bottom contains the model number, serial number, and external access code.

The system also includes four 720p cameras.


Each camera is equipped with infrared LEDs, providing 66 feet of night vision.

Additionally, the cameras have an IP66 ingress rating, meaning they are rain and dustproof.

The remainder of the system is primarily composed of cables and power adapters.


I can’t imagine any DVR system being completely inconspicuous; however, this system does a fine job blending into the background. The DVR would blend in with any entertainment center containing your everyday media devices, and the cameras could be tucked away into just about any corner.

Setup

The system isn’t particularly difficult to set up; however, the included user manual is of no help. The manual immediately skips from describing the LEDs and ports on the DVR, to explaining how to install a hard drive; there is absolutely no mention of how to connect the cameras or power adapters. Fortunately, if you’re somewhat tech-literate, the process is pretty easy to figure out.


First you attach the plugs from “cable end A” into the plugs at the end of the camera. You then plug the blue end of “cable end B” into one of the video ports on the rear of the DVR. Next you plug the red end of “cable end B” into one of the power adapter splitters. You then plug the splitter into one of the power adapters.

Once you’ve installed the cameras you can plug the DVR into a HDTV or computer monitor. You then attach the system to your router, plug in the remaining power adapter, and plug the mouse into the USB port.

Once all the hardware is set up, you can begin the on-screen setup; this is a pretty simple process.


The first time you turn on the system you will be asked to activate it. This requires nothing more than choosing an administrative password for the system. You next choose an unlock pattern in order to avoid having to reenter a password repeatedly. Finally, you go through the setup wizard.

Once you’ve completed the wizard, the DVR system is ready to operate. For the most basic use, this is all you need to do. I’ll discuss more advanced use later.

Performance

Although I’ve never had a DVR system for my home, I’ve utilized and interacted with them countless times at work. I was very pleased with how well the Annke system worked compared to others I’ve seen.

The system was easy to use and the picture quality was generally very good; although, in low light situations the image was a bit darker than I would like.

Truthfully, the basic use of the DVR system is so simple there isn’t a lot to write about. You install it, go through the setup wizard, and it immediately starts streaming a live view of things.

It works wonderfully, and that’s really all there is to say.

Annke App

Not only can the system be viewed through your TV or computer monitor, but you can also access it through Annke’s app.

The app is available for Android and iOS.


After you download and install the app, you’ll go through an easy setup wizard where you’ll choose your location, set up your mobile account, and connect your system.

After you’ve completed the wizard, you should have access to your live view.


As with the basic use of the DVR, the mobile app is wonderfully simple to use.

Advanced Use

So here’s the thing, this DVR would be great for a basic home surveillance system, but it also has a ton of features that would make it great for protecting a business or any other institution. In fact, it has so many features that I couldn’t have possibly gotten around to trying them all.

In order to take advantage of all the extra features, you’re going to want to install a hard drive in the DVR. (according to its Amazon listing, the system does not include a hard drive; however, the sample they sent me included a 1 TB hard drive.)

Once a hard drive is installed you can choose from several different recording features.

You can set the DVR to record continuously or only record during specific hours on specific days.

You can choose to have it record when motion is detected or when specific types of motion, AKA “events”, occur.

Examples of events are as follows: face detection/face capture, line crossing detection, people gathering detection, fast moving detection, parking detection, unattended baggage detection, etc.

Admittedly, I didn’t come close to testing all the different triggers; however, I did set a motion alarm and it appeared to work well, consistently.

As with recording, there are a handful of different ways to playback events.

You can choose to playback an event by time period, by event type, by user created tags, by using smart search to analyze video footage, and by going through system logs.

If the DVR is connected to a network there are another dozen options to consider, including connecting to a Network Time Protocol sever, configuring email settings for email alerts, monitoring network traffic, etc.

This is just scratching the surface; you can set on-screen labels, place a black privacy box over certain areas, run hard drive diagnostics, and create backup files.

The amount of features available is borderline overwhelming, but in a good way.

My only issue with all the features was the lack of instruction in the included user manual. While some features were covered, most didn’t appear to be. I was able to locate a 110 page advanced user manual on Annke’s website; however, based on the diagrams inside, it wasn’t the manual for the exact model I was reviewing.

Conclusion

I’m impressed with the Annke DVR; it can function as a basic home surveillance system or work as a full featured security DVR.

The system provides good video quality and an abundance of features.

Everything is fairly easy to use and set up, but you have to do some digging on Annke’s website to get the correct information.

All in all, for $109.99, I’m not sure you’re going to find a better deal.

Source: The sample for this review was provided by Annke. Please visit their site for more information and Amazon to order.


Product Information

Price: $109.99
Manufacturer: Annke
Retailer: Amazon
Requirements:
  • An extra computer monitor or TV with HDMI to display video footage
  • Android, iOS, or Windows device for certain features
Pros:
  • Simple set up despite lack of directions
  • Good video quality
  • Tons of features
Cons:
  • Included user manual not always useful
  • Footage can be dark in low light

Filed in categories: Reviews

Tagged: ,

ANNKE 1080P lite security system DVR review originally appeared on The Gadgeteer on July 17, 2017 at 3:20 pm.

Note: If you are subscribed to this feed through FeedBurner, please switch to our native feed URL http://the-gadgeteer.com/feed/ in order to ensure continuous delivery.

JBL Flip 4 Waterproof Bluetooth speaker review

It’s summertime again, and that means pool parties, camping, canoe trips, picnics, and barbecues. But what’s a great summer get-together without a killer soundtrack? There’s just one problem… how are you going to get everyone to actually hear that bangin’ playlist you spent all day making?

Ditch the awkward phone-in-a-cup sound hack and stop worrying about getting that Bluetooth speaker ruined by a spilled beer… the JBL Flip 4 Waterproof Bluetooth speaker has got you covered.

What is it?

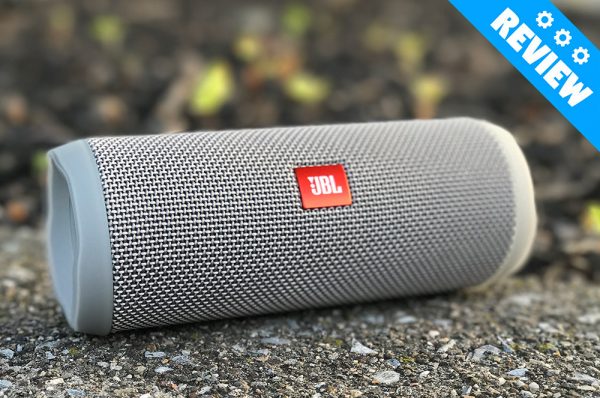
The Flip 4 by JBL is a small external Bluetooth speaker with a waterproof case and sound to spare. It features Bluetooth 4.2 streaming with speakerphone and voice assistance (OK Google/Siri) capability, a 3000mAh battery that purportedly lasts up to 12 hours of playtime, and a waterproof rubber and fabric casing that can even be fully submerged in water with no ill effects. Additionally, it’s JBL Connect+ enabled, which allows for linking of over 100 supported speakers, if you, um, happen to have a few dozen of these laying around.

Their packaging is indeed lovely.

Actually, it would be pretty cool to have several scattered around your back deck or party area. I was not able to test this function, but can imagine the results.

Let’s Get Physical

The Flip 4 is roughly the size of a 16oz. energy drink (think can of Monster or Rockstar) and just a tad heavier.

The form factor of a giant can of Red Bull.

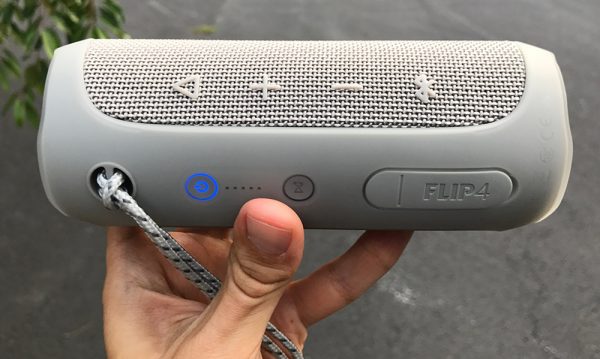
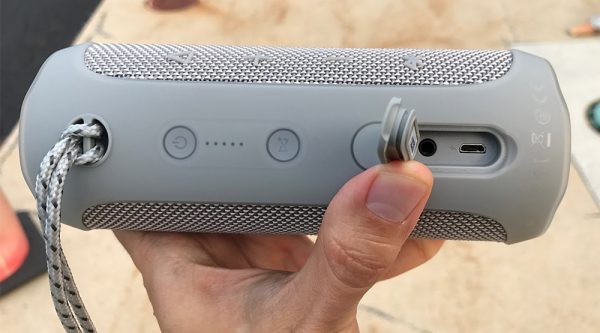
It’s wrapped in a waterproof fabric material, flanked on both ends with rubber. There is a weighted, flat rubber strip running the length of the unit that serves as a rest on a flat surface, preventing it from rolling away. The power button, Connect+ button and charging/aux ports (with waterproof cover) are located on that strip, with the control buttons just above it on the fabric material. There is also a handy wrist strap looped onto the unit, allowing it to be hung up or tied to a pack or wrist.

Both ends consist of the bass radiators, which reverberate and vibrate with the beat. It’s pretty neat to watch, but if something comes into contact or leans into them, it will cause some buzzing. Likewise, a towel or shirt pressed against either end will cause some muffling.

There’s a waterproof plug insulating the ports.

The waterproof housing is one of the main selling points, I took the liberty of running the speaker under the tap for about 30 seconds to no ill effect. It just felt a bit damp when I shook off the excess water and was nearly dry with a quick towel wipe. Really impressive stuff. One wouldn’t have to fear getting sand, dirt or ocean or pool water on it, allowing for high versatility of applications. This speaker would be right at home on a beach towel, backpack, pool deck, boat or campground. It could even survive a lengthy dunk in the pool, which is tough to say of many electronics.

(PSA: Don’t be that camper or beachgoer who is blaring their music for everyone in a square mile to hear, just because you can. Be considerate, people.)

How’s It Sound?

No matter how many neat little features you can cram onto a speaker, it’s all going to come down to what sort of sound it can crank out. The Flip 4 is no slouch. I put it through its paces, throwing everything from Mozart to Daft Punk to Frank Ocean. It definitely prefers bass-heavy, what I’d consider “party” music. It’s definitely LOUD enough. At half volume, streaming through my iPad, it’s definitely loud enough to be heard in a large room, and any louder would be enough to obscure normal conversation levels.

Keep your shirt away from these woofers!

Turning it up louder than 50% resulted in the expected sacrifice of bass and treble for more volume. At around 75% volume, which, again, is probably much louder than you’d typically want to go in most settings, the bass and treble diminish and you’re left with mostly the mid-range. I’d guess the only times you’d want to turn it up to that level is in an already loud setting, like moving at a fast clip on a speedboat, or if you were blaring it from a window pointed out toward your backyard party.

All in all, at the sound levels that someone would most likely be using this at, it sounds great. Hands-down better than anything you’d get out of your phone or tablet, but that’s a pretty low bar to clear.

Final Thoughts

I really like this little speaker. It’s small, super easy to pair and use, is plenty loud and dismisses the common “what if I get it wet or dirty” worries. There are better sounding speakers of similar size, but they’re most certainly not as rugged or as affordable.

The Flip 4 is available from JBL for $99.95.

Source: The sample for this review was provided by JBL. Please visit their site for more info and Amazon to order.


Product Information

Price: $99.95
Manufacturer: JBL
Retailer: Amazon
Pros:
  • – Excellent portability
  • – Waterproof, sand and dirt resistant
  • – More than loud enough
Cons:
  • – Sound tends to get muddy at high volume
  • – Exposed bass speakers need clearance

Filed in categories: Reviews

Tagged:

JBL Flip 4 Waterproof Bluetooth speaker review originally appeared on The Gadgeteer on July 17, 2017 at 7:00 am.

Note: If you are subscribed to this feed through FeedBurner, please switch to our native feed URL http://the-gadgeteer.com/feed/ in order to ensure continuous delivery.

JBL Flip 4 Waterproof Bluetooth speaker review

It’s summertime again, and that means pool parties, camping, canoe trips, picnics, and barbecues. But what’s a great summer get-together without a killer soundtrack? There’s just one problem… how are you going to get everyone to actually hear that bangin’ playlist you spent all day making?

Ditch the awkward phone-in-a-cup sound hack and stop worrying about getting that Bluetooth speaker ruined by a spilled beer… the JBL Flip 4 Waterproof Bluetooth speaker has got you covered.

What is it?

The Flip 4 by JBL is a small external Bluetooth speaker with a waterproof case and sound to spare. It features Bluetooth 4.2 streaming with speakerphone and voice assistance (OK Google/Siri) capability, a 3000mAh battery that purportedly lasts up to 12 hours of playtime, and a waterproof rubber and fabric casing that can even be fully submerged in water with no ill effects. Additionally, it’s JBL Connect+ enabled, which allows for linking of over 100 supported speakers, if you, um, happen to have a few dozen of these laying around.

Their packaging is indeed lovely.

Actually, it would be pretty cool to have several scattered around your back deck or party area. I was not able to test this function, but can imagine the results.

Let’s Get Physical

The Flip 4 is roughly the size of a 16oz. energy drink (think can of Monster or Rockstar) and just a tad heavier.

The form factor of a giant can of Red Bull.

It’s wrapped in a waterproof fabric material, flanked on both ends with rubber. There is a weighted, flat rubber strip running the length of the unit that serves as a rest on a flat surface, preventing it from rolling away. The power button, Connect+ button and charging/aux ports (with waterproof cover) are located on that strip, with the control buttons just above it on the fabric material. There is also a handy wrist strap looped onto the unit, allowing it to be hung up or tied to a pack or wrist.

Both ends consist of the bass radiators, which reverberate and vibrate with the beat. It’s pretty neat to watch, but if something comes into contact or leans into them, it will cause some buzzing. Likewise, a towel or shirt pressed against either end will cause some muffling.

There’s a waterproof plug insulating the ports.

The waterproof housing is one of the main selling points, I took the liberty of running the speaker under the tap for about 30 seconds to no ill effect. It just felt a bit damp when I shook off the excess water and was nearly dry with a quick towel wipe. Really impressive stuff. One wouldn’t have to fear getting sand, dirt or ocean or pool water on it, allowing for high versatility of applications. This speaker would be right at home on a beach towel, backpack, pool deck, boat or campground. It could even survive a lengthy dunk in the pool, which is tough to say of many electronics.

(PSA: Don’t be that camper or beachgoer who is blaring their music for everyone in a square mile to hear, just because you can. Be considerate, people.)

How’s It Sound?

No matter how many neat little features you can cram onto a speaker, it’s all going to come down to what sort of sound it can crank out. The Flip 4 is no slouch. I put it through its paces, throwing everything from Mozart to Daft Punk to Frank Ocean. It definitely prefers bass-heavy, what I’d consider “party” music. It’s definitely LOUD enough. At half volume, streaming through my iPad, it’s definitely loud enough to be heard in a large room, and any louder would be enough to obscure normal conversation levels.

Keep your shirt away from these woofers!

Turning it up louder than 50% resulted in the expected sacrifice of bass and treble for more volume. At around 75% volume, which, again, is probably much louder than you’d typically want to go in most settings, the bass and treble diminish and you’re left with mostly the mid-range. I’d guess the only times you’d want to turn it up to that level is in an already loud setting, like moving at a fast clip on a speedboat, or if you were blaring it from a window pointed out toward your backyard party.

All in all, at the sound levels that someone would most likely be using this at, it sounds great. Hands-down better than anything you’d get out of your phone or tablet, but that’s a pretty low bar to clear.

Final Thoughts

I really like this little speaker. It’s small, super easy to pair and use, is plenty loud and dismisses the common “what if I get it wet or dirty” worries. There are better sounding speakers of similar size, but they’re most certainly not as rugged or as affordable.

The Flip 4 is available from JBL for $99.95.

Source: The sample for this review was provided by JBL. Please visit their site for more info and Amazon to order.


Product Information

Price: $99.95
Manufacturer: JBL
Retailer: Amazon
Pros:
  • – Excellent portability
  • – Waterproof, sand and dirt resistant
  • – More than loud enough
Cons:
  • – Sound tends to get muddy at high volume
  • – Exposed bass speakers need clearance

Filed in categories: Reviews

Tagged:

JBL Flip 4 Waterproof Bluetooth speaker review originally appeared on The Gadgeteer on July 17, 2017 at 7:00 am.

Note: If you are subscribed to this feed through FeedBurner, please switch to our native feed URL http://the-gadgeteer.com/feed/ in order to ensure continuous delivery.