Samsung Dex Station review

Ever since the first days of the Palm Pilot PDA, I’ve wanted a small handheld device that would function as my phone, my camera, and my desktop computer. One device to rule them all!

Companies like Motorola with their Atrix phone flirted with this concept six years ago, and I’ve even tried turning an Android smartphone into a pseudo computer by connecting a mouse and a keyboard using an OTG adapter. With the right apps, it’s possible to get real work done with this type of setup but working on a phone’s small display is pretty painful.

Samsung has a solution for this. It’s the DeX Station. Verizon Wireless sent me one to test. Let’s check it out.

What is it?

The Samsung DeX Station is a docking station for the Samsung Galaxy S8, S8 Plus, and Note8 smartphones. It allows connection to an HDMI display, a keyboard, mouse, and speakers, to turn the smartphone into a multi-windowed multi-tasking desktop workstation.

What’s in the box?
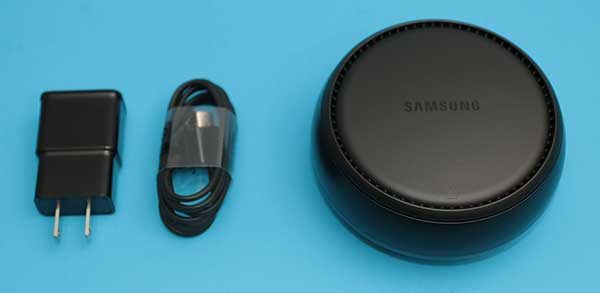
DeX Station
AC adapter
USB Type C cable

Design and features
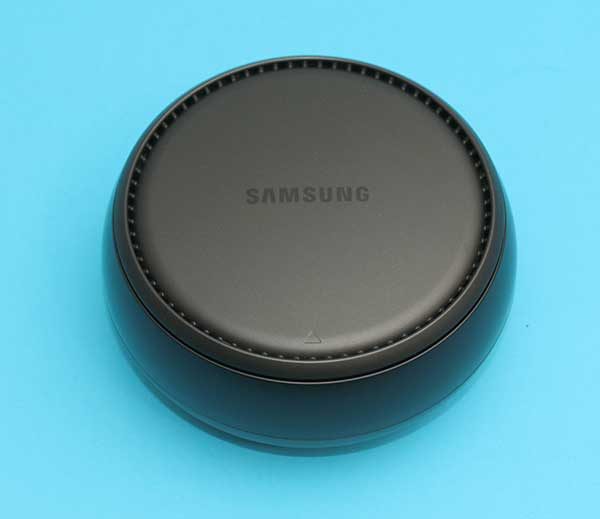
The DeX Station is a black plastic module that reminds me of a bulging hockey puck.
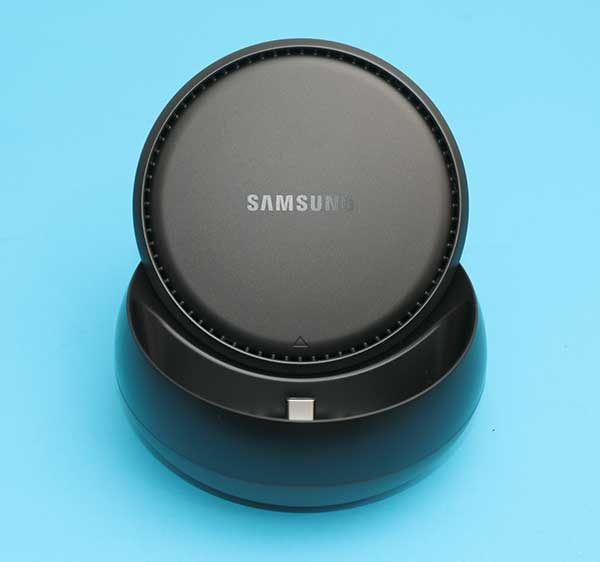
The top cover slides open and turns into a backrest for the phone which plugs into the exposed USB Type-C connector.
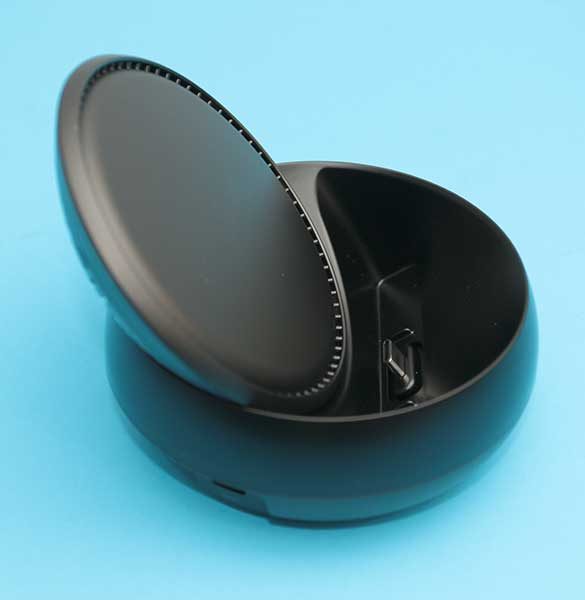
The lid has a built-in fan that turns on to keep the phone cool when it is working hard from displaying multiple windows and apps.
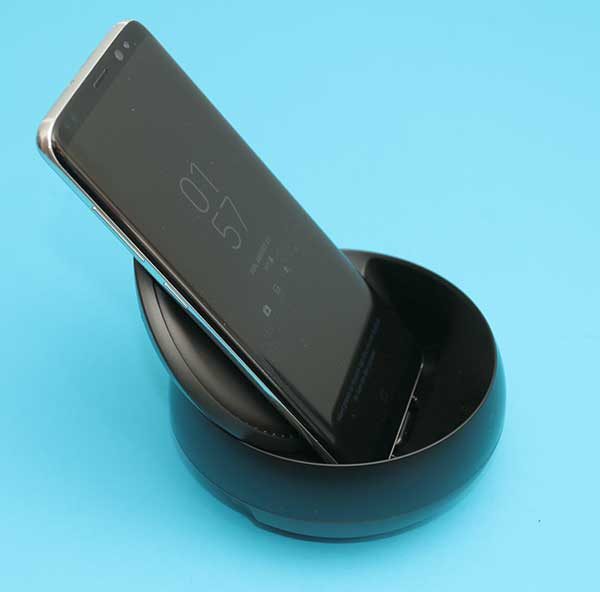
Verizon sent me a Samsung Galaxy S8 to test with the DeX and it fit in the docking station perfectly. The DeX will also work with the Samsung Galaxy Note8, but it won’t work with other smartphones that have a USB Type-C connector. The DeX Station is only compatible with Samsung Galaxy S8 and newer devices.
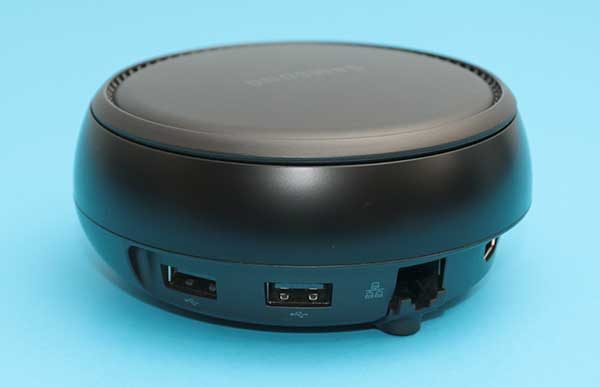
Along the base of the DeX, you’ll find two USB 2.0 ports that can be used to connect a keyboard and a mouse. There’s also an Ethernet port if you need a hard wire into your network.
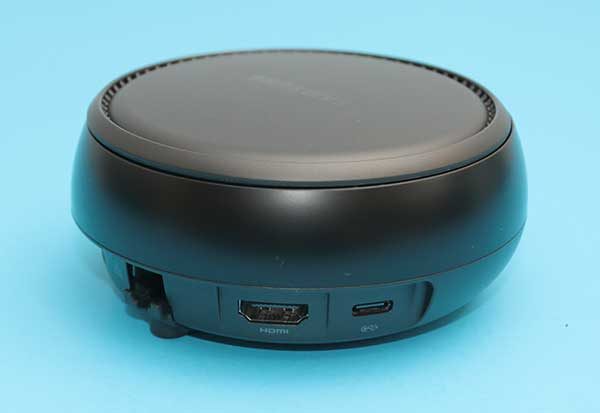
Next to the Ethernet port is an HDMI port and a USB Type-C port which is used with the included AC adapter to power the DeX.

Setup
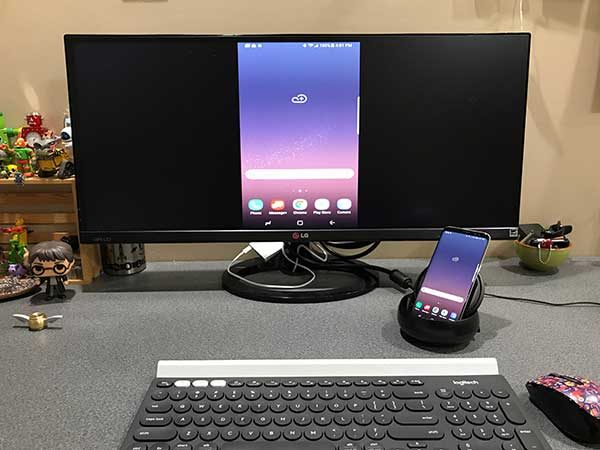
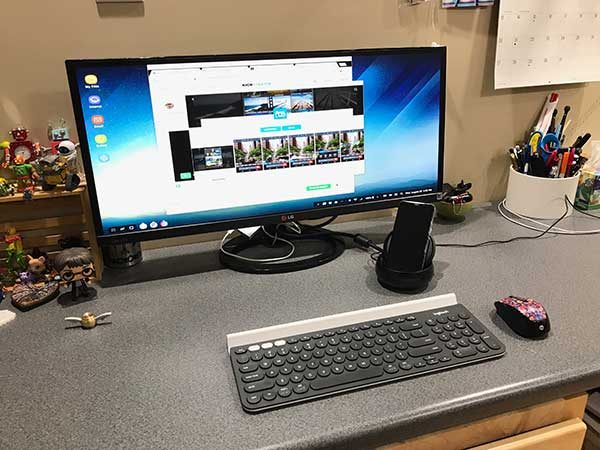
Hooking up the DeX Station is simple as long as you have a monitor with an HDMI input and an HDMI cable. I connected the DeX to an LG 29″ monitor. I also connected the Samsung Galaxy S8 to a Logitech K780 keyboard using a USB dongle, and I paired a Microsoft Bluetooth mouse to round out the setup.

When connecting the S8 to the DeX connected to the monitor, you’re given the option to mirror the display as shown above.

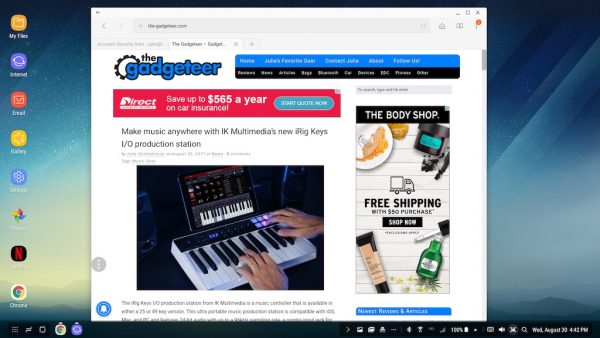
Or you can go full screen which effectively turns the smartphone into a desktop computer that can multi-task with multi-windows, a taskbar, app shortcuts, etc. The effect is pretty awesome and really made me feel like my one-device-to-rule-them-all gadget daydream had finally come true.

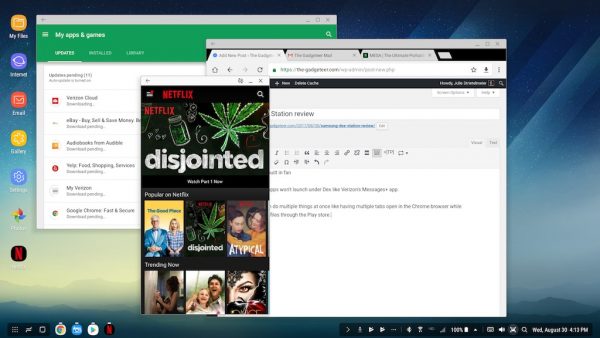
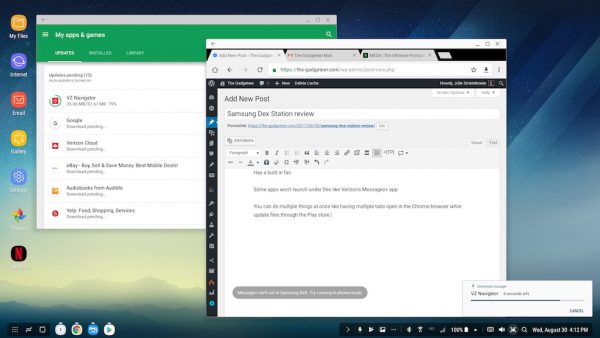
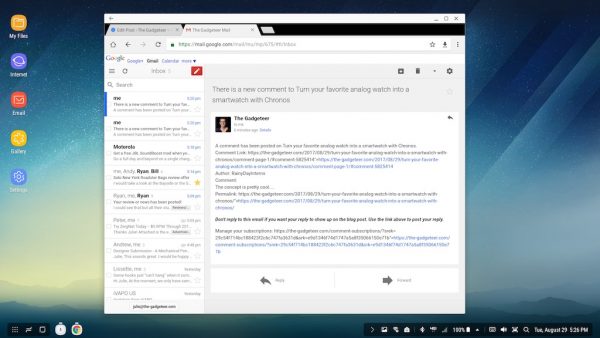
Launching the Chrome browser really feels like you’re surfing on your laptop or desktop and you forget that you’re using a smartphone. You can do multiple things at once like having multiple tabs open in the browser while updating files through the Play store.

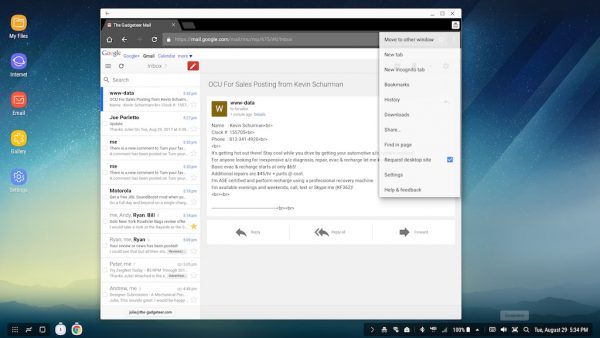
My first gotcha was noticing that Gmail through the Chome browser showed the mobile version of the site instead of the desktop version which I prefer.

I tried requesting the desktop version through the browser settings and tried using an incognito window too but didn’t have any luck.

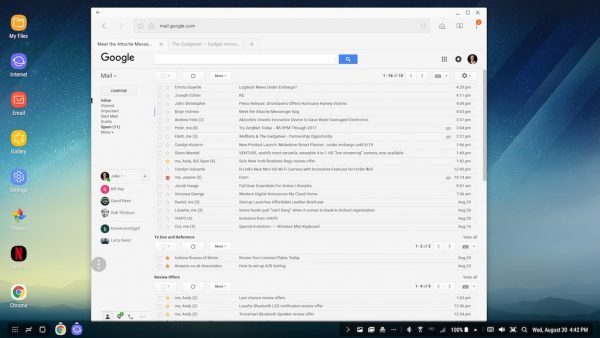
To get around this issue I tried the Samsung browser and discovered that it does allow you to load the desktop version of Gmail. Yay! The desktop version of Gmail lets me have my multiple inboxes and stars just like working on my Mac or Windows machine. This is a big deal for people like me who get eleventy billion emails a day.

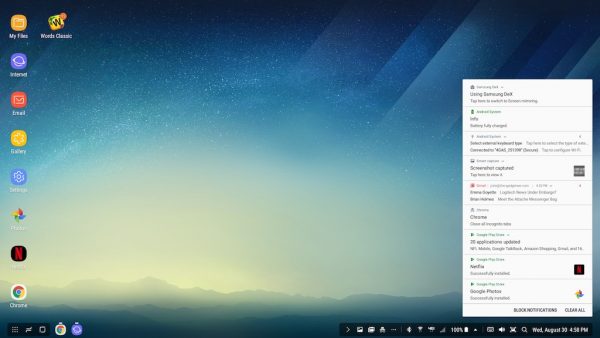
Although the DeX desktop doesn’t look like your phone, notifications still come in like normal and can be accessed in a panel on the bottom right corner of the display.

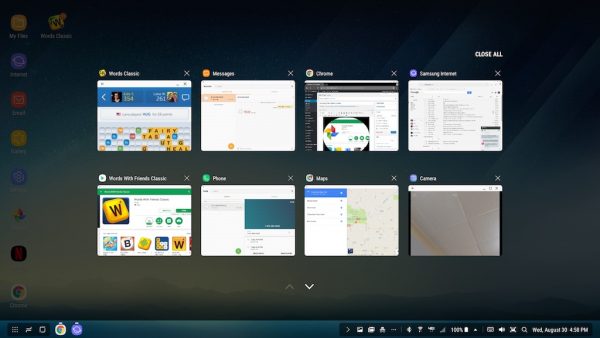
You can also see thumbnails of open apps to easily switch between them.

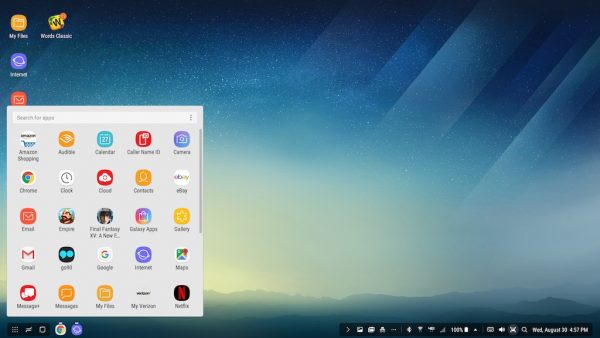
There’s also a launcher screen with all your installed apps listed for easy launching.

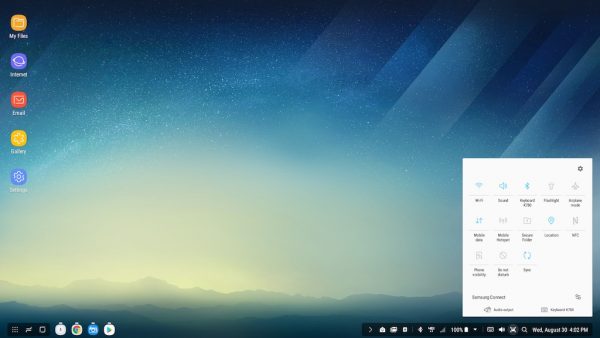
And there’s a nice big settings picker window.

Working through a browser feels very much like you’re working on a laptop or desktop computer. But when you try to use some of your favorite apps, you’ll start running into issues because they probably won’t work in full-screen mode like you’d expect and want with this type of setup.

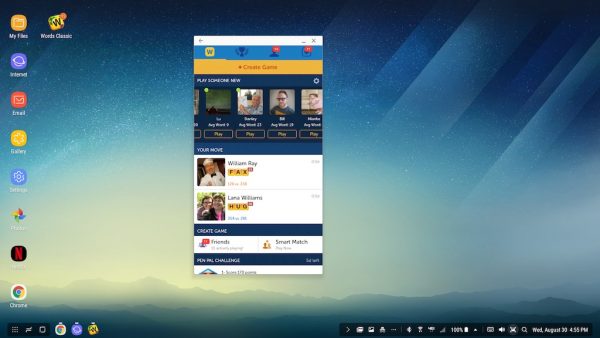
Examples of this include Words With Friends, which launches in a phone-sized window that cannot be resized.

The Netflix app has the same problem. What’s even worse is that I couldn’t get the Netflix app to load a video. It would stay on the loading screen forever. But if I tried using my iPhone to watch the same video that I was trying to pull up on the S8 connected to the DeX, it popped up just fine when using the same WiFi connection.

The Samsung internet browser usually works the best to go to the web versions of apps and services vs. the mobile apps that you have installed on the phone. So I thought I could get Netflix to work that way, but it just showed a blank black screen.

I also tried the Chrome browser but it would just launch the Netflix app.

Some apps won’t launch at all when connected to the Dex Station like Verizon’s Messages+ app and even worse, the Firefox browser won’t work at all.

However, you can use Samsung’s messages app to send SMS messages while connected to the DeX.

A few other things that I noticed:

  • Right mouse click is supported with Dex optimized apps.
  • Double-clicking the mouse to select a word in the Chrome browser in an edit window will not work but it does work in the Samsung browser.
  • Trying to edit images in Google Photos just brings up a blank black screen.

Who is this product for?

I was excited to try the Samsung DeX Station, but after I used it, I started thinking what I would use it for and came to the conclusion that it would not be useful for someone like me who already has a laptop at work, a laptop at home, and a tablet.

The DeX would be perfect for a minimalist who has no extra room or need for multiple computers but does have an HDMI display, a keyboard, and a mouse to use when a full-screen desktop experience is required.

I can imagine a time in the not too distant future where our smartphones really WILL be our only devices and we’ll have docks like the Samsung DeX Station at our day job and our home.

Final thoughts

I enjoyed using the Samsung Dex Station and am excited for the future of devices like this one. I would happily go down to one device if the OS on that one device was beefed up a little more, all apps took advantage of full-screen mode, and there were docks to turn the phone into a laptop and a tablet too. I think it’s just a matter of time and I can’t wait.

Source: The sample for this review was provided by Verizon Wireless. Please visit their site for more info.


Product Information

Price: $149.99
Manufacturer: Samsung
Retailer: Verizon Wireless
Pros:
  • Easy to use
  • Turns the phone into a desktop computer
  • Multi-window, multi-tasking
  • Phone charges while docked
Cons:
  • Most apps appear in small phone sized windows that can't be resized
  • Netflix would not work
  • Some apps won't work at all while docked in the DeX

Filed in categories: Reviews

Tagged: , ,

Samsung Dex Station review originally appeared on The Gadgeteer on September 27, 2017 at 4:04 pm.

Note: If you are subscribed to this feed through FeedBurner, please switch to our native feed URL http://the-gadgeteer.com/feed/ in order to ensure continuous delivery.

Thinkware F800 dashcam review

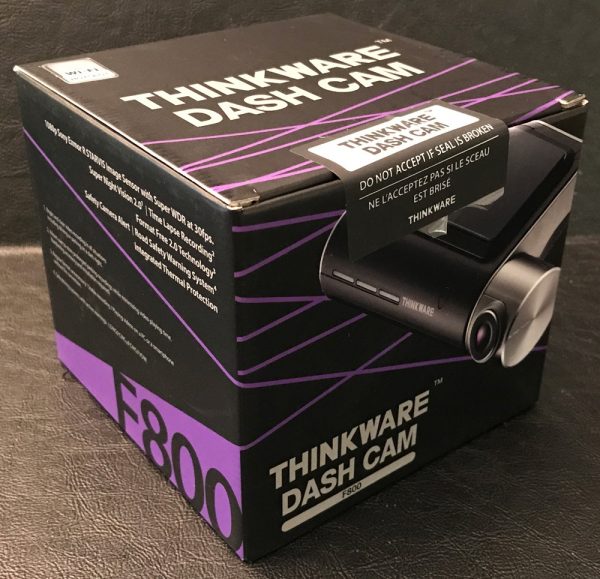
I’ve been patiently waiting for the Thinkware F800 dashcam to make it to the US market since Thinkware announced their latest flagship @CES 2017, hopeful they would send one my way to review. The F800 is similar to the Thinkware F750 Julie reviewed last year in many ways. Though Thinkware has added polish and features to its latest flagship dashcam making it even more tech-worthy in the process. Let’s see if my patience has been worth the wait 😀

Note: Photos may be tapped or clicked for a larger image.

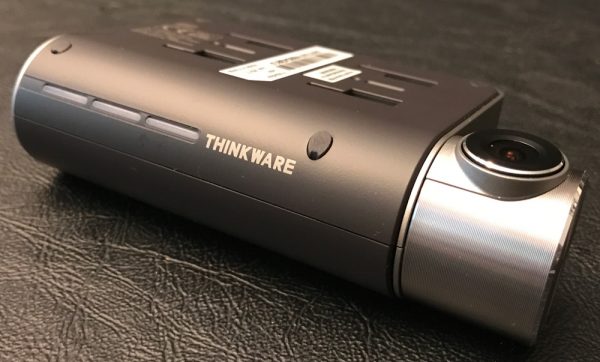
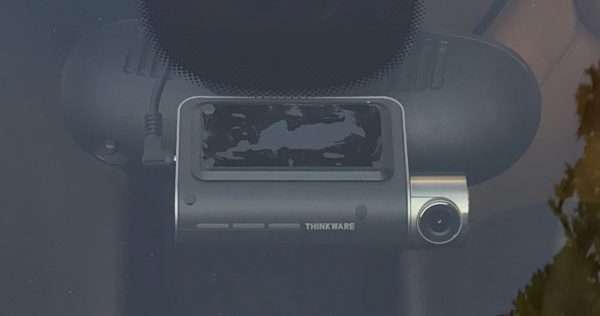
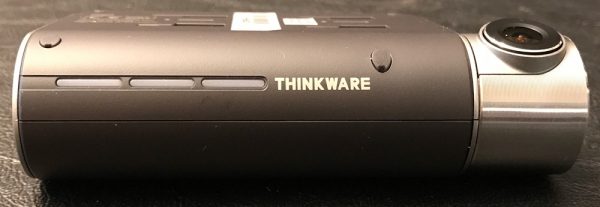
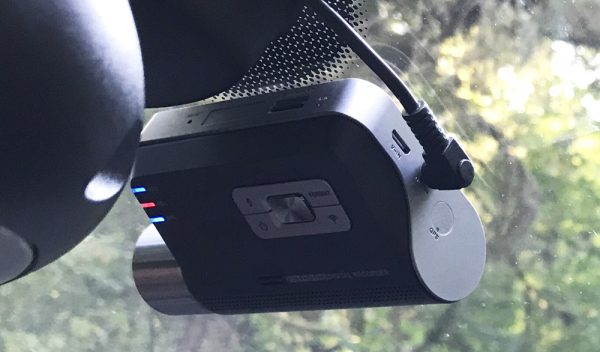
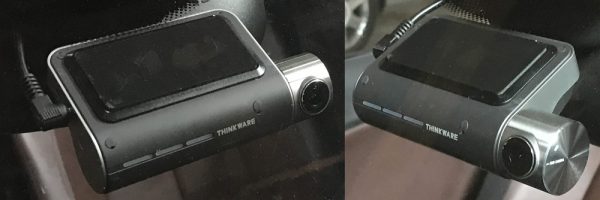
Like Thinkware’s previous F-series flagships, the F800 is screen-less, shaped more or less like a thick deck of cards with a growth on its side to house the lens assembly. I’m not saying that is a bad thing. I love the minimalistic, non-distracting form factor of the F800. Other than verbal/audio notifications, you can hardly tell it’s installed in my fast car being tucked behind my SLK’s rearview mirror. In addition to just looking sweet, the F800 is packed full of the latest tech, features, and Sony’s 2.13MP Exmor CMOS camera.

Specifications:

Camera Sony Exmor CMOS 2.13MP (Same for rear camera)
Resolution Front & Rear: Full HD (1920 x 1080P)
Capacity Micro SD Card 16GB / 32GB / 64GB UHS-I
Recording Modes Continuous Recording, Incident Recording, Manual Recording, Audio Recording
Sensor 3-Axis Accelerometer G-Sensor (3D, ±3G)
GPS Embedded GPS
Power Input Power: DC 12/24V
ETC Security LED / Operation Status LED/ GPS Receiver LED/ Wi-Fi LED

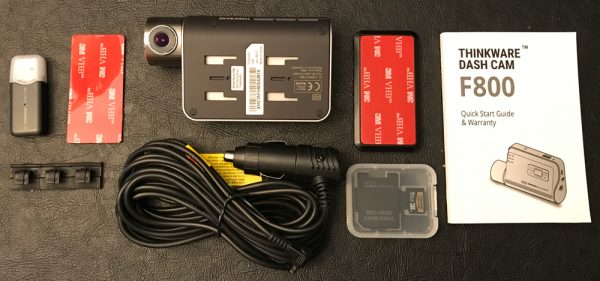
Package Contents:

  • Main Dash Cam Unit
  • Mount with 3M tape (1ea)
  • Cigar Jack Adaptor
  • Adhesive Cable Holders
  • MicroSD memory card with adapter(consumable)
  • Quick Start Guide/Warranty Card

F800 Hardware:

The F800 is one of Thinkware’s latest dashcams featuring full HD resolution, GPS, WiFi, 3-Axis Accelerometer G-Sensor, Night Mode 2.0, dual channel recording, etc. As I said, I really like the F800’s form factor…preferring screen-less dashcams, finding them less distracting or intrusive.

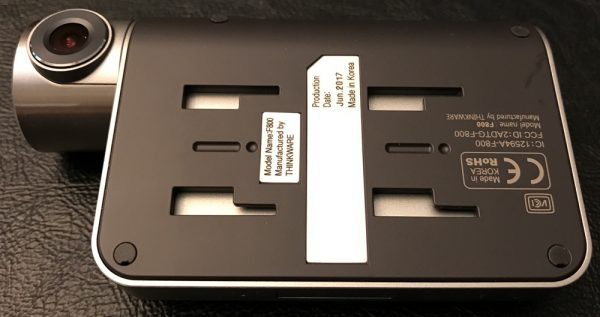
The top of the F800 has four slots that slide onto the mounting plate which allows for easy installation and removal of the device. The mounting plate is securely held to the windshield by a 3M adhesive strip (vs suction cup mount). The dashcam locks into place with a secure, wiggle-free connection.

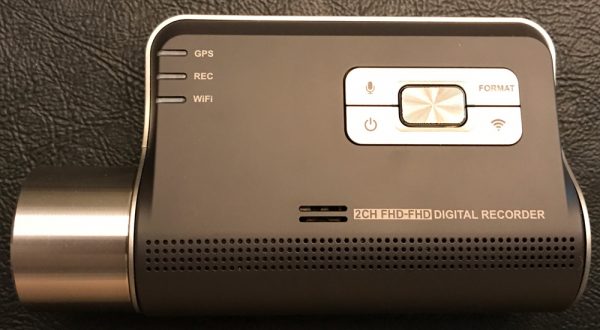
The main face of the F800 has the mute, SD card format, WiFi, and power buttons in addition to the GPS, recording, and WiFi status LEDs located on the left. The F800’s speaker is also located on the front of the device. I have to say the speaker impressed me, definitely the clearest and loudest dashcam sound I have experienced to date.

The bottom, front facing edge of the dashcam has LED security lights that are managed via the Thinkware smartphone app.

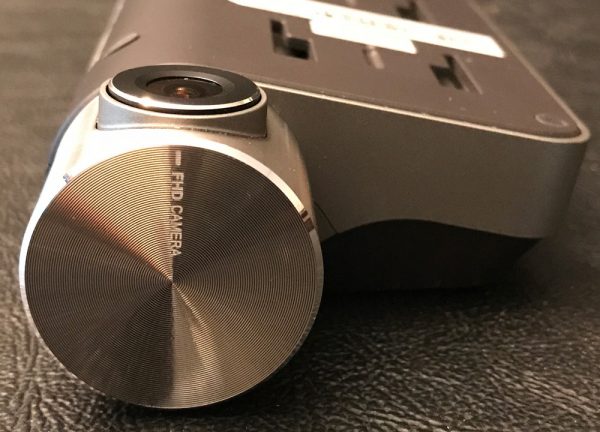
The F800’s camera is on the left side of the device, engineered to sit very close to the windshield to reduce distortion and glare. The camera housing is able to rotate vertically approximately 90 degrees to accommodate nearly any windshield angle and vehicle design.

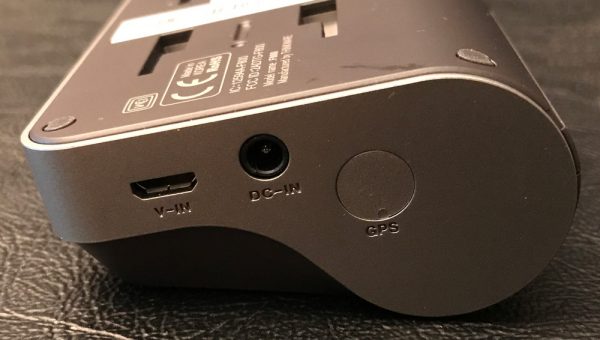
The right side of the F800 has its video-in, power, and external GPS ports.

The top of the F800 has the recessed reset button, microSD card slot, and microphone.

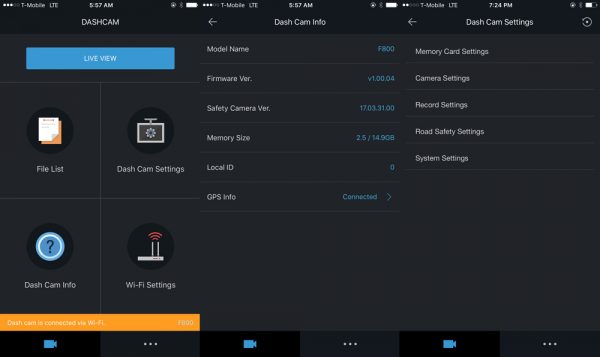
Other than the mute, format, WiFi, and the power buttons, configuring, managing and viewing/downloading video is all done via the Thinkware app available for iOS and Android devices.

Setup and Management:

To customize the F800’s multitude of settings, you have to connect to the dashcam via WiFi and use the mobile app to tweak things as you like. The process requires you to press the WiFi button on the front of the dashcam, directly connect to the its WiFi (for me it is Thinkware53), then start up the app.

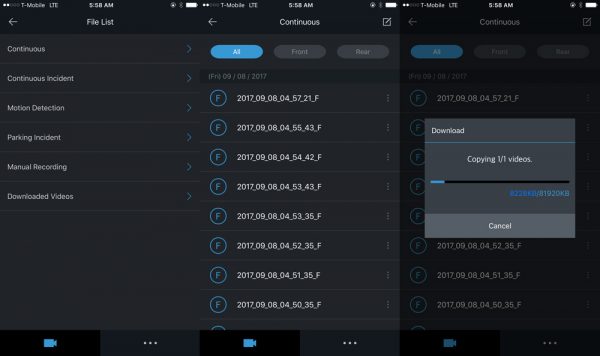
In addition to accessing the F800’s camera (memory card/camera/recording/road safety/system) settings, the app also provides a listing of recordings and enables you to download these files from the microSD card to your smartphone wirelessly. Each 85mb file takes approximately a minute to download. Viewing videos are definitely easier by removing the microSD card and watching them on the Thinkware viewer on your computer.

Noteworthy Features:

  • Built-in GPS sensor  – the F800 has absolutely the FASTEST built-in GPS I have ever tested.
  • Driver assistance – Includes lane departure, forward collision avoidance, and forward vehicle departure warning.
  • Speed camera alerts – the F800 has an internal database that warns you when you’re coming up to an intersection or location with a known speed camera standing watch.
  • High-temperature protection system – a built-in thermal sensor protects the F800 hardware and data against intense heat by automatically turning it off to prevent overheating.
  • Dual channel capable (aka second camera) – Thinkware also offers a rear camera that captures HD video @30fps.
  • Optional Parking Mode with permanent installation – Thinkware has an optional wiring kit that allows you to hardwire their dashcams directly into your cars electrical system. This enables you to use the F800’s Parking Mode with time-lapse recording to capture video when you leave your car or regular video if it detects an impact.

Daytime Video:

Like the X550, the F800’s daytime video is good with solid resolution, excellent color, and better than usable image quality. Even though the F800 has a 2.13MP Sony Exmor CMOS image sensor, some details are lost at HD (1920 x 1080) quality video.

The F800 uses the Ambarella A12 Chipset able to record 1080p simultaneously on both channels. The lens has 140 degrees of viewing angle with little fish-eye effect.

Here is a screen capture from this video where you can make out the street sign but not the vehicle’s license plate passing by.

As I have stated in past Thinkware reviews, I firmly believe Thinkware needs to up its game in this department, bumping its higher-end dashcams up to 4MP – 2K (2560 x 1440 @30 fps) HDR video.

Nighttime Video:

Thinkware’s Super Night Vision 2.0 and Sony Exmor CMOS image sensor are very good at capturing light, producing excellent nighttime video. The example shows excellent control of glare and exposure while producing well lit, very usable video.

Thinkware Viewer:

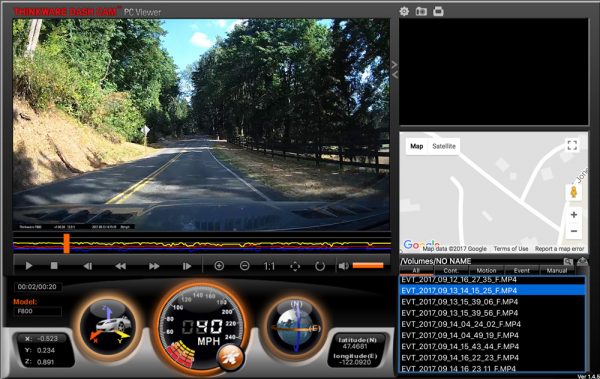
The Thinkware PC viewer is one of the best features of using their dashcams, very well polished and intuitive. Other dashcam manufactures either create a half-baked viewer or do not offer one at all.  The Thinkware viewer is an excellent integrated tool for viewing not only your driving video but speed, lat/long, Google map location, and three-dimensional G-forces the car is experiencing at any particular moment. These G-forces are illustrated in the bar graph under the video and the dial with a car in it with X- Y- and Z- axis in the lower left corner of the window. Like the X550, the F800 records in 1:00 minute blocks that are approximately 85mb in size. The only issue I had with the viewer was the Google mapping integration was a bit hit or miss but I believe it might be the security settings on my Mac and/or iPhone.

F800 vs F800 Pro:

Thinkware also creates a F800 Pro version of its flagship dashcam. Other than its very cool all black casing, I have not been able to find any significant difference between the two. The Pro version is available on Thinkware’s worldwide website but not in the US.

Bottomline:

I really like the F800’s screen-less, minimalistic form factor. This feature rich, WiFi enabled dashcam is without a doubt a keeper. I would prefer a high resolution sensor but Thinkware’s flagship device has solid video quality and definitely gets the job done. Many of the Road Safety Warning System features may not be for some users but can be disabled in the Thinkware app. The hardware, smartphone app, and viewer are all well thought out and very nicely done. If you’re in the market for a high end dashcam the Thinkware F800 is definitely worthy your consideration.

Source:  The samples for this review were provided by Thinkware. Please visit their site for more information and visit Amazon to order.


Product Information

Price: $299.99
Manufacturer: Thinkware
Retailer: Amazon
Pros:
  • Great build quality
  • Stealthy/minimalistic form factor
  • Good video quality (especially Night Vision)
  • Dual channel/camera capable
  • Quick GPS lock
  • Excellent PC viewer
  • Easy to install/use
  • Solid companion smartphone app
Cons:
  • Needs 2K resolution
  • Some of the driver assist features need work

Filed in categories: Reviews

Tagged: ,

Thinkware F800 dashcam review originally appeared on The Gadgeteer on September 27, 2017 at 9:00 am.

Note: If you are subscribed to this feed through FeedBurner, please switch to our native feed URL http://the-gadgeteer.com/feed/ in order to ensure continuous delivery.
Bob Ross figurine, TP-Link Deco, BBQ Dragon Chimney, and more – Review updates

This week we have a selection of review updates from Bob Patterson including a really fun one that you won’t want to miss. Click through to see this week’s list of updated reviews and then scroll to the bottom of each review to read the latest update.

This is the Bob Ross desk ornament that has been missing from your life. by Bob Patterson

TP-Link Deco M5 Whole Home Mesh WiFi System review by Bob Patterson

WTFactory SlimClip VR Steady iPhone case review by Bob Patterson

BBQ Dragon Chimney of Insanity review by Bob Patterson


Product Information

Price:

Filed in categories: Reviews

Tagged:

Bob Ross figurine, TP-Link Deco, BBQ Dragon Chimney, and more – Review updates originally appeared on The Gadgeteer on September 27, 2017 at 8:00 am.

Note: If you are subscribed to this feed through FeedBurner, please switch to our native feed URL http://the-gadgeteer.com/feed/ in order to ensure continuous delivery.
OVC H15 Noise Cancelling Earphones review

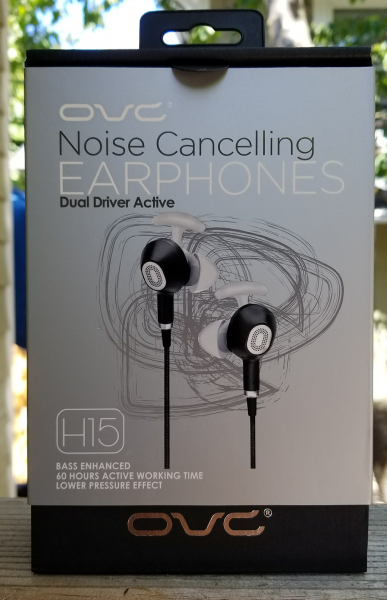
When you travel as much as I do, the ability to shut off the outside world and immerse yourself in music or a movie is not just important, it is a necessity.  And when hear about a small, lightweight product which claims up to 60 hours of battery life, active noise cancelling, and all in an affordable package, you have to investigate.  Today I am doing just that with the OVC Noise Cancelling Earphones.  How well does the real-world performance stack up against the claims?  Read on to find out…

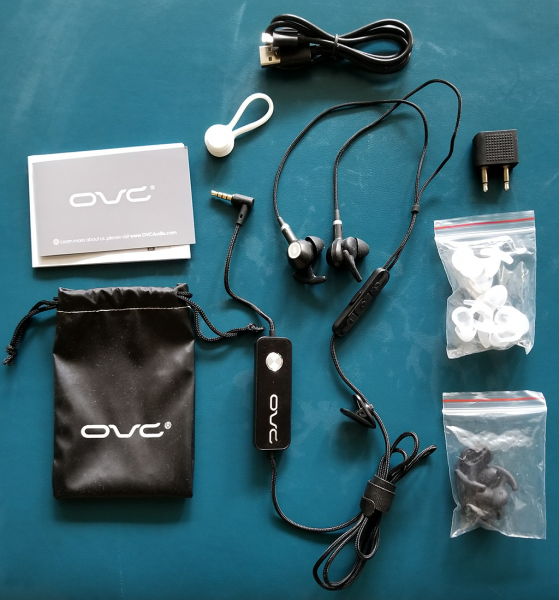
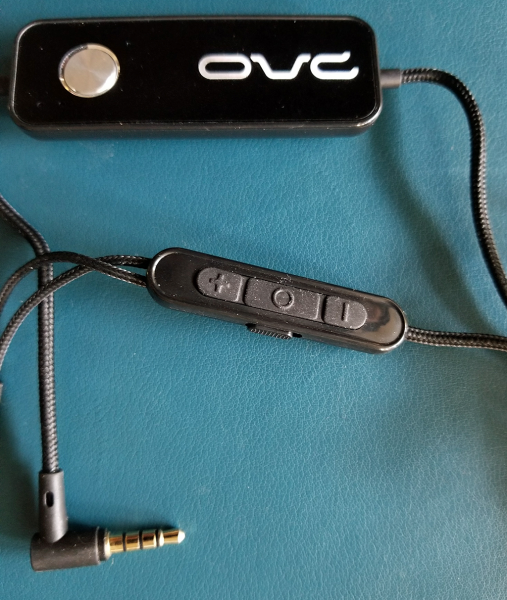
OVC packs a lot of stuff in the box.  You get a small carry pouch, two sets of earbuds (one white, one black with small, medium and large sizes in each color), a charging cable (micro USB but no wall plug so plan on using your computer to charge these), an increasingly unnecessary dual airplane plug, and a cord manager.  Pretty complete setup for such a low price point.  You can see what you get in the picture below.

So how do they stack up in the real world?  I started this journey just listening to music on my phone while at my home office desk.  The H15’s sport a bass boost mode that is activated via a switch on the volume/microphone inline control.  When turned off, the H15’s sound like the cheapest earbuds you can buy – tinny, muddied and the volume (even at maximum) feels low.  Turn on the bass boost, however, and the sound is great.  You get the bass (not Beats-level, chest-thumping style but enough to let you feel the music) plus the music clears up – you can hear the highs, vocals are clear and crisp, and the volume is much louder.

I also used the H15’s for business meetings via Skype and my computer, and once or twice to make phone calls.  The microphone works well – in both Skype and the phone others could hear me clearly and I could hear them – but, again, only with the bass boost activated.  Without it, while callers could hear me I could hardly hear or understand them.  Pretty clear that the only way you want to use these is with the bass boost on at all times, which does reduce the battery life.  More on that in a minute.

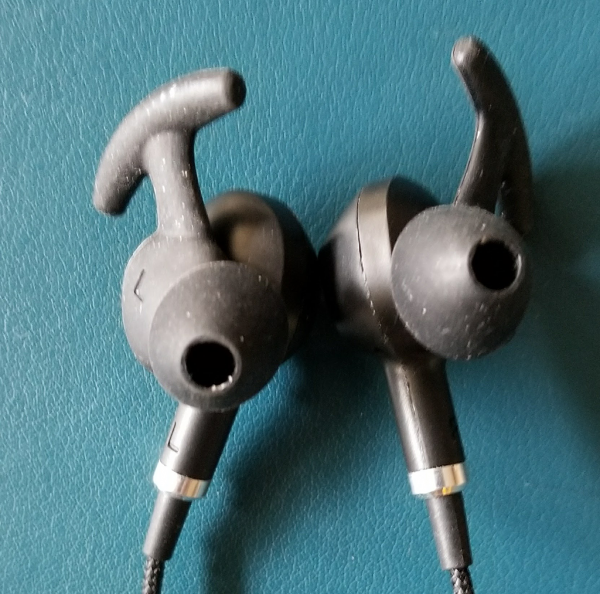
The H15’s also have active noise cancelling.  Pretty unusual to find this in a sub-$50 earbud.  On the outward facing side of each ear bud, you can see a series of small holes on an O shape – these are the microphones used to generate the anti-sound waves that active noise cancelling produces.  The feature is activated via a button on a control close to the end of the cable that plugs into your device.  Press to turn it on or off.  Noise cancelling seems to work OK, but I have a specific problem that prevents me from getting the full benefit.  Each size of the rubber earbuds comes with a “stabilizer” that you can see in the picture below.  I have unusually large ear holes (hmmm…) but small ears.  The stabilizers push the earbud slightly out of my ear canal and breaks the seal.  If I hold the earbuds in place, the intact seal gives me the full effect of both the bass boost and the noise cancelling.  I cut off the stabilizer on the large size black buds and problem solved, although I feel I am not alone in this problem and OVC should include standard earbuds in the box.

With the stabilizers out of the way, I could begin the real test of the noise cancelling feature – 4 cross-country airline flights in 8 days.  Yes, I am a glutton for punishment.  That said, the noise cancelling feature is a partial success.  With a good seal in my ears and the feature activated I could drown out the engine noise from the plane.  Weirdly, though, I could still hear snippets of conversation around me – not a constant thing, mind you, but the occasional word or phrase would come through reasonably clearly, most likely the result of the noise cancelling feature choosing to continue the suppression of the engine noise over a higher-pitched sound like human conversation.  On phone calls and in Skype while in office surroundings, the noise cancelling feature works as advertised.

One thing missing, however, is sidetone.  This is the ability to monitor your speech while listening to an active conversation.  The H15’s seemingly don’t support this, so if you use the noise cancelling while on a phone call your voice sounds like it is coming from two rooms away.  Getting this to work properly is not an easy task, and even headphones like the Logitech H800 – which are made specifically for Skype-type communications – can’t get this to work.  So just be aware that if your use case is primarily communications, these may not be the earphones you want.

Finally the quirks.  There is the standard inline volume and call accept/end control at the place where the earphones split into the separate channels.  The bass boost switch is on the side of this control.  If you look at the picture, though, you will see the noise cancelling box (and, I assume, the larger battery this headphone supports).  The plug for your device is about 4 inches away from this control.  That means if you put this in your pocket along with your phone and are involved in pretty much any sort of activity you are constantly going to press the on-off button for noise cancelling.  Plus, given where my headphone jack on both my laptop and tablet lives this control just sort of dangles there – too close to the plug to lay on the table or desk.  Thankfully the control is not heavy or this could present problems.  A better design choice would be to have incorporated both the inline and noise cancelling controls into one and placed that higher up where the inline control lives.

Also bass boost and noise cancelling are not mutually compatible.  If noise cancelling is on, the bass boost switch does not appear to do anything.  You do get what I would consider 90% of the bass boost in noise cancelling mode, but the bass didn’t feel as deep as without noise cancelling, most likely because of the dampening sounds the earphones produce.

As far as battery life goes, I was never able to get to 60 hours active use no matter which configuration I used (noise cancelling on/off, bass boost on/off).  I was able, however, to get a very respectable 14 hours use with noise cancelling on.  That’s on par with my Bose QC-35’s so good job there.

For what they are – a sub-$50 active noise cancelling earphone – the OVC H15 delivers on most of the promises.  The places where it fails are either easily overcome or a personal choice.  These won’t replace my more expensive noise cancelling headphones, but if I were looking for earbuds for a child or were on a budget, these would be near the top of the consideration list.

Source: The sample for this review was provided by OVC.  Please visit their website for more info or Amazon to purchase.


Product Information

Price: $43.99
Manufacturer: OVC Audio
Retailer: Amazon
Pros:
  • Sounds great with bass boost and a good fit
  • Priced well with lots of extras
  • Fantastic battery life
Cons:
  • Hard to get a good fit
  • Odd control design choices
  • Not as responsive in noise cancelling as other earphones

Filed in categories: Reviews

Tagged:

OVC H15 Noise Cancelling Earphones review originally appeared on The Gadgeteer on September 26, 2017 at 9:00 am.

Note: If you are subscribed to this feed through FeedBurner, please switch to our native feed URL http://the-gadgeteer.com/feed/ in order to ensure continuous delivery.
weBoost eqo 4G cellphone signal booster review

A few months ago we finally ditched our analog phone line. Yes, I know that I’m way behind the curve, but I was required to keep a landline phone line due to my hardwired T1 broadband which I also disconnected. That means that we are now relying on our Verizon phones for contact with the outside world and although I don’t live that far from a Verizon cell tower, the signal isn’t that strong throughout my house. Especially in the basement where dropped calls are the norm. So I was happy to test the weBoost eqo cell phone signal booster when the opportunity presented itself.

What is it?

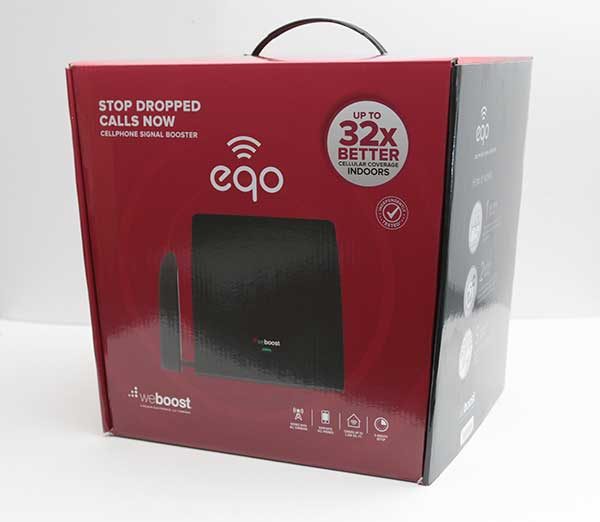
The weBoost eqo is a cell phone signal booster that is designed to be used in a home or office up to 1200sq ft and has the ability to boost cell signals for any US and Canadian carrier by as much as 32x.

What’s in the box?

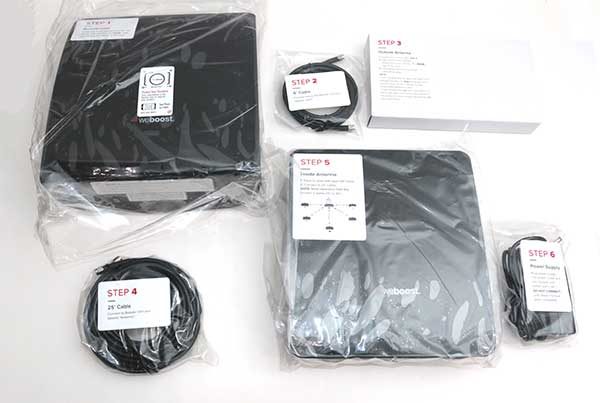
eqo Booster
eqo Inside Antenna
eqo Outside Antenna
25′ of Coax Cable
6′ of Coax Cable
Power Supply
User manual

Before we go any further, it’s important to understand that if you don’t receive any signal at all in your location, that the weBoost eqo will not boost the signal because there’s no signal to boost. So with that in mind, let’s continue.

The weBoost eqo is designed to be used indoors and does not require any type of hardware to be installed outdoors.

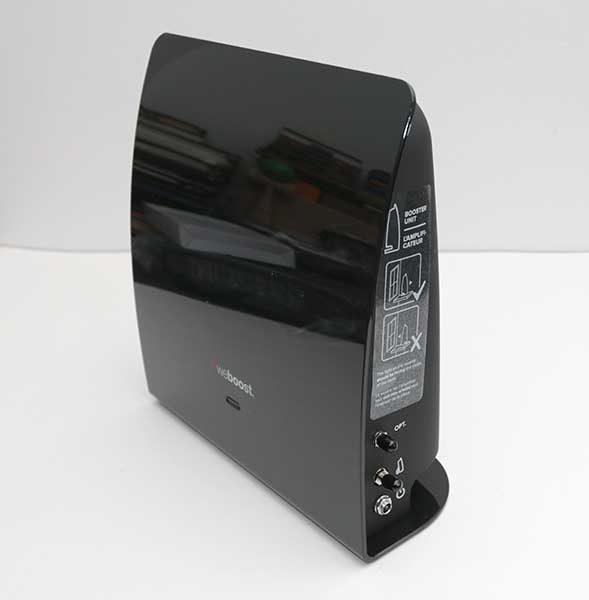
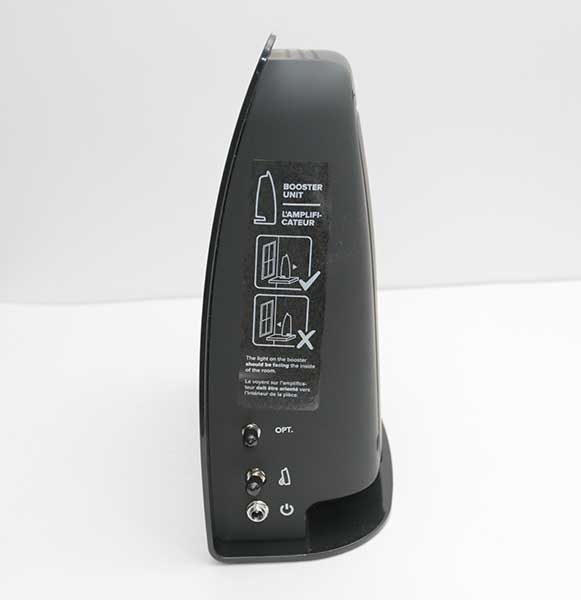
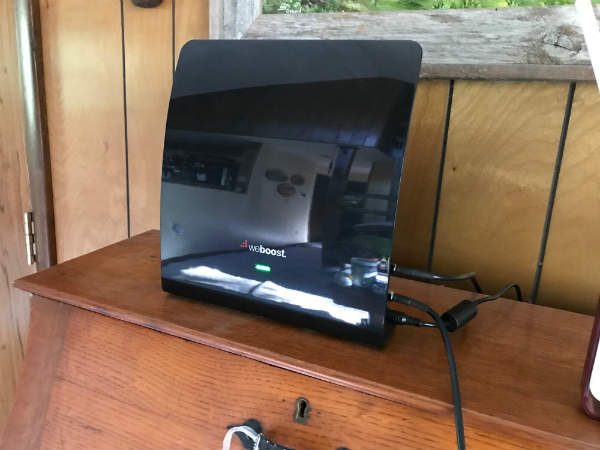
The setup includes three modules. There’s the Booster unit shown above, which needs to be placed on or near the window sill in your home where you receive the strongest cellular signal.

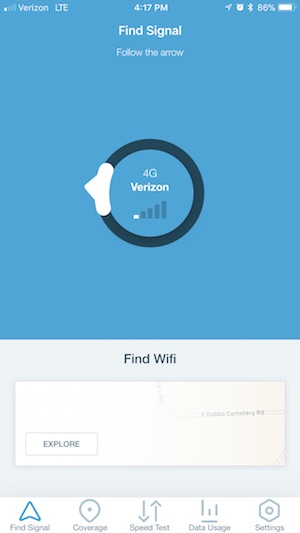
I used an app called OpenSignal which shows a compass that points to the direction where the cell signal is coming from.

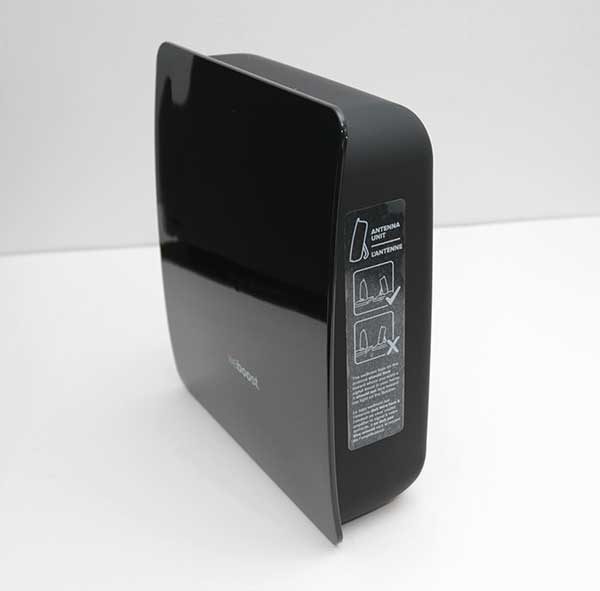
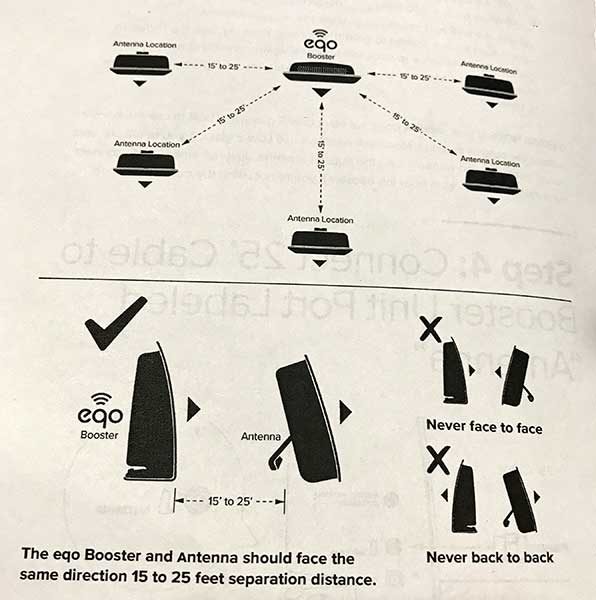
Each of the eqo modules has pictorial diagrams to help you with the setup.

The indoors booster unit has three connections on the right side. There’s one marked Optional, which is where the Outside Antenna connects and the connection below that is for the indoor antenna. At the bottom is where the AC adapter connects.

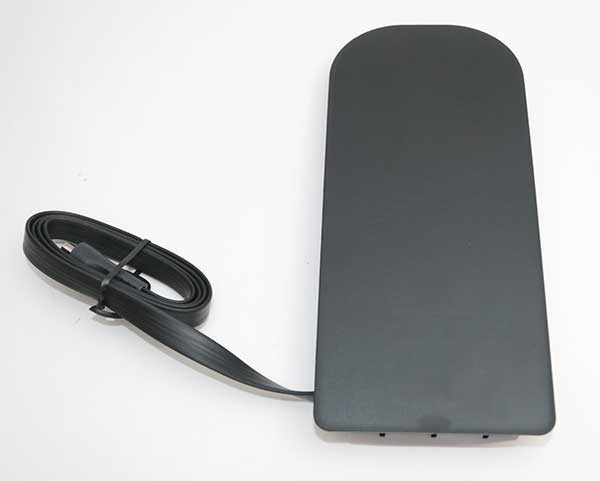
The Outside Antenna doesn’t really go outside. It goes between your window and the window screen.

The Outside Antenna has a short section of flat cable that can bend under the edge of the window so it can shut.

If you don’t have a window screen, you can use double stick tape to tape the antenna to the outside of the window and if you have a window that can’t open, you don’t have to use the Outside Antenna at all.

Once placed in the window, you connect the 6-foot coax cable to the Outside Antenna cable and then the other end connects to the Booster unit.

The last step is to place the Inside Antenna in an area in your home where the cell signal is weak.

The Inside Antenna needs to be oriented so that it’s pointing in the same direction as the Booster unit as shown above.

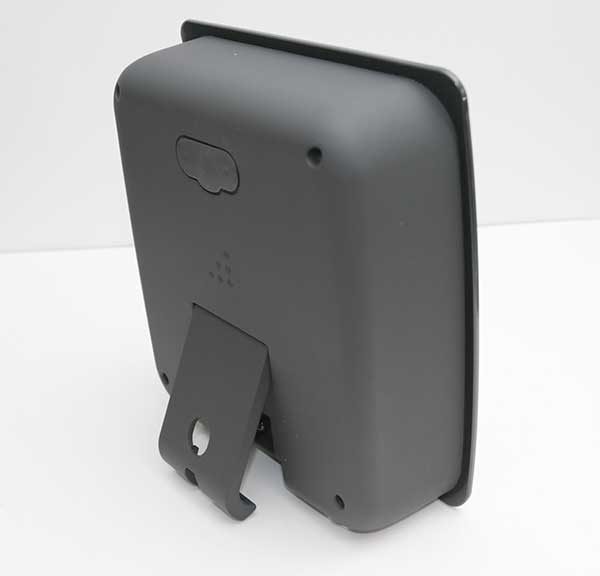
The Indoor Antenna has a popout stand so that it can sit on a shelf.

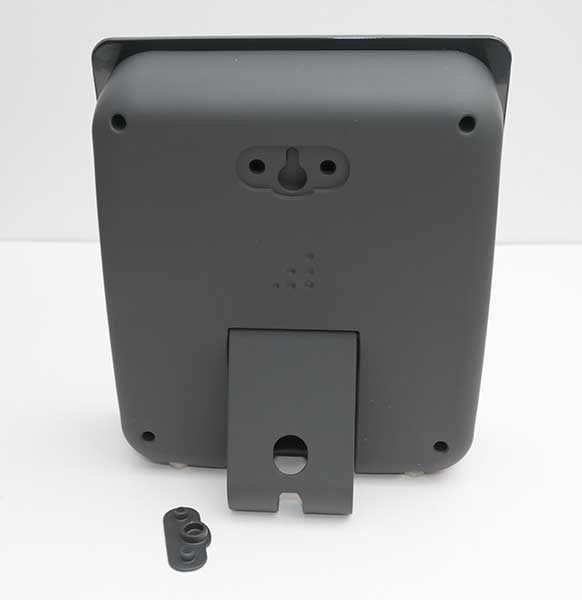
It also has a removable plug that covers slots that can be used if to mount it on a wall.

The 25-foot coax cable connects to the Indoor Antenna behind the popout stand. This is the only downside to setting up the weBoost, you have to route coax cable between each module. For my setup, I had the Booster unit upstairs and the indoor antenna downstairs. That means that I had to route the 25ft of coax from one floor to another.

After the three modules are placed, all that’s left to do before plugging in the AC adapter for the Booster unit is to check your phone’s current signal so you’ll be able to compare before and after signal strength readings.

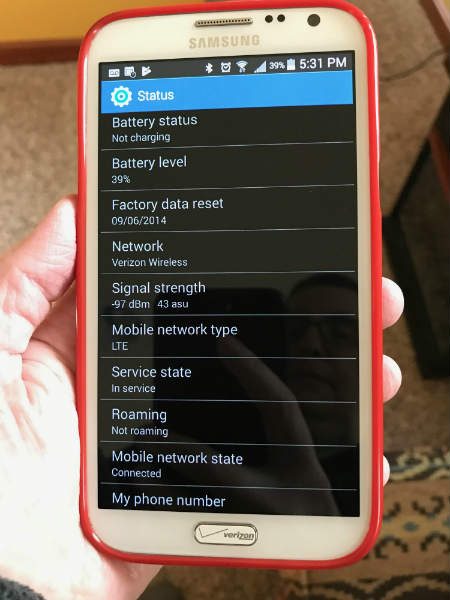
You can’t really go by how many bars that you see on your phone’s display. It’s better to see the dB signal strength reading. For iPhones, that used to be as easy as dialing *3001#12345#* , but the latest OS update to iOS 11 seems to have killed that feature. Luckily I was able to use Jeanne’s Samsung Galaxy Note 2 which runs Android. With Android you can check the dB signal strength by going to Settings > About Phone > Status or Network > Signal Strength or Network Type and Signal (it depends on the phone and what Android version it’s running).

Before turning on the weBoost eqo, I checked the signal in my basement with my iPhone 7 Plus. It consistently showed 1 bar and Jeanne’s Note 2 would show 113-117 dBm.

After the weBoost eqo was powered on, the iPhone would show 2-3 bars and the Note 2 would show 96-105 dBm. A very nice improvement. Of course, those readings didn’t remain rock steady, but they have been better than without the weBoost eqo powered on.

LEDs on the Booster unit provide a coverage status. If the light is Green, that means you should have good coverage. Orange means you’re receiving a low signal boost and a Red light means no signal boost. The manual includes troubleshooting tips for orange and red light issues.

Final thoughts

There isn’t much more to say about the weBoost eqo other than it does what it is designed to do, boost an existing cellular signal.

As long as you have some signal in your area, this product will do its job. And as long as you don’t mind having to set up 3 different modules connected by coax cable, it’s a good solution for boosting signal strength.

During my testing of the weBoost eqo 4G, we had no dropped calls in our basement, which is a testament that this product works as advertised.

Source: The sample for this review was provided by the RepeaterStore. Please visit their site for more info.


Product Information

Price: $379.99
Manufacturer: weBoost
Retailer: RepeaterStore
Pros:
  • Easy to setup
  • Does not require an outdoor installation
  • Can improve existing signal by as much as 32x
Cons:
  • Have to route coax cables

Filed in categories: Reviews

Tagged:

weBoost eqo 4G cellphone signal booster review originally appeared on The Gadgeteer on September 25, 2017 at 10:22 am.

Note: If you are subscribed to this feed through FeedBurner, please switch to our native feed URL http://the-gadgeteer.com/feed/ in order to ensure continuous delivery.