DockCase MacBook sleeve with built in USB C hub review

I love my 12″ MacBook that I bought as a refurb from Amazon a couple years ago. It’s the perfect size and the perfect weight for everyday use and especially for travel. I actually downsized from a 13″ MacBook Pro just to get a smaller and lighter machine. But downsizing also meant that I would have to sacrifice performance and expansion capabilities.

I honestly haven’t had any issues with the smaller MacBook’s performance, but expansion, on the other hand, has been a challenge at times due to the machine only having one port which is used for both charging AND peripherals.  A USB hub is pretty much a necessity with this computer if you ever want to connect something to it like an external monitor, wired keyboard, wired mouse, flash card reader, etc. USB Type-C expansion hubs are a dime a dozen, but have you ever seen a sleeve style case with a built-in hub? You will now because this is a review of the DockCase for the 12″ MacBook.

What is it?

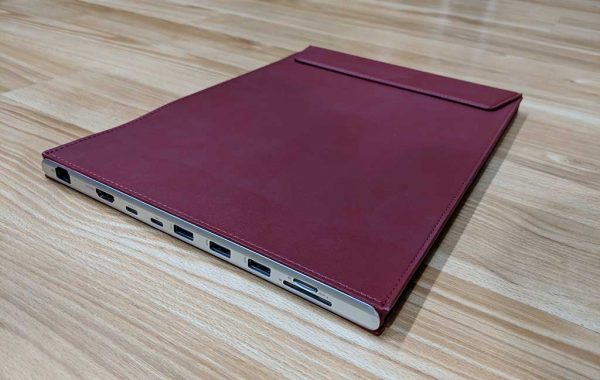
The DockCase is a slim microfiber leather and aluminum sleeve style case for 12, 13, and 15 inch Apple MacBooks that has built-in USB, USB Type-C, Ethernet, HDMI, microSD and SD card readers.

What’s in the box?

  • DockCase
  • USB Type-C to Type-C cable
  • Quick start guide

Design and features

If you didn’t look at the end of the case, you might not even realize that it’s more than a slipcover for your MacBook. Depending on the size of your MacBook, the DockCase comes in several colors like the red version that was sent to me.

On the end of the case, you’ll find the following ports:

1 LAN Ethernet(1000M Gigabit)
1 HDMI Video Output (4K@30Hz,1080P@60Hz)
1 USB C Power Delivery Charging (Up to 100W)
1 USB C 3.1 Data (Up to 5 Gbps)
3 USB 3.0 Data (Up to 5 Gbps)
Multi-in-1 Card Reader (SD-XC, SD, MMC, RS-MMC, SD-HC, Micro-SD)

A third Type-C port is on the side of the DockCase. This port is used to connect the DockCase hub to your MacBook using the included Type-C to Type-C cable.

As a case, the DockCase is just a basic sleeve that’s made of microfiber leather which is a synthetic (fake) leather with the look and feel (but not the smell) of real leather.

The interior of the DockCase has one main pocket to hold the MacBook, and a narrow pocket on the side that holds the included USB Type C to Type C cable.

The short cable is easily removed and stowed in the DockCase when it’s not being used.

My 12-inch MacBook it nicely in the 12-inch DockCase along with the cable.

Using the DockCase with my 12-inch MacBook
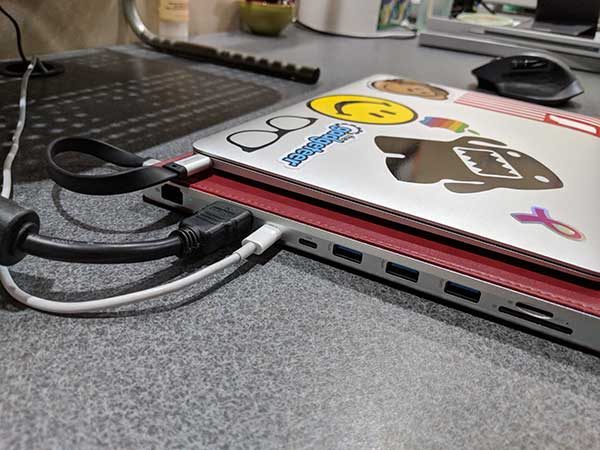
To use the DockCase, you connect one end of the included USB C cable into the USB C port on the MacBook and the other end of the cable goes in the USB C port on the side of the DockCase. To keep your MacBook charged you will need to connect your existing charger cable into the USB PD port on the DockCase which is located next to the HDMI port. You can see how the cables are connected by checking the image above.

I do wish that the included Type C cable was a round cable instead of a flat cable, which looks awkward routed from the MacBook to the back of the DockCase.

I tested the DockCase with my 12-inch MacBook connected to 4-year-old 29-inch ultra wide LG LED monitor. The LG monitor is not 4K, but the DockCase is able to handle 4K@30Hz or in my case, 1080P@60Hz. I couldn’t tell any difference using the DockCase’s HDMI vs. using the LandingZone docking station’s HDMI, which is what I’ve been using for the last several months.
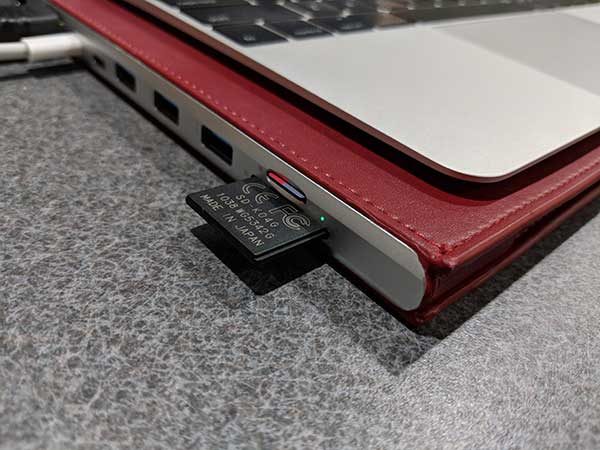
The documentation that comes with the DockCase advises that you NOT use the USB ports to charge your phone or other devices. They are supposed to be used for data transfers only. Even so, I had to test them to see if they would actually charge my phone, a Pixel 2 XL. The 2nd Type C port next to the Type C PD port would not charge my phone at all, but the other three USB ports did seem to be charging the phone.

I tested the DockCase’s card slots which worked fine. I was able to read each one individually and transfer files between two cards. I was also able to copy files to and from USB flash drives. So, the hub does work as intended. But there is one problem and that’s heat.

The DockCase hub gets noticeably hot after several minutes of use (especially when you’re connected to an external monitor using the HDMI port). I used an IR thermometer and recorded readings of 100F to as hot as 120F. These temps weren’t hot enough to burn my skin, but the heat did make me nervous that it could become a fire hazard at some point and made me leery of leaving my MacBook connected to it while unattended. That said, the heat dissipates when the MacBook is not being used.

What I like

  • It’s a case with a built-in hub
  • Nice for the newest MacBooks that only have one USB Type-C port like my 12″ MacBook

What needs to be improved

  • The hub gets too hot
  • Not supposed to use it to charge phones or other devices
  • No room for other accessories like a charger

Final thoughts

Having a case for newer MacBooks that combines everyday protection with a USB hub is unique and useful while remaining relatively slim and sleek. If they can solve the heat issue, I think they have a winner on their hands, but as it is, I’m worried about recommending something that could be a fire hazard.

Price: $119.00 – $149.00 depending on size. $119 for the 12″ version reviewed here.
Where to buy: DockCase and Amazon
Source: The sample for this review was provided by DockCase.

Filed in categories: Reviews

Tagged: , ,

DockCase MacBook sleeve with built in USB C hub review originally appeared on The Gadgeteer on March 6, 2018 at 1:00 pm.

Note: If you are subscribed to this feed through FeedBurner, please switch to our native feed URL http://the-gadgeteer.com/feed/ in order to ensure continuous delivery.


Meccano Erector M.A.X. Robotic Interactive Toy with A.I. review

I have two young sons, 7 and 5, who are obsessed with building.  Legos, old sets of Lincoln Logs, boxes, whatever.  They are constantly building and creating things.  Recently my 7 year old started getting into robots so when I saw the Meccano M.A.X. robot erector set I knew it would be a hit.  I was correct.

What is it?

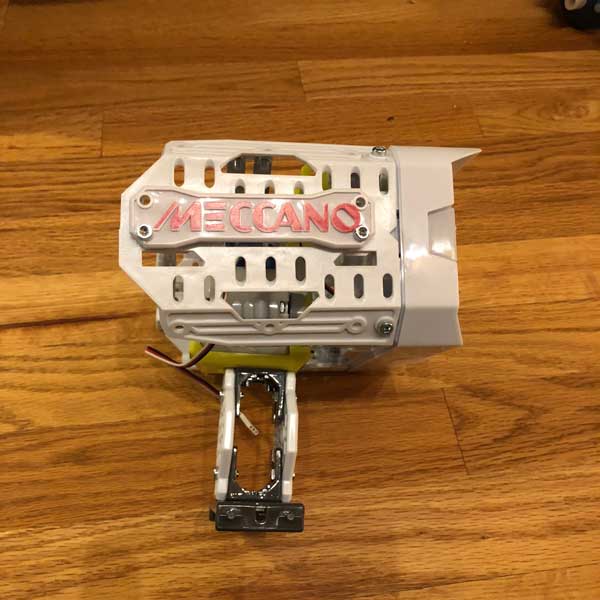
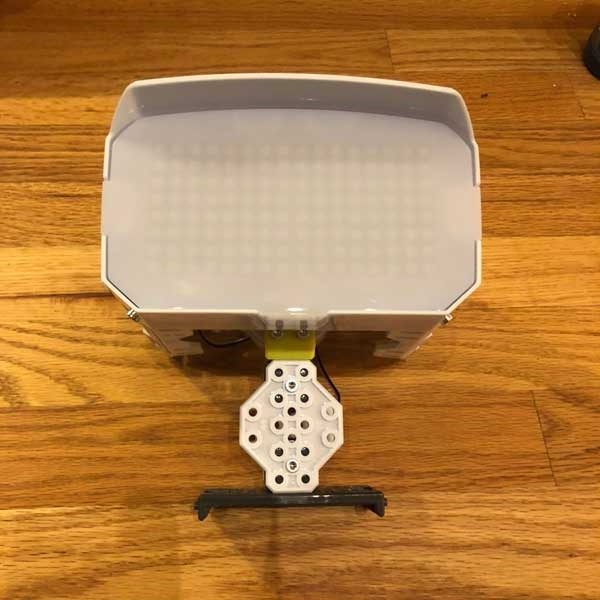
Well, the product name and title of this review pretty much says it all.  MAX is an artificial intelligence robot erector set.  There is a 66 step instruction guide to assemble MAX and there are a lot of parts, motors, bolts, nuts, etc. everything you would expect in an erector set.  What makes MAX different is that once assembled, it is a fully interactive toy for your kids.  Or for you if you end up not wanting to share it with the kids, or for those of you who just love building things and robots, no judgment here, this thing is pretty cool!

Hardware specs

  • 12″ tall when assembled
  • 332 parts
  • 2 hand tools
  • 1 AC/DC wall mount charger (10.4W)
  • 1 rechargeable Ni-MH 1800mAh battery
  • Recommended for kids 10+ (like I said mine are 7 and 5 so they needed my help but it was a great project for us)

What’s in the box?

332 pieces, 2 hand tools (all you need to assemble), instructions, stickers for decorating MAX and a wall charge

Design and features

The build process is like most any other erector set or similar project.  The pieces are dense plastic so I don’t worry about it breaking after a week of play like other products.  The instructions are actually very well thought out and easy to follow, which is a great thing when you are looking at a pile of 332 pieces!


Once assembled you have to download MAX’s brain software onto the brain module.  Then MAX comes to life.  Once your child (or you) brings MAX to life he starts asking you questions to learn about you.  This process takes about 10 minutes.  After that, MAX begins to learn.  It has commands that are in the instruction book that allow you to interact with him, some of which are unlocked after a period of time of interacting with it.  It has built-in infrared sensors to help it avoid obstacles when it is moving around.  You can ask MAX questions, ask it to deliver something using its gripping hands, ask it to tell you something interesting and a number of other things that my kids have just loved.

MAX is a great project to challenge young minds interested in S.T.E.M subjects and a great introduction to engineering and robotics projects.

What I like

  • Great project to work on with my kids
  • A toy that learns as you play with it
  • The sense of accomplishment my children (and I) got when MAX was built
  • Very reasonable price (on Amazon for $119.99 with a MSRP of $149.99)

What needs to be improved

I am not sure why you have to download the brain software after receiving it rather than it coming preloaded with it.  That was a little annoying but not an issue, just delayed play time a little after building it while I installed software.  Maybe Meccano is making changes to the A.I. software so when you download it you are getting the latest version, but I don’t know.

Other than that, I don’t have any complaints.  We really enjoyed the build process and the fun playing with MAX and watching it learn.

Final thoughts

As with any erector set, building it is part of if not most of the fun.  In the case of MAX, building it was a blast to work with my kids on but seeing MAX learn and its abilities grow has been really fun in the time we have had with it.  I work a lot so I am always looking for fun projects to work on with my kids so we can spend some quality time together.  When that quality time also engages their minds and imaginations and nurtures their interest in building, robotics, and science, well that’s a home run for me.

I definitely can recommend this product for kids of any age who this product fits their interest but would definitely recommend sticking with the 10+ age recommendation if they will be working on it alone.  With adult supervision, it can be fun for kids of all ages but you may have to take a lot of breaks because 332 pieces is a lot for one sitting with a 7 and 5 year old!

Price: $119.99
Where to buy: Amazon
Source: The sample of this product was provided by Meccano.

Filed in categories: Reviews

Tagged: ,

Meccano Erector M.A.X. Robotic Interactive Toy with A.I. review originally appeared on The Gadgeteer on March 6, 2018 at 10:00 am.

Note: If you are subscribed to this feed through FeedBurner, please switch to our native feed URL http://the-gadgeteer.com/feed/ in order to ensure continuous delivery.

Think Tank Lily Deanne Tutto premium-quality camera bag review

Over the past 30 years I have probably purchased and resold 15 different types of camera bags looking for that perfect bag.  I have looked at backpacks, over the shoulder bags and roller bags and have come to a conclusion: one bag will not ‘cut the mustard’ when it comes to my camera bag needs.  I have a great Think Tank roller bag that I use when I must carry 2 pro camera bodies, several lenses, flashes and a laptop to action shoot jobs.  However, I still needed a camera bag that I could use for fun day trips or even vacations where I was not taking so much stuff and did not want to look conspicuous.  I finally found what I think is my almost perfect bag in the Lily Deanne.  Let’s take a closer look.

What is it?

The Lily Deanne is a camera bag designed by women for professional photographer women.  Honestly the looks of this bag really allow a man or a woman to use this bag.  Think Tank wanted to create a bag that did not look like a camera bag and would look professional enough to carry into events like weddings, meetings, corporate events or even on the street.  The bag comes in three different sizes.  The Lucido which will hold a single standard DSLR with 1-3 lenses and an 8in table.  The second bag is called the Mezzo and it will carry a single standard DSLR, a mid range zoom, 2-3 additional lenses and a 10in tablet or 11in laptop.  Finally, the bag I got the Tutto will carry a gripped DSLR, a mid range zoom, 2-5 additional lenses, 2 flashes and up to a 15in laptop.

Hardware Specs

The bag is made of full grain Dakota leather.  The black parts of the bag are 420 high-density nylon with a durable water-repellent coating.  The strap is made of nylon seat belt webbing that is adjustable in length and comes with a heavy duty nicely padded strap that has yet to cut into my shoulder.  All the zippers are YKK RC Fuse abrasion-resistant zippers.  The bag weighs 3.3 pounds.  Think Tank has some of the best warranties in the business and they will guarantee and warrant their products against any defects in material or workmanship for as long as you own the product.  I have had other professional photographer friends get new wheels for roller bags or sometimes an entirely new bag when a bag that is several years old and heavily used has come up with an issue.

What’s in the box?

The bag came in a gorgeous box and was wrapped in some beautiful tissue paper.  The packaging of the bag could not have impressed me more.  In the box came the actual bag, some closed cell foam dividers and a nice seam-sealed rain cover that comes in its own pouch.

Design and Features

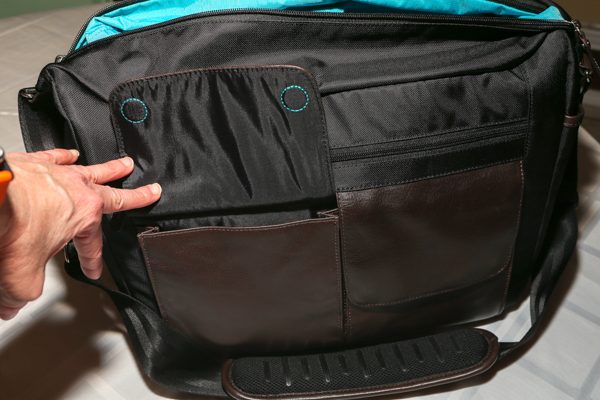
Looking at the intro picture you can see the bag is covered with a main flap.  That flap is attached to the bag via magnets.  Velcro is nowhere to be seen on this bag and it really makes my day.  I can’t tell you how many times I have been at an event and wish to get into my bag and have tried to quietly open a Velcro attachment.  When you flip the flap back you can see there is a big main zippered compartment up top, a side zippered area and two smaller flaps.

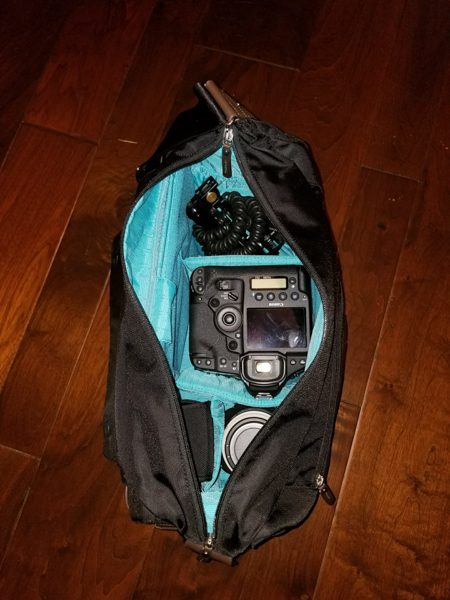
Once you unzip the top zipper, you are presented with the main storage compartment.  The entire inside of the bag is lined in a brilliant turquois blue.  That color really makes it easy to see what is inside the bag.  A lot of bags are lined with black material and in dim or dark environments it is nearly impossible to find what you need in the bag.   At the top of the bag you see a flap with a picture of a computer on it.  Simply flip the flap back and up to a 15 inch laptop can be stored in this area.  The divider of the computer area and the camera area is nicely padded.  The back part of the bag is not as well-padded but very sturdy feeling due to the full grain Dakota leather.  The bottom of the laptop compartment comes down to a V shape and is padded.

In the main camera compartment area, I currently have set up to hold a flash,  a bracket, a professional DSLR with a built in grip, and attached to it is a 24-70 lens, rain proof bag, and an additional 70-200 lens on the side.  All the dividers are fully adjustable.  Simply pull them out and arrange them as you wish.

This front zippered area has a red loop on the upper left where you could clip key rings or the popular Think Tank compact flash card holder.  There is a small sleeve that you can see that will hold my Note 8 if I wished.  The rest of the area is just open to store whatever items you wish.  It is not super expandable and I would limit items in that area to fairly flat items.

The two front flaps are also closed with magnets that you can see in the stitched blue circles as the top of each flap.  Inside the left pouch which is also lined with the turquoise material you will find a similarly sized slot that I use to hold filters and then in front of that slot I slide my lens caps.   The right flap has slots to hold pens and pencils and a couple of other small slots to hold various smaller items.  The sides of the bag have a single snap that can be undone to hold a standard water bottle or possibly a hard sunglass case.   You can also see the underside of the shoulder pad where it has rubber grips that keep it in place on your shoulder.

Finally, the back of the bag has a luggage carrier slot where you can slide the handle of a roller bag completely through and it will allow you to place this bag securely on top of a roller bag.  You can see the definition of this slot outlined in the turquois stitching.  There is also one additional storage slot behind that roller bag slot to put additional flat type items.

What I like

I love the looks of this bag.  I have received many compliments on it.  I really like how I can keep the bag on my shoulder and reach in and grab the camera equipment I need quickly and easily.  That was what I hated about backpack bags.  I always had to put them down to get what I need.  The bag stands easily on its own.  It certainly holds all I need and more.  I also love that no one realizes I am carrying around a lot of expensive camera equipment.  Finally, I love the warranty and quality of the bag.  I just have not found another company that beats the quality of Think Tank.

What needs to be improved

It does hold so much stuff that yes, I can overpack and the bag can get very heavy very quick.  I wish they had figured out a way to attach a grab handle to the top of the bag.  That would have been a nice feature when my shoulders were getting tired of holding all the weight.

Final thoughts

In conclusion, I use this bag when I have a lighter photo shoot or when I need to be inconspicuous.  Once the camera is out of the bag and I am taking pictures, I really don’t notice the weight of the bag.  I can easily reach in and swap out lenses quickly.  I have used this for a couple of wedding engagement shoots and the bag was perfect in the public environments where the client wanted their pictures taken.

Price:  $299.75
Where to buy: B&H Photo/Video
Source: The sample of this product was purchased with my own funds

Filed in categories: Reviews

Tagged:

Think Tank Lily Deanne Tutto premium-quality camera bag review originally appeared on The Gadgeteer on March 5, 2018 at 11:00 am.

Note: If you are subscribed to this feed through FeedBurner, please switch to our native feed URL http://the-gadgeteer.com/feed/ in order to ensure continuous delivery.

Rezzimax TUNER review

A few years ago I took a pretty bad fall while skiing and injured my neck and suffered a concussion, which has had lasting effects to this day.  I was interested in the Tuner from Rezzimax because it offers multiple applications for high frequency massage of your neck, shoulders, face or anywhere else you may need a little relief.

What is it?

The Rezzimax Tuner is a compact yet powerful personal massager that is aimed to assist people with migraines, neck pain, jaw pain (TMJ), sinus pain and other ailments.  In a few minutes of use the user can experience substantial relief if not total resolution of the pain they are experiencing.  The Tuner is portable, wireless and easily fits in your hand.  It utilizes adjustable high frequency vibrations to massage your problem area and bring relief in a short time.

Hardware Specs

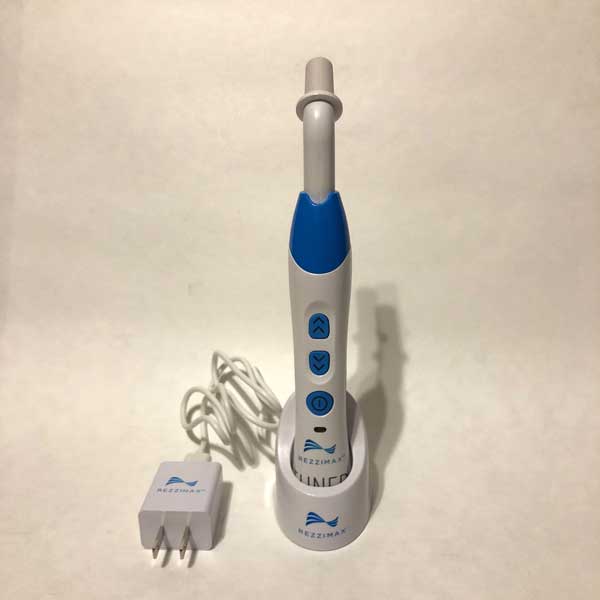
The Tuner weighs two pounds and is 10 x 6 x 2.5 inches (about the size of an electric toothbrush when the massaging head is not attached).  I couldn’t find any information about the battery but I have been able to get many sessions with this out of one charge so battery life isn’t a concern for me.

What’s in the box?

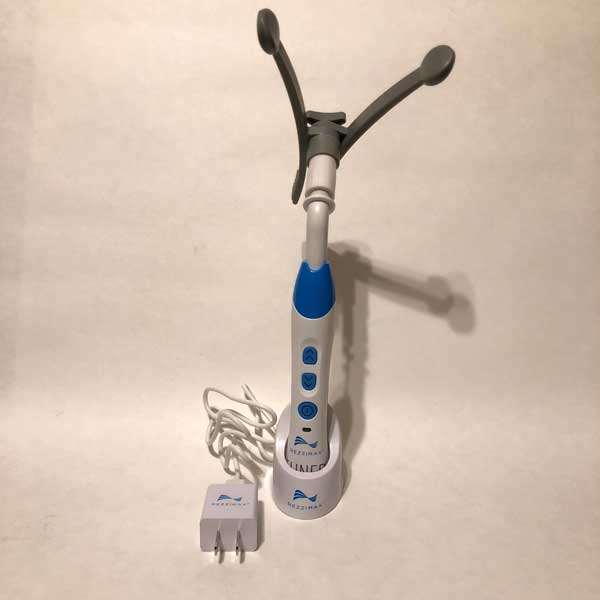
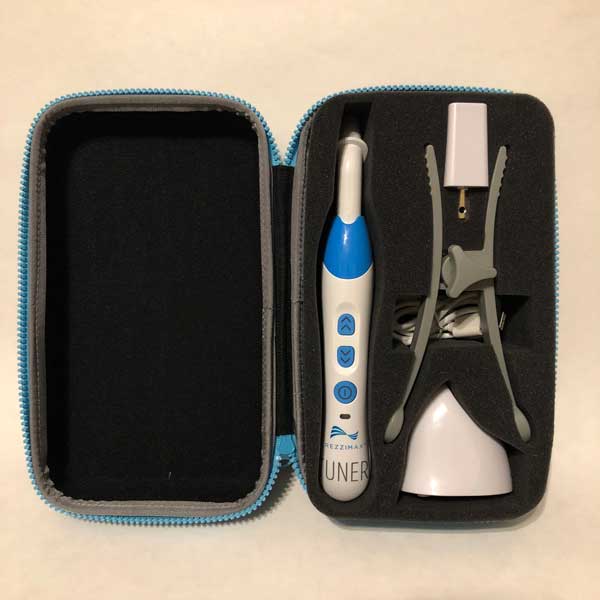
When you purchase a Tuner, you receive a hard sided carrying/travel case with a sturdy sipper closure.  Inside the case you will find the Tuner base, adjustable massaging head attachment, a charging base, USB/micro USB power cable and a wall adapter that is similar in size to an iPhone power cube.

Designs and features

The first thing I noticed about the Tuner compared to other massagers I have seen or used was the compact size.  With the sturdy, hard-sided carrying case I have been able to pack this in my briefcase or suitcase to go to the office or on a trip without taking up much room.  Once I began using it I instantly was aware of the resonance technology that they discuss on their website.  This massager vibrates at a much higher frequency than other products on the market.  At first I didn’t know if this would make a difference but after a few sessions with it I really noticed a difference in my neck pain, sinus pressure and overall stress level.  It has a way of humming you into a very relaxed state while your trouble area is worked on.

The battery life has not been an issue for me.  I have used it multiple times on a single charge, and while I cannot find information on the battery capacity or battery life, I am not concerned with running out of juice once charged.  The unit charges wirelessly in the base so all you have to do is set the Tuner base in the charging cradle and it begins the charging cycle automatically.  I love this feature as I’m sure anyone with anything that charges wirelessly does.

The dark grey adjustable massaging head can open or close to fit most of your needs.  I say “most” because I have a slightly larger than average head and the arms do not open wide enough for me to massage moth of my temples at once, which is a big drawback for me as that was a feature I was really looking forward to.  I do use the adjustable head to massage my neck, face and head and it honestly feels AMAZING!   In one of their videos they even show putting the massager in your mouth in between your cheeks and upper gums to relieve TMJ pain.  I have yet to try this as I don’t have TMJ issues but I can imaging it would provide relief just like it has for my headaches, neck pain and sinus pressure.  You can also use the tuner without the grey attachment for a more precise and intense massage.  I usually go without the attachment for my neck where I can really get into those tight muscles that cause my headaches and where I hold my stress.

What I like

  • It works!
  • 7 levels of vibration to dial in the treatment you like best
  • Results in minutes
  • Compact size/carrying case
  • Wireless charging
  • Long battery life
  • Natural alternative to pain management through medication
  • Attractive and high quality design

What needs to be improved

  • Wider messaging head to fit more people to massage temples
  • At $249, it comes in at the higher end of personal massagers.

Final thoughts

Since receiving the Tuner, I have been hooked.  I have used it when I am in pain or had sinus pressure but have also used it just to relax at the end of the day.  I keep it in my briefcase so I can use it at the office or at home and find myself reaching for it instead of the bottle of Advil.  If you suffer from any of the issues I have mentioned here or that are listed on the website, or just carry a lot of stress and get relief from massage, I can confidently recommend this product.  I think the price tag of $249 is a little high but can’t argue much since I have seen results and it has relieved my pain.  From that perspective, I think it is worth it.

Price: $249
Where to buyRezzimax
Source: The sample of this product was provided by Rezzimax.

Filed in categories: Reviews

Tagged:

Rezzimax TUNER review originally appeared on The Gadgeteer on March 4, 2018 at 11:00 am.

Note: If you are subscribed to this feed through FeedBurner, please switch to our native feed URL http://the-gadgeteer.com/feed/ in order to ensure continuous delivery.
Constantly monitor temperature and humidity with the SensorPush wireless sensor

When we got a new fridge last year, I wanted to monitor its temperature for a while to be sure it was safe for storing my insulin.  My fridge had a temperature display, but it would only show me a snapshot of the conditions in there, so I could never be sure that the insulin had never been in freezing conditions.  That would be the same weakness for every other thermometer I had on hand.  After some research, I found the SensorPush.  It’s a little fob-like device about the same size as those tracking fobs you can add to your keyring.

The SensorPush connects via Bluetooth to an app running on your phone or tablet.  Inside, it has a Swiss-made sensing component that provides reliable, accurate measurements.  It can push readings via Bluetooth 4.0 to your mobile device, and you can monitor hourly, daily, monthly, and yearly records of both temperature and humidity so long as you are within Bluetooth range.  You can also get alerts if the readings are outside your desired limits.  You can add an optional SensorPush G1 WiFi Gateway for data and alerts via the internet.

The SensorPush is $49.99; the optional G1 gateway is $99.95.   You can purchase them at Amazon.

Filed in categories: Reviews

Tagged:

Constantly monitor temperature and humidity with the SensorPush wireless sensor originally appeared on The Gadgeteer on March 4, 2018 at 9:00 am.

Note: If you are subscribed to this feed through FeedBurner, please switch to our native feed URL http://the-gadgeteer.com/feed/ in order to ensure continuous delivery.