WORX 20V GT Revolution Trimmer/Edger/Mini-Mower review

I’ve been a homeowner since 1989, but I have never used a weed eater to trim around trees or the edges of sidewalks. How can this be you ask? I’ve always had problems starting pull string style equipment because I have crummy shoulders and not enough upper body strength. So Jeanne has done the weed eating around our home. But she doesn’t like having to keep track of which gas can has the 2-cycle oil mixed in and sometimes she has trouble getting the weed eater started too. So, I was excited to try the WORX 20V GT Revolution Trimmer/Edger/Mini-Mower when it was offered because it runs on a battery which means no gas cans or special gas and oil mixtures are needed and no pull string to start it. I’ve always wondered how well battery powered outdoor tools work and now I know because I’ve been using this one for the past few weeks. Yes me! I’ve actually started weed eating and trimming for the first time in my life. Let’s check it out.

What is it?

The WORX 20V GT Revolution Trimmer/Edger/Mini-Mower is a 20-volt battery powered weed eater that can also be used as an edger and a mini mower because it has two removable wheels.

What’s in the box?

  • WORX 20V GT Revolution Trimmer/Edger/Mini-Mower
  • 3 spools of line
  • 2 20V batteries
  • Battery charger
  • Manual

Design and features

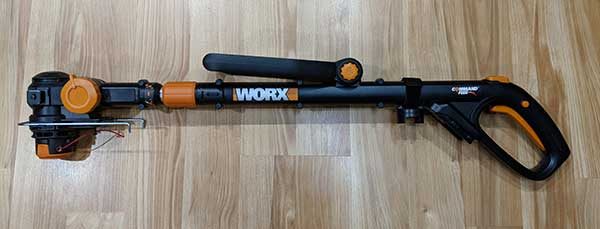
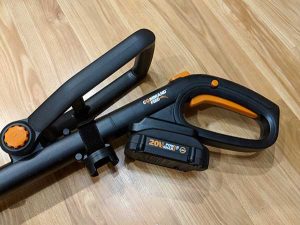
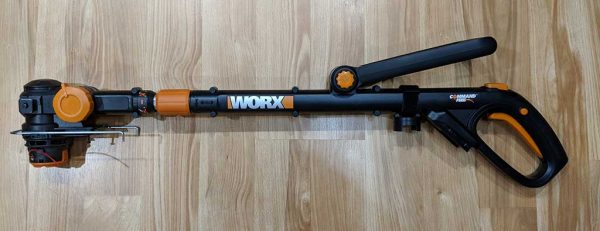
The WORX arrives about 95% assembled. It has a black plastic shaft that features a rear handle with a pistol style grip that has a power button that you have to hold down as you grip the handle to power on the trimmer. Once it’s running, you can let go of the power button, but you have to continue to grip the handle to keep it running. There’s also an adjustable auxiliary handle that folds down as shown above.

The auxiliary handle can pivot around 180 degrees so you can customize how you hold it.

To adjust the position, you have to press in on the orange locking knob on the side.
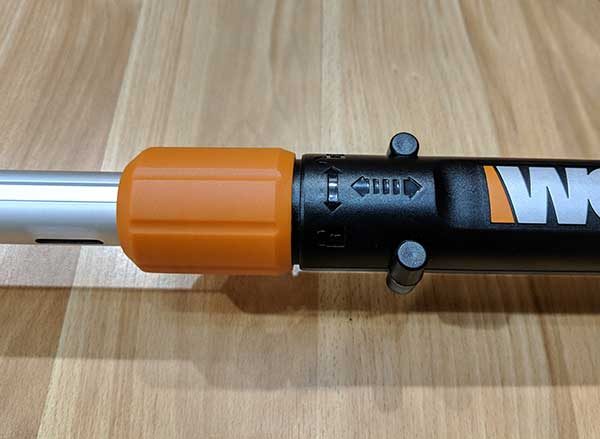
The trimmer has a telescoping shaft that lengthens by twisting the orange locking collar to extend the shaft.

Here we can see the WORX 20V GT Revolution Trimmer’s shaft is fully extended. Extending and retracting the shaft isn’t difficult, so it is easy to adjust the length for your height and posture and it makes the trimmer easier to store if you have a small garage or shed where you store your yard work gear.

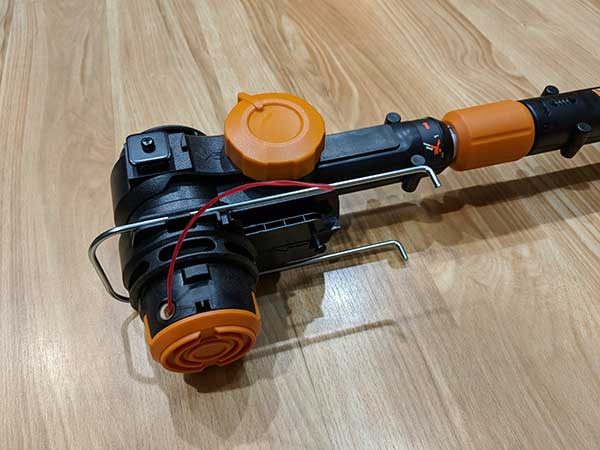
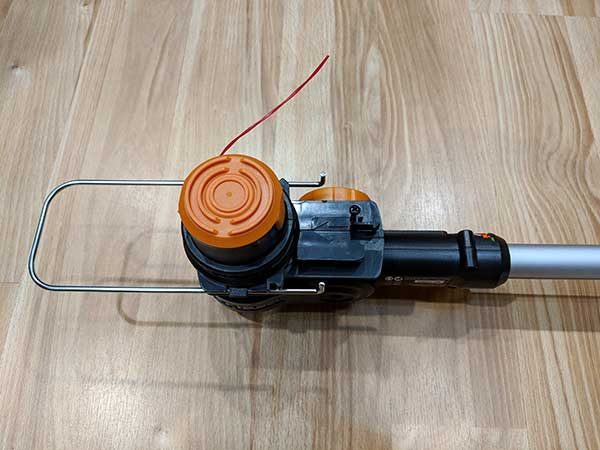
The business end of the WORX trimmer has several features. First of all, there’s the spool holder. That’s the circular orange part pointing down in the image above. You can see the red line sticking out of the feeder hole in the trimmer’s head.

The spool holder has an orange plastic cap that holds the spool in place. It makes switching out spools really easy compared to a few trimmers that I’ve worked with in the past. The WORX trimmer comes with 3 spools of DNA2 DoubleHelix cutting line (10ft of line in each spool) and when you buy the WORX trimmer you can sign up to receive free spools for life where you get 6 spools and only have to pay shipping costs ($8.62/package of 6).


There’s an extra on-b0ard spool holder on the trimmer’s handle so you won’t have to head back to the garage or shed if you run out of line in the middle of a trimming session.

Back to the trimmer head…


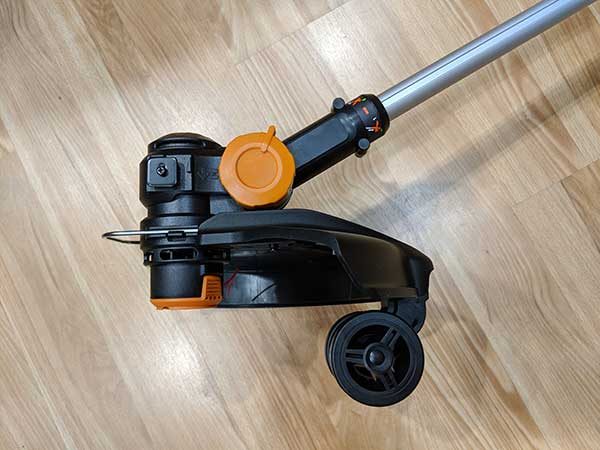
The angle of the trimmer head can rotate in 6 positions so that it can go from trimming to mowing, to edging. You’ll also notice the metal wires. That’s the flower guard.

You can extend or retract the flower guard to help prevent you from trimming foliage that you don’t want to trim.

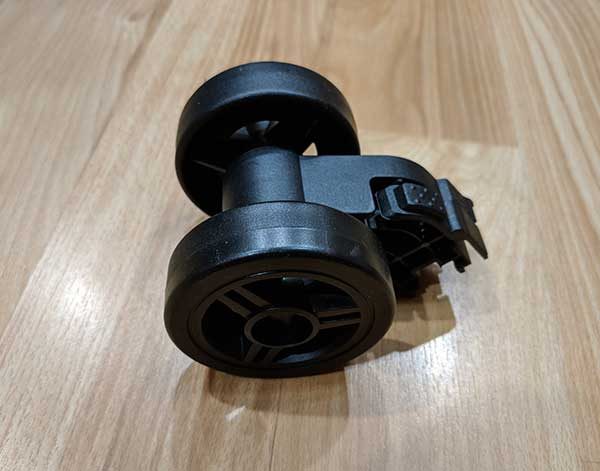
You might be trying to figure out how this weed eater can transform from a trimmer to an edger and a mower. The secret is the edger/trimmer support wheels that are included.

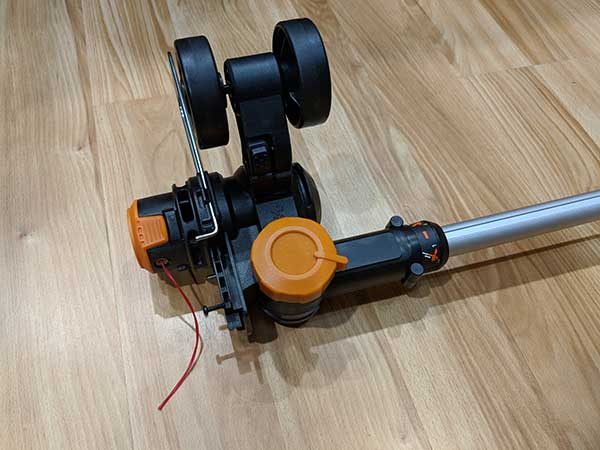
The wheels snap into the trimmer head. There are two places where the wheels can be attached. One location is the side of the trimmer head shown above. In this location, the WORX 20V GT Revolution Trimmer can be used as an edger.

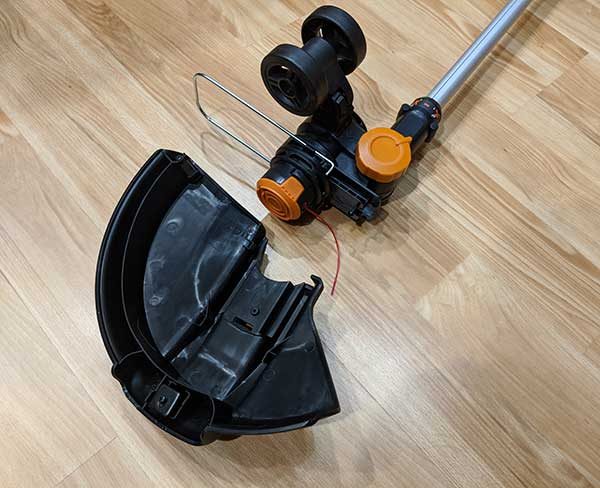
All you have to do is attach the safety guard…

Then you can roll the edger down the sidewalk.

Or, you can attach the wheels to the underside of the safety guard.

You can then roll the trimmer around like a tiny mower. I found the mower setup to feel a bit awkward. Granted, I am not a trimmer guru as we already established at the start of this review… But for me, using the WORX as a trimmer or edger felt the easiest for me.

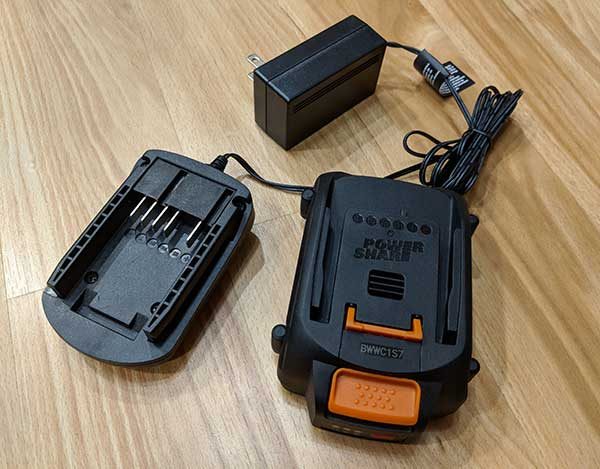
Before we can start trimming, we have to put gas in the trimmer… charge the batteries! The WORX trimmer comes with two 20V batteries and a charger. The charger can only accommodate one battery at a time and it takes 5hrs to charge each battery. It should go without saying that as soon as you get one battery charged that you should go ahead and charge the other one next. It is nice that the batteries seem to retain their charge for quite a while. I charged both batteries about 3 weeks ago and have only used one battery so far and the other one is still showing that it still has a full charge.

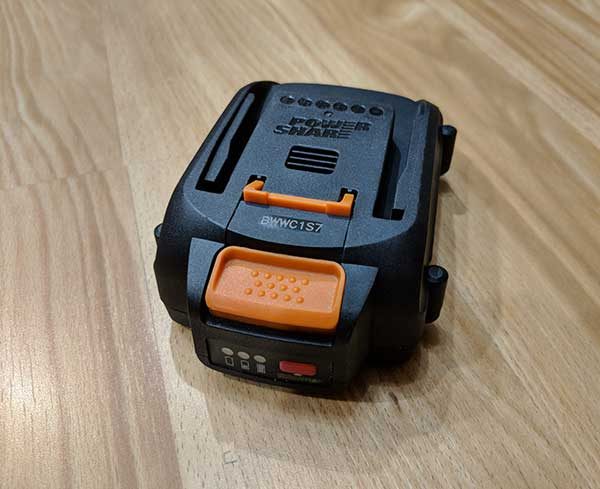
How do I know how much charge the battery has? There’s a tester built right into the end of the battery. You can see it in the image above. It’s that rectangular red button to the right of three dots along the bottom front edge of the battery. When you press the button, the lights will light up in green to show the capacity. The first light is low, the second light is 50%, and the third light means it the battery has a full charge.


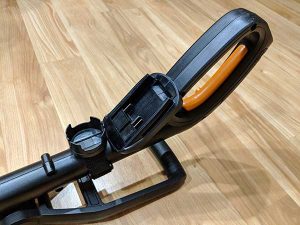
The battery snaps into the bottom of the handle and is easy to detach when you need to switch it out for a fresh one.

Let’s trim some grass!

It’s time to watch my very first weed eating video! Seriously, this video is the first time I’ve used a string trimmer, so be kind to me please. 🙂

https://youtu.be/Y8DdYCyvRCU

There were several things that surprised me about the WORX trimmer. First of all, I was surprised by how well the trimmer was able to cut thick grass. It even wacked through thicker stalks of mutant weeds and baby tree shoots that you get when you live in a rural wooded area like I do. I’ve also been surprised by how strong the line is because I’ve not needed to press the button on top of the handle to feed new line. And last but not least, I’ve been happy so far with battery life. Actually, I’m still on the first battery after weed eating several days for 15-20 minute sessions.


Cleanup is pretty easy too. I just sprayed everything with a hose and the WORX trimmer was pretty much good as new.

What I like

  • No messy gas and oil to mix
  • Simple to start
  • Easy to replace line spools
  • Converts from a trimmer to an edger and a mini-mower

What needs to be improved

  • Nothing

Final thoughts

As my first battery-powered trimmer, the WORX 20V GT Revolution Trimmer/Edger/Mini-Mower has impressed me with how easy it is to use, battery life, and versatility. Now that I’ve used a battery powered trimmer, I’d like to replace our gas blower with a battery powered blower and do they make battery powered rototillers too? 😉

Price: $99.99
Where to buy: WORX and Amazon
Source: The sample for this review was provided by WORX.

The post WORX 20V GT Revolution Trimmer/Edger/Mini-Mower review appeared first on The Gadgeteer.

Filed in categories: Reviews

Tagged: ,

WORX 20V GT Revolution Trimmer/Edger/Mini-Mower review originally appeared on The Gadgeteer on June 6, 2018 at 1:01 pm.

Note: If you are subscribed to this feed through FeedBurner, please switch to our native feed URL http://the-gadgeteer.com/feed/ in order to ensure continuous delivery.

Audioengine A5+ Wireless speaker review

I’m fortunate to have been able to review each version of Audioengine’s A5 speaker series. The original was (and still is) a powerhouse of a speaker that sounds much better than its cost. Heck, all of Audioengine’s speakers fall into that category. Later, their A5+ speaker improved on a good thing—a larger, more efficient heat sink, a remote control and better audio inputs, just to name a few. However, it’s a rapidly evolving audio world and Audioengine’s latest response to fans of the A5 is the new A5+ Wireless speaker.

What is it?

The A5+ Wireless speakers are a large(ish) pair of bookshelf speakers that work as well—if not better—as computer speakers.  I’ve used the various A5 speakers hardwired to my iMac, connected via USB to my iPod (and later, iPhone) and even wirelessly using Audioengine’s own W3 audio adaptors (a not inexpensive add on). Now with the huge advancements made to to Bluetooth, Audioengine is offering all that is good with the A5+ in a newer Bluetooth wireless version.

Specs

The A5+ Wireless speakers are identical to the A5+ speakers in size, weight and specs. Two notable changes are that the 3/4″ silk tweeters are now centered above the 5″ Kevlar woofers—the original 5+ tweeters were off-centered. Also, a powered USB port at the rear of the A5+ speaker has been replaced with a Bluetooth pairing button on the wireless version. 

For those interested in such things, here are some specs:

  • Power Output: 150W peak power total
  • 3.5mm stereo mini-jack
  • 115/240V, 50/60Hz manually switchable
  • Amplifier Type: Dual Class AB monolithic 
  • Drivers: 5″ Kevlar woofers, 3/4″ silk dome tweeters
  • SNR: >95dB (typical A-weighted)
  • THD+N: <0.05% at all power settings
  • Crosstalk: -50dB
  • Frequency response: 50Hz-22kHz ±1.5dB
  • Input impedance: 10K ohms unbalanced
  • Protection: Output current limiting, thermal over-temperature, power on/off transient protection, replaceable external main fuse
  • Power Consumption:
    Idle: 10W
    Mute: 6W
    Sleep: 4W
  • Bluetooth specs:
    Internal D/A converter: AKM AK4396
    Input bit depth: 24-bits upsampled
    Bluetooth: 4.0 audio
    Supported codecs: aptX, AAC, SBC
    Wireless operation range: Up to 100ft
  • Dimensions:
    Left speaker: 10.75″H x 7″W x 9″D
    Right – 10.75″H x 7″W x 7.75″D
    Weight (LEFT): 15.4 lbs
    Weight (RIGHT): 9.6 lbs
  • Colors:
    Satin Black
    Hi-Gloss White
    Solid Carbonized Bamboo

Design and features

First, let’s get this out of the way: The addition of Bluetooth adds $100 to the price of the wired A5+ speakers. You might think a hundred bucks is a lot for a Bluetooth option, but there’s more to it than that. Because of Bluetooth, the A5+ wireless has a built in 24-bit upsampling digital audio convertor (DAC)—which isn’t cheap. Without this DAC, the A5+ Wireless speaker would just be a—well, a regular A5+ speaker! Let me explain the path that audio takes from your source (smartphone for example) to the A5+ Wireless: Smartphone converts music to a Bluetooth codex—sends Bluetooth signal to speaker DAC—DAC receives Bluetooth signal and converts digital signal to analog—analog signal is sent to speakers and then you hear your music. This is overly simplified, but you get the idea. The A5+ Wireless speaker is doing quite a bit of work that the regular A5+ speakers can’t do.

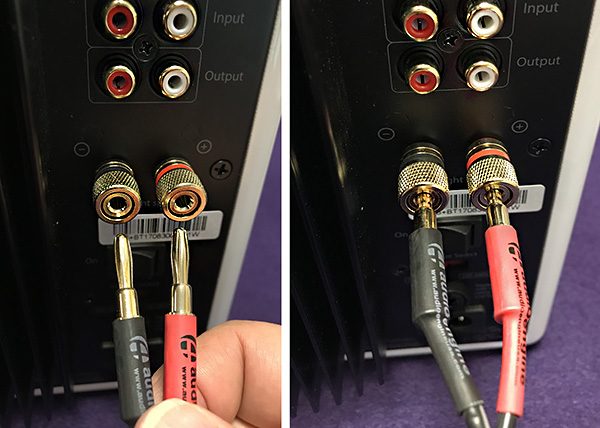
Connecting and pairing the A5+ wireless speakers is straightforward. The left speaker contains all the important stuff. Simply connect the left speaker to either a receiver or computer and then wire the right speaker to the left and music happens. However, now you don’t even need anything more than a smartphone to enjoy what the A5+ can do. Just press the pairing button on the rear of the left speaker and pair with your smartphone. Pairing only takes a few seconds. 

So how does Bluetooth compare to hard wiring? There are no surprises here. Bluetooth connection is rock solid. I have not had any dropouts (admittedly, the speakers are no more than 12 inches from the source). Even though audio quality is slightly lower when compared to wired, I could only discern any differences by turning Bluetooth on and off. But seriously, only weird testers like me will do that kind of thing. Otherwise, the only other noticeable difference was volume. Bluetooth needed to be turned up to match the same loudness as wired. Keep in mind that this is true of many wireless speakers, not just these. Trust me, you won’t have any sound quality complaints using Bluetooth.

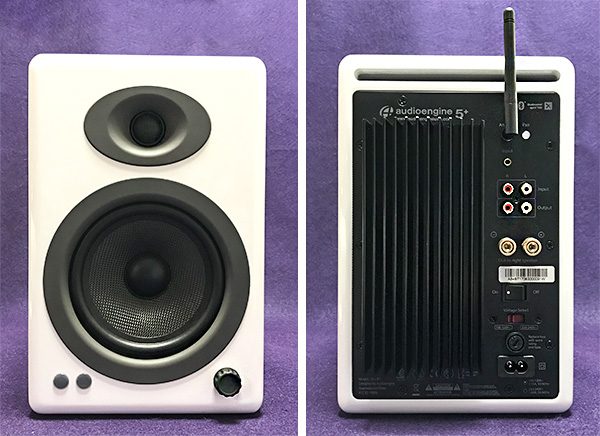
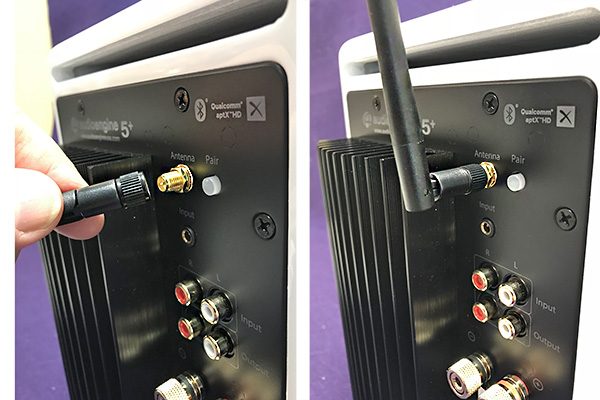
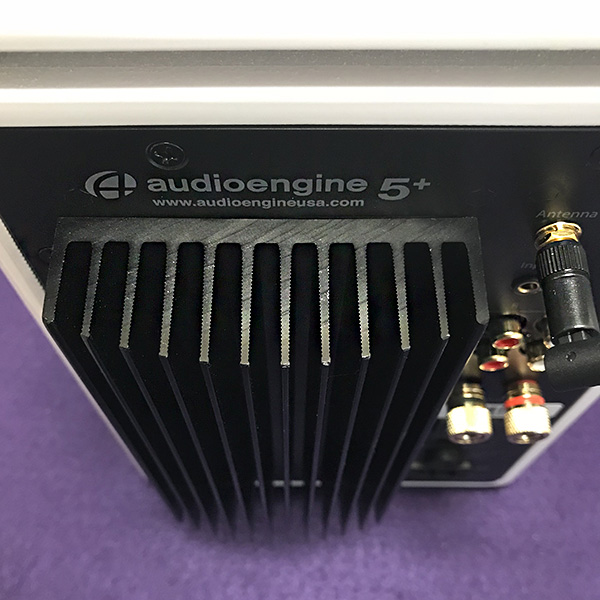
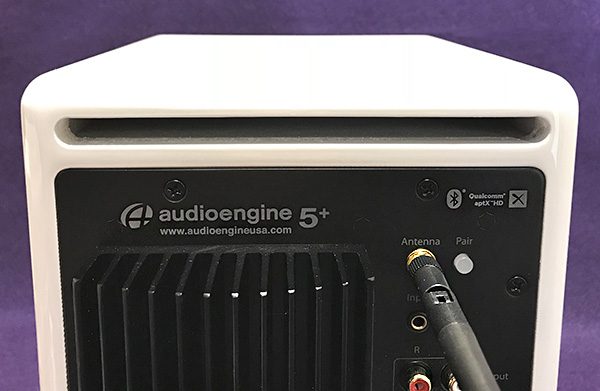
Along with the pairing button on the left speaker’s rear panel are the power switch, a mini plug input and RCA inputs and outputs. The RCA outputs allow a subwoofer to be connected if desired. A screw-in external Bluetooth antenna is included.

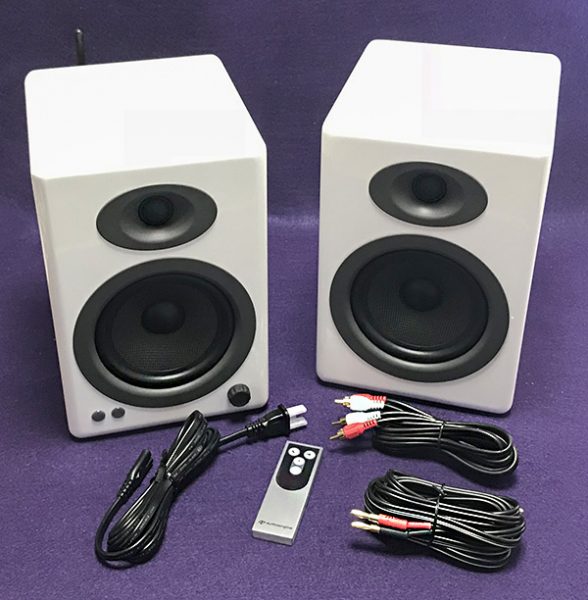
The front of the left speaker has a Bluetooth pairing indicator light as well as a volume knob. The A5+ wireless speakers include a remote that’s identical to the remote included with the more expensive Audioengine HD6 speakers. This remote handles the basics: Volume, mute and sleep. I’ve don’t see the advantage of a sleep button over the simple mute. The two buttons seem a bit redundant. I would have preferred an on/off button instead. 

The A5+ wireless speakers are powered by a built-in 150 watt (75 watt per channel) class A/B amplifier. Because of the amp, a turntable can be directly attached to the speakers without the need of a receiver.

The back of the left speaker has a large and heavy metal heatsink to dissipate the heat generated by the amp. Each speaker box is made of softly round-edged 1/2″ thick MDR board that’s either lacquered white gloss, black matte or real (extra cost) bamboo. There are no protective speaker grills, so the exposed and delicate silk tweeters should be kept out of reach from little poking fingers. 

The A5+ Wireless speakers don’t noticeably add to or detract from any audio frequency. Thanks to some wide bass ports, they can go deep, but even so, they might disappoint some bass heads. The A5+ Wireless speakers can handle plenty of bass—they just don’t add to it unnecessarily making music more bass heavy than it already is. In fact, on some of my 60s classic rock recordings (the debut Jimi Hendrix Experience album, for instance), I wish the A5+ Wireless speakers actually added more bass because some of those albums could certainly use a boost. However, I blame the recordings and not the speaker. Likewise, the speakers are not overly bright sounding or overly mid-centric on vocals. Their frequency balance is pretty darn good!

The A5+ Wireless speakers are also up to the task of reproducing excessive bass found in many modern albums—especially at max volume. Bryan Ferry’s “Kiss & Tell” from “Bête Noire” has plenty of bass kick. When called on, the 5″ Kevlar woofers are capable of some serious bottom.

Since bass on the speakers themselves is more than adequate, I was curious what would happen if I connected a floor subwoofer to the mix. While I was impressed with the enhanced and revealing lower frequencies previously unheard (or felt), it was obvious that it’s not absolutely necessary to add a sub right away. It can always be added later if warranted. 

What I like

The audio is balanced, yet offers a decent bass kick when required. Setup couldn’t be easier—Bluetooth pairing was successful on the first try and has remained flawless since. The subdued and elegant design looks good on any desktop or in any living room setting. 

What needs to be improved

The remote should have an on/off button. 

Final Thoughts

The A5+ Wireless speakers have always been a bargain when you consider how good they perform. The added convenience of Bluetooth only sweetens the deal—even at a $100 premium. You can find better sounding and better made speakers, but not at this price.

Price: $499 US ($569 for bamboo)
Where to buy: Audioengine and Amazon
Source: The sample of this product was provided by Audioengine. Visit www.audioengine.com for more information.

The post Audioengine A5+ Wireless speaker review appeared first on The Gadgeteer.

Filed in categories: Reviews

Tagged:

Audioengine A5+ Wireless speaker review originally appeared on The Gadgeteer on June 6, 2018 at 10:00 am.

Note: If you are subscribed to this feed through FeedBurner, please switch to our native feed URL http://the-gadgeteer.com/feed/ in order to ensure continuous delivery.

The Andiamo by Tivoli Audio is a small Bluetooth speaker that may pack a big punch!


As Bluetooth speakers continue to become mainstream and par for the course, companies continue to design and redesign their products to provide more convenience and better sound for consumers, and of course to be a better choice than the competition.

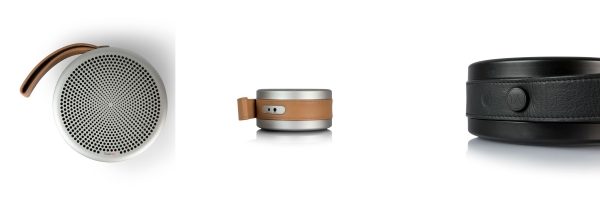
Tivoli Audio is an audio company that has been around for a while, and recently they decided to offer the Andiamo, which is a small compact Bluetooth speaker. It is being marketed as a high-end compact Bluetooth speaker, with finishes that include an Italian leather carrying strap. It will be offered in a black or silver model, and hopefully since the name Andiamo means “Let’s go” in Italian, it will sound as good as or better than the competition.

Tivoli Audio is scheduled to release the Andiamo in June 2018, and it will cost $199. You can visit the Tivoli Audio website for more details.

The post The Andiamo by Tivoli Audio is a small Bluetooth speaker that may pack a big punch! appeared first on The Gadgeteer.

Filed in categories: Reviews

Tagged:

The Andiamo by Tivoli Audio is a small Bluetooth speaker that may pack a big punch! originally appeared on The Gadgeteer on June 5, 2018 at 12:00 pm.

Note: If you are subscribed to this feed through FeedBurner, please switch to our native feed URL http://the-gadgeteer.com/feed/ in order to ensure continuous delivery.
Bestek MRJ1011 Wi-Fi smart plug review

The Bestek MRJ1011 Wi-Fi smart plug is a device that can turn on or off the AC outlet on it’s front. The device can be controlled manually, self-controlled by timers set by an app, or controlled by the IoT through the Smart Life app, Amazon Alexa, Google Home,  or IFTTT. It also has two 2.4 amp USB ports. Read on to see what I think!

What is it?

The Bestek MRJ1011 Wi-Fi smart plug is part of a new wave of inexpensive AC Adapters that allow users to remotely turn on and off items through a Wi-Fi connection. Smart plugs came into existence about eight years old; even though they costs less these days, they still offer about the same features as they did at their introduction. Not every manufacturer offers every feature but the smart plug generally offers local control, remote control by one or more communication protocols, energy monitoring, and USB power. The design of smart plugs includes various layouts and power capacities. What has immensely improved in the past eight years is the maturity of home automation and IoT. These days, the capacity of the smart plug to integrate with home automation and IoT is a key component of it’s usability.

What’s in the box?


Bestek MRJ1011 Wi-Fi smart plug
User Manual
Information card

Design and features

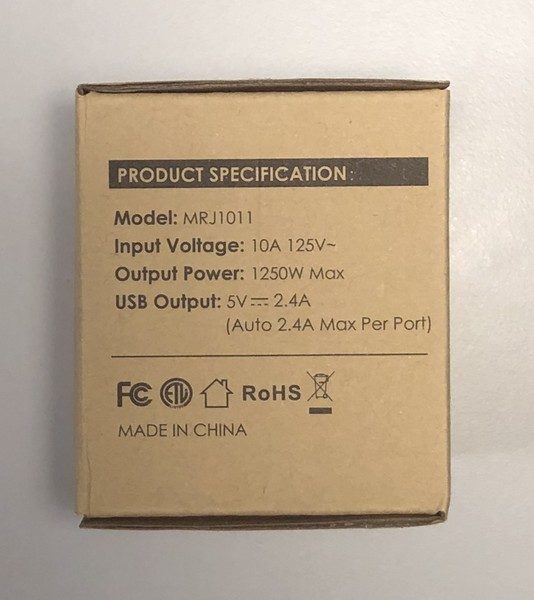
Specifications

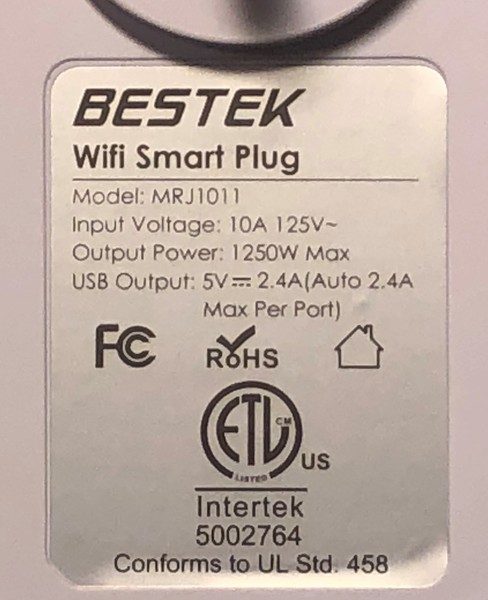
AC Input: 10A 125V ~ 1250W Max
USB Input: 100-250V ~ 50Hz/60Hz 0.45A Max
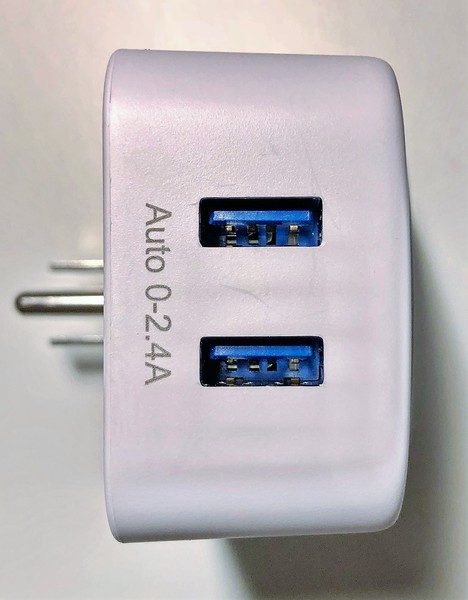
USB Output: 5V 2.4A(Auto 2.4A Max Per Port)
Total USB Output Power: 12W
Size: 3.25 x 2.00 x 2.40 inches
Weight: 96g

Unboxing

The Bestek Wi-Fi Smart Plug comes in a no-frills cardboard box. The two pack comes in a cardboard sleeve. The front, back and sides are printed with the product, specifications, and QR codes for the control app. 

The QR codes below will redirect you to a page to download the control app.


Design of the Bestek MRJ1011 Wi-Fi smart plug

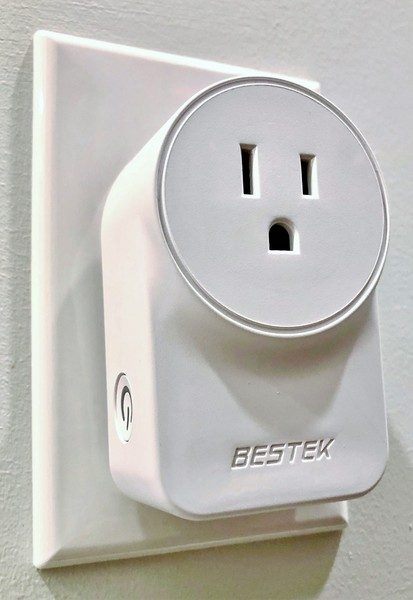
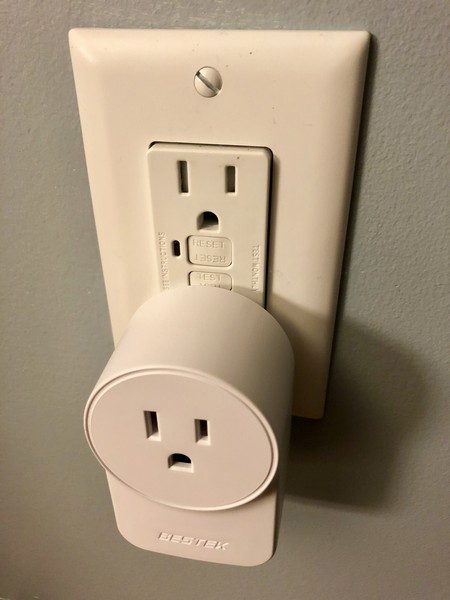
The Bestek MRJ1011 Wi-Fi smart plug is a white plastic plug adapter that looks similar to the “wall wart” transformers that are part of many electronics.  However,  like many Apple voltage adapters, its smooth lines and unobtrusive design enables it to blend in to light colored wall plates better than the typical black plastic designs.

The front of the unit contains a 15 amp grounded receptacle. Since it isn’t tamper resistant, to comply with the intent of the NEC and for general safety, only install the smart plug if an item is plugged in it.  Also, even though the receptacle on the front is a 15 amp design, the unit itself is only rated to 10 amp. Consequently, to ensure that this item is not overloaded the user must be cautious and ensure the wattage of items plugged in to the front does not exceed 1250 watts.   This precludes using this item with many space heaters, most ovens/toasters and perhaps coffee brewers. I do not see any internal circuit breaker or fuse, so I’m not sure what will happen if this powers something over 1250 watts.

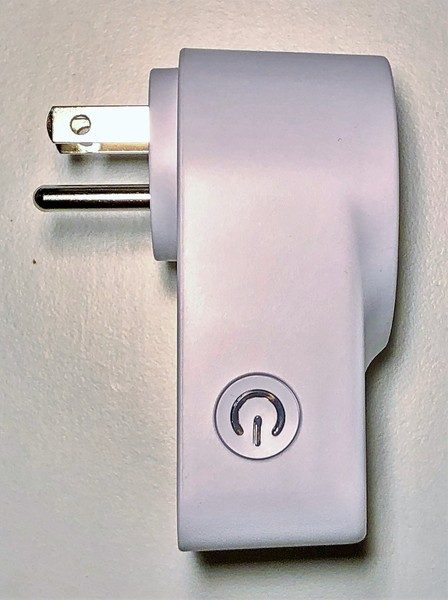
The rear of the unit includes a specification decal and the unit’s plug that slightly protrudes from the rest of the unit’s rear. The stepped design of the real may allow installation of the smart plug on decorative wall plates where the outlets are slightly below the highest point.

The unit’s plug does not block the top outlet of a duplex receptacle. However, the portion of the smart plug that contains the electronics and the USB connections will block the bottom outlet of a duplex receptacle.

The bottom of the unit contains two USB plugs that are not switchable but can power and recharge USB devices.

Operation

The smart plug operates in three ways: by the manual pushbutton, by an internal timer, and by an IoT signal.

Manual mode

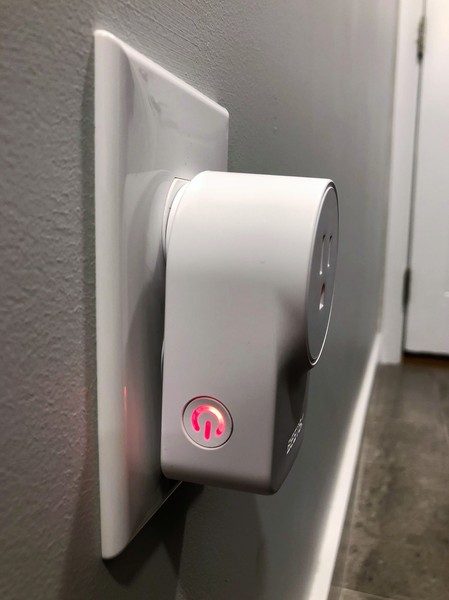
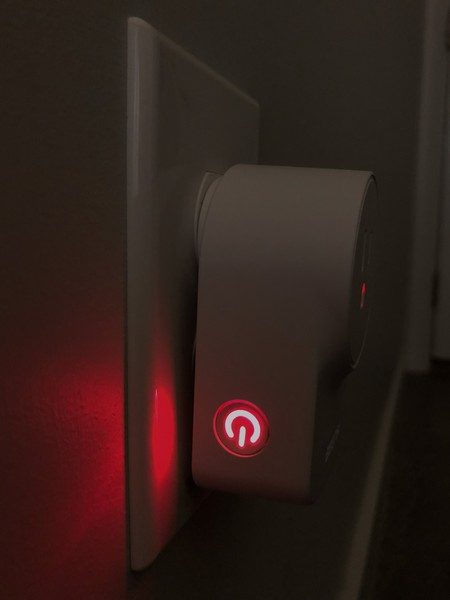
Manual operation is by a pushbutton on the unit’s side. When the receptacle on the front is on the button glows red.

The red glow may seem overbearing at night. Some electrical tape will block out the red glow if its presence is a nuisance.

Timer Mode

Timer mode requires the Smart Life or BESTEKHOME app. You can use either one – the BESTEKHOME app is the same as the Smart Life app with a new title and app icon. To connect the smart plug to the app power it on, wait ten seconds and then power it off, then hold the power button for ten seconds. The power button will blink after performing these steps.  The app will ask for Wi-Fi credentials so that the device can join a network on its own. Note that this device only supports 2.4Ghz Wi-Fi channels. The device has its own access point that can pair to a phone if no other Wi-Fi is available.  in this scenario, the phone needs to join the devices AP.

After installation, the app can turn on the device remotely, turn on or off the device after a set time (like a countdown timer) or schedule the device to turn on or off at some future time. The schedule may apply to each day or certain days during a typical week.

IoT Mode

There is an entire 26-page booklet of instruction for how to connect the device to Amazon, Google, or IFTTT. The manual can be viewed here (https://fccid.io/2AKS6-MRJ1011/User-Manual/User-Manual-3801625) on the FCC site. In each case, the first step is to pair the unit with the Smart Life or BESTEKHOME app. The activation by Amazon Alexa is straightforward and the IFTTT includes both trigger and action. Note that IFTTT integration permits SmartThings to interact with the device; IFTTT can turn on the physical smart plug when SmartThings switches on a virtual switch, and vice versa.

Performance

The operation through the Smart life or BESTEKHOME app is very quick and operation through Amazon Alexa is only a little slower. The relay inside does make an audible pop, so using this to blink decorative lights is going to create a lot of unwanted noise.

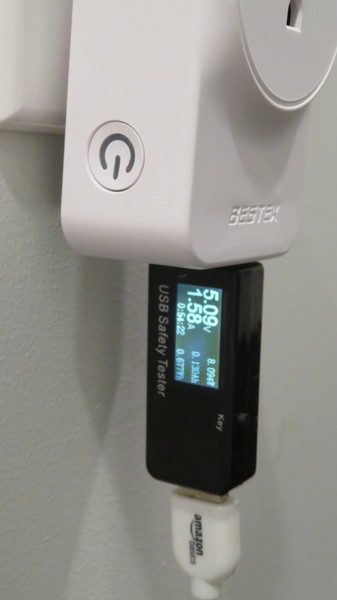
The smart plug contains circuitry that optimizes USB port current to intelligently charge or power the connected device. However, I was not able to get a full 2.4 amps out of the port even with a mostly dead phone battery. 1.58 amps is the highest draw I saw.

What I like

  • Lots of IoT connectivity
  • Included USB ports

What needs to be improved

  • 15 amp service
  • internal circuit breaker/fuse

Final thoughts

The Bestek MRJ1011 Wi-Fi smart plug has a host of connectivity options that enable control with a variety of services. If the allowable current were only more than 10 amps this would be a really great design.

Price: $15.99
Where to buyAmazon
Source: The sample for this review was provided by BESTEK.

The post Bestek MRJ1011 Wi-Fi smart plug review appeared first on The Gadgeteer.

Filed in categories: Reviews

Tagged: ,

Bestek MRJ1011 Wi-Fi smart plug review originally appeared on The Gadgeteer on June 5, 2018 at 10:00 am.

Note: If you are subscribed to this feed through FeedBurner, please switch to our native feed URL http://the-gadgeteer.com/feed/ in order to ensure continuous delivery.

Utama Spice Danau Satu nebulizing essential oil diffuser review

If you’re interested in trying aromatherapy with essential oils, you will need a diffuser. This is a topic I’ve been aware of for a while now but had never tried until I was offered the opportunity to review the Danau Satu nebulizing essential oil diffuser from Utama Spice.

What is it?

The Danau Satu nebulizing essential oil diffuser is a small wood and glass device that diffuses essential oils (concentrated forms of herbs, spices, and plants) into the air to fill a room (up to 400 sq ft) with the aroma of the oil which can provide calming or other effects. The Danau Satu diffuser does not use water or heat so it is more effective at dispersing the aroma throughout a room or your home.

What’s in the box?

  • Danau Satu diffuser base
  • Glass reservoir
  • Glass cap
  • 2 eye droppers
  • USB power cable
  • USB AC power adapter
  • Manual

Design and features

This is the first essential oil diffuser that I’ve ever used, so I don’t have anything to compare to, but my first impression of the Danau Satu is that it has a very attractive minimalist design.

The base is made of wood, and the reservoir is made of clear blown glass.

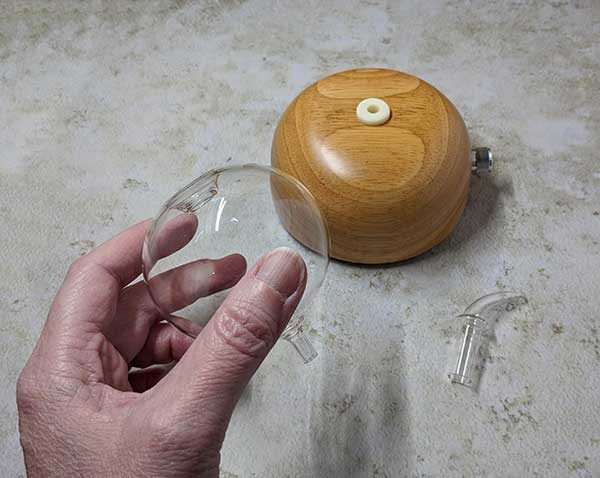
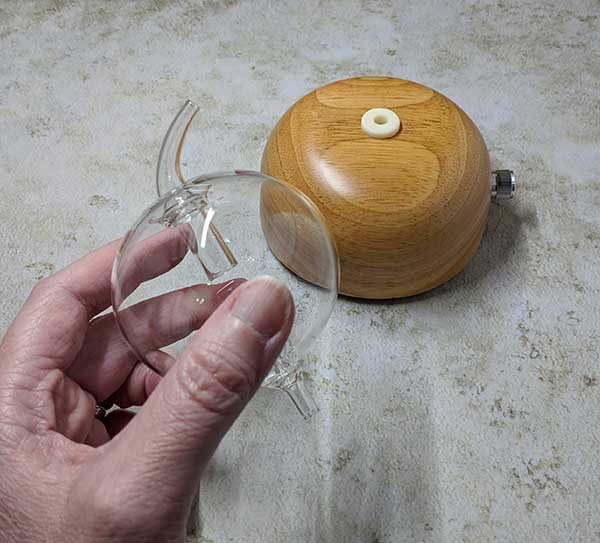
There are two glass parts. The main reservoir and the glass cap which sits in the top of the reservoir to direct the diffused oil particles into the surrounding air.

There is a little bit of assembly that is required before you can use the Danau Satu diffuser. You press the pointed end of the reservoir into the wooden base. It’s important not to twist it into the rubber gasket in the base, but to just press it in place. The same goes for removing it when you need to clean it. You can wiggle it back and forth as you pull it out, but you shouldn’t twist it as it could break off in the base.

Once the reservoir is seated into the wooden base, you can plug in the included power cord, add a few drops of essential oil into the opening at the top of the glass reservoir, place the glass cap on top and then turn on the diffuser using the knob which rotates from low up to a high setting.

How does it work?

There is a glass nozzle and a microtube at the bottom of the reservoir that is connected to the tube that is pressed into the wooden base.

Air generated from the base enters the bottom of the reservoir and forces the oil to diffuse through the microtube and out through the glass cap.

A white LED glows from the base when the diffuser is turned on and a special timer diffuses the oil for 2 minutes and then turns off for 1 minute before turning back on for 2 minutes. This cycle continues for 2 hours before the diffuser turns off. Note that the LED does NOT turn off after 2 hours, but remains on.

While the diffuser is running, it does make a sound, but it’s not too loud or annoying.

Utama Spice included a small bottle of their Citronella essential oil with the diffuser so that I would have something to test. It’s important to only use pure essential oils that do not contain perfumes or other synthetic fragrances since you will be breathing in the oil particles. It’s also important not to use thicker oils like sandalwood, cypress, etc. which can clog of the microtubes.

It is pretty easy to clean the reservoir which needs to be done occasionally. The manual advises that you can put some alcohol in the reservoir and diffuse it for a few minutes to clean the microtubes or you can submerge the glass reservoir into a pan of hot water.

The Utama Spice Danau Satu nebulizing essential oil diffuser is very easy to use and easily filled my basement with a wonderful aroma. That said, I wasn’t able to use it very many times because I happened to read that some essential oils are toxic to cats and the citronella essential oil that they included with the diffuser was on the list of toxic oils that should not be used around a cat. Since I didn’t want to make my cat Max sick, I only tested the diffuser a few times with him outside at the time. I don’t have a lot of experience with essential oils, so I wasn’t sure how long the oil particles could “hang” around in the air. I didn’t think there would be any harm testing the unit with him outside, but it made me a little nervous that I could make him sick doing it very much, so I limited my testing.

What I like

  • Easy to use
  • Easy to clean
  • Attractive design

What needs to be improved

  • Box or manual should provide a warning that some oils are toxic to pets.

Final thoughts

There are many uses for essential oils for aromatherapy. Some oils can help with headaches, stress, insomnia, anxiety, and even some health problems. The Utama Spice Danau Satu nebulizing essential oil diffuser is an easy to use and attractive diffuser that will let you explore this type of therapy. Just make sure you read about all possible toxic issues for pets and even babies BEFORE you use any essential oils.

Price: $54.99
Where to buy: Utama Spice and Amazon
Source: The sample for this review was provided by Utama Spice.

The post Utama Spice Danau Satu nebulizing essential oil diffuser review appeared first on The Gadgeteer.

Filed in categories: Reviews

Tagged: ,

Utama Spice Danau Satu nebulizing essential oil diffuser review originally appeared on The Gadgeteer on June 4, 2018 at 4:53 pm.

Note: If you are subscribed to this feed through FeedBurner, please switch to our native feed URL http://the-gadgeteer.com/feed/ in order to ensure continuous delivery.