IOGear Quantum Thunderbolt 3 Docking Station Pro 85 review

What is it?

The Quantum T3 is a desktop docking station for USB-C computers that adds additional ports and functionality all through a single USB-C connection.

Hardware specs

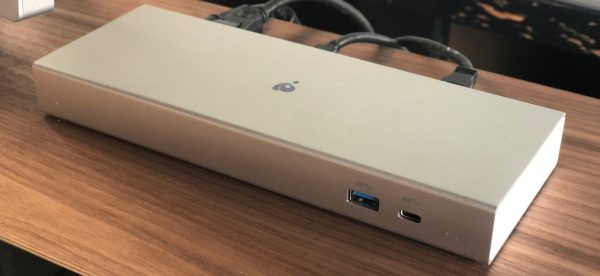
Front connections: 2 USB ports (USB-A 3.1 and USB-C)
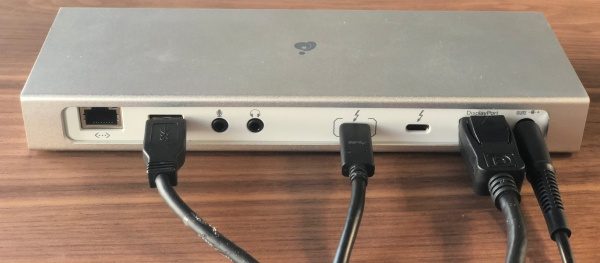
Back connections: Gigabit Ethernet, USB-A 3.1, 3.5mm Audio in, 3.5mm Audio out, 2 USB-C, Displayport and DC power
Dimensions: 22 x 8.1 x 2.5cm
Video capability: DisplayPort 1.2 (up to 4K@60Hz with single video stream), Thunderbolt 3 (USB-C port), up to 5K@60Hz on DP Alt mode with single stream or 4K@60Hz with dual streams

What’s in the box?
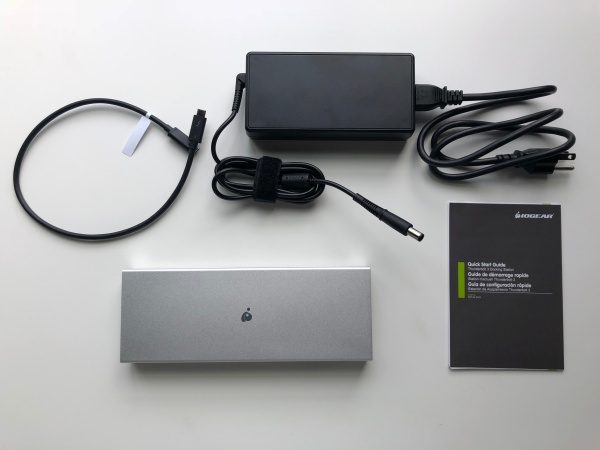
  • Quantum Thunderbolt 3 Docking Station Pro 85
  • Thunderbolt 3 cable
  • AC power adapter
  • Quickstart guide & warranty card

Design and features

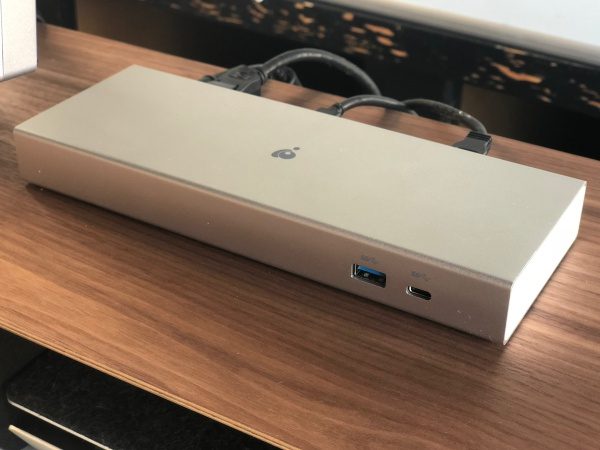
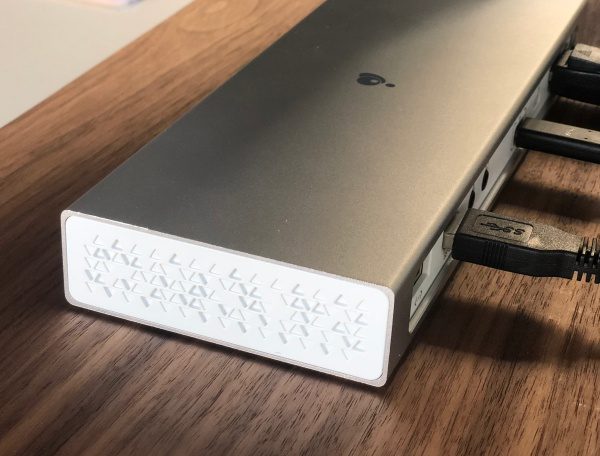
The Quantum 3 is a beautiful piece of equipment that looks at home with current computers of the aluminum variety and provides all kinds of connectivity to your USB-C computer at your workstation. The main body is aluminum with plastic used for the inset back connector panel and the end panels which sport a cool repeating triangular relief pattern.
As you can see in the next photo, there are also connections for gigabit ethernet, USB 3.0, microphone, headphones, USB-C, displayport and power.
On the front of the unit there is a pair of connectors, one for USB-C and one for USB 3.0.
Setup

Connect to Quantum 3 to its power supply and then the included USB-C cable to your computer. It’s important to note that the first one with the [    ] around the port has a higher throughput and 85 power supply for connecting to your computer, supporting the other functions through the hub and keeping your computer charged without a separate power cable.

All that’s left is connecting everything else you plan to use. I have an HP Envy ultrawide monitor that I selected specifically because it had USB-C input. What I found in initial use is that some of the other connections through the monitor like standard USB 3.0 accessories, required me to add another cable to my mac which is what I was trying to avoid in the first place.

With the Quantum 3, I connected a DisplayPort cable to the monitor along with a USB 3.0 cable and that’s it. The office I work in is all wifi, so I haven’t had to try the gigabit ethernet yet. Maybe in the new office starting next week.

Performance

It’s really quite amazing how seamless a product can be when it does exactly what it’s supposed to. It’s not like I forget that it’s there, but at the same time, I don’t have to monkey with it. With the connections described above, I’m able to set my Mac down, connect a single USB-C cable and everything just works and my Mac is charging. The headphone amp that’s connected to the monitor with USB works perfectly. The monitor’s built-in pop-up camera works perfectly (previously required an extra cable to the mac). I can go on, but you get the picture.

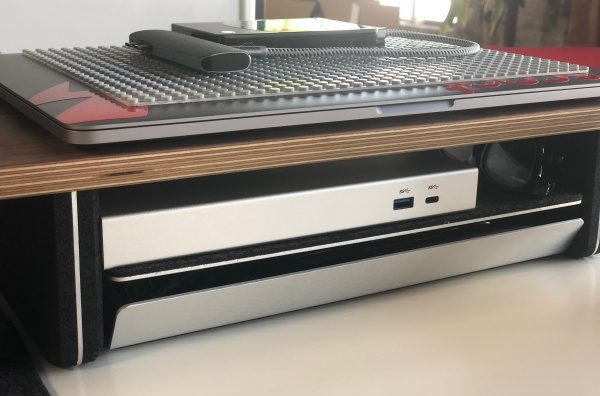
I’ve got the Quantum 3 tucked into a pocket of my desk riser where I have access to the front two ports should I need them and everything else is out of the way.
What I like

  • Simple set-up
  • It just works
  • Single connection to the computer (including charging!)

What needs to be improved

  • The cost is pretty steep (but less so when you factor in the cost of buying a second Mac power adapter)

Final thoughts

The Quantum 3 is a docking station that does exactly what it’s intended to do. It’s not inexpensive but is incredibly well made and will likely outlast a couple of laptops. If the idea of a single connection to your computer gets you excited, this is a great solution. I’m at my desk a lot during the day, but it is generally in fits and starts and that means a lot of plugging and unplugging. The Quantum 3 solved that with style and now the power adapter that came with my Mac can stay in my backpack.

Price: $299.95
Where to buy: Amazon
Source: The sample of this product was provided by IOGear.

The post IOGear Quantum Thunderbolt 3 Docking Station Pro 85 review appeared first on The Gadgeteer.

Filed in categories: Reviews

Tagged:

IOGear Quantum Thunderbolt 3 Docking Station Pro 85 review originally appeared on The Gadgeteer on July 3, 2018 at 11:00 am.

Note: If you are subscribed to this feed through FeedBurner, please switch to our native feed URL http://the-gadgeteer.com/feed/ in order to ensure continuous delivery.

Leitner LH270 Wireless Office Headset review

REVIEW – I’m a remote worker – and no, that has nothing to do with my emotional attachment to the people in my office.  Because I am remote 90% of the time, I need effective communications tools.  For years I have been looking for the perfect Bluetooth headset to use with the various communications apps I use daily, and to me perfect includes wireless.  Is the Leitner LH270 Wireless Office Headset the answer to my quest or just another stop on the journey?  That’s a great question, and thank you for asking…

What is it?

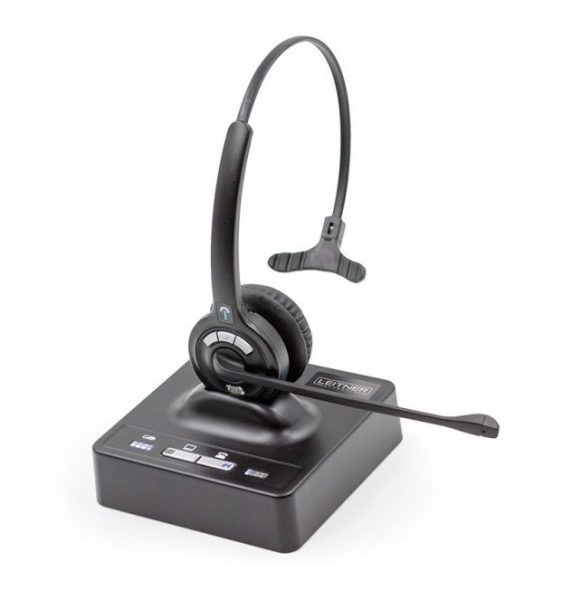
The Leitner LH270 is a professional-grade communications headset designed to work with both a traditional phone line and soft-phone applications like Skype and WebEx.  The LH270 is a monaural headset, meaning it has a single earpiece (the LH275 model is exactly the same except it has 2 earpieces).  The headset itself is wireless, but it connects to a base unit that acts as both the interface to your communications devices/software as well as a charging stand.

There are volume up/down buttons on the headset as well as an indicator light (and button) to let you know when the headset is on or online.  The light and button also act as a call answer/end switch.  The boom mic rotates a full 180 degrees, so you can safely disregard the “left” notation on the earpiece and wear the headset on either the left or right sides.  The middle button between the volume buttons is your mute/unmute switch when in a call.

What’s in the box?

You get the LH270 headset and a replaceable battery pack for the headset (making it relatively easy to get a spare battery and never miss a call).  You also get the base unit/charger, a power cord for the base unit, an RJ-9 phone cord to connect to a handset on a traditional phone, and a type A to mini USB cord to connect to your computer.  That last item is important – the headset is wireless, but the base unit must be connected to your computer and/or your phone.

How it works

Once you have installed the battery in the headset, connected the base unit to power and then charged the headset (normally about 4 hours for a full charge), you are ready to begin.

Plug one end of the USB cable into the base unit and the other end into your computer.  On both my MacBook Pro and Surface Book devices, drivers automatically installed and within minutes I was ready for my first call (or, at least, ready from a hardware perspective).  It has been a while since I had a dedicated landline or VOIP phone, so I made a semi-annual pilgrimage to my office where I have an actual desk and phone.  I try to visit at least twice a year, and this seemed like a way to kill two birds with the single stone.  On my desk phone, I unplugged the handset from the phone base and plugged it into the LH270 base.  Then, using the RJ-9 cord I plugged the LH270 base unit into the phone.

Now I am REALLY ready.

And this is where I found the first quirk.  There is a button on the base unit that determines which device the base is connected to.  By default on power up the base unit selects the phone and not the computer.  So when I received a Skype call I pressed the answer button only to find that the base unit does not switch to the active source automatically.  You will have to get to the base unit, switch to the proper mode and then answer the call.

If you use the LH270 with a regular phone you are going to want to invest in a handset lifter.  Without it (and assuming you are in the proper mode on the base unit), you must be close to the phone in order to lift the handset to answer.  With the handset off the phone base, you can press the answer button on the headset to divert the signal to the headset rather than the phone’s handset.  Oh, and you will also have to hang up the handset when the call is over because – without doing that – you will not get any calls.

WebEx proved to be an interesting quirk.  And note, this is not a problem with the LH270, but rather with the WebEx software on both the Mac and Windows.  About half the time on loading WebEx it would select a different mic rather than the one on the LH270, with the end result being that no one could hear me until I switched the communications device in settings.  I have never had that problem with any other device, but it was consistent with the LH270 over about 14 calls, so if WebEx is the preferred app you might want to check with Cisco about a software update.  Nothing in time to help me, though.

So those are the oddities when answering or ending a call.  As a communications headset, though, the LH270 is close to perfection.  The calls are crystal clear, and people on the call could hear me with the same clarity.  I could move all over the office without any drops in connection or static.  I could get about 30 feet away from my desk without a clear line of sight to the base unit before I had any problems.  That included multiple walls between me and the base.

Did I mention the battery life?  Extraordinary.  I can spend 6+ hours during the day on calls with the LH270 and end the day with over 50% of the battery remaining.

When in the right mode, starting and ending computer-based calls was easy.  Moving around was also easy – if I ever strayed too far, the headset would beep but the call would not drop.  To get back in the conversation, all I had to do was move back within range and the headset automatically reconnected to the call.

What I liked

  • Amazing clarity on calls
  • Outstanding battery life
  • Easy setup
  • Little touches like call retention when out of range

What needs improvement

  • No handset lifter in the box (important if you use a regular phone)
  • No automatic switch between PC and phone mode based on the incoming signal

Final thoughts

If business communications are important to your work, you can’t do much better than this headset.  It is pricey at $288 and I wish it came with a handset lifter, but it also comes with a 5-year warranty out of the box so the clarity you get in your calls today will be with you for a long time to come.  Should Leitner solve the lifter issue along with the active mode issue, I could see this – and the LH275 dual earpiece version – becoming the gold standard for business communications.

Price: $288.28
Where to buy: Amazon
Source: The sample for this review was provided by Leitner.

The post Leitner LH270 Wireless Office Headset review appeared first on The Gadgeteer.

Filed in categories: Reviews

Tagged:

Leitner LH270 Wireless Office Headset review originally appeared on The Gadgeteer on July 3, 2018 at 9:00 am.

Note: If you are subscribed to this feed through FeedBurner, please switch to our native feed URL http://the-gadgeteer.com/feed/ in order to ensure continuous delivery.
BenQ EX350IR Curved Monitor review


REVIEW – When editing photos or videos, a reasonably sized display with great color reproduction is really essential. I have always been a fan of the quality of BenQ monitors, but I have not purchased a new one for quite some time. When I was offered the opportunity to review one of their newer curved monitors, I jumped at the chance to see if they could keep me as a fan. Here is how it went:

What is it

The BenQ EX350IR is a 21:9 35″ Vertical Alignment MonitoCurved Monitor, boasting a  3440 x 1440 resolution.

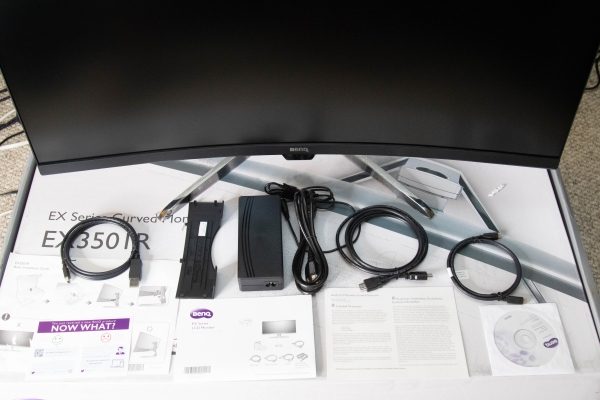
What’s in the box

Unpacking

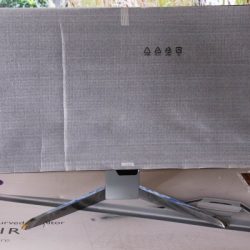
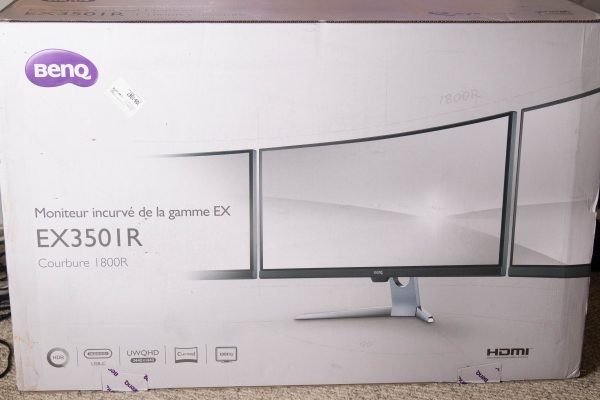
As you can see from the pictures below, the monitor and the accessories arrived well-packed and in a very large box that was cushioned in every way with styrofoam. The screen also had additional protection.


Contents


1 x BenQ EX350IR Curved Monitor
1 x System CD-Rom
1 x Power Cord
1 x Power Adapter
1 x DisplayPort to Mini DisplayPort Cable
1 x HDMI Cable
1 x USB Type-C Cable
1 x Back Cover
1 x Quick Start Guide

Specifications

Size: 35″
Screen Area: 32.26 x 13.62″ / 81.94 x 34.59 cm
Panel Type: VA LCD
Native Resolution: 3440 x 1440
Aspect Ratio: 21:9
Pixels Per Inch (ppi): 103 ppi
Brightness: 300 cd/m2
Contrast Ratio: 2500:1
Dynamic Contrast Ratio: 20,000,000:1
Refresh Rate: 100 Hz
Adaptive Sync Technology: FreeSync
Bit Depth / Color Support: 8-Bit (16.7 Million Colors)
Color Gamut: 100% sRGB
Response Time: 4 ms (GtG)
Viewing Angle: Horizontal: 178°
Vertical: 178°

Connectivity:
2 x HDMI 2.0
1 x DisplayPort 1.4
2 x USB (USB 3.0) Output
1 x USB (USB 3.0) Input
1 x USB Type-C
1 x 3.5 mm Output

HDCP Support: Version 2.2
Dimensions (W x H x D): 32.8 x 19.8 x 8.8″ / 83.4 x 50.4 x 22.4 cm
Weight: 22.93 lb

Design and features

The BenQ EX350IR Curved Monitor is a beautiful curved monitor that has a 178-degree viewing angle from each side. It is a 21:9 format that has a HD resolution up to 3440 x 1440.
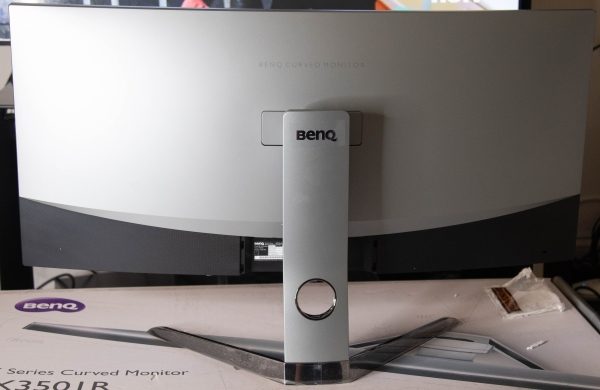
The picture below shows the back of the monitor with the hole in the stand to pass the connected cables through. I already have holes on my desk to triage the cables, so I did not use this feature. You can also see where the stand with its triangular style platform connects to the back of the monitor. Ths stand can be removed, and an optional VESA wall mount transfer kit can be purchased separately and attached so that the monitor can be VESA mounted.

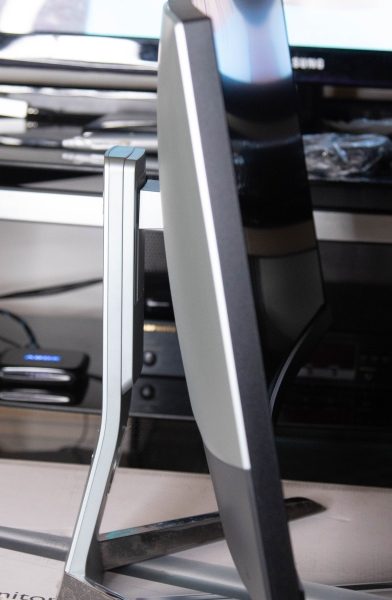
This angle below shows the tracks on the stand between the stand and the monitor that allow the height of the monitor to be raised or lowered simply by pulling it up or pushing it down. The tracks provide the necessary tension to keep it firmly in place. The visible spring that you see controls the tension when tilting the display.

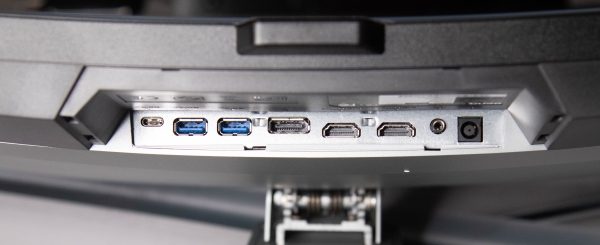
This monitor has a nice selection of ports. (From left to right as pictured below):
1 x USB Type-C Port
2 x USB 3.0 Ports
1 x DisplayPort
2 x HDMI Ports
1 x Headphone Jack
1 x DC Power Input Jack


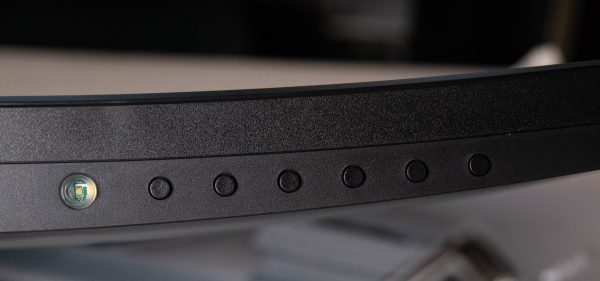
If you are facing the front of the monitor, the control buttons are underneath the bottom right side of the display (From left to right):
Button 1 – Power Button: Power On /Off
The next 6 buttons are “Control Keys or hotkeys” (Pressing any control key brings up a menu function)
Button 2 – Input Hot Key: Input Selection
“The Custom Keys perform as hotkeys to provide direct access to pre-defined functions. You can change the default setting and designate different functions for these keys”.
Button 3 – Custom Key 1: Picture Mode
Button 4 – Custom Key 2: Contrast
Button 5 – Custom Key 3: Brightness
Button 6 – Menu: Activates the Main Menu
Button 7 – Exit: Exit On Screen Display Menu
(For the record, I did not change any of the functions of the Custom Keys, since they worked well for me at the factory default settings)

Performance

I connected the monitor to my main workstation where many nights I work into the early morning hours editing videos and photos. (Note: Some aspects of the following pictures are purposely blurred).


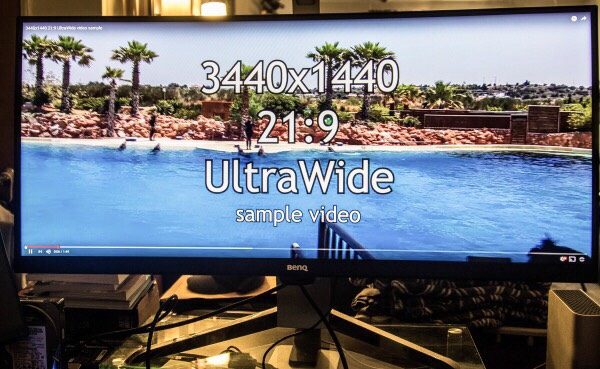
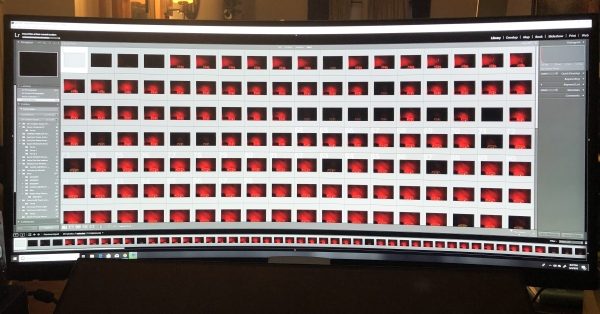
In my testing, I worked with Adobe Premiere, LightRoom, and Photoshop, as well as PortraitPro Studio as my main editing tools. This monitor performed flawlessly. The color reproduction was great and extremely close to being 100%”true”. I made sure that I left everything as it was right out of the box, and did not do any color calibration. The added desktop space 0f 3440 x 1440 @21:9 is really great to work with, and this 35″ monitor still seems massive when compared to my previous 29″ monitor.


Here are some screenshots of the actual applications that I work with:


While I am not a gamer, I did test using a few gaming demos to see what they looked like on this display. While it may not be realistically visible in the pictures below, the colors are great from edge to edge, and I did not notice any kind of color bleeding or dead pixels in any scenario throughout my testing.


The refresh rate of this monitor works very well for all of my needs and for all of the applications that I work with. And since I work a lot with editing and rendering videos, that is a major help when rendering and utilizing “live view” simultaneously.

In terms of additional hardware functions, I also tested the audio output jack. The sound is very good and close to the sound I get from my external USB DAC. However, for my purposes, I did not find it practical to have the headphone cable draped across my desk from the bottom of the monitor. If the choice is to use the audio output from the monitor, I would suggest using a Bluetooth audio transmitter and receiver to make the connection wireless.

What I like

First of all, I absolutely love the size of this display. I also love the color reproduction and the refresh rate. The build quality is great and despite its size, this monitor is sturdy and stable. It performs very well for photo and video editing, as well as for watching movies and performing everyday tasks.

The only thing that could make me more overjoyed about a BenQ monitor like this is if/when I get the opportunity to test a 4K version. For me, the 4K capability would make a BenQ monitor like this the “above all” monitor for my use.

What can be improved

Since this monitor has a sizeable bezel, I think the design would work better if the control buttons are on the bottom right front face of the monitor. In my opinion, the design that places the buttons underneath the display where you have to feel for them, and either memorize their position or keep pressing buttons until you get the right ones is not practical unless there is at least a corresponding label on the front.

Final thoughts

Since I have always been a fan of BenQ monitors and their quality, I was expecting a whole lot in the design, build, and performance of this monitor, and it does not disappoint. While there is the issue of the location of the control buttons that I find inconvenient, that is as far as “MY” negatives go. We may all have a difference of opinion about a product like this, especially when it is a major part of the typical workflow experience. However,  I would not hesitate in any way to recommend this monitor. Just like with my previous BenQ monitor that I purchased probably over 12 years ago, I am a fan.

Price: $849.00
Where to buy: Amazon and B&H Photo Video
Source: The sample for this review was provided by BenQ.

The post BenQ EX350IR Curved Monitor review appeared first on The Gadgeteer.

Filed in categories: Reviews

Tagged: ,

BenQ EX350IR Curved Monitor review originally appeared on The Gadgeteer on July 2, 2018 at 11:00 am.

Note: If you are subscribed to this feed through FeedBurner, please switch to our native feed URL http://the-gadgeteer.com/feed/ in order to ensure continuous delivery.
Air Vinyl Design Leather AirPod case review

REVIEW – AirPods have been out for the better part of a year now, and I’ve been seeing them in more places “in the wild.” There are, of course, AirPod cases and leashes and all manner of add-on products for the new Apple wireless buds. I was sent a Leather Case for AirPods from Air Vinyl Design in a camel brown to test. The cases are also available in Black, Red, and a Chocolate Brown.

Note: Photos may be tapped or clicked for a larger image.

What is it?

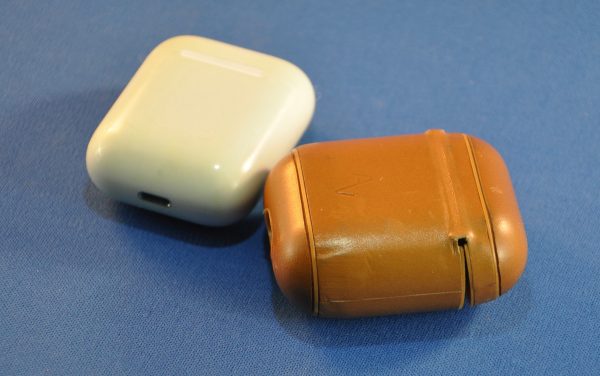
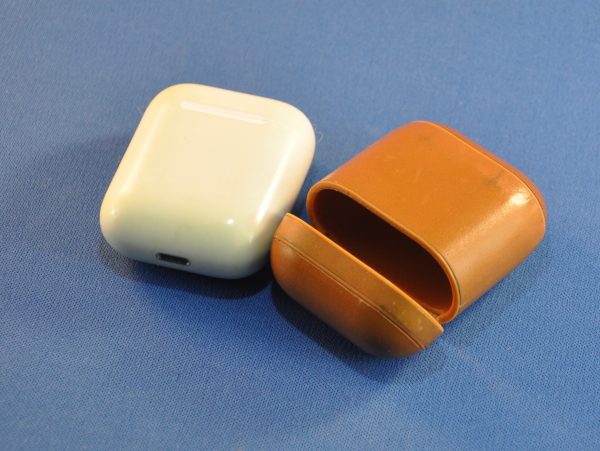
The Air Vinyl case is just that – a cover to fit over the AirPod recharging case. The inside is a smooth plastic that fits perfectly around the AirPods case, and a hinged cover fits perfectly into the flip-up top of the AirPods cover. Once it’s installed, it’s actually difficult to remove the case.

What’s in the box?

Just the cover – nothing more, nothing less.

Design and features

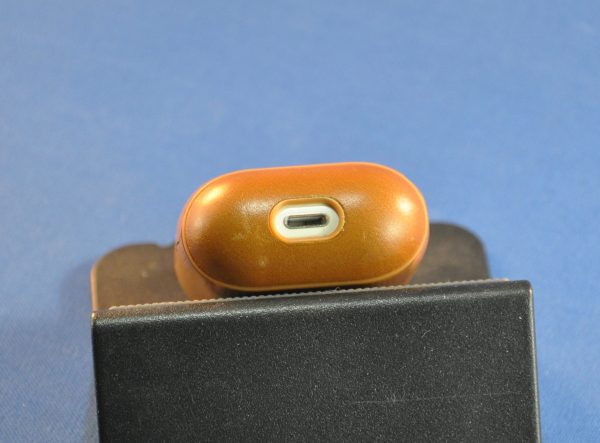
The cover is based on a plastic form-fitting overcase for the AirPods and covered with a thin, glove-soft overskin of leather. The inside of the case is the actual plastic, but the outer covering is pure leather, with its true feel and scent and wearability. In the few weeks I’ve been using it, I can already see the personality of the leather develop. There is a hole in the bottom center which allows charging with every Lightning cable I’ve used with it.

What I Like

  • Individualizes my AirPod case
  • Gives me a bit more grip when taking AirPods out or replacing them
  • Looks nice

What needs to be improved

  • Not really necessary

Final thoughts

I was perfectly happy with my AirPods with just the bare case in my pocket. My boss has a silicon case around hers, and I thought I might want a case, but then I thought “I’m not going to try and resell these.” Others in my office have their AirPods on their desk, but we rarely have them out together in a conference room or snack area where they might get mixed up. Not like phone cases or your computer or iPad. Usually, with a phone, I need the grip, and I want to protect the phone for resale. But, now that I have the AirPod case, I do like it and enjoy the feel of the leather. Would I buy it? Probably not. But I can’t deny it brings me a little happiness. I would love it as a gift.

The company also has vinyl stickers sized for your bare AirPod case for major cities ($7.99) and offers custom designs as well. I might like a Bull City logo even more than leather.

Price: $19.99
Where to buy: Air Vinyl Design
Source: The sample of this product was provided by Air Vinyl Design.

The post Air Vinyl Design Leather AirPod case review appeared first on The Gadgeteer.

Filed in categories: Reviews

Tagged:

Air Vinyl Design Leather AirPod case review originally appeared on The Gadgeteer on July 2, 2018 at 9:00 am.

Note: If you are subscribed to this feed through FeedBurner, please switch to our native feed URL http://the-gadgeteer.com/feed/ in order to ensure continuous delivery.
Kora Shola 230 Zip yak wool shirt review

REVIEW – You’ve no doubt heard of clothing that has been made of merino wool right? It’s well known for keeping you warm when it’s cold, comfortable when it’s warm, and it can be worn multiple times without getting smelly. Many people seek out clothing made of this material, but is there another type of wool that is even better? How about yak wool? Let’s take a look at the Shola 230 Zip yak wool shirt from Kora.

What is it?

The Shola 230 Zip is a base layer shirt made of 100% pure Himalayan yak wool fabric that has been sourced from nomad families on the Qinghai Tibet plateau in the Himalayas. The Himalayan yaks live in altitudes between 12-18,000 feet which causes their wool to be finer and according to Kora, up to 40% warmer and more breathable than merino wool.

Design and features

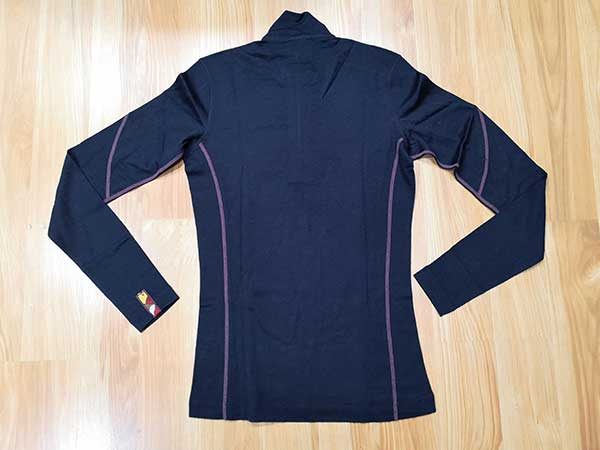
I was sent the women’s version of the Shola 230 Zip in obsidian blue. The shirt is thin and lightweight with a YKK zippered neck and contrasting wine colored stitching along the flatlock seams on the shoulders, arms, and sides.

When fully zipped the shirt has a sleek sporty turtleneck style. The only noticeable branding on the shirt is the Kora logo which is embroidered in silver on the left shoulder.

There is a decorative fabric tape on the left cuff that depicts the contours of the Himalaya mountains and the colors of Tibetan prayer flags.

The Kora Shola 230 Zip has tapered sides for a flattering fit. It’s available for women in sizes XS up to XL and for men in sizes S up to 2XL.

I asked for the Shola 230 Zip in size medium even though I normally wear a size small shirt. I decided to go up one size larger just because I knew this shirt was designed as a base layer and I don’t really like a skin-tight fit. As you can see from the image above, the shirt does fit me. But even with the medium size, it was still much tighter than I find comfortable and almost felt like a compression shirt. That said, I found the length of the sleeves and the hem of the shirt to be fine and the tightness of collar/neck area was also just fine. It was just the arms and torso that felt too tight to me.

I don’t know if the tight fit of the Kora shirt made me notice the very slight scratchiness of the yak wool, or if that’s just the way yak wool feels next to my skin, but unlike the Shadow Pass Trailhead bamboo and merino wool shirt that I also reviewed, recently, the Kora shirt wasn’t quite as soft or comfy. Of course, the Kora shirt is all wool, while the other one is 50/50 merino and bamboo. But according to the Kora website, yak wool is actually supposed to feel softer than merino wool. Note that I’ve worn other clothing made entirely of merino wool like socks and haven’t had issues with them feeling itchy.

What I like

  • Lightweight
  • Sporty look
  • Keeps you warm
  • Wicks away moisture
  • Machine washable on cold (don’t dry in the dryer though)

What needs to be improved

  • Expensive
  • Size runs small
  • Felt a little scratchy

Final thoughts

I wore the Kora Shola 230 Zip shirt off and on for a few weeks without washing it and it never got smelly even when I got sweaty which is easy to do right now since it’s in the upper 90’s here in southern Indiana. This really isn’t the right time of year to review base layers, but I gave it my best shot by giving the shirt a day to day wear type of test.

With clothing this expensive, I expected to feel the difference, but I really didn’t. Yes, the Shola 230 Zip is well made, looks nice, kept me warm, and didn’t stink after wearing it for a few weeks. But that’s about all I can say about it. So I looked at a few other reviews of the Kora products to see what others were saying about them and most people really loved Kora’s yak wool garments. So I guess yak wool just might not be the best choice for me personally. Hey, every product isn’t perfect for everyone.

If you decide that you want to buy one of these shirts, make sure that you order a size or two larger than your regular size. At least Kora allows for 30-day exchanges or returns with no questions asked if you end up getting the wrong size on your first order. If you’re going to spend $160 on a shirt, you definitely want it to be the right size so that you’ll actually wear it.

Price: $160.00
Where to buy: Kora
Source: The sample for this review was provided by Kora.

The post Kora Shola 230 Zip yak wool shirt review appeared first on The Gadgeteer.

Filed in categories: Reviews

Tagged: ,

Kora Shola 230 Zip yak wool shirt review originally appeared on The Gadgeteer on July 1, 2018 at 4:36 pm.

Note: If you are subscribed to this feed through FeedBurner, please switch to our native feed URL http://the-gadgeteer.com/feed/ in order to ensure continuous delivery.