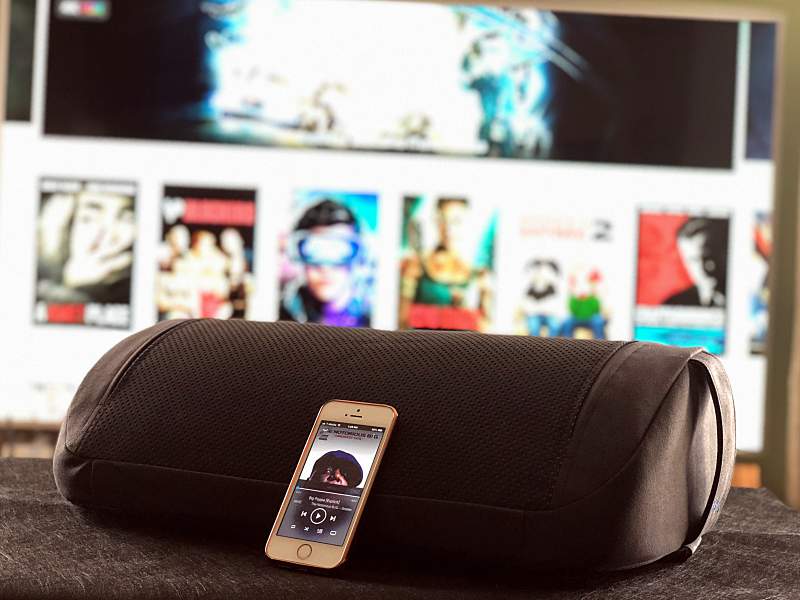
Flexound HUMU Augmented Audio Cushion review

REVIEW – One of the great things about writing for the Gadgeteer is the number of fun and interesting products I have a chance to review. That being said it isn’t often that I get to review a product that is really unique. The Flexound HUMU Augmented Audio cushion is one of those products. I was excited to be given the opportunity to test it out. Let’s see if my excitement was warranted.

What is it?

The Flexound HUMU Augmented Audio Cushion is a binaural stereo cushion that makes you both hear and feel the sound from your favorite entertainment. The cushion is boosted by Flexound Augmented Audio technology that adds the sensation of touch to all audiovisual experiences. HUMU also uses near-field audio so you can listen to it without disturbing others around you.

What’s in the box?
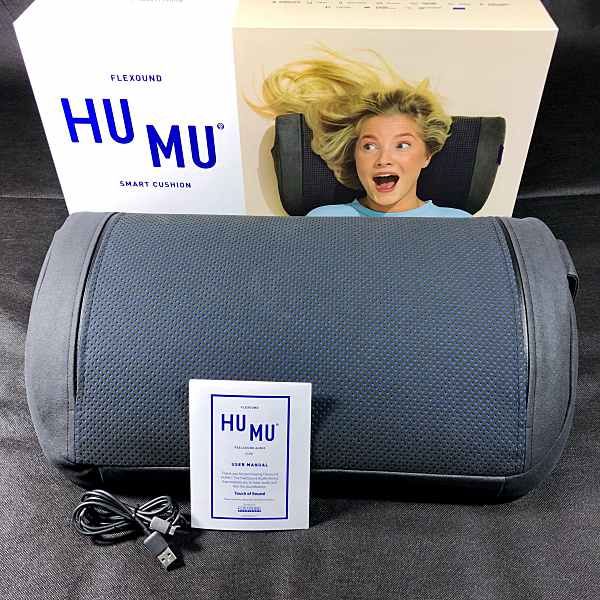
  • HUMU sound cushion
  • Micro USB charging cable
  • Users manual

Design and features

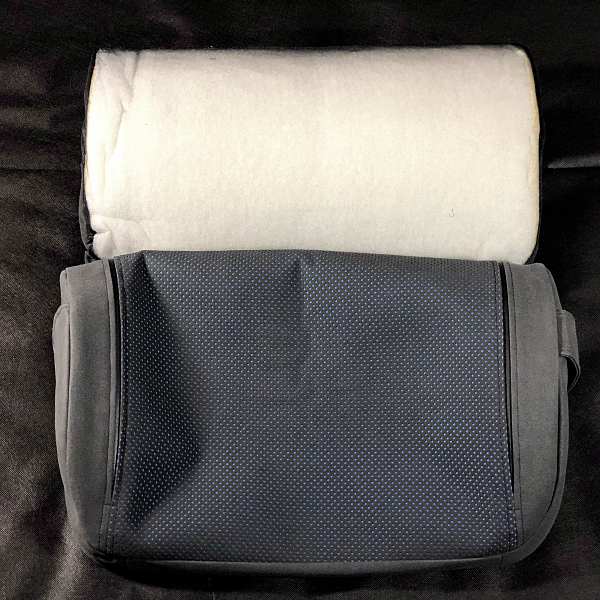
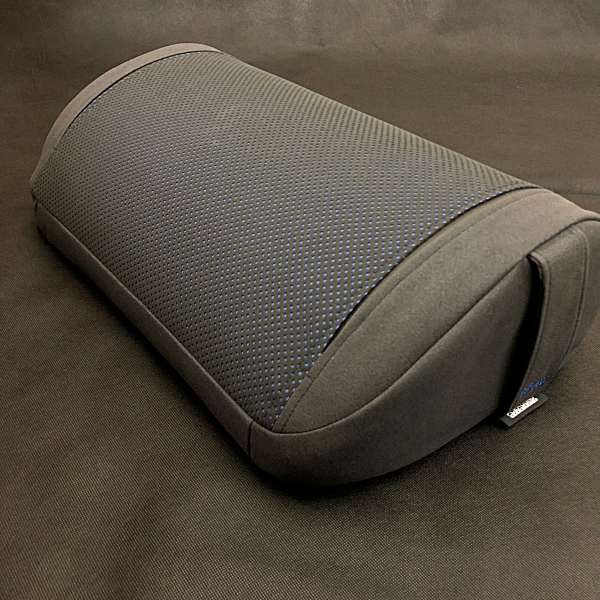
With its removable vegan suede cover and wedge shape, HUMU has a modern look. Made up of 50% polyurethane and 50% nylon, vegan suede is artificial. Despite not being real suede it feels soft and comfortable against the skin.

I received the cushion in graphite, it’s also available in gray.

There are two zippers one on either side of the cushion that allow you to remove the cover. The zippers blend so seamlessly into the cushions design that it took me a while to find out how to access them.
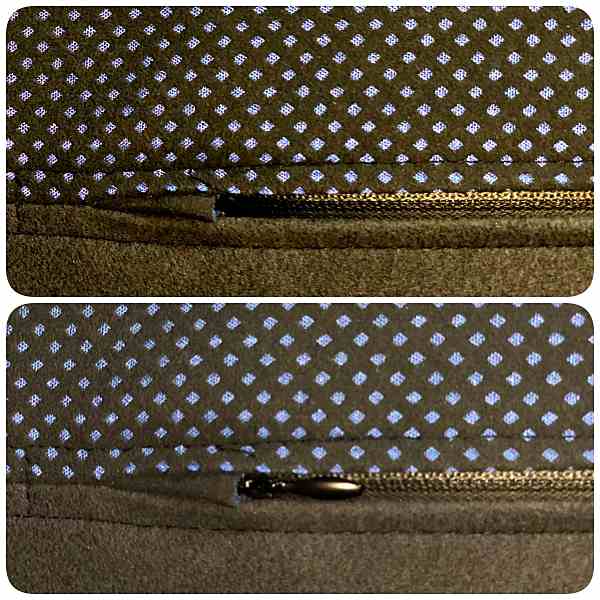
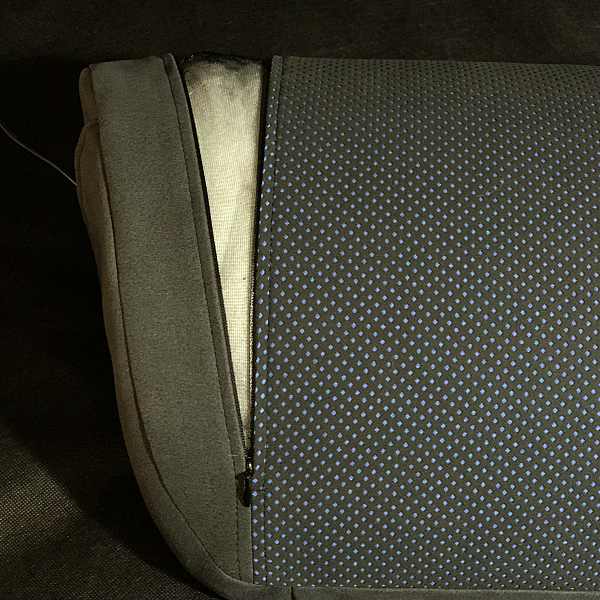
The cover is easy to remove and put back on. You can spot clean it using a wet cloth or wash it by hand.
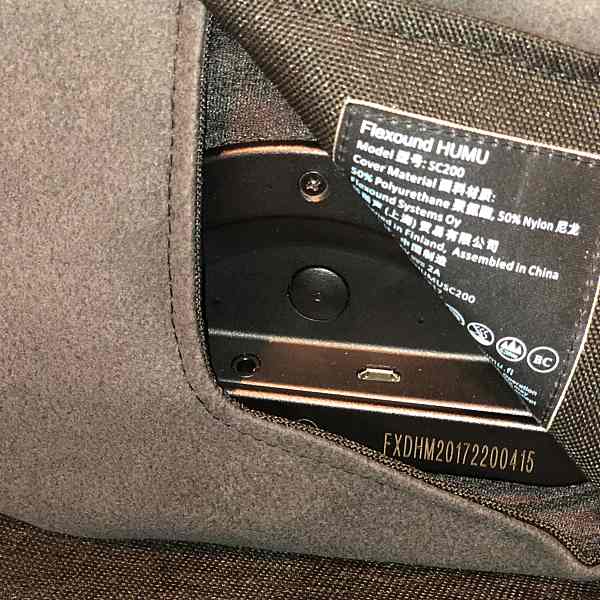
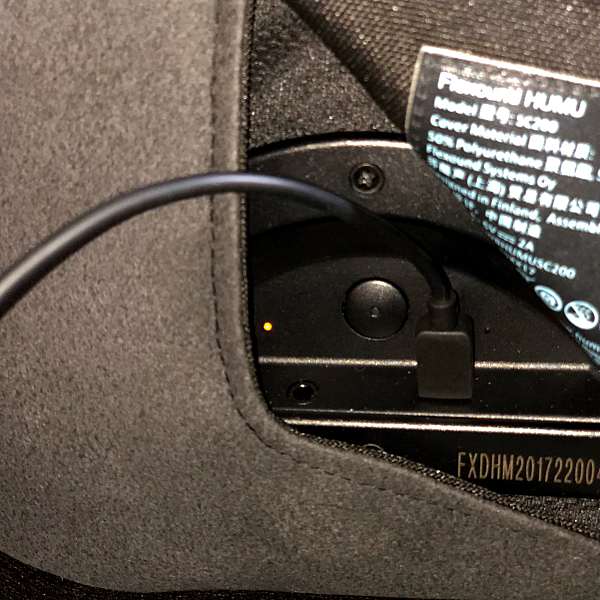
On the left side of the cushion, there’s a magnetic flap that lifts up to reveal the power button, charging port and indicator lights.
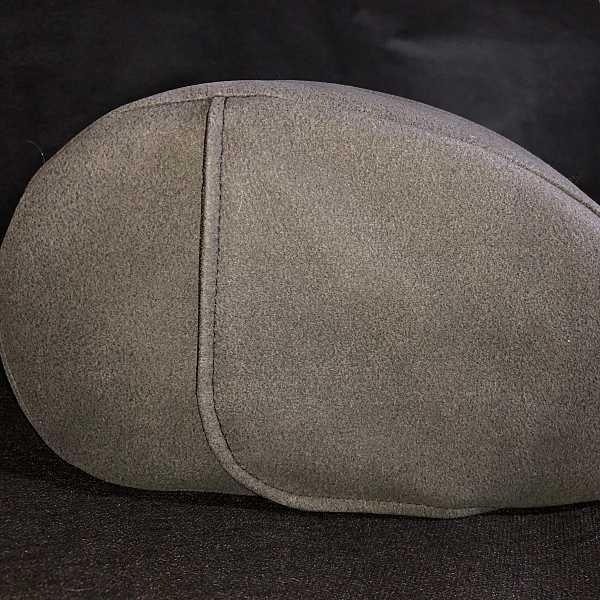
On the other side of the cushion, there’s a fabric carrying handle.
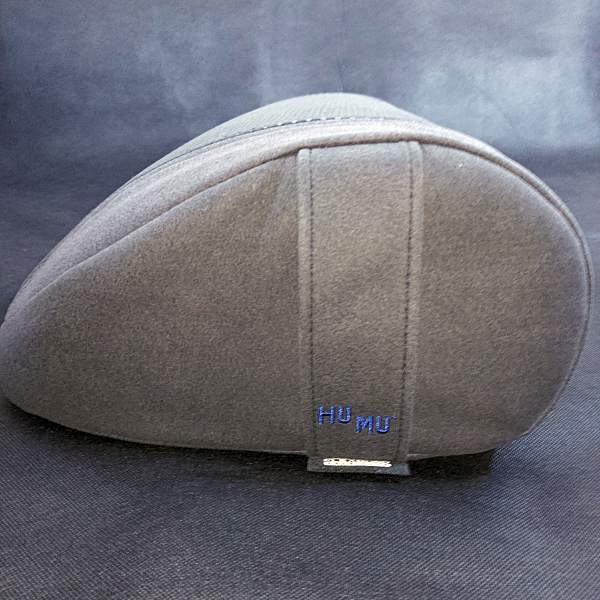
The cushion itself is pretty comfortable, although it does take a little breaking in. And it holds its shape well.

Battery & Charging

HUMU runs on a rechargeable Lithium battery. On a 3-hour charge, the battery can last up to 8-hours.  A provided 62-inch long Micro USB cable makes it easy to charge the cushion during use.

To charge the cushion plug the cable into the charging port located behind the magnetic flap. The indicator light glows orange while charging and turns off when fully charged.

Connection

HUMU uses Bluetooth 4.2 technology to connect to any Bluetooth enabled device. It can also be connected using a 3.5mm audio cable (not provided).

Bluetooth set up is easy as one, two, three. 1. Turn on HUMU. 2. Enable the Bluetooth function in your smart device. And 3. Select “Flexound Xperience” to pair.

I was able to easily connect it to my iPhone X, iPad Pro, and my 4K Apple TV.

Note: When using the cushion with a Bluetooth transmitter, my tv’s built-in Bluetooth or a 3.5mm audio cable I was unable to control the volume level.

How it works

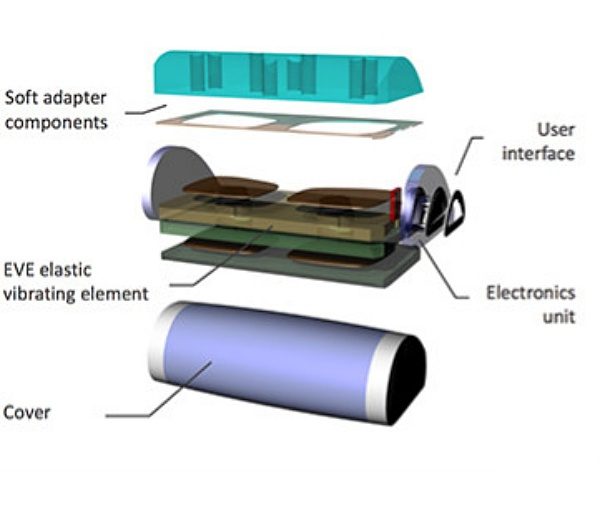
Unlike loudspeakers that vibrate sound into the air, Humu contains a single, proprietary Flexound Augmented Audio module with patented Elastic Vibrating Element (vibrating soundboards) to vibrate sound into an intelligent foam interior. This allows it to produce a wider range of frequencies (20 to 20,000 Hz) than most consumer loudspeakers or headphones. 
Performance

Movies, music, gaming, and relaxation all take on new life using HUMU.

Movies

During action movies, you feel every explosion, gunshot, and punch.

Horror movies are more immersive making them even more intense. I admit I even jumped a few times from the vibration of the cushion during scary scenes.

Even soundtracks seem to come to life.

HUMU’s like a mini home theater built into a cushion.

My experience using Humu to watch movies blew me away. So it’s not surprising that the technology will soon be available in movie theater seats.

If you’re a big fan of movies, you’ll love the 3D home theater experience that Humu provides.

Music

Listening to music provided a front row experience. I could feel the music as though I were actually sitting in the front row of a concert. Vocals, highs, and lows were all crisp and clear. The bass, especially from hip-hop tracks made the cushion rumble. HUMU creates a personal 3D stereo sound bubble that gives music a more spatial element, a wider soundstage if you will.

Why would you only listen to music if you can also feel it?

Gaming

I’m not much of a gamer but I tested a couple of games out on my Apple TV using HUMU. Like with movies and music it made gaming a more immersive experience.

Relaxation

I like to try to sneak a catnap into my daily routine whenever possible. Humu was a perfect excuse for me to take one of those naps. For testing purposes of course. Using my iPhone, I popped on a relaxing thunderstorm soundtrack. The experience was immersive, the rain felt like it was falling around me and I could feel a gentle vibration from the cushion with every roll of thunder. The sound was both resonate and soothing. To say it was relaxing would be an understatement, I was out like a light within 5 minutes. Humu took my relaxation to a whole other level.

What I like

  • Everything

What needs improvement

  • Nothing

Final thoughts

Was my excitement about HUMU warranted? You better believe it was. The Flexound HUMU Augmented Audio Cushion is one of those magical products that don’t come along very often. It provides a personal audio experience, unlike anything I have ever heard or felt before. And it immediately shot to the top of the list of my favorite products ever reviewed for the Gadgeteer. If you’re looking for a unique audio experience that you can actually FEEL, then you need to get your hands on a HUMU.
Price: $279.99
Where to buy: Indiegogo and Sharper Image
Source: The sample of this product was provided by HUMU.

Filed in categories: Reviews

Tagged:

Flexound HUMU Augmented Audio Cushion review originally appeared on The Gadgeteer on July 23, 2018 at 11:00 am.

Note: If you are subscribed to this feed through FeedBurner, please switch to our native feed URL http://the-gadgeteer.com/feed/ in order to ensure continuous delivery.

Aukey WiFi Smart plug review


REVIEW – Aukey has entered the home automation market with its new WiFi smart plug. Let’s take a look at how it works and why it might be the entry point you’ve been looking for.

What is it?

Aukey’s smart plug is basically a WiFi enabled switch that you place in between your wall outlet and the device that you want to be able to control. As far as home automation goes, it’s a very easy first step and when paired with a home assistant like Amazon Alexa or Google Assistant can be quite powerful.

Hardware specs

  • Input / Output: AC 110–125V 15A
  • Maximum Power Output: 1800W
  • Dimensions: 63 x 37 x 33mm / 2.48” x 1.46” x 1.3”
  • Weight: 79g / 2.78oz

What’s in the box?

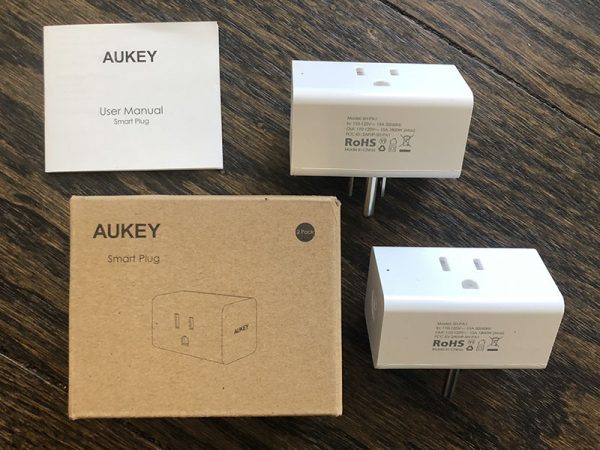
The review sample was actually their dual pack which makes a lot of sense as you start kitting out your home, and it’s nice to see the minimal packaging. Here’s what’s included…

  • 2 WiFi smart plugs
  • User Manual

Design and features

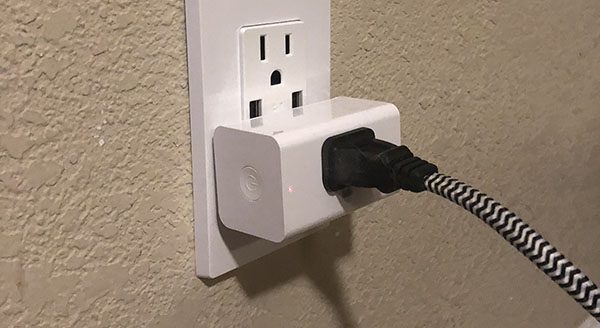
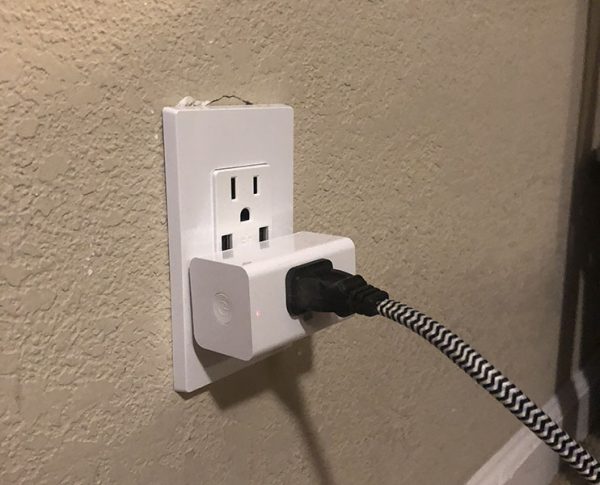
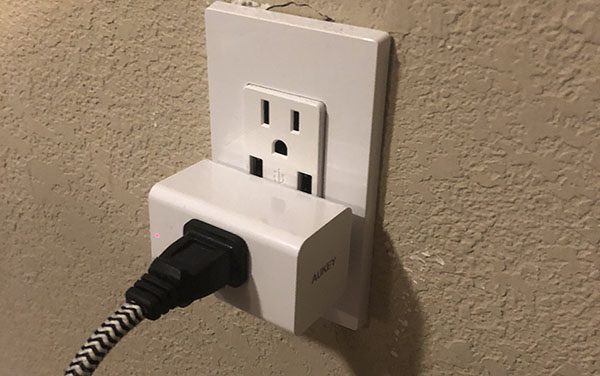
From an aesthetic point of view the smart plugs are minimalistic and are meant to not draw your attention. Their minimal width keeps them inside the dimensions of most wall plates. Keeping the height down allows you to place one above another on one double wall outlet. This particular outlet I’ve connected it to has USB ports which are now blocked by the unit, but that’s an outlet problem, as connecting USB cables frequently interferes with any AC plug.

Staying consistent with the minimal approach, There’s very little else on the smart plug. On the left end, there’s a power button and a simple LED light on the front edge next to it.

Setup

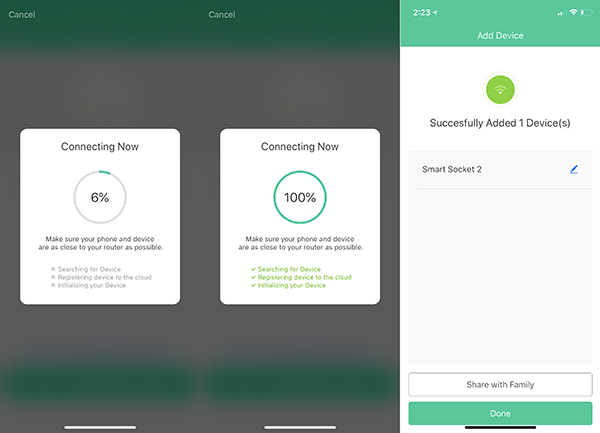
Getting started is a similar process to most WiFi enabled, app-controlled accessories. Download and launch the AUKEY Home app from the app store for your device. Bounce over to your WiFi settings and connect to the WiFi that the device is broadcasting, and then back to the app to enter your home network information. The app then does the connection for you which in my case took maybe 30 seconds. It was really fast and worked first try on both smart plugs which is something I cannot say for some other smart plugs that I’ve tried.

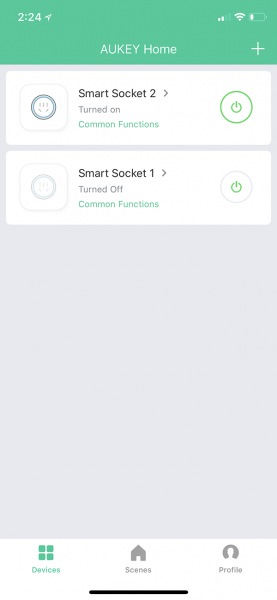
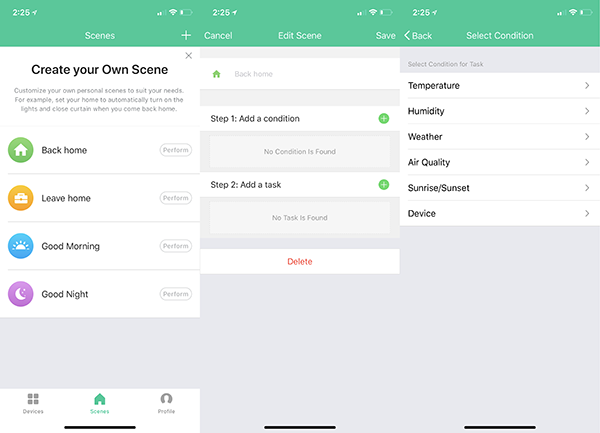
So at this point, the smart plugs are set up and you will see them (and any others you may have set up) in the app as seen here. If all you want to do is launch an app and turn things on and off, you can read the next paragraph and then skip ahead to performance.

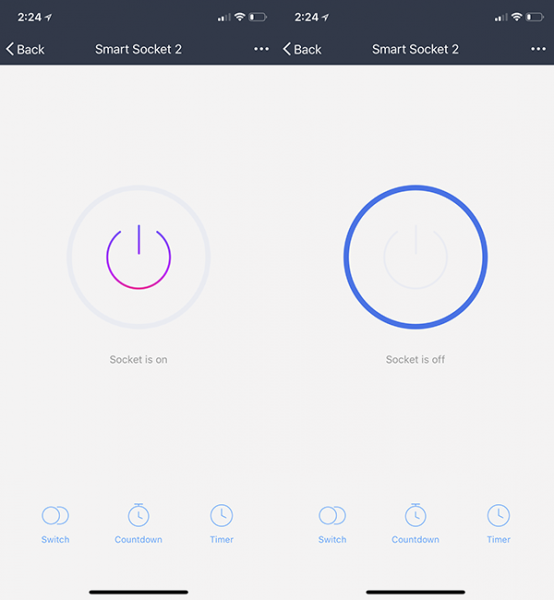
The power button icon on the right of each smart plug lets you toggle power to whatever device you have plugged in. You can see above the language changes ‘Turned on’ vs. ‘Turned off’ as well as the icon on the left is highlighted in blue when a device is on. Clicking into the device also lets you toggle power with the center icon or the bottom ‘switch’ icon (redundancy) and the visual is even more clear as to its status.

You’ll also see the two other icons across the bottom of the screen where you can start to customize further. Countdown lets you set an expiration time in case you might fall asleep while reading as an example. Timer lets you set an event to turn on or off at a specific time and have it recur or be a one time need.

Creating ‘Scenes’ lets you activate multiple smart plugs (and of course the devices connected to them) and set conditions that trigger them. There are four scenes built in as you see above, but you can choose a condition and have it perform a task which is typically toggling a smart plug.

So want your floor lamp to come on at sunset? Choose sunset and the smart plug connected to your floor lamp, and then give the scene a distinctive name. This is important as if you connect an assistant like Alexa you want it to easily understand.

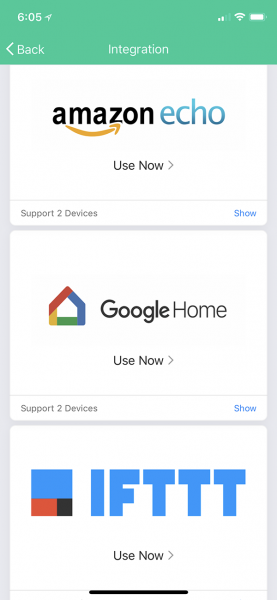
That brings us to the last part of setup if you want to connect it to your Alexa device should you have one. In the profile section (icon in the leftmost image above) you’ll see a selection called integration. Once there, you’ll see these three options.

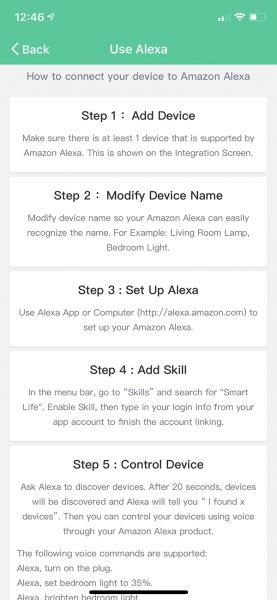
Amazon and Google are pretty self-explanatory, but if you haven’t heard of IFTTT (IF This, Then That) you should definitely check it out. That may be your solution when you wish you were able to automate something that otherwise doesn’t look to be supported by whatever system you’re using. As for connecting your Amazon Echo, here are the instructions that Aukey provides in app and while this crowded screen may make it look time-consuming, it’s super fast and works first try.

Okay, enough with the setup already. How does it work?

Performance

As I’ve mentioned a couple of times above, Aukey’s smart plugs just plain worked. It’s something that I’ve come to be surprised by in today’s ‘ship it and fix it with firmware later’ mentality. I have 10 (yes ten) smart plugs and switches from an established brand and every time I add a new switch the app forgets some of the earlier ones and let’s not even get into updating wifi passwords (ugh). Aukey’s app is clean, simple and controls devices in a logical way. The integration with Alexa is great with Amazon taking the naming convention directly from Aukey without a problem.

So what’s the catch? None really, just a couple of things to keep in mind.

First, choose distinctive device and scene names. If you’re using Alexa and all your devices are ‘something lights’ there’s a good chance background noise will cause Alexa to only hear ‘lights’ and you’ll get a ‘there are multiple devices with that name’ response which is annoying. You can double this issue when you add scene names as well. The second part of this is just making sure that they’re memorable and not too lengthy. This is an ‘assistant’ problem and not a flaw of Aukey or their device.

Second, the smart plug like all the others on the market, are toggling power only. This means you can’t connect just any device and have it work. Lamps and any other lighting with an AC cord work great (remember the lamp itself needs to be on). A coffee maker, on the other hand, would only work if said coffee maker automatically starts brewing when the power switches on. Similarly, a computer that needs a password after startup, or a TV that always defaults to the input you don’t use won’t work so well.

Lastly, please be careful automating something that could be dangerous, like a space heater. Asking Alexa to turn something on while you’re home is one thing, but if it’s set to come on at 6am to warm up the house and the dog has dropped a toy or pushed their dog bed too close, nothing is going to catch that and decide maybe it’s not a good idea to turn on right now.

What I like

  • Small and compact
  • Two unit bundle
  • They just work
  • Integration with assistants like Amazon and Google
  • The low cost

What needs to be improved

  • Would like to see native Apple HomeKit support

Final thoughts

I’m going to sound like a broken record here, but again, these just work. I’ve spent a few hours mucking around with products like this only to get frustrated or resort to full WiFi reset up. This was as simple as it gets and again I found myself surprised. If you’re looking to have control of a few lights or other compatible devices and want a low-cost way to do it then look no further. The other players in the space are twice this cost and don’t function this well.

Price: $27.99
Where to buy: Amazon
Source: The sample of this product was provided by Aukey.

Filed in categories: Reviews

Tagged:

Aukey WiFi Smart plug review originally appeared on The Gadgeteer on July 23, 2018 at 9:00 am.

Note: If you are subscribed to this feed through FeedBurner, please switch to our native feed URL http://the-gadgeteer.com/feed/ in order to ensure continuous delivery.
Pampered Chef Breakfast Sandwich Maker review

REVIEW – You’ve probably heard that breakfast is the most important meal of the day.  Given that, with our busy lifestyles we need a tool that can help us make quick, healthy choices for that most important meal.  The Pampered Chef Breakfast Sandwich Maker aims to do that by giving you a better, faster and more convenient choice than your local drive-through.  But can it live up to the expectation of a tasty breakfast sandwich?  That’s what we are going to find out today…

What’s in the box?

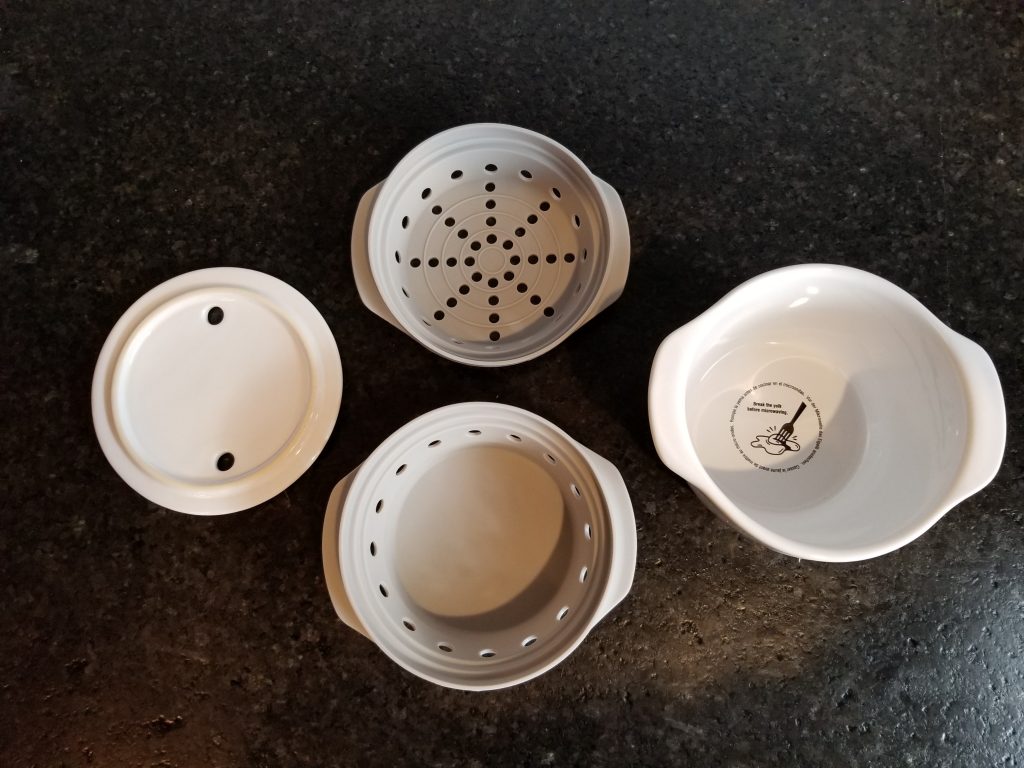
The Pampered Chef Breakfast Sandwich Maker consists of four parts: there is a ceramic deep bowl that is the base of the sandwich maker.  This is where you put the egg that is the centerpiece of your sandwich.  Next is a deep silicon tray where you can put any other sort of filling you want heated – Canadian bacon, a veggie patty or any other sort of pre-cooked item.  It is important to note that you cannot use frozen meats in the sandwich maker – all fillings need to be pre-cooked and at worst, refrigerated but not frozen.  After the filling insert is a shallow silicon tray for your bread.  An English muffin, a thin sandwich round or even a tortilla will work.  Finally there is a ceramic top.

How does it work?

OK, so let’s get started.  I love an over-medium egg sandwich, so that’s what I will begin with.  After greasing the bottom of the ceramic bowl with butter as instructed, my lovely assistant is ready to crack a large egg into the bowl.

According to the instructions, if you are making an over-medium egg you should use only 1 egg.  If you are scrambling the egg, you can use 1-2 eggs.  One egg it is.  I also like Canadian bacon, so we add the deep silicon tray with a single slice.

We are ready for stage 1 cooking.  I place the ceramic lid on the bowl, place it in the microwave and begin.  The instructions state that cooking times are calculated for a 1200 watt microwave, and as my microwave is a measly 1100 watts, I adjust up from the suggested 30 seconds cooking time to 40 seconds.  And so the interminable wait begins.

Visibly 30 seconds older, I remove the bowl from the microwave and the top from the bowl.  Adding the shallow insert and a sliced English muffin, I return the lid to the top.  Another 30 second eternity in the microwave.

Now comes the hard part: removing from the microwave, I have to let the bowl rest for a whole minute before removing the trays and assembling my sandwich.  Patience is a virtue, just not one of my virtues.

A minute later, I open the container to…disappointment.  The egg is not cooked.  At all.  It is still a liquid mess.  The Canadian bacon, on the other hand, is dried out on the edges, a classic sign of over-cooking.

I replaced the lid on the pot and begin cooking the egg in 10 second bursts as instructed.  After an additional 30 seconds, the egg yolk is a hard mess but the white part is still mostly liquid.

OK, so over medium is not going to work.  Did I mention that I love scrambled eggs?  After a thorough cleaning and then re-greasing the bottom of the bowl, my lovely assistant breaks a single egg into the bowl and we scramble it.  Despite what my high school guidance counselor said, I learned from my mistake last time.  This go-around I put the egg in the microwave by itself and cook for 30 seconds per the instructions for a single-egg scramble.  After 30 seconds, I remove the bowl, add the tray with another slice of Canadian bacon, and cook for 10 seconds.  Yes, I know, I am going off script here, but I am trying to reach the happy center of the experience – a fully cooked egg, Canadian bacon that does not look like it spent 6 months in the Sahara, and an English muffin.

After the initial 40 seconds, I add the muffin and cook for a final 30 seconds.  Another minute wait, and another disappointment.  While the Canadian bacon is fully cooked and in pretty decent shape, the egg is still mostly uncooked.

After two more tries making scrambled eggs, I am completely unable to get a nicely cooked egg.  Either it is horribly overdone or undercooked.

What I like

The Pampered Chef Breakfast Sandwich Maker is nicely made.  My wife loves the pieces and will re-purpose them for other uses.  Unfortunately, you just can’t use it to make breakfast sandwiches.

What needs to be improved

I’m not sure – it seems to me that there are 2 issues at work here.  First is that a “one approach fits all” way just doesn’t work.  There are too many variables, specifically in the microwave part of the equation.  The second is that in order to get past the first you have to have some sort of innate cooking skills, or the patience and time to go through many failed experiments to find the combination that works for your ingredients, your microwave and your time.  And with a limited selection of ingredients that are compatible with the sandwich maker (and the associated breakfast boredom that would set in with those choices), it seems like a lot of work for a very limited return.

All I know is that I have to go back to the old, less convenient way of making breakfast sandwiches.

Final thoughts

The Pampered Chef Breakfast Sandwich Maker seems to fail at its basic function: cooking an egg for a breakfast sandwich.  My microwave is as standard as they come, and no amount of tweaking the cooking time yielded a nicely cooked egg.  I suppose I could have used a pre-cooked scrambled egg patty, but then if I did why would I need the sandwich maker?

Another concern is the bread.  A good sandwich (in my humble opinion) has a toasted bread.  The sandwich maker gives you a steamed muffin.  Adding the muffin is a crucial part of the cook timing, so if you choose to toast and not use the sandwich maker for your bread, there is even more adjustment you need to do to ensure your ingredients are not overcooked.

Price: $29.95
Where to buy: The Pampered Chef web site
Source: The sample of this product was provided by The Pampered Chef.

Filed in categories: Reviews

Tagged: ,

Pampered Chef Breakfast Sandwich Maker review originally appeared on The Gadgeteer on July 22, 2018 at 10:00 am.

Note: If you are subscribed to this feed through FeedBurner, please switch to our native feed URL http://the-gadgeteer.com/feed/ in order to ensure continuous delivery.
TaoTronics Smart LED Floor Lamp, Works with Alexa review


REVIEW – I must admit that I am a fan of Alexa controlled smart devices, not only because of the smart integration but also because my kids simply love the “play around” with Alexa.

What is it?

The TaoTronics Smart LED Floor Lamp is a floor standing LED lamp that works independently or with Alexa as a smart device.

What’s in the box


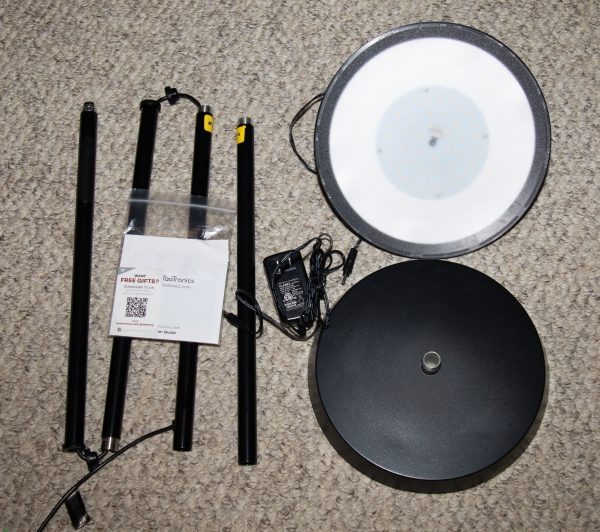
In the box, there is the base of the lamp, the top of the lamp that includes the LEDs and the diffusion shade, the lamp pole that comes pre-wired, and in 4 sections that have to be screwed to together, the AC adapter and the assembly/instruction manual.

Design and features

The TaoTronics Smart LED Floor Lamp works with Alexa as a smart device. It is a 65 inch Dimmable Lamp with 3000 Kelvin Warm Light that is covered by a diffusion shade. You can control this wifi-connected light with your voice via Alexa, or it can be manually controlled.
There are apps available for both IOS and Android. The app allows you to stay connected and control your lamp even when you’re not at home. You can also use the timer function to pre-set the time to turn the lamp on or off from anywhere in the world.
Additional functions include wireless dimming and the ability to control the percentage brightness of the lamp either by tapping the power sensor on the lamp or by voice command. (For example: “Alexa set floor lamp to 60 percent). “Floor lamp” is just an example of a name that can be assigned to the lamp when you set it up in the Alexa app. The lamp also memorizes your most recent brightness settings.


Once the lamp is assembled, the power cable extends out of the bottom and connects to the AC adapter. The 4 rubber plugs seen in the picture below are shipping plugs that protect the threads on the sections of the lamp pole.


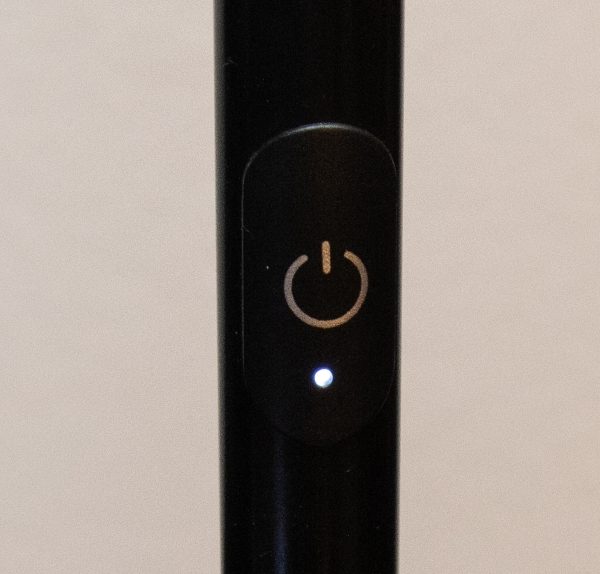
The only control on the pole of the lamp is a power/sensor button that controls powering on and off and dimming. Also, with a press for a few seconds in the off mode, it activates the wifi function so that it connects to your network. (Same network as Alexa of course)


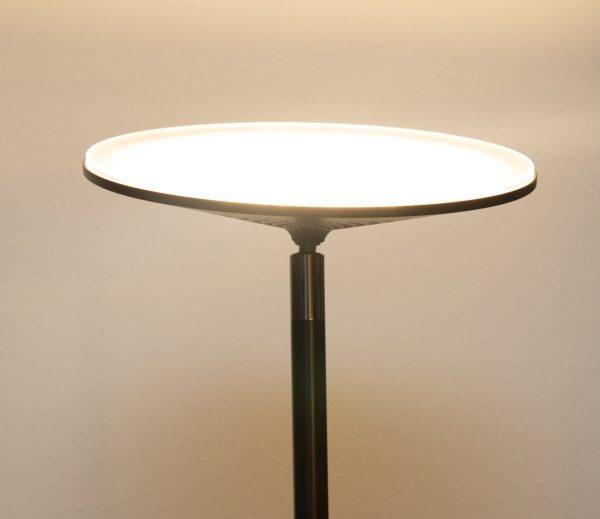
The head of the lamp that includes the LEDs and the diffusion shade connects to the lamp pole with a swiveling ball joint. It swivels approximately 20 degrees in any direction.


The lamp gives off an even and widely spread diffused light that is easy on the eyes and yet provides adequate coverage for a 20′ x 10′ room.

App

Taotronics offers the SunHome app for IOS and Android, that allows you to control the lamp including power functions and setting scenes. Here are the screenshots from the app:


What I like

I like everything about the physical lamp. It looks great and functions well.

What can be improved

When I signed up to gain access to their app, I was initially successful, but then I got an “invalid login” message and it took over a dozen attempts over a 2 week period to finally get continuously successful access. This included submitting requests to reset my password and entering new passwords and codes over a dozen times. Access to their app needs to be simplified and improved.

Final thoughts

This TaoTronics Smart LED Floor Lamp that works with Alexa is simply a nice looking and great functioning lamp, that easily integrates into the smart environment in my home. Prior to receiving this lamp, I already had a floor lamp that works with an Alexa enabled WEMO outlet. Since I received this lamp, the pre-existing lamp is rarely used. The cost to value dynamic is usually individually subjective, so I will not quantify it. However, I am very happy to have this lamp, and if I did not, I would consider it at its current price.

Price: $89.99
Where can I buy: Amazon
Source: The sample for this review was provided by Taotronics.

Filed in categories: Reviews

Tagged:

TaoTronics Smart LED Floor Lamp, Works with Alexa review originally appeared on The Gadgeteer on July 22, 2018 at 9:00 am.

Note: If you are subscribed to this feed through FeedBurner, please switch to our native feed URL http://the-gadgeteer.com/feed/ in order to ensure continuous delivery.
Uni Jetstream Stylus Ballpoint Pen review

REVIEW – What features do you look for when shopping for an inexpensive everyday pen? A capless design? Lightweight body? Slim barrel? Built-in stylus? If you answered yes, yes, yes, and yes to those questions, then the Uni Jetstream Stylus from JetPens ticks all those boxes and is priced at a reasonable $5.25. Let’s take a closer look.

What is it?

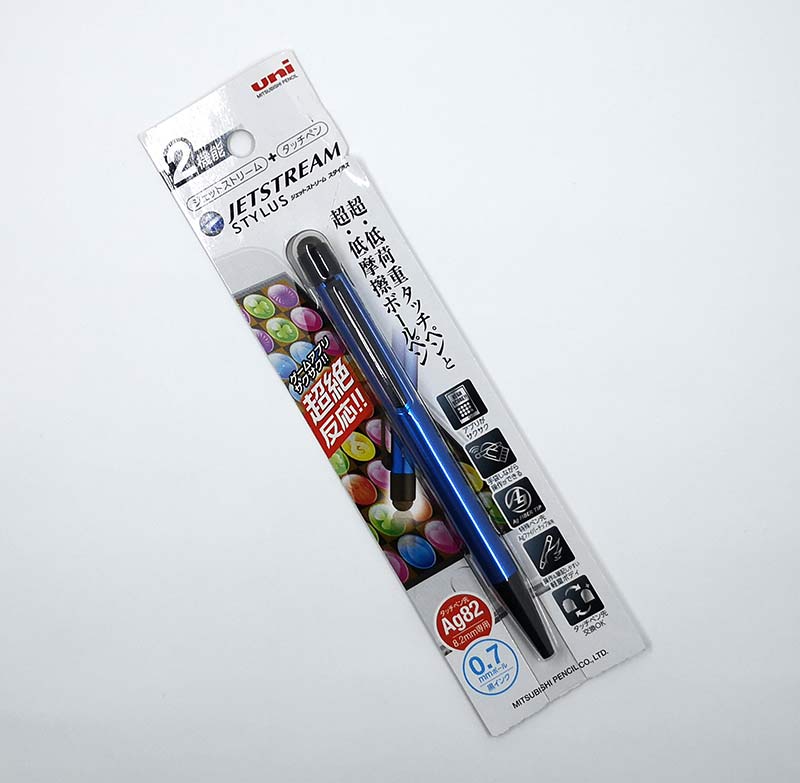
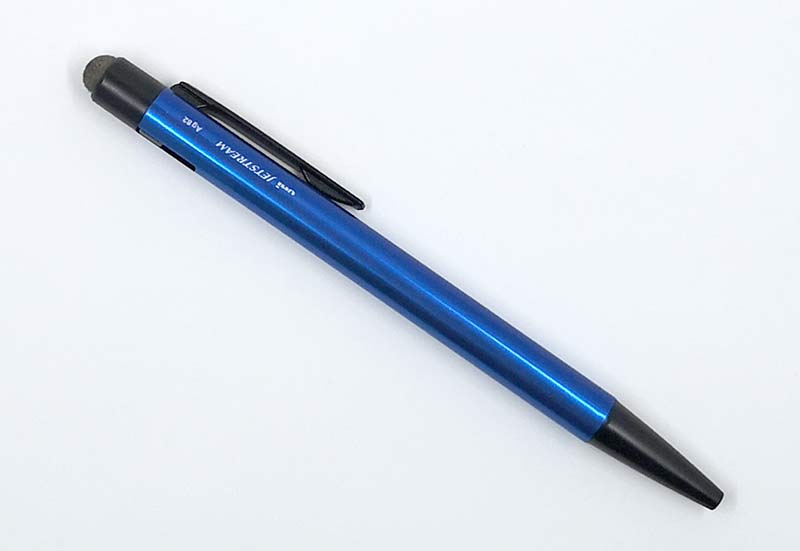
The Uni Jetstream Stylus Ballpoint Pen is just what you would think it is. It’s a ballpoint pen with a built-in stylus. It’s available in 4 colors including the bright blue version that was sent to me.

Design and features

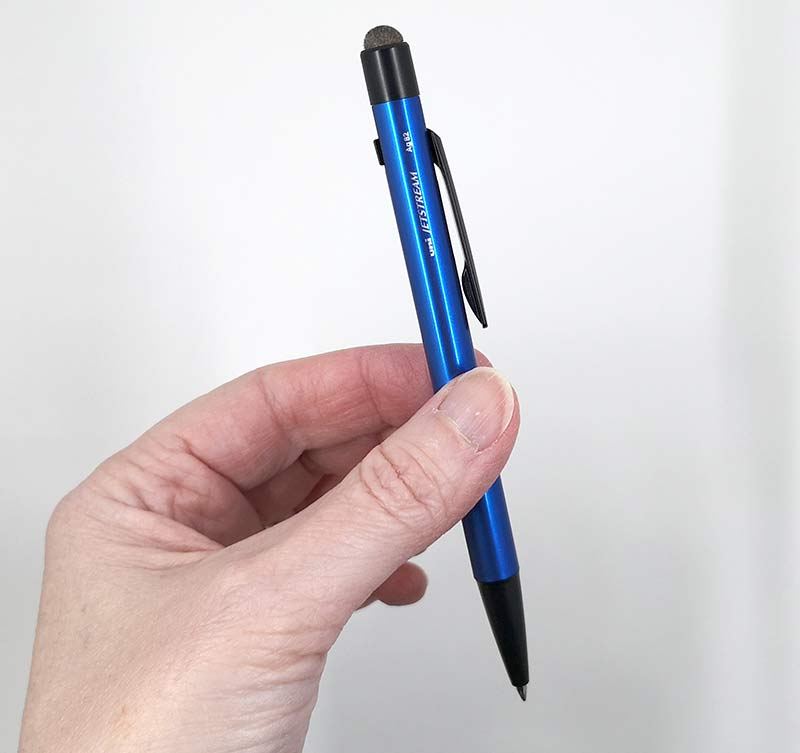
The Uni Jetstream Stylus Ballpoint Pen has a sleek look, with a slim plastic resin barrel which looks like brushed aluminum, but without the weight. A black tip, top, and clip give it a snazzy look.

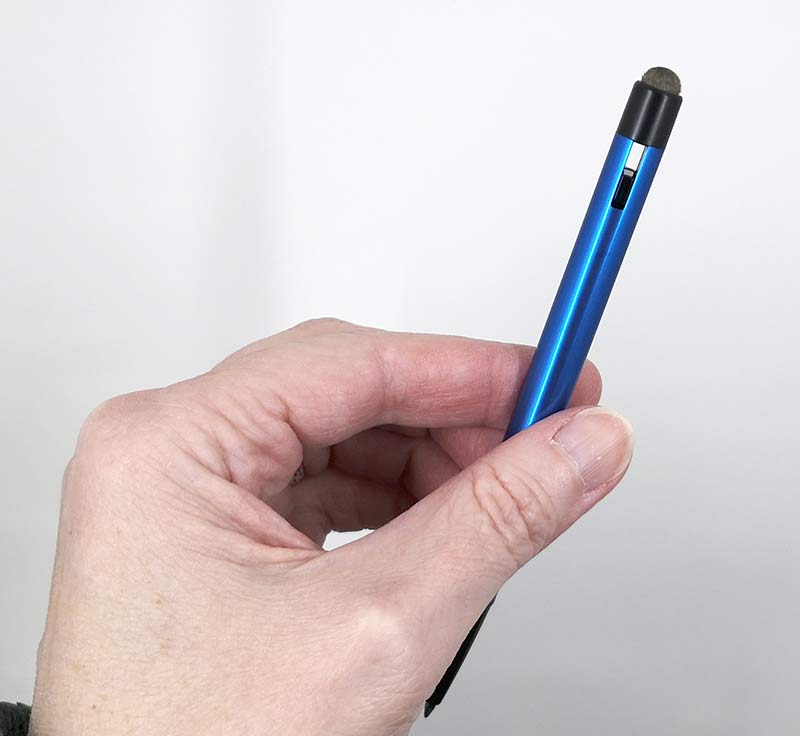
The writing tip is extended by sliding down the pocket clip which snaps in place and when it does, a retract button pops out of the opposite side. Pressing that button immediately retracts the tip with a satisfying click.

When the writing tip is extended, you can see through the Jetstream’s barrel.

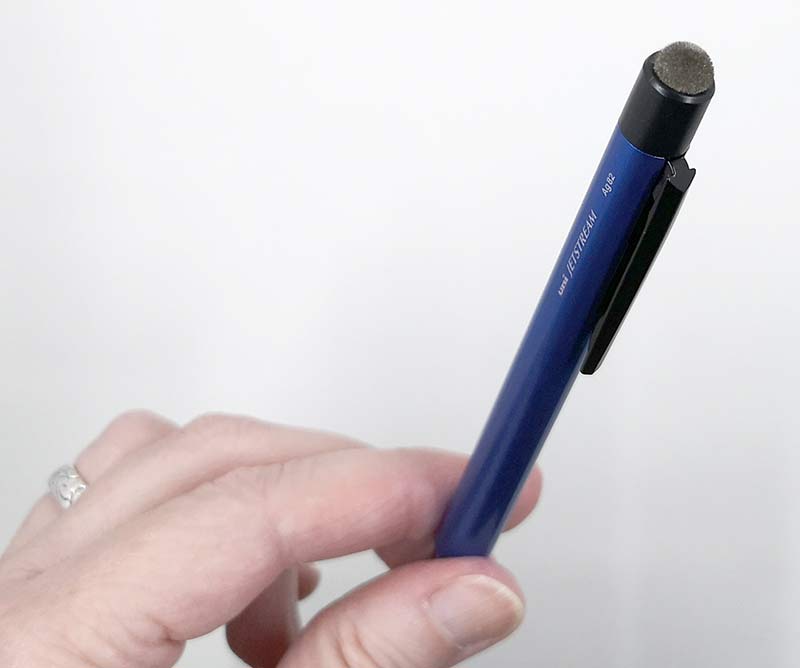
On the top of the pen is what might look like an eraser, but it’s really a capacitive stylus tip. It’s an Ag Fiber capacitive stylus tip to be exact. This stylus tip has silver coated fibers that make is soft and fuzzy. I wouldn’t recommend it as a drawing or writing stylus just because it’s a bit wide and can obscure your view while writing and drawing. But for scrolling through lists, and web pages and selecting icons on your tablet or phone, it works great and better than a typical rubber tipped stylus.

Both the ink and stylus tips are refillable/replaceable. The ink refills are $1.95 each and the stylus refills come in a pack of 2 for $5.25.

What I like

  • Lightweight and slim
  • Inexpensive
  • Ink can be refilled
  • Stylus tip can be replaced

What needs to be improved

  • Stylus tip doesn’t have a protective cap

Final thoughts

Although the Uni Jetstream Stylus Ballpoint Pen 0.7mm pen writes smoothly and puts down a nice line of black ink, it won’t exactly blow your mind. That’s fine though. After all, it’s a $5.25 pen, it’s not expected to change your life. But if you’re looking for a nice slim everyday pen with a built-in stylus tip that is a lot nicer than a generic rubber tipped stylus, this pen will do the job and look pretty snazzy while doing it.

Price: $5.25
Where to buy: Jetpens
Source: The sample for this review was provided by Jetpens.

Filed in categories: Reviews

Tagged: ,

Uni Jetstream Stylus Ballpoint Pen review originally appeared on The Gadgeteer on July 21, 2018 at 10:00 am.

Note: If you are subscribed to this feed through FeedBurner, please switch to our native feed URL http://the-gadgeteer.com/feed/ in order to ensure continuous delivery.