Scosche Boombottle MM Bluetooth speaker review


REVIEW – Over the past few years, portable Bluetooth speakers have taken the market by storm and there is a flood of new devices that readily available with various features and many at reasonable prices. The Scosche Boombottle speaker is another device fighting for a niche. Let’s see how it does.

What is it?

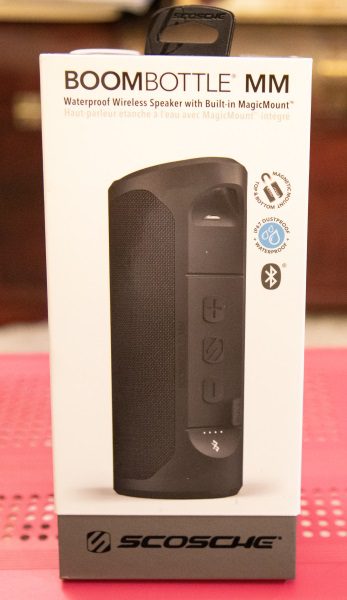
The Scosche Boombottle speaker is a waterproof wireless Bluetooth speaker with a magnetic mount to secure your mobile device and a tripod mount or magnetic mount that allows it to be mounted to a metal surface or on a tripod or a stand with a 1/4-20″ stud. It is available in black and gray camouflage.

What’s in the box


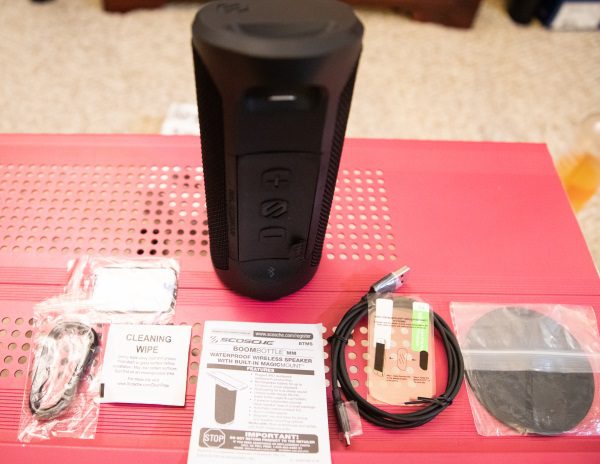
1 x Boombottle Speaker
1 x USB Type Charging Cable
1 x Large Mounting Metal Plate
1 x Extra Large Circular Mounting Metal Plate
1 x Carabiner Clip
1 x Protective Film Sticker
1 x User Manual

Design and features

Features
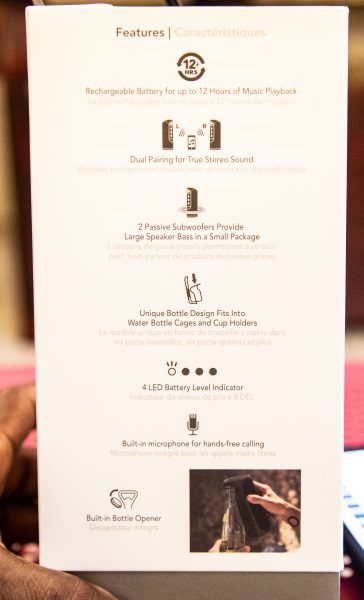
• Magnetically mount your device to the Boombottle MM Mobile Speaker while also magnetically mounting the Boombottle to most metal surfaces
• Built-in Bottle Opener
• Built-in Microphone for Hands-free Calling
• Unique Bottle Design Fits Into Water Bottle Cages and Cup Holders
• Rechargeable Battery for up to 12 Hours of Music Playback
• Dual-Pairing for True Stereo Sound
• IP67 Rated Waterproof / Dustproof Construction

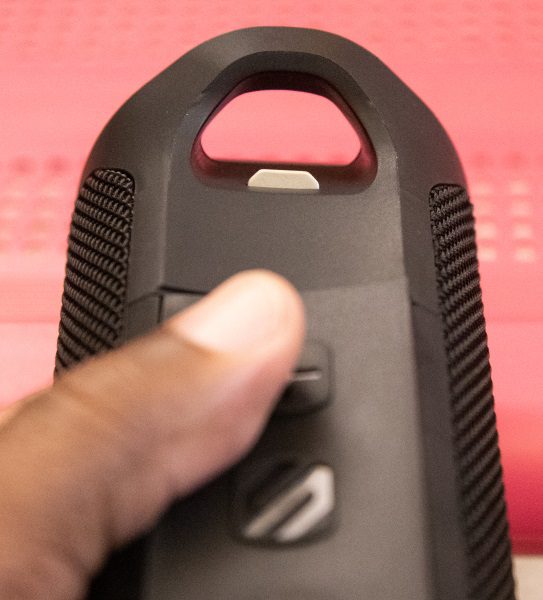
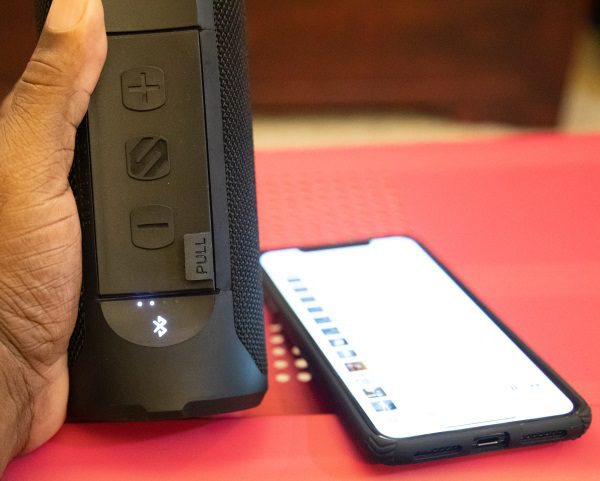
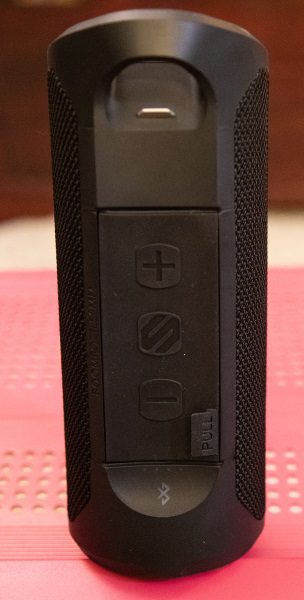
The front of the speaker has the carry handle that can be used as is or with the Carabiner, and there is also a bottle opener at the top. In the middle, there is the rubber sealing door with embedded external buttons that from top to bottom are the volume up button, the multi-function button, and the volume down button. Below the control buttons, there is the LED Battery Level Indicator and the Bluetooth LED Status Indicator.


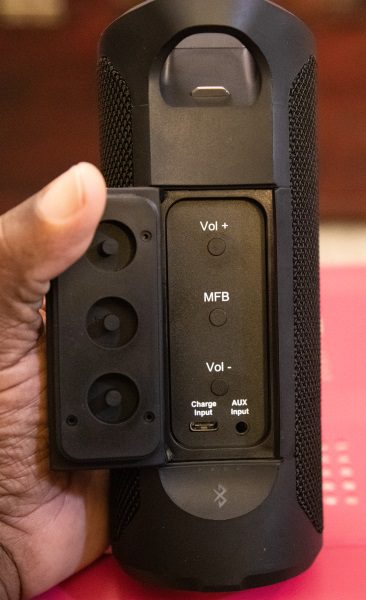
When you open the rubber sealing door, underneath there are the actual buttons that correspond with those embedded in the rubber cover along with the charging and auxiliary ports below the buttons.


Under the handle of the speaker, there is a bottle opener.


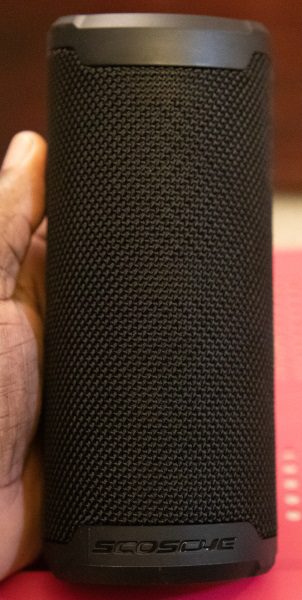
On the front of the speaker, there is a nice matte black speaker grille, with the brand name engraved below.


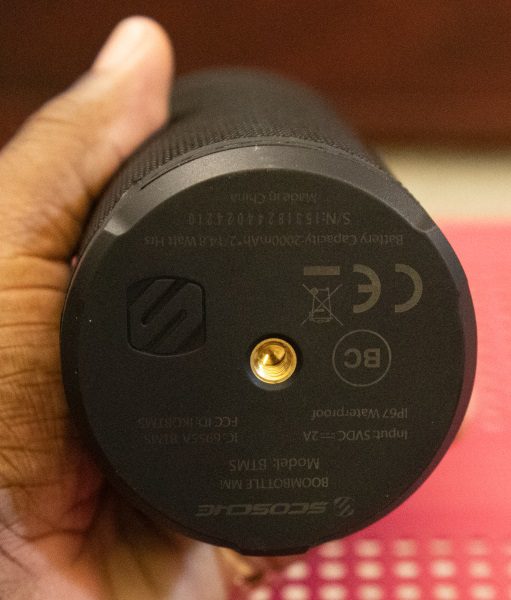
At the bottom of the speaker, there is as 1/4-20″ female mount that allows it to be mounted to a tripod or stand or any surface with a matching stud. The extra large round magnet mount can be attached to the bottom if you choose to mount the speaker magnetically.

Performance

Specifications

  • Bluetooth®: BT 4.2 AWRCP, A2DP
  • 30ft. Wireless Range
  • 2 x 45mm Speakers
  • Freq. Range: 80Hz – 18 KHz
  • 12W Power Output
  • 4000mAh Internal Battery
  • Size: 185mm (H) x 72mm (D)
  • Weight: 1.25lbs

This Bluetooth speaker looks and sounds great, and the build quality is second to none. It is easy to pair and operate and seems like it can take a beating. The magnetic base mount or the tripod mount are great options for versatility when choosing where and how to place the speaker. I am not a fan of the upper magnetic mount that is used to mount your phone, because you need to attach the magnetic mounting plate to your phone or phone case in order to safely secure the phone. I was able to get my phone to stay in place without the metal plate, but any amount of vibration caused it to start to slide off. The battery charge lasts a long time and more time than I would ever use this speaker for at any one time.


Pairing the speaker is very easy and the Bluetooth and charge level indicators are very visible.

The manufacturer includes the following short but helpful video on their website, showing how to pair one or two speakers:

What I like

  • That it is waterproof
  • The sound
  • The ability to carry it or mount it
  • The solid Bluetooth connection
  • The design
  • The battery life

What can be improved

Final thoughts

After testing quite a few Bluetooth speakers, I have become quite “picky” about what I like and what I classify as a desirable and usable feature versus a useless gimmick. I really like this Bluetooth speaker because of the build quality, the sound, the features, and the style. And, the fact that it is waterproof means that I have so much less to worry about when I am using it, especially outdoors. I really like it, and I think that many people looking for this type of device will like it as well. I definitely give it two thumbs up!!

Price: $129.99
Where to buy: Scosche website and Amazon
Source: The sample for this review was provided by Scosche.

Filed in categories: Reviews

Tagged:

Scosche Boombottle MM Bluetooth speaker review originally appeared on The Gadgeteer on November 3, 2018 at 11:17 am.

Note: If you are subscribed to this feed through FeedBurner, please switch to our native feed URL http://the-gadgeteer.com/feed/ in order to ensure continuous delivery.

Moodoo Smart Home Fragrance Diffuser review

REVIEW – The Moodoo Smart Home Fragrance Diffuser is a enables you to customize scents to your style and preference

What is it?

It’s a smart home aroma diffuser that enables you to customize your scentscapes to match your mood. And yes, “scentscapes” are a thing.

Hardware specs

  • Connects through 2.4 Ghz WiFi networks
  • IOS and Android compatible apps
  • Amazon Alexa, Google Assistant, and IFTTT compatible
  • Fans with adjustable speeds designed for up to 600 square foot rooms
  • Available with EU or US adaptor
  • Built-in battery optional

What’s in the box?

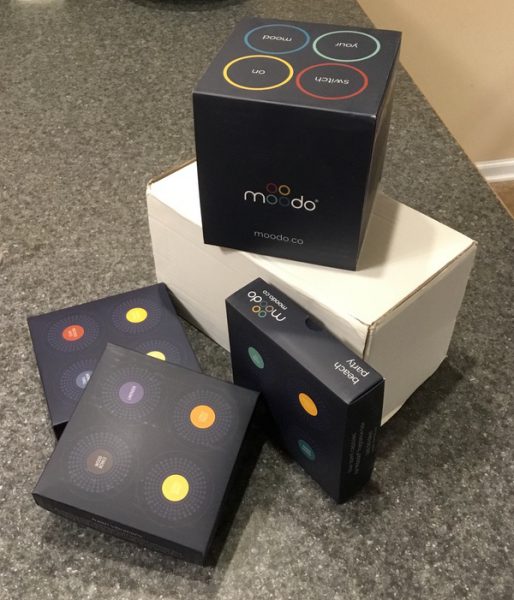
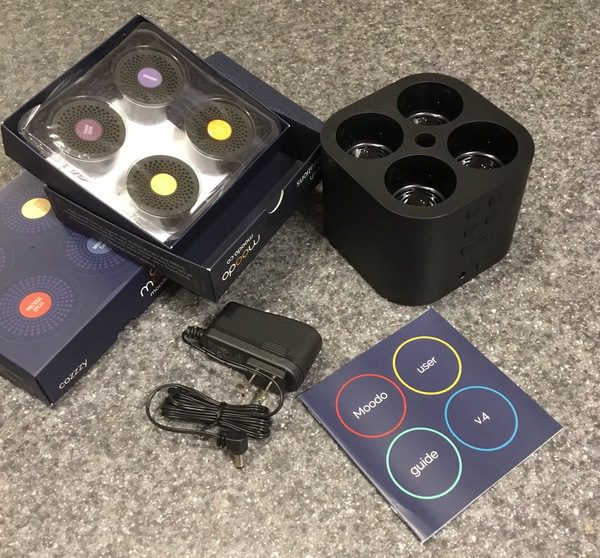
I’m testing the Moodoo Starter Pack which comes with the base unit, adaptor, and three packs of scent “families.” The kit also includes a printed user guide.
Design and features

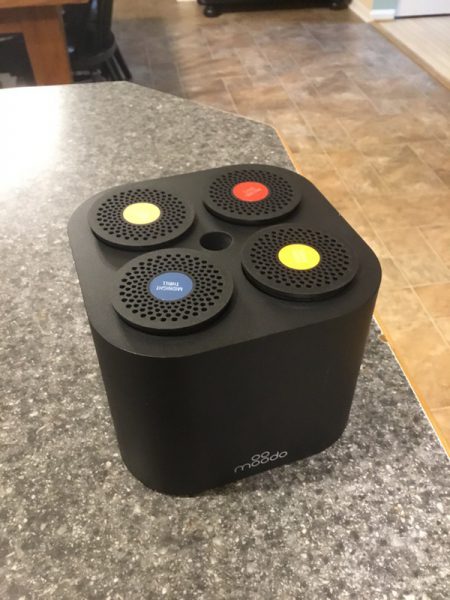
The Moodoo is designed to allow you to customize your scents through a programmable aroma diffuser. Four aroma pods are loaded into the device, which has an individual fan for each pod that controls the strength and intensity of the scent. This enables you to customize thousands of different aroma combinations to match your desired ambiance.

The unit is a black cube that measures 3.75″ by 4.5″ by 4.5″. The matt black finish is elegant and subdued, so you can park it anywhere in your house and it won’t clash with your decor.
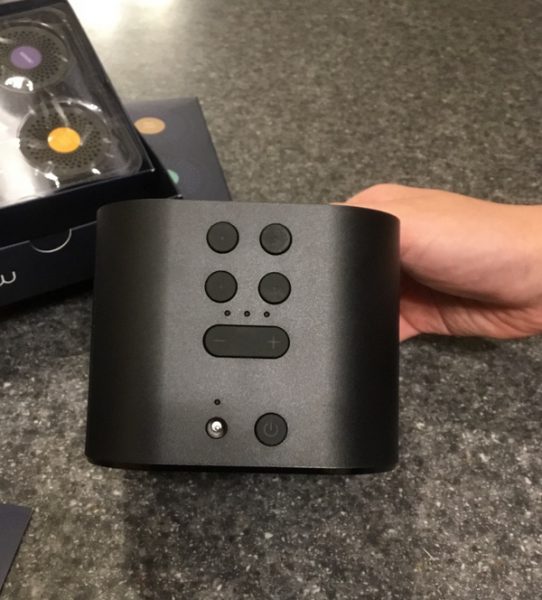
Manual controls are all on the front face of the unit, including individual fan controls and a “volume” button to increase the intensity of the diffusion. The black rubberized buttons on the face allow for manual operation. You can order this unit with a battery if you like for full portability, or plug it in with the included adaptor. Options for a US or EU adaptor are included in the ordering process.
Setup

While the manual controls are a nice backup, we’re focusing on the excellent app in this review. It’s a well-designed, intuitive piece of software that enables full customization of the Moodoo’s capabilities. You’ll start by downloading the app to your Android or iOS compatible device and creating an account with Moodoo. Signing up with your Facebook or Google account saves the step of remembering another email/password combo:

With the iOS app, I was given the option to pair with Siri right out of the gate. I did not test full smarthome compatibility in this review, but it should be noted that Moodoo can also be set up with Alexa, Google Home, or IFTTT for full customization if that’s your preference.

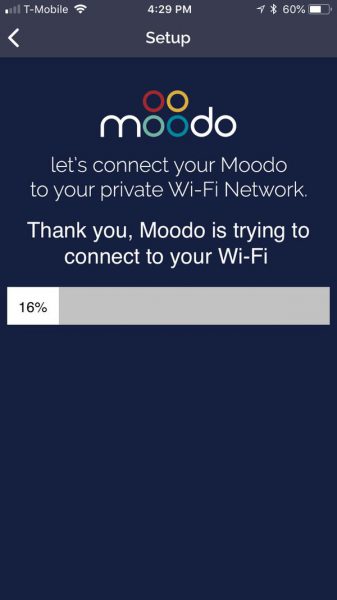
I appreciate when apps like this provide straightforward setup instructions. No manual required… follow the onscreen prompts to get connected.
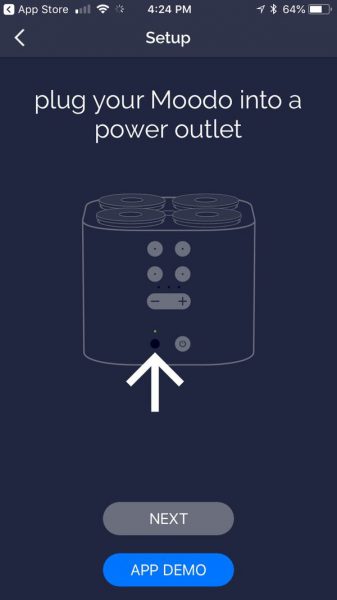
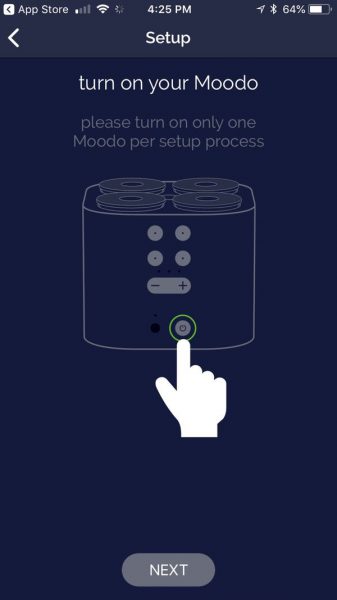
I did experience some issues with getting the WiFi pairing working properly, but that may be my network. I run a mesh network over my Verizon Fios-provided router, so some devices have trouble pairing. I don’t think this was an issue specific to the unit, however. I have seen that some Amazon reviewers have reported similar issues, however, so it’s something I’ll have to keep an eye on for future updates.

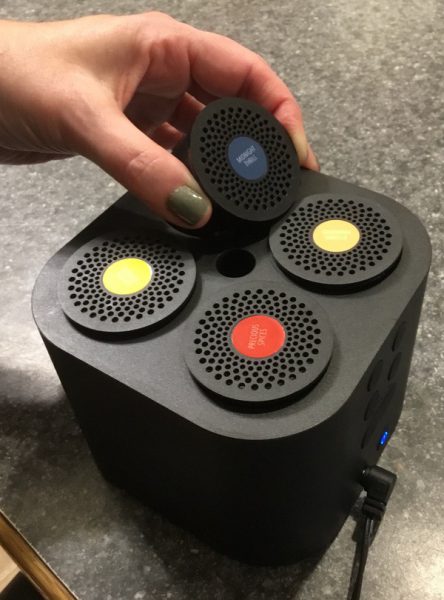
Once you have loaded & paired the app, you’ll crack the seal on the desired fragrance family and drop the pods in the 4 slots on the unit. The 4 pods in each family are designed to compliment each other as you create fragrance combinations. I’ve got the “Cozzzy” family loaded here, with fancy scent names like Orange Sunrise, Precious Spices, Granola Vanilla, and Midnight Thrill. The starter kit also contains the “Beach Party” and “Fresh Vibrations” families, for a total of 12 different pods in all.
Using the App

Here’s where the fun begins. When you load the pods and fire up the app, the app automatically recognizes which pod is in each slot. You can even switch slots or swap out pods from different fragrance families, and the app adjusts to the new configuration. No manual programming required.

Once loaded, you’ll be presented with a series of preset scent themes based on the pods in the unit at the time. These presets adjust the intensity of the scent from each pod. When I choose “Chai Sunset”, for example, Precious Spice becomes the dominant scent with a hint of Orange Sunrise and Golden Vanilla. The interface shows me the balance and intensity produced for each scent pod. A “volume” slider on the side enables be to increase the fan strength as desired for greater scent disbursement.

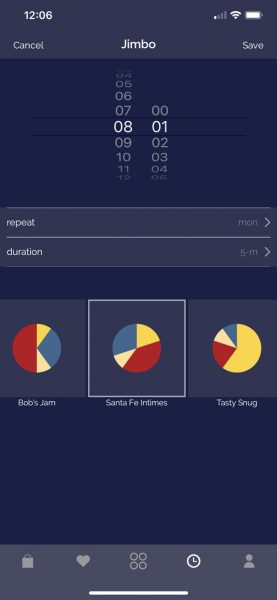
You can also determine pre-selected schedules for activating the Moodoo that include day, time, and duration of operation. These can be saved so that you can diffuse different scent combinations at different times of the day:
If you want to be an aroma alchemist, you have the ability to create completely new scent combinations. In the example below, I chose to emphasize the Orange Sunrise and Precious spices scents. Simple color-coordinated sliders allow me to choose the intensity of each scent pod in the mix:

Settling on a combination I liked, I had the option to give it a name and save it for future use:

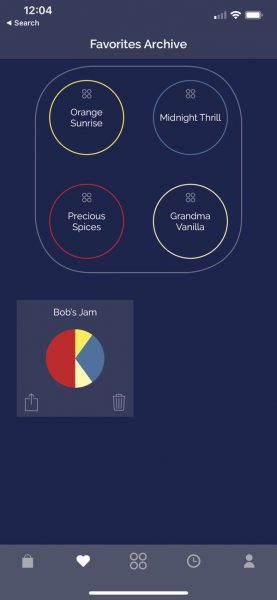
Once it’s saved, it can be found in the favorites tab. A reference screen is also saved there so that I can make sure I load up the right combination of pods if I am mixing and matching between families. This saved scent combo is now available for on-demand use or scheduled events:
Beyond the basics, there are additional features in the Moodoo app that round out the capabilities nicely. You can run a “shuffle” mode like your music playlists that changes the scent combination every few minutes. There’s also an interval feature that turns the unit off periodically to extend the life of your scent pods, and sharing feature so that you can send customized scent combinations to friends.

All in all, the app is truly excellent. I love how Moodoo has adopted conventions from music apps here for a familiar-feeling interface. It’s clean, simple, and easy to learn. The simplicity of the app encourages experimentation, which adds to the fun factor.

Performance

So the app is great… but how does it smell? Pretty great, actually.

Agan Aroma, the maker of the Moodoo, has been in the fragrance business for over 35 years. They know a thing or two about fragrance design, and it shows (or smells) in the finished product. There’s a subtle sophistication to the aromas and combinations the Moodoo produces that’s unique and interesting, without overpowering you with cheap or kitschy smells. If you’re looking to add some high-end class and style to your home ambiance, you’ll be very happy with the Moodoo. The company is also continuing to produce new scent families, so you’ll never run out of interesting combinations to play with based on the season or mood.

While the kit states that the Moodoo is capable of diffusing a 600 square foot room, we found that placement of the unit it important to maximize coverage. We have an open floorplan on the first floor of our house, with a vaulted ceiling in the family room. I originally placed the Moodoo in a corner, and found that the vaulted ceiling worked against us as the scents kinda lifted up beyond our noses. Moving it to more central location solved that problem pretty quickly. If you’re in a smaller room or have lower ceilings, you’ll get great range out of this unit. For bigger areas, you may have to play with location. No matter how you set it up, keep in mind that the fans are not super strong. This does contribute to quiet operation, however, and you barely hear it when it is running.

The individual pods are rated for approximately 60 hours of diffusion at maximum “volume” (intensity) before tapping out. The scents are pretty potent, so we haven’t found the need to run the Moodoo all day to keep a consistent aroma. Assuming you’re not running the unit full-blast and make use of the timer and interval features, I believe you could get a couple of months out of a set of pods before having to replace them. It will depend on your own use, of course. We’ll have to see how this holds up over long term testing.

With that in mind, let’s talk about pricing. The starter kit begins at $139 (the Moodoo and one scent family), while the starter kit I tested retails for $189 (same base unit, three scent families). You can add the built-in battery for about $20. Pods are sold in 4-packs that retail for $29.95 each, and can be purchased in either a single scent or the pre-selected families. It’s a bit more pricey than you’re mall-store aromatics, so price shopping isn’t really what you’re here for. If you’re looking for unique scents and the ability to play DJ with your aromas, however, it’s a pretty neat alternative.

What I like

  • Excellent, intuitive interface
  • Unique fragrances
  • Endless opportunity for customization

What needs to be improved

  • Not as effective in large spaces
  • Pricey compared to some alternatives
  • Some reported Wifi connectivity issues

Final thoughts

I really like the concept of the Moodoo. The ability to customize your home aromas as a “scent DJ” is a brilliant & fun idea. The quality of the fragrances is excellent, and the app interface is extremely well executed. It is a bit more expensive than your typical aroma options. While I think the value is there relative to the quality of the product, you’ll just have to decide if it’s worth it.

Price: Starter kits begin at $139.00. Scent packs are $29.95 each for refills.
Where to buy: Check out Moodoo’s web site or their Amazon store.
Source: The sample of this product was provided by Moodoo.

Filed in categories: Reviews

Tagged:

Moodoo Smart Home Fragrance Diffuser review originally appeared on The Gadgeteer on November 2, 2018 at 11:00 am.

Note: If you are subscribed to this feed through FeedBurner, please switch to our native feed URL http://the-gadgeteer.com/feed/ in order to ensure continuous delivery.
Ooni 3 portable outdoor pizza oven and Gas burner attachment review

REVIEW – Back in April, I wrote about the Uuni 3 portable wood-fired pizza oven. Since then the company changed the spelling of their name, they’re now known by Ooni, and they’ve added a gas burner attachment to their lineup. I was extremely excited when Ooni sent me both units to try out for myself.

What is it?

The Ooni 3 is a portable outdoor wood-fired pizza oven that’s capable of reaching a temperature of 932-degrees in 10 minutes and cooking a pizza in 60 seconds. The Gas Burner for Ooni 3 attaches right onto the back of Ooni 3, providing a convenient and easy option to power the oven with gas.

What’s in the box?

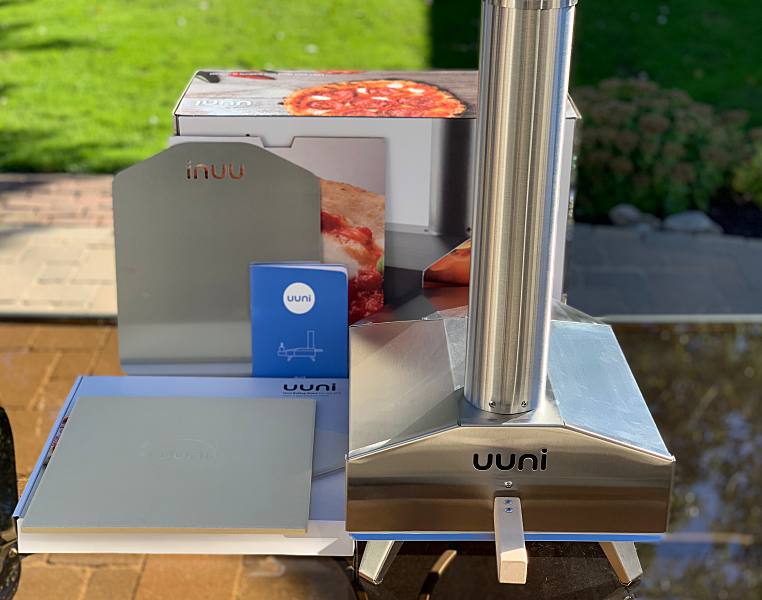
Ooni 3:

  • Ooni 3 pizza oven
  • Wood pellet burner
  • Cordierite stone baking board
  • Pizza Peel
  • Manual and safety instructions

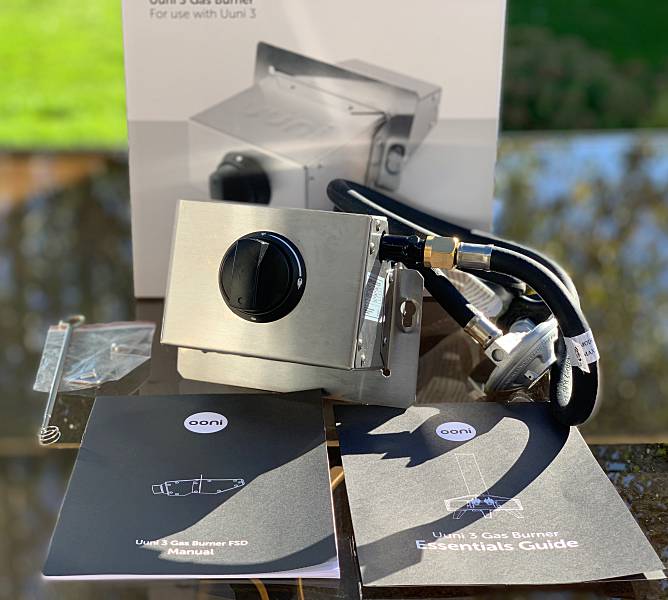
Gas burner for Ooni 3:

  • 11 WC regulator with gas hose
  • 2 x 10mm screws and Allen key
  • Extendable match holder
  • Instruction manual

Design and features

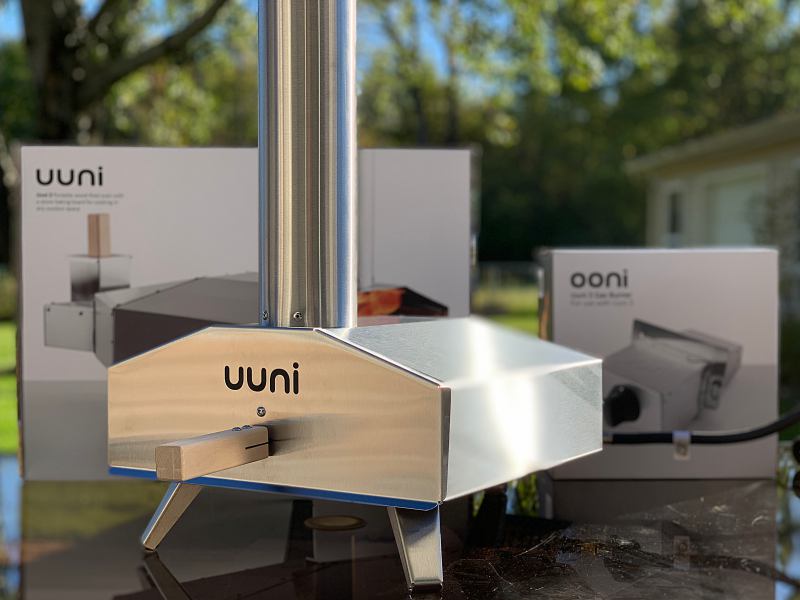
Both the Ooni 3 pizza oven and gas burner are made of 430 brushed stainless steel for heat and weather resistance. The oven body is insulated with ceramic fiber for improved heat retention. The units lightweight and clever design including hinged legs and a removable chimney make it incredibly portable. Perfect for tailgating, picnics, or camping. Ooni even sells a cover/bag so  you can easily transport your Uuni 3 wherever you like.

Setup

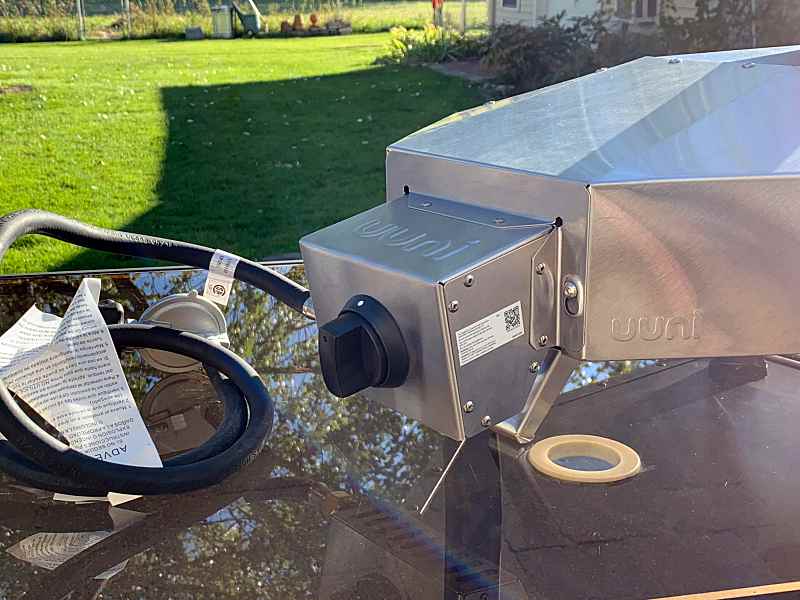
The oven is really easy to set up. Put the legs down, slide the cordierite pizza stone into the oven, and attach the gas burner onto the back of the oven. The video below shows how to attach the gas burner and hook it up to your propane tank.

Once set up its time to turn on the burner and preheat the oven. 

Since the oven gets really hot, it’s recommended to set it up on a wooden table. I used a small foldable table and just placed a piece of plywood on top. That worked nicely.

Let’s make a pizza

The Ooni 3 needs to preheat for 10-minutes which gives you time to prepare your pizza. Ooni recommends using their dough recipe for the best results. Unfortunately, I was unable to find the 00 flour needed to make the dough at any of my local grocery stores or specialty markets. Luckily I was able to find a small Italian bakery near me that made their own pizza dough fresh daily, so that’s what I used.

The toughest part of making a Neapolitan-style pizza is stretching the dough. It takes practice and a little patience. There’s a helpful video on Ooni’s website that shows how to stretch your dough. The website is a great resource, it has a lot of videos with tips, recipes, and FAQ’s, which I found very helpful. They even have their own YouTube channel which I recommend subscribing to.

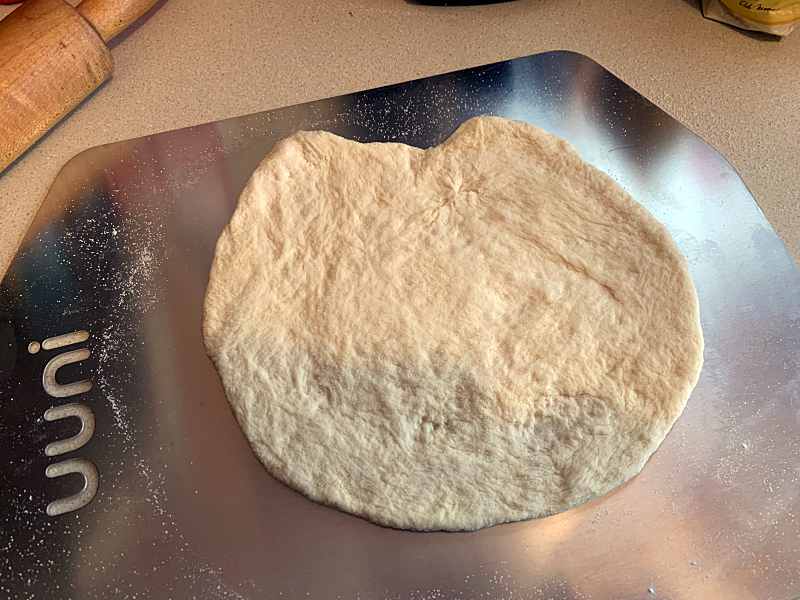
It’s important to prep the Ooni pizza peel before stretching the dough. This is done by sprinkling flour onto the peel ( I recommend using semolina flour, it has a higher burn point then regular flour and creates a flavorful, crunchy bottom crust ). The biggest thing is to make sure that the pizza easily slides around on the peel.

I stretched the dough into a 10-inch pie and then put on my toppings. For my first pizza, I went simple with just cheese and pepperoni.

Launching the pizza into the oven is another thing that takes a little preparation and practice. I posted a short video below showing how to launch and cook your pizza.

The whole cooking process took just over a minute. I think the cooking time is dependent on toppings and thickness of the dough. It’s very important to keep an eye on your pizza and the time because this thing really cooks quick. Truth be told I burnt my first attempt, it was still edible but burnt more then I wanted.

Much like cooking with a grill, it takes practice and repetition to get the best results.

I found that taking the pizza out and rotating it on the peel every 20-25 seconds worked pretty well.

Time to mangiare!

Now that the hard part was over it was time to taste my pizza. In a word it was Delizioso! The crust had a nice outer crunch, but, was soft inside and the flavor was outstanding. Without question, the pizza I made in the Ooni 3 rivaled that of any I’ve had from a restaurant. 

I can’t wait to try cooking other things in the Ooni 3. That’s right the Ooni 3 can cook more than just pizza. With their cast iron Sizzler Pan you can cook vegetables, seafood, meat, and poultry. Guess what’s going to be on my Christmas list this year? Look for my further cooking adventures in a future review update.

Go gas or go home

The Gas Burner attachment for the Ooni 3 IMO is the perfect accessory for this oven. It’s easy to use and makes reaching the perfect temperature almost foolproof. And if you plan on using Ooni to cook other foods, it gives you better control over the ovens cooking temperature.

What I like

  • Portability
  • Easy to use
  • Makes a great tasting pizza in 60-90 seconds
  • Ability to cook other foods with purchased accessories

What needs to be improved

  • Would be nice if they included a cover/carry bag with purchase

Final thoughts

The Ooni 3 portable pizza oven and Gas Burner attachment are FANTASTIC! The ability to cook a great tasting pizza outdoors in 60-seconds is amazing. I had read good things about the Ooni 3 prior to receiving it but, I was amazed that it lived up to the hype. Great job Ooni! If you love pizza or just cooking outdoors in general then the Ooni 3 is a must have for your backyard. The Ooni 3 portable outdoor pizza oven – That’s Amore!

Price: Ooni 3 – $299  Gas burner – $85
Where to buy: Amazon
Source: The sample for this review was provided by Ooni.

Filed in categories: Reviews

Tagged:

Ooni 3 portable outdoor pizza oven and Gas burner attachment review originally appeared on The Gadgeteer on November 2, 2018 at 9:00 am.

Note: If you are subscribed to this feed through FeedBurner, please switch to our native feed URL http://the-gadgeteer.com/feed/ in order to ensure continuous delivery.
Ooni 3 portable outdoor pizza oven and Gas burner attachment review

REVIEW – Back in April, I wrote about the Uuni 3 portable wood-fired pizza oven. Since then the company changed the spelling of their name, they’re now known by Ooni, and they’ve added a gas burner attachment to their lineup. I was extremely excited when Ooni sent me both units to try out for myself.

What is it?

The Ooni 3 is a portable outdoor wood-fired pizza oven that’s capable of reaching a temperature of 932-degrees in 10 minutes and cooking a pizza in 60 seconds. The Gas Burner for Ooni 3 attaches right onto the back of Ooni 3, providing a convenient and easy option to power the oven with gas.

What’s in the box?

Ooni 3:

  • Ooni 3 pizza oven
  • Wood pellet burner
  • Cordierite stone baking board
  • Pizza Peel
  • Manual and safety instructions

Gas burner for Ooni 3:

  • 11 WC regulator with gas hose
  • 2 x 10mm screws and Allen key
  • Extendable match holder
  • Instruction manual

Design and features

Both the Ooni 3 pizza oven and gas burner are made of 430 brushed stainless steel for heat and weather resistance. The oven body is insulated with ceramic fiber for improved heat retention. The units lightweight and clever design including hinged legs and a removable chimney make it incredibly portable. Perfect for tailgating, picnics, or camping. Ooni even sells a cover/bag so  you can easily transport your Uuni 3 wherever you like.

Setup

The oven is really easy to set up. Put the legs down, slide the cordierite pizza stone into the oven, and attach the gas burner onto the back of the oven. The video below shows how to attach the gas burner and hook it up to your propane tank.

Once set up its time to turn on the burner and preheat the oven. 

Since the oven gets really hot, it’s recommended to set it up on a wooden table. I used a small foldable table and just placed a piece of plywood on top. That worked nicely.

Let’s make a pizza

The Ooni 3 needs to preheat for 10-minutes which gives you time to prepare your pizza. Ooni recommends using their dough recipe for the best results. Unfortunately, I was unable to find the 00 flour needed to make the dough at any of my local grocery stores or specialty markets. Luckily I was able to find a small Italian bakery near me that made their own pizza dough fresh daily, so that’s what I used.

The toughest part of making a Neapolitan-style pizza is stretching the dough. It takes practice and a little patience. There’s a helpful video on Ooni’s website that shows how to stretch your dough. The website is a great resource, it has a lot of videos with tips, recipes, and FAQ’s, which I found very helpful. They even have their own YouTube channel which I recommend subscribing to.

It’s important to prep the Ooni pizza peel before stretching the dough. This is done by sprinkling flour onto the peel ( I recommend using semolina flour, it has a higher burn point then regular flour and creates a flavorful, crunchy bottom crust ). The biggest thing is to make sure that the pizza easily slides around on the peel.

I stretched the dough into a 10-inch pie and then put on my toppings. For my first pizza, I went simple with just cheese and pepperoni.

Launching the pizza into the oven is another thing that takes a little preparation and practice. I posted a short video below showing how to launch and cook your pizza.

The whole cooking process took just over a minute. I think the cooking time is dependent on toppings and thickness of the dough. It’s very important to keep an eye on your pizza and the time because this thing really cooks quick. Truth be told I burnt my first attempt, it was still edible but burnt more then I wanted.

Much like cooking with a grill, it takes practice and repetition to get the best results.

I found that taking the pizza out and rotating it on the peel every 20-25 seconds worked pretty well.

Time to mangiare!

Now that the hard part was over it was time to taste my pizza. In a word it was Delizioso! The crust had a nice outer crunch, but, was soft inside and the flavor was outstanding. Without question, the pizza I made in the Ooni 3 rivaled that of any I’ve had from a restaurant. 

I can’t wait to try cooking other things in the Ooni 3. That’s right the Ooni 3 can cook more than just pizza. With their cast iron Sizzler Pan you can cook vegetables, seafood, meat, and poultry. Guess what’s going to be on my Christmas list this year? Look for my further cooking adventures in a future review update.

Go gas or go home

The Gas Burner attachment for the Ooni 3 IMO is the perfect accessory for this oven. It’s easy to use and makes reaching the perfect temperature almost foolproof. And if you plan on using Ooni to cook other foods, it gives you better control over the ovens cooking temperature.

What I like

  • Portability
  • Easy to use
  • Makes a great tasting pizza in 60-90 seconds
  • Ability to cook other foods with purchased accessories

What needs to be improved

  • Would be nice if they included a cover/carry bag with purchase

Final thoughts

The Ooni 3 portable pizza oven and Gas Burner attachment are FANTASTIC! The ability to cook a great tasting pizza outdoors in 60-seconds is amazing. I had read good things about the Ooni 3 prior to receiving it but, I was amazed that it lived up to the hype. Great job Ooni! If you love pizza or just cooking outdoors in general then the Ooni 3 is a must have for your backyard. The Ooni 3 portable outdoor pizza oven – That’s Amore!

Price: Ooni 3 – $299  Gas burner – $85
Where to buy: Amazon
Source: The sample for this review was provided by Ooni.

Filed in categories: Reviews

Tagged:

Ooni 3 portable outdoor pizza oven and Gas burner attachment review originally appeared on The Gadgeteer on November 2, 2018 at 9:00 am.

Note: If you are subscribed to this feed through FeedBurner, please switch to our native feed URL http://the-gadgeteer.com/feed/ in order to ensure continuous delivery.
iHealthLabs PT3 infrared thermometer review


REVIEW – I have 2 young kids who attend school, and colds and fever are a part of everyday life in my household. When I was a kid, my mom taught me to detect a fever by resting the back of my hand on the neck and observing the warmth. While over the years I have perfected that technique (my wife would beg to differ), I do not take any chances with my kids. Being able to not only detect a fever but to know the severity of the fever is very important. The methods of sticking a thermometer under an active kid’s armpit or trying to fight to get it inserted in the rectum become too challenging. The iHealthLabs PT3 Infrared Thermometer is designed to quickly ascertain a temperature without even touching my kids. Does it actually work? Let’s see!!

What is it?

The iHealthLabs infrared Thermometer utilizes no-touch infrared technology to get an immediate temperature reading without having to touch the skin and possibly wake up a sleeping child.

What’s in the box


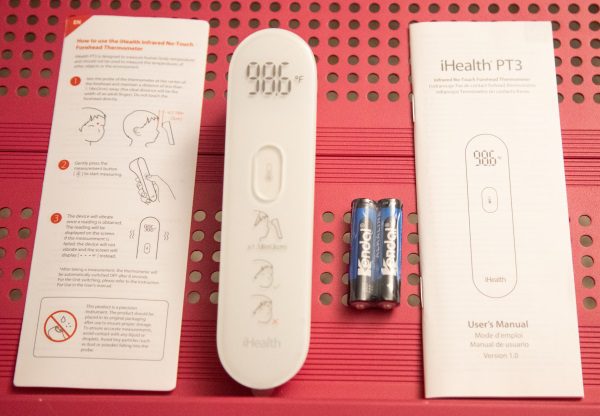
1 x iHealthLabs infrared Thermometer
1 x Manual
1 x Instruction Leaflet
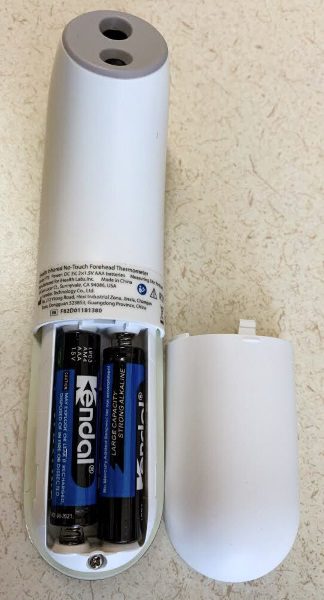
2 x AAA Batteries

Design and features

Features:

  • High precision: ultra-sensitive infrared sensor measures IR energy emitted from the forehead and collects more than 100 data points per second.
  • Fast testing in just 1 second, get reading instantly.
  • Safe & Hygienic. No-Touch design, non-invasive measurement.
  • Gentle vibration to alert when a reading completed. No annoying beeps.
  • Hold. Aim. Press. Only 3 steps to test, easy for self-measurement.
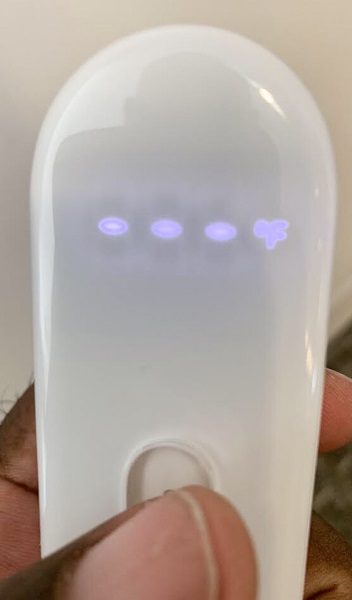
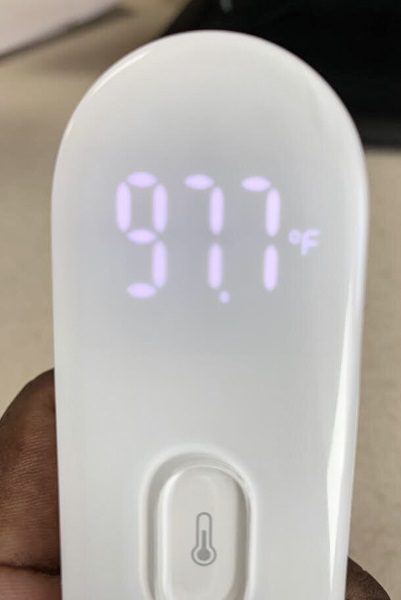
  • Readable at night with LED backlit.

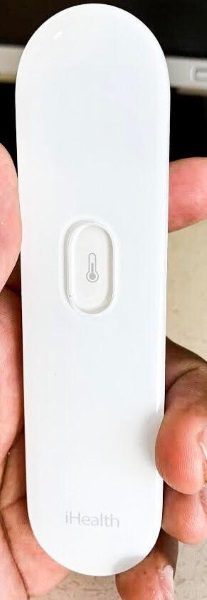
The iHealthlabs Infrared Thermometer is small and compact measuring 5″ long x 1 1/2″ wide. It is about 0.5″ thick on the body and about 1 1/4″ at the head. On the front surface, there is the control button in the middle and the name branding on the bottom.


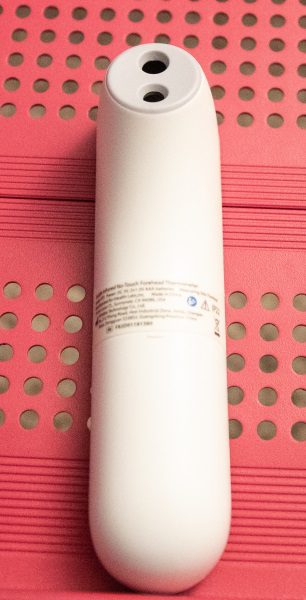
On the opposite side there is the “head” that is used to read the temperature, and on the bottom half, there is the battery compartment that holds 2 AAA batteries.


Performance

How to use:

• Aim the probe of the iHealth at the center of the forehead and keep it there approximately 1.0” away from the
skin.
• Press the button to start to measure the temperature
• The thermometer will vibrate once it obtains the temperature, and the reading is displayed on the LED display

• If it fails to read the temperature, dashes (—-) will appear instead.


• The thermometer will switch off after 8 seconds of no use

I tested this thermometer side by side with a conventional thermometer with the armpit as the testing area of choice for the conventional thermometer. Each time the readings of the thermometers were within 2 degrees of each other. Considering that the armpit would conceivably be slightly warmer, I consider the iHealthlabs thermometer surprisingly accurate and consistent. I say surprisingly because prior to testing this thermometer, I had always believed that the $400 plus thermometers that I would see at my medical center were the best bang for the buck. While I do believe that in urgent cases each degree is critical, it is my opinion that the iHealthlabs Infrared Thermometer is generally fine for daily use as long as the immediate surroundings are within “normal” temps. I say this because I did notice that if I am in an air-conditioned room this thermometer does seem to read the skin temp which may be lower than the internal body temperature.

What I like

  • The size
  • The ease and speed of use

What can be improved

  • A brightly colored LED display for the temperature would make it easy to read in any kind of lighting

Final thoughts

As I mentioned earlier in this review, I was quite surprised at the performance of this thermometer when I tested and compared it to my usual daily use thermometer. For the price, I honestly expected erratic readings but they were very close and consistent. The thermometer is made of plastic, and I only tested it for one month, so I will post an update if anything changes. But for now, it works.

Price: $19.99
Where to buy: iHealthlabs website and Amazon
Source: The sample for this review was provided by iHealthlabs.

Filed in categories: Reviews

Tagged:

iHealthLabs PT3 infrared thermometer review originally appeared on The Gadgeteer on November 1, 2018 at 11:00 am.

Note: If you are subscribed to this feed through FeedBurner, please switch to our native feed URL http://the-gadgeteer.com/feed/ in order to ensure continuous delivery.