Gourmia GAF365 Digital Air Fryer review


REVIEW – For quite some time now, my family has been into healthy eating with healthy ingredients and healthy ways to prepare food. When we heard about the Air Fryer and its concept, we rushed out and bought a pretty large one. Unfortunately, it got accidentally damaged, so I was really happy when I received the offer to test one.

What is it?

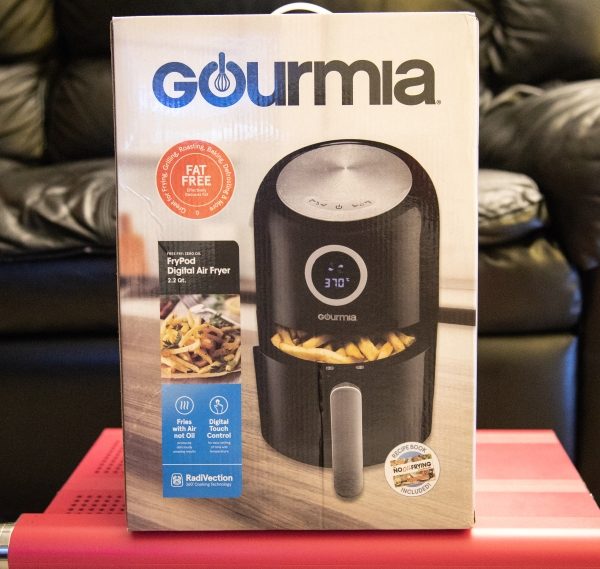
The Gourmia GAF365 Digital Air Fryer is a 2.2-quart oil-free air fryer. Just in case anyone is not familiar with the air fryer concept, here is a description from Wikipedia: “An air fryer is a kitchen appliance that cooks by circulating hot air around the food using the convection mechanism. A mechanical fan circulates the hot air around the food at high speed, cooking the food and producing a crispy layer via the Maillard effect.”

“The Maillard reaction is a chemical reaction between amino acids and reducing sugars that gives browned food its distinctive flavor.”

What’s in the box


1 x Gourmia GAF365 Digital Air Fryer
1 x Instruction/Cookbook

Design and features

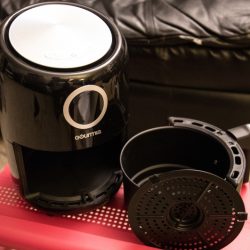
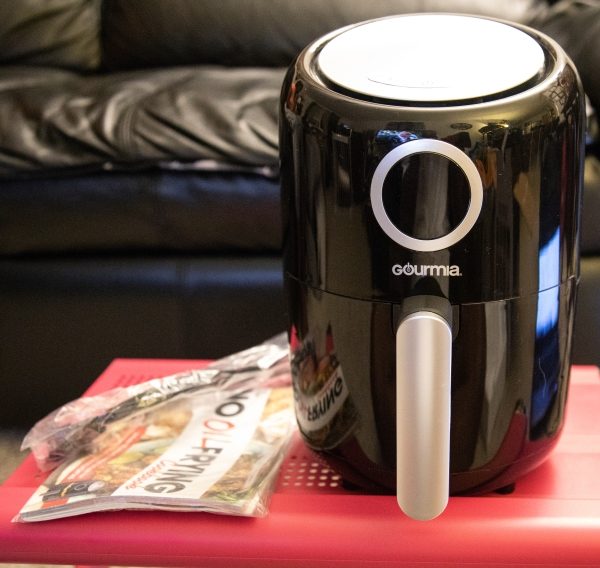
The Gourmia GAF365 Digital Air Fryer is a round cylindrical form that measures 9.5″ x 7.5″ x 12.5″ and weighs approximately 5.4 pounds. It has a slanted top with the controls, a front blue LED display and a bottom half removable 2.2-quart basket pan. The basket pan includes a removable drip tray. Both the basket pan and the drip tray are made of a relatively lightweight metal and coated with a non-stick surface. The handle and a part of the exterior form sort of a semi-circle around the pan that matches the rest of the exterior of the fryer. It is the same plastic and color as the rest of the fryer so that it all matches when the basket pan is in the fryer. The removable drip tray is also metal and because it is removable, it makes it easier to clean the basket. In my experience, when cooking foods like chicken, there always is some residue from the food left stuck to the tray despite the non-stick surface. This is also the same when making french fries. When I am done using it, I pour water into the basket high enough to cover the drip tray and I leave it for a few hours. It then cleans quite easily with just a sponge.


On the slanted top, there are controls for raising or lowering the temperature and the cooking time. In the middle in between the controls, there is the power button. On the back of the fryer, there is an air vent.


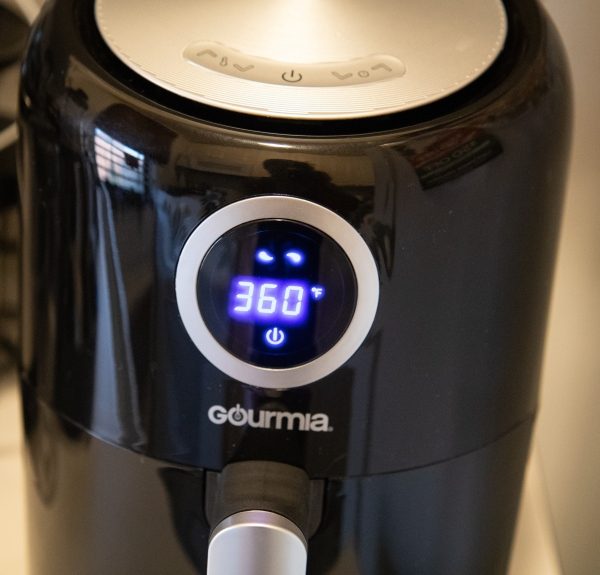
On the top front of the fryer, there is a blue LED display that shows frying time and temperature. The fryer can be set to a maximum of 400 degrees, and 30 minutes for any single cooking cycle. If more time is needed,  a new cycle can be started.

Here is a quick video of the fryer in action:

The pictures below show seasoned, raw chicken being placed into the fryer and the nicely browned result after being fried.


Once you get the timing right, the foods come out of the fryer properly cooked and in the case of the chicken, soft, and tender and with an abundance of flavor. We also use it for fries, sausages, and many other types of meat as well as vegetables.

What I like

  • The look and design of the fryer
  • The controls and the easy to read digital display
  • The compact design
  • Its ability to properly fry food

What can be improved

  • Currently, cooking cycles are limited to 30 minutes

Final thoughts

The Gourmia GAF365 Digital Air Fryer is just simply a nice, compact, sleek and good performing air fryer. The first one I owned was not digital, so I really appreciate the digital functions on this one. It is not the biggest fryer and it does not have a large capacity, but for my family, it is just right. While it will probably take months before I can more reliably ascertain its ability to withstand almost daily use, I am giving it a thumbs up for now, and I will provide an update should anything change.

Price: $49.99
Where to buy: Amazon
Source: The sample for this review was provided by Gourmia.

Filed in categories: Reviews

Tagged: ,

Gourmia GAF365 Digital Air Fryer review originally appeared on The Gadgeteer on September 6, 2018 at 11:00 am.

Note: If you are subscribed to this feed through FeedBurner, please switch to our native feed URL http://the-gadgeteer.com/feed/ in order to ensure continuous delivery.

Jese Air Fryer review

REVIEW – With more and more people looking for healthier ways to prepare food air fryers are becoming very popular these days. I have been researching them myself recently so when I got the chance to review the Jese Air Fryer I didn’t hesitate.

What is it?

The Jese air fryer is a fryer that uses 360-degree rapid and dynamic airflow instead of oil to fry foods.

What’s in the box?

  • Air Fryer
  • Quick start guide
  • Cookbook
  • Users manual

Design and features

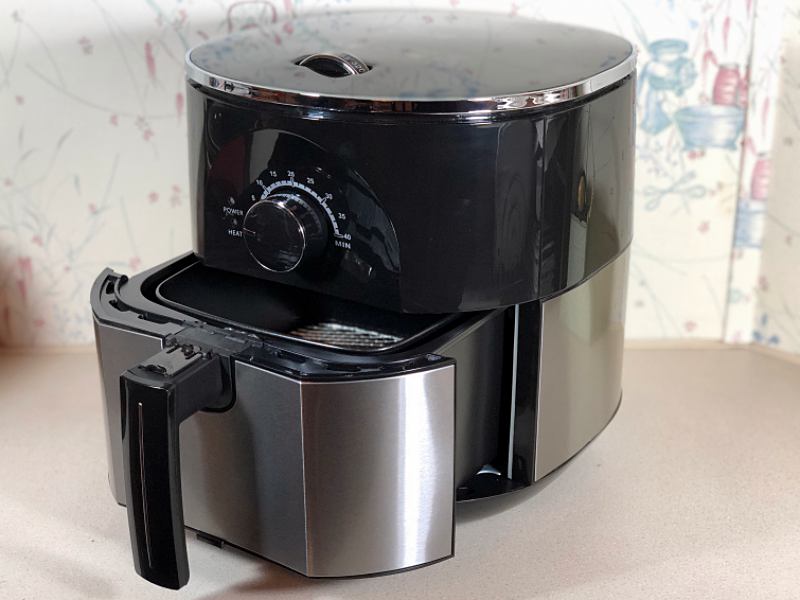
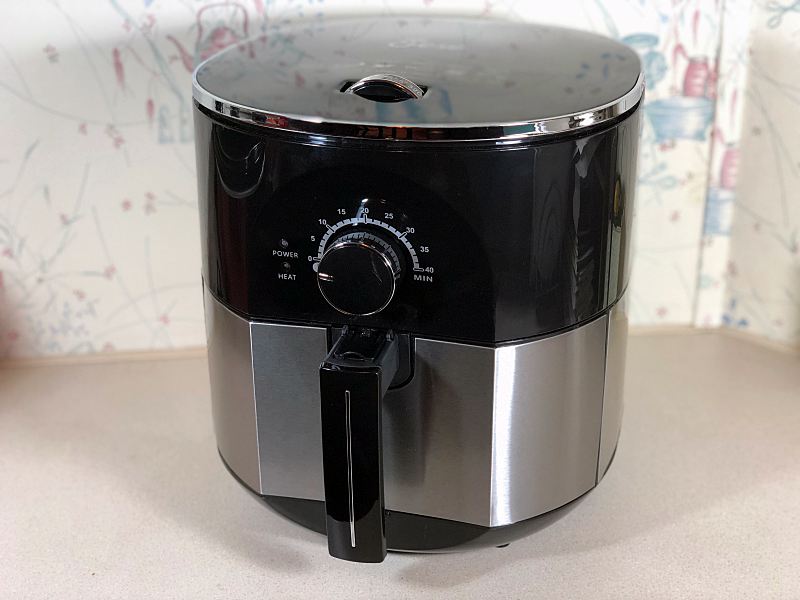
Black with brushed steel accents the Jese Air Fryer has a modern design that would compliment any kitchen. It’s rather large because of its 3.5-quart capacity, so it does take up a little counter space.

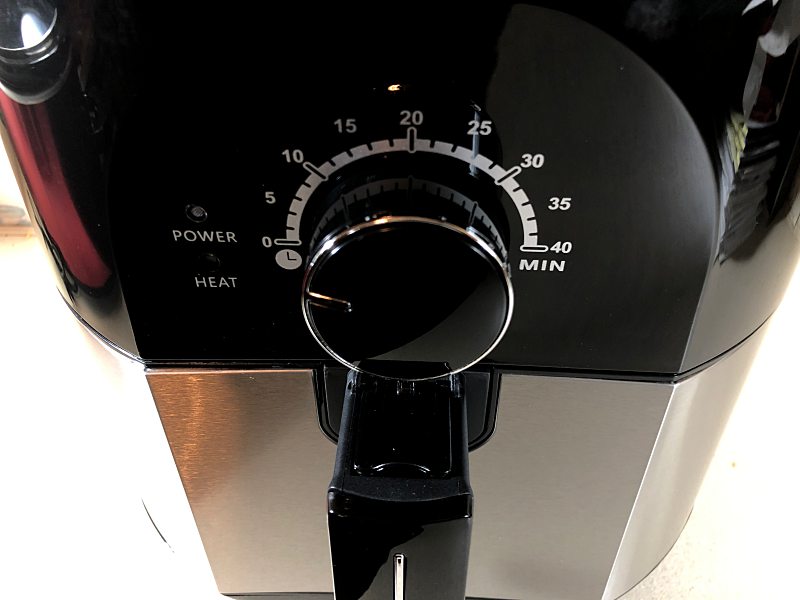
The timer knob and fryer basket are located on the front of the unit. The timer knob is large, and the numbers are pretty easy to read going from 0 to 40 minutes.

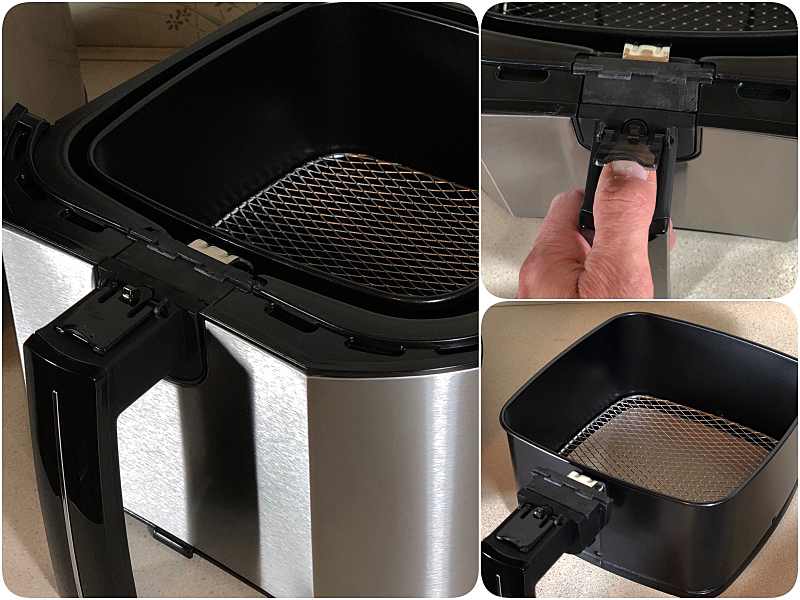
The fryer basket is two pieces. There’s a release button on the handle that’s covered by a small plastic flap. To remove the basket flip the flap up and push the button.

The air fryer has an automatic shutoff feature. It will shut off whenever the basket is removed and will restart when the basket is replaced. It will also shut off once the timer has expired.

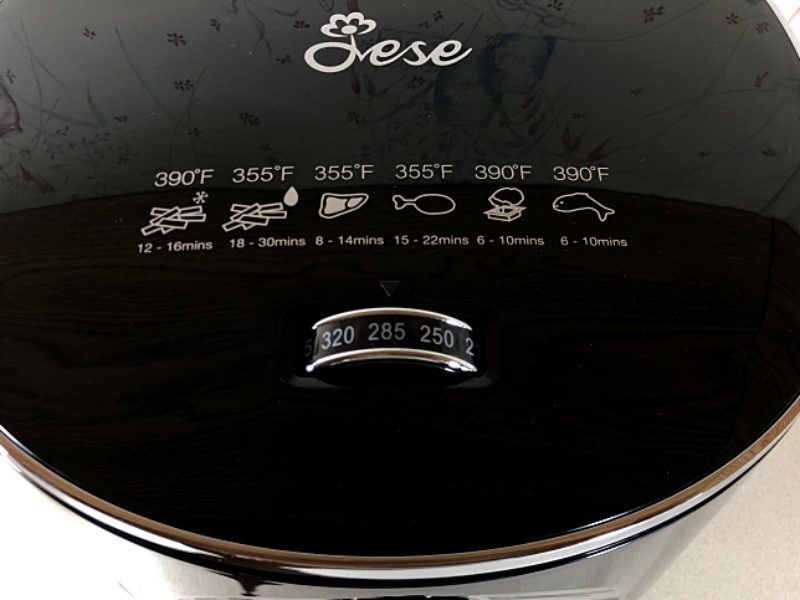
The temperature setting dial is located on top of the unit. The numbers on the dial are easy to read with temperature settings from 180F to 390F. And there’s even a handy quick cook guide printed above the dial.

There are also two indicator lights for power and heating.

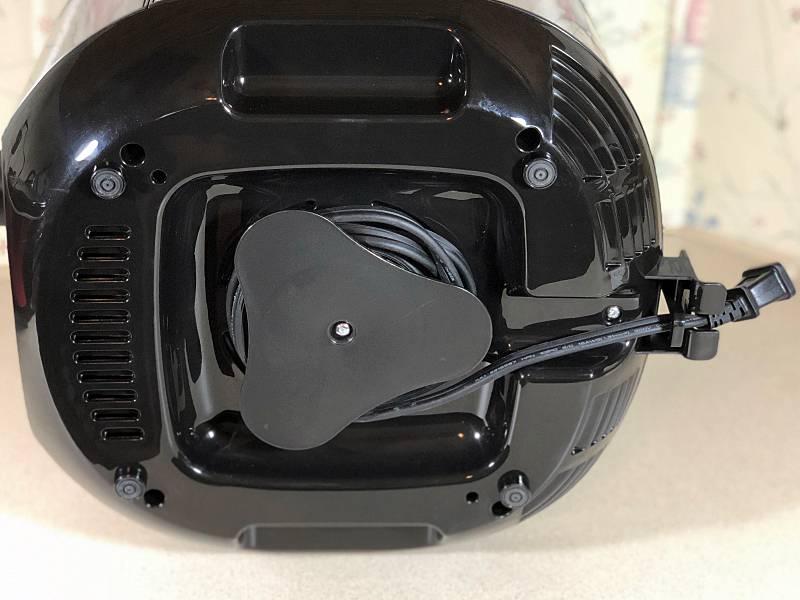
The power cord is a nice length, and I like that you can wrap the cord around the base for easy storage.

I did notice that the fryer is pretty quiet when cooking. I was happy about this because in my research one of the main complaints was how loud some of the fryers were.

Jese is cool to the touch while cooking. The only place where it gets hot is in the back where the hot air vents are located. Just make sure that it’s pulled away from the wall when using it.

One of the things I liked about the Jese is its versatility. You can use it for frying, grilling, baking, and roasting just about anything.

For my first time using the fryer I wanted to start with something simple, so I decided to cut up some squash and zucchini. With the air fryer, you don’t have to use a lot of oil. For the veggies, I used 1/2 tablespoon of olive oil and seasoned them with salt and pepper. I preheated the fryer for the recommended 3 min at 355-degrees. After about twenty minutes the veggies were done. They were delicious. They had a slight crisp on the outside but, the insides remained juicy and flavorful.

One thing about air fryers, you can’t just set them and forget them. You have to occasionally remove the basket during cooking and shake the contents so that they brown on all sides.

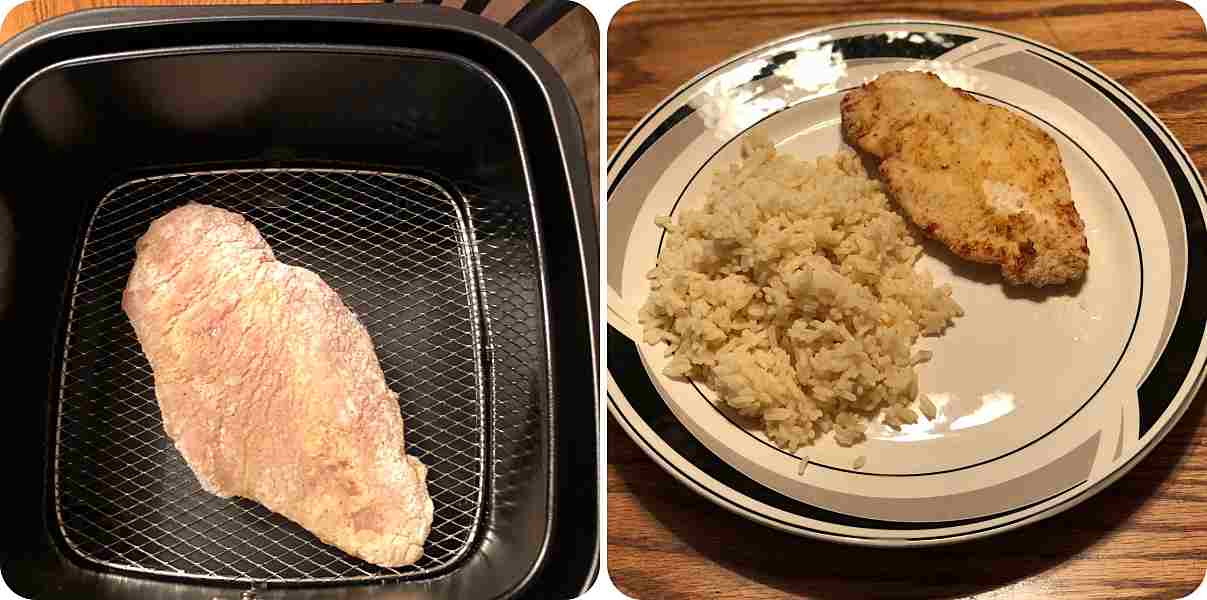
I decided to step it up for my next meal. I found an easy fried chicken breast recipe online. The fryer does come with a small cookbook but, I found that the recipes weren’t all that great. Fortunately, with the popularity of air fryers, there are tons of recipes available online. The chicken breast was fantastic. Total cook time was 14 minutes, flipping the breast halfway through. The outside had a nice brown crisp, and the inside was juicy and flavorful. Tip: use a spray oil (I used an olive oil spray) and lightly spray anything that you’re going to bread. This helps the breading brown up and gives it a little more crispiness.

In the past few weeks, I’ve used the Jese to make a lot of stuff. Fresh waffle chips, fried onion potatoes, frozen french fries, and frozen onion rings. I noticed that the frozen foods cooked up the best. They turned out crispier than the fresh foods I made. The fries and onion rings were the best I’ve ever made at home. But everything I’ve made using the fryer has turned out great. I can’t wait to experiment with even more recipes in the future.

The fryer’s 3.5-quart capacity is perfect whether you’re cooking for a family or just one or two people. However, with larger items like chicken breasts, fish or steaks you’ll probably only be able to fit 2 of each in the basket at one time. So cooking these items for a larger group will take some planning.

Clean up is easy. Because you’re not using a lot of oil the mess is minimal. The fryer basket itself is fully submergible, or you can just wipe it clean with a damp cloth.

What I like

  • Easy to use
  • Food tastes great
  • Versatility
  • Easy to clean

What needs to be improved

  • Can’t think of anything

Final thoughts

I love the Jese air fryer and have used it a lot in the past few weeks. I like the fact that it’s easy to use and the results are great every time. And it doesn’t hurt that it makes everything a little healthier without sacrificing taste. If you haven’t tried using an air fryer yet, the Jese is a great place to start.

Price: $61.99
Where to buy: Amazon
Source: The sample of this product was provided by Jese.

Filed in categories: Reviews

Tagged: ,

Jese Air Fryer review originally appeared on The Gadgeteer on September 5, 2018 at 9:00 am.

Note: If you are subscribed to this feed through FeedBurner, please switch to our native feed URL http://the-gadgeteer.com/feed/ in order to ensure continuous delivery.

Juschef Professional Blender review

REVIEW – There’s a big market for home blenders that provide decent power without breaking the bank. Today we’re looking at the Juschef Professional Blender, which promises high-powered function at a price tag of under $100 while adding a heating feature. Let’s see what it’s got!

What is it?

It’s a high speed blender that also heats liquids.

Hardware specs

  • 14.6 pounds
  • 9” deep by 8.5” wide by 19” tall (22-1/2” with stirring rod)
  • 35,000 RPM blade speed
  • 900 W motor power, 800 W heater
  • 110-120V, 60Hz
  • BPA Free glass pitcher
  • 56 ounce capacity

What’s in the box?

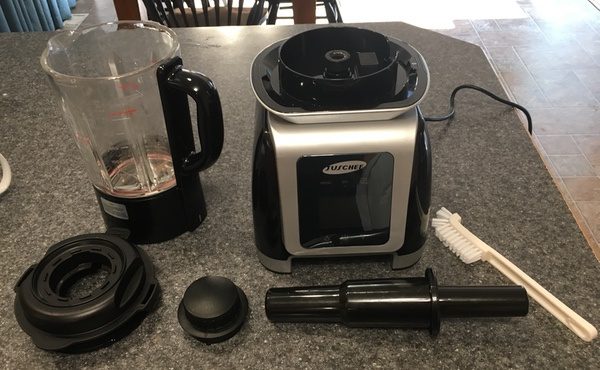
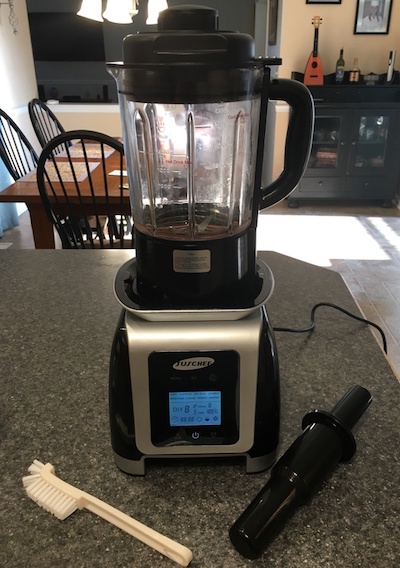
The package includes the blender base, the pitcher, a locking lid, a lid cap, a stirring rod and a cleaning brush. An instruction manual (not shown below) is also included in the kit.

Design and features

The Juschef Professional Blender is a big, heavy beast of a blender. Heavy duty plastics, a weighted base, and a thick glass pitcher give the Juschef what feels like professional-level durability and stability. All the components are substantial and beefy, including the pitcher lid and stirring rod. You’ll want to find a permanent space on your counter for this 15 pound appliance; just note that it’s 19”+ height won’t fit under most cabinets.
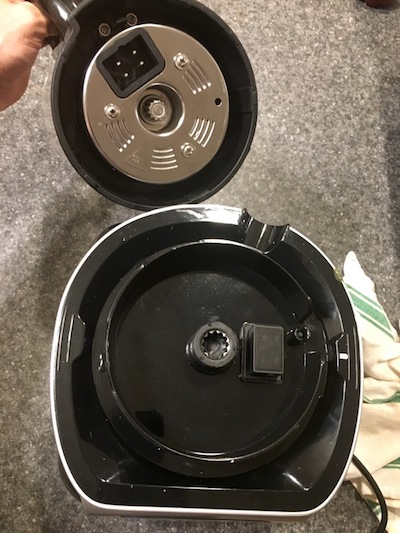
The blender has the ability to heat liquids, and the heating unit is built into the pitcher base. While it’s a nice bonus feature, I’m not crazy about this part of the design because the electronics are exposed. While those elements are sealed off in use, you can’t submerge the pitcher in water for cleaning. It also adds quite a bit of weight to the pitcher.
The pitcher itself is nice and thick, and has a maximum capacity of 56 ounces (40 ounces for heating). Unfortunately, the liquid measurements only start at the 24 ounce mark. The picture below shows 12 ounces of stock in the pitcher, measured separately. Not a huge deal, but it would be nice if the measurements ran down the whole side.

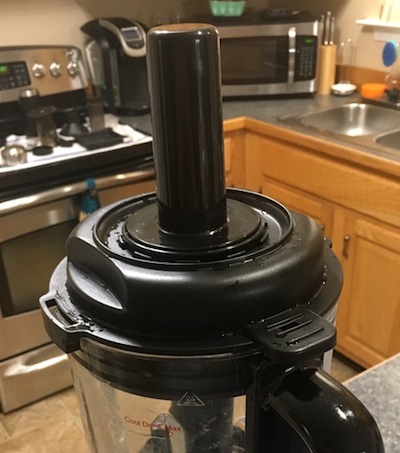
The lid mechanism is nice and sturdy, with a rubber gasket underneath to ensure a tight seal. You’ll need to rotate the lid tab into the locking slot before it will start, which is a good safety feature. I have no doubt that the lid will hold up to extended use.


 

The kit includes a pitcher cap and stirring rod that fit precisely in the lid. Both are built from durable plastic and are just as burly as the lid itself.

All of your operations are managed through an LED interface. There are 8 preset options as well as a “DIY” function for custom blending. 6 touch-panel buttons are utilized to set your operations. We’ll talk more about this in the Performance section.

The Juschef Professional blender sports a 900 watt power motor, which puts it above your typical countertop blender in terms of power (like the Ninja lineup), but not quite as powerful as high-end home models like the Vitamix or Blendtec. The blade speed is rated at 35,000 RPMs. This combination makes for a blender that, on paper, should handle most of your home needs.

Performance

The Juschef Professional Blender is a good choice for safety and durability. The whole unit is rock solid, and won’t bounce around your counter even when crushing ice at the highest blend settings. You also have to lock the lid to operate the unit, which is great for safety. You’ll find, however, that there’s a bit of a learning curve to understand all of the operations.

There’s no easy way to put this: the manual is just awful. It’s really poorly written with bad grammar and unclear instructions. It’s also incomplete and doesn’t explain how the presets work. The congee function, for example, is simply described as “To make healthy congee.”  Do you know what a congee is, or how to make one? I had to google it. It’s basically a rice-based soup or porridge that’s heated and blended. The blender gives no instructions about whether you add raw or cooked rice first, how long it will heat, or how the blend function works to make it. The same goes for “Porridge,” “Chi Soup,” and “Soy Milk.” Some of the functions are more obvious, and a quick reference guide is supplied with a recipe for each function… but I couldn’t tell you what the presets actually do or how long they take to work. There’s no online support either. You’re on your own.

To start things up, you’ll plug in the blender and add your desired ingredients. Lock the lid, and the unit will beep and the display lights up. We’re not “on” yet though. You have to press the power button to get into the features. It’s not particularly obvious, and Amazon reviews point to a bit of confusion and frustration with this.

Once you hit the power button, the rest of the buttons light up to indicate operation. Select “DIY” and you can set your own power level and duration using the up and down arrows at the bottom of the panel. You’ll hit the “DIY” button to cycle through each setting, then “On/Stop” to fire it up.

If you choose the “Menu” button, you can now cycle through the available functions. “Menu” or the up/down arrows now toggle through the preset functions, and you hit “On/Stop” to start the function.

As I mentioned earlier, each function does some combination of blending and/or heating if needed. The Smoothie function, for example, runs a 45 second cycle that winds up the blender to different speeds during operation. All good there. The Simmer function is stated as being used “To make different kinds of smooth soups,” but it doesn’t blend the ingredients other than the occasional 3 second whirl to stir things up. You have to blend your stuff first. It’s all very confusing.

Once we get past the interface woes, the blender actually does a fairly good job. Here’s a pitcher full of fresh tomatoes from my garden that I pureed using the DIY feature in about a minute on a higher setting. The result was pretty well done, with a little thickness, but no seed or skin remnants in the blend:


Running on the preset smoothie function, I added a combination of spinach, frozen fruit, almond milk, protein powder, and some diced ginger. It did not completely liquefy the spinach or the ginger and left some frozen fruit chunks, but the results were generally smooth. It’s about what I would expect from a blender at this level.


For my next trick, I decided to make a soup using the simmer function. We’ve got cucumbers and tomatoes (my garden is going nuts this week), basil, some chicken stock, a couple picked garlic bulbs, with some jalapenos to give it some oomph:

On my first go I tried the “simmer” function, assuming would also blend as the instructions implied. I got a hot bowl of stuff. This was how I learned that the instruction manual isn’t too clear.

When I realized that it was just heating, I stopped the process, blended the ingredients, and restarted the simmer mode. I did, in fact, get a nice smooth soup out of the deal:

It took about 20 minutes to get to full heat. That may be because simmer is intended to be a slower process. I haven’t quite figured that out yet. After all is said and done, however, I’d probably skip the heating feature and use my stovetop to get faster, more predictable results.

The blending function on the Juschef is plenty strong for most home uses and the stability of the unit is great, but I am also concerned about cleaning. It’s hard to clean since you have to be so careful around those components at the base of the pitcher. There’s also the blade configuration to consider. The blades are three separate components,  bolted together to form a six-bladed configuration that cannot be removed from the unit. Here’s the problem: see that discoloration in the crevasses?
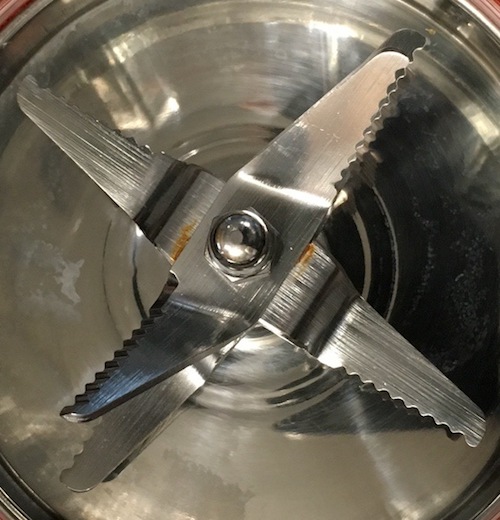
I am hoping that’s not rust. I’ve only used it a few times. Those little nooks and crannies will accumulate moisture and material, and present a real problem for cleaning and potential rusting no matter how well you clean and dry it. The unit ships with a soft brush that’s nice, but I am not sure that it is getting the job done.

What I like

  • Heavy, stable unit that won’t bounce around
  • Nice safety features
  • Well-build components
  • Strong blending capabilities

What needs to be improved

  • Awful documentation and instructions
  • Confusing user interface requires a steep learning curve
  • Hard to clean due to electronic components in the pitcher
  • Blade assembly will accumulate material, and might be susceptible to  rust

Final thoughts

At a retail price of $80-$90, the Juschef Professional Blender seems to be a good value for the money. It’s a stable, powerful unit that will handle most kitchen needs. The heating feature may be useful to some as well. Usability is not good, however, so expect some trial and error to use anything beyond the basic features. Cleaning and maintenance is also a potential trouble spot. I think you’d do well to check out some competitors in this category before buying this item.

Price: Between $80 and $90 depending on availability.
Where to buy: Buy it on Amazon.
Source: The sample of this product was provided by Juschef.

Filed in categories: Reviews

Tagged: , ,

Juschef Professional Blender review originally appeared on The Gadgeteer on September 3, 2018 at 9:00 am.

Note: If you are subscribed to this feed through FeedBurner, please switch to our native feed URL http://the-gadgeteer.com/feed/ in order to ensure continuous delivery.
Pop some corn with the sound of your voice with this GE microwave

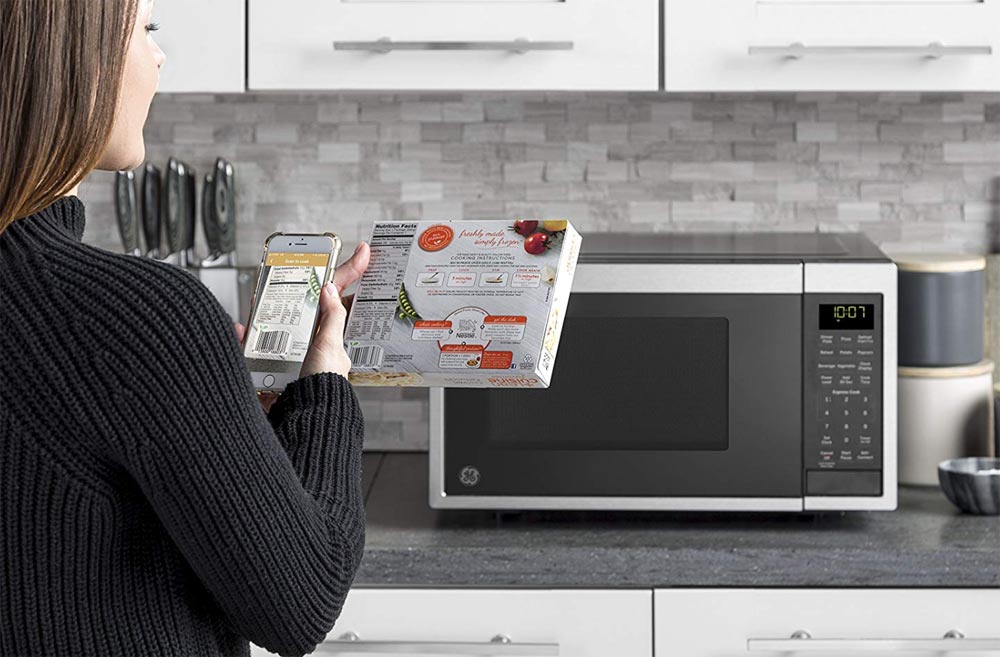
NEWS – GE’s 0.9 Cu. Ft. Capacity Smart Countertop Microwave Oven with Scan-To-Cook Technology (JES1097SMSS) adds Alexa voice control to your microwave.  The microwave connects to your home WiFi, so you can control it with voice commands through your Alexa device.  

The 0.9 ft³ oven has 900W of cooking power.  It has a variety of pre-set controls for defrosting food, reheating a dinner plate, popping corn, baking potatoes, and more.  Or you can use Alexa voice commands to set time and power levels, add cooking time, stop the microwave, and other commands.  And using the GE app, you can scan the bar code on a food package, and the GE Smart Countertop Microwave automatically adjusts power levels, cook times, and more, according to package instructions.

The interior has an LED light and a glass turntable.  The exterior measures 19″ wide x 11 ½” tall x 14 ½” deep, and the interior measures 13.7″ wide x 8.7″ tall x 12.4″ deep.  It has a gray body and a stainless steel door.

The MSRP is $139.00.  Check the GE website to learn more about the 0.9 Cu. Ft. Capacity Smart Countertop Microwave Oven with Scan-To-Cook Technology and to find local retailers.  Amazon also sells this microwave for $125.99.

Filed in categories: News

Tagged: ,

Pop some corn with the sound of your voice with this GE microwave originally appeared on The Gadgeteer on August 28, 2018 at 8:00 am.

Note: If you are subscribed to this feed through FeedBurner, please switch to our native feed URL http://the-gadgeteer.com/feed/ in order to ensure continuous delivery.
Replace your clunky wooden cutting board with the woodNflex flexible cutting board

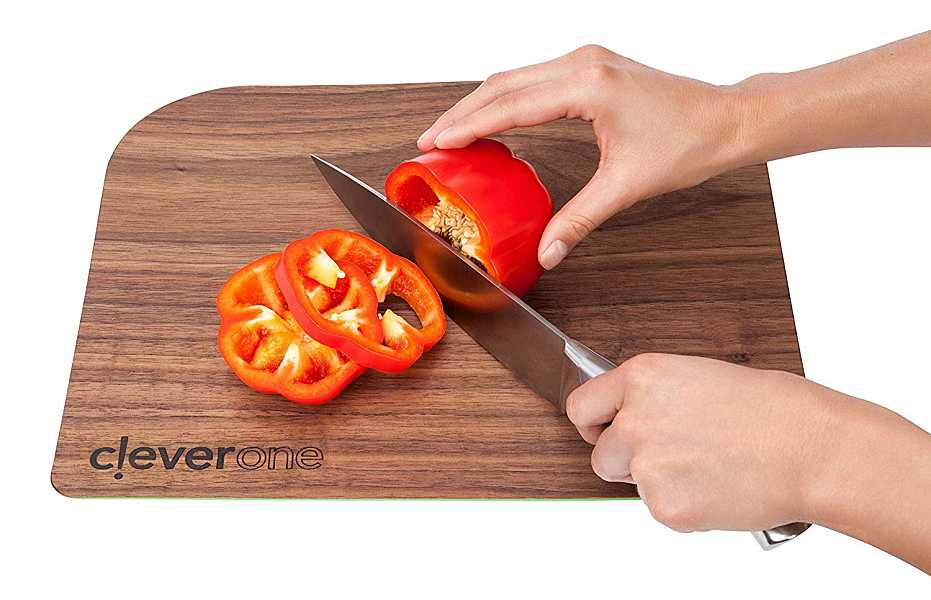
NEWS – I fashion myself as somewhat of an amateur cook. One of the things I use a lot to prepare meals is an old wooden cutting board. I’ve tried using those flexible plastic boards, but I just prefer the feel of my old wooden board. The problem with wood, of course, is that it’s a little cumbersome and it doesn’t flex or bend, until now. The woodNflex flexible cutting board gives you the best of both worlds.

woodNflex has a natural wood cutting surface that is backed by food-grade silicone. The thick silicone base gives the board grip and some bendability.

The wood cutting surface is a veneer made from natural American hardwood.

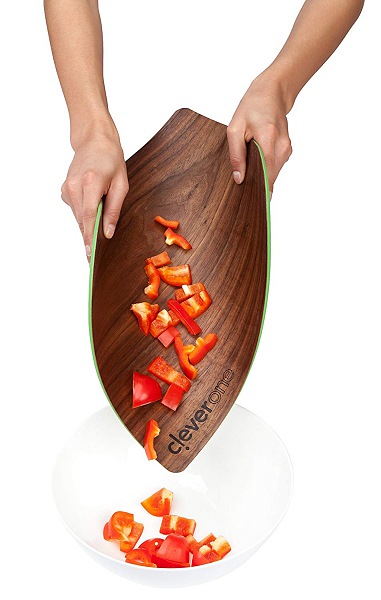
woodNflex’s lightweight and thin design make it easy to wash and store. It also adds a protective layer to your countertop. And because it’s flexible, it’s easier to transfer whatever you’re cutting from the board to a bowl or pan.

You can even use it as a server for things like cheese and party favors.

The board measures 14” x 11” and comes in either oak ($32.99) or dark walnut ($34.99).

The woodNflex cutting board is available on Amazon.

Filed in categories: News

Tagged: ,

Replace your clunky wooden cutting board with the woodNflex flexible cutting board originally appeared on The Gadgeteer on August 19, 2018 at 8:43 am.

Note: If you are subscribed to this feed through FeedBurner, please switch to our native feed URL http://the-gadgeteer.com/feed/ in order to ensure continuous delivery.