How to Host a Website (Step-by-Step)

How to create a server

To host a website on a server, you’ll need to get your hands dirty and set up the whole environment by yourself. Below, you’ll find a generalized example of how to get things done using a virtual private server running Ubuntu 18.04

In short, you’ll need to:

  • Perform the initial server setup
  • Set up a DNS zone and point your domain
  • Install a software stack
  • Create a virtual host
  • Get your website up and running

P.S. If you don’t want to go through this complicated steps, consider getting a web hosting.

1. The First Server Setup Steps

If you decide to rent a dedicated server or a VPS, you’ll first need to lay a solid foundation. This involves accessing your server through a terminal or an SSH client and making security tweaks and updates.

Connect to Your Server

Start by connecting to your server. The following command will do the trick:

ssh root@your_server_IP -port

When connecting for the first time, you may be prompted to add your server IP to the list of known hosts. Type in yes to proceed and you’ll then be prompted to enter the root password.

adding server IP to known hosts

Here’s an example of what you should see on your screen if everything went right.
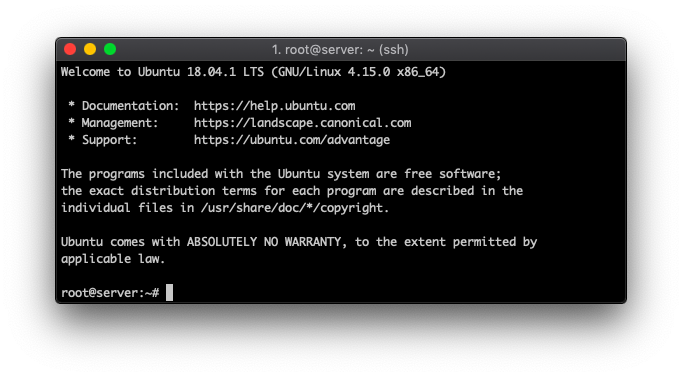
initial Ubuntu SSH login screen

Get the Latest Updates

Run the following commands to get the latest updates for your Ubuntu 18.04 server:

sudo apt update
sudo apt upgrade

When running the second command, you’ll see a confirmation screen. Type in Y to proceed.
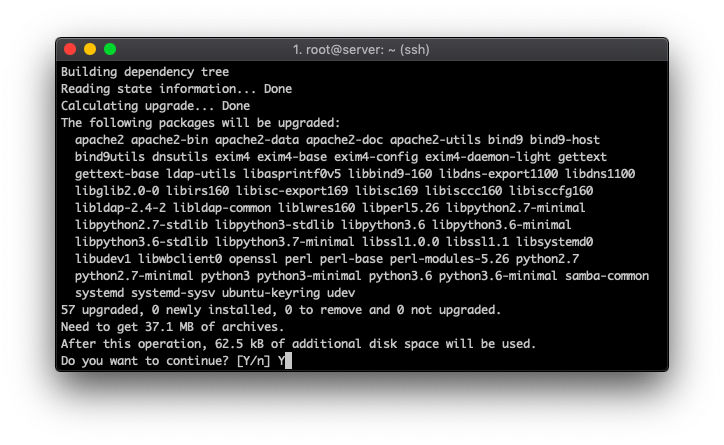
confirming server updates Ubuntu

Create a New User

Next, you’ll need to add a new user, as using the root one for everyday tasks is not recommended. Let’s call it webmaster. To begin the user creation, execute:

adduser webmaster
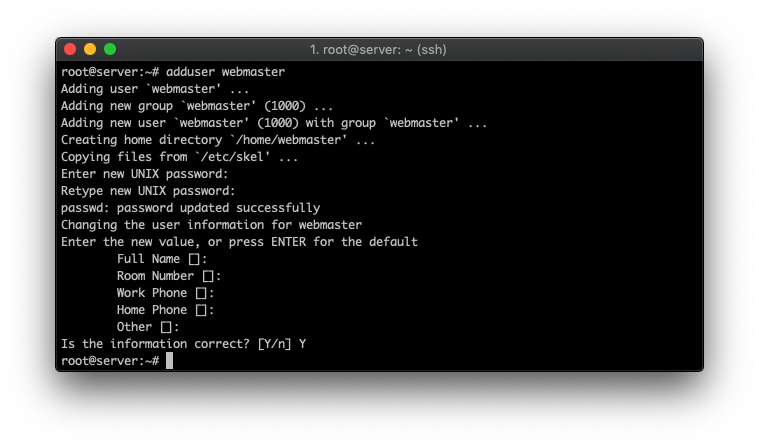
creating a new user Ubuntu

Once you create a password, you’ll be prompted to enter the general details (which you can leave blank). Then, type in Y to confirm the new user creation.

By default, the new user won’t have enough privileges to do everything you need, hence you’ll need to add them manually. Here’s how you do it:

usermod -aG sudo webmaster

That’s it! Your new administrative user is ready. To start using it instead of root, execute:

su – webmaster
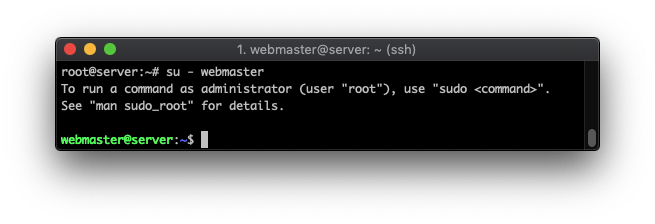
changing system user

Set Up Public Key Authentication (Optional)

Using a password to authenticate leaves you vulnerable to brute-force attempts and puts your server in a moderate risk (especially if you’re lazy to set up a unique and strong password).

A great way to improve server integrity is to use SSH keys instead of a regular password. The steps should be identical regardless of which Linux distribution you’re running. To begin log out of your server and execute the following command on your local computer to create a new public key:

ssh-keygen

You’ll be asked to enter an additional passphrase and the location of where to save the public key. By default, it saves everything to /Users/Your_User/.ssh directory (which you can keep unless you have other plans in mind).
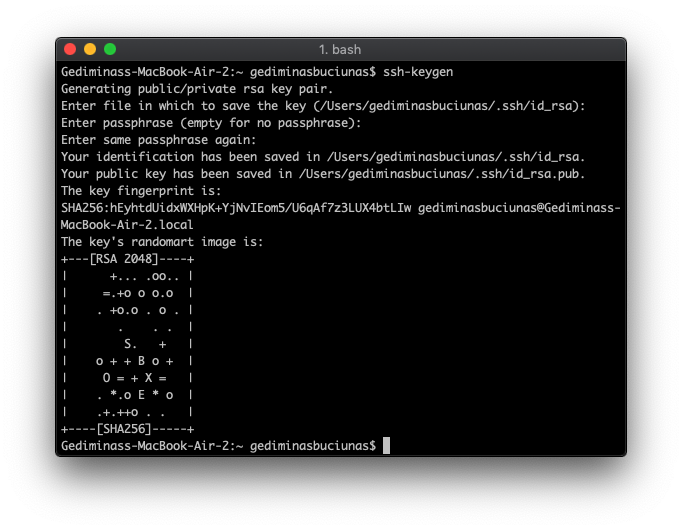
running SSH keygen

As soon as it’s finished, copy over the SSH key to your server by using:

ssh-copy-id webmaster@your_server_IP

You may also do the same for your root user just in case:

ssh-copy-id root@your_server_IP
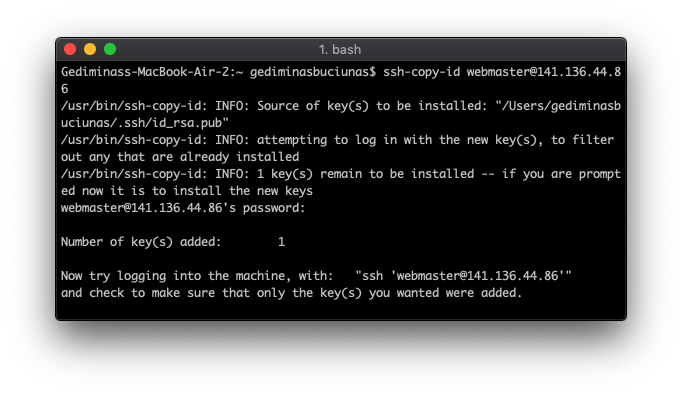
moving SSH key to remote server

Finally, you’ll need to login to your server again. Only this time, you’ll be using the SSH key and its passphrase to authenticate. If your password is guessed by someone, they will be unable to log in, as the public key is required to make a successful connection.

logging into server with SSH key

Disable Password Authentication (Optional)

Since you’re now able to access your server with the newly generated SSH key, it’s advisable to disable the regular password authentication. To do so, we can use the nano text editor:

sudo nano /etc/ssh/sshd_config

Look for a line that says #PasswordAuthentication yes, delete the # and change the yes to a no. The final result should look like:
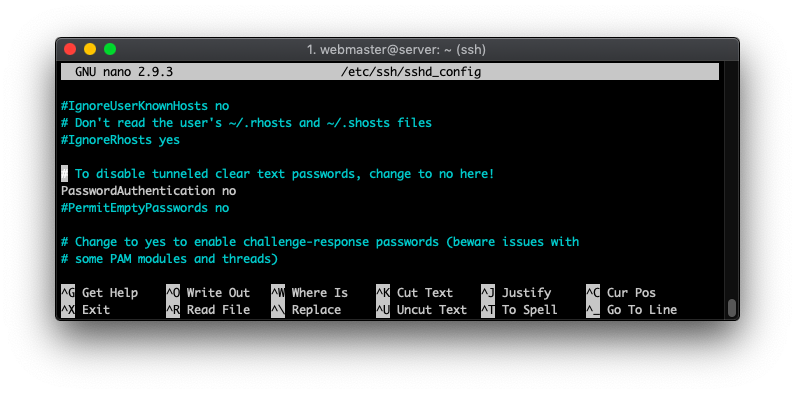
disabling password authentication in sshd config

To save these changes and exit the nano editor, press CTRL+X, type in Y and press Enter. And finally, apply everything by reloading the sshd service:

sudo systemctl reload sshd

And that’s it! You’ll now use a public key to authenticate instead of a password, which is considered a more secure way to access and manage a server.

Set Up a Firewall

Last, but not least, it’s advisable to use a firewall to protect yourself from the dangers lurking on the web. Uncomplicated Firewall is one of the best tools for the job. To set it up, execute:

sudo apt-get install ufw

When installed, the firewall will not work unless turned on manually. You can enable it by using:

sudo ufw enable

enabling ufw Ubuntu

To check if it’s up and running, execute:

sudo ufw status verbose


2. Set Up a DNS Zone

The next challenge will be creating a DNS zone, which acts as the binding material between a domain name and a server. We can break it down into two smaller steps:

  1. Setting up a DNS zone within your server
  2. Creating custom nameservers at your domain registrar

Create a New DNS Zone

To make a new DNS zone, we’ll be using a tool called bind9. In the end, this is the service that allows us to load a website through a domain name instead of an IP address.

To install Bind9 on your Ubuntu 18.04 server, execute:

sudo apt-get install bind9

Once installed, all the files will be available in the /etc/bind directory. Let’s navigate to it first:

cd /etc/bind

To keep everything neat and organized, we’ll create a separate directory for our DNS zones:

sudo mkdir -p zones

Let’s create a new DNS zone file for our domain. We’ll be using domain-example.com for demonstration purposes (you should replace it with your actual domain name).

sudo nano zones/domain-example.com

DNS zone snippet example:

;
; BIND data file for domain-example.com
;
$TTL    3h
@       IN      SOA     ns1.domain-example.com. admin.domain-example.com. (
                          1        ; Serial
                          3h       ; Refresh after 3 hours
                          1h       ; Retry after 1 hour
                          1w       ; Expire after 1 week
                          1h )     ; Negative caching TTL of 1 day
;
@       IN      NS      ns1.domain-example.com.
@       IN      NS      ns2.domain-example.com.


domain-example.com.     IN      A       YOUR_SERVER_IP
ns1                     IN      A       YOUR_SERVER_IP
ns2                     IN      A       YOUR_SERVER_IP
www                     IN      CNAME   domain-example.com.
mail                    IN      A       YOUR_SERVER_IP
ftp                     IN      CNAME   domain-example.com.
domain-example.com.     IN      MX      10      domain-example.com.

Make sure to replace all instances of your Your_Server_IP and domain-example.com with the actual values. Save the zone file by pressing CTRL+X and then typing Y to confirm the changes.

Next up, we’ll need to edit the local configuration and specify the location of our newly created DNS zone. This ensures that the server knows which zone file belongs to which domain name.

sudo nano named.conf.local

Paste down the following lines at the bottom of the file while replacing domain-example.com with your actual website address.

zone "domain-example.com" {
       type master;
       file "/etc/bind/zones/domain-example.com";
};

Press CTRL+X and input Y to save your changes and exit the nano editor.

You can also test out whether everything was added and configured correctly by executing the following command:

sudo named-checkzone domain-example.com /etc/bind/zones/domain-example.com

verifying dns zone

Lastly, run these two commands to restart your server’s DNS service and to make sure it’s running:

sudo /etc/init.d/bind9 restart
sudo /etc/init.d/bind9 start

At this point, the DNS zone is ready from your server side. To finalize it, you’ll need to create custom nameservers entries within your domain registrar.

Create Custom Nameservers For Your Domain

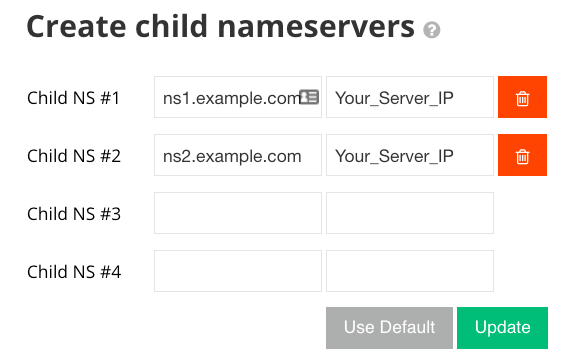
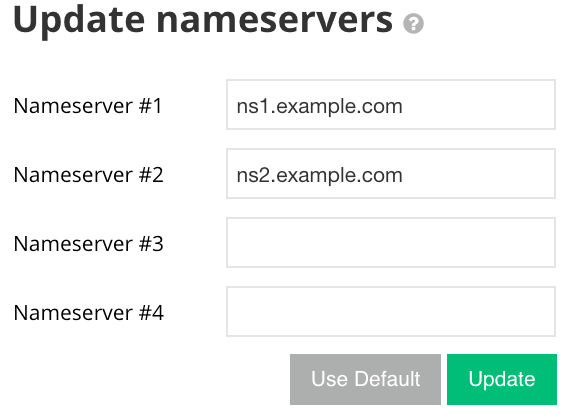
Since we specified two nameservers (ns1.domain-example.com and ns2.domain-example.com) in our DNS zone example, we’ll need to create these entries at the domain registrar and use them.

Here’s how the entries should look like:

Custom Nameserver Points to
ns1.domain-example.com Your_Server_IP
ns2.domain-example.com Your_Server_IP

child nameserver creation

Once created, you’ll need to point your domain to these new nameservers.
3. Install LAMP Stack

LAMP is one of the most used software stacks of the web. It stands short for Linux, Apache HTTP Server, MySQL/MariaDB, and PHP. Before hosting a site, you’ll need to make sure all these ingredients are available at your server. Here’s how the process of setting them up would look using Ubuntu 18.04:

Apache

Apache HTTP Server may already be included in the default packages that come with your server. If not, then execute:

sudo apt-get install apache2
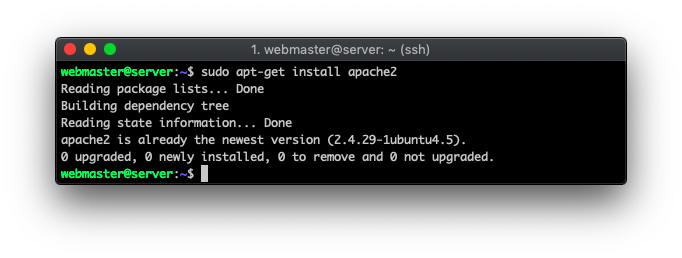
install Apache

Since there’s a firewall, we need to make sure these ports are open as Apache won’t work properly otherwise. Here’s what you should allow through the firewall:

sudo ufw allow 80/tcp
sudo ufw allow 443/tcp

Then, restart it to make sure the changes are applied:

sudo ufw reload

At this point, here’s what you should see by visiting the IP address of your server through a browser:
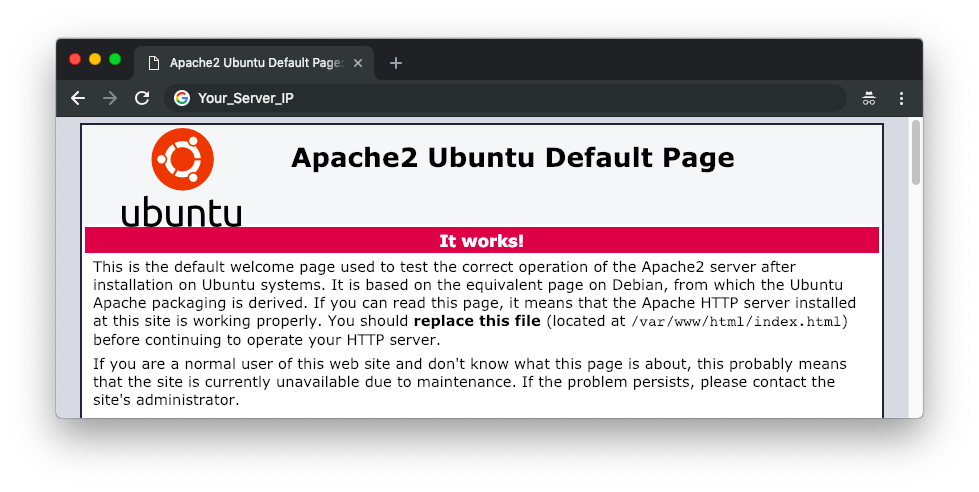
default Apache2 page

PHP

To get the latest PHP version with a few extra modules that WordPress needs, execute:

sudo apt-get install php php-common php-mysql php-gd php-cli
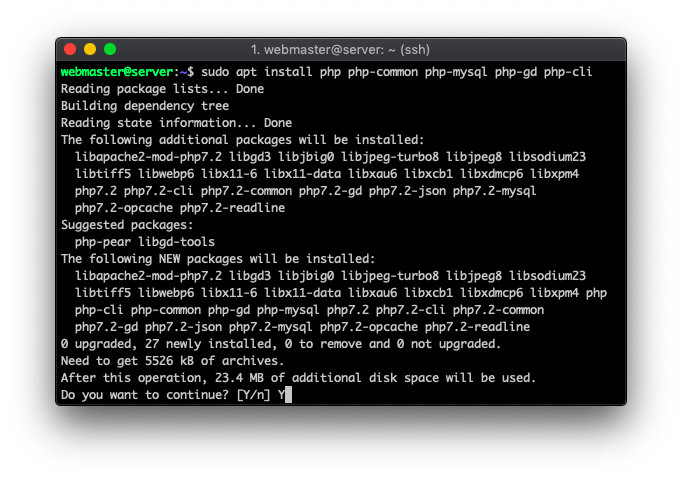
confirm PHP installation

You can check which PHP version was installed on your server by typing:

php -v
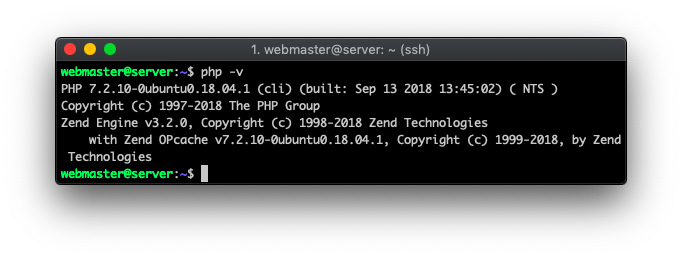
check PHP version

MySQL/MariaDB

MariaDB and MySQL are two of the top choices for your database server in Linux. For this example, we’ll use MariaDB. To install it on your server, execute:

sudo apt-get install mariadb-server mariadb-client
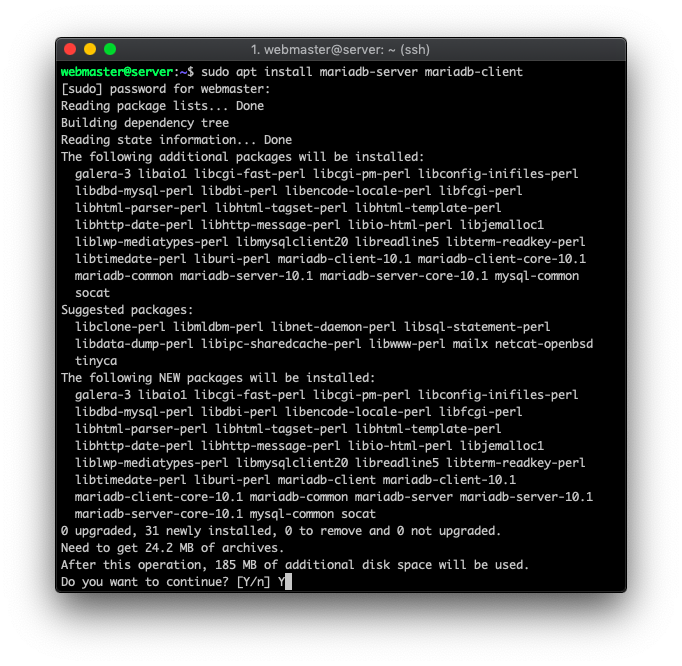
install Mariadb

Once done, you’ll need to use an additional script that comes with the package. It will establish the basic security measures for your database server. Start it by typing:

sudo mysql_secure_installation

At the very first step, you’ll be asked to provide the root MySQL password. Press the Enter button to continue as it’s not created yet. Then follow the rest of the instructions that pop up in the command line interface.
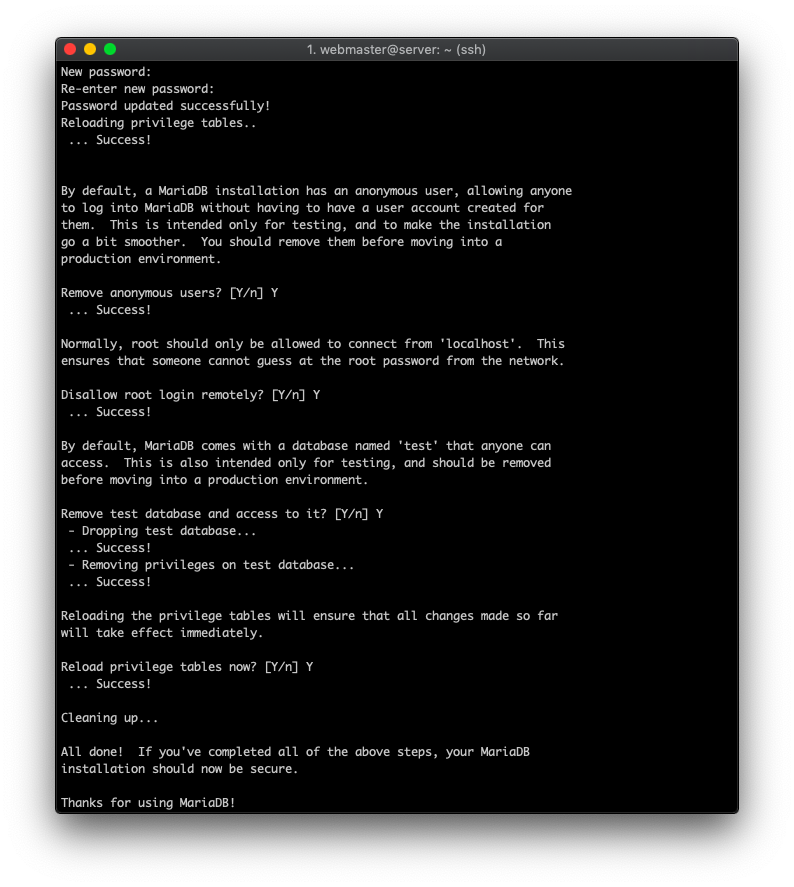
Mariadb secure installation

Finally, you can check if my database server is operational by running:

sudo systemctl status mysql

4 Create a Virtual Host

The next task will be creating a dedicated directory for your website files. Start by changing your working directory:

cd /var/www/html

Use this command to create a folder for your domain and an additional one within in:

sudo mkdir -p domain-example.com/public_html

Then, make the webmaster user we created previously the owner by using:

sudo chown -R webmaster:webmaster domain-example.com/public_html

You’ll also need to make sure that read permissions are applied to the Apache root directory. In this case:

sudo chmod -R 755 /var/www/html/

At this point, Apache gets all the settings from the 000-default.conf file. We’ll need to copy the contents of this file and create a separate one for our domain name. The easiest way to copy a template of the virtual host configuration is by using the following command:

sudo cp /etc/apache2/sites-available/000-default.conf /etc/apache2/sites-available/domain-example.com.conf

Essentially, this makes a copy of the file under a different name in the same directory. This is the file that tells your Apache web server the location of a domain’s root directory, error log, and other important paths. To change its content, we’ll use nano:

sudo nano /etc/apache2/sites-available/domain-example.com.conf


Apache config example:

<VirtualHost *:80>
        # The ServerName directive sets the request scheme, hostname and port that
        # the server uses to identify itself. This is used when creating
        # redirection URLs. In the context of virtual hosts, the ServerName
        # specifies what hostname must appear in the request's Host: header to
        # match this virtual host. For the default virtual host (this file) this
        # value is not decisive as it is used as a last resort host regardless.
        # However, you must set it for any further virtual host explicitly.

        ServerAdmin admin@domain-example.com
        DocumentRoot /var/www/html/domain-example.com/public_html
        ServerName domain-example.com
        ServerAlias www.domain-example.com
        
        # Available loglevels: trace8, ..., trace1, debug, info, notice, warn,
        # error, crit, alert, emerg.
        # It is also possible to configure the loglevel for particular
        # modules, e.g.
        #LogLevel info ssl:warn

        ErrorLog ${APACHE_LOG_DIR}/error.log
        CustomLog ${APACHE_LOG_DIR}/access.log combined
        
        # For most configuration files from conf-available/, which are
        # enabled or disabled at a global level, it is possible to
        # include a line for only one particular virtual host. For example the
        # following line enables the CGI configuration for this host only
        # after it has been globally disabled with "a2disconf".
        #Include conf-available/serve-cgi-bin.conf
</VirtualHost>

Make sure to replace all instances of domain-example.com with your actual domain name. To save the file, press CTRL+X and confirm by typing Y. The final result should look like:
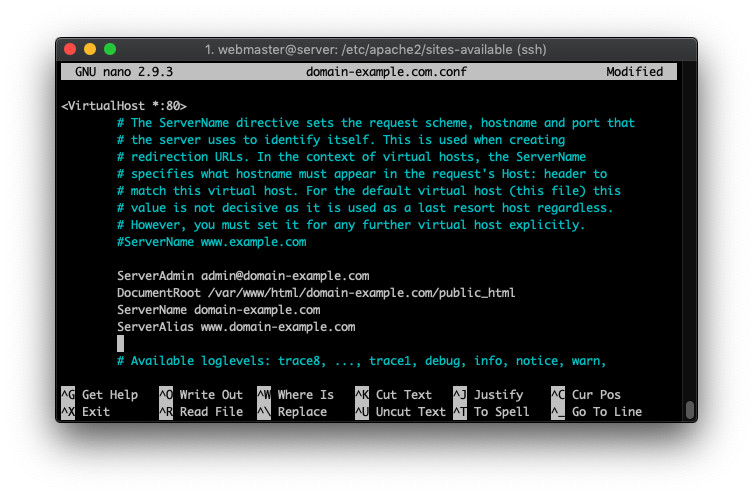
adding domain config to Apache

At this point, you’ll need to turn off the default virtual host configuration file and use the newly created one. This command will disable it:

sudo a2dissite 000-default.conf

Then, add the recently created configuration file as shown below:

sudo a2ensite domain-example.com.conf

Lastly, you’ll need to restart Apache for the changes to apply. You can do that by running:

sudo systemctl reload apache2

You successfully installed LAMP on your server. Since your domain is already pointed to the server, you may need to wait a few hours for the DNS to fully propagate. Then you should see a similar screen when visiting your domain through the browser.
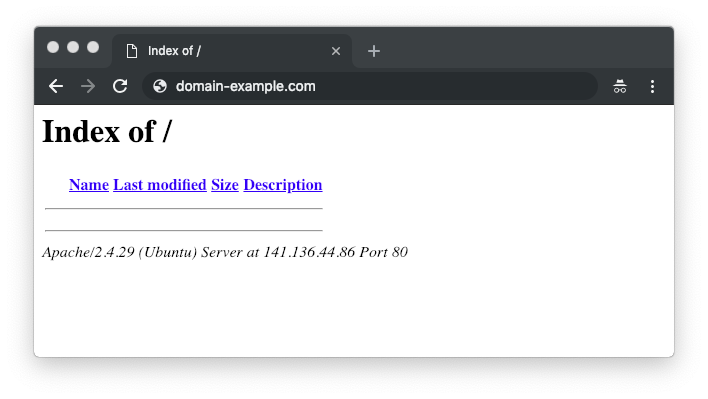
domain root directory content

5. Set Up WordPress (or Upload a Website)

Since the initial server setup is finally complete, it’s time to host a website on it. In this section, we’ll show you a generalized example of how to get a WordPress site up and running.

Create a New MySQL Database and User

Start by accessing the MySQL interface through the terminal:

sudo mysql

>Use the following syntax to make a new database:

CREATE DATABASE wpdatabase;

Then, create a new user and specify the password:

CREATE USER 'wpuser'@'localhost' IDENTIFIED BY 'SuperSecurePassword123';

Next, assign administrative privileges to your newly created user with:

GRANT ALL PRIVILEGES ON wpdatabase.* TO 'wpuser'@'localhost';

That’s it! Your MySQL user and database are ready for action. To turn off the interface, type in:

exit

Move WordPress Files to Your Server

Last, but not least, we have to get the actual website files uploaded to the root directory of your domain. There are two approaches that we’ll describe step-by-step:

  • Using the wget command to get the latest WordPress version
  • Configuring an FTP client (such as FileZilla)

Method 1: Using the Command Line Tools

The first way is to use a command called wget. To use it on your server, you’ll have to install it:

sudo apt-get install wget

Then, change your working directory to the root folder of your domain name:

cd /var/www/html/domain-example.com/public_html

Use the wget command to download the latest version of WordPress from the web:

wget https://www.wordpress.org/latest.zip

Then, extract all the contents of the archive by using:

unzip latest.zip

By default, all the files will appear in a new directory called wordpress (which may result in your website working via domain-example.com/wordpress). For everything to work correctly, we’ll need to move all the files out of that directory to the one above. Here’s how to do it:

cd wordpress

The following command will move all files from the current directory to your specified location:

sudo mv * /var/www/html/domain-example.com/public_html/

Before starting the installation, you’ll need to prepare your wp-config.php file. Since only a sample one is provided. Start by renaming it:

sudo mv wp-config-sample.php wp-config.php

Then, edit the file using nano and add the MySQL database configuration details.

sudo nano wp-config.php

Make sure to update the MySQL User, Database, and Host sections with the values that you created previously.
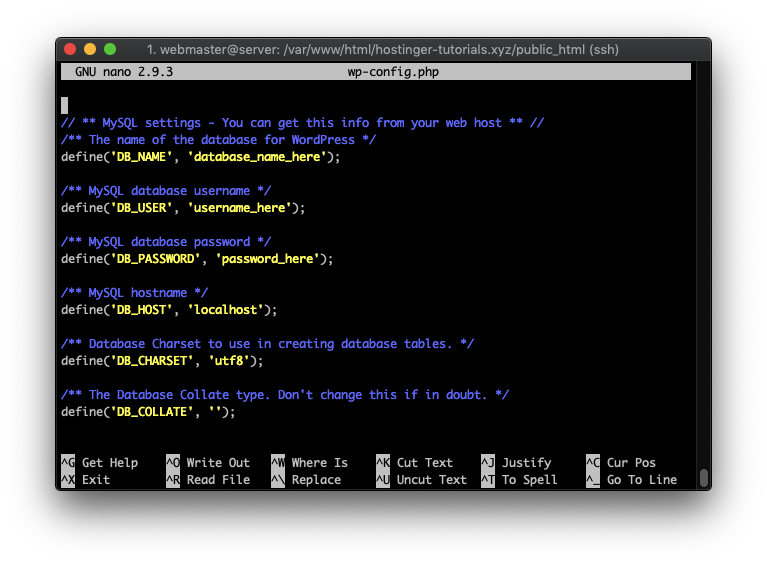
editing WP config

Lastly, visit your domain name in the browser and you’ll see the initial WordPress setup screen.
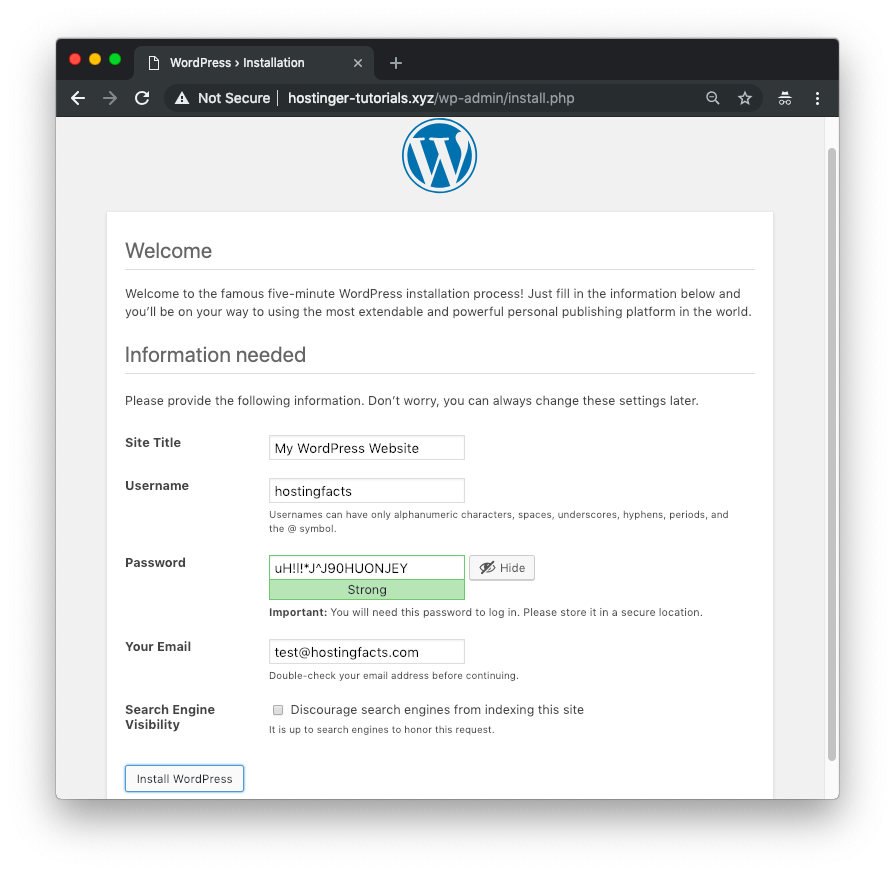
initial WordPress setup

Once you finish it, you can install a migration plugin such as All-in-One WP Migration to import an existing WordPress website.

Method 2: Using an FTP Client

Alternatively, you can use an FTP client such as FileZilla. In case you configured an SSH key and disabled password authentication, you’ll need to use it to log in instead of the regular username and password combination. To configure the SFTP connection:

  1. Go to FileZilla Site Manager and add a New Site.
  2. Set the protocol to SFTP – SSH File Transfer Protocol.
  3. Enter your server IP in the Host field and set the port to 22.
  4. Set the login type to Key file.
  5. Specify the path to your SSH key (e.g. /Users/Name/.ssh/id_rsa).
  6. FileZilla will convert it into a .ppk file, which you can then use to make a connection.
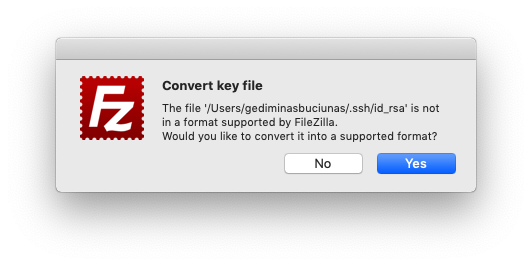
converting SSH key

The final configuration should look something like this:
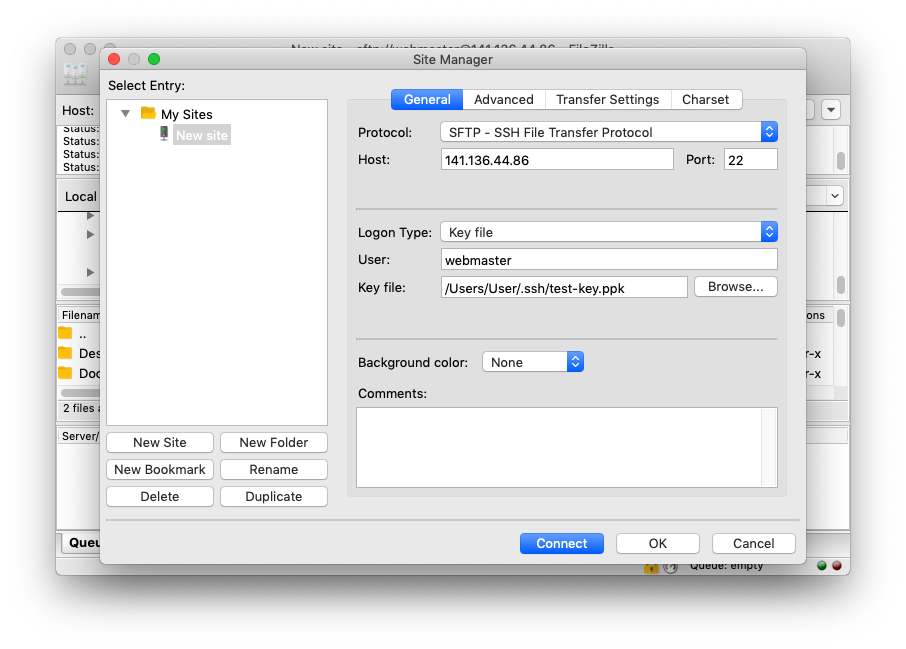
FileZilla sftp configuration

Now, you’ll be able to access your server via FTP and upload any files directly from your computer.
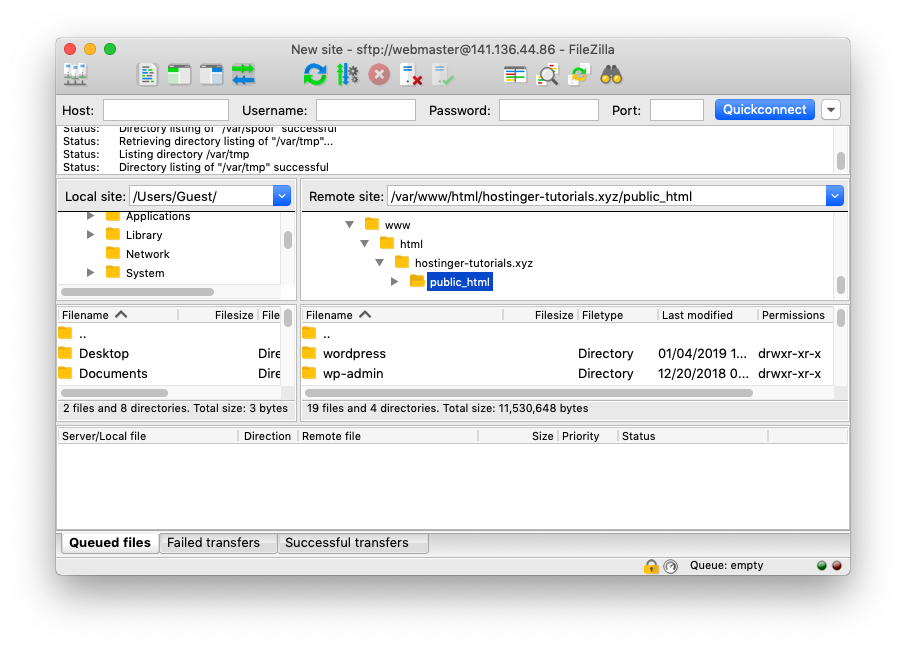
FileZilla sftp connection

Congratulations! You’ve learned how to host a website on a virtual private server running Ubuntu 18.04. Everything from the initial server setup to preparing the software stack has been covered. All that’s left is to grab a server and get your hands dirty!

This article was published with the help of Hostinger.com.

The post How to Host a Website (Step-by-Step) appeared first on HostingFacts.com.

Posted by / January 9, 2019 / Posted in Guide

Botto storage containers expand and shrink as needed

NEWS – It’s about time that food storage containers evolved. Botto containers are the first adjustable storage containers that expand and shrink to hold a little or a lot. Made of food-safe materials that are BPA, and phthalate-free, Botto containers come in two styles. There’s the clear variety that you see pictured here and a UV-blocking version that is harder to see through.

Each Botto air-tight container is designed to hold a little or a lot. It starts out as 16 oz (470 ml) and can grow to hold as much as 32 oz (960 ml). A special airlock inside the container pushes the air out as you compress the size. I thought the idea was terrific until I saw the price. Each standard (clear) container is $14.95 and if you want the Pro version which is darker plastic, the price jumps up to $22.95 each. YIKES! If the price doesn’t scare you away, you can read more about Botto containers by visiting thebotto.com and The Grommet.

Filed in categories: News

Tagged: , ,

Botto storage containers expand and shrink as needed originally appeared on The Gadgeteer on January 8, 2019 at 12:00 pm.

Note: If you are subscribed to this feed through FeedBurner, please switch to our native feed URL http://the-gadgeteer.com/feed/ in order to ensure continuous delivery.

Pelican Go G40 Case review

REVIEW – We all have our EDC essentials and some of us lug them into environments that are potentially a bit more harsh than average.  If you are one of the aforementioned folks, then you probably already know that Pelican has been making hard cases that are water- and drop-resistant for a long time and are arguably the gold standard for such containers.  Pelican’s most recent product in the personal hard case space is their Pelican Go G40 Case.   It not only has many of the features that have made Pelican’s products successful for many years, but also has a few additional features for EDC fans.  How did it fare?  Let’s check it out!  Gadget on!

What is it?

The Pelican Go G40 Case is a water- and drop-resistant personal hard case that is designed to hold and keep save several small items in potentially extreme conditions.

Hardware specs

  • Colors: Anthracite/Grey, Blush/Grey, Lime/Green, Surf Blue/Grey (reviewed here)
  • Dimensions: 7” x 3.5” x 1.6”
  • Material: ABS plastic
  • Waterproof rating: IP67 (Submersible for 30 minutes in a depth of up to 3 feet (1 meter))
  • Exterior: Equipped with a rubberized bumper, easy carry handle and secure closure latch to protect even the smallest valuables.
  • Interior: Cushioned EVA Lining in Lid and Base to keep cellphones and valuables safe plus Organization Tray with built-in credit card pockets and cord management strap
  • Warranty: Pelican lifetime warranty

What’s in the package?

  • Pelican Go G40 Case

Design and features

Fends off dust, dirt, sand, and water up to 1.5m deep for up to half-an-hour.

I actually already own two Pelican cases, both their 10xx and 1050 cases, which I purchased through GORUCK, and I have been very happy with them; they have protected my cell phone, wallet, car keys, and several other items through all sorts of adventures and harsh conditions.  When I first saw a photo online of the Go G40 Case, my initial thought was, “Hey, where’s the transparent lid?”  I was a bit skeptical, but the Go G40 Case’s other features intrigued me enough to want to review it.  

Other than the lack of a transparent lid as mentioned above, the Go G40 Case does share many similar features to existing Pelican cases, each of which will be covered in more detail below.  For starters, it looked and felt very rugged and durable.

Another thing that I noticed about the Go G40 Case immediately was its matte finish.  Most personal Pelican cases that are sized similarly to the Go G40 Case have a high-gloss finish.  While this has an appealing appearance initially, I’ve found this to be a bit problematic over time, because if you are actually using your Pelican case at all, it is likely that the case is actually coming into contact with other objects, which tends to scratch and scuff that appealing gloss finish.  I think the matte finish of the Go G40 Case is a serious improvement.

One of the more obvious external features that I appreciated immediately was the generously-sized loop that can be used to attach the Go G40 Case to things, such as a backpack.  Loop-type features are present on most hard cases of this type, but I’ve found most of them to be quite small and I’ve always been concerned that they might break off and I’d lose my hard case.  Not so here.  As mentioned, the loop on the Go G40 Case is very generously sized, thick, and integrally molded directly into the exterior of the case.  This thing is solid—good luck breaking this off without basically destroying the case.

The Pelican Go G40 Case, like many of its predecessors, has a single latch mechanism that locks down the lid and seals the case tight.  Like the loop described above, this latch is big, beefy, and provides a very positive tactile and auditory feedback when locked down.

The latch includes a valve that is similar to other existing Pelican case models.  This valve is intended to help equalize the pressure inside the case with the ambient pressure outside the case, such as at higher altitudes.

Moving to the other side of the Go G40 Case, the lid is attached to the main body of the case with two very solid hinges that have durable metal core pins as shown above.  This is yet another reason why Pelican is considered a gold standard for personal protection cases.  In addition, the gray strip running around the outside perimeter of the Go G40 is actually a rubber bumper that helps protect the case (and its contents) from shocks and drops.

The Pelican Go G40 Case is a decently compact size, while still being able to hold a fair amount of EDC-type items, as you will see below.  Above, I’m holding the Go G40 Case just to give an idea of scale.

Next let’s look inside the Go G40 Case, where there are some additional new features, such as the lining and tray.  More on these features below.

First, let’s take a look at the interior of the case itself, and focus on the bottom of the main compartment.  The inside of the Go G40 Case is lined with a soft EVA material that helps both cushion items placed inside as well as reduce the risk of scratching them against the inside of the case.  There are also two cross-shaped features that are very slightly raised from the bottom.  These are to prevent items from getting “stuck” to the bottom of the case.

Similar to the bottom of the case, the inside of the lid also has the same soft EVA material to help protect items placed inside it.  In the photo above, you can also see the black rubber O-ring that sits down in its own groove and runs the circumference of the case’s lid.  This rubber O-ring is key to the Pelican Go G40’s IP67 waterproof rating, which allows it to remain submerged in water to a depth of 1 meter for up to 30 minutes.

Next, let’s check out the Go G40’s Case’s internal tray.  This tray is specially sized to lay into the lower portion of the case, but stay elevated above the bottom; it rests in a ledge that is built into the circumference of the lower portion of the case’s interior.

This tray is molded to specifically fit into the lower portion of the Go G40, but the tray’s exterior is a fabric-type cloth, the texture of which is shown in the close-up photo above.  There is also an oval slot on either end of this tray, with I think is simply to help remove the tray from the Go G40 and to prevent the tray from getting “stuck” in the Go G40.

The tray serves two purposes.  First, it provides a space for your mobile phone to sit that is separated from any other contents in the lower portion of the Go G40 (see photo below).  Additionally, the underside of the tray has two card slots as well as a strip of elastic that can be used for cable management.  In the photo above, I’ve placed a debit card and my Driver’s License, along with a pair of iPhone earbuds.

Above, you can see that my iPhone 6 Plus fits perfectly in the tray; however, I did have to remove the Magpul case I that I typically have on my iPhone.  Smaller phones will fit fine in the tray, but if you have a larger phone, you may have to remove it from its case, or use a very thin case, in order for it to fit in the tray.  (Please ignore the goofball reflected in the iPhone’s screen. 😉 )

Above, I’ve placed a handful of my essential EDC items into the Go G40 Case, including my naked iPhone 6 Plus (which will actually sit down in the cavity in the tray as seen in the photo above and below), my Leatherman Squirt PS4 multitool with a 550 paracord fob, a Sandisk USB flash drive, a Sharpie pen, a Parker Jotter ballpoint pen, a Lumintop Tool AAA flashlight and a pack of Listerine Breath Strips.    Also included are the two cards and iPhone earbuds in the underside of the lid.

Above is the Go G40 Case with all of the items shown above placed inside it.  Everything fit well and the latch closed fine.  In fact, even with the items above placed in the lower portion of the Go G40 Case, there was still room for a few more small items if I arranged them all to fit.

In the photo above, I’ve used a carabiner to attach the Go G40 Case to the grab handle of my GORUCK GR1 rucksack as an example of how you might carry this case securely on the outside of a bag.

What I like

  • IP67 water resistance rating
  • Matte finish doesn’t show scratches, scrapes or smudges
  • Thick, tough carabiner loop
  • Exterior rubber bumper for added shock protection
  • Interior lined with soft EVA material
  • Interior tray separates phone from other items and also includes card slots and elastic strap

What needs to be improved

  • I had to remove my iPhone 6 Plus from the case I typically use in order for it to fit into the tray

Final thoughts

I really like the Pelican Go G40 Case.  It provides an excellent level of water- and shock-protection for small valuables and its interior tray that holds your cell phone is a great new feature.  If you work or frequently spend time in a harsh environment, or plan to visit such an area, I would encourage you to take a look at the Pelican Go G40 Case as a way to secure your important personal items.  In fact, I plan to use the Go G40 case to protect my wallet, phone, watch and a few other items on my next GORUCK Challenge, which is a really good testbed for protective hard case like this, because it is very likely that will be banged around around a lot, and also to be submerged in water.  Interestingly, the Pelican Go G40 Case is currently only available at REI, so if you are interested, check their site for more info or to order (see links below).

Price: $39.95
Where to buy: REI.com
Source: The product sample for this review was provided by Pelican.

Filed in categories: Reviews

Tagged:

Pelican Go G40 Case review originally appeared on The Gadgeteer on January 8, 2019 at 11:00 am.

Note: If you are subscribed to this feed through FeedBurner, please switch to our native feed URL http://the-gadgeteer.com/feed/ in order to ensure continuous delivery.

Wicked Audio Syver wireless earbuds charge inside a Bluetooth Speaker case

NEWS – Wicked Audio is adding new products to their line of audio gear with the new Syver Bluetooth earbuds. It’s hard to get excited about Bluetooth earbuds these days because there are so many to choose from. But the Syver earbuds stand out from the crowd with a unique charging case that doubles as a speaker. Syver earbuds have an IP65 waterproof and dust resistance level so they can go with you on your hiking and camping adventures. The Wicked Audio Syver Bluetooth earbuds will cost $99.99 and will be available Spring 2019. You can visit wickedaudio.com for more details soon.

Filed in categories: News

Tagged: ,

Wicked Audio Syver wireless earbuds charge inside a Bluetooth Speaker case originally appeared on The Gadgeteer on January 8, 2019 at 10:00 am.

Note: If you are subscribed to this feed through FeedBurner, please switch to our native feed URL http://the-gadgeteer.com/feed/ in order to ensure continuous delivery.

Azulle Byte3 fanless mini desktop PC review

REVIEW – Desktop PCs don’t seem to get the love that laptops get these days. Most people want a small laptop that they can carry around with them where ever they go. But what about people who don’t need a portable computer setup and want a Windows PC that has a small footprint and one that’s ultra quiet? Let’s take a look at the Byte3 fanless mini desktop PC from Azulle.

What is it?

The Azulle Byte3 is a Windows 10 PC that’s small enough for almost any desk and quiet enough for any home theater.

Hardware specs

Processor: Quad-core Intel® Apollo Lake N3450
Operative System: Windows 10 Pro or Ubuntu Linux
Bios: Wake ON LAN / PXE / BIO Reset
RAM: 4 GB / 8 GB
Storage: eMMC 32 GB / 2.5” SSD Supported or M.2 Supported
GPU: Intel HD Graphic 500
WIFI: Dual Band 2.4 Ghz / 5.0 Ghz
Ethernet: 1 Gigabit
Bluetooth: Bluetooth 4.0
VGA Output: VGA Port x1
HDMI Output: x1 Port, 4K @60fps
USB: x3 3.0 Ports/ x1 2.0 Port / x1 Type-C
SD Card Slot: Up to 256 GB
M.2 Slot: AHCI (SATA)
SATA: Yes
3G Support: Via dongle
IR: Yes
Audio Output: 3.5 mm Jack
HDMI Output: 4K @60fps
Power Supply: 12V
Dimensions: 5.6 in x 4 in x 1.5 in

What’s in the box?

  • Azulle Byte3 PC
  • AC power adapter
  • Remote control
  • Quick guide

Design and features

The Azulle Byte 3 has a black plastic housing and a compact form factor that’s about 6 x 4.25 x 1.25 inches. It’s a sleek alternative to a traditional tower PC.

The front of the computer has a small power button with the Azulle logo that doubles as a status LED that glows red when the unit is connected to power but not actually powered on and blue when powered on. In the bottom left corner is an IR receiver that is used to receive commands from the included remote control.

The basic remote that is included with the Byte3 has dedicated buttons to toggle power, adjust volume, mute volume, launch Windows settings, go back, and switch tabs. There’s also a 5-way nav button in the center that you can use to navigate fields but it does not let you move the mouse pointer around on the screen.


Azulle sells a more advanced remote called the Lynk controller which has extra features including a small keyboard on the back of the remote and an air mouse feature that lets you wave the remote in the air to move the onscreen cursor/mouse. The remote even has backlight feature but it’s only for the buttons on the top of the remote and not for the keyboard on the back.

On one side of the Byte3, you’ll find an SD card slot and 2 USB ports.

The opposite side has a speaker grill / air vent.

The back of the computer has a 3.5 mm headphone jack, a Kensington lock slot, 2 more USB ports, an Ethernet port, HDMI port, VGA port, power port, a USB Type-C port, and a wireless antenna. I have to say that I was pleasantly surprised by the abundance of expansion ports on the Byte3.

The bottom of the Azulle Byte3 is vented and there are 4 holes that will allow you to mount the computer on a wall or under a desk if you so desire.

If you remove the bottom plate, you’ll find an M.2 SATA port and a SATA cable for adding a 2.5-inch drive which is something you’ll probably want to do at some point since this PC only comes with 32GB of built-in storage which Windows 10 takes a big chunk of.

Setting up the Azulle Byte3

I was sent the 4GB Ram Quad-Core Apollo Lake J3455 configuration of the Byte3 which comes preinstalled with Windows 10 Pro. My idea for testing the Byte3 was to connect it to my Denon AV receiver to use for streaming Netflix, Hulu, Amazon Video, and other content on my 65-inch Vizio TV in my basement living room.

I was able to easily connect the Azulle to my AV receiver using an HDMI cable (not included). It shouldn’t come as a surprise that also not included with the Byte3 is a mouse and a keyboard. Since my plan was to review the Byte3 as a media player/streaming device, I decided to order a small wireless keyboard. I settled on a Logitech K400 wireless keyboard mainly because it was really cheap and had a built-in touchpad which I hoped would make it easier to navigate Windows from the couch.

The first time I powered the Byte3 on, I was impressed by how quickly it booted up and has booted up since then. Granted, it is Windows 10 we’re talking about, but the experience using this operating system hasn’t been painful on this little PC at all. Note that if you don’t want to run Windows, you can get a Byte3 with Linux or with no OS installed at all. I wish it macOS was an option 😉

I was also happy that the Byte3 doesn’t have a fan, so it is completely silent, just the way I like my computers to be. I’m such an anti-fan girl (see what I did there?), that I returned a brand new 2018 MacBook Air that I purchased several weeks ago just because I didn’t realize that it had a fan in it. Yes, I’m weird about noise.

I tested the Byte3 while surfing websites using Chrome and other browsers, as well as watching Netflix, Youtube, Hulu, Philo, and other streaming services. All in all, I was really impressed. This little computer handled media streaming via WiFi very well to my 65-inch Vizio TV.

The Azulle even handled streaming 4K video content which was a nice surprise for such a small PC like this one.

I didn’t run any speed tests on the Byte3, so if you want that kind of technical information you can find other reviews that include all sorts of charts and data that usually make my eyes glaze over. I also didn’t test this PC with any high-end games because it’s not designed for them and I’m not a gamer.

What I like

  • Fanless
  • Small footprint
  • Decent array of ports
  • Works well as a streaming computer hooked to a large display

What needs to be improved

  • Nothing

Final thoughts

The Azulle Byte3 PC is a capable and affordable Windows 10 Pro desktop computer that you can hide almost anywhere given its small form factor. I found that it works great as a media player/streaming device hooked up to a large display and as such, it’s earned a permanent spot next to my AV receiver and may just be the device that will finally make me cut the cord for good.

Price: $239.99 as configured
Where to buy: Amazon
Source: The sample for this review was provided by Azulle.

Filed in categories: Reviews

Tagged:

Azulle Byte3 fanless mini desktop PC review originally appeared on The Gadgeteer on January 8, 2019 at 9:00 am.

Note: If you are subscribed to this feed through FeedBurner, please switch to our native feed URL http://the-gadgeteer.com/feed/ in order to ensure continuous delivery.