Nitecore NU25 Headlamp review

REVIEW – Sometimes a product is so universal that it’s hard to imagine it needs a manual. Headlamps fall into that category for me. They have batteries, LEDs and buttons to turn them on and off. What more is there to know? In the case of Nitecore and their NU25 headlamp… Quite a bit, and I’m impressed. Join me after the jump to find out more.

What is it?

Nitecore’s NU25 is a best-of-breed headlamp designed specifically for outdoor use. It’s slim, fits well and does what it’s designed to do very well. Read on.

Hardware specs

– Size: ~2.2″ x 1.4″ x 0.9″ including holder
– Weight: ~1 oz
– Lamp: CREE XP-G2 S3 LED
– Max Output: 360 lumens
– White Light: CRI ≥90
– Color Temp: 4500K
– Max Beam Intensity: 1650cd
– Max Beam Distance: 81m
– Battery: 610mAh Li-ion polymer battery
– Charging: Via micro-USB port

What’s in the box?
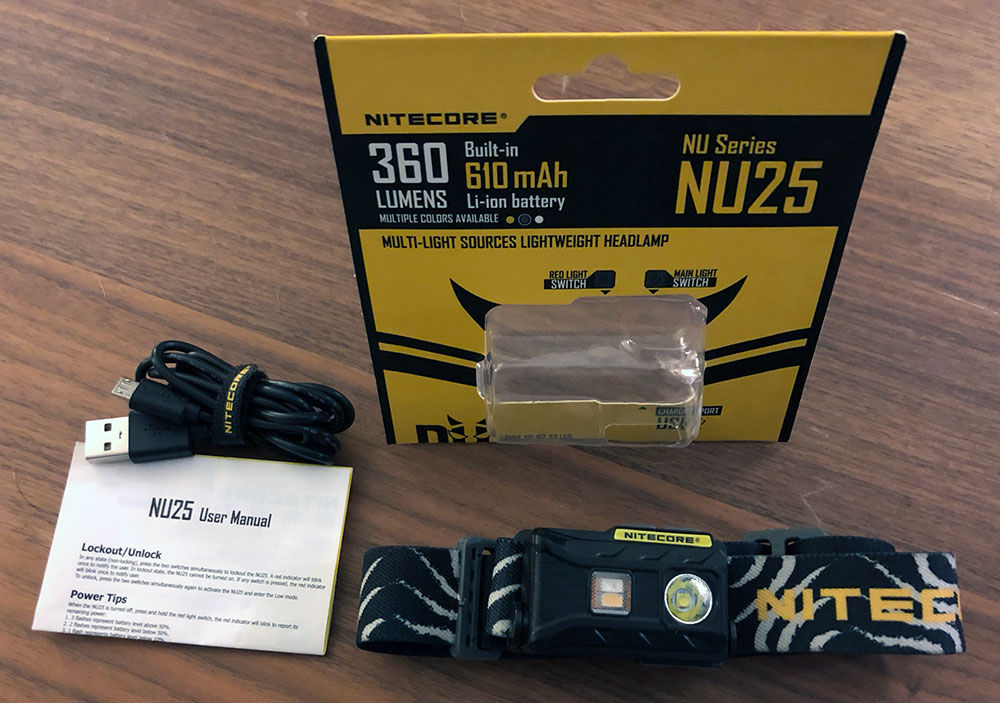
  • Inside the refreshingly simple packaging are the following items.
  • NU25 headlamp
  • Elastic headband
  • Micro-USB charging cable
  • Instruction manual

Design and features

The NU25 is a very slim, rectangular headlamp. The low profile is a welcome feature as is the lightweight.
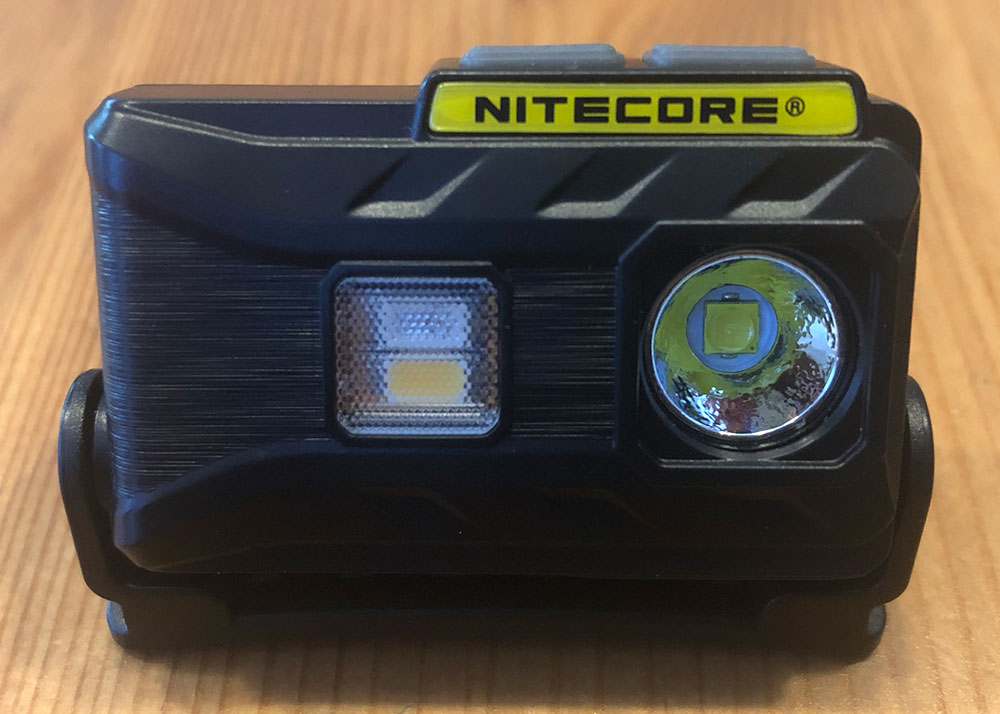
On the front, you can see the main light on the right and the auxiliary light on the left which provides both red and white lights independently.
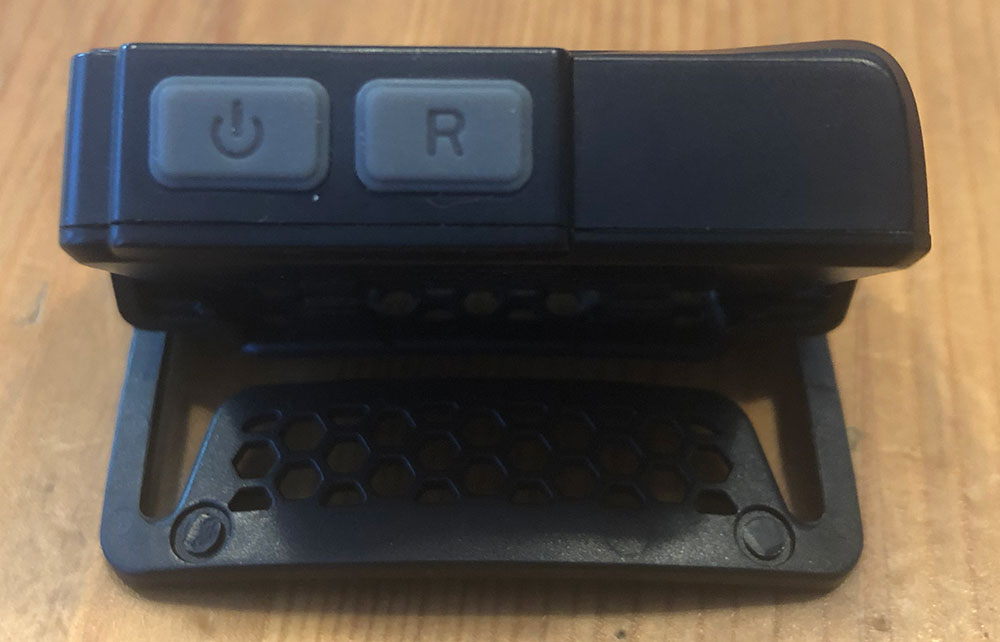
Two buttons. White on the left and red on the right.
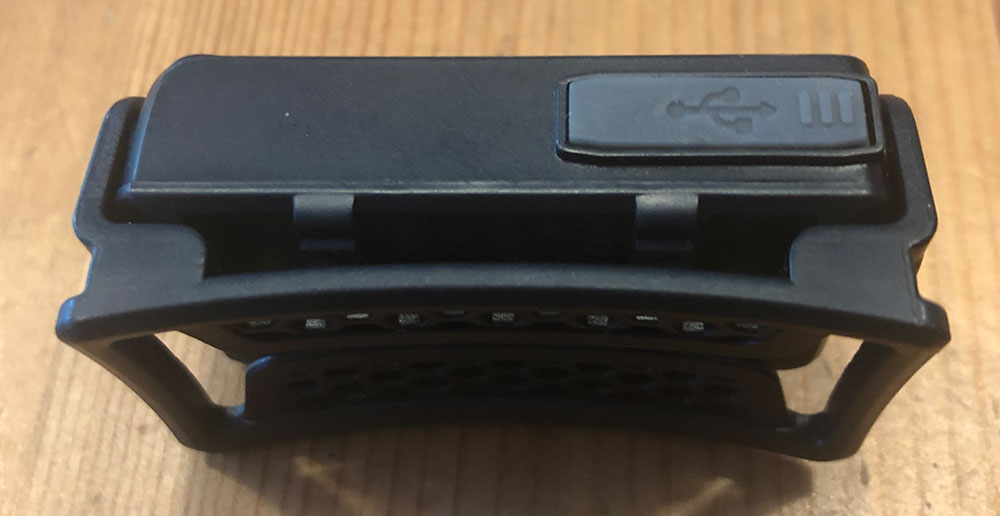
On the bottom is the Micro-USB port underneath the silicon tab
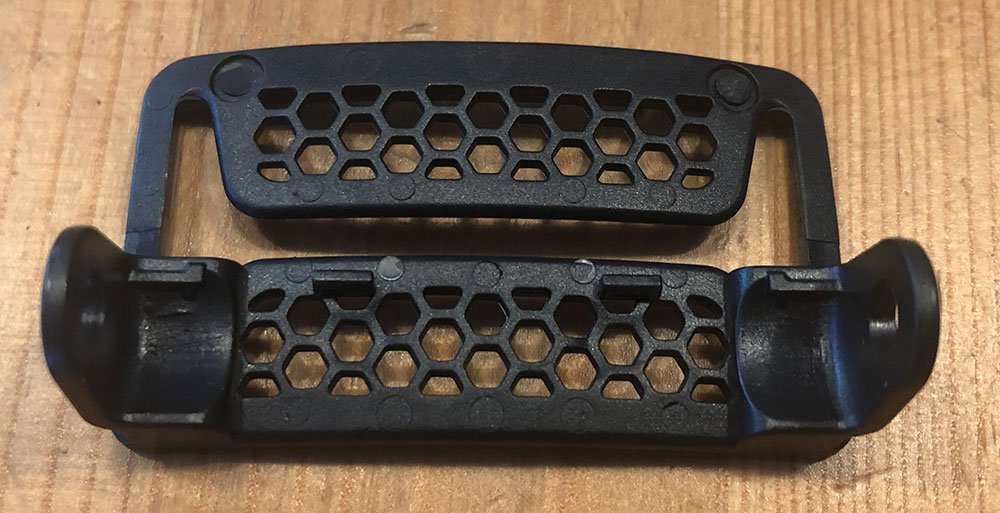
The holder pops off easily (but not too easily) for you to attach the headband.
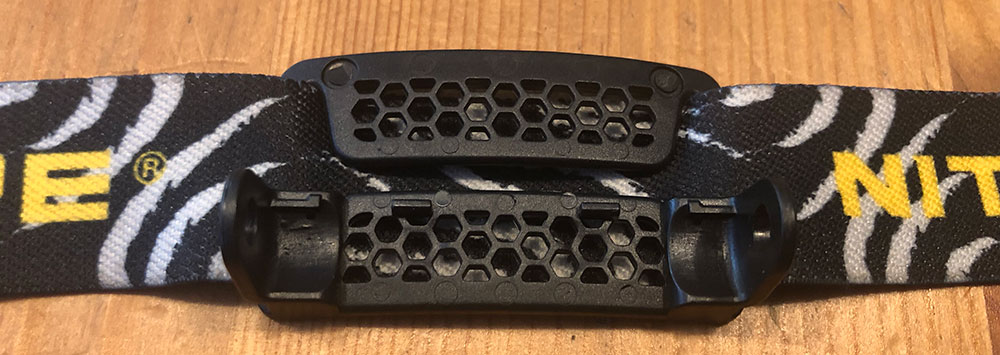
Tuck it behind the lower section and then again under the top like so.

Here’s a look at the different angle indexes within the 60º range of motion that the interface between the holder and the module provides.

Feature list:
– Lightweight design specific to outdoor activities
– Built-in rechargeable battery
– White (4 levels) and Red (2 levels) light options
– 1 SOS flashing mode
– Button lock mode
– IP66 rating against water and dust ingress
– 60º of angle adjustment

Setup

Out of the box, setup is as simple two-step operation.
1. Connect the USB cable to the micro USB charging port to make sure the battery is topped off
2. Slide the headband into the guides of the pivoting holder and adjust to fit

Performance

This review has taken me longer to get to than any other one that I’ve worked on for a simple reason. It works so well that I pretty much forgot that I was testing it. Let me explain a bit more.

Our family includes two dogs. A big sweetheart great pyrenees/shepherd and a very loud beagle. They get wound up pretty quickly on walks and are very vocal with other dogs to the extent that we now do the extended walks at 6am and after 9pm. For the last couple months that means that it’s been really dark when we’re out for our stroll, and headlamps are the solution for us to see and be seen. We’ve got 3 or 4 headlamps that are pretty typical examples of what you might expect. They have a bright LED and take 3 AAA batteries each. The odd number of batteries makes for interesting charging as we like to use rechargeable batteries and a lot of chargers require charging in pairs. But I digress.

The NU25 is… easy to size adjust, plenty bright, very comfortable, lightweight and its battery lasts. As a result, it’s been going on my head every morning and every night and has become such a reliable part of our daily outings that it really slipped my mind that I needed to write a review. The second part of that is that it works so well that there aren’t any negatives that were gnawing at my brain to talk about. And lastly, I finally got around to reading the manual (something I didn’t think I needed to do) and learned about three new features that I didn’t even know it had.

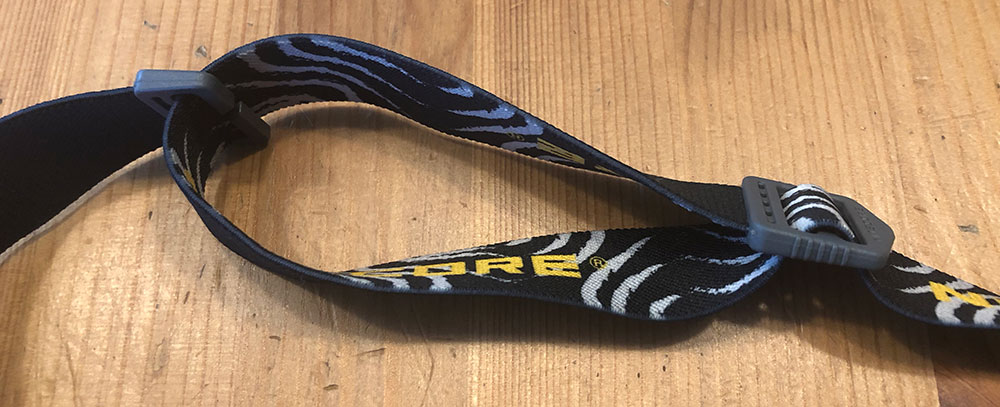
When I first put the NU25 on I noticed that the band was threaded differently than most headbands I’ve used. It’s deceptively simple in that the adjustment slides effortlessly and then stays in place when on your head. This means that when not on your head the setting is likely to change. At first I was a little annoyed, but then I quickly realized how frequently I adjust the tension and it became one of my favorite features. The headband also has a thin strip of silicon printed on the inside of the band which helps to keep it right where you place it without being too tacky.
Next is the buttons. Really easy to press, and know you’ve pressed them. There are two buttons. One for the white light and one for the red. Each cycle through the different levels of each light. For white (off, level 1, level 2, level 3), for red (off, level 1, level 2). A cool intuitive feature you discover while using is that if you are idle on a setting for a bit (I generally use level 2), the next press will now turn it off. It’s a quick learning curve that you adapt to pretty much right away.

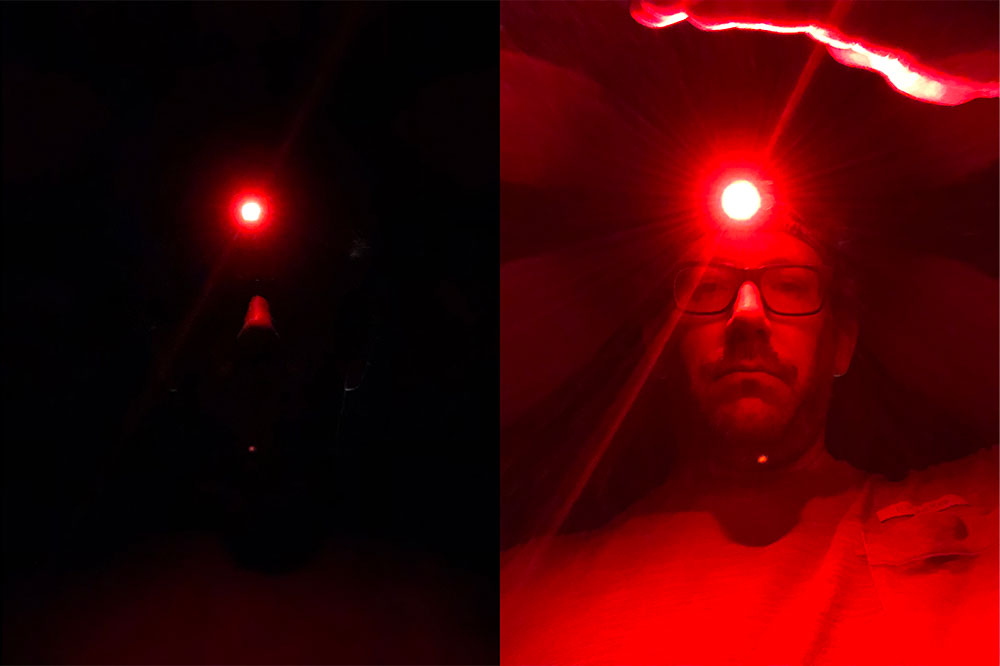
You may have noticed that the features bullets listed 4 levels for the white light. Here’s the first extra I learned reading the manual. A 1 second hold on the white light engages Turbo mode. This is full 360 lumens and will only run for 30 seconds to avoid overheating. The handy chart in the manual then explains the lumens for each level.  1 = 3 lumens, 2 = 38 lumens, 3 = 190 lumens. Here are photos to show what each of those looks like. I’ll update this post with a Turbo photo just as soon as I’m back from traveling, as again as I wasn’t even aware that it had a Turbo mode. I had just assumed the level 3 was 380 lumens.

The red light is a really useful feature for visibility without the harshness of a white light. Best use example is probably camping and needing to find something in your gear without waking up your tent mates. It’s also just very cool looking. Here are those two levels.
The next thing I learned from the manual (aside from remembering that I should always read manuals), is that there’s a button lock. To engage this, just press both buttons simultaneously. This is a great way to keep the headlamp from turning on while in your bag. Instead of turning on, it’ll just flash its status light once. Repeat the process to unlock the buttons again.

My last manual discovery was the SOS feature. A three second press of the white light sets off the well known ••• – – – ••• Morse code sequence. A very cool and potentially life-saving feature to have access to.

As for the battery, it just works. I was pretty used to charging batteries once a week and frequently finding a dead headlight when I needed it. With the NU25, it seemed very hard to kill the battery, and when it was running low, it would restrict access to the highest output white light first and then dim the 2nd level. It was pretty easy to tell that it was time to charge again which is a quick 2 hours to get back to full. Let’s wrap this review up.

What I like

  • The ease of size adjustment
  • The many lighting options
  • Lightweight and comfort
  • Great battery life

What needs to be improved

  • Nothing that I could find

Final thoughts

It’s really uncommon to find products that work this well and this thoroughly thought through. As I mentioned earlier, this is now in the daily kit as a product I can 100% rely on without surprises. I’ll be picking up a second one for our daily dog rounds and probably a third to keep in my bike commuter bag.

Price: $36.95
Where to buy: Amazon
Source: The sample of this product was provided by Nitecore.

Filed in categories: Reviews

Tagged:

Nitecore NU25 Headlamp review originally appeared on The Gadgeteer on October 20, 2018 at 11:30 am.

Note: If you are subscribed to this feed through FeedBurner, please switch to our native feed URL http://the-gadgeteer.com/feed/ in order to ensure continuous delivery.

Otterbox turns your Google Home Mini into Mickey Mouse

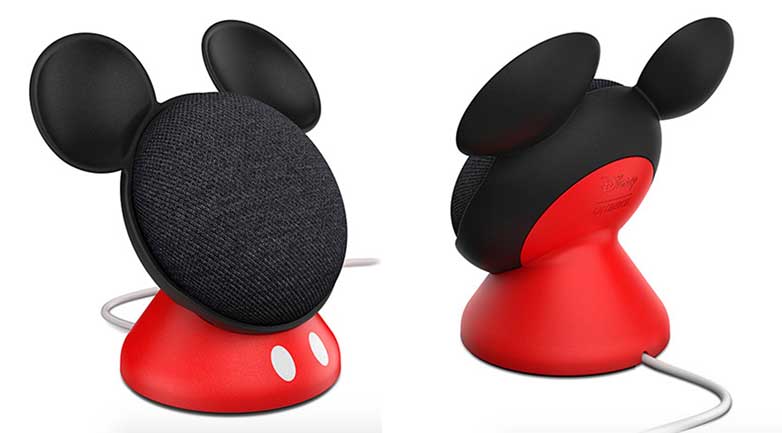
NEWS – Have you ever wished that your Google Home Mini voice assistant looked less like a speaker and more like everyone’s favorite cartoon mouse, Otterbox has just what you need with their new Den Series. I don’t quite understand the naming concept, but who cares about that when you can turn the charcoal colored Google Home Mini into a Mickey Mouse head?

No, the Den Series doesn’t add any extra functionality to the Mini, other than propping it up at an angle and making it look a lot cuter. The Den Series is $19.99 and is available now from Otterbox.com. Just remember that the Google Home Mini isn’t included but you can pick one up for $49 from Google.

Filed in categories: News

Tagged:

Otterbox turns your Google Home Mini into Mickey Mouse originally appeared on The Gadgeteer on October 20, 2018 at 10:30 am.

Note: If you are subscribed to this feed through FeedBurner, please switch to our native feed URL http://the-gadgeteer.com/feed/ in order to ensure continuous delivery.
Inateck 9 in 1 USB-C Hub review


REVIEW – Just recently, I acquired access to a MacBook and I immediately saw the need to have a USB-C hub to be able to use all of my desired accessories and peripherals. This was especially true since the only ports on my MacBook Pro are 2 USB-C ports. A couple of weeks ago, I got the chance to test and review the Inateck 9 in 1 USB-C Hub. Here is a review of my experience.

What is it?

The Inateck 9 in 1 USB-C Hub is a compact and lightweight hub that allows you to use one USB-C port on your MacBook/Laptop and expand it to accommodate just about every commonly used accessory/peripheral.

What’s in the box


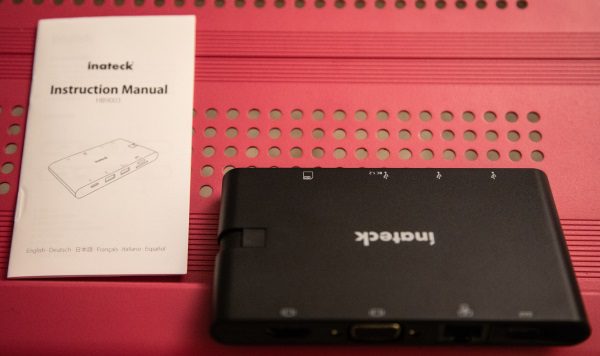
1 x Inateck 9 in 1 USB-C Hub
1 x Instruction manual

Design and features

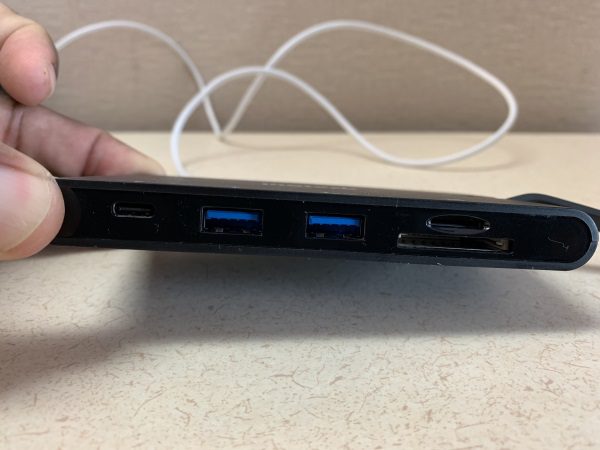
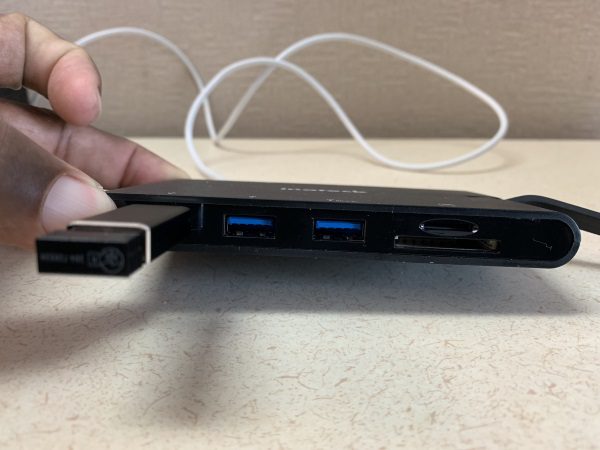
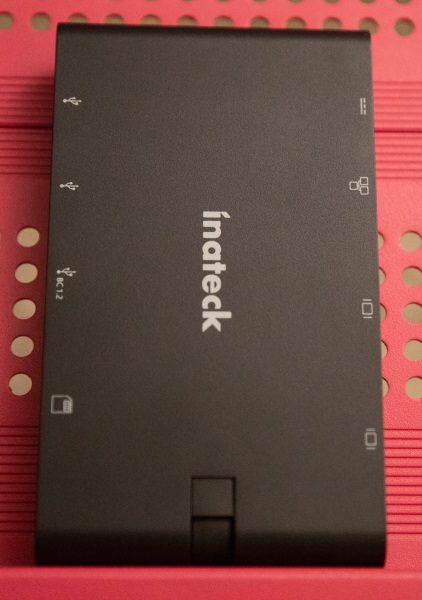
On the side of the hub shown below, from left to right, there is a USB Type C port, 2 USB 3.0 ports, a lower SD card reader and an upper micro SD card reader.

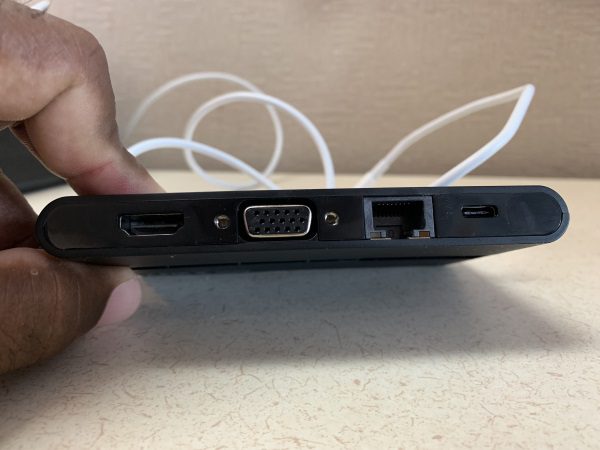
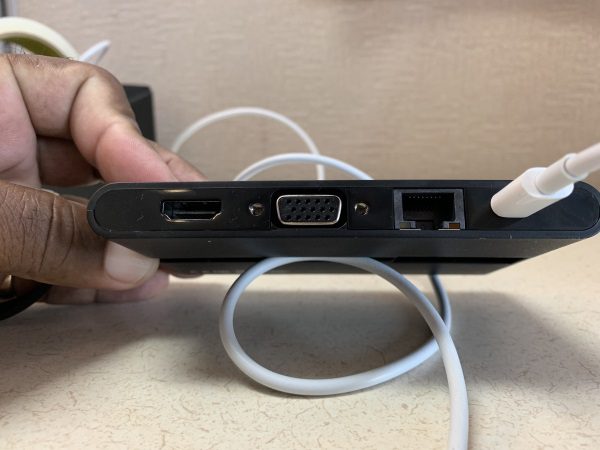
On the opposite side as shown below, from left to right there is a HDMI port, a VGA port, a gigabit ethernet port, and a 100W PD USB type C charging port.

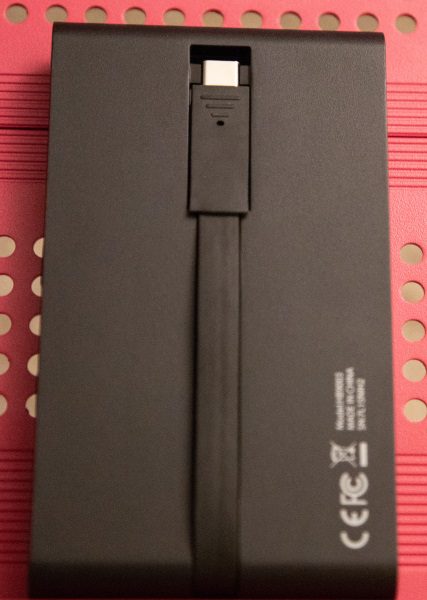
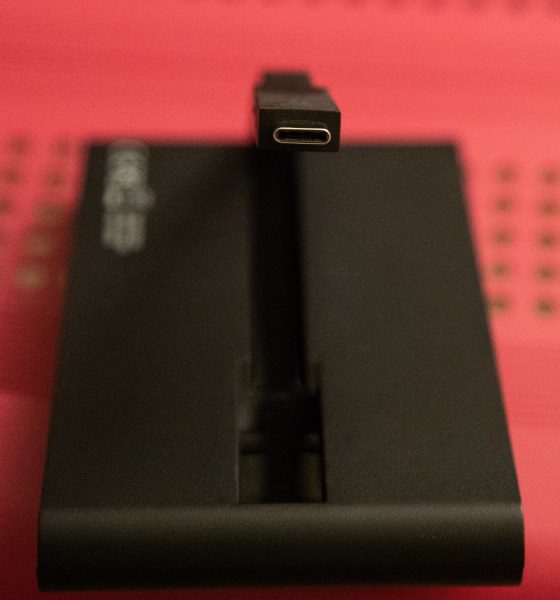
At the bottom of the hub, there is a built-in USB-C cable that can be tucked away until you are ready to use it.

Performance

This hub performed well in every way. In the first picture below, I am showing the MacBook Pro USB-C AC power adapter connected to the pass-through USB-C power port on the hub. This allows you to charge/power the MacBook Pro while using the hub and also provides the USB charging port with power.

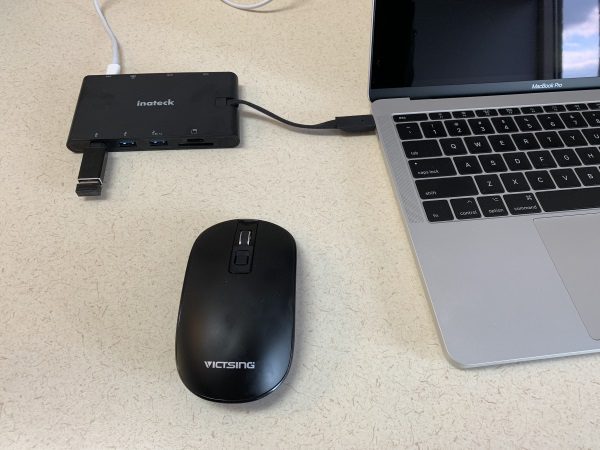
Below, I have a USB-C male to USB A female adapter connected to the USB-C data port on the hub. I then have a USB 2.4Ghz wireless dongle connected to the adapter that allows me to use my wireless mouse.


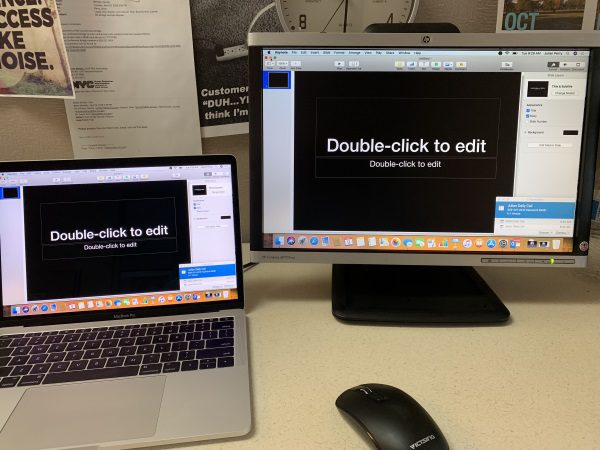
Here I have both my MacBook Pro and a monitor connected to the hub. I am mirroring the screen. The monitor is connected to the hub via the HDMI connection, and I also successfully connected the monitor via the VGA connection.

The hub performed without any access or operational issues for everything I tested. The only thing that I notice is that after each period of use, approximately 8 hours, the body of the hub is quite warm. I am not sure how the heat will affect the performance of the hub over time and after repetitive and continuous use.

What I like

  • The size, weight, and portability
  • The number of accessories/peripherals it accommodates
  • The built-in USB-C cable
  • The pass-through power port
  • The powered charging port

What can be improved

  • Better heat dissipation so that the heat does not shorten the life of the device

Final thoughts

I really like the 9 in 1 USB-C hub. It allows me to add just about every accessory that I need to my MacBook, and to use just about every data drive that I commonly use whether directly or via a USB card reader. While I have not tried it as yet, I feel confident that I can use this hub on my PC laptop via a USB-C female to USB A male adapter. This simple but effective device gets two thumbs from me!!

Price: $59.99
Where to buy: Amazon or Inateck Website
Source: The sample for this review was provided by Inateck.

Filed in categories: Reviews

Tagged: ,

Inateck 9 in 1 USB-C Hub review originally appeared on The Gadgeteer on October 20, 2018 at 9:30 am.

Note: If you are subscribed to this feed through FeedBurner, please switch to our native feed URL http://the-gadgeteer.com/feed/ in order to ensure continuous delivery.
Hang curtain rods without needing any tools

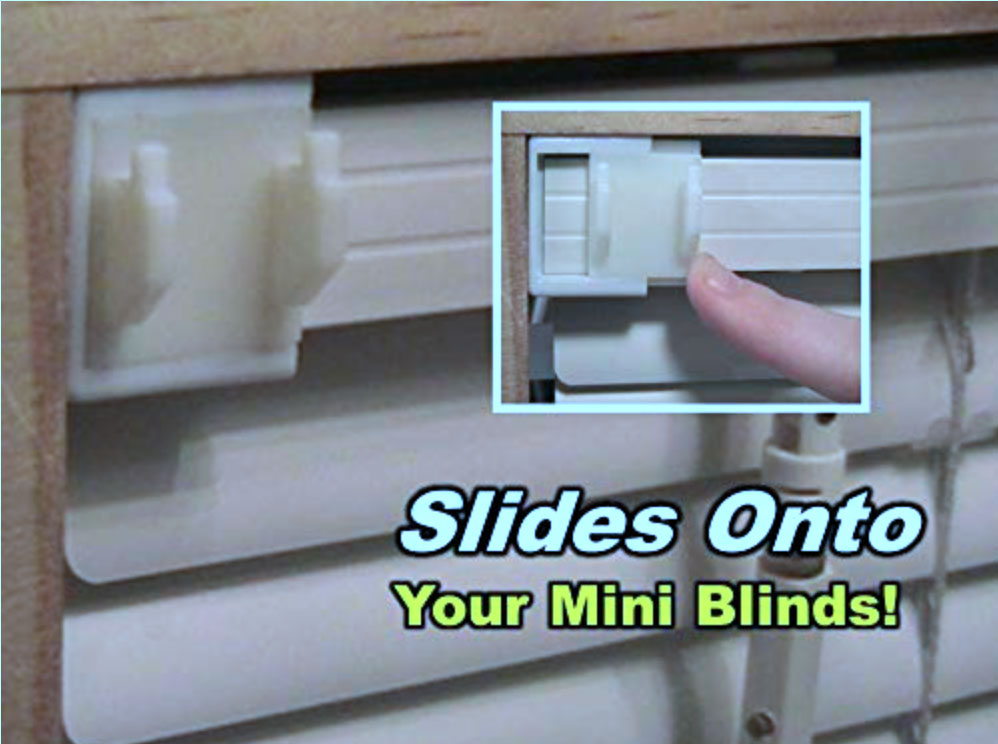
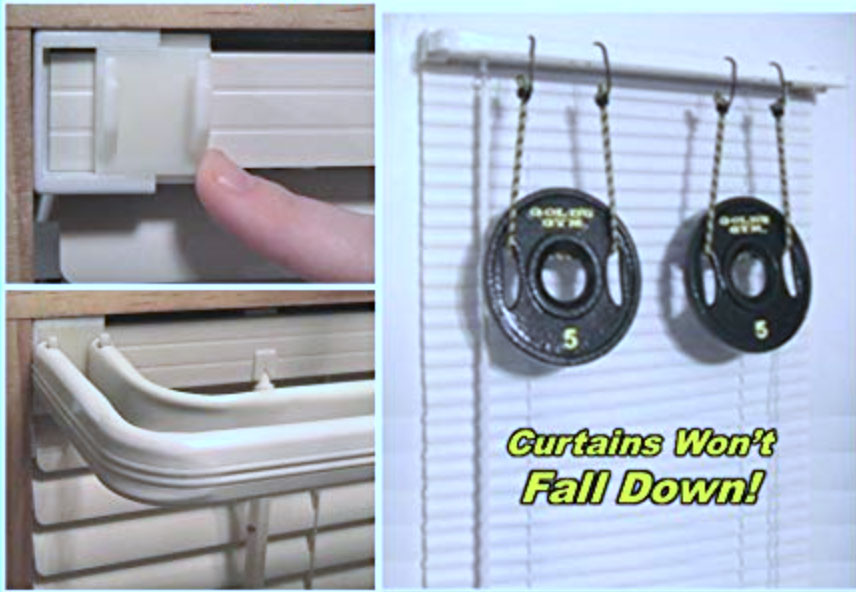
NEWS – Do you wish there was an easy way to hang curtains in windows that also have mini blinds?  For example, maybe you have a metal kitchen door with a mini blind over the window.  You’d like to add a decorative curtain, but you don’t want to drill more holes in the metal.  Install the Slide on Curtain Brackets to your mini blind’s brackets, and you’ll add two traditional lockseam curtain rod hooks without drilling a single hole.

When you replace the removable faceplates from your mini blinds with these slide-on covers, you’re immediately ready to hang your curtains.  The brackets can support up to 10 pounds.  You’ll get five pairs of brackets for $13.75 + $2.99 shipping at Slide on Brackets or for $13.75 + $4.49 shipping at Amazon.

Filed in categories: News

Tagged: ,

Hang curtain rods without needing any tools originally appeared on The Gadgeteer on October 20, 2018 at 8:18 am.

Note: If you are subscribed to this feed through FeedBurner, please switch to our native feed URL http://the-gadgeteer.com/feed/ in order to ensure continuous delivery.
Gadgeteer Team EDC 2018 updates – Andy Jacobs

ARTICLE – Fact: We’re Gadgeteers, so we carry EDC.   Some carry more, some less, but we all carry Everyday Carry items.  Since I last gave an update on my EDC gear back in March 2017, several of my EDC items have changed, but I was actually a bit surprised to discover that many had stayed the same.  Have a look!
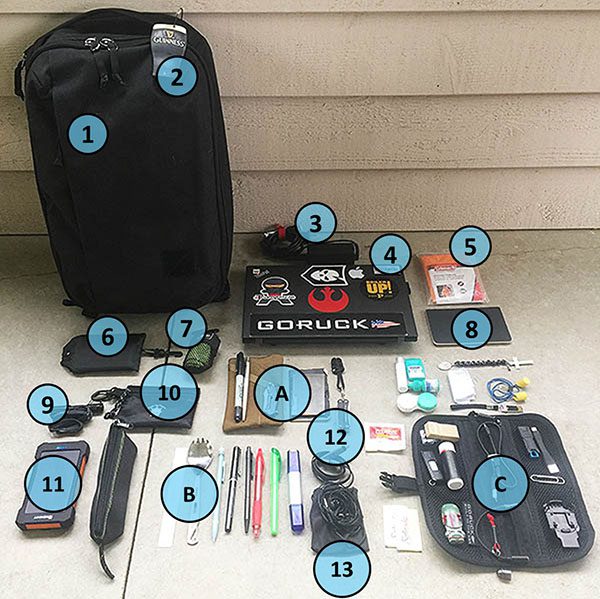
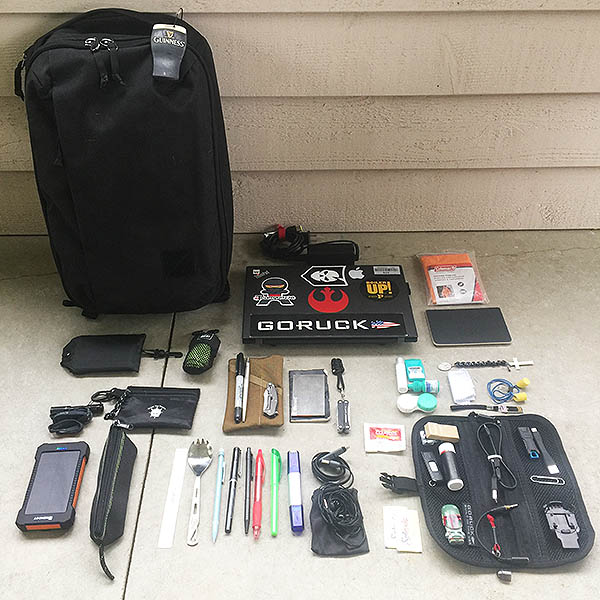
1 – EVERGOODS CPL24 backpack – I’ve only had this backpack for a few weeks as of this writing, but the more I use it, the more I like it.  Very thoughtfully designed (in terms of organization features, ergonomics and other aspects), understated yet very attractive styling, high-quality materials and built sturdy.

2 – Guinness Pint Luggage Tag – My wonderfully thoughtful in-laws bought me this when they visited Dublin, Ireland and took the Guinness Storehouse tour several years ago.  As a huge fan of Guinness Stout, I love this thing and it’s been on every EDC/travel bag I’ve used for years.

3 – Laptop AC adapter – Goes with item 4 below.

4 – Lenovo Thinkpad X230 laptop (work issued) – The same work laptop I’ve had for several years now.  It just won’t die.  Actually, I really like its small size and ruggedness.

5 – Coleman Hooded Emergency Poncho – In case of unexpected heavy rain.

6 – Collapsible grocery bag in pouch

7 – REI Mini Multitowel – This little dude has come in handy on several occasions.

8 – Moleskine Cahier Journal – Black

9 – Lumintop Tool AAA flashlight attached to an old lanyard – Still my favorite EDC flashlight.  Small, durable, water-resistant, and with a clicky on-off button.

10 – Small first-aid kit – My brother gave me this years ago, it has the logo of his old shop where he sold survival gear.  It only has some adhesive bandages, some gauze and some antiseptic ointment, but it’s there just in case.

11 – Renogy 10,000 mAh Solar Panel Water Resistant Power Bank – Although I wasn’t impressed with the solar charging capabilities of this device, it is ruggedly built, water-resistant and fairly compact, so I still use it.

12 – Lightning + Micro USB cable

13 – Earbuds + microfiber drawstring pouch

A – See below

B – See below

C – See below

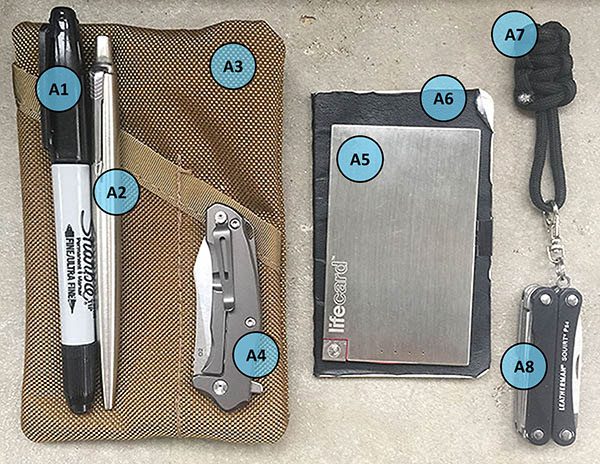
A1 – Twin Tip Sharpie – black – It’s like having two Sharpie pens in one: fine point and ultra-fine point.  Comes in handy often.

A2 – Parker Jotter ballpoint pen – black ink – One of the best “cheap” pens on the market: durable, smooth writing and feels good in the hand.

A3 – Yellow Birch Outfitters PocKit EDC Pocket Organizer – coyote tan – I reviewed this not long ago and it is still one of my favorite EDC pocket items.  Although I usually toss it into the outside pocket of my CPL24 backpack, it fit fairly comfortably in my pants pocket, as long as it is not overloaded.

A4 – Bastion Braza Bro EDC folding mini knife – Great little knife, I carry it on me often.  Small, compact, sharp and it has a pocket clip.

A5 – PlusUs LifeCard Powerbank – I reviewed this device quite a while ago and I still carry it for emergencies.

A6 – Moleskine Volant Journal – black

A7 – 550 paracord zipper pull – Salvaged from Bomber Barrell Duffel Bag after it basically fell apart.  Nuff said.

A8 – Leatherman Squirt PS4 keychain multitool – I’ve been carrying this little dude for years and I think it is actually my single most useful EDC item.  Super small and compact, it has both a small scissors and a small pliers in addition to many other tools—all of which I’ve used at one time or another.

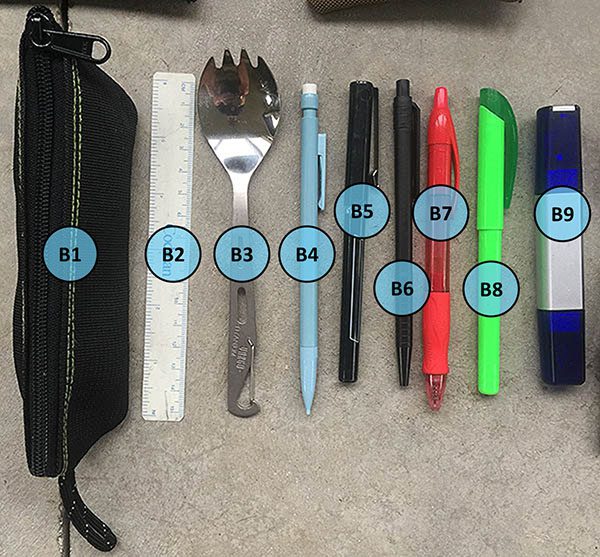
B1 – County Comm Handy Zipper Pouch by Maratac – size small – Maratac makes some great stuff, and this little pouch is durable and compact.

B2 – Plastic ruler I rescued from the garbage bin at work

B3 – Vargo Titanium Eagle Spork – I probably use this once a week when I  forget to pack a spoon or fork in my lunch.  Lightweight and versatile.

B4 – Cheap mechanical pencil I got from a hotel

B5 – Pilot Precise V5 Rolling Ball pen, Extra Fine Tip, Black

B6 – Cheap ballpoint pen I got from a hotel

B7 – Gel Pen, red

B8 – Green highlighter

B9 – Mini modular screwdriver – I picked this up at a recruiting fair; it was “swag” from one of the other company’s tables.

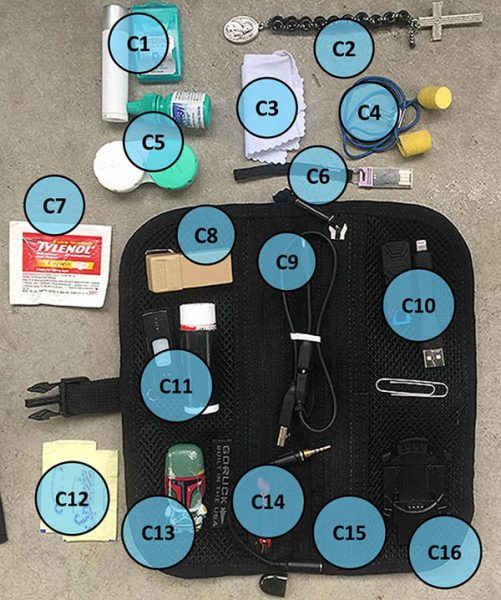
C1 – Lip balm and breath strips

C2 – Single-decade Rosary – As a practicing Catholic, I try to pray the Rosary often; it’s an ancient form of prayer that is a meditation or contemplation on key events in the life of Jesus.

C3 – Microfiber cloth – I mainly use this to clean my iPhone’s screen

C4 – Foam earplugs – These have come in handy when staying in hotel rooms with noisy neighbors.

C5 – Contact lens case and eye drops

C6 – USB memory card on small lanyard

C7 – Tylenol packet

C8 – Mini stapler

C9 – TYLT SYNCABLE-DUO Charge and Sync Cable – This cable is extra useful because it can switch between both Apple Lightning and micro USB tips.

C10 – GorillaDrive USB Flash Drive and flexible USB to Apple Lightning Adapter – The GorillaDrive is SUPER durable, with high crush- and water-resistance.  The flexible Lightning Adapter is nice for plugging my iPhone into my laptop when I don’t want a bunch of cord tangling me up.

C11 – SanDisk USB flash drive and Tylenol travel size tube with a short length of Gorilla Tape wrapped around it – The Gorilla Tape around the tube is a trick I learned on an EDC site and it has come in handy once or twice to have some tape, especially since Gorilla Tape is super strong.

C12 – 2x Splenda sweetener packets – Emergency coffee sweetener.

C13 – Mimobot Boba Fett (RoTJ) USB Flash Drive – Fun, but not super practical, because it isn’t very compact.

C14 – Headphone adapter cable for LifeProof case

C15 – GORUCK Mini Wire Dopp (NOTE: The Mini version has not been sold for some time, but the regular, full-sized version is available) – I love this thing because it has the GORUCK uber-durability and it is also a smart way to organize your small items and still be able to see them all when you lay the Wire Dopp open flat.

C16 – Extra charging base for Garmin fenix 3 HR GPS watch – I like my fenix 3 HR, but like all high-end smartwatches, it required charging every few days, so I bring this in case I need to top off my watch’s battery at work.

Filed in categories: Articles

Tagged:

Gadgeteer Team EDC 2018 updates – Andy Jacobs originally appeared on The Gadgeteer on October 19, 2018 at 1:00 pm.

Note: If you are subscribed to this feed through FeedBurner, please switch to our native feed URL http://the-gadgeteer.com/feed/ in order to ensure continuous delivery.