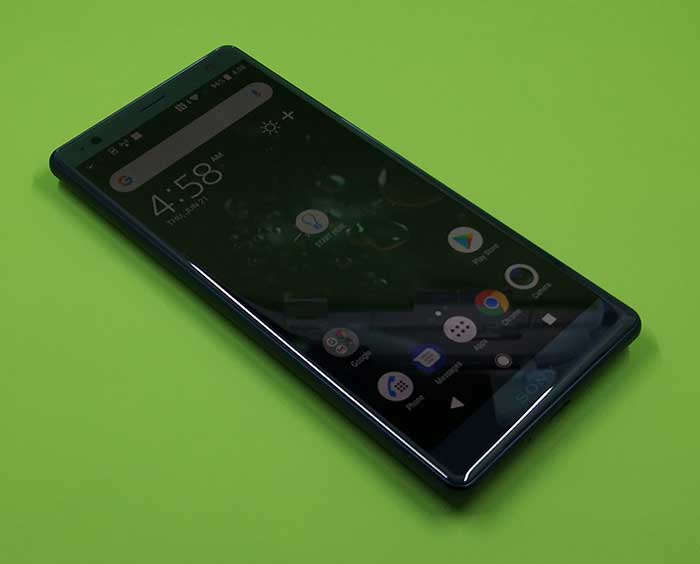
Sony Xperia XZ2 review

REVIEW – It’s been almost 4 years since I reviewed a Sony smartphone. The last one was the Sony Xperia Z3v. How has the Xperia evolved since then? I’ve been testing the Sony Xperia XZ2 for the last few weeks so let’s find out.

What is it?

The Sony Xperia XZ2 is Sony’s latest smartphone which is powered by Android and features a 19MP camera capable of 4K HDR video recording, high-resolution audio, and more.

Hardware specs

Processor: Qualcomm® Snapdragon™ 845 Mobile Platform
Operating System: Android 8.1
Memory: 4GB RAM, 64GB UFS internal memory5, microSDXC support (up to 400GB)
Display: 5.7″, 18:9 Full HD+ (1080 x 2160) HDR display
Network: GSM GPRS/EDGE (2G), UMTS HSPA+ (3G), LTE (4G) Cat18 with up to 1,2Gbps
Camera (rear): 19MP, f/2.0 aperture
Camera (front): 5 MP, f/2.0 aperture
Connectivity: Bluetooth: 5.0, WiFi, Miracast, NFC
Positioning: A-GPS, A-Glonass, Beidou, Galileo, QZSS
Battery: 3180 mAh
Qi wireless charging
Dimensions: 153 x 72 x 11.1 mm
Weight: 198 g

What’s in the box?
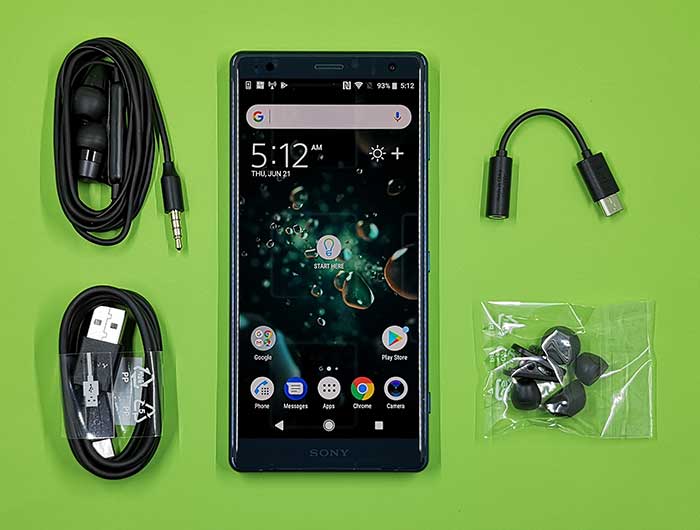
    • Sony Xperia XZ2
    • USB-C Cable
    • USB-C to 3.5 mm Headphone Jack Adapter
    • Earbuds with several earbud sizes (3.5mm wired)

Design and features

The XZ2 is available in two sizes. The larger one that you see here and a compact version that has a 5.0-inch display. The XZ2 comes in four colors including the dark green (I think it looks blue) one that was sent to me. It has a 5.7-inch display that has slightly curved edges. The XZ2 doesn’t have the newest fad in smartphones. There isn’t a notch at the top, but there is both a “forehead” and a “chin” at the top and bottom, but very minimal size bezels.

At the top is the front-facing camera, ambient light sensor and a tiny status LED that is used for notifications and battery charging status.

At the bottom is a front firing speaker that is almost hidden in the area where the display meets the metal rail along the bottom edge.
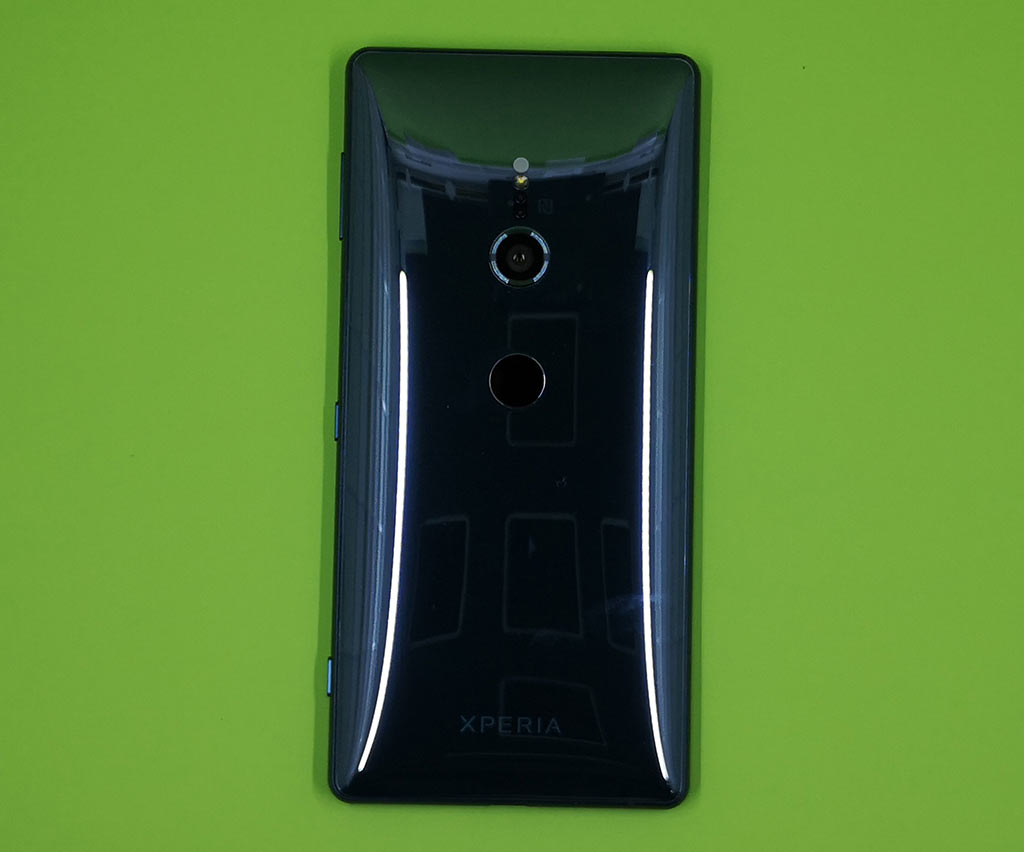
The back of the phone is made of glass that is polished to a high sheen with a bulging pillow look and curved edges. Let me just say right now, that the XZ2 is slippery. I’m talking crazy slippery. I will say that it’s easily the most slippery phone I’ve ever hand my hand before. Unless you have the hands of a tree frog, you will want a case for this phone because otherwise, it’s going to end up shattered on the floor.

Now that I’ve given you that public service announcement, back to describing the back of the phone. It’s very pretty and feels nice in hand and it has a fingerprint scanner on the back of the phone, which is my favorite location for fingerprint scanners. However, the location of the fingerprint sensor is lower than on other phones I’ve reviewed, so it can sometimes take more than one try to locate it with the tip of my index finger because it’s almost completely flush with the case.

Above the fingerprint scanner is the camera and above the camera is the LED flash.

The right side of the phone has three buttons. The top button is a one-piece volume button, the center button is the power button, and the lower button is a dedicated camera launch/shutter button.
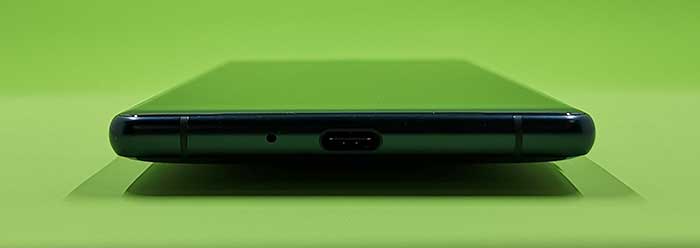
On the bottom edge is a microphone and a USB-C port.
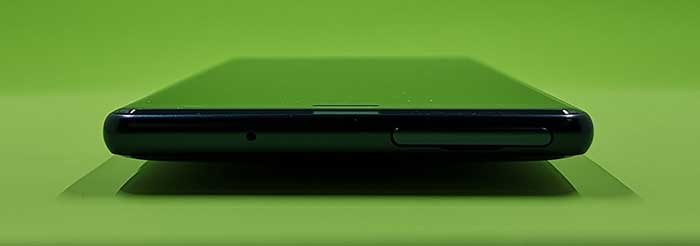
Flip the Xperia around to the top edge and you find another microphone and the SIM card/MicroSD card slot. Unlike 99% of the phones on the market, you don’t need a SIM tool to open the tray. It pulls out easily with your fingernail.
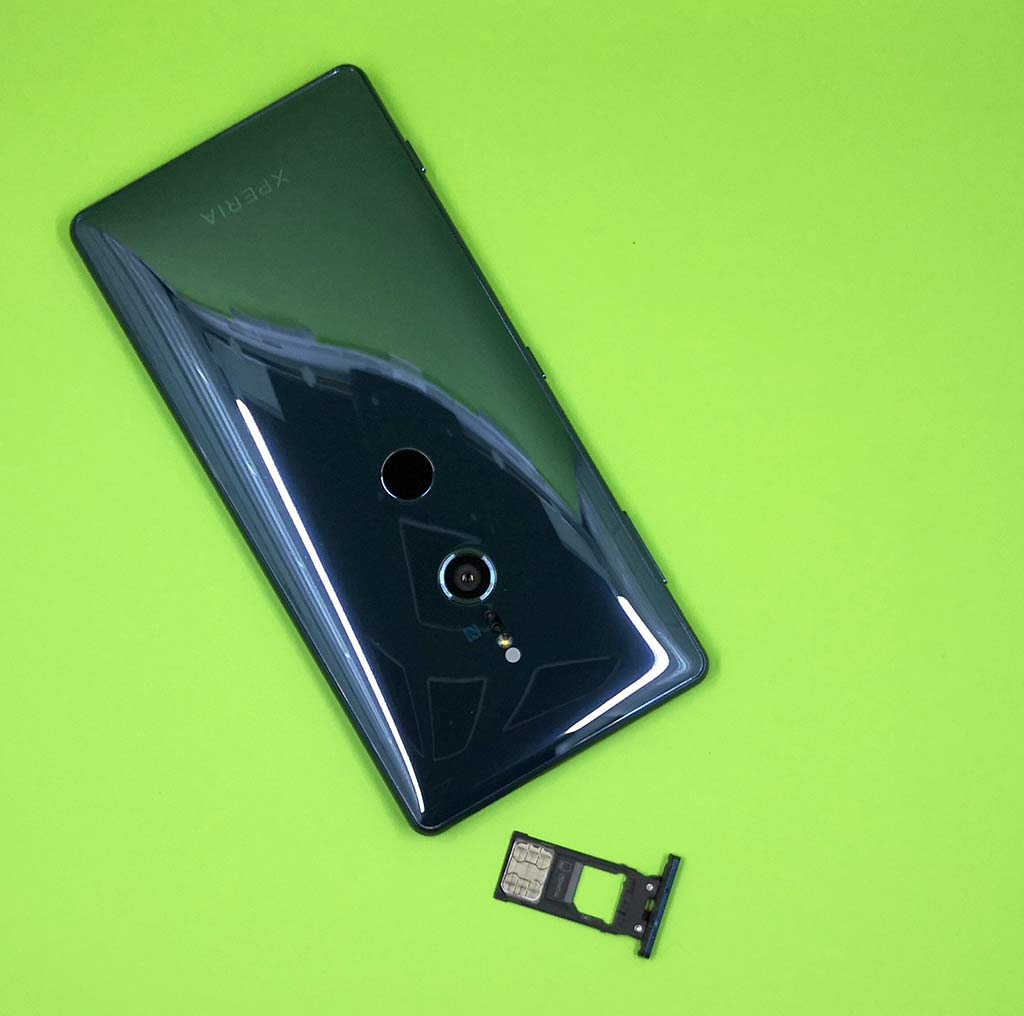
There are two SIM slots or you can put a microSD card in the extra slot.
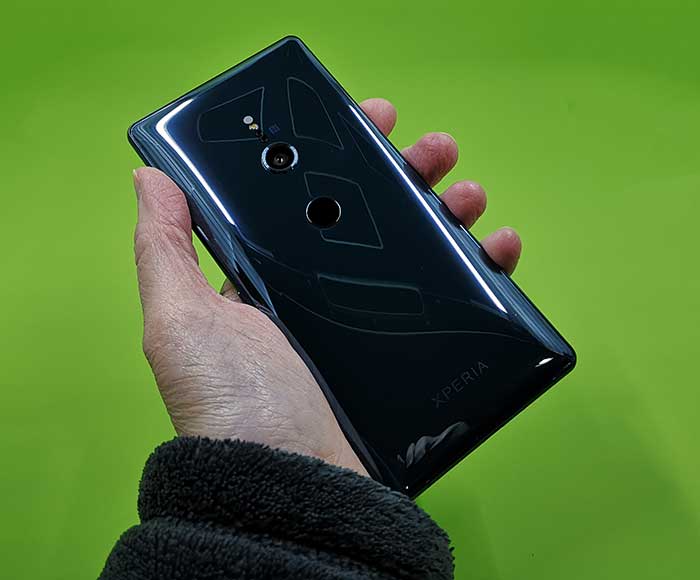
The Sony Xperia XZ2 looks nice and passes my Gadgeteer squeeze test, but it’s hard to get past how insanely slippery it is. I don’t have a case for it, so I have to constantly pay attention to where I place it. If the surface is even slightly uneven or unlevel, it will slide off in a second, like a drop of mercury. It’s so slippery that I had trouble getting photos of it in my Shotbox lightbox because it would start spinning all by itself like it was alive. And speaking of spinning, it doubles as a fidget spinner when you’re bored!

Jokes aside, the phone does feel solid in hand. Solid and heavy. The curved back is there to disguise how thick this phone really is, but its weight can’t be hidden. It weighs 198 grams compared to my Pixel 2 XL which has a larger display and weighs in at 175 grams.

Display
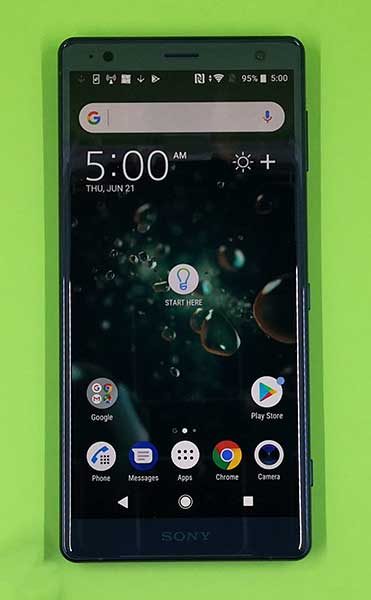
The XZ2’s display bright, crisp, vivid, and clear. I have no complaints as far as what it looks like, viewing angles or touch sensitivity. The only feature it lacks is an always on clock like my Pixel 2 XL and Samsung phones. I rely on that feature since I don’t wear a watch and really missed while reviewing this phone.

Fingerprint reader
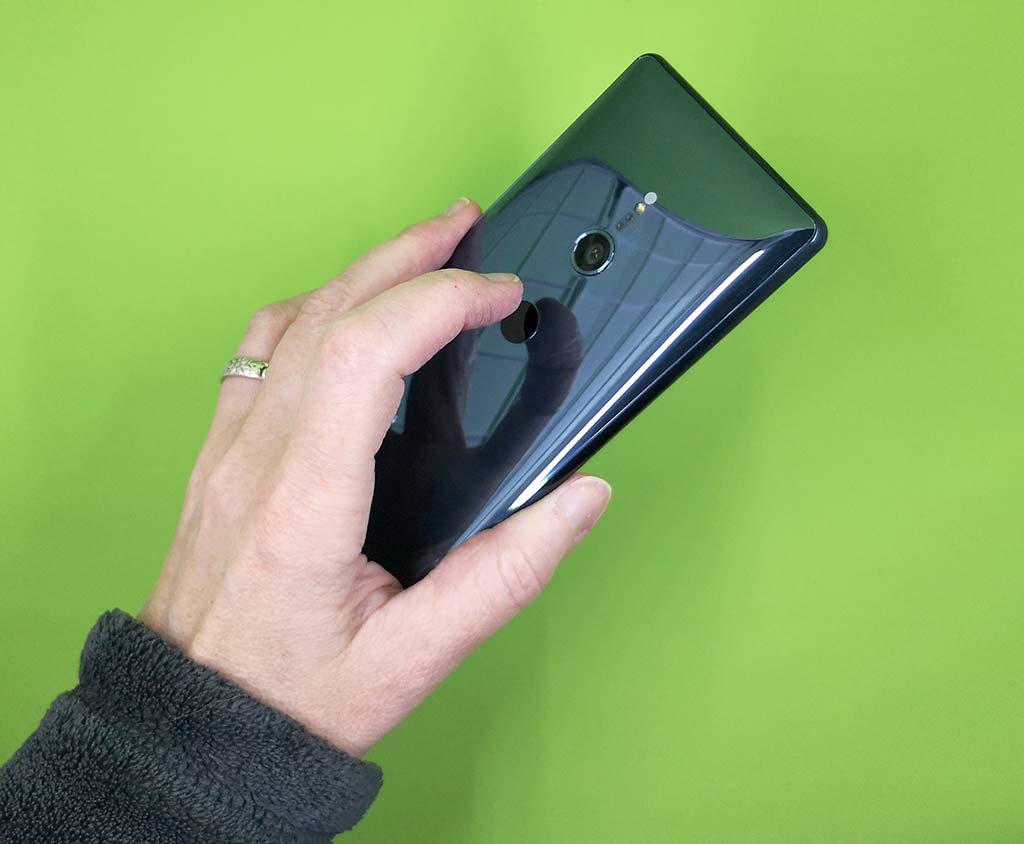
Except for the fact that the fingerprint sensor located to low on the back of the phone, it works great for me. I tend to have issues with scanners not registering my touch, but this one works 9 times out of 10 as long as I actually touch it the first time instead of the camera lens!

Camera

The Xperia XZ2 has a nice camera. It’s a little disappointing that it doesn’t have a dual camera the iPhone X, Huawei P20, and others, but for what it is, I was happy with the shots I tool. Check out some samples below that are straight out of the camera.


I was pretty happy with the pictures that I took while using this phone. But, I did run into a strange issue which you can see in the examples below.


Notice the strange color bands/glare on the first two images above? I only noticed this with a handful of pictures that I took and there were only two things that were similar between the images: it was a sunny day and I shot the images with the phone in portrait orientation. If you check the two images on the right, they were taken within seconds of each other and the one with the glare was taken in portrait orientation and the other one in landscape orientation. I’m not sure what caused the glare/bands.

Audio quality

The Sony’s front firing speakers sound good when listening to music or watching videos without using headphones. Even at full volume, audio sounds clear and crisp.

The phone has an interesting Dynamic Vibration feature that vibrates the phone depending on the type of audio that’s playing so it’s kind of cool for games and watching video.

Using the Sony Xperia XZ2 for phone calls

For the most part, I’ve had no issues making and receiving calls on the T-mobile network with this phone except when I’m in the basement of my house. For some reason, this phone seems to have issues holding on to the cell signal down there and on several occasions, people have tried to call me and gotten voice mail.

As far as call audio quality, the volume level and clarity on both sides of conversations have been just fine.

Software and user interface

The XZ2 comes with a collection of Sony-made camera tools for video editing, 3D creator, Bokeh, AR Effects, and others. They are all standalone apps which is odd. I think they should have been features added to the camera app. Besides those apps, there are a few others that come pre-installed like Facebook, AVG Protection, Playstation app, News, Xperia lounge, and a few others. Unfortunately, you can’t uninstall these apps to free space.

Overall performance and battery life using the Sony Xperia XZ2 for day to day tasks

This phone has a 3180mAh battery that kept it running for a full work day of normal use and with wireless charging, it is convenient to keep it topped off. With my typical usage level, I had no problems with battery life.

As far as performance, I think the Sony XZ2 does very well and felt comparable to other phones I’ve recently reviewed.

What I like

  • Wireless charging
  • microSD card slot
  • Dedicated camera shutter button

What needs to be improved

  • No 3.5mm headphone jack
  • Weird location for the fingerprint scanner
  • Slippery

Final thoughts

The Sony Xperia XZ2 makes a nice smartphone with almost every feature on my smartphone wishlist including wireless charging and a microSD card slot. That said, I couldn’t quite love this phone because it lacks the always-on clock display that has become a must-have feature for me and it’s just so darned heavy and slippery. Yes, I can put a case on it to help with grip, but that would add more weight to an already heavy phone.

I’m rooting Sony on, but I think they have an uphill battle ahead of them if they want to compete with the likes of Huawei, Samsung, and Google when they are pricing their Xperia phones at the same price level.

Price: $799.99
Where to buy: Amazon
Source: The sample of this product was provided by Sony.

Filed in categories: Featured Items, Reviews

Tagged:

Sony Xperia XZ2 review originally appeared on The Gadgeteer on July 16, 2018 at 10:14 am.

Note: If you are subscribed to this feed through FeedBurner, please switch to our native feed URL http://the-gadgeteer.com/feed/ in order to ensure continuous delivery.

Blinkers Laser Set review

REVIEW – Blinkers Laser set adds turn signals and a laser to a bicycle lighting system providing a lot of bang for your Euros. Read on to find out more.

What is it?

Blinkers Laser Set is a bicycle lighting system that includes front and rear lights, turn signals and a rear high-visibility laser that casts a bright green arc on the pavement behind you to increase your visibility to cars and pedestrians. Sound interesting? I thought so too. Let’s take a look.

Hardware specs

  • White LEDs in the front light with amber turn signals
  • Red LEDs in the rear light with amber turn signals
  • Green laser projection from rear light
  • Rechargeable lithium-ion batteries
  • Micro-USB charging ports (behind rubber port covers)

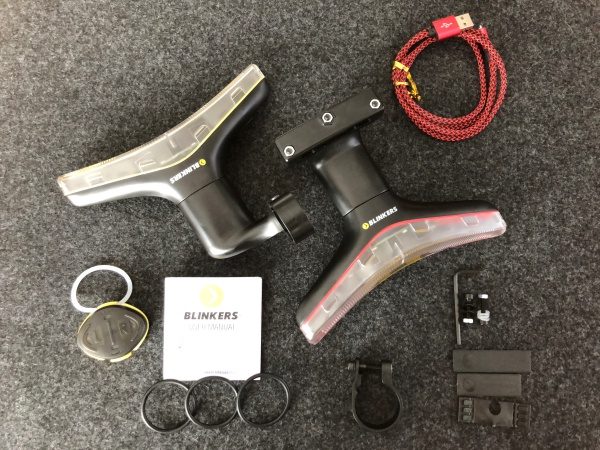
What’s in the box?

  • Front Blinkers Light and mount with two handlebar clamps and hardware
  • Rear Blinkers Laser Light with seat rail mount with hardware
  • Handlebar-mounted remote control with retention O-rings
  • Spare hardware and Allen wrench
  • USB cable for charging
  • Instructions

Design and features

Bicycle lights have seen a lot of invention over the years and while LED technology has brightened things up for quite a while now, there’s a lot more opportunity to create a safer biking experience. That’s what Blinkers is going for. Let’s see what we have here.

First off, there’s a distinctive arrow-head or mustache look to the lights. While the visual may be hit or miss, it’s really the technology we want to dive into. Both the front and rear light use LEDs for lighting which results in some significantly bright lights.

The lights are also fully sealed from any kind of water ingress with the micro-USB charging port needing a simple tethered rubber plug cover to keep moisture at bay. The lights do not have an on/off switch per se or any kind of controls on the light, as they automatically come on when slid into the magnetic mounts. A sort of soft trapezoidal shape in the mount only allows the lights to be attached in one orientation keeping things simple.

Setup

The installation will vary a little bit depending on your specific bike and your components. Blinkers have included what you’ll need to save a couple of specific scenarios that I’ll mention as we get to each one.

For the front light, it’s mounted off-center to the left of your stem looking at the front of your bike. Choose the large clamp if you’ve got bars that swell to a 31.8mm diameter, or the smaller clamp if you’re running a smaller bar. Choose one of the two small rubber strips to add some cushion and friction, placing the raised edges upward so the clamp traps the strip. The Blinker only fits into the clamp one way, so take a look at that closely before proceeding. Take care not to over-tighten as the clamp will snap (as I found out). I was running a 22mm Renthal bar with no diameter change where I couldn’t quite get the clamp tight enough. I solved this with a 22-25.4 shim and a strip of gaffer’s tape around the bar to slightly increase the diameter. In the review below, I’m using the large clamp on a Jones H-Bar that is 31.8mm and I’m using the thinner rubber strip.

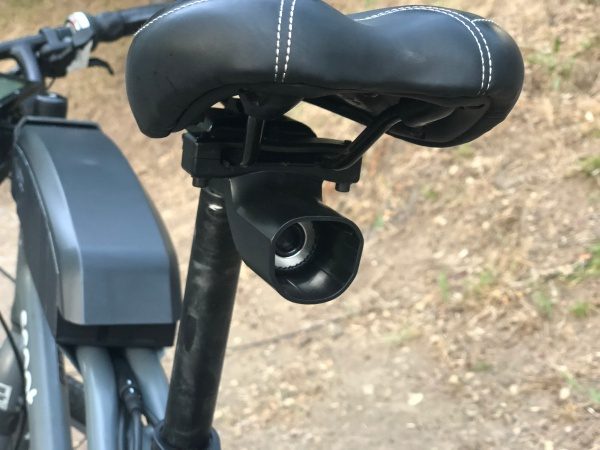
The rear light mounts onto your saddle rails. Unless you have your seat adjusted all the way forward, you should have plenty of room to mount the rear Blinker. There’s a small rubber strip that needs to be placed on the underside of the rails for traction that can be a bit finicky, so just make sure to keep an eye on it. Mount the screws finger tight, center first, then installing the two outside screws and adjusting the position. When you’ve got it where you want it, tighten the outside screws firmly, then tighten the center screw so that the mount slightly bows. Over-tightening this screw will crack the top bracket (as I found out). Blinkers do make a rear mount specifically for rear racks if you’re running one. You can pick one up on their site.

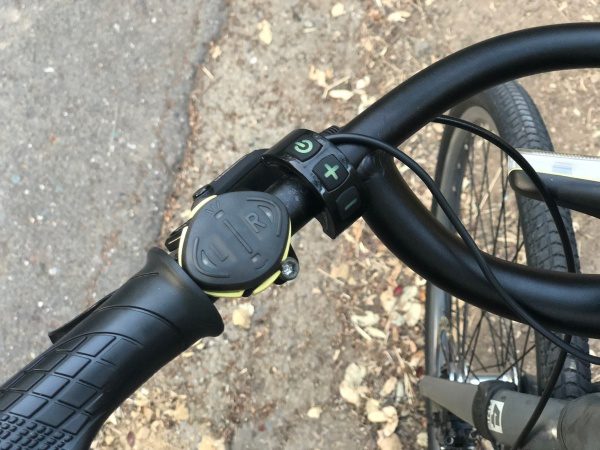
The remote has a curved underside to fit on your handlebars provided you have the real-estate. I have probably the worst case scenario as I’ve got an ebike with a power button, separate brake and shifter mounts, a throttle and a bell. Ultimately I was able to slide my brake lever off, slide an O-ring onto my brake lever and then reinstall letting the remote rest directly on the brake clamp which worked well. On receipt of this Blinkers set, there was a separate clear O-ring with a little fortune cookie note saying to please use this instead. Out of curiosity, I tried the black O-ring and over a weekend in the garage, it split. No such problem with the clear one so looks like they’ve got that fix working.

The final step is pairing the remote to your lights. Here are the steps as Blinkers describes them…

  • Make sure your Blinkers are charged.
  • Connect Blinkers to USB cables or plug them into the mounts.
  • Press the upper and lower buttons of the control pad for 3s until the “L” and “R” lights turn on.
  • Start with the rear light and bring the remote close to the Blinker (~10cm) and wait until the lower green light on the remote control turns on.
  • Bring the remote close to the front Blinker (~10cm) and wait until the upper red light of the remote turns on.
  • Finally, all the lights of the remote control will start blinking meaning that everything is paired.

Performance

Okay, so I immediately need to mention how cool it is that these lights function with a magnet and a hall-effect sensor. All you have to do is start to place each of the lights into its mount and it will be sucked in by the magnet with a satisfying thunk, the light immediately comes to life. Its startup amber lighting also gives you a clue of how much charge you have left with the left side being zero and the far right side being full. Having used a number of lights over the years, it can be very easy to forget to turn lights off or forget to remove them when locking your bike up. Blinkers are not small, and they’re bright so it’s hard to not notice that you’re about to leave them behind. Secondly, the magnet makes them so easy to remove that there’s no excuse not to do so.

Pressing the upper button toggles the front light from solid to flashing to an interrupted flash to off. A long press will put the front light into an “emergency” mode which is basically like a hazard light. A long press again disables that light. Here’s a video that runs through all of that with the front light.

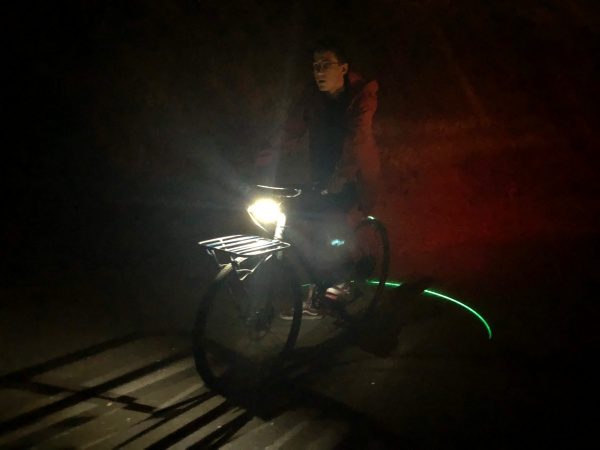
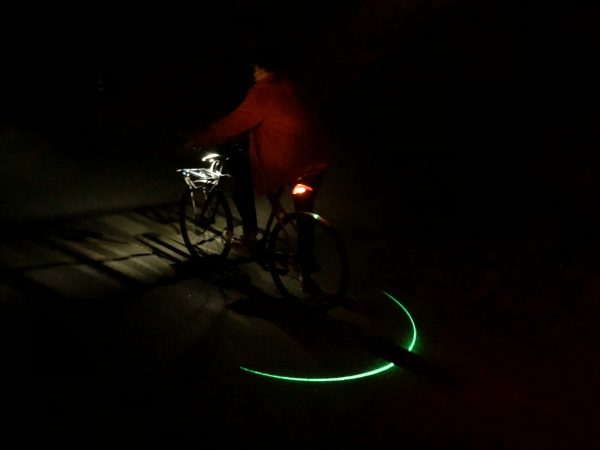
Pressing the lower button toggles the rear light from solid to flashing to an interrupted flash to off. A long press turns on the rear laser which casts a bright green arc on the pavement behind your rear tire. It projects a little closer to the bike than I would have imagined and the only way to change that would be to change the angle of your saddle as there’s no adjustment in the mount itself. The gap in the arc below is where the light is being interrupted by my rear tire.

The left and right buttons activate your turn signals which fire simultaneously on the front and rear lights. Another press turns them off, or they will automatically cease after 12 seconds. If you anticipate a longer wait before turning… a longer press will deactivate the 12-second timer.

In daylight, you’ll want to use the flashing modes to increase visibility. There’s a couple things to know about the rear laser. First, it isn’t visible during the day so you might as well save some battery and leave it off. Second, it will time out after 12 minutes. Blinkers say this is a safety feature as lasers do generate a lot of heat. As a safety feature of being seen, however, this seems like a fault to have it time out. The only way to tell that it’s stopped is to notice that the blinking light on the remote has also stopped. I also wonder why the laser function is not also available on the front light. At night, the lights are super visible from a good distance. I’d estimate 40-50 meters in really dark conditions. Here’s a video shot at night where you can get an idea of visibility.

What I like

  • Magnet mounting feature with the auto-on function
  • Turn signals for letting cars know you’re turning
  • Bright visible lighting
  • Cool laser function for increased visibility

What needs to be improved

  • The mounts need to be stronger
  • Would like a 2nd USB cable for charging
  • Would like to see no timeout on the laser
  • Would like to see a laser on the front light

Final thoughts

Lights are a very important part of using a bicycle. Blinkers have created a great light system that provides great lighting with the added functionality of both turn signals and a rear laser that helps create even more awareness directly around you. Their unique mounting system makes is easier to take them with you after parking your bike, and almost instantaneous as you start to ride. If their size and look isn’t an issue for you, it’s a great solution. It may be summer and full of long days, but this set will stay on my bike and I’m looking forward to seeing further ahead and being more visible as the days start to get shorter.

Price: €120
Where to buy: Blinkers.bike
Source: The sample of this product was provided by Blinkers.

Filed in categories: Reviews

Tagged:

Blinkers Laser Set review originally appeared on The Gadgeteer on July 16, 2018 at 9:00 am.

Note: If you are subscribed to this feed through FeedBurner, please switch to our native feed URL http://the-gadgeteer.com/feed/ in order to ensure continuous delivery.

Control this smart aromatherapy diffuser with the sound of your voice

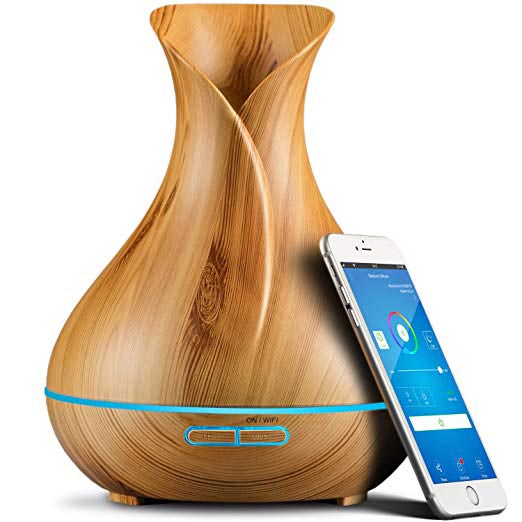
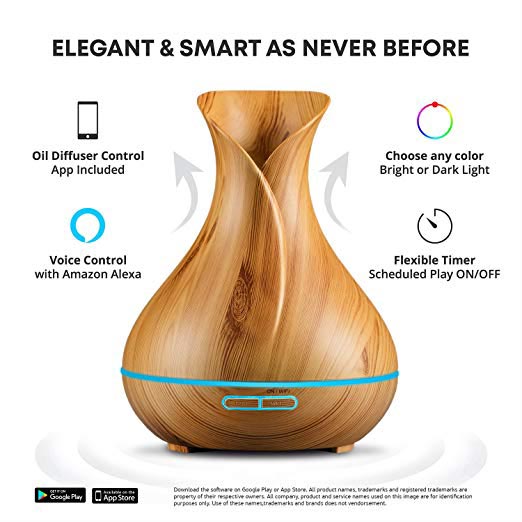
NEWS – The Gadgeteer has told you about aromatherapy diffusers before, but this is the first smart diffuser we’ve seen.  The Smart WiFi Essential Oil Aromatherapy Diffuser can be used as a normal diffuser, or you can download its app and control features like LED color, mist intensity, or set timers or schedules from your phone.  It’s also compatible with Google Home and Amazon’s Alexa, so you can also control it with vocal commands.

The diffuser has a 400ml water reservoir that’s sufficient for about 12 hours of continuous mist.  Instead of heat, this diffuser uses ultrasonic frequencies to vaporize water and the essential oils, so there’s no worry that the heat will damage the oils.

The Smart WiFi Essential Oil Aromatherapy Diffuser is $36.95 at Amazon.

Filed in categories: News

Tagged:

Control this smart aromatherapy diffuser with the sound of your voice originally appeared on The Gadgeteer on July 16, 2018 at 8:00 am.

Note: If you are subscribed to this feed through FeedBurner, please switch to our native feed URL http://the-gadgeteer.com/feed/ in order to ensure continuous delivery.

Posted by / July 16, 2018 / Tagged with / Posted in News

Carry a few pens in this attachable pen case

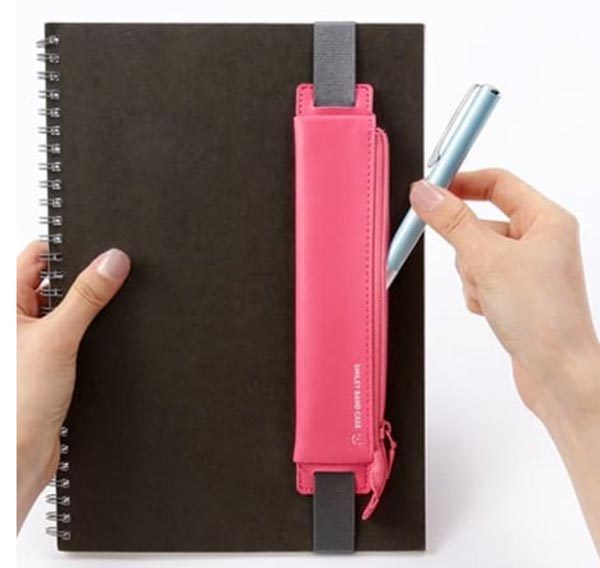
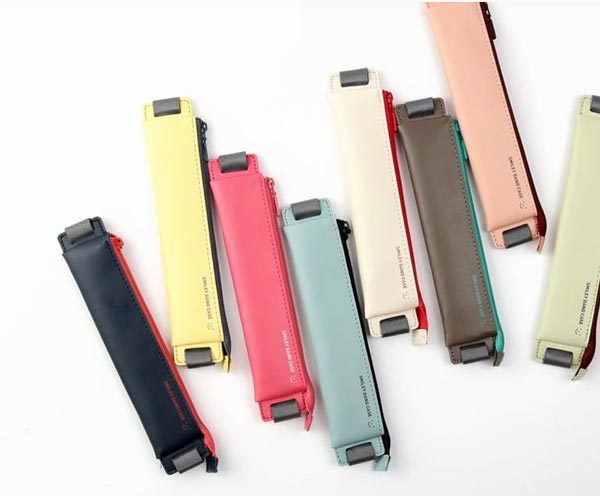
NEWS – Most pen cases that fit over a notebook seem to hold only one pen.  That’s fine for some, but other folks may like to color-code entries and need a couple ink colors at hand.  Instead of needing to buy multiple pen holders to carry those pens, get the Smiley Attachable Pen Case and keep everything in one case.

The Smiley case is made of synthetic leather.  It’s attached to an elastic band that fits over a notebook or journal cover; it’s for use with hardcovers only.  The height of the notebook should be between 7.75 – 10.25 inches for best fit.  The case itself measures 1.5″ x 7.6″ x 0.33″ and weighs 0.8 ounce.  It fits 3-4 pencils or pens.  It is not designed for long writing implements; your pens should be no longer than 5.9″, so it unfortunately won’t work with the Apple Pencil.

The Smiley Attachable Pen Case is available in the eight colors shown above.  It is $11.01 at MochiThings.

Filed in categories: News

Tagged:

Carry a few pens in this attachable pen case originally appeared on The Gadgeteer on July 15, 2018 at 10:30 am.

Note: If you are subscribed to this feed through FeedBurner, please switch to our native feed URL http://the-gadgeteer.com/feed/ in order to ensure continuous delivery.

AlphaCool instant cooling towels review

REVIEW – As an avid fan and reviewer of audio products, I got the opportunity to review … towels. Yes, towels. Unexciting, right? Well, it depends on how you look at it.

What is it?

AlphaCool instant cooling towels are a series of absorbent towels made of different materials that provide extra cooling during hot and sweaty yard work, exercising or just enduring the dog days of summer.

Specs

There are three towels I’ve been testing for this review.

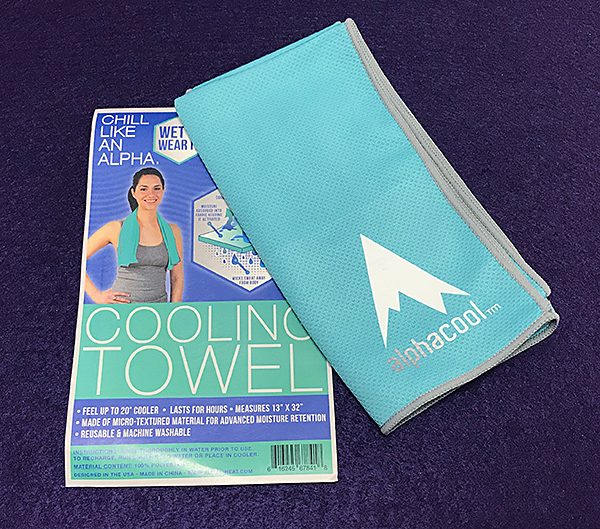
1. The AlphaCool cooling towel is made of a lightweight textured polyester cloth.

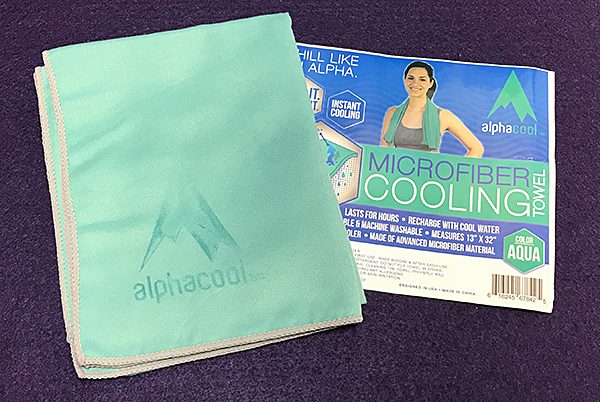
2. The AlphaCool microfiber cooling towel is exactly what it says it is—a towel made of microfiber.

3. The best towel offered is the AlphaCool PVA cooling towel. However, it may not be the one for you.

Design and features

I live in Central Florida where it gets quite hot and even more humid half of the year. Doing hours of yard work each week can wreak havoc on the body, especially as I age. I am never without my BubbaKeg filled with iced tea and a wet terrycloth towel to wipe my overly sweaty face and head. After using the AlphaCool towels for a few weeks, their advantage over terrycloth became apparent.

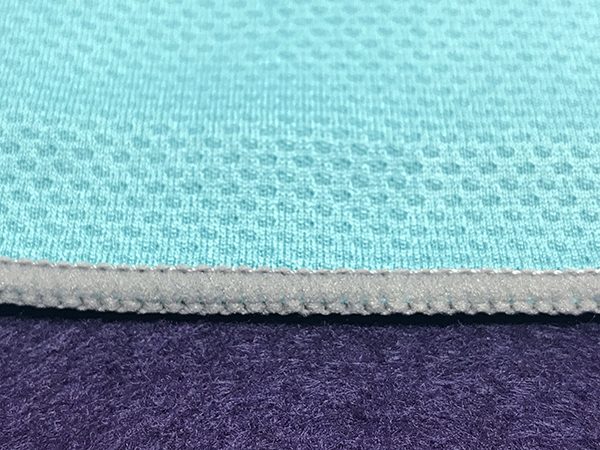
Each towel measures 13” X 32”, which is an odd size, but fits nicely around the neck and shoulders. Both the regular and microfiber towels feature finished edge stitching for extra durability.

So why are they called “cooling” towels? To activate the cooling effect, you can either wave it around or quickly pull both ends apart creating a snapping effect. This makes the towels feel much cooler against the skin than before. AlphaCool states that it feels 20° cooler. The accuracy of that statement is anyone’s guess, but it does feel cooler than just a terrycloth towel used as a comparison. Note that the towels must be wet or damp for the cooling effect to happen.

There are only a few color choices available per towel—I received both blue and aqua colors. All three towels will cool as advertised, but do so at varying degrees (pun intended) of effectiveness. Here’s a breakdown of each:

The regular AlphaCool towel performs as well as the more expensive microfiber towel, but it dries out quickly requiring it to be re-wet often—if that’s what you want. If you’re looking for a towel to dry quickly between wiping sweat from your face and neck, it does a great job. The lightness of the towel makes it good for workouts that don’t produce a ton of sweat. It has a textured surface that easily wicks away moisture from skin.

Next is the PVA cooling towel. This is a weird feeling towel, but it became my favorite for one main reason—it feels the coolest and stays damp the longest by a big margin. PVA stands for polyvinyl acetate. Even though this material will stay wet longer, it feels mostly dry. Plus, because it retains water so well, it won’t soak your clothes while wearing. The PVA towel is textured and feels more like rubber than cloth. But it works! Mowing my 1acre backyard isn’t any less strenuous, but I’m now a bit cooler while mowing and I cool down quicker when done. That’s counts for a lot. When dry, the PVA towel will get quite rigid and almost brittle feeling. Once wet though, it soften’s right up.

I get that the feel of this towel may not be for everyone, especially if you are looking for a towel that will dry quickly for wiping the sweat off your face because it remains wet longer. Since I want my towel to remain damp longer for effective cooling, it has become my go-to towel for yard work.

Then there is the AlphaCool microfiber towel. This towel costs more than the others and its easy to see why. It’s soft and remains so throughout use. It has a satisfying bulk to it that allows more water retention while keeping a fairly quick drying time, so it’s good for heavy workouts or extra warm yard-work days. I liked that I could re-wet the towel and it would keep me cooler for a good while, but again, the PVA towel performed even better—if you want a towel to remain damp and cool rather than dry out quickly. If you want a towel that will dry off your sweaty face and neck while still pampering you with its soft texture, then this is your towel.

What I like

 AlphaCool offers different kinds of towels depending on your preferences. Each type of towel is affordable, so it’s easy to have more than one type for various uses.

What needs to be improved

If AlphaCool can develop a microfiber towel with the advantages of the PVA towel, it could be the perfect towel.

Final Thoughts

AlphaCool has managed to get me to ditch my collection of old terrycloth rags in favor of these more modern and better cooling towels. My outdoor chores are already more manageable despite the summer heat.

Price: AlphaCool towel – $9.99; PVA towel – $9.99; microfiber towel – $9.99. All prices US.
Where to buy: Amazon
Source: The samples for this product were provided by AlphaCool.

Filed in categories: Reviews

Tagged:

AlphaCool instant cooling towels review originally appeared on The Gadgeteer on July 15, 2018 at 9:30 am.

Note: If you are subscribed to this feed through FeedBurner, please switch to our native feed URL http://the-gadgeteer.com/feed/ in order to ensure continuous delivery.