Want to save money on gadgets? Then check out this quick list of Amazon Prime Day tech deals

Today is like Black Friday except that it’s Tuesday and it’s July. But other than that, it’s exactly the same because today is Amazon Prime Day where there are tons of deals and bargains on some of your favorite products. You’ll need to be an Amazon Prime member to take advantage of all the savings, so if you’re not a member yet, head over to Amazon and sign up for a free 30-day trial and then warm up your credit card and browse through this quick list of deals that look worthy to me. Don’t wait too long though because the best deals are selling out fast.

Amazon hardware deals

Echo Dot (2nd Generation) for $34.99 which is a 30% savings and the lowest price it’s ever been. Read our Amazon Echo Dot 2nd Gen review.
Amazon Echo for $89.99 which is a 50% savings and the lowest price it’s ever been.
Kindle Paperwhite E-reader for $89.99 which is a savings of $30.
Fire 7 Tablet for only $29.99.
Element 50-Inch 4K Ultra HD Smart LED TV – Amazon Fire TV Edition for only $549.99.

Keyport key organizer deals

Keyport Pivot Essential Bundle for $33.79.
Keyport Pivot Key Organizer for $17.99. Read my Keyport Pivot review.
Keyport Slide Pro 8+ Bundle for $39.99. This is the original Keyport Slide.
Keyport MOCA Key Tool – 10-in-1 Keychain Multi-Tool for $9.99.

AUKEY

AUKEY Latitude Wireless Earbuds for $19.99.
AUKEY 24W Dual-Port Car Charger for $6.29.
Quick Charge 3.0 AUKEY 6-Port USB Charger for $20.99

Other deals

Mohu Leaf 50 TV Antenna for $59.95.
Mohu Leaf Glide HDTV 65-mile range antenna for $89.99.
iRobot Roomba 652 Robotic Vacuum Cleaner for $249.99 which is a $125 savings.
Ring Video Doorbell Pro for $176.69 which is a $72 savings.
Moto G Plus (5th Generation) for only $179.99 which is a $120 savings.

Filed in categories: News

Tagged:

Want to save money on gadgets? Then check out this quick list of Amazon Prime Day tech deals originally appeared on on July 11, 2017 at 7:41 am.

Note: If you are subscribed to this feed through FeedBurner, please switch to our native feed URL http://the-gadgeteer.com/feed/ in order to ensure continuous delivery.

Porsche brings the power and performance of a sports car to the home theatre with their 911 soundbar

I’ve been fascinated with Porsche’s 911 sports car since I was old enough to even think about driving. I even owned a scale die cast model in midnight black. So when I saw that Porsche had designed a soundbar using parts from a 911 you can bet it peaked my interest.

I never could afford that 911 I dreamed of as a kid and quite frankly even the sound bar is a little too rich for my blood. But, it’s oh so cool! Porsche Design took the original rear silencer and twin exhaust from a 911 GT3 and used them to resonate sound. The rear silencer acts as an onboard subwoofer. The result is a deeper, measurably louder audio experience with a higher maximum volume. Design wise it’s awesome. The look is raw, right down to the visible soldering marks on the rear silencer and the glossy black of the twin exhaust. A real collector’s piece to be sure. 

The 2.1 virtual sound system has a powerful 200-watt output and is loaded with features. A Dolby Digital decoder, DTS TruSurround, Bluetooth 3.0, a LED display and more. As far as connections go, there are 2 digital inputs (coaxial and optical), an analog input and a Subwoofer output in case you want to add your own subwoofer to the mix. The soundbar also comes with a basic remote control.

The Porsche 911 soundbar can be yours all for the low, low price of $3500. After you pick your jaw up off the floor, head over to their website for more info. Vrooom! Vrooom!


Filed in categories: News

Tagged:

Porsche brings the power and performance of a sports car to the home theatre with their 911 soundbar originally appeared on on July 11, 2017 at 7:00 am.

Note: If you are subscribed to this feed through FeedBurner, please switch to our native feed URL http://the-gadgeteer.com/feed/ in order to ensure continuous delivery.

SnapPower SwitchLight review

I love products that are simply designed, simply packaged, and easily installed. Products from SnapPower tick all three of those boxes. Three years ago I reviewed their GuideLights outlet covers plates which I still use today and today I’m going to show you their newer SwitchLight covers.

What is it?

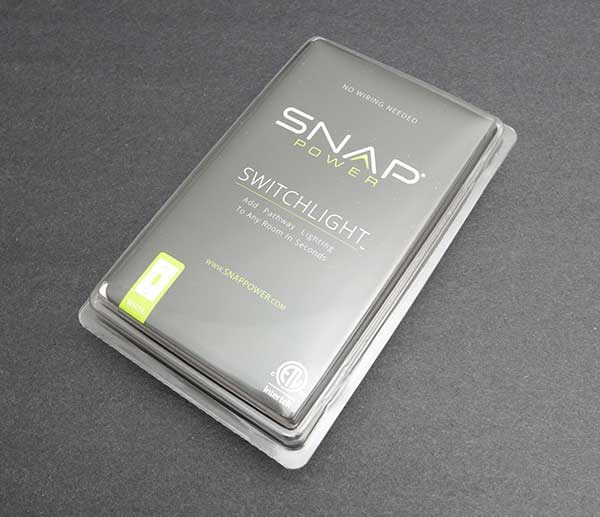
The SnapPower SwitchLight is a cover that turns your ordinary switch light cover into a night light without any special wiring, batteries or a complicated installation.

What’s in the package?

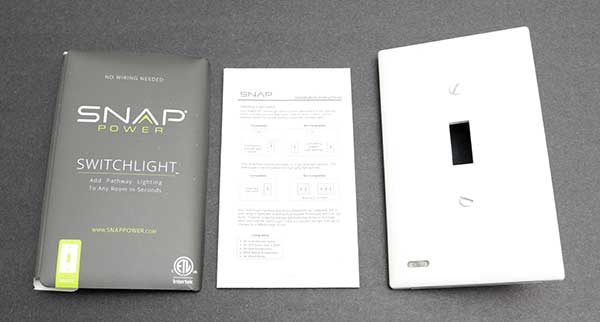
SnapPower SwitchLight
Instructions

Design and features

SnapPower SwitchLights are available in two styles that include the Toggle style and a Decor style. They also come in white, light almond, and ivory colors. I was sent a Toggle style in white.

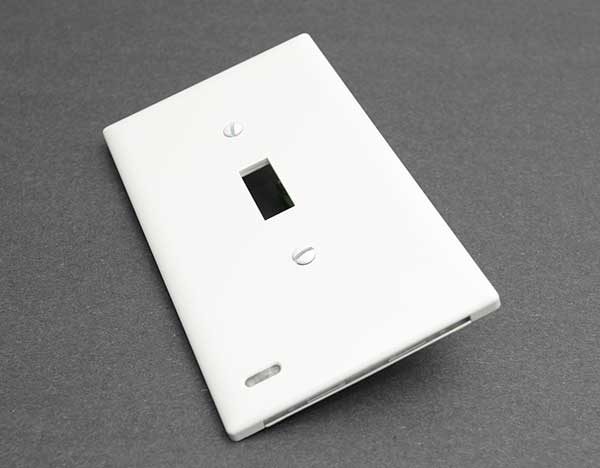
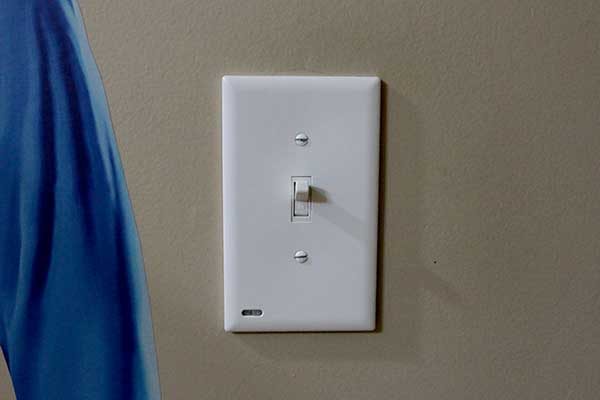
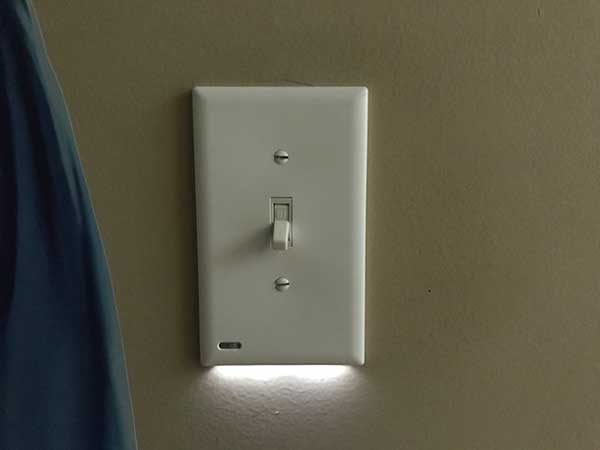
The SwitchLight looks like an ordinary switch light cover until you look closely. Then you’ll notice the small switch / ambient light sensor in the lower left corner and a row of LEDs along the bottom edge of the cover.

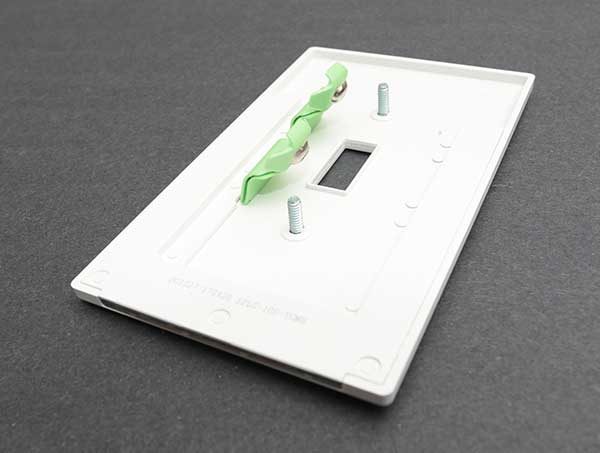
When you flip the SwitchLight over, you’ll see two tabs with electrical contacts on the end. These expertly designed tabs make installation literally a snap.

Installation

Installing the SnapPower SwitchLight will take you less than 5 minutes. All you will need is a light switch in a room that has a light fixture that is controlled by just one switch. You’ll also need a flat head screwdriver, a flashlight, and you’ll need to know where your electrical panel is located.

Step 1. Turn off the power to the light fixture by flipping one of the switches in your breaker box / electrical panel.

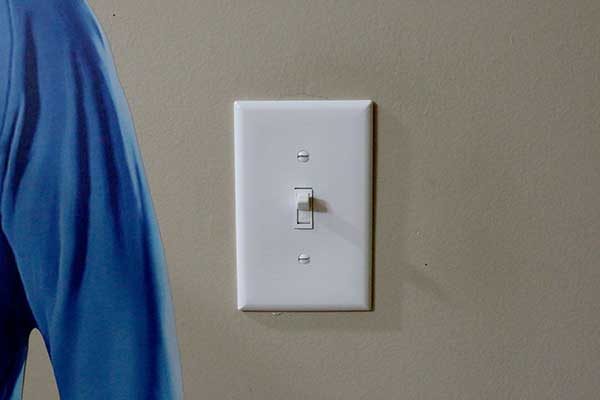
Step 2: remove the existing switch cover.

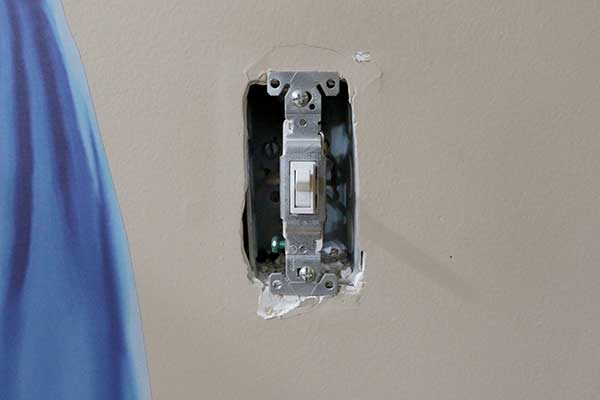
When I did this, part of the paint and drywall chipped off and I was immediately dreading the annoyed looks that I knew I would be getting from Jeanne as soon as she noticed that I damaged the wall.

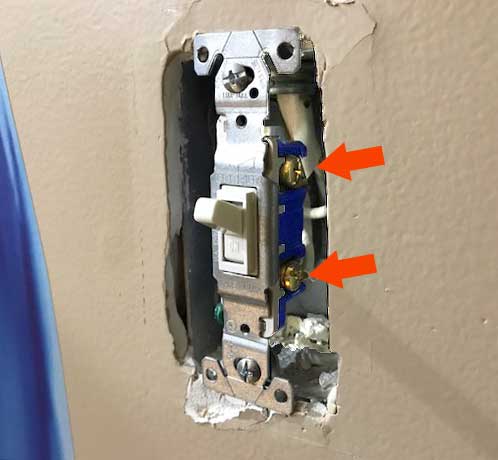
Step 3: Notice the screws on the side of the switch. The tabs on the SwitchLight press against these screws to power the built-in LEDs. Genius right?

Step 4: Snap the SwitchLight in place.

Step 5: Tighten the screws.

Step 6: Turn the power back on.

That’s it!

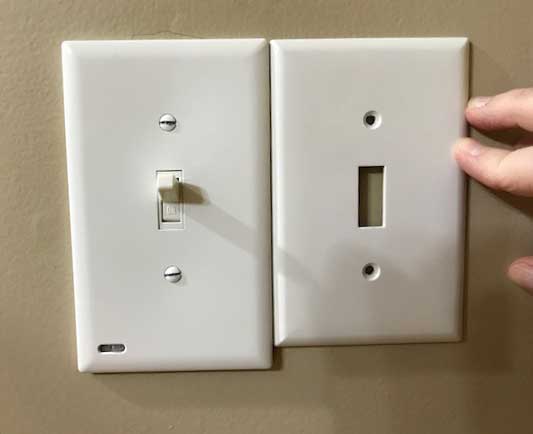
I was overjoyed that the SnapPower SwitchLight plate is slightly longer than the original switch light cover. The extra length hides the chipped paint. Crisis averted!

It’s time to try it out!


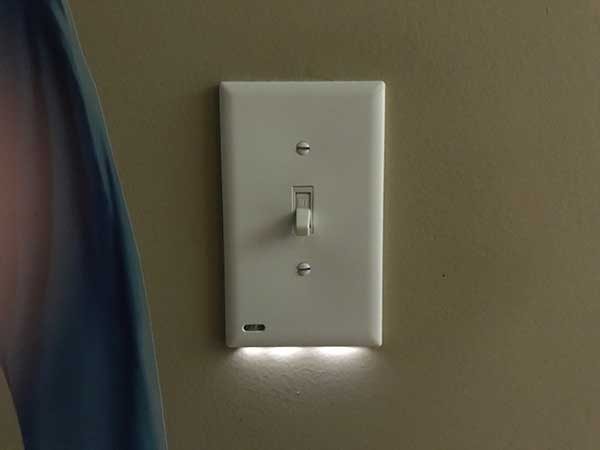
Turn off the light and make sure the switch in the lower left corner is set to low or high brightness instead of off. Then as the room gets darker, the LED lights along the bottom edge of the SwitchLight cover will start to glow. The LEDs turn off as the room gets brighter. Simple!

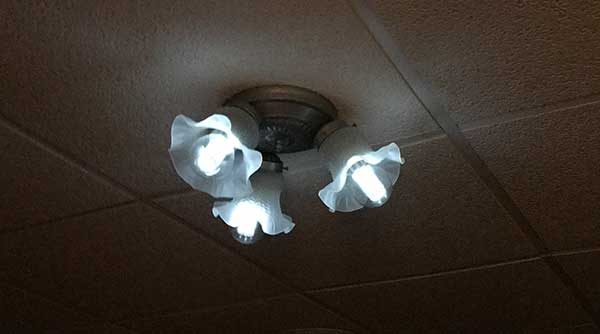
However, I did notice something strange with the SwitchLight cover. If I have the switch set to bright and turn off the overhead light fixture by toggling the switch where the SwitchLight is installed, the LED bulbs in the fixture will still glow dimly. The image above makes the bulbs appear brighter than they are in real life. If I move the switch to the lower brightness setting, this doesn’t happen.

Final thoughts

I think the SnapPower SwitchLight is a great way to add ambient night lights to a room, hallway, etc., without complicated wiring or electrical know-how. Installation is incredibly fast and easy. The LEDs in the SwitchLights should last for 25 years and will only cost about 10 cents a year to power. You can’t beat that!

Source: The sample for this review was provided by SnapPower. Please visit their site for more info and Amazon to order.


Product Information

Price: $17.00
Manufacturer: SnapPower
Retailer: Amazon
Pros:
  • Fast and easy to install
  • Simple "night light" without batteries or wiring
  • 3 light settings
Cons:
  • High setting causes LED bulbs in ceiling fixture to continue glowing (dimly)

Filed in categories: Reviews

Tagged:

SnapPower SwitchLight review originally appeared on on July 10, 2017 at 5:25 pm.

Note: If you are subscribed to this feed through FeedBurner, please switch to our native feed URL http://the-gadgeteer.com/feed/ in order to ensure continuous delivery.
SnapPower SwitchLight review

I love products that are simply designed, simply packaged, and easily installed. Products from SnapPower tick all three of those boxes. Three years ago I reviewed their GuideLights outlet covers plates which I still use today and today I’m going to show you their newer SwitchLight covers.

What is it?

The SnapPower SwitchLight is a cover that turns your ordinary switch light cover into a night light without any special wiring, batteries or a complicated installation.

What’s in the package?

SnapPower SwitchLight
Instructions

Design and features

SnapPower SwitchLights are available in two styles that include the Toggle style and a Decor style. They also come in white, light almond, and ivory colors. I was sent a Toggle style in white.

The SwitchLight looks like an ordinary switch light cover until you look closely. Then you’ll notice the small switch / ambient light sensor in the lower left corner and a row of LEDs along the bottom edge of the cover.

When you flip the SwitchLight over, you’ll see two tabs with electrical contacts on the end. These expertly designed tabs make installation literally a snap.

Installation

Installing the SnapPower SwitchLight will take you less than 5 minutes. All you will need is a light switch in a room that has a light fixture that is controlled by just one switch. You’ll also need a flat head screwdriver, a flashlight, and you’ll need to know where your electrical panel is located.

Step 1. Turn off the power to the light fixture by flipping one of the switches in your breaker box / electrical panel.

Step 2: remove the existing switch cover.

When I did this, part of the paint and drywall chipped off and I was immediately dreading the annoyed looks that I knew I would be getting from Jeanne as soon as she noticed that I damaged the wall.

Step 3: Notice the screws on the side of the switch. The tabs on the SwitchLight press against these screws to power the built-in LEDs. Genius right?

Step 4: Snap the SwitchLight in place.

Step 5: Tighten the screws.

Step 6: Turn the power back on.

That’s it!

I was overjoyed that the SnapPower SwitchLight plate is slightly longer than the original switch light cover. The extra length hides the chipped paint. Crisis averted!

It’s time to try it out!


Turn off the light and make sure the switch in the lower left corner is set to low or high brightness instead of off. Then as the room gets darker, the LED lights along the bottom edge of the SwitchLight cover will start to glow. The LEDs turn off as the room gets brighter. Simple!

However, I did notice something strange with the SwitchLight cover. If I have the switch set to bright and turn off the overhead light fixture by toggling the switch where the SwitchLight is installed, the LED bulbs in the fixture will still glow dimly. The image above makes the bulbs appear brighter than they are in real life. If I move the switch to the lower brightness setting, this doesn’t happen.

Final thoughts

I think the SnapPower SwitchLight is a great way to add ambient night lights to a room, hallway, etc., without complicated wiring or electrical know-how. Installation is incredibly fast and easy. The LEDs in the SwitchLights should last for 25 years and will only cost about 10 cents a year to power. You can’t beat that!

Source: The sample for this review was provided by SnapPower. Please visit their site for more info and Amazon to order.


Product Information

Price: $17.00
Manufacturer: SnapPower
Retailer: Amazon
Pros:
  • Fast and easy to install
  • Simple "night light" without batteries or wiring
  • 3 light settings
Cons:
  • High setting causes LED bulbs in ceiling fixture to continue glowing (dimly)

Filed in categories: Reviews

Tagged:

SnapPower SwitchLight review originally appeared on on July 10, 2017 at 5:25 pm.

Note: If you are subscribed to this feed through FeedBurner, please switch to our native feed URL http://the-gadgeteer.com/feed/ in order to ensure continuous delivery.
Julie’s gadget diary – Another successful gadget giveaway day has just ended

Being the Gadgeteer certainly has its perks. I’m very lucky that I get a chance to play with and test the latest and greatest gadgets. But what do I do with all those great gadgets and gizmos once my reviews have been published? I continue to use some products, but the ones I don’t use end up cluttering the shelves of Gadgeteer Headquarters (otherwise known as the basement office of my house). When I can no longer see the floor in the office, it’s time for a gadget purge and another gadget giveaway day at Cummins Inc. (otherwise known as my day job).  

Once or twice a year I fill storage bins with forgotten and unused products sitting on my office shelves, in drawers, in baskets under the desks, and even sitting in the middle of the floor.

That’s what I did this past weekend and was able to fill three large storage tubs with goodies. Then yesterday, Jeanne and I brought the tubs into work so they would be ready for another gadget giveaway day. I always like to bring the items in on a Sunday and then have the giveaway bright and early Monday morning.

The image above shows the bins under my desk filled with gadgets that are ready for a new home.

Before the gadgets are set out. It’s still dark outside because I get to work at 6 AM each day 🙂

At 8 AM I get some helpers to help me move the bins and set out all the items. I then take a picture and give the thumbs up for everyone to grab what they want.

It’s a lot of fun to watch everyone’s excitement as they look through the items and ask me “what’s this?”, “how does this work?”.


My co-workers look forward to gadget giveaway days as much as I look forward to clearing the clutter out of my office!

After 30 minutes, the majority of items are gone and by tomorrow, almost everything will be gone. If anything is left after that, I usually take the leftover items and put them in the vending area with a FREE sign and within just a few minutes, they will be gone too.

It feels good to free up some shelf and floor space in my office, but I know that will be short lived.  The life of a Gadgeteer is tough, but someone has to do it! 😉

Filed in categories: Articles

Tagged:

Julie’s gadget diary – Another successful gadget giveaway day has just ended originally appeared on on July 10, 2017 at 9:51 am.

Note: If you are subscribed to this feed through FeedBurner, please switch to our native feed URL http://the-gadgeteer.com/feed/ in order to ensure continuous delivery.