Cover-Up MacBook and iPhone stone cases review

“That’s the coolest MacBook cover I have ever seen! Is that real stone?” This was the comment I received in my first meeting after setting up my new Cover-Up laptop Stone Skin. Yes, it is cool. And yes, it’s real stone. Cover-up sent me two covers for this evaluation, they are unlike anything I have seen before. They are real, all natural stone cases that have been crafted for your iPhone and MacBook. But how do they hold up to practical use? Let’s dig deeper into these beauties…

First Impressions

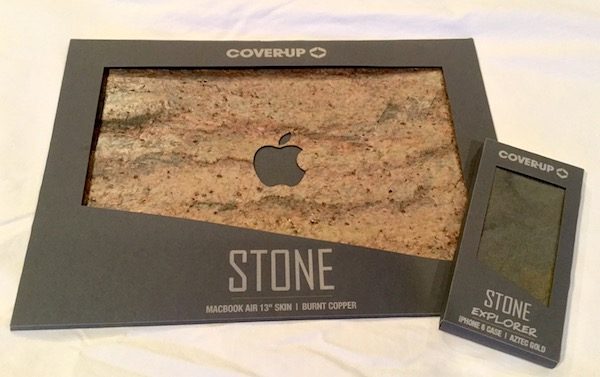
Cover-Up is a company based out of South Wales, UK that produces elegant covers and skins for mobile phones, laptops, and tablets. All covers are made from natural materials such as wood, stone and wool felt. Hand cut and finished, each cover is a unique product that highlights the natural grains & textures of the material. I received a MacBook skin and an iPhone 6s cover from the Stone collection, in different color schemes that use natural slate as the base.
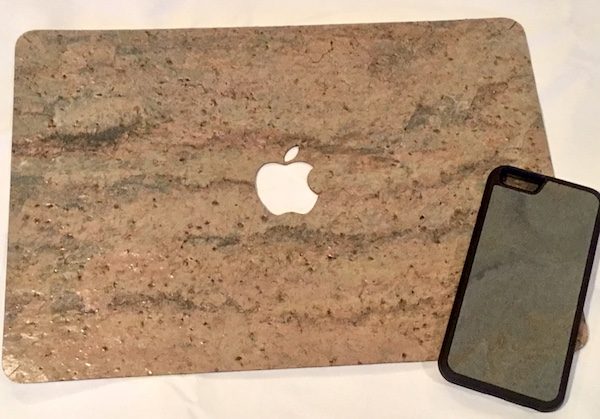
MacBook skin in Burnt Copper, iPhone case in Aztec Gold.

The real stone finishes are stunning. This is not a composite material or some sort of synthetic. Running your hand across the surfaces reveals all the contours & textures of the natural stone. Turn them in your hands and you see the colors shift and shimmer, highlighting the unique grains and patterns in the material as the light plays across them. They are just delightful to look at, and definitely get attention. I just can’t figure out how they make them!

The MacBook Skin

When I pulled the skin out of the package, I was a bit surprised at how simple it is. It’s a single-cut piece of stone backed to a thin rubberized base layer that’s been precisely cut to the device specifications (I have a 13″ MacBook Air). There’s a peel-off plastic backing that you remove to reveal the 3M adhesive material to apply it to your device.

Top view of the skin in place. Shimmery!

The instructions state that you should run your MacBook for 10 minutes to ensure optimal adhesion. Application is pretty straightforward: peel off the plastic, line it up, and stick it on. The adhesive material is forgiving, so you can pull it up and reposition it if you feel like you are not aligned quite right. I found it took a couple of attempts to get it right where I wanted it.
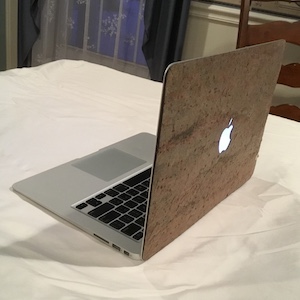
Side view of the skin in place.

I found that the skin doesn’t quite align edge-to-edge with the MacBook, but I think this is intentional to allow for some tolerance in application. I don’t think anyone has noticed it but me. There is also a slit in each corner which I think is designed to accommodate the rounded corners of the MacBook, but I have not found that it detracts from the overall package once it’s in place. I did find that the edges took some buffing to get them to adhere tightly. Given that it’s real stone, it’s a pretty impressive piece of engineering.

Closeup of the Burnt Copper material.

This cover is called the Burnt Copper pattern and highlights oranges, greens, and browns with shimmering metallics. The textures are more pronounced than I expected, and I was concerned about possible chipping or flaking. After two weeks of work commuting and meeting jumping, however, I’ve seen no signs of wear & tear. It also provides a nice layer of protection for the computer, which is cool.
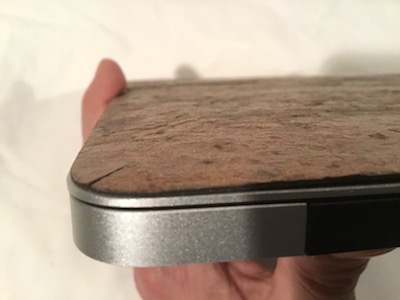
The edging and cornering could use some refinement.

A couple of minor issues did crop up during testing. First, the edges could be finished cleaner. The edging is rough (you’ll feel it if you run your hand across it), and the adhesive pulls up a bit. It should also be noted that this is a skin. I believe it will protect the MacBook from a direct hit but it doesn’t provide corner protection from accidental drops. It’s also a thick cover compared to some others that I have played with. Other than those minor points, it’s great. It provides a beautiful, distinctive look and presents a unique sense of style.

The iPhone Cover
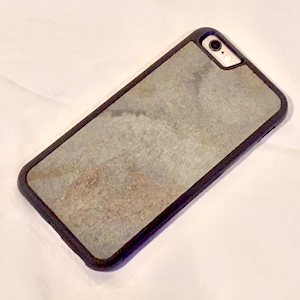
iPhone 6s case in Aztec Gold.

The iPhone cover design is a pretty straightforward affair. It’s a snap-style cover that snugly fits my iPhone 6s, with the stone glued to an insert in the backing. Application is easy, and there’s no looseness to the cover once it’s on.
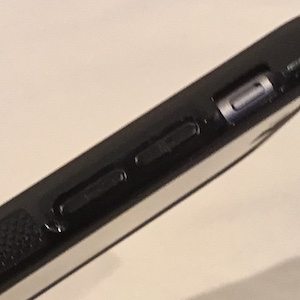
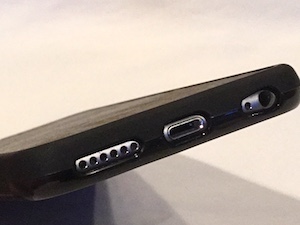
 

All port access and rocker buttons are precision cut.

Given the unique stone material that is the highlight, one of the nice surprises here is that Cover-Up didn’t skimp on the cover itself. It’s a well-engineered, rubberized material that provides bumper-style protection including a full rubberized backing under the stone. All the slots are cut precisely for your camera, audio jack, adapter port, ringer switch, etc. and don’t interfere with normal operation. The integrated button stud for the volume rocker & on/off switch work perfectly. There’s a nice ridged texture that runs up each side, which helps grip the phone but doesn’t cause the phone to get stuck in your pocket. Overall, it’s a good cover that matches the quality of the stone surface.

Closeup of the Aztec Gold pattern on the iPhone cover.

For the iPhone, I chose the Stone style called Aztec Gold. It sports a smoother texture than the Tempest MacBook skin. Colors are subtle, highlight greys and blacks with veins of gold running through the stone. It’s really classy and understated.

Overall, I really enjoy using the cover. It’s slim and unobtrusive, so you can comfortably slip it into your pants pocket. I’ve even dropped it once (maybe twice), and it does the job protecting the phone. Like the MacBook skin, I have not seen any signs of chipping or cracking of the stone finish after twin weeks of constant use.

Conclusion

Cover-Up has done a nice job of fulfilling their mission with the Stone Skin MacBook skin and iPhone case. Not only do they add unique style to your gear, but they are beautifully crafted pieces. You should know that they are not inexpensive: prices range between $50 and $60 for the iPhone cases and $60 and $100 for the MacBook skins depending on the size of your device. After playing with them for a few weeks, however, I think the materials and quality are in alignment with the premium pricing. They offer a range of stone styles, each one with its own distinctive personality. If you’re looking to invest in a truly unique look for your gadgets with natural materials, check out cover-up.com for more information!

Source: The sample for this review was provided by cover-up. For more info visit their site and you can check their Amazon store as well.


Product Information

Price: $49 – $99 for the MacBook skin, $15 – $55 for the iPhone cases
Manufacturer: Cover Up
Retailer: Amazon
Pros:
  • Adds a beautiful, unique look to your iPhone or MacBook.
  • High-quality craftsmanship.
  • The real stone actually works as a protective surface for your devices.
  • iPhone cover doesn't sacrifice looks for solid build and functionality.
Cons:
  • Premium pricing.
  • MacBook cover could use some more refinement around the edges.

Filed in categories: iOS, Laptops and Gear, Reviews

Tagged: , ,

Cover-Up MacBook and iPhone stone cases review originally appeared on on March 27, 2017 at 12:06 pm.

Note: If you are subscribed to this feed through FeedBurner, please switch to our native feed URL http://the-gadgeteer.com/feed/ in order to ensure continuous delivery.

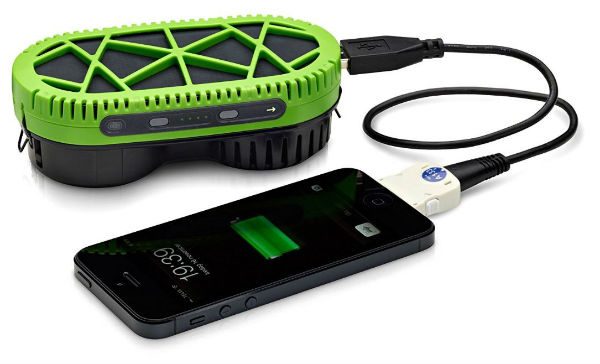
Charge your gadgets when you’re off the grid with 1 tablespoon of water

Portable backup batteries are handy to have when you’re away from an electrical outlet and need to charge your devices. But they are only good for a limited number of charges before they need to be recharged themselves. Solar chargers are another backup power solution that works great as long as you’re in an area with direct sunlight. Is there a backup power solution that doesn’t suffer from either of those limitations? The myFC Powertrekk fuel cell charger looks like it has potential.

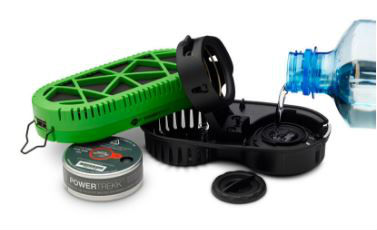
What is it? The myFC Powertrekk is a hybrid charger that has a built-in 3800 mAh battery that can be charged from a USB cable and an AC adapter like traditional backup batteries, but the Powertrekk can also generate electricity from water and small fuel cells called Pucks.

One myFC Puck contains Sodium Silicide, Sodium Borohydride and 12 g Aluminum. When you add one tablespoon of water or liquid that contains water to the Puck, it will generate 1400 mAh of power.

Water reacts with sodium silicide to produce heat and an inert mineral called sodium silicate. Hydrogen from the water is unused in this process and is released for consumption by the fuel cell. The chemistry of the process is safe and the only bi-product from the fuel cell is a little water vapor. Expended PowerTrekk Pucks can be recycled as metal waste.

The myFC Powertrekk comes with one Puck and extra Pucks can be purchased in packages of 9, 12 and 15 for about $5.44 per Puck. I know that’s very expensive considering the Pucks are good for one use only. It should go without saying that the PowerTrekk wouldn’t be a backup power solution that you’d want to use all the time. But, it’s more of a niche product that would be good to include in a bug out bag or an emergency preparedness package since the Pucks will be ready to use at any time to generate power unlike a backup battery that will lose its charge over time even if it isn’t used.

You can read more about the Powertrekk at myfcpower.com and you can order one for $119.97 from Amazon.

Filed in categories: Cables, Batteries and Chargers, News

Tagged:

Charge your gadgets when you’re off the grid with 1 tablespoon of water originally appeared on on March 27, 2017 at 11:04 am.

Note: If you are subscribed to this feed through FeedBurner, please switch to our native feed URL http://the-gadgeteer.com/feed/ in order to ensure continuous delivery.
CARLOCK advanced real time car tracker & alert system review

Aside from a house, a vehicle may be one of the priciest purchases a person will make. That being the case, most people want to make sure they protect their investment. One of the easiest ways to protect that investment is to know where the vehicle is at all times.

Carlock is a small device that fits into your vehicle’s On-board Diagnostic port (OBD) and tracks your vehicle by GPS. It can send alerts if your engine is started, someone’s tampering with the car, or the vehicle is moved while you’re away from it.

Design

Carlock is a very simple device.


It’s a small, square device, with a 16 pin plug. It has branding on one end of the device; other than that it’s an extremely plain device.

The entire device is about the same length and width as a debit/credit/gift card.

There isn’t much to the design of the Carlock. It’s a very plain device, but that doesn’t matter much because it will be tucked away under the dashboard and won’t be seen.

Setup

Of all the devices I’ve reviewed for the Gadgeteer, this has to be one of the easiest installations I’ve ever encountered.


First, you’re going to locate your vehicle’s OBD port. It’s going to be located somewhere under the driver-side dashboard.

If you’re having trouble locating it, you can use this OBD locator site.

Once you’ve located the OBD port, you plug the Carlock device into it.

That’s all there is to physically installing the device.

Once the device is physically installed, you download the app and create an account with Carlock.

This is also a simple process.


First, you enter the activation code and serial number that came with your device. Then you enter some biographical information and the make/model of your vehicle.

Once that is complete, you’re ready to use the device.

Use

The first time you open the app, it will instruct you to drive for a bit before it can detect your location.


After about 5 minutes, the app should find your location. Your location is updated approximately every 30 seconds while driving, and every 30 minutes while stationary.

For most people, the most important aspect of the Carlock is its security features.

In the picture above, the vehicle is “disarmed”. You can drive the vehicle and you won’t receive any movement alerts.

As you can see in the diagram above, arming your vehicle is simple.

If your vehicle is moved while armed, an alarm on your phone will go off and the app will show your vehicle’s current location and path it took to get there.

Along with notifying you when your vehicle moves, Carlock can also alert you when the engine is started, if the vehicle vibrates excessively, and if Carlock is removed from the OBD port.

Most of us probably wouldn’t remember to always arm and disarm our vehicle; fortunately, the app has an “AutoLock Scheduler” that allows you to set the times you want the vehicle to be monitored.

Perhaps you’re not concerned with security, but rather the safety of those driving the vehicle.

Carlock is also able to monitor speeding, fast acceleration, sudden braking, and harsh cornering. If Carlock detects any of the above, it can send an alert to your phone.

Additionally, the app scores how the vehicle was driven over the previous month and keeps a log of trips and notifications.


This is an excellent way to keep tabs on younger drivers you may have in your household.

Cost

The device itself costs $59.94. That’s not a bad price for a security device with so many features; however, there is also a subscription that must be purchased in order to take advantage of the device’s abilities.

You have two options for the subscription service. You can pay $113 upfront for an entire year of service, or you can pay $9.60 a month.

In my opinion, neither price is too prohibitive; although, the savings for the yearly plan is negligible at $2.20.

Depending on your car insurance company’s policies, you may be able to get a discount for using Carlock.

Conclusion

Carlock packs a lot of punch for being in such a small package.

It’s incredibly easy to install and doesn’t require any upkeep, yet still manages to monitor your vehicle’s security and the driving habits of those using your vehicle.

Whether or not it’s a sound purchase depends on the user.

Is your neighborhood safe, do you have young drivers in your home, or are you looking for an inexpensive way to lower your insurance rates? These are all questions you need to ask before purchasing Carlock. Depending on the answer, Carlock may be for you.

Source: The sample for this review was provided by Protectus Technologies, Inc. Please visit their site for more information and Amazon to order.


Product Information

Price: $59.94
Manufacturer: Protectus Technologies, Inc.
Retailer: Amazon
Requirements:
  • Compatible vehicle with an OBD diagnostic port
  • Check vehicle compatibility here:
  • https://www.carlock.co/features-device/#will-it-work-in-my-car
Pros:
  • Easy install
  • Generally affordable
  • Great way to monitor young drivers
  • Insurance discount?
Cons:
  • None

Filed in categories: Car Gear, Reviews

Tagged:

CARLOCK advanced real time car tracker & alert system review originally appeared on on March 27, 2017 at 8:10 am.

Note: If you are subscribed to this feed through FeedBurner, please switch to our native feed URL http://the-gadgeteer.com/feed/ in order to ensure continuous delivery.

Hands-free tablet viewing while you’re 40,000 feet above Earth

The next time you’re packing your gear for a trip that involves a flight, you might want to consider a pair of AirClipZ.

What are AirClipZ? They are a set of two plastic hooks that are made in the US and have been designed to hook to the top edge of the tray table on the seat back in front of you.

Once in place, AirClipZ provide a convenient hands-free mount for your iPad, Android tablet, Kindle or other devices of a similar size.

AirClipZ will even work if your device is in a case.

You can also use AirClipZ in your car with the optional Velcro strap that can be used to attach the clips to the back of the head rest.

Available in several colors, a set of AirClipZ is priced at $14.95. You can read more about them at airclipz.com and order a pair through Amazon.

Filed in categories: News, Tablets, Ultra Portables, Travel Gear

Tagged:

Hands-free tablet viewing while you’re 40,000 feet above Earth originally appeared on on March 26, 2017 at 10:47 am.

Note: If you are subscribed to this feed through FeedBurner, please switch to our native feed URL http://the-gadgeteer.com/feed/ in order to ensure continuous delivery.

FlexiSpot M4B Corner Standing Desk review

Standing desks have been gaining in popularity for years since various studies were released warning of the dangers of prolonged sitting. There are now tons of standing desk options to fit every type of home or office environment. The FlexiSpot M4B Corner Standing Desk is a great, affordable choice for people who have an existing standard desk that they would like to use as a standing desk. The Flexispot desk is constructed of fiberboard and steel and once assembled is very sturdy and balanced. This particular model comes with an optional keyboard platform and is designed to be used in a regular or corner desk configuration.

The Flexispot desk comes delivered in a rather large box that weighs about 53lbs. Make sure you have help when lifting it.

It is very difficult to lift the desk out of the box from the top. The best way to extract the desk is to lay the box flat, cut open the sides, and open the box by lifting the front cardboard flap up.

The desk comes partially assembled. All that is required is to attach the optional keyboard platform and two protective caps that go over the main cross joints.

The included protective caps snap easily over the left and right cross joints.

Flexispot includes four cord organizers to route cords out of the way of hinges and joints. There is also a provided bolt for an ergonomic monitor mount which is sold separately.

The Flexispot desk can be used with or without the included keyboard platform. Assembling the keyboard platform is very simple. The two keyboard brackets fit perfectly into two indentations on the underside of the main platform.

The only tool required for assembly is a standard Phillips screwdriver. Learn from my mistakes and be sure to consult the instructions first because the brackets can fit on to the platform upside down. Once configured correctly, the keyboard platform brackets attach securely with eight wood screws. Be careful not to over-tighten the screws though, because it is very easy to strip right through the fiberboard.

The assembled keyboard platform then hooks in under the main workspace. The platform is secured in place by left and right pre-installed knobs. Simply loosen the knobs, hook the platform into place and then hand-tighten the knobs.

You’re not required to secure the Flexispot desk to your existing desk in anyway, it just sits on top of it. Once in place it’s very easy to adjust the height of the Flexispot desk. There are adjustment levers conveniently placed on either side of the main platform. Squeeze these levers simultaneously while holding on to the sides of the platform and you can lift or lower the desk into any height you like. Flexispot indicates that there are 12 adjustment levels, but I didn’t find that the desk “clicked” or settled into any particular spots.

The Flexispot has a “gas spring hovering system” which allows you to adjust the desk smoothly when fully loaded. Keep in mind that the workspace and spring system have a maximum indicated weight limit of 33lbs.

The Flexispot desk can adjust from low height of 5.9″ to a high setting of 19.7″. Whereas some similar standing desks extend out as well as up, the Flexispot desk moves straight up and down within its own footprint.

We use the Flexispot desk for our PC Virtual Reality/Edit workstation. This PC is used mainly for video editing and rendering as well as for testing our 360° videos and VR apps. It’s great to have the option to lower the desk into a traditional sitting position for long editing sessions and then be able to raise the desk for VR and 360° video demos.

I was initially concerned that the lowest setting of the desk would be too high to work at while seated. I soon found though that the low-height setting was actually perfectly designed to afford optimal keyboard and monitor placement while working in a seated position.

Even though the desk is designed for a corner space, the workspace is large enough to hold our 24″ Eizo monitor and all of the Oculus accessories with plenty of room to spare. If needed, we could definitely fit a second monitor as well.

The keyboard shelf is roomy enough for a full-sized PC keyboard and mouse. The mouse area is too small to place a regular mouse pad, but our basic Logitech mouse works fine on the shelf surface.

There is also a slot built into the front of the workspace for tablet or phone placement. I find this location for the slot a little odd though, and don’t use it to hold my tablet or phone.

At $349.99 I feel that the FlexiSpot M4B Corner Standing Desk is a great buy. The easy assembly, well-thought out design and sturdy construction makes it a standout among all of the current standing desk offerings. Although the manufacturer states that the desk is available in black or white, the only selectable item on both the Flexispot website and Amazon was black.

Specifications:
Product weight: 53 lbs.
Max. Loading Weight Limit: 33 lbs
Dimensions (Weighted Base): 23″(W) x 22.3″(D)
Dimensions (Flat): 5.9″(H) x 41″(W) x 23″(D)
Dimensions (Extended): 19.7″(H) x 41″(W) x 23″(D)
Extension Height: 19.7″ (Footprint Surface) & 14.2 ” (Keyboard Tray)
Work surface measures: 41″(W) x 31.5″(D) (Display Surface & Keyboard Tray)
Keyboard tray measures: 34″(W) x 11.8″(D) (Middle) & 7.9″ (D) (Both wings)

The sample for this review was provided by Flexispot. Please visit their website or Amazon to order.


Product Information

Price: $349.99
Manufacturer: FlexiSpot
Retailer: Amazon
Requirements:
  • • Existing standard desk
  • • Phillips screwdriver for assembly
Pros:
  • • Quick and easy setup
  • • Made to fit in corners
  • • Very simple to adjust
  • • Perfect height for sitting or standing
  • • Works with existing standard desk
Cons:
  • • No tilt adjustment
  • • Non-adjustable keyboard shelf
  • • Non-powered height adjustment

Filed in categories: Reviews

Tagged: ,

FlexiSpot M4B Corner Standing Desk review originally appeared on on March 26, 2017 at 8:39 am.

Note: If you are subscribed to this feed through FeedBurner, please switch to our native feed URL http://the-gadgeteer.com/feed/ in order to ensure continuous delivery.