This butter knife spreads cold butter without tearing your bread

I love butter and I love bread, but I don’t love it when the butter is cold and I can’t spread it without tearing the bread or toast. First world problem? You betcha! But is there a solution? Of course, there is… The Butter Knife from Butter & Honey. I’ve reviewed a couple other cold butter spreading gadgets over the years, but this knife looks like it could be the best of the bunch.

It looks like an ordinary stainless steel butter knife. It has a serrated edge on one side of the blade, but on the other side are small holes and at the top is a wider slot.

Raking the knife edge with the holes across the top of a stick of butter causes little strings of butter to collect on the blade. Multiple thin bits of butter spread easier than a big chunk of cold butter, especially on toast.

The wider slot at the tip of the knife allows you to shave off larger ribbons of butter and then when you’re done you can put the knife in the dishwasher for cleaning.

The Butter & Honey Butter Knife is priced at $19.90 and is available from Amazon.

Filed in categories: Home and Kitchen, News

Tagged:

This butter knife spreads cold butter without tearing your bread originally appeared on on March 6, 2017 at 4:29 pm.

Note: If you are subscribed to this feed through FeedBurner, please switch to our native feed URL http://the-gadgeteer.com/feed/ in order to ensure continuous delivery.

BeatsX Wireless Earphones review

It feels like ages ago when the iPhone 7 was officially announced, putting to rest the rumors on whether or not it would do away with that ubiquitous feature that graces almost every mobile device… the headphone jack. In classic Apple fashion, their self-described bold move was backed by a new wireless audio technology that would quickly be found in several of the popular Beats earphones, the W1 chip.

I believe it was in November when the BeatsX were shown off and finally, three months later, I was finally able to secure a pair for myself. Not because it was in short supply… they were simply delayed that long. I assume it was to add some cushion for Apple to sell its own diminutive AirPods. So here’s the big question… were they worth the wait? So very much.

I should address this W1 chip right off the bat. What’s the big deal? The W1 is a standard Bluetooth receiver, compatible with any other Bluetooth device, but when paired with an iPhone, iPad, Apple watch or iMac, it gains several important improvements. Once you connect the earphones to one of your Apple products, it’s automatically paired with all your devices signed in with the same iCloud account. Switching the device the earphones are connected to takes one simple tap. The chip also massively increases the range. I was easily able to leave my iPhone on my desk and walk around the entire office without losing a signal.

Only a handful of earphones utilize this technology so far — several other Beats products and Apple’s AirPods, which were in short supply at launch — and this technology is, to me, what made the BeatsX worth the wait. But what about the actual headphones, themselves? Let’s get into it.

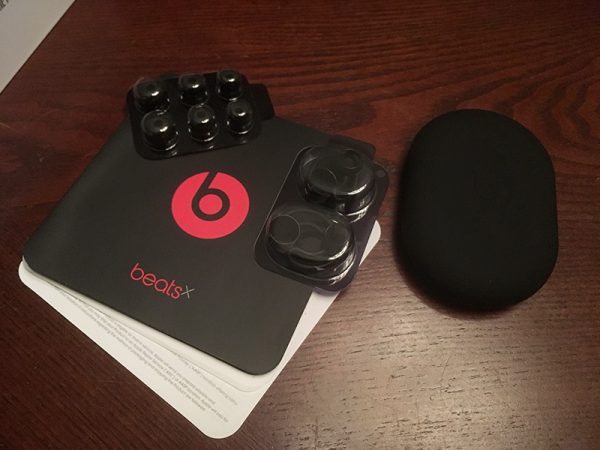
Contents of Beatsx Packaging

All those earbud options!

Here’s what’s in the box:

  • BeatsX earphones
  • Eartips with four size options
  • Removable secure-fit wingtips
  • Pocket-sized carrying case
  • Lightning to USB-A charging cable
  • Quick start guide

The unit that I purchased also came with a promotion for 3 free months of Apple Music. I’m already a subscriber, but was able to convert the offer value into iTunes store credit, which was just like chopping money off the cost of the earphones and moving it into apps I’ll eventually buy, anyway. Pretty good deal.

One of my favorite features in any earphone I’ve tried, the magnetic clasp.

As for the earphones themselves, they are extremely lightweight, seem rather sturdy and sweat/water resistant. The earbuds form a good seal and didn’t shake loose while jumping around and shaking my head. They’re designed for sports, workouts, running, biking… anything where a long cable would be considered a nuisance. I don’t do a lot of that right now, being winter and living in the northeast, but I imagine when it’s warmer and I start jogging again, they’ll go with me.

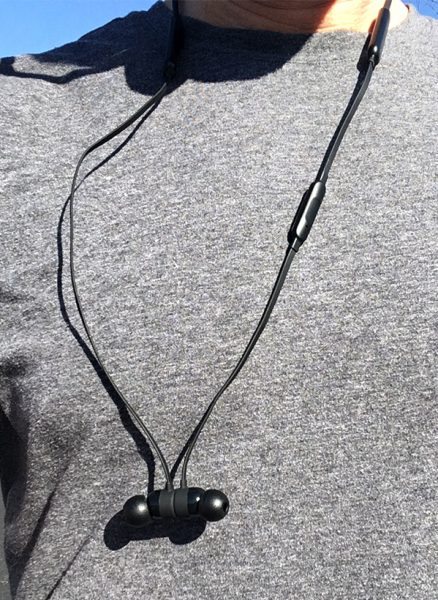
Inside the earbuds are two small magnets that clasp together to keep them from swinging around when they’re not in your ears. This is probably my favorite feature of any earphones I’ve owned. I have a fair amount of talk time at work, so it’s nice to be able to keep my earphones around my neck, lanyard-style, when I’m engaged in a conversation or walking around the office, and go right back to listening in one quick motion.

On one cord, there is a simple volume clicker with a center button for answering calls and music controls. The mic is located on this bit and hangs close enough to your mouth to pick up normal conversation levels.

They stay out of the way and don’t sway around too much.

The earphones have an interesting construction. There’s a flexible neck strap that rests on the back of your neck, kept in place by the weight of the two battery packs on both sides. One of the battery packs houses the power/pairing button with a tiny charging indicator LED. The other has a Lightning port for charging, which is fantastic. I have several Lightning cables at work, in my car and at home, so an opportunity for a battery top-off is close at hand.

The battery life is quite good… eight hours on a full charge. The Beats brand touts what they call Fast Fuel rapid charging, giving them the ability for 2 hours of battery off a 5 minute charge.

You’re probably thinking by now, “Yeah, okay, that’s a lot of really neat stuff, but how do these things actually sound?

I mean, that’s kinda of the whole point, right? I wouldn’t consider myself an audiophile by any stretch of the imagination, but as a casual earphone user, I’d award them a solid B. They’re not the best, in terms of clarity, but they’re certainly a step up from any stock earphones that you’d get with a phone or a wired pair you’d drop $50 on.

Beats have always been punchy and bass-heavy, and while the tiny drivers in these are surprisingly loud, they tend to be a little too muddy for my taste. The highs aren’t as crisp as I’d like, but overall they sound pretty good. The sound certainly benefits from the earbud construction, forming a tight seal in your ear canals. They do block quite a bit of outside noise, even when nothing is playing, so that’s something to keep in mind for traffic safety if you’re going to be biking or running or, I don’t know, walking on some railroad tracks. Take heed!

It’s the combination of the W1 chip, smart construction and good sound that makes the BeatsX an easy recommendation at $129. That may be a tall order for some looking for a simple pair of earphones. While the headphone jacks of the world don’t seem to be going anywhere in a big hurry, any future iPhone I’ll be purchasing will certainly be devoid of that option, and I sure do hates me some converter dongles. For me, wireless is the way to go, and these came in at a much lower price than many of the other options out there.

Source: The sample for this review was purchased with my own funds. For more information, visit the Beats by Dre site and Amazon to order.


Product Information

Price: $149.95
Manufacturer: Beats by Dre
Retailer: Amazon
Pros:
  • W1 chip = simple pairing and super long range
  • Decent sound
  • Long battery life
  • Lightning cable charging
Cons:
  • Relatively expensive
  • Not the best sound you could get for the price vs. wired earphones

Filed in categories: Audio, Video, TV, Reviews

Tagged:

BeatsX Wireless Earphones review originally appeared on on March 6, 2017 at 11:49 am.

Note: If you are subscribed to this feed through FeedBurner, please switch to our native feed URL http://the-gadgeteer.com/feed/ in order to ensure continuous delivery.

DecaTxt one-handed Bluetooth keyboard review

What do all QWERTY keyboards have in common from the large clickity clackity USB keyboards to the smaller wireless keyboards? They all have dozens of keys. But less is more right? If that’s your motto then I don’t think you’ll ever look at another traditional keyboard again once you see the DecaTxt one-handed Bluetooth keyboard.

What is it?

The DecaTxt is a one-handed Bluetooth keyboard that has only 10 keys, but those 10 keys provide all the same letters, numbers, punctuation symbols, function keys and even some media control keys that a full-size traditional keyboard has, but in a form factor that is about the same size as a deck of cards.

Design and features


The DecaTxt keyboard looks like some sort of game or puzzle device with all the letters and graphics printed on it. But it’s really a fully functioning keyboard that has a total of only 10 keys.

There are 8 hard plastic keys on the front. Each key has good travel and tactile feedback. Printed on the keys are two letters. The top letter is what you get if you press the key all by itself and the bottom number is what will be typed if the number lock is enabled. Below each key are two more letters in red and blue. The red letters will be typed when the E key on the top edge is held while the key is pressed and the blue letters will be typed with the F key on the top edge of the DecaTxt is held down while a key is pressed. Then there are even more characters printed next to each key.

The E/6 and F/5 keys are used to switch to the second and third set of alphabet keys and are also used like a shift button if you press them at the same time, let go and then press the desired letter.

Yes, that’s a mini USB port that you see on the bottom edge of the DecaTxt keyboard and I was just as surprised as you probably are to see it. I had to scrounge around in my drawers to find an old cable because unfortunately, a mini USB cable is NOT included with the keyboard.

Fully charging the keyboard takes between 2 – 4 hours and will power the keyboard for about a week. During charging, a faint red LED below the D/0 key will light up.

On both sides of the keyboard are rough sandpaper-like strips that help you grip and hold the keyboard against your side, leg, etc while typing on it.

Using the DecaTxt keyboard

To use the DecaTxt with your computer, phone, tablet, etc, you first have to charge it using a mini USB cable. When charging is finished, you can then press a key on the keyboard to wake it up and then go into the Bluetooth settings on your device to search for DecaTxt in the Bluetooth devices. When you select that device, it will pair and vibrate 3 times to let you know it’s connected.

The DecaTxt is held in one hand, left or right with the E and F keys facing up and the rough edge resting against the fleshy pad of your palm below your fingers. The other side of the keyboard should then be pressed against your side, leg, hip, etc to anchor it.

In this position, you’ll easily be able to use your 5 fingers to press letters A through Z. A through J can be printed with a single finger press. To get K through R, you need to hold down the E button, press the key and then release both keys. S through Z uses the same procedure, but with the F key held down.

So, following that logic, if you wanted to type the word “cat”, you would press the C key with your ring finger, press the A key with your index finger, hold down the F key with your thumb while pressing the B key with your middle finger and then release both keys.

If I had wanted to capitalize one of the letters, I would have needed to press both the E and F keys at the same time, released them and the pressed the desired letter. If I had wanted to capitalize the T, I would have needed to press the E and F at the same time, released them, held down the F key and the pressed the B key.

With a little practice, I was able to type single words with little effort, but not with a lot of speed.

But things get infinitely more complex when you add numbers, punctuation and other symbols into the mix. Luckily, pretty much everything you need to figure what key to press to type the desired character or symbol is printed right on the keyboard itself. Notice the colored bars next to the keys and the colored symbols printed next to the keys? This is your built-in guide.

Can you figure out how to do that by looking at the image above? Give up? The # symbol is gray and there’s a gray bar next to the C key. So you hold the C key with your ring finger, press the D key with your pinky and voila!

See the $ symbol next to the I key? Notice how there are two $ symbols on top of each other? One is gray and one is pink. Do you know how to type it? You have to hold down the C and the D while pressing the I. Yes, it’s getting more complicated.

What about spacing, pressing enter, and backspacing? To insert a space you have to hold your thumb down on the E and F keys on the top edge of the DecaTxt and press the A key with your index finger. You can also hold down all three keys to continuously space. To backspace, you hold down the E and F and press the G key. The backspace will also repeat if you hold down all three keys. The enter key is typed by pressing the A and G keys at the same time.

Final thoughts

Using the DecaTxt keyboard is not physically difficult, but it could be considered mentally difficult because you need to remember the various key press combinations to type punctuation characters, symbols, numbers, etc. There is a definitely learning curve with the DecaTxt once you get past typing letters A through Z.

I can imagine that the DecaTxt would be really useful for someone with just one functioning hand or someone who needs to type while walking around. But for someone like me who is at a desk all day, it feels much slower and error prone compared to using a traditional keyboard. But then again, I don’t think a typical desk jockey is who the DecaTxt has been designed for.

Would you use a keyboard like the DecaTxt one-handed Bluetooth keyboard?

Source: The sample for this review was provided by DecaTxt. Please visit their site for more info and Amazon to order.


Product Information

Price: $125.00
Manufacturer: Decatxt
Retailer: Amazon
Pros:
  • Small
  • Can use with one hand
  • Can be used with either hand
Cons:
  • Expensive
  • Learning curve
  • Charges via mini USB and a cable is NOT included with the keyboard

Filed in categories: Bluetooth Gear, Computer Gear, Reviews

Tagged:

DecaTxt one-handed Bluetooth keyboard review originally appeared on on March 6, 2017 at 6:30 am.

Note: If you are subscribed to this feed through FeedBurner, please switch to our native feed URL http://the-gadgeteer.com/feed/ in order to ensure continuous delivery.

Axess “Superior” Extended Vegetable Tanned Leather RFID-blocking V-shaped wallet review

I am on a quest for a great leather wallet. I really enjoy using my Garzini Essenziale Finestra wallet, but are there others out there that I might like better? When the Gadgeteer was offered an Axess leather wallet to review, I volunteered to do so. I chose the Axess “Superior” Extended Vegetable Tanned Leather RFID-blocking V-shaped wallet because I need a lot of pockets for the number of cards I carry. How did it measure up to my Garzini wallet?

Design & Quality

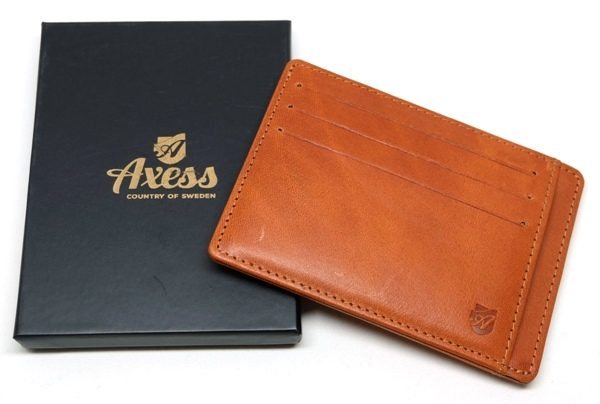
The Axess “Superior” Extended RFID-blocking V-shaped wallet came in a very nice black box, wrapped in a black sheet of non-woven polypropylene material (or poly non-woven which is the same material used in reusable grocery bags).

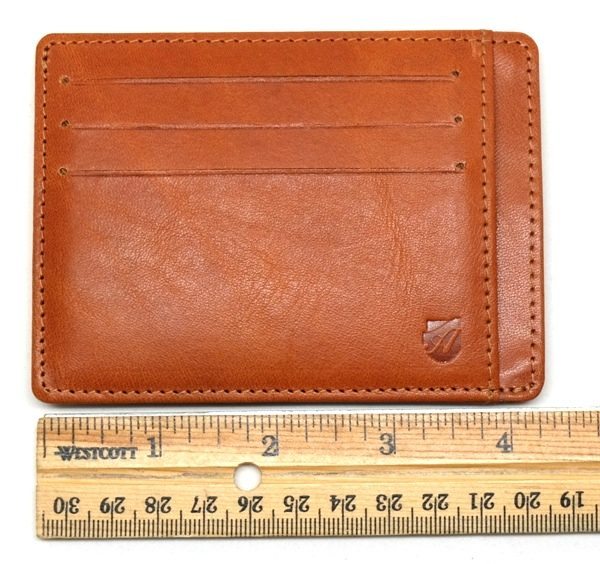
The Axess “Superior” Extended wallet is a professional looking wallet that is handmade using full grain vegetable tanned Tuscany leather and measures 8 cm x 11 cm. The Tuscany leather is supposed to age well and develop a rich patina over time. The leather is smooth and has a wonderful smell and color. It is also very thin to minimize the amount of space the wallet takes up. Even though the wallet appears to be well made, because the leather is so thin, the wallet does not have a very robust feel.

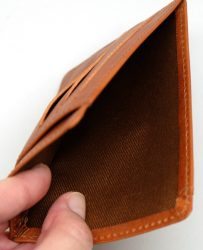
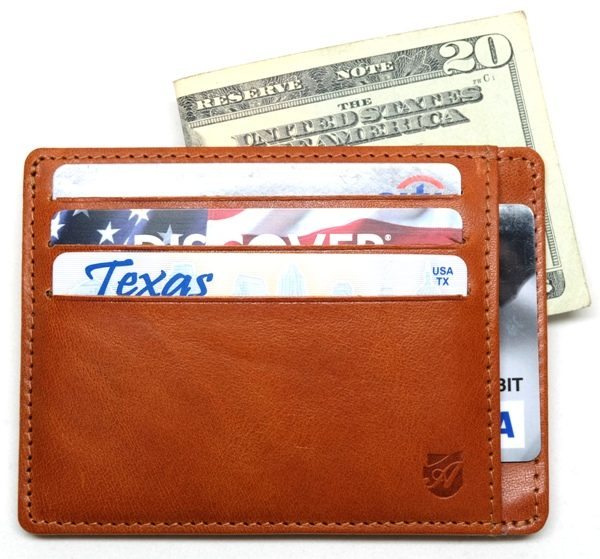
This wallet has three credit card slots on the front with a side slot to the right of them. The thread used in this wallet is a “polyester/cotton corespun thread. The edges are hand cut.”

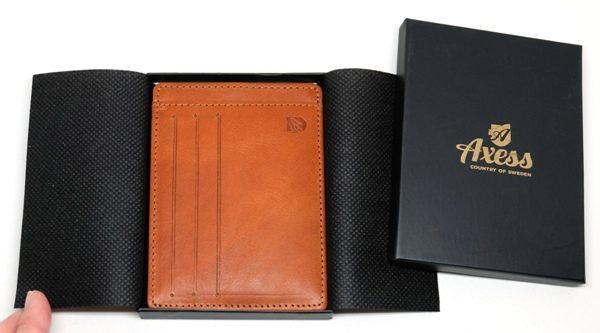
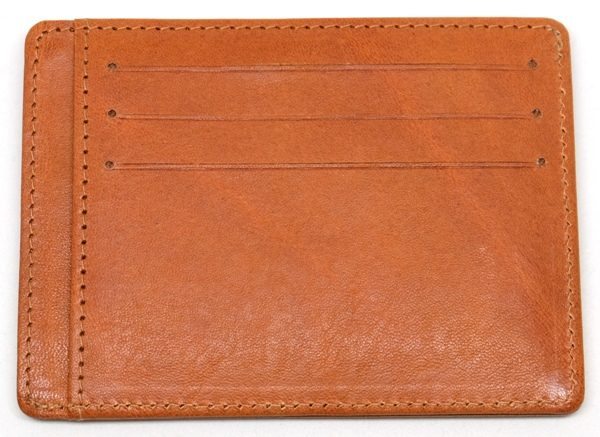
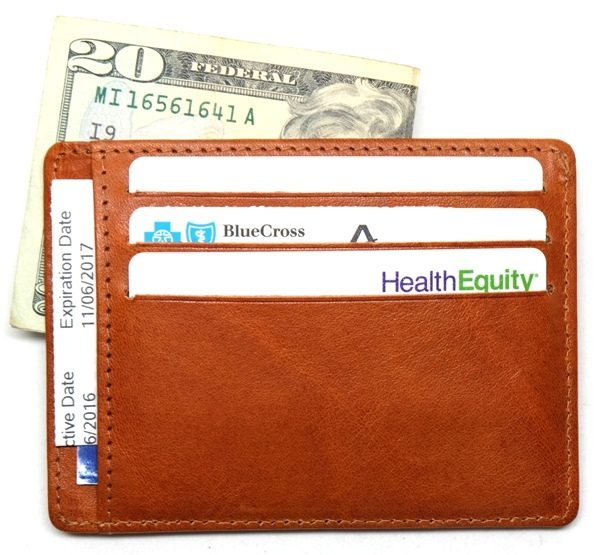
The back of the Extended version of the “Superior” wallet has another three credit card slots with a side slot as well, whereas, the non-extended version does not have these.


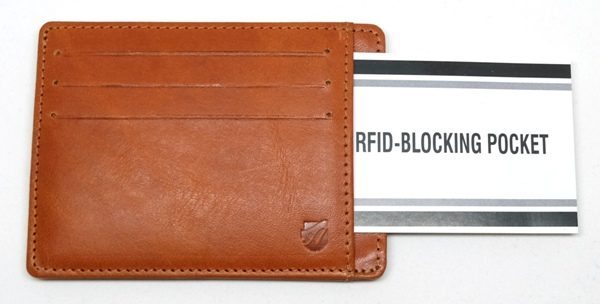
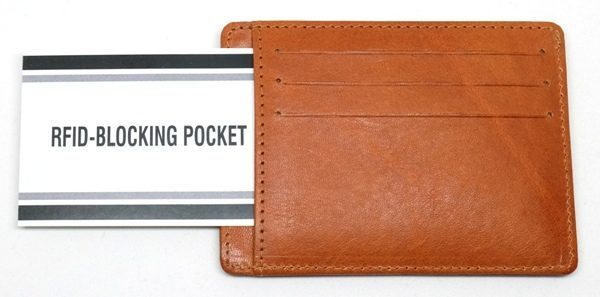
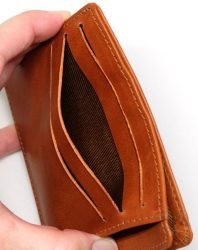
The wallet has two RFID-blocking pockets, one of which is the side slot on the front of the wallet as shown above on the left. The second of the RFID-blocking pockets is the side slot on the back of the wallet (above on the right).

RFID stands for radio frequency identification. According to creditcards.com,

RFID is actually the granddaddy of NFC and a generic term for technologies that use radio waves to identify people or objects. It also refers to the long-range communication technology that’s used in, for example, highway toll payment devices.

But NFC is a type of RFID that requires you to be within inches of the card reader, so fraudsters cannot skim your information easily. Still, as use of NFC-enabled mobile payments grows, contactless payment cards are being phased out.

Thus, if you are using contactless cards that allow you to wave your card over a card reader, then you may want an RFID-blocking wallet. Even though your information may be emitted from the chip on such a card, it usually requires that you be within inches away from the card reader and thus a thief would have to be that close to steal your information.

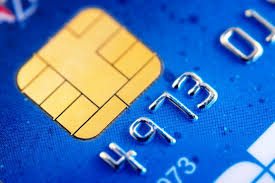
EMV (stands for Europay, Mastercard & Visa) is the current standard used in credit card chips today and requires direct contact with the card reader (the chip looks like that in the photo above). These cards require you to insert the chip end of your card fully into a card reader and they use tokenization which means that such a card “transmits a unique code for each transaction” thus making “it nearly impossible to counterfeit the card” according to creditcards.com. (Mobile wallets like Android Pay and Apple Pay also use tokenization). When using EMV chipped cards, you would not need to have an RFID-blocking wallet.


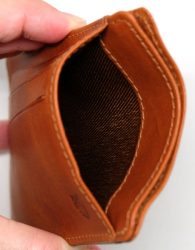
Anyway, continuing on with my review. In addition to the four slots on each side of the wallet, there is a V-shaped center pocket that holds paper money. This V-shaped opening allows the user easy access to the bills.

Each of the pockets (the paper money slot, the RFID slots, and the six credit card slots) is lined with a shiny nylon or polyester type of material. The lining of each of the pockets feels like it is covering a thin layer of cardboard to provide rigidity.

The wallet has a slim profile and is about 5 mm thick when empty. The uniformity of every aspect of this wallet makes it look like it is mass produced rather than handmade.

Use


In the front of the wallet, I inserted three plastic cards into the credit card slots and also inserted one plastic card into the RFID-blocking side slot. In the center slot, I had only one $20 bill.

On the back of the wallet, I inserted two plastic cards in the top and bottom credit card slots and three paper cards into the center slot. I also inserted two paper cards into the side slot.

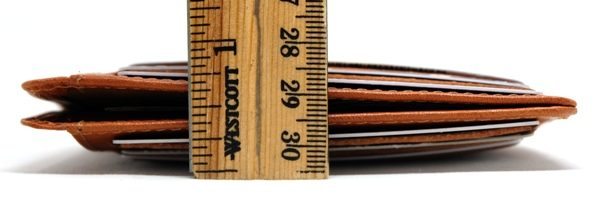
With all of my necessities inserted, the wallet ended up measuring about 7/8″ thick.

Final Thoughts

The Axess “Superior” Extended Vegetable Tanned Leather RFID-blocking V-shaped wallet appears to be a well-made wallet and uses vegetable tanned Tuscany leather which develops a unique patina over time. New, it already has a wonderful color and smell. It is what I would describe as a professional looking businessman’s type of wallet. The wallet, being constructed so uniformly, has the appearance of being a mass produced wallet even though the website says Axess wallets are handmade. It also does not have a very robust feel to it so I cannot say how long it will last.

The V-shaped center opening is useful for easy access to your paper money, however, I found that the wallet expanded freely on the open side and was, therefore, less compact than I would like it to be. This, of course, is a matter of personal preference. Axess offers a handful of different styles of wallets and knowing what I know now about the opening, I may have been happier with the “Smooth” – Extended Vegetable Tanned Leather RFID-blocking compact wallet (caramel).

If you like professional looking leather wallets with the V-shaped style center pocket to hold your paper money, you are sure to enjoy using the Axess “Superior” wallet, however, I personally prefer my Garzini wallet.

Source: The sample used in this review was provided by Axess. Please visit their website for more information or to purchase one. You can also find their wallets on Amazon.


Product Information

Price: $45.00
Manufacturer: Axess
Retailer: Amazon
Pros:
  • Well-made wallet using full grain vegetable tanned Tuscany leather
  • Beautiful color and wonderful leather smell
  • Has two RFID-blocking pockets
Cons:
  • V-shaped pocket allowed the wallet to expand too much for my taste

Filed in categories: Reviews, Wallets

Tagged:

Axess “Superior” Extended Vegetable Tanned Leather RFID-blocking V-shaped wallet review originally appeared on on March 5, 2017 at 9:53 am.

Note: If you are subscribed to this feed through FeedBurner, please switch to our native feed URL http://the-gadgeteer.com/feed/ in order to ensure continuous delivery.

Yale Real Living Assure lock with Bluetooth review

I find myself at a point in life where my hands are always full. Whether carrying work equipment, groceries, or my children, I often find myself without a free hand to open the door to my house.

I was recently given the opportunity to review the Yale Real Living Assure lock. It’s a Bluetooth smart lock that can be opened with your phone or by the keypad. The Assure lock is also compatible with Z-Wave and ZigBee systems so it can be fully integrated into your smart home.

Hopefully, this is the hands-free device I’ve been looking for.

In the box

  • Exterior keypad
  • Interior locking mechanism
  • Latch
  • Strike plate
  • Battery cover
  • Batteries
  • Screws/Bolts
  • Instructions

Specifications

  • Fits on doors 1 3/8″ to 2 1/4″ thick
  • Backset 2 3/8″ or 2 3/4″
  • Face Bore Hole: 2 1/8″
  • Edge Bore Hole: 1″
  • Adjustable latch

Design

The Assure lock isn’t the first smart lock on the market, and it looks fairly similar to its predecessors; however, it does have a feature – or lack thereof – that I haven’t seen before.

The Assure lock doesn’t use a physical key; it can only be unlocked by keypad or by smartphone.

The black portion in the above picture is a keypad. The keypad lights up when the lock is in use but remains off otherwise.

The interior side of the lock looks the same as any other smart lock I’ve previously seen. The upper, black portion of the lock is where the batteries are stored. The black button to the right of the lock is a Privacy Mode button.


The “guts” of the lock also look like other smart locks I’ve seen in the past.

If for someone reason you forget to replace the batteries and find yourself staring at a “Dead” lock, you can use a 9-volt battery to temporarily power the lock.

You can see the 9-volt contacts on the bottom of the lock, in the picture on the right, above.

Installation

Although it probably goes without saying, the first step in using the lock is installing it.


For me, this met removing my old deadbolt from my door.


Next, you slide the latch into the door.


Now you install the keypad on the exterior side of the door. When doing this you have to be sure to run the attached cable under the latch.

Next, you install the mounting plate on the interior side of the door, making sure you run the cable through the proper channel.


You next insert the cable into the port identified by the yellow arrow in the left picture. Then you attach the lock to the interior side of the door.

Finally, you insert four “AA” batteries and attach the battery cover.

The Assure Lock installation was simple and easy; it shouldn’t take more than a few minutes to install.

Performance

For the most part, using the lock is simple.

The first step is “waking” the keypad.

This is done by placing your hand over the keypad.

After doing so, the keypad should light up like above.

When using the lock for the first time, you have to create a Master Pin code. This is done by pressing the gear button, selecting a four to eight digit code, then pressing the gear button again.

Once the Master Pin is set, you can do the following:

  • Create User Pin codes
  • Set Automatic Re-lock times
  • Activate Indicator Lights
  • Activate One Touch Locking
  • Activate Privacy Settings
  • Adjust Volume
  • Adjust Language
  • Activate Lockout Mode
  • Program ZigBee and Z-Wave (if equipped)
  • Program Bluetooth

After you’ve adjusted all the options, you’re ready to use the lock.

To unlock the door you have two options.

First, you can place your hand over the keypad to wake it, and enter the User Pin you created to unlock your door.

You can also unlock the door via Bluetooth with your smartphone, but I’ll get more into that later.

If you have One Touch Locking activated, you can lock the door by waking the keypad. If One Touch Locking isn’t activated, you lock the door by entering a User Pin.

If you’re inside the residence, you can lock the door by turning the knob.

If for some reason you didn’t want anyone entering your home, you can hold down the Privacy Mode button for four seconds. This disables all pin codes until Privacy Mode is turned off.

Before I move on, I should mention there is actually a third way to unlock the door. The Assure lock is Zigbee and Z-Wave compatible; unfortunately, you have to buy a separate module first. The module can be purchased from the Yale Accessories page for $75.

I wasn’t provided with the module so I can’t comment on how well it does or does not work.

Yale App

In order to take advantage of the Assure’s Bluetooth feature, you’ll first need to install the Yale app on your phone. The app is compatible with Android devices 4.3+ and iOS devices 9.0+.

After you install the app, the first thing you will need to do is add the lock to your account.

After the lock is added, you will be greeted by the above screen.

Clicking on the icon in the lower left corner brings up the above window. All the above options are self-explanatory and don’t require any further description.

Clicking on the key will bring up the options menu. From here you can adjust notifications, change the key image/color, rename the key, etc.

More importantly, this is where you can assign keys to friends or family.


First, you press invite user and enter a name, email, or phone number. If the person hasn’t registered with the app before, you will be asked to send them an invite.

Once they download the app and register, you can select them and send them an unassigned virtual key. Before finishing the process you will have to enter your password.

When assigning keys, you can choose to make the key permanent or temporary.


A temporary key can be for a specific date range or a weekly schedule; this is an exceptional feature if you have a weekly babysitter, cleaning service, or go on vacation and have a dog-sitter.

Once you have the app set up and keys assigned, using the Bluetooth function is easy; however, it took me forever to figure out.

This is how the instructions explain how to use the Bluetooth feature.

It seems easy enough, but I couldn’t get the Bluetooth feature to consistently unlock. It always took me three or four attempts to get the Assure to unlock. I took the exact same steps every time.

First, I’d twist my phone as described above. Then I’d wake the keypad by placing my hand over it. Finally, I’d press the check mark. Unfortunately, this never worked on the first try.

For the life of me, I couldn’t figure out what I was doing wrong. I tried finding better documentation online or through the Yale app but was unsuccessful.

Eventually, I did find the following video on the Yale website.

I must have watched the video half a dozen times before I realized the person in the video doesn’t wake the keypad before pressing the check mark.

I then tried to use the Bluetooth function without waking the keypad and… VIOLA!… the device unlocked.

Clearly, it’s my fault for not taking the instructions literally; nowhere in the instructions does it tell you to wake the lock. I just assumed the check mark would have to be lit to press it. That being said, I do think the instructions should indicate the keypad doesn’t need to be activated.

The nicest part about the Bluetooth feature is that is has a two-minute window. If you do have your hands full, you can twist your phone and you have two minutes to press the check mark.

My only complaint is that the two minutes may not always be enough time. If you’re bringing in a large amount of groceries or have to remove your kids from a child safety seat, you may run out of time. It would be nice if the two-minute window were adjustable.

Conclusion

The Yale Assure lock is an excellent smart lock. It’s easy to install and easy to use; although, the instructions could use clarification.

The fact that it requires an extra module for ZigBee or Z-Wave compatibility is disappointing, but in fairness, the Assure Lock is comparable in price to smart locks that only have either Bluetooth or Zigbee/Z-Wave.

I like the Assure so much I’m considering purchasing the module so it will work with my Samsung Smarthings system.

If you are in the market for a reliable smart lock, I would suggest investing in the Yale Assure lock. I assure you {rimshot}, you won’t be disappointed.

Source: The sample for this review was provided by Yale. Please visit their site for more information and Amazon to order.


Product Information

Price: $199.99
Manufacturer: Yale
Retailer: Amazon
Requirements:
  • For Bluetooth feature – Android devices running 4.3 or later, iOS devices running 9.0 or later and Samsung Gear smartwatches running 4.3 or later.
Pros:
  • Easy install
  • Easy to Use
  • Temporary Keys are an excellent feature
  • Ability to add ZigBee/Z-Wave
Cons:
  • Instructions could use clarification

Filed in categories: Home and Kitchen, Reviews

Tagged:

Yale Real Living Assure lock with Bluetooth review originally appeared on on March 5, 2017 at 8:00 am.

Note: If you are subscribed to this feed through FeedBurner, please switch to our native feed URL http://the-gadgeteer.com/feed/ in order to ensure continuous delivery.