DripJoy coffee service and JoyBarista coffee maker review

Like many households, mornings at the Chapman residence usually start with a trip to the coffee maker. I love my coffee hot, but I always put milk in mine, which cools the coffee to barely tolerable levels. DripJoy has a single serve coffee maker called the JoyBarista and a subscription coffee service with multiple types of coffee. What thrilled me most about the JoyBarista brewer was the ability to brew hotter coffee, which is supposed to make it taste better. I’ve just had my cup, so let’s head into the review!


I was sent the JoyBarista and three types of coffee; medium, medium-dark, and dark. I dislike nearly all types of dark coffee, so I had to test theirs out to see if I could tolerate it. My husband, on the other hand, loves dark coffee.


In the JoyBarista box, you’ll find the JoyBarista brewer and an instruction manual.

Setup was really easy. I simply plugged in the brewer, filled up the water reservoir, then ran the recommended amount of cycles to clean out the innards. Once that was done, I was ready to start brewing me some coffee.


Now seems a good time to talk about DripJoy’s coffee subscription service. There are many packages you can choose from, with the price ranging from $.39/cup (256 cups per month) to $.62/cup (24 cups per month). These examples are for the residential home options, and there are further discounts if you need more than that. You can tinker around on their website and see further pricing.

When you start a subscription, you get the option to purchase the JoyBarista for a discounted price. Now, the pods themselves claim to be Keurig 2.0 compatible, so the JoyBarista isn’t a necessity, but I could not get any of the pods to work in my Keurig 2.0 unit. Keurig 2.0 K-Cups worked fine on the JoyBarista, however.


Alright, back to the brewer. The JoyBarista can brew between 6-12 ounces of coffee with a single pod. 6 ounces was a little small, but 8 ounces was just right for both my husband and I. You can easily remove the cup base to place taller cups if need be. The time between pressing the ‘brew’ button and getting your final cup of coffee is just a little longer than the Keurig, which makes sense since DripJoy claims the hot water sits longer on the coffee grounds to draw out the full flavor.


The one thing I disliked about the brewer was the sleep mode. After 1-3 hours (adjustable) of idle time, the brewer will automatically go to sleep. This is to save power since there is a commercial grade heater within the unit, but both my husband and I agreed that waiting for the water to heat up in the morning was quite annoying. I timed it one morning, and it took a little over two minutes for the water to heat up and the brewer to be ready. I contacted support and they said there is no way to disable sleep mode, but they’ve received similar comments to my own and will look into it for future models.


Using the brewer is very, very simple. You press the button on the top and it opens up so that you can place a coffee pod inside, then you close it, choose your cup size, and press the brew button. You can’t customize the coffee strength, which some may dislike, but my husband never complained once. (He uses the strong setting on the Keurig all the time!) When I used regular Keurig coffee pods in the JoyBarista, it tasted good; a little stronger, but more flavor as well. Despite the flavor being better, I still couldn’t stand any of my husband’s dark roast coffee pods.

That being said, the dark roast pods (named French Elation) from DripJoy were much better. These were my husband’s favorite type, and I have happily drank several cups of dark roast coffee. We would definitely get the dark roast pods again. We also were able to try their Colombian Cheer (medium strength) and Morning Joy (medium-dark strength), and my favorite had to be the Colombian Cheer. Since we had a way to bypass the non-Keurig 2.0 pods, I tried the DripJoy branded coffees in the Keurig 2.0 machine we have, and I really preferred using the DripJoy.

Overall, I can’t see myself going back to my Keurig, even when we run out of DripJoy branded coffee pods. My coffee is a bit more flavorful in the JoyBarista than the Keurig, and the temperature of the coffee comes out perfect in my eyes. All of the flavors of coffee we were sent were fantastic, and non-DripJoy branded coffee also tasted good. I am still unsure whether or not the Keurig will be demoted to storage in the garage, but for now, the DripJoy JoyBarista coffee maker will stay on the counter for me and my family to use.

Source: The sample used in this review was provided by DripJoy. Please visit their website for more information.


Product Information

Price: Pods: ~$.39/cup – $.62/cup : JoyBarista – Base price $189.99; discounted with subscription order.
Manufacturer: DripJoy
Pros:
  • – Very simple to use
  • – Hotter coffee than standard Keurig coffee makers
  • – Great tasting coffee both from the brewer and from their coffee pods
Cons:
  • – Have to wait for the water to warm up if it goes into sleep mode
  • – DripJoy coffee pods may not work in Keurig 2.0 coffee makers

Filed in categories: Home and Kitchen, Reviews

Tagged:

DripJoy coffee service and JoyBarista coffee maker review originally appeared on on March 12, 2017 at 9:12 am.

Note: If you are subscribed to this feed through FeedBurner, please switch to our native feed URL http://the-gadgeteer.com/feed/ in order to ensure continuous delivery.

Escort radar detector, wallets, Epson printer and more – Weekly roundup

Make sure you didn’t miss any of our reviews, news, and articles from the past week. Click through to see a full list of all our posts.

Reviews

Articles

News

Filed in categories: News

Tagged:

Escort radar detector, wallets, Epson printer and more – Weekly roundup originally appeared on on March 11, 2017 at 10:59 pm.

Note: If you are subscribed to this feed through FeedBurner, please switch to our native feed URL http://the-gadgeteer.com/feed/ in order to ensure continuous delivery.
SimpleUSB Automotive 12V to USB Adapter Dashcam Installation Kit review

I have reviewed (more than) my fair share of dashcams and radar detectors over the past few years. All of these devices require power in a relatively inconvenient place in your car. Typically these devices are installed up near your rearview mirror. Few automobiles have a 12V or USB port anywhere near that location. Running or hanging power cables from your 12V port to your rearview mirror can be a time-consuming hassle or dangling eyesore. I have been searching for a solution for a while now and the SimpleUSB Automotive 12V to USB Adapter seems like a quick and easy DIY project to make this happen.

The SimpleUSB adapter is a pretty simple device, designed to tap into a majority of powered rearview mirrors and provide enough juice to power most automotive-centric USB devices (aka radar detectors and dashcams). The SimpleUSB adapter is meant for those brave enough or those who enjoy DIY projects.

What’s included:

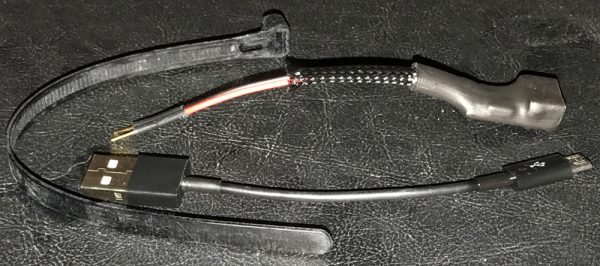
  • SimpleUSB Automotive 12V to USB Adapter
  • 3″ microUSB cable
  • Zip-tie

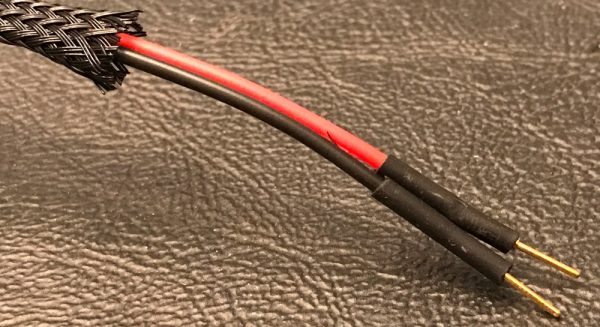
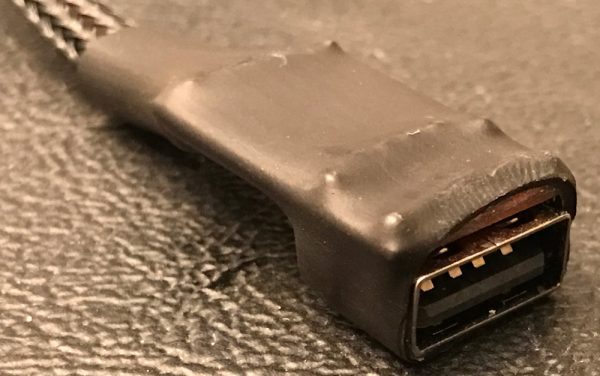
The USB end of the adapter is heat-shrink wrapped to hold and protect the electronics powering/controlling the port.

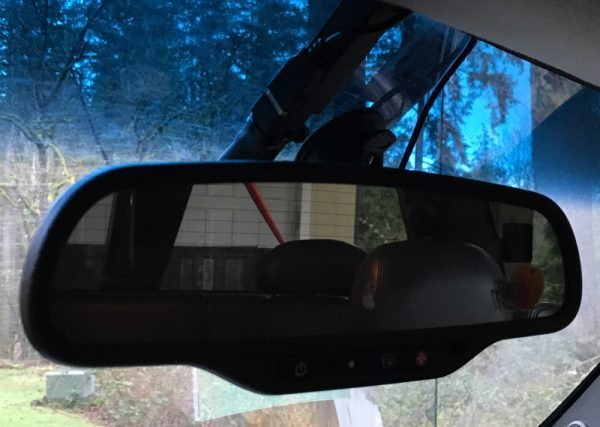
The prongs are designed and sized to be inserted/slipped into the back of your powered mirror’s wire harness, the red into the switched 12V power and the black into the ground. The prongs, wires, and assembly wrapping is all pretty mediocre quality but do get the job done.

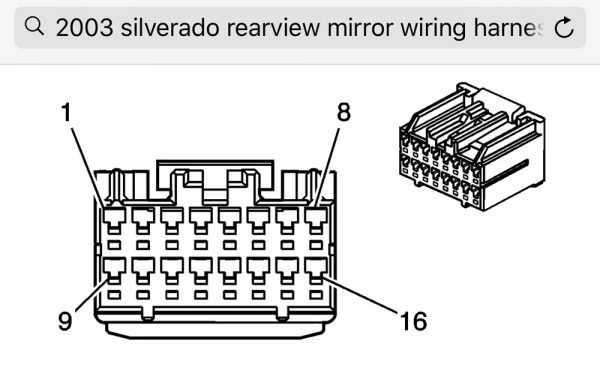
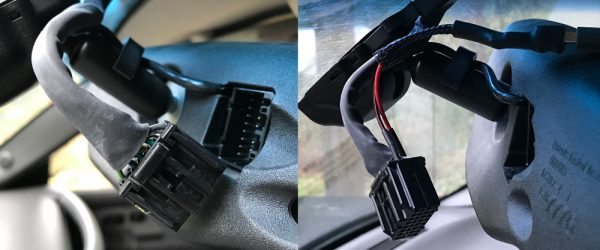
The only difficult part of this whole process was figuring out which wires to tap into. My old truck was pretty top of the line back in its day and the rearview mirror has OnStar, exterior temperature, compass direction, dimming, and various other LED indicators. Which means it has a relatively complex wiring harness that plugs into the back of it. But with a bit of Googling and internet surfing, I found that the switched power was wire 13 and the ground was wire 8.

Being the tech-smart Gadgeteer I am, I test drove the connection points to make sure they provided the power needed to run the VicoVation dashcam I wanted to install. It worked first try…but I was worried the entire time that the fragile metal prongs would snap off as I was getting everything dialed in.

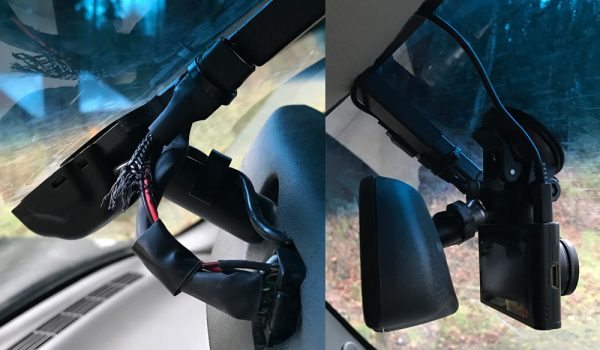
I used better zip-ties, double sided tape, and electrical tape to ensure the SimpleUSB Automotive 12V to USB Adapter was securely installed. I was definitely careful on how tight I synched down the zip-tie due to the very breakable electronics surrounding the USB port. But once everything was anchored down and the mirror angled back in place, there shouldn’t be any real stress on the setup. Though I may add more electrical tape but that is just me being AR. Here you can see the VicoVation Vico-MF3 dashcam installed. The 3-inch microUSB cable included with the adapter was too short, so I used a spare 6-inch one that I had laying in a drawer.

Even though the SimpleUSB Automotive 12V to USB Adapter build quality is less than ideal and the prongs are a bit fragile, it gets the job done. Overall, I am very pleased with my DIY effort. I have been meaning to install something like this in my truck for ages now. Having a power port near my rearview mirror will make setting up devices like dashcams and radar detectors far easier than running wires or putting up with the unsightly tackiness of dangling power cords.

Source: The SimpleUSB automotive adapter used in this review was purchased from Amazon with my own funds.


Product Information

Price: $26.50
Retailer: Amazon.com
Requirements:
  • Powered rearview mirror
Pros:
  • Compatible with most powered rearview mirrors
  • Easy installation
  • Does not require routing of bulky wires to fusebox or 12V power port
  • Does not require removal of trim or headliner during installation
  • Is able to power most car USB devices
Cons:
  • Mediocre build quality
  • Only works with powered mirrors where the harness/wires are accessible

Filed in categories: Cables, Batteries and Chargers, Car Gear, Do-It-Yourself, How-To, Reviews

Tagged:

SimpleUSB Automotive 12V to USB Adapter Dashcam Installation Kit review originally appeared on on March 11, 2017 at 3:10 pm.

Note: If you are subscribed to this feed through FeedBurner, please switch to our native feed URL http://the-gadgeteer.com/feed/ in order to ensure continuous delivery.
Julie’s gadget diary – Fun with scammers

Jeanne and I were parked on the couch enjoying our usual Saturday morning ritual of oatmeal, hot tea, feet up on the coffee table and MacBook Pros on our laps. She was surfing for vacation ideas and I was working on Gadgeteer stuff when the phone rang.

The person on the other end had a thick accent that sounded like an unlikely combination of Scottish and Nigerian said “My name is Jack and I’m calling from Microsoft to let you know that your computer is infected.”

“It is?” I said sounding completely horrified.

“You don’t want to lose your computer do you?” Jack asked.

“No, no I don’t. What do I do?”

“Is your computer in front of you now?” He asked.

“Yes, help me please.”

“Is your computer powered on?”

“Yes.” I said.

“What do you see on the screen?” He asked me.

“Porn,” I said. It was the first crazy answer that popped into my mind. Not sure what that says about me so don’t judge!

Silence…

“Are you there?” I asked Jack.

“Hold please…” He said.

“I need help. Don’t leaaaaaaaave me.” I wailed.

“Hold please…” He said again.

A few seconds passed…

“Hello. My name is Jack and I’m calling from Microsoft…”

“You already told me this.” I said. “How do I fix my computer?”

“What do you see on your screen right now?” He asked.

“Porn”

“What?” he asked.

“Porn” I replied.

CLICK. The phone went dead.

You know it’s going to be an awesome weekend when you’re able to make a scammer hang up on YOU instead of the other way around! 🙂

Filed in categories: Articles

Tagged:

Julie’s gadget diary – Fun with scammers originally appeared on on March 11, 2017 at 11:44 am.

Note: If you are subscribed to this feed through FeedBurner, please switch to our native feed URL http://the-gadgeteer.com/feed/ in order to ensure continuous delivery.